
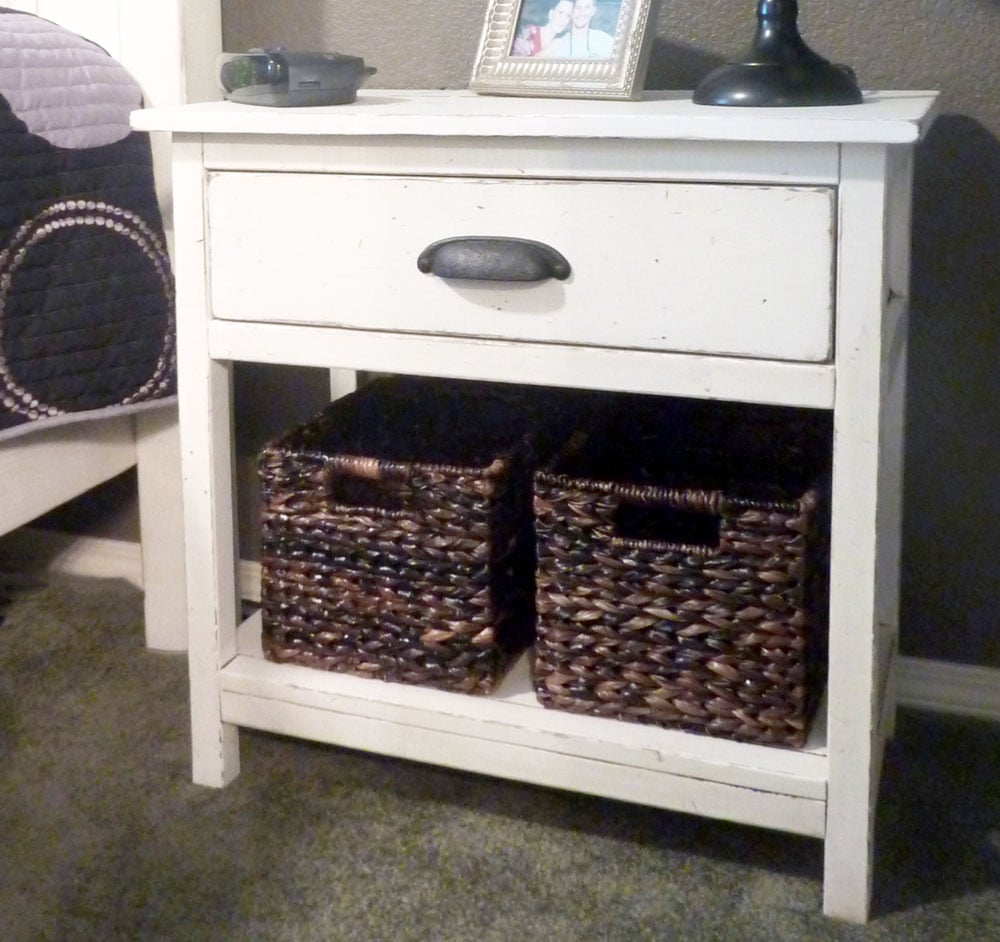

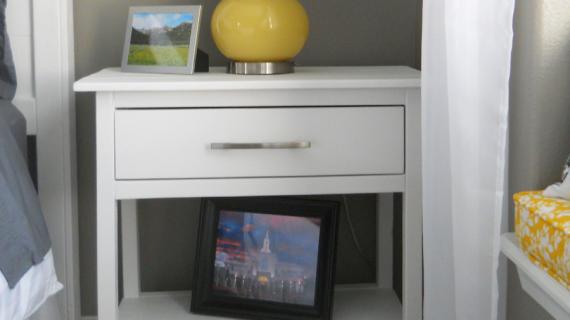
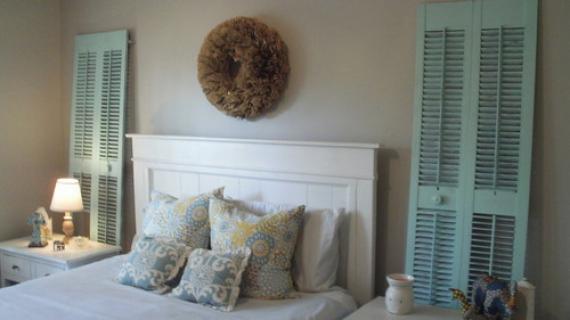
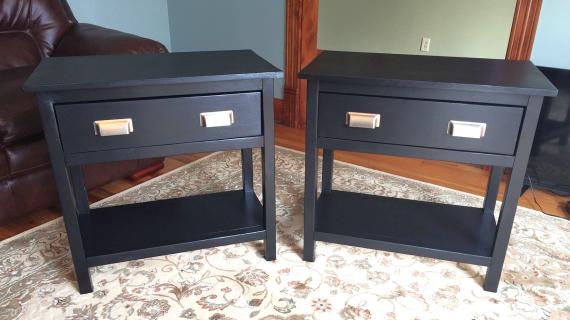
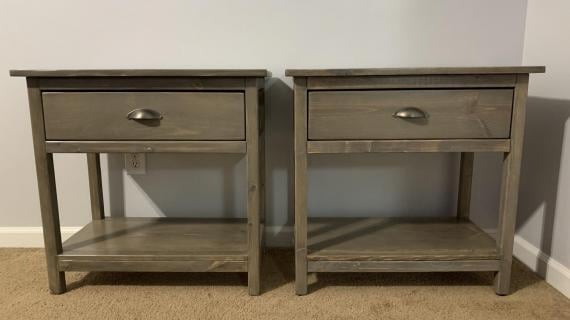
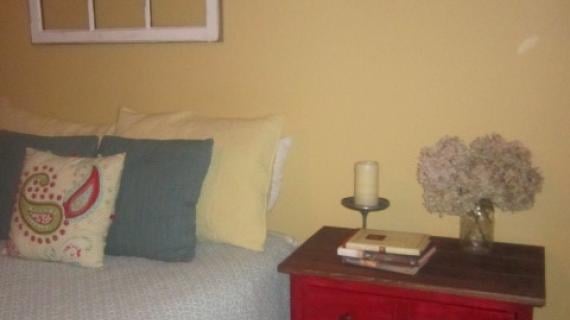
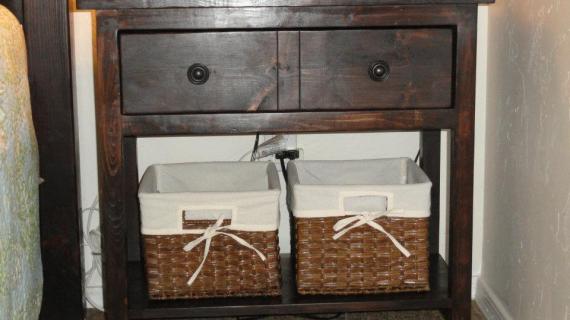
A bedside table to match our Farmhouse Beds. Features one large bottom shelf and one large drawer built with no drawer slides. Free step by step plans with diagrams created by Ana White.
Pin For Later!


Preparation
1 – 1×12 @ 6 feet long
2 – 1×6 @ 8 feet long
4 – 2×2 @ 8 feet long
2 – 1×2 @ 8 feet long
1/4″ plywood scrap, at least 24″ x 8″ (minimum, ideally 26″ x 8 1/2″)
2 1/2″ Screws or Pocket Hole Screws
1 1/4″ Finish nails or Screws
Wood Glue, wood filler and finishing supplies
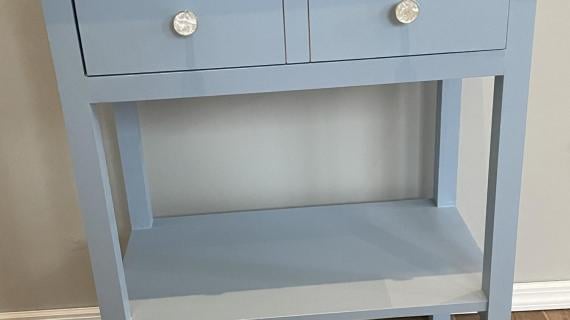
2 Knobs
2 – 1×12 @ 8 3/4″ (Sides)
2 – 1×2 @ 11 1/2″ (Side Trim – needs to be width of your 1x12s)
4 – 2×2 @ 26 1/4″ (Legs)
2 – 2×2 @ 11 1/2″ (Side Stretchers, same width as your 1x12s)
6 – 2×2 @ 23″ (Front/Back Trim)
1 – 1/4″ Plywood or paneling or other sheet goods @ 26″ x 8 1/2″ (back, optional)
3 – 1×2 @ 11 1/2″ (Top Supports)
3 – 1×6 @ 28″ (Top)
2 – 1×6 @ 22 3/4″ (Front and Back of Drawer)
2 – 1×6 @ 11 1/2″ (Width of 1×12 – Sides of Drawers)
1 – 1×12 @ 21 1/4″ (Bottom of drawer)
1 – 1×12 @ 26″ (Bottom Shelf)
2 – 1×2 @ 23″ (Bottom Shelf Trim)


Instructions
Step 1
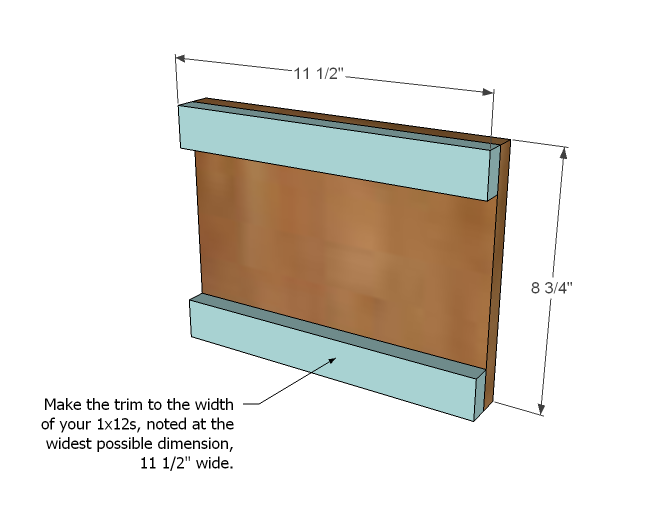
Sides Build the sides by screwing or nailing from the insides into the back sides of the 1×2 trim, as shown above. Remember that the 1x2s are on the outside, so hide your fasteners on the back side. Use glue. Make sure trim is flush on top and ends with the 1×12. You will need to build two of these.
Step 2
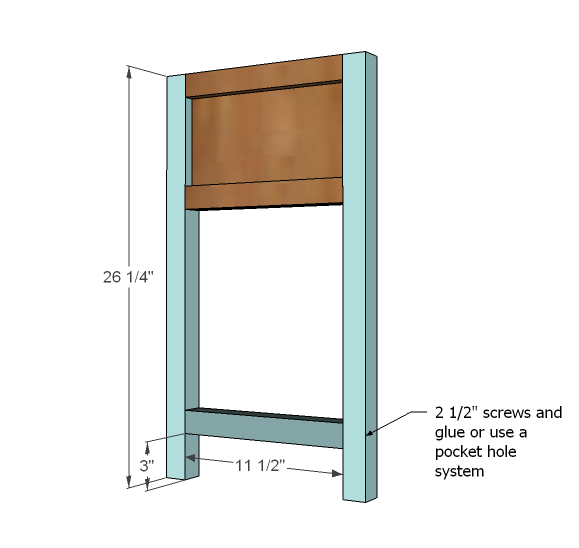
Legs Next add the legs to the project as shown above. Predrill holes and use glue and 2 1/2″ screws. Finish with the bottom stretcher. You will need to do this on both sides.
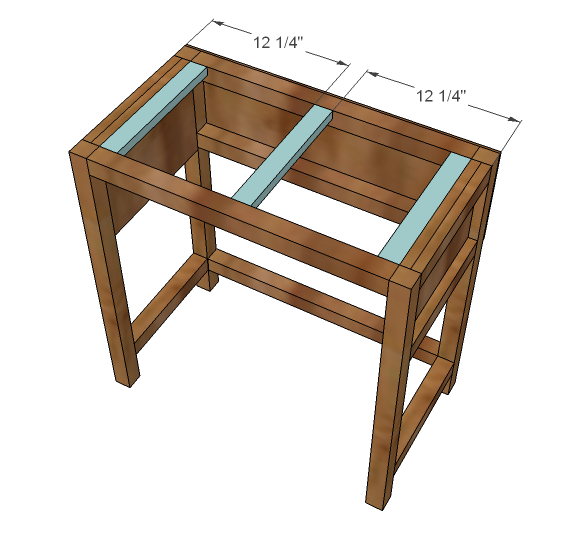
Step 3
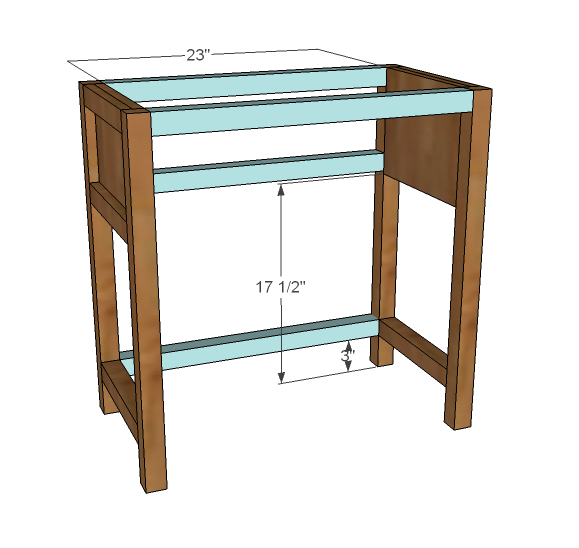
Front/Back Trim Join the two side pieces with the front and back trim as shown above. Use 2 1/2″ screws and glue.
Step 4

Back This could even be a stiff cardboard or hardboard if that’s what you have on hand. Try asking at your hardware store for a scrap piece of plywood or a damaged sheet to save extra money. Tack on with either 1 1/4″ finish nails or screws and glue.
Step 5
Step 6
Top The top needs to overhang the base by 1″ on all sides. If you have a pocket hole system, build your top, then screw the base to the top through the supports. Otherwise, screw the supports to the top, starting with the middle top board, and minimizing gaps between the boards as you screw the outer boards to the supports.
Step 7
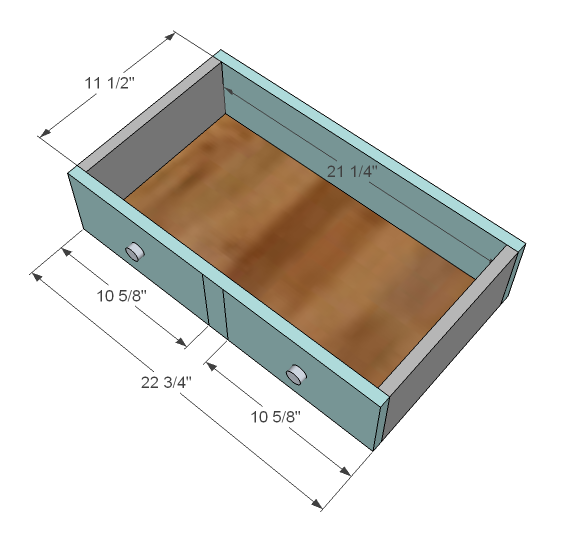
Drawer Build your drawer as shown above. Use screws and glue. The bottom is inset, with all sides screwed into the bottom. The front is merely false cuts made with a circular saw with the saw blade set at 1/8″.
Step 8
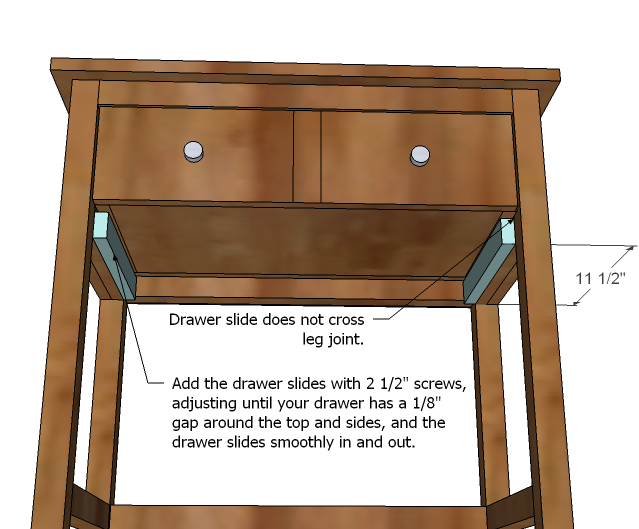
Drawer Slides What I would start with is screwing the drawer slides in place, flush with the bottom of the sides. Then fit the drawer in and unscrew the drawer slide and adjust until the gap around the top and sides is even and the drawer slides in and out nicely.
Step 9

Front Trim Attach the front trim to the legs as shown above, leaving an even gap on the underside of the drawer.
Step 10

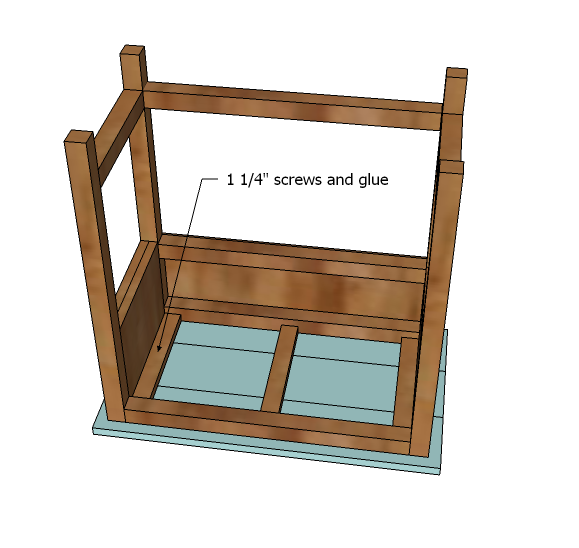
Bottom Shelf You can lay the bottom shelf on the side stretchers, or you can screw to the legs as shown above.


Comments
Ana White (not verified)
Thu, 01/13/2011 - 20:15
I'll be posting the giveaway
I'll be posting the giveaway winner in the morning . . . Grace is asking me to put her to bed :) Good night!
liz @ btb (not verified)
Thu, 01/13/2011 - 20:21
Ana! This is the *perfect*
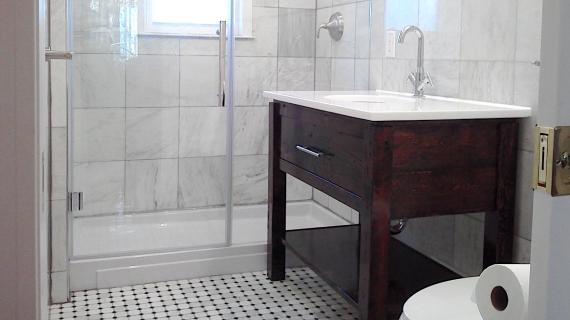
Ana! This is the *perfect* solution for my bathroom storage problem. Thank you!!
michelle minor (not verified)
Thu, 01/13/2011 - 20:21
Love it want it:)
Love it want it:)
Alison (not verified)
Thu, 01/13/2011 - 20:26
Beautiful build! I can
Beautiful build! I can totally understand the joy you must of hand for those smooth sliding drawers, great feeling that is!
Jess (not verified)
Thu, 01/13/2011 - 20:34
It's gorgeous Ana - as ever!
It's gorgeous Ana - as ever! We need bedside tables and I think this might be our winner! Thank you
Miranda (not verified)
Thu, 01/13/2011 - 20:39
Gosh, that is gorgeous. You
Gosh, that is gorgeous. You are truly cool!. Bad Alaska light or no, it still looks amazing.
Summer (not verified)
Thu, 01/13/2011 - 20:41
This looks gorgeous! I'm
This looks gorgeous! I'm building our two night stands next week and I SO wish I could build them like this! I have to make them a little narrow though, more like the Simple Nightstand...I'll have to make it look similar to this one though! Love it!
Heidi (not verified)
Thu, 01/13/2011 - 21:29
LOVE your work!!! would it be
LOVE your work!!! would it be possible to do same bedside table but with 3 drawers?
Kev (not verified)
Thu, 01/13/2011 - 22:49
for gap use a few dimes or
for gap use a few dimes or washers
Turn unit upside down place spacers on drawer sides and fit guides
Job done
In reply to for gap use a few dimes or by Kev (not verified)
CarolinaL
Sat, 08/10/2019 - 19:21
Great tip, thanks!
Great tip, thanks!
Green Gracie Home (not verified)
Fri, 01/14/2011 - 00:33
I love everything you do!
I love everything you do! Great job. Stay warm. Bev
Britni B. (not verified)
Fri, 01/14/2011 - 03:37
I love that night stand,
I love that night stand, beautiful!
Shawn (not verified)
Fri, 01/14/2011 - 04:20
Now I just need a dresser :)
Now I just need a dresser :)
Alexiis (not verified)
Fri, 01/14/2011 - 04:22
I am SOOOO happy you posted
I am SOOOO happy you posted this! I have been waiting for this one...can't wait to get started!
Megan (not verified)
Fri, 01/14/2011 - 04:36
Love these! My husband
Love these! My husband surprised me and built the Farmhouse bed while I was away and it would be awesome to build one of these! Thanks for the plan, you rock!
Jalet (not verified)
Fri, 01/14/2011 - 05:12
Boy if the legs were
Boy if the legs were lengthened, and I added a moulding lip at the front, I could use this as a standing desk for my laptop and have plenty of storage for the stuff I like to keep near my desk. I love this project and I will be building it. Great job and congratulations on the 'smmmoooth' drawers.
Chelle (not verified)
Fri, 01/14/2011 - 05:14
Thank you! I have been in
Thank you! I have been in search of a good nightstand to fit the bed I want to make. To Do list just got longer! :)
Rob (not verified)
Fri, 01/14/2011 - 05:36
Ana- Great looking and easy
Ana- Great looking and easy to build as always. One small suggestion: add a drawer stop. Attach a small scrap to the bottom of the drawer box at the back. This will prevent little ones from pulling the drawer all the way out and on to their heads.
Katie (not verified)
Fri, 01/14/2011 - 05:48
I currently have 2 browser
I currently have 2 browser windows open with about 10 tabs in each of bedroom furniture that I just don't like. The farmhouse bed and this nightstand are perfect! Did you make your own dresser/chest of drawers to go with these?
Jessica Christensen (not verified)
Fri, 01/14/2011 - 05:49
Oh I love it, we've been
Oh I love it, we've been looking for a perfect bedside table!!
Ana White (not verified)
Fri, 01/14/2011 - 08:37
Great advice, I'm taking it!
Great advice, I'm taking it! Thank you!
Ana White (not verified)
Fri, 01/14/2011 - 08:38
Thank you, another great
Thank you, another great suggestion!
DeBird (not verified)
Fri, 01/14/2011 - 08:51
This looks exactly like my
This looks exactly like my pottery barn farmhouse night stands that I paid WAY too much money for!!! I wish I had discovered you before I bought them :)
Rob (not verified)
Fri, 01/14/2011 - 08:54
From the looks of things this
From the looks of things this will be the very last step in your instructions. Fit the drawer then, add the stop. As an aside: Maybe start using some white epoxy drawer slides from HD :-)
Nan Tovar (not verified)
Fri, 01/14/2011 - 09:29
I think I need these! Thanks,
I think I need these! Thanks, Ana, glad to see the site back up :)
Lori (not verified)
Fri, 01/14/2011 - 09:53
Okay, I got addicted to
Okay, I got addicted to looking at your site about a year ago and then got scared and abandoned ship. But these look so simple! My husband and I have decided to make a pair of them together. Hopefully the marriage survives the project. :)
Erin (not verified)
Fri, 01/14/2011 - 14:04
I second a dresser!
I second a dresser!
Nicky Hurt (not verified)
Fri, 01/14/2011 - 14:25
This is the cutest table!
This is the cutest table! I'm SO making this after we move and have our stuff back! Thank you for not only the plans, but for the confidence to do this stuff myself! :)
Jennifer Orgill (not verified)
Fri, 01/14/2011 - 15:26
Ana, I was actually in
Ana,
I was actually in the middle of trying to figure out the measurements for the extra wide dresser from this collection. Any way you could create the plans for that? I LOVE your website and can't wait to make my Farmhouse bed, kitchen table, and now bedside tables!
CarolineRN (not verified)
Sat, 01/15/2011 - 00:01
I absolutely love this
I absolutely love this table!!! Can't wait to build it! Thanks!
Ellen Farrow (not verified)
Sun, 01/16/2011 - 14:31
I think you must be psychic,
I think you must be psychic, as every time I need something you have just posted plans for the very thing that would fit the bill. I just finished the "taller, thinner bookcase" and put it in my hallway temporarily. I thought, gosh, it would be nice to have something there, but not so big...and this will be perfect I think! But first I have to prime and paint the Dress-up center, the Grace's Table and 4 stackable chairs, and the bookcase. It has been way too much fun building everything. Thanks for the plans and the inspiration!
Marla (not verified)
Tue, 01/18/2011 - 02:47
Ana- we are in the process of
Ana- we are in the process of building 2 of these and unless I've completely lost it, the cut list is short (2) 1x2s for the side trim. You list (5) 1x2s cut at 11 1/2" for the project, but (7) is needed... Am I the only one that was short? Anyway, I thought I'd letcha know! :) Will send pictures after we are finished!
Maria (not verified)
Wed, 01/19/2011 - 13:16
I second Marla! I think the
I second Marla! I think the cut list is missing 1x2s....I am missing 4 1x2s in the cut list, the drawer slides and the side trim. Thank goodness I have the scrap lumber to keep going anyway! So excited about these! They are going next to the farmhouse bed that my fiance built me as a surprise for Christmas :)
Michelle (not verified)
Sun, 01/23/2011 - 08:43
Ana, this is a PERFECT
Ana, this is a PERFECT project for my 11 y/o son! We homeschool, and are looking for an art project (just finishing a unit on early american art/furniture building). He is excited about this one, and eager to build something he can use in his room! Will be posting plenty of pictures when we finish!
Becky V (not verified)
Mon, 01/24/2011 - 05:57
Looks great! - I have a
Looks great! - I have a couple of questions on the drawers - 1) What does "inset" mean? 2) Do you screw from the front and back pieces into the side pieces and then fill the front screw holes ?
Becky (not verified)
Mon, 01/24/2011 - 06:11
Looks great! About to start
Looks great! About to start work and have acouple of questions on the drawer assembly - 1) what does "inset" mean and 2) Do the screws go from the fromt and back pieces into the sides? If so, presumably I'll need to fill the front screw holes?
Donna (not verified)
Mon, 01/24/2011 - 09:50
No, you;'re right. I was
No, you;'re right. I was wondering why I only had 5 1x2's and reading I needed 7. i kept reading the plans over and over to make sure I was right.
Joel (not verified)
Fri, 01/28/2011 - 09:11
I really like that stain
I really like that stain color...can you share the details?
NancyO (not verified)
Wed, 03/02/2011 - 12:42
If you change the top to be a
If you change the top to be a single piece of wood, make the length shorter and add some trim, this table will look a lot like the Stratton Bedside Table at PB.
http://www.potterybarn.com/products/stratton-bedside-table/
melissa2
Mon, 04/11/2011 - 20:16
1 x 2s comments
I've been looking at possibly doing this beautiful plan, and agree--it does look like the cut list is missing something. I think instead of
2 - 1 x 2 @ 11 1/2"
it should be three times that--6 pieces cut at 11 1/2". The reason being, you need two for each side of the table, plus drawer slides (the measurement for these is in the graphic).
melissa2
Sun, 05/08/2011 - 19:53
Just finished building this!
Hi, everyone! I just finished building this, but since I don't have a digital camera (and the table isn't painted yet, anyway), maybe posting some tips is a way I can help before attempting to get a photo somehow! :)
- To figure out the gap for the bottom of the drawer (i.e., where to install the drawer sliders), I measured what space there was taller than the drawer, then divided it in two, then drew pencil lines to mark this measurement. It was really easy, and I didn't have to adjust the drawer slides once!
- The plan calls for "6 – 2×2 @ 23″ (Front/Back Trim)," but I could only find five in the instructions.
- At least with the table I ended up with, there's no "stop" in the back for the drawer--in fact, it can slide in almost 2" more than it should. Because of this, though, it's almost impossible *not* to make a "flush" drawer. Hooray!
- My shelf ended up being a tad short. If I had to do this all over again, I would have had the "big box store" cut it slightly longer, and then belt-sanded it down after it was installed. Part of the problem may have been that I tried something new for the legs--and hope to be able to share it soon!
- The only good 2 x 2s I could find were over $5 each in 3' lengths! I used some at first, but after a while, ended up making my own, by laminating together two 1 x 2s. This worked really well, and I liked the widths better than the "quality" 2 x 2s, which were not really square.
- I glued the three table pieces together (along their sides) before putting them on. Just a bit of hand sanding and belt sanding helped clean things up.
- Becky V., "inset" means that the drawer bottom is flat on the ground, with the other pieces attached to its sides rather than its top.
- I made this the "old-fashioned" way--plain old counter-sunk screws. You'll be left with painter-quality furniture, because so much obvious patching will be needed.
- Like member jsle_bel, I also chose to go with just one center pull (a knob). It creates a whole different look! You can also dress up the drawer--I added moulding to match another piece of furniture made from Ana White plans.
Thanks so much for sharing this plan and your talent, Ana!
Guest (not verified)
Sat, 06/04/2011 - 18:27
Thank You!
Thank You, Ana for the plans for the Farmhouse Bedside Table. Hubby built one for me for my birthday and I absolutely *love* it! (I've asked for the Farmhouse Bed for Christmas :) I have quite the honey-do list for things I'd love to have... maybe he will offer to teach me to use the tools and I could create something myself! Thanks again!
CoreyS
Fri, 12/16/2011 - 08:47
Farmhouse tallboy dresser
I love this! Im going be building two for my wife and i next week. Dear ana all i want for christmas is a plan for a farmhouse tallboy dresser from pottery barn? Please?
CoreyS
Sat, 12/17/2011 - 07:07
Farmhouse tallboy dresser
I love this! Im going be building two for my wife and i next week. Dear ana all i want for christmas is a plan for a farmhouse tallboy dresser from pottery barn? Please?
Leah315 (not verified)
Thu, 12/22/2011 - 15:59
Do you think this would work as a entertainment storage unit?
We are trying to wall mount a tv in our bedroom and I really want to build the farmhouse bed, but I'm thinking the bedside table might be good to hide our cable box and DVD player in, is it big enough?
Guest (not verified)
Fri, 01/13/2012 - 18:56
big box, small wood
I'm about to start working on a pair of these tables this weekend and I'm a little worried, I purchased my lumber from the big blue box store and all of it is just a bit smaller than it is suppose to be, 1x12 and just a fraction over 11" 1x6 just making 5 1/4, all the 1 by stuff somewhere between 1/2 and 3/4. I'm worried about how this will effect the outcome of the project but we'll see. On thing I learned already though is it's lumber yards for me from here on out.
Guest (not verified)
Sat, 01/14/2012 - 08:36
I love the look of this table
I love the look of this table and plan to make 2 smaller (less wide) versions along with a farmhouse bed for my wife for valentines day. With that said, I have also made the loft bed for my step daughter with desk/bookcase under it and she loves it. I painted that white. I would like to stain these pieces. I have never stained before.... You say sand, then stain, THEN wood fill? then of couse light sand and stain again... Whats the philosophy to not just wood fill before the FIRST coat of stain?
Like I said, new to this, but my step daughters bed turned out well and her mother and I got some really good quality time in building it, same with your floating shelves, love this site, keep up the good work!
Robert (not verified)
Sat, 08/18/2012 - 19:52
Where do you get 2" x 2" stock?
This is a great looking plan. It calls for quite a few 2x2's. The only stock pine in this dimension that I can find are furring strips, which are poor in quality. I've ripped 2x4's down to this size, and even starting with better material, the results still aren't suitable for furniture, IMO. I thought about gluing up 1x2 select pine, since that is what I'm using on the rest of the project . What do you use when the plan calls for for 2x2 pine?
Elizabeth K (not verified)
Mon, 09/17/2012 - 16:33
Hi there! This was my very
Hi there! This was my very first wood project and considering that, I don't think it turned out that bad. But I am very discouraged that my drawer gets stuck coming in and out. It's roughly about 1/8" at the top and bottom like the plans says but I think there is a little bit more room on the sides which causes this problem? What can I do to fix it? Today is a rainy day and it is almost impossible to not want to throw the thing across the room just trying to open it! Help!!! I don't think there is enough room to install a runner or anything. I've seen stuff about using a router to make grooves in the side of the drawer? Remember, this is my first project! Any advice would be appreciated!
In reply to Hi there! This was my very by Elizabeth K (not verified)
DirtSquirt
Mon, 10/08/2012 - 12:08
Is your drawer square?
Hi Elizabeth,
Is your drawer perfectly square? That could be causing your problems. Easiest way to measure for square is to measure diagonally corner to corner. Your 2 corner to corner measurements should be exactly the same. If not, you will need to unscrew and and adjust your drawer until they are.