Easy Build End Table or Nightstand with Drawer

easy to build diy end table plans ana white
Difficulty
Beginner Projects
| Print this plan

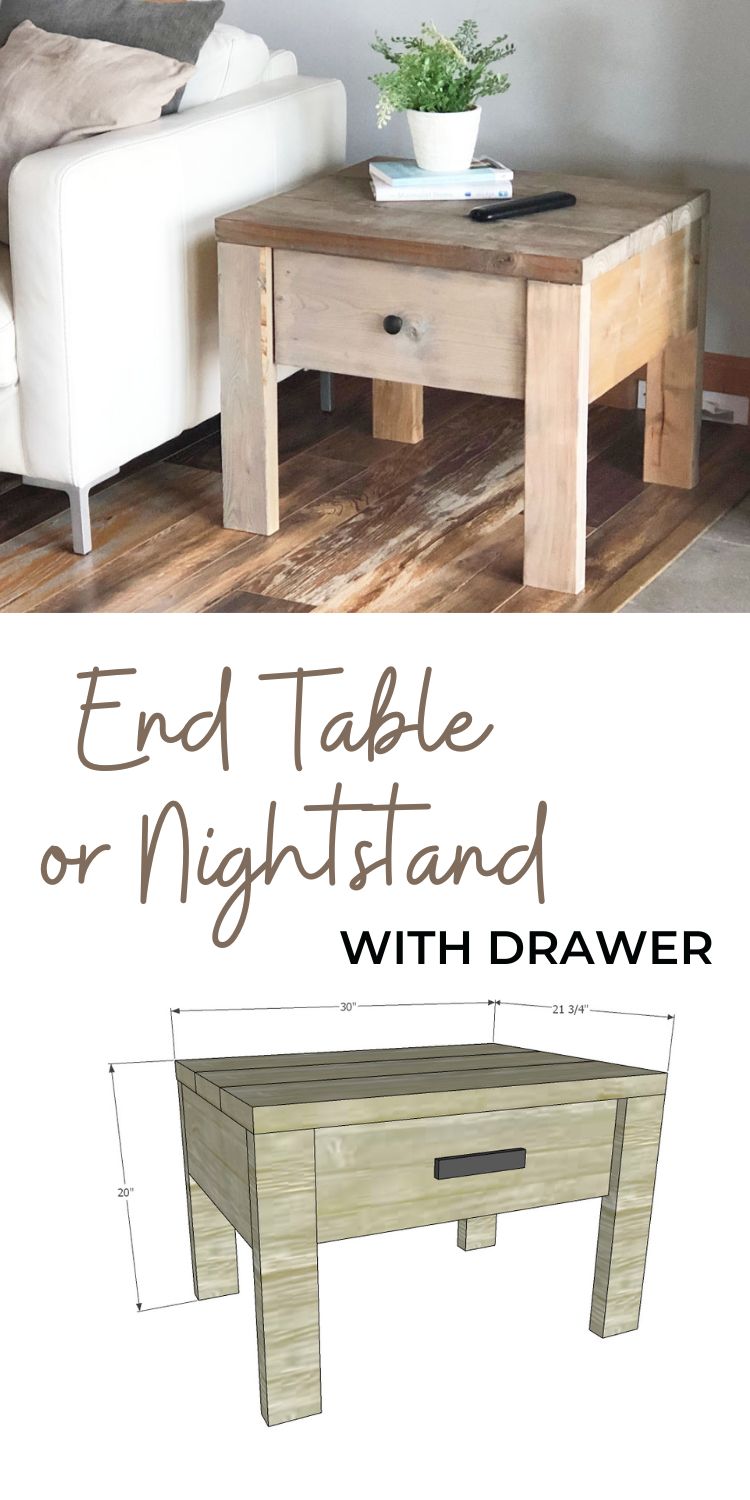
Build your own end table or nightstand with drawer, for about $50 using 2x4s and 2x6 lumber. Beautiful, solid wood design is substantial in size and sturdy.  Features a large, roomy drawer and planked wood top. You just need a few basic power tools and our easy, beginner plans with step by step diagrams, video tutorial, detailed shopping list and cut list.

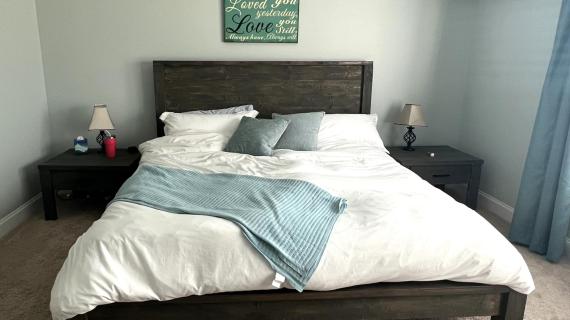
Build the matching Modern Farmhouse Bed with our free plans.

Collections

easy build nightstand

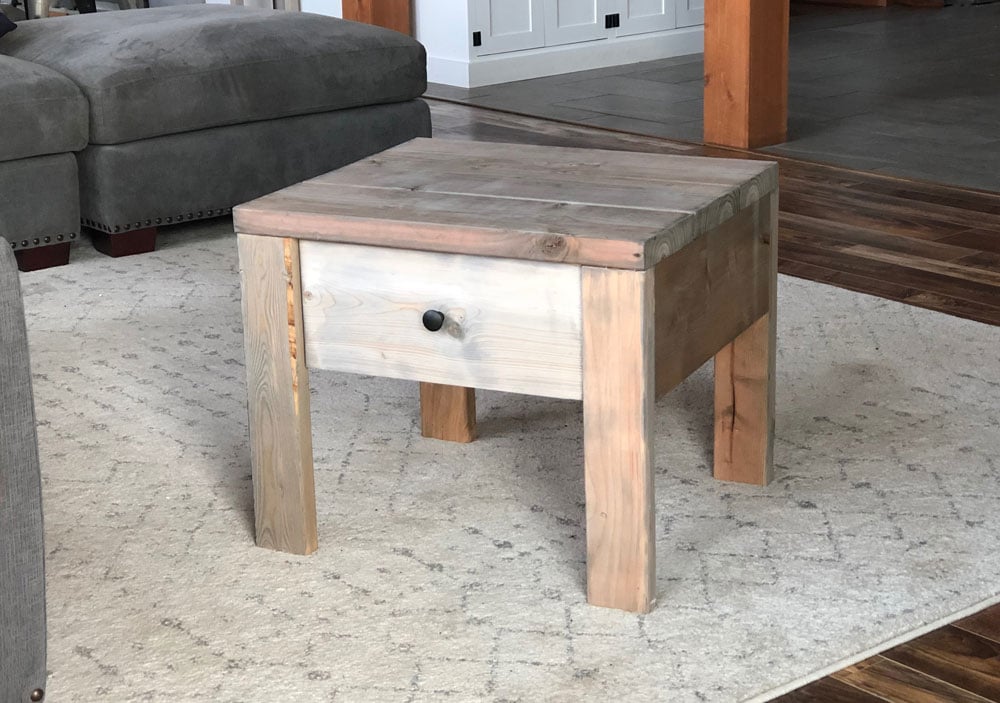
End Table with Drawer Features

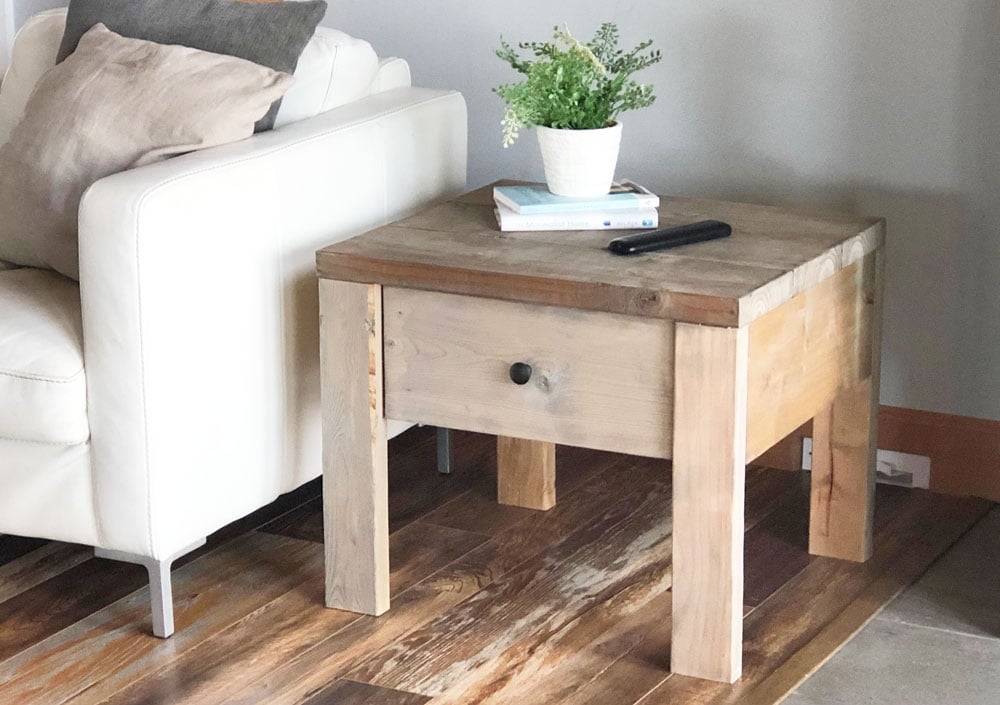
With a simple, solid wood design that can be painted or stained, this DIY end table fits almost any decor and is super functional.

  • Easy to build design 
  • Basic tools (no pocket holes)
  • Roomy drawer
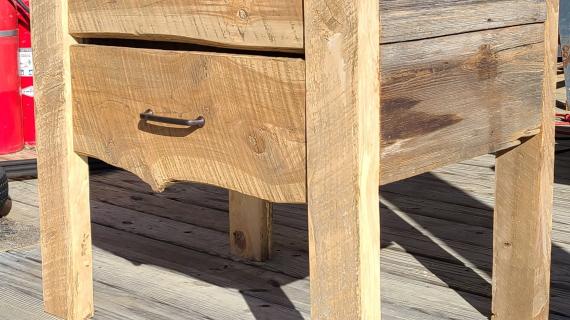
  • Easy to vacuum underneath
  • Paint or stain - all wood
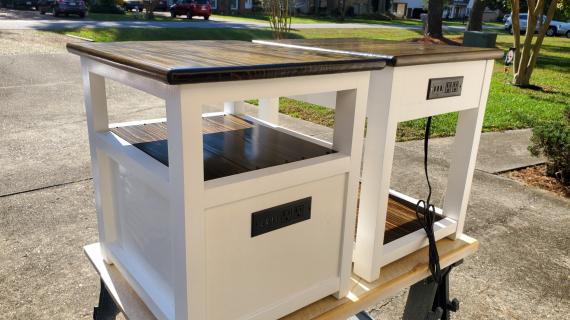
  • Substantial size - like something you'd find at Pottery Barn!
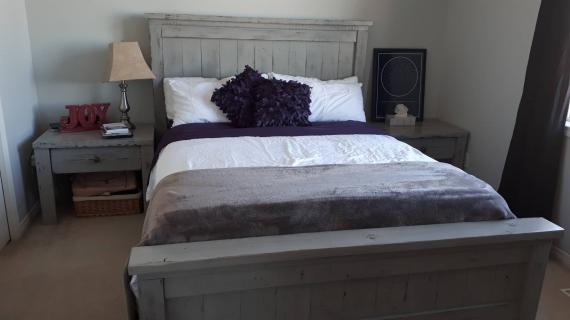
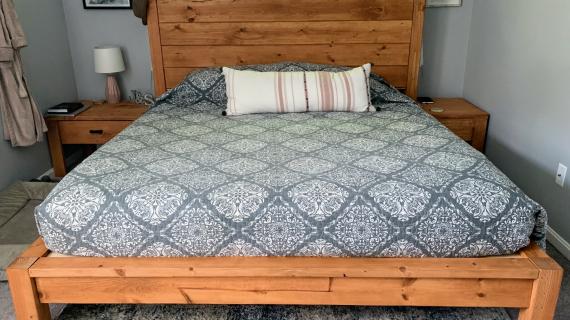
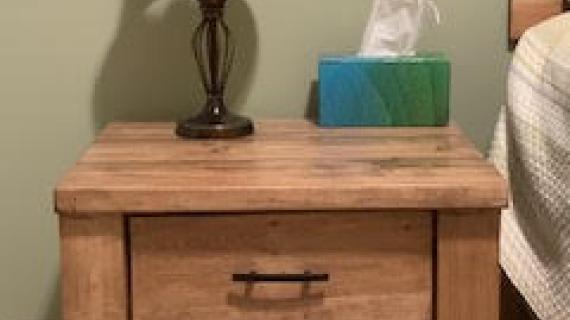
rustic farmhouse end table


Use as a Nightstand

This end table can also be used as a nightstand to match any of our beds, I have it paired with our Modern Farmhouse Bed (plans here).

modern farmhouse bed with matching nightstands


See it Get Built - Video Tutorial

If you are interested in building this nightstand, please take a moment to watch the build video - HOW this nightstand is built is everything.


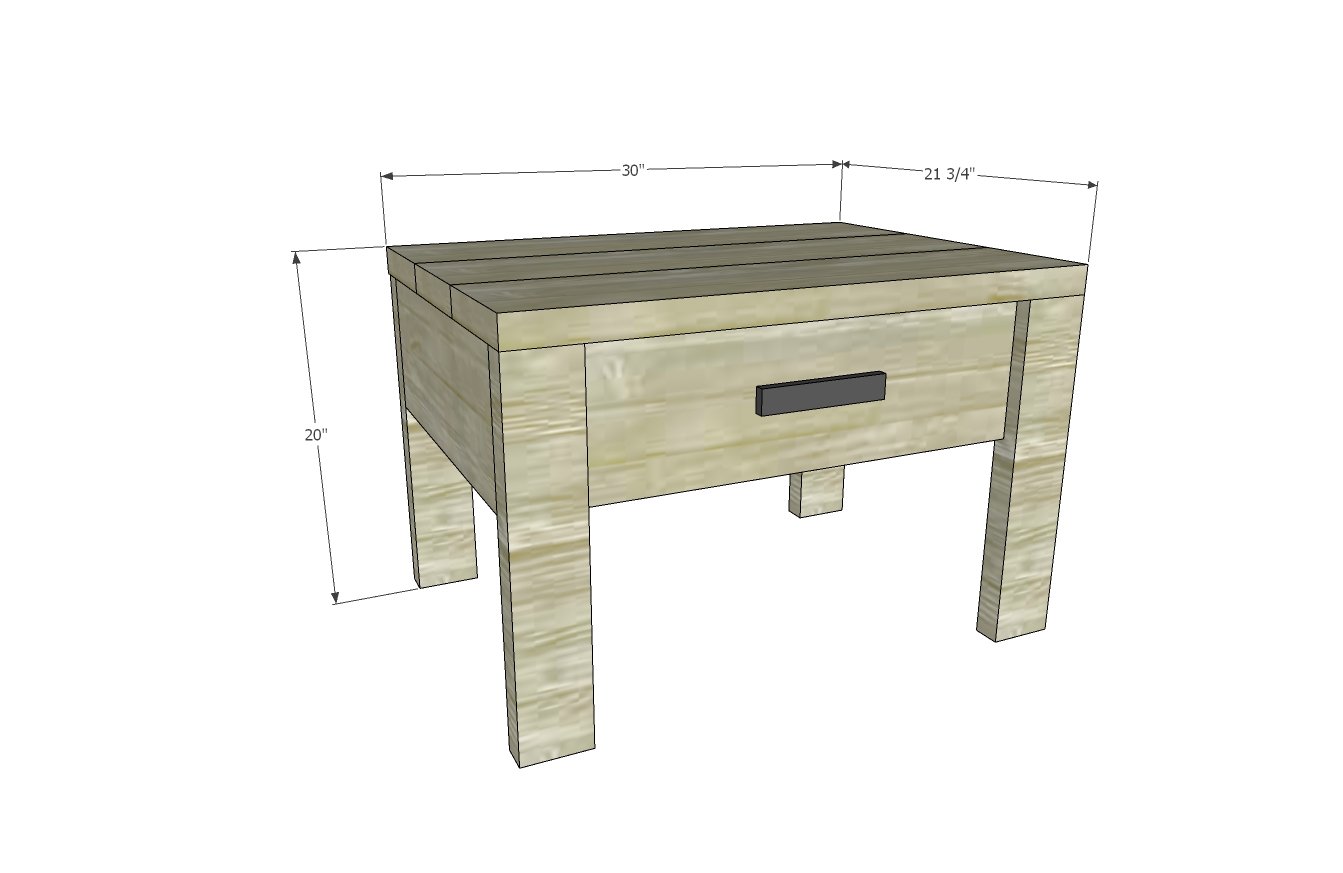
Easy Build End Table with Drawer Plans

We are happy to share with you our free step by step plans below.  If you build, we very much appreciate brag posts so others can see how your project turned out.

Pin For Later!


Easy Build End Table or Nightstand with Drawer


Dimensions
modern farmhouse nightstand dimensions woodworking project
Dimensions shown above - this is a good sized table, but it is easy to modify the height and width

Preparation

Shopping List
  • 1 - 2x4 @ 104-5/8" long (or longer
  • 1 - 1x8 @ 8 feet long
  • 1 - 2x8 @ 8 feet long
  • 1 - 1x4 @ 8 feet long
  • 1 - 1/4" plywood @ 20-1/2" x 19"
  • 18 white euro style drawer slides
Common Materials
3/4 inch finish nails
1 1/4 inch finish nails
2 inch finish nails
Cut List
  • 4 - 2x4 @ ~7-1/4" - cut to match the width of the 1x8 boards
  • 2 - 1x8 @ 18-1/4" - sides
  • 4 - 2x4 @ 18-1/2" - legs
  • 1 - 1x8 @ 23" - back
  • 1 - 1x8 @ 22-3/4" - drawer face
  • 3 - 2x8 @ 30" - top


DRAWER - Do not cut until you can measure the opening and adjust to fit if needed

  • 2 - 1x4 @ 18"
  • 2 - 1x4 @ 19"
  • 1 - 1/4" plywood @ 20-1/2" x 19"
Tools
Tape Measure
Speed Square
Pencil
Safety Glasses
Hearing Protection
Drill
Circular Saw
Miter Saw
Brad Nailer
Power Sander
General Instructions

1-1/4" nails can be used for the 1-1/2" nails, if you don't want to buy both

Instructions

Step 1

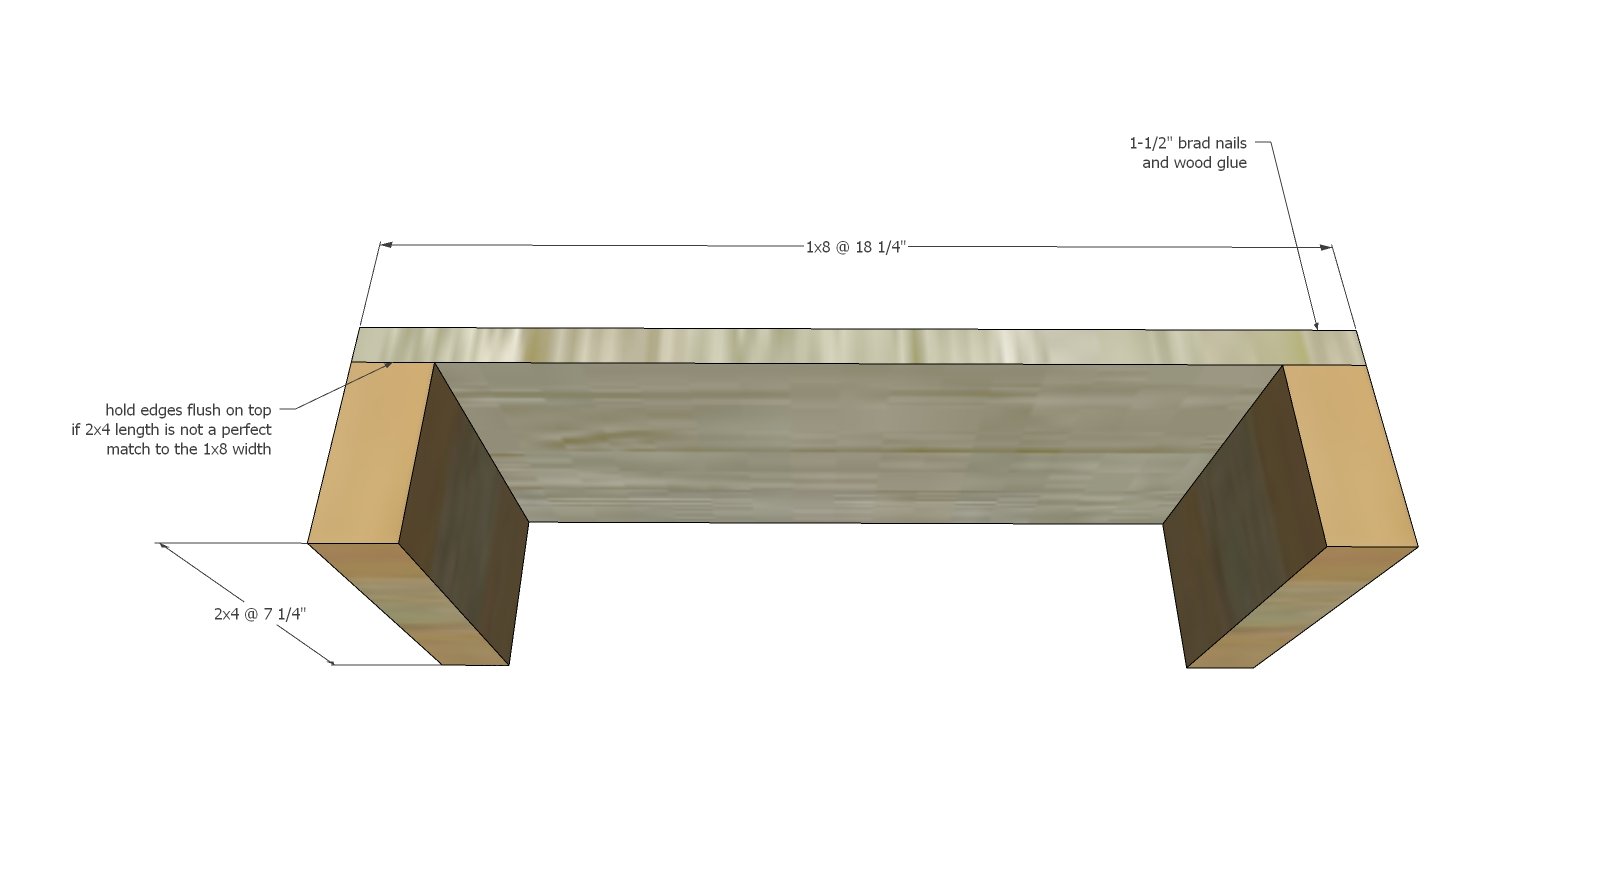
Use glue and the 1-1/4" or 1-1/2" brad nails to attach the 1x8 sides to the shorter 2x4s.

Line outside edges up carefully.

Hold flush to top, leave any discrepancies at the bottom.

Repeat to build two of the same.

Step 2

Apply glue where legs overlap the sides.

Attach with 2" brad nails and glue, keeping outside edges and top edges flush.

Step 3

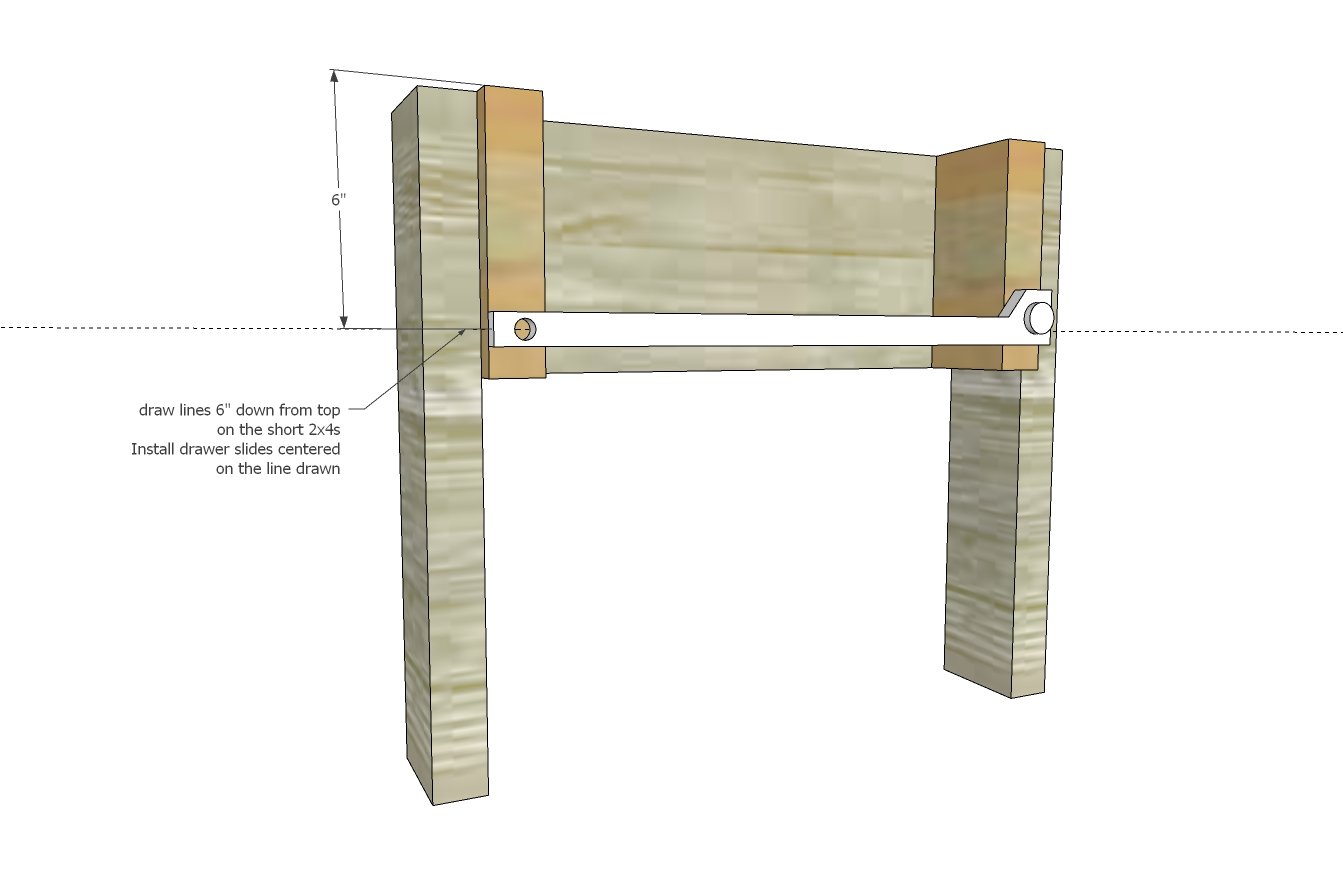
Install drawer slide cabinet member on the shorter 2x4s.

Make sure the two drawer slides are installed exactly the same location so your drawer slides evenly.

The front of the drawer slide (wheel side) is flush to the front edge of the shorter 2x4.  The back edge may end short of the back shorter 2x4 depending on your drawer slides.

Repeat for opposite side (but in mirror).

Step 4

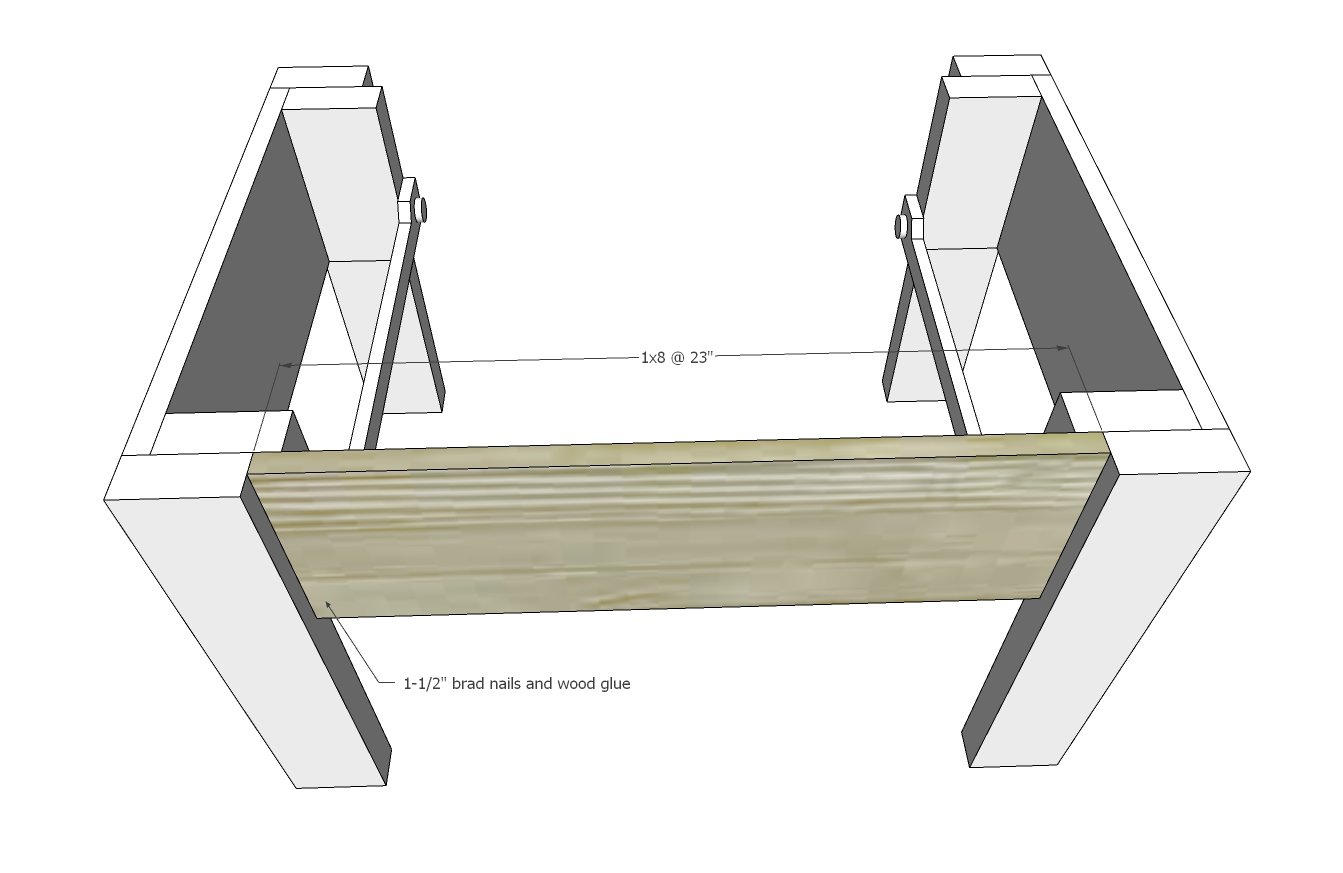
Attach back with 1-1/4" or 1-1/2" brad nails and glue.

Step 5

Measure the opening for the drawer cavity.

Read the instructions with your drawer slides.  Common drawer slide clearance is 1" overall (1/2" on each side).  

Figure your drawer size and build to fit.


If ALL of the following are TRUE, you can proceed with measurements shown in diagram and given in cut list -

  • Inside width is 21-1/2"
  • 1x4 thickness is 3/4"
  • Drawer slide clearance is 1/2" per side (1" overall)

Cut bottom plywood and nail and glue to bottom with 3/4" brad nails.

Install drawer members on the finished drawer.

Test drawer inside the nightstand.

Step 6

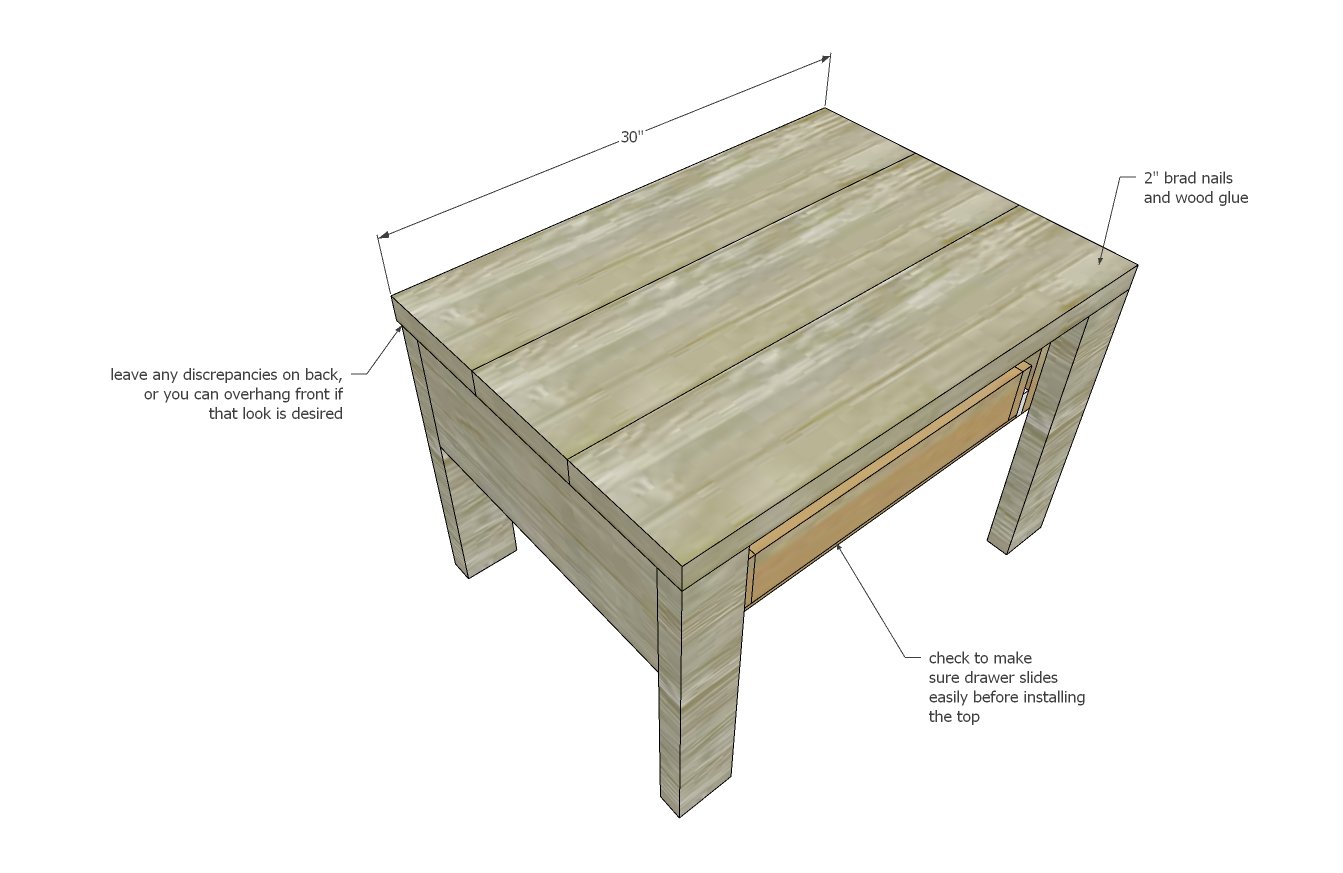
With drawer opening and closing smoothly, nail top boards to the top of the nightstand.  

I kept everything flush to the front to match the look of our modern farmhouse bed, but you can overhang the front (or even cut longer to overhang on the sides) if trying to match our classic farmhouse bed.

Step 7

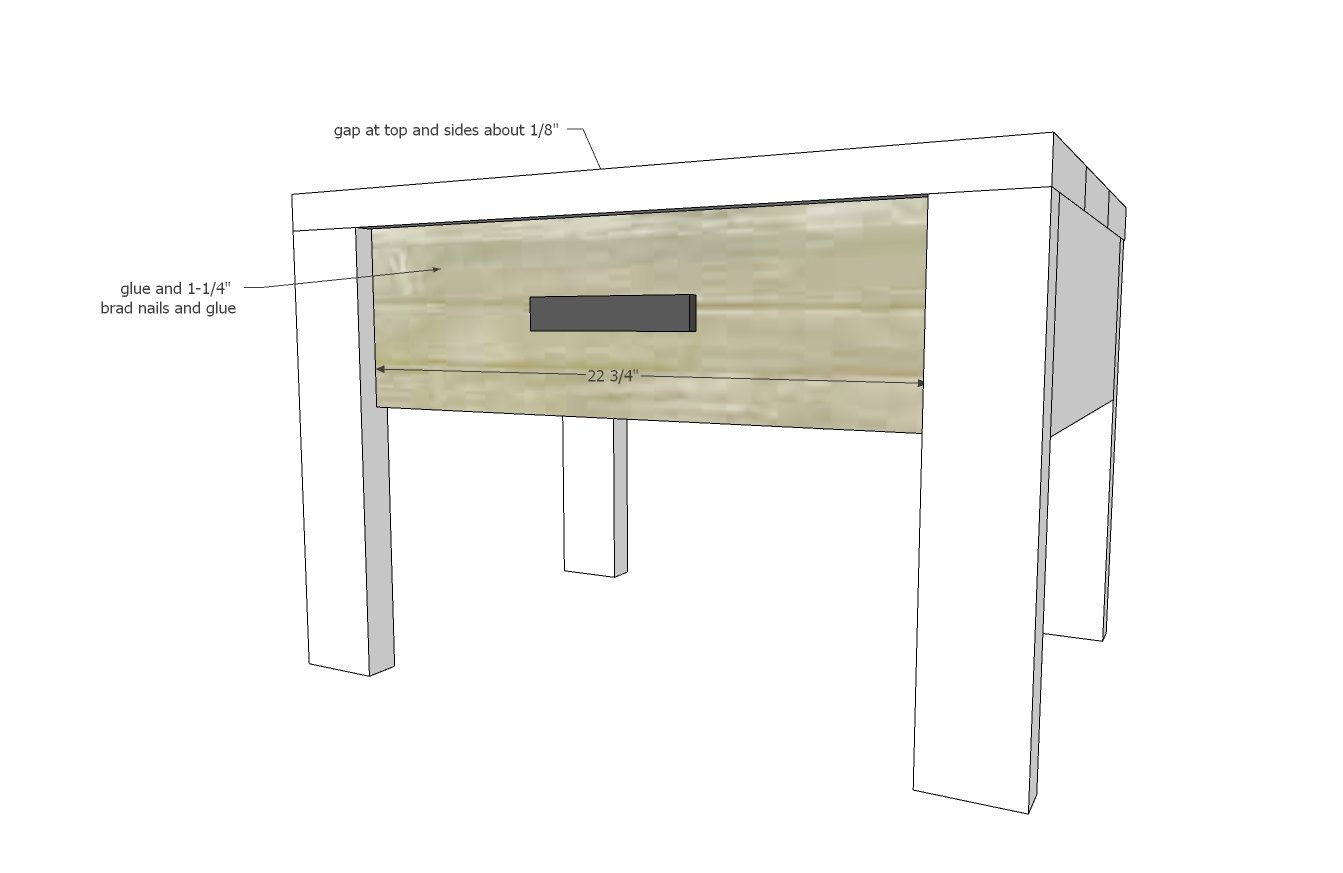
Cut the drawer face about 1/4" smaller than your front opening.

Apply glue and nail the drawer face to the front of the drawer, leaving an even gap at top and sides, use 1-1/4" brad nails.

Avoid nailing where the hardware will be placed.

Finishing Instructions
Finish Used
We used weathered wood accelerator by Varathane

Comments

andrew14321

Wed, 10/16/2019 - 04:04

Hi Ana,

Would you mind telling me what stain and wood you used on the Modern Farmhouse Bed picture above, below the first nightstand picture with the gray and white pillows?

Thank you,

Andrew

Emo Wood Works

Mon, 04/13/2020 - 18:14

Hi Anna I love this nightstand I would love to make 3 draws I was going to make it 30" high. I do want my draws deep so I will use 1x6 draws and 1x8 face front I just want to know how many inches will the back 1x8 piece should be. Please let me know. Thank you

hdan450

Sat, 04/10/2021 - 15:09

I am currently making this, it is a really good blueprint with great details used alongside the YouTube video

This is my first woodworking project and it looks great, just need to sort the top out and attach the drawer face

Some good lessons learned - the width I required needed to be shorter than this, and I realised that the 2x4s here too wide, along with the wood for the drawer. I have successfully managed to scale both down to get a nice drawer in there

If there is a way to upload images here I'm happy to share :)

Overall pleased with this and how it is progressing for a first attempt :)

s@flores

Tue, 06/01/2021 - 07:34

Hi Ana,
Quick question regarding the top of this night table, is it really 30 inches? The one you made on the video does not look like that long? We are in the process of making the matching king bed and eventually make the matching night stand but with the length of 30 inches it won’t fit in our room. I hope you will notice my comment.
Thank you very much

Frequently Asked Questions

Wood Questions

What kind of wood should I use?
Most of our plans use standard construction lumber like pine or fir. It's affordable, easy to work with, and easy to find. It's also rapidly renewing and biodegradable, so a great eco friendly choice!

Can I use hardwoods instead?
Yes—just keep in mind they're heavier, cost more, and can be tougher on tools and harder to join together and finish. I recommend not tackling a hardwood project until after you have built several softwood projects.

What if my boards are warped?
Choose the straightest boards at the store. You can often work around slight warps by cutting them into shorter pieces.

What wood should I use for outdoor furniture?
Use red-toned or pressure-treated 2x lumber for framing, and cedar or cedar fence pickets for the decking. Outdoor furniture should be built like a deck—your local home center can help recommend the right wood for your climate.

Will my wood move or warp after I build?
Potentially, especially in humid climates. Let your wood acclimate indoors before building. Once acclimated and kept in a stable environment, movement should be minimal. Remember, most houses are built using framing lumber - it's all about keeping moisture down indoors.

Cutting Questions

Do I need a miter saw?
A miter saw is great, creating fast, safe, and precise cuts, even for beginners. But most plans can be built with a circular saw and a straight edge. If using a circular saw to cut, take time to practice, and get good at making cuts, before cutting your project boards.

How do I get clean cuts with a circular saw?
Clamp your board, measure twice, cut slow, and use a sharp blade. This takes practice, so spend some time making cuts. I go through becoming proficient at freehand cutting in my course, it is worth taking if you want to master this skill.

Will the store cut my wood?
Yes—most stores will do rough cuts to help you transport your materials home. But from store to store, the quality of cuts could greatly vary.

Joinery Questions

What screws should I use?
We recommend star-head self tapping screws for framing, most common sizes are 2-1/2", 1-3/4". Pre-drill if close to the edge or you find your wood is splitting.

Do I have to use pocket holes?
Pocket holes are the cheapest, easiest and fastest way to do some joints - like edge to edge or a hidden fastener joint. There are other methods, but these can be time consuming and expensive. We recommend using pocket holes as indicated in plans for best results.

How do I keep things square?
Use a speed square and measure diagonals after each step. Always clamp joints before screwing to keep them tight and flush.

Finishing Questions

Stain or paint before or after building?
A quick sand before and a full finish after gives the best results. Pre-finish if you're doing two-tone or detailed finishes.

What type of finish?
Use oil-based or water-based stain. For paint, cabinet-grade latex or enamel works great. High use surfaces on indoor projects should get a coat of polyurethane, I recommend a Helsman or Spar or other flexible poly that won't crack or peel with wood movement. For exterior projects, use a finish suitable for exterior fences.

How to get a smooth finish?
Start with a well sanded project. Sand between coats (220 grit), wipe clean, and apply light coats with a foam brush or roller.

Plan Questions

Can I change the size?
Many people do, and that's the great thing about building your own furniture! But do keep in mind going bigger might mean more supports are required, and often plans are optimized for minimal material waste.

Are these beginner-friendly?
Yes—plans are written with simple tools and clear steps in mind, with every effort to make plans as simple as possible.

Can I sell what I build?
Absolutely! Just don’t resell or repost the plans themselves.

General Questions

What tools do I really need?
A drill, circular saw, tape measure, square, and a few clamps will get you through most projects.

Do I need a workshop?
Nope! A driveway or small patio is plenty to get started, just make sure you have a level place to work. If you find you are building several projects a year, creating a small workbench is a great way to store tools and have a dedicated workspace.

What if I mess up?
Wood filler, sanding, or flipping boards goes a long way. Mistakes are part of the process!

What can I do to make my projects look more professional?
Start with straight boards, make accurate cuts, clamp all joints, and line up everything neatly. Sand thoroughly, use a neutral finish, and apply it in light coats for a clean look.

I've never built anything before. Where should I start?
Start with a few smaller softwood projects to get hands-on experience. Or if you're tackling a big project, buy a little extra lumber and practice your cuts and joints first. If possible, work with someone who has a bit of experience.

Care & Maintenance

How long will my furniture last?
With good joinery and regular care, your DIY furniture can last for decades. I have pieces in my own home that are over 20 years old and still going strong! One of the best parts about DIY furniture is that it’s easy to repaint, refinish, or repair—so your projects can grow and adapt with you.

How should I care for outdoor furniture?
Lightly pressure wash or hose it down once or twice a year. Tighten screws and reapply finish as needed to protect it—just like a deck or fence. A little upkeep goes a long way in extending the life of your furniture.

How about indoor furniture?
Regularly dust or wipe with a damp cloth. If it starts to look worn, a light sanding and touch-up paint or stain can refresh it in no time. DIY pieces are meant to be durable and fixable—so don’t be afraid to give them some love now and then.

Want to Build with Confidence?

Check out my ebook: 12 Skills to Build Your Own Furniture
It walks you through the core skills every builder needs—measuring, cutting, joinery, and finishing—so you can build beautiful furniture that lasts.

Still Have Questions?

Email us anytime at [email protected] and we’ll be happy to help!