
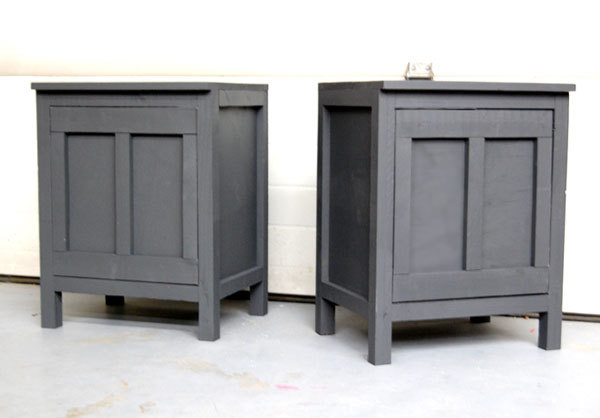

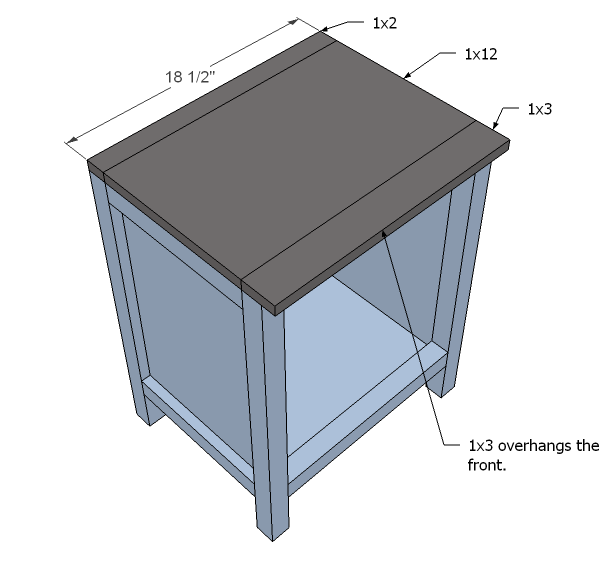
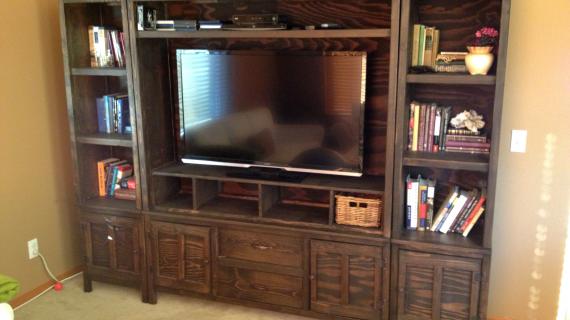
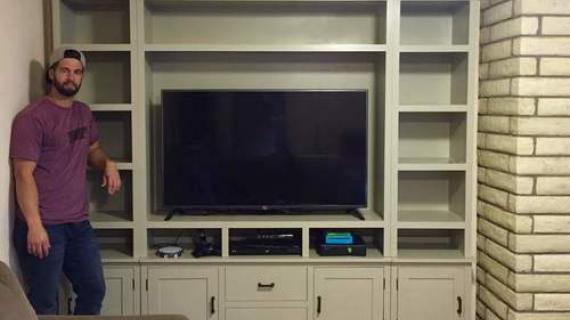
These little guys can be both a nightstand or side bases to form an entire media wall. Features large interior with optional shelf, open base for air circulation, ideal for storing just about anything.
Preparation
Shopping List (for ONE nightstand/side base cabinet)
1×12 @ 8 feet long
2 – 2×2 @ 8 feet long
1 – 1×2 @ 6 feet long
1 – 1×3 @ 8 feet long
1/4″ up to 3/4″ plywood scrap, (1×16 scrap would be great) 16 3/8″ long
1 set of euro style inset hinges OR basic hinges handle or nob
2 1/2″ screws,
1 1/4″ finish nails or screws or pocket hole screws
finishing supplies including wood glue and wood filler, paint and primer, or stain
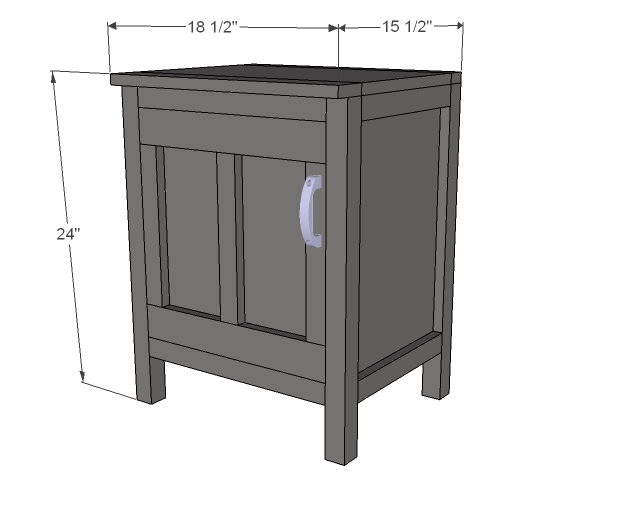
2 – 1×12 @ 19 1/2″ (Sides) 4 – 1×2 @ 11 1/2″ (Side Trim – cut to the width of your 1x12s) 4 – 2×2 @ 23 1/4″ (legs) 2 – 1×12 @ 15 1/2″ (Shelf) 4 – 2×2 @ 15 1/2″ (Front/Back Trim) 1 – 1×2 @ 18 1/2″ (Top) 1 – 1×12 @ 18 1/2″ (Top) 1 – 1×3 @ 18 1/2″ (Top) 2 – 1×3 @ 15 3/8″ (Door) 3 – 1×2 @ 11 3/8″ (Door) 1/4 – to 1/2″ plywood @ 15 3/8″ x 16 3/8″ (door back)


Instructions
Step 1

Side Trim
Attach the side trim to the outsides of the sides as shown above.
Step 2
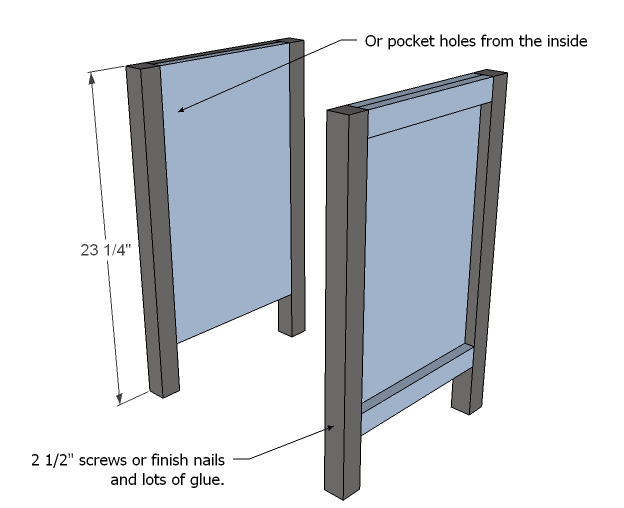
Legs
Keeping the legs flush with the top, attach legs to the sides as shown above. Predrill holes if you are using screws.
Step 3

Shelves
The bottom shelf sits flush to the bottom. You can either add a second shelf or drill holes for shelf pins for an adjustable shelf. Glue and screw with either pocket hole screws or 2 1/2″ screws.
Step 4
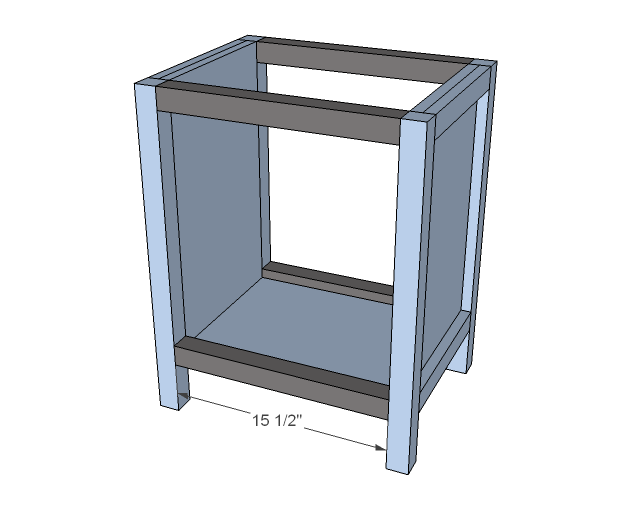
Front/Back Trim
2 1/2″ screws and glue.
Step 5
Step 6
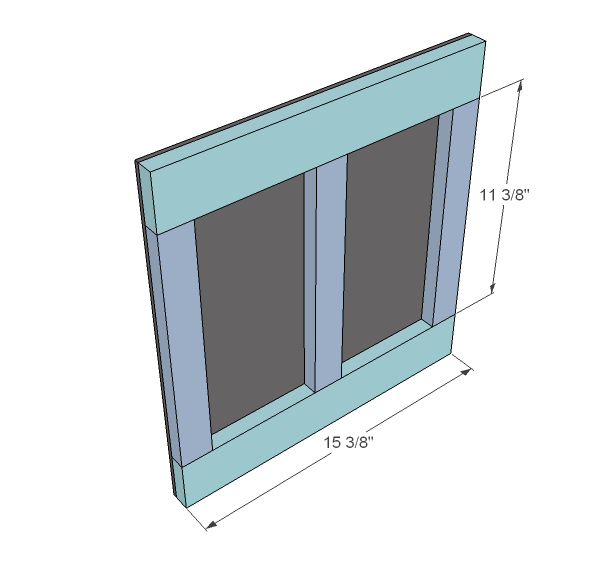
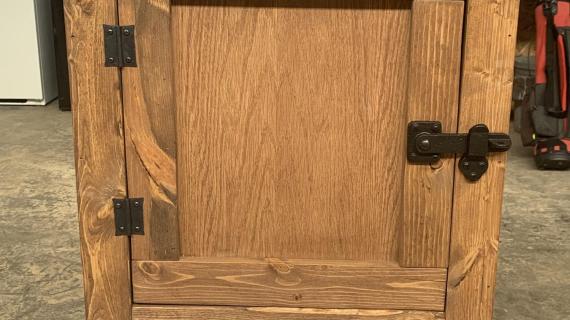
Doors
When you cut your boards, make sure you measure the exact opening of your door, and leave 1/8 gap for a tight fit, 1/4″ (total gap, so that’s 1/8″ all the way around) for a roomier door. If you have a pocket hole system, build the door frame as shown above. You can use a countersink bit or wood dowels to build the door frame too. Otherwise, glue and nail to the back plywood. Keep in mind the allowance need for your hinges. Depending on the type of hinge that you are using, you may need to cut the plywood out around the hinge.
Step 7

Finishing
Fill holes with wood filler and sand and finish as desired. Attach door with hinges followed by a handle.

Comments
Leah (not verified)
Thu, 01/20/2011 - 22:07
We have been looking for
We have been looking for nightstands like this, thank you! Good luck with all the computer stuff, I always look forward to your posts. =) As for stress, remember at least that each day Interior AK is moving closer & closer to spring!
Elvira Clay (not verified)
Thu, 01/20/2011 - 22:12
Thanks for all of your hard
Thanks for all of your hard work...you are seriously talented! May God continue to bless your endeavors.
jojabis (not verified)
Thu, 01/20/2011 - 22:29
I am so sorry. I just hate
I am so sorry. I just hate to hear of your wohs. I want to thank you from the bottom of a long list of custom hand crafted furniture. Without you, B wouldn't have a bed, nor would A or me and the man. We wouldn't have a perfect table, or one for the whole family of 22 to sit at. Without you we would be entertainment centerless, deskless, bench x 5less, and cubbieless. While I would understand if you just said "enough already" I wanted to say Thank you from Maui where it to snowed this week.
Michelle (not verified)
Fri, 01/21/2011 - 01:05
As frustrating as it may be -
As frustrating as it may be - what a wonderful thing to be frustrated about! You, and the site, are doing SO well that you are busting at the seams! It just means we can't get enough of you and the awesome plans you (and now others) give us. I'm sure the ones who are generating all that traffic will stick around through the rough spots... we can't help it, you've got us addicted! :)
Rosalyn Bown (not verified)
Fri, 01/21/2011 - 02:01
Just what I needed! Thank
Just what I needed! Thank you.
Sharon Lambirth (not verified)
Fri, 01/21/2011 - 02:44
When I saw this, I instantly
When I saw this, I instantly found my solution for hiding a litter box ! I know that wasn't the intention, but I am tired of looking at it and the cats don't particularly care where it is... so picture a hole cut out of one end, and the door convenient for changing out the box or scooping litter..yay! Thinking of a small shelf inside to hold bags and litter scoop too.
megnstuff (not verified)
Fri, 01/21/2011 - 02:57
ditto. Almost our whole
ditto. Almost our whole basement is furnished with handmade Ana Design furniture. And now we can start on an entertainment center!!!
Thank you Ana for all you do. We will be as patient as needed. We are loyal to your site no matter what kind of thumbnail problems you are having :)
megnstuff (not verified)
Fri, 01/21/2011 - 03:02
p.s. I love how the gray you
p.s. I love how the gray you chose modernizes the "cabin" look. It is the perfect blend of modern and family friendly accessible furniture.
Melissa (not verified)
Fri, 01/21/2011 - 03:03
Thanks so much for all you
Thanks so much for all you do. I pray that tomorrow goes much smoother for you!
K (not verified)
Fri, 01/21/2011 - 03:41
Awesome idea !
Awesome idea !
K (not verified)
Fri, 01/21/2011 - 03:44
Ana, we all think you are
Ana, we all think you are doing an amazing job! It's completely understandable that the growth and transition is going to be a little rough. But that is something we're ALL willing to work with you on :) We love you !!! I really truly enjoy all that you are doing here for us, and keep up the AWESOME work !!
Sarah (not verified)
Fri, 01/21/2011 - 03:46
Relax. Do something else for
Relax. Do something else for a break. Don't worry about the website, it will happen. Have a great weekend.
James Reeves (not verified)
Fri, 01/21/2011 - 03:48
Ana, again another awesome
Ana, again another awesome project, l just got this past week my K3 pocket hole jig and allot of screws and also bought the kreg DVD's Cabinets and the Tables DVD both awesome dvd's, since buying DVD's now have 7-8 easy to teach myself then your awesome site don't have to surf the net no more just come to your excellent site.
Going to order this week the kreg jigs for attaching drawer slides and 2 right angle clamps makes easy for a one person assembly operation.
Keep up the excellent work, your site has helped me Ana, so much with my depression. Now having new jig now just save up to buy plwood to start building because 90% of my material l have in my shop is 1'' x in oak and pine.was made in the 1980's.
Bye for now
Jim, Ontario, Canada
Nice l no longer have to use my old pocket jig think it
Monica (not verified)
Fri, 01/21/2011 - 04:17
I was just looking at our
I was just looking at our litter box this morning and trying to think of a great place to "hide" it! lol! It's in our tiny bathroom (the only one in the home! augh!) so I was thinking of building some sort of shelving next to our toilet that would house the liter box in the bottom and would be out of site. :0)
Bonnie (not verified)
Fri, 01/21/2011 - 05:20
Oh Ana, I think this is the
Oh Ana, I think this is the entertainment center for me!! I love the Shaker style of the doors, and up off the floor too. The more I look at it, the more I love it! Cannot WAIT for the rest of the plans. And Ana, from me personally, you SO have my undying admiration and respect. I feel so horrible for YOU when your site is down. I know you will work out what ever kind of bug has you at that time, but I also know how much work it will take you to get that job done. So please, don't appologize. You are doing such a GREAT job! I hope that you truely know how much we all appreciate what you do! Sometimes words just do not seem enough. You are my hero!!
Angie (not verified)
Fri, 01/21/2011 - 06:29
I've never thought about it
I've never thought about it before but I really love this dark grey for furniture. I think if I ever have a garage I will have to make this entertainment center.
Tsu Dho Nimh (not verified)
Fri, 01/21/2011 - 07:05
Ana - Don't get too stressed
Ana - Don't get too stressed about the website. Any site that grows as quickly as yours is going to have some problems.
You things are worth waiting for.
Cherie (not verified)
Fri, 01/21/2011 - 07:43
You are so productive! Those
You are so productive! Those are beautiful. I think I'll build them.
I can't say how much I appreciate what you do for us. Thank you.
TheWorldMovesForLove (not verified)
Fri, 01/21/2011 - 08:37
Hang in there! It may seem
Hang in there! It may seem like it's frustrating for us- but we can manage without the site for just a few days while it gets worked out. I can only imagine how frustrating it must be for YOU! It'll work out! (and if it doesn't, I'm sure between all of your fans, we have every single plan on here saved, and we could put the site back together in no time!)
:) This new plan looks fantastic!
Cindy (not verified)
Fri, 01/21/2011 - 08:38
Ana, thank you for all you
Ana, thank you for all you do. We love you and everything you so generously give to us. Thisw weekend, put your feet up and have a beer or a mug of cocoa with the Ram. xo
Jamie Dafoe (not verified)
Fri, 01/21/2011 - 09:21
You are awesome Ana! My
You are awesome Ana! My goodness you are providing a free site for all of us to save money and have good furniture! Its no biggy if we cant get to things from time to time! Just reminds us that sometimes we need to take a step back from our on demand lifestyle and have patience! Thank you for all you do and all your non paid, non salaried work!
trish (not verified)
Fri, 01/21/2011 - 09:53
Don't stress out too much,
Don't stress out too much, Ana (I know easier said than done!). I love your site and have been a follower for just under a year. I am very happy to say that no matter the trials, I am willing to see them through with you as are a ton of other readers no doubt. I have seen some of the glitches that have happened and can definitely attribute them to the great but unreliable world of computers. We all know that if you could control everything it would be glitch free : ) That said, if things always ran perfectly we would never grow in such experiences. Love your site no matter what!
Theresa (not verified)
Fri, 01/21/2011 - 10:41
Great project. Don't let the
Great project. Don't let the site problems get you down. We sure aren't going any where. Thank you for all that you do for us. Theresa
Chelle (not verified)
Fri, 01/21/2011 - 10:46
Yea! These are definitely THE
Yea! These are definitely THE nightstands. Awesome! Good luck with the computer woes, I hate that stuff!
Cheryl (not verified)
Fri, 01/21/2011 - 10:46
Love these! Ana, thanks so
Love these! Ana, thanks so much for all the hours and work that you put into your site! You're so giving and generous. As I've said before, I (and so many others) truly appreciate you.
xo,
CC (Cheryl in Canada)
Gwenevere (not verified)
Fri, 01/21/2011 - 11:40
Will that entertainment
Will that entertainment center have sliding hideaway/pocket doors, it almost looks like it but I can't tell. It never ceases to amazing how much less my kids ask me to watch TV when they can 't see if.
Lori (not verified)
Fri, 01/21/2011 - 12:50
Try not to stress out too
Try not to stress out too much. You're doing an amazing job with the website; and by the way, it's the BEST one I've ever come across! I've told my husband over and over about how much I love this website and I think what you're doing is so great. I just can't get over the fact that I can actually make my own furniture now, and I'm saving, literally, thousands of dollars!! I think you're amazing! May God continue to Bless You!
Eodiin (not verified)
Fri, 01/21/2011 - 13:18
Hey! I actually LIVE in a
Hey! I actually LIVE in a cabin so this is perfect! I actually just saw a base like this one and thought it would be a perfect base for my bookshelves so this is really a godsend for me. Thank you so much, and good luck with your tech issues. :)
Rachelle (not verified)
Fri, 01/21/2011 - 14:43
Thank you, Thank you for
Thank you, Thank you for everything. This is the media unit (when all the plans are up) that we are going to build. You had me with the doors. Thanks for your wonderful site and all of your hard work. Love it.
Loni (not verified)
Fri, 01/21/2011 - 14:46
This has been a stressful
This has been a stressful week for all, I hit a deer (destroyed my truck) and was layed off this week. It will get better! (although I did suggest we take a vote to have this week removed from our calenders for years to come, lol)
As for this post! Perfect! I look forward to the plans for the center piece too because I was just trying to figure out how to build a new dresser with the doors on each side and drawers in the middle and this would be perfect to match the "end" tables!
Thank you for everything! We love you no matter what technical difficulties may arise :)
Loni (not verified)
Fri, 01/21/2011 - 15:22
Question, (probably a dumb
Question, (probably a dumb one)
Is the back intentionally left off because this was designed for an entertainment center and that way plugs and cords can go through?
Kristy (not verified)
Fri, 01/21/2011 - 21:24
Sorry about your troubles, it
Sorry about your troubles, it will get better:)
I can't believe that you just posted plans for this, it makes me SO happy. I have the picture of the camp media wall system that my husband and I were going to try and figure out how to build but now bless your heart you are making it so easy for us. THANK YOU!!!!!! It looks amazing!
Treva (not verified)
Sat, 01/22/2011 - 05:20
Because of your awesome site,
Because of your awesome site, we have a bench for our kitchen table, sofa table/bookcase, bed for my son, a kitchen for my two year old, an almost finished hutch in my garage, and a new found confidence/hobby. What a wonderful problem to have--too many followers of your site. I hope you can figure it out soon for your sake, but I am willing to wait.
Eleven years ago I watched Trading Spaces and wanted to be a carpenter like Amy Wynn. I bought woodworking magazines for years only to find the plans too complicated. With your approachable plans, you are helping my dreams come true. When I want a custom piece of furniture, now I just build it. Now the only problem is finding the time to build all the things on my list. Thank you!
Mike (not verified)
Sat, 01/22/2011 - 08:45
Ana - it may not be the fix
Ana - it may not be the fix you are looking for, but I've found your site performs better using Google Chrome than Microsoft IE. If you agree, you may want to let people know that this may produce a better experience. At least until you work everything out, as I'm sure you will.
Mike
Jennifer (not verified)
Sat, 01/22/2011 - 12:08
This is exactly what I was
This is exactly what I was looking for. I've been wanting to build the Tryde side tables but I need a drawer or door for storage. This is perfect. Thanks Ana!
Jeff (not verified)
Sun, 01/23/2011 - 15:08
Ana...wonderful ideas and
Ana...wonderful ideas and plans. I will be building one or two of these for our breakfast room. However, I would love to see how you do the hinges. I built a doll clothes cabinet and messed up the hinge installation (pre-planning?). I need to make some doors for the closet and want to use piano hinges...any thoughts or suggestions? (ie, hiding or showing hinges, etc) Jeff
Ana White (not verified)
Sun, 01/23/2011 - 15:38
Jeff, what I do is use full
Jeff, what I do is use full inset euro style hinges, face mount. Before putting the back on the cabinet (optional) lay the cabinet on it's face, with the top overhang extending off the table. You want the cabinet to rest flush, with the door opening flush to a tabletop. Then insert your door from the back and fit it until you are happy with the gap around the door. With the hinges in the closed position, (90 degree angle instead of opened at 180 degree angle) attach the hinges to the inside of the cabinet and door. Then test the door and fit as necessary. Inset doors can be tricky. Overlay doors tend to be easier, so you could make your doors a little bigger and make them overlay. Make sure your doors are really square, and your box is square too. I will be beginning a video tutorial section shortly, and this will go in it. Thanks for asking.
Amy J (not verified)
Wed, 02/16/2011 - 07:15
I am going to build one of
I am going to build one of these with a little different dimensions to hide my litter box in! I see I am not the only one who had that idea! I might also cut holes in the top to slip a food and water dish into now that we have a dog so that he can't get to the cat's food!