
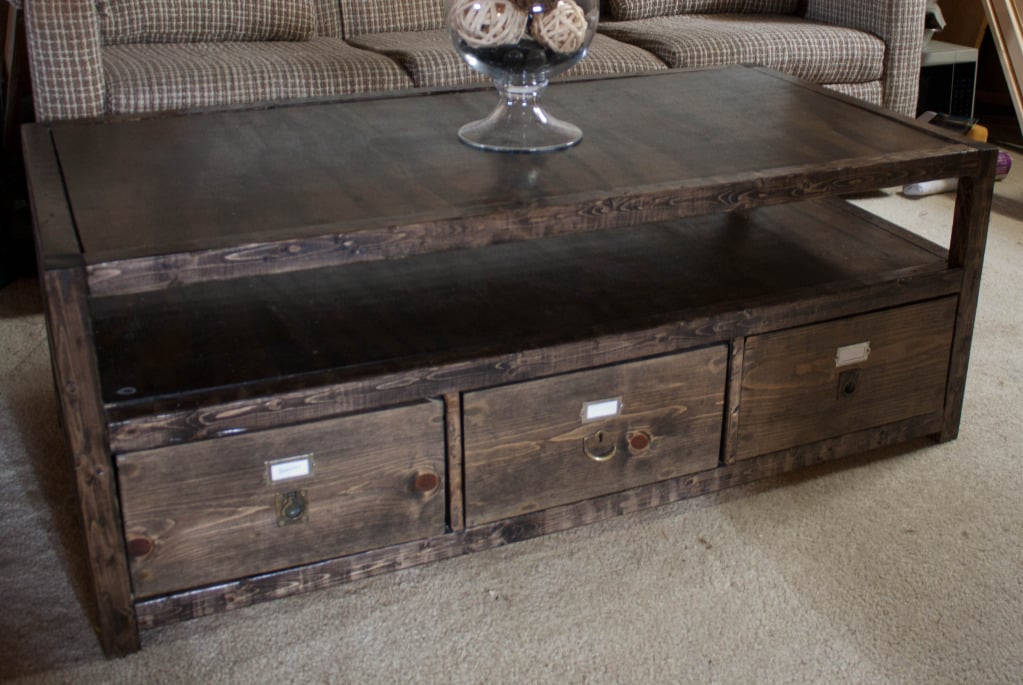

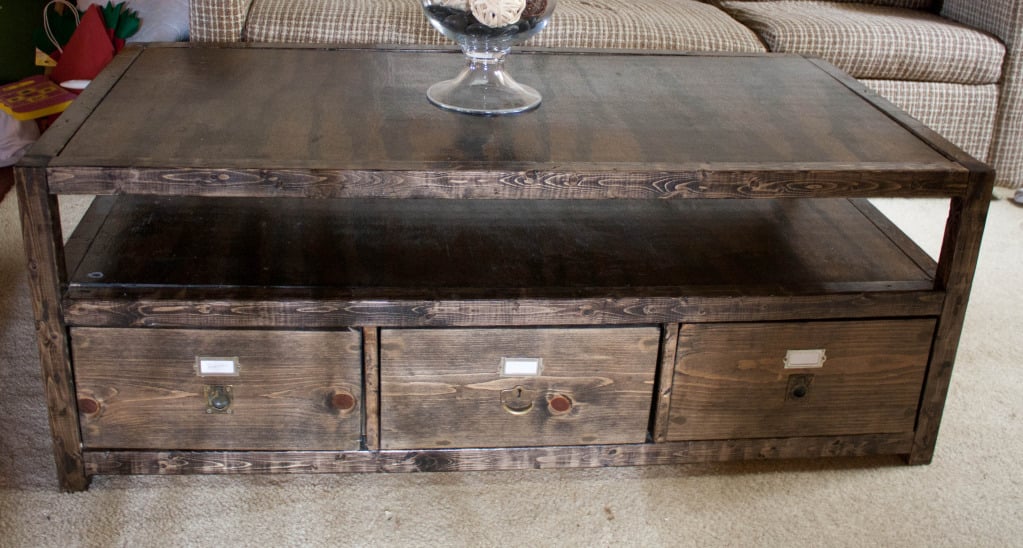
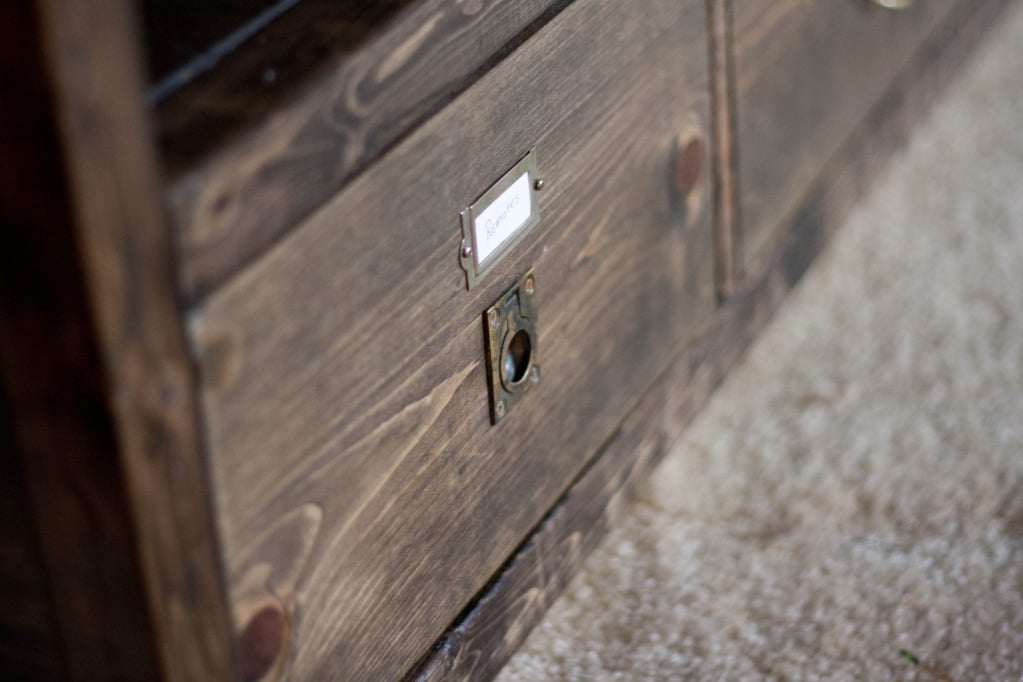
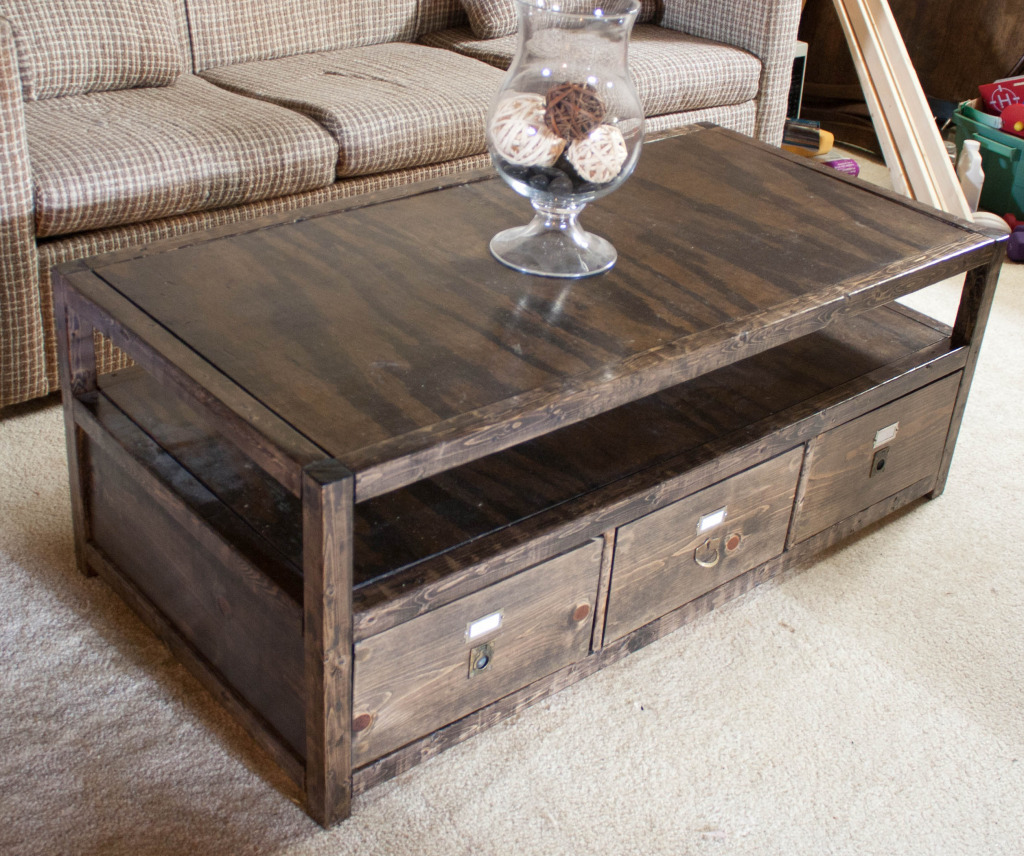
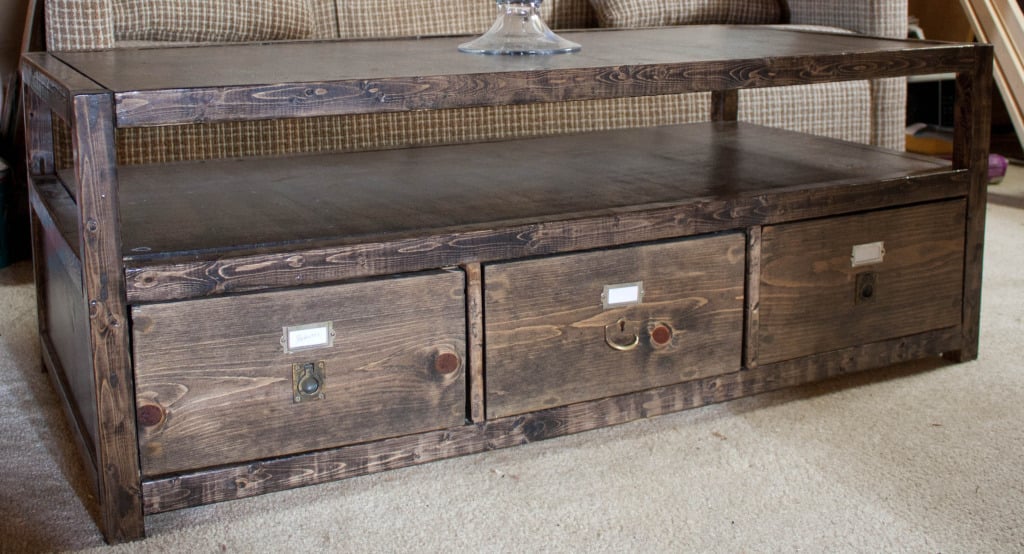
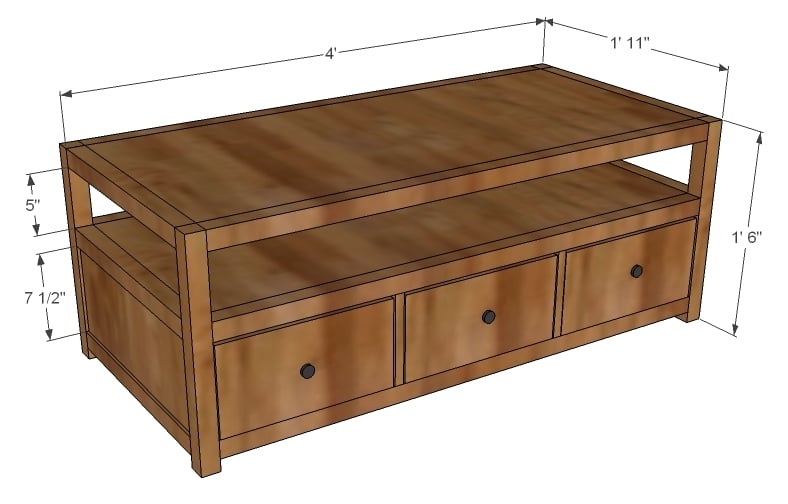
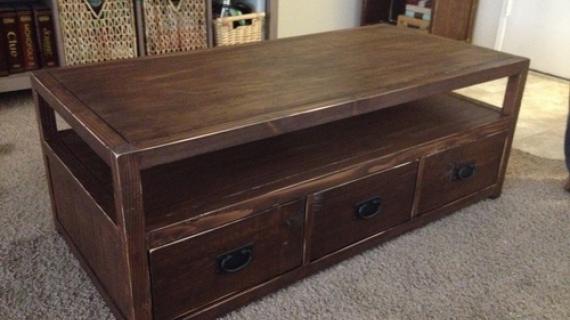
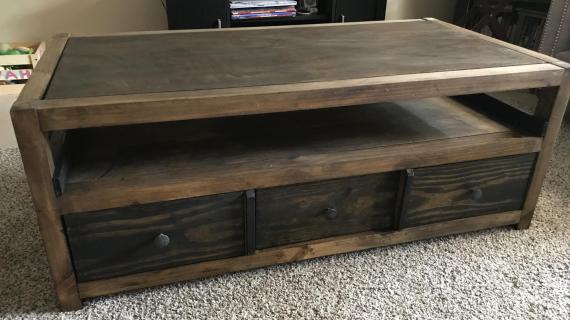
This is a the coffee table that matches the Rhyan series of plans. It is based on Pottery Barn's Rhys Coffee table and features and open shelf and six drawers. Head on over to More Like Home for the plans!
http://morelikehome.blogspot.com/2012/02/rhyan-coffee-table.html

Please read through the entire plan and all comments before beginning this project. It is also advisable to review the Getting Started Section. Take all necessary precautions to build safely and smartly. Work on a clean level surface, free of imperfections or debris. Always use straight boards. Check for square after each step. Always predrill holes before attaching with screws. Use glue with finish nails for a stronger hold. Wipe excess glue off bare wood for stained projects, as dried glue will not take stain. Be safe, have fun, and ask for help if you need it. Good luck!
It is always recommended to apply a test coat on a hidden area or scrap piece to ensure color evenness and adhesion. Use primer or wood conditioner as needed.

Comments
Gary Maurizi (not verified)
Thu, 03/08/2012 - 18:53
Desperation
Hello, this comment is about The espresso stained coffee table, I'm trying to reproduce this finish, actually I have been trying desperately for nearly two weeks to get a finish close to this...I have spent over $250 dollars in finishing samples and small jars trying every brand of ebony, espresso and dark walnut stains in both oil & water, trying to sand to every grit and then stain, trying different pre-conditioners, you name it, I've tried it, and I can't get ANYTHING like this to happen, HELP!
I have an unfinished pine ply entertainment center I want to get as close to this finish as possible, and could REALLY use help if anyone knows the original poster, or if you are the original poster that finished this could I possibly get more information about what brand of espresso stain was used, and, what grits of sanding when/how, like a step by step guide..
Did you use water to raise the grain and then sand it back down? (you said you wiped it down with a damp cloth before staining, did you let the wood get very wet during the process of cleaning off the dust?)
Did you use a pre-conditioner?
What brand of espresso stain was this? and was it an oil or water based espresso stain?
Did you sand AFTER staining BEFORE clear coating to make more of the grain pop out? (it doesn't look like it...)
I tried your instructions, sanded to #120, wiped project clean with damp cloth, applied varathane brand oil based espresso stain from home depot, let the stain soak in for a minute or so and wiped it off... I get NOTHING like this!
Any further assistance or advice would be EXTREMELY appreciated!
Thank You,
--Gary M.
[email protected]
In reply to Desperation by Gary Maurizi (not verified)
spiceylg
Fri, 03/09/2012 - 05:02
view profile
Hi Gary. I can't answer your quesion, but if you go up to where it says "submitted by" for the plans, you will view their user profile and can send them a msg via that avenue. Best wishes!
In reply to Desperation by Gary Maurizi (not verified)
Georgia M
Thu, 04/19/2012 - 06:25
Stain tips
I'm so sorry, I just found this message!
This is the stain I used:
http://www.amazon.com/Rust-Oleum-241412H-Varathane-Stain-Espresso/dp/B0…
I wiped with a (barely) damp cloth but did not let the wood really get wet at all. That was just to remove sawdust. I think the difference from what you're saying is that I didn't let it soak in AT ALL. I dipped a rag into the stain, and rubbed it into the wood pretty fast so that it only picked up a little of the color. That's really all I did, no wetting or sanding afterwards or letting it sit or anything. Hopefully that helps!
tknox827
Sat, 05/09/2020 - 13:02
The stain that is in the…
The stain that is in the picture is typically achieved by getting the espresso stain, NOT shaking it up, and only using the top-most part of the stain. Any stain, like paint, uses different pigments to make it. If you allow the stain to settle, which can take a few days depending on the stain, you can use a sponge to pull out only the top layer. This method will take several more stains to complete the project as you're only using about one-third of the pigment.
Little miss builder
Thu, 04/19/2012 - 12:41
Rhyan coffee table
I have two end tables that could use some fixin up. I love this coffee table and was wondering if it would be to hard to take both end tables and turn them into a coffee table similar to this?
Gary Maurizi (not verified)
Sat, 04/21/2012 - 22:56
Thanks!
I had to experiment with many different stains, after much experimentation I got pretty close to the results I was after, it seems I got lucky as I ended up settling on using the same stain you did! I just saw your reply for the first time now. My results can be seen at my google+ page here:
https://lh4.googleusercontent.com/-r_wI06LSefM/T5OPb2RHODI/AAAAAAAAAKU/…
For those of you trying to get similar results here is everything I learned:
I settled on sanding to #220, wiping the dust off (gently) with a brush, and staining (at night with high humidity, at-least 40%) the project with 'Varathane' brand OIL based stain in 'Espresso' color using a sock/tack cloth. I kind of had to "rub the stain into the wood" and spread it out very fine / apply the least amount of stain possible to my rag and literally scrub it into the grain to cover as much area as possible & instantly wipe off every bit of excess stain that was not immediately absorbed.
If I did not do this carefully the results would end up being way too dark, almost black. This would be pretty easy (almost instinctive) on a smaller project, but I was doing a large project so it was a bit difficult to try to cover a whole surface and wipe the excess off before too much color was absorbed. I had to work in sections using grain lines to hide any color variations.
--This is opposite to the usual procedure of applying the stain to the surface of the wood liberally (during the day), and letting it sit and soak in for a few minutes before wiping it off -- this normal staining routine caused my 'home-depot grade' pine plywood project to turn 100% black, and show no grain. (I'm used to working with quality hardwoods, pine is VERY thirsty).
The "at night with high humidity" part actually turned out to be pretty important, my results in California during the day in April -- the pine ply surface would be too dry to 'thinly spread out the stain' or 'rub it into the grain' as the pine kept sucking up the stain instantly and turning completely black, VERY little excess stain would wipe off onto the dry towel. The stain would come out COMPLETELY black and would soak in & dry way too fast to "spread the stain out thin" if I tried to work during the day with lesser humidity. I had to use OIL based stain--It was not possible to use this technique at all, or get even close to these results what so ever day or night, using water based stains.
If you are new to wood finishing like me & trying to duplicate the results of this finish (or my finish) here are a few tips, I hope you can learn from my mistakes (that is if you can get through reading it! I was typing quickly & started to rant a bit, I apologize):
1. If the wood is absorbing too much stain and ending up darker then desired--sand to a higher grit, likely #220 or #240 or higher. If the opposite is your problem, I don't recommend sanding less or a lower grit, its best to always sand to at-least #220. (If your project is coming out lighter then desired, try staining on a very hot dry day and the wood will take more stain & become darker, also do multiple coats of stain. It is possible but not preferable to sand between staining coats with a high grit above #400 to open the wood pores up a bit if necessary). The most influential factors on how dark or light your results are (with a single coat of stain) is the weather (how hot it is and how humid), how much you sanded and to what grit (higher grit, lighter results and more grain will raise and show through.), how long you let the stain sit on the wood before wiping it off, and what type of wood you are working with -- in that order from most important to least important last.
2. You can never sand TOO much (unless it is plywood, in that case you CAN sand through the first layer of ply veneer! ... I did).
3. Regardless of what type of clear coat you are after, always start your first few coats with HIGH GLOSS (it is stronger / more durable), for example, if you want a 'satin' finish, coat once with high gloss, wait 8 hours to dry, wet-sand lightly with #400, wipe the dried white dust from 'wet sanding' off the project completely with a wet rag/towel and re-coat with satin clear coat, wet-sand, re-coat, etc.. The project will be more difficult to scratch or damage in the long run this way, vs. Starting with and only using 'Satin' clear coat. (I did not know this and did this backwards, applied "Varathane brand semi-gloss OIL polyurethane" clear coat not thinned out on first, and then switched over to "Varathane brand gloss OIL based polyurethane" as It was not glossy enough for my taste).
4. I have been told that it is also a good idea to thin out your first layer of clear coat (if using oil based polyurethane/clear coat thin it out with mineral spirits) to help the brush marks settle, and to help the first layer of clear coat to run into all the small dents/voids in the surface and flatten out. This helps more on larger projects. Clear coat dries in two stages, first it "sets" and then it "cures", normally it takes 45 min to set and will be mostly dry but tacky, then it takes 24 hrs to cure and will be hard & dry when done curing. Adding mineral spirits lengthens the 'setting' time so you can brush more on before the first area where you started at begins to 'cure', allowing you to do one final 'brush sweep' across the whole large area removing all brush stop marks -- without brushing over tacky/dry clear coat. (this is important on LARGE projects as brushing over clear coat that is starting to get tacky will permanently leave raised brush strokes in your finish).
5. ALWAYS use a high quality natural bristle brush! (Cheaper brushes will leave tons of brush strokes in your dried clear coat even if you thin out the clear coat.)
6. I value the earth just as much as the next person, but OIL based wood finishing products work WAY better for me / in my experience vs. water based alternatives, I tried for two weeks to get desirable results with water based alternatives (for environmental reasons) and I just couldn't do it, if you can all power to you--most OIL based wood finishing products are extremely bad for the environment and I would love to switch to water based if I could get the same results. For educational purposes--the closest product I had some luck with in water base for my results was Minwax brand water based 'ebony' color stain--which did not give me the results I wanted, but it wasn't too far off.
Alright, this reply is large enough and I have been ranting far too long! I hope this information helps the next person on google who stumbles across this post & wants to get similar finish results on a project. :)
Thank You again Author for your informative post, it set me on my way to learning all of this stuff & was very helpful! and your coffee table is lovely!
--G.M
llangan
Tue, 03/22/2016 - 07:11
Plans
Are there step by step plans for this coffee table? I am a beginner and would love to make this!
In reply to Plans by llangan
Ana White
Wed, 03/23/2016 - 14:30
Plans here http://www
Plans here http://www.morelikehome.net/2012/02/rhyan-coffee-table.html