

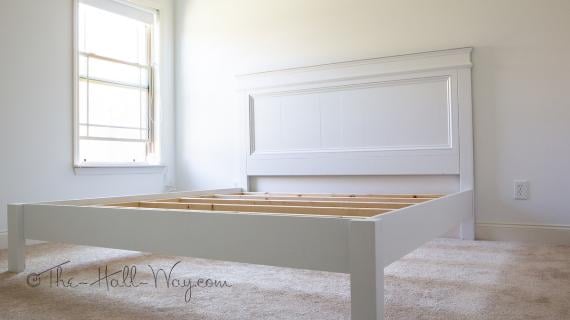
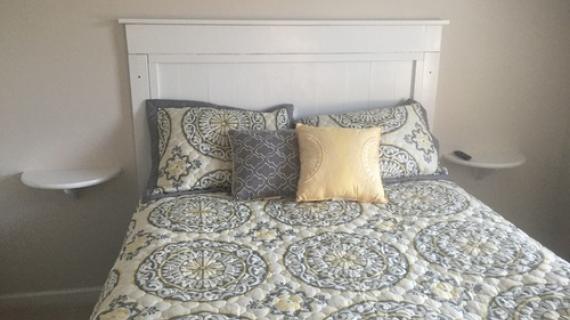
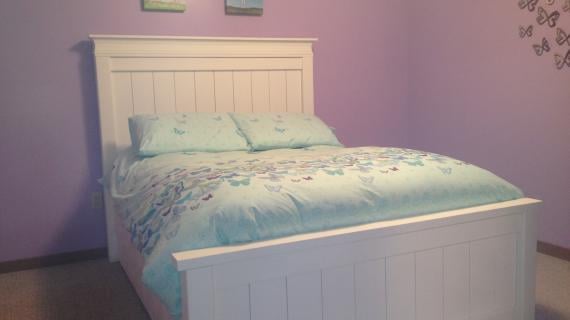
A fancier touch to the Farmhouse Bed. Features decorative moulding and no footboard. Very sturdy freestanding bed.
My mother has been asking for a bed for at least five years now. She's even offered to pay me to make her a bed.
And every year, I have intentions of making my mother a bed for her Birthday.
And every year, I don't get around to it in time.
But not this year.
Today is my Mom's Birthday, and here is the bed that we made for her.

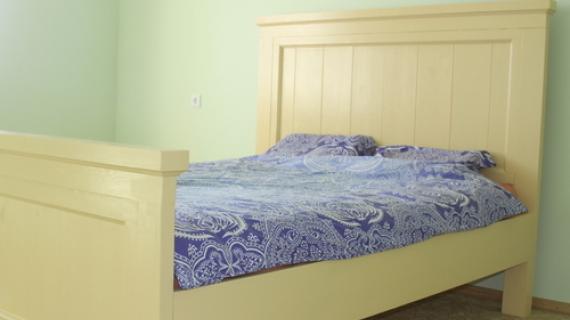
If the bed looks familiar, it's because my mom once commented that she liked Pottery Barn's Somerset Bed, but in White. Really pretty in a stain, eh? (for those of you who checked out the link)

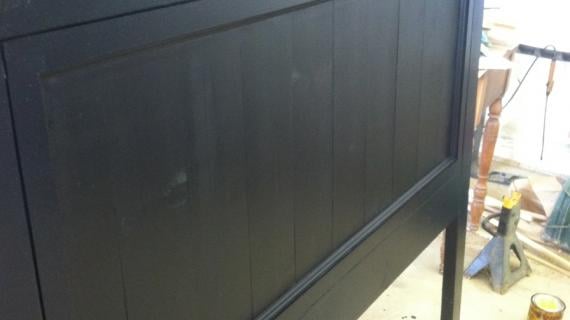
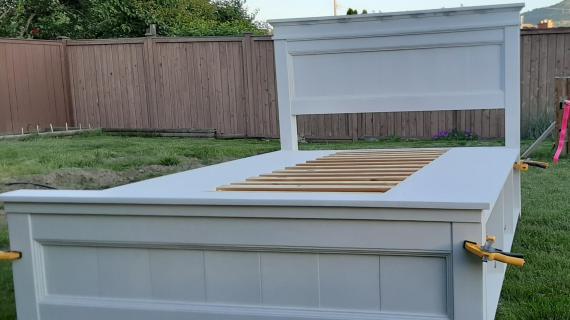
Painting this bed was quite easy in this nifty paint booth made of 2x2s and tarps (the Ram's invention) but making the decision to go through with painting it . . . not easy.

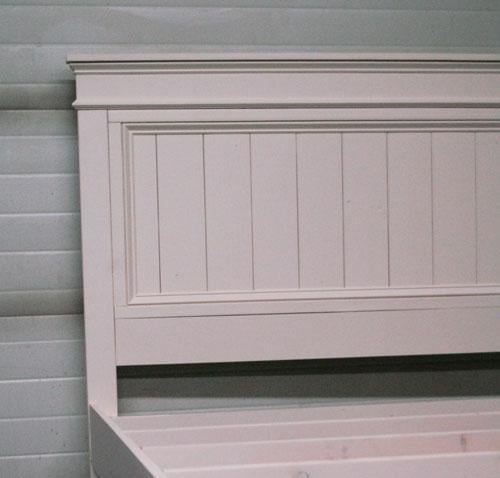
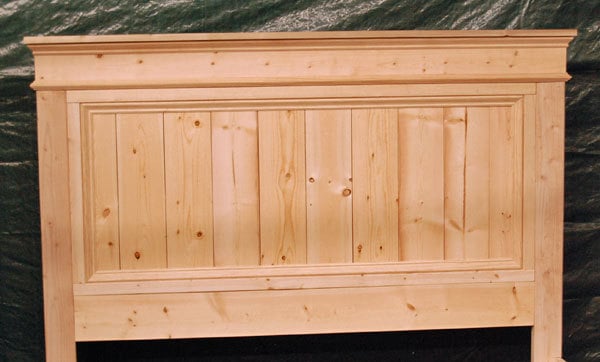
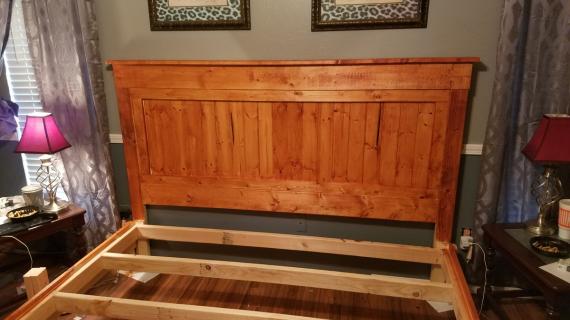
This is what the headboard looked like before any wood filler or sanding. And yes, those are stud grade 2x4s and 2x6s. Amazing how beautiful lumber can be.

And here is two coats of Antique White by Valspar, Flat Enamel, over primer. I'm still playing with the idea of distressing the edges ever so slightly to bring out the moulding in this bed. What would you do? We of course will need to add a final top coat.

The bed stands alone well with the frame secured to the headboard. We choose a 2x4 joist system which will get topped with plywood because we live in a very dry climate, and do not have to worry about mildew buildup in this particular application. Slats are recommended (or a box spring) for those of you who live in a humid climate, but nothing beats the sturdiness and quick setup of plywood.
If you are thinking this might be a cute Valentine's Day project, go for it. The Ram and I worked together on this bed, and we finished the headboard in about two hours. The most time consuming part was the moulding. Believe it or not, because we are nailgun-less the moulding is simply glued and clamped on - and it's not going anywhere. Unless the bed goes too, of course.
Preparation
3 – 1×6 @ 8 feet long
2 – 1×2 @ 8 feet long
2 – 2×6 @ stud or 8 foot length
8 – 2×4 @ stud or 8 foot length
1- 1×3 @ 8 foot length
1 – 1×8 @ 12 feet long
1 – 1×8 @ 8 feet long
1 – 2×2 @ 30″ long
2 1/2″ wood screws
3″ wood screws
1 1/4″ finish nails or wood screws
wood glue, wood filler, sandpaper (medium grit) and other finishing supplies
10 – 1×6 @ 24″ (Panel Boards – cut panel boards at 23 7/8″ to account for saw blade if you need to conserve boards)
2 – 1×2 @ 24″ (Side Trim for Panel – cut at 20 7/8″ if you cut your panel boards at 23 7/8″)
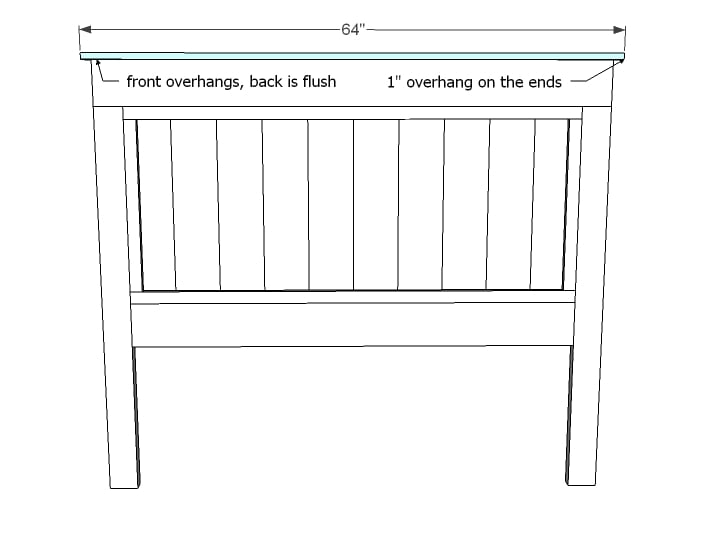
2 – 1×2 @ 55″ (Top/Bottom Panel Trim)
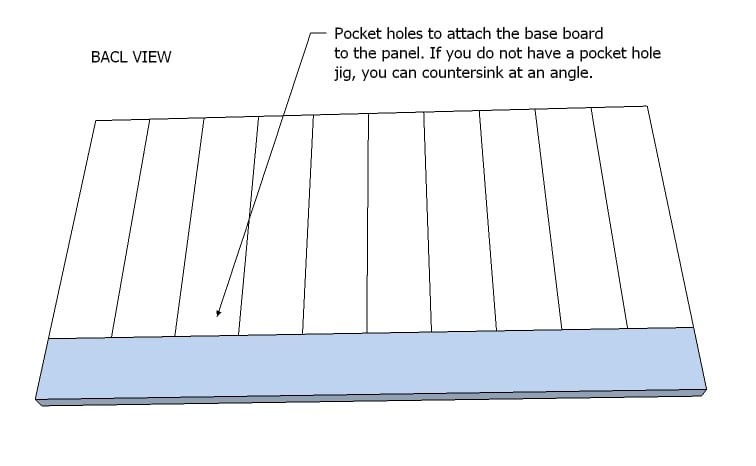
1 – 2×6 @ 55″ (Base of Panel)
2 – 2×4 @ 48″ (Legs)
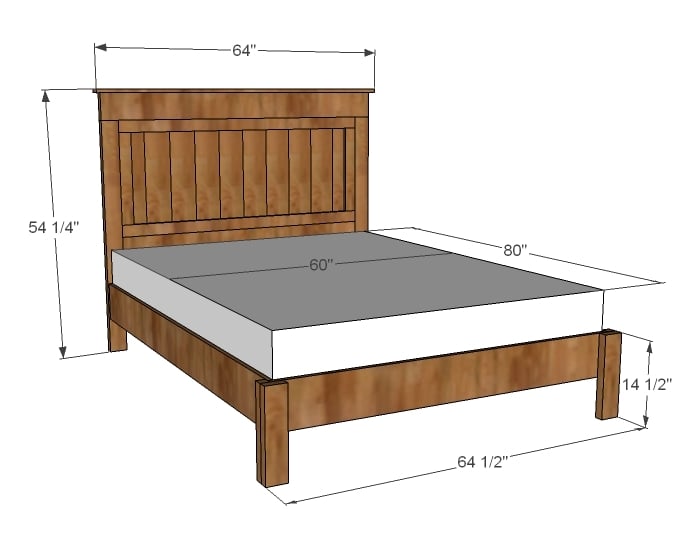
1 – 1×3 @ 64″ (Top of Headboard)
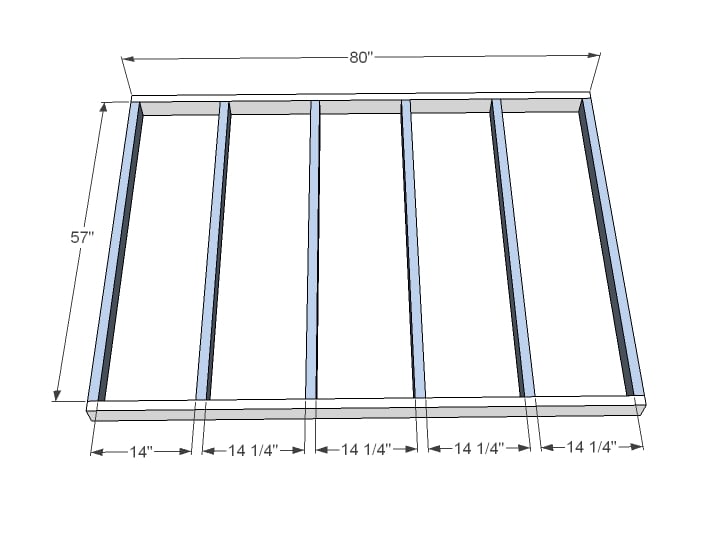
5 – 2×4 @ 57″ (Joists)
2 – 2×4 @ 80″ (Sides of Bed Frame)
2 – 1×8 @ 80″ (Siderails)
1 – 1×8 @ 61 1/2″ (Footrail)
2 – 2×2 @ 14 1/2″ (Legs)
2 – 2×4 @ 14 1/2″ (Legs)
Moulding
1 – 8′ Stick of Chair Rail like this one from Lowes (use this stick on the bottom tier of the headboard)
3 – 8′ Sticks of Base Cap like this from Lowes (use this type of moulding to trim panel and for the top tier on the headboard)


Instructions
Step 1
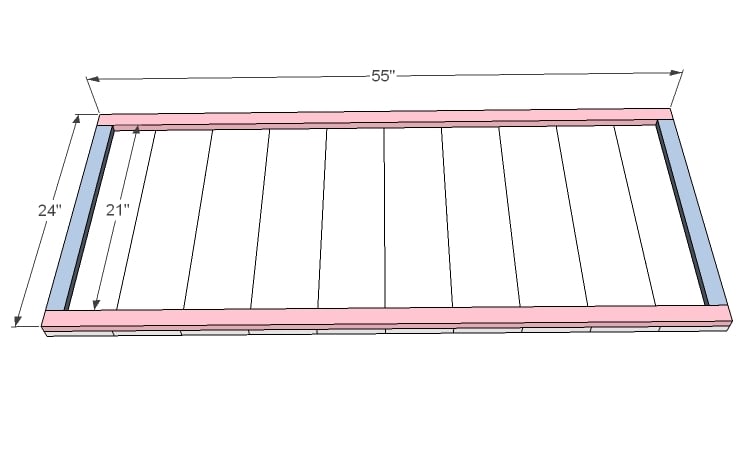
Build the Headboard Panel
If you have a finish nailer, it’ll be a two second job to attach the trim to the panel boards. Otherwise, screw from the back with 1 1/4″ screws to hide your screw holes. Use glue and adjust for square, squaring ends up. I used screws.
Step 2
Headboard Base
Now attach the base to the panel. You won’t need a ton of screws, so if you only have a countersink bit, you can carefully predrill holes at an angle. Use 2 1/2″ screws and wood glue. I thought about recommending brackets, but for the cost of the brackets, you could purchase a Kreg Jig™, so I scrapped that idea.
Step 3
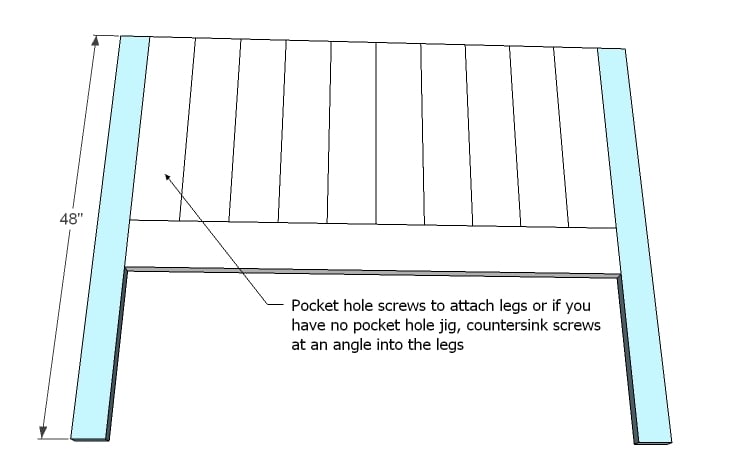
Attach the Legs to the Headboard Panel
Same as the base, attach the legs from back of the headboard
Step 4
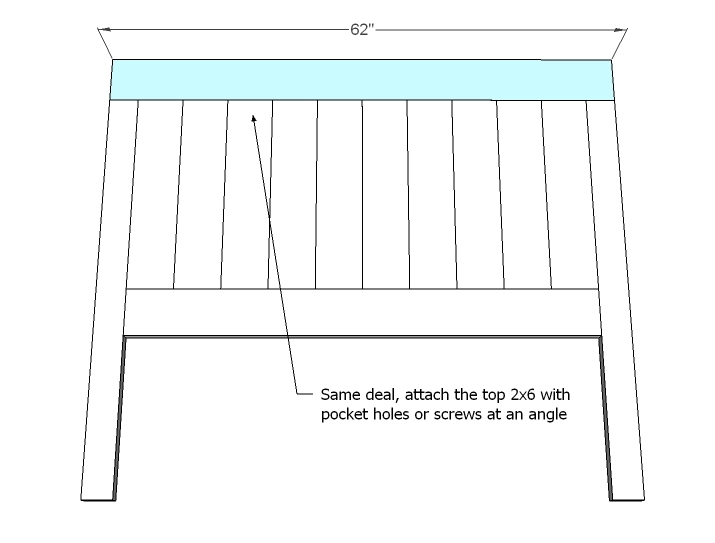
Headboard Top Panel
Now the top panel. If you are really nervous about trying what would be called “toenailing” if you were using nails (screwing at an angle) a scrap piece of 1/4″ plywood that covers the entire panel and overlaps the legs and top and bottom could do the trick too.
Step 5
Step 6
Moulding
This is the trickiest part, so definitely do some testing before you make your final cuts. All corners are at 45 degree angles. Use a miter box or a miter saw to carefully make your cuts. I did not give measurements here because you should fit your moulding perfectly to your bed rather than my measurements. If you have a finish nailer and 1″ finish nails, glue and nail in place. Otherwise, glue and clamp in place. Avoid letting glue dry on bare wood, as those areas will not accept stain.
Step 7
Bed Frame
There are many many ways to build a bed frame, but this is probably my favorite. We do live in a dry climate, so a plywood frame may make more sense for us than you. Make sure you check out our other bed frames if a plywood platform does not work for you. We simply screwed 2x4s together, just like you would to build a wall. Adjust for square. Use glue and 3″ screws countersunk.
Step 8
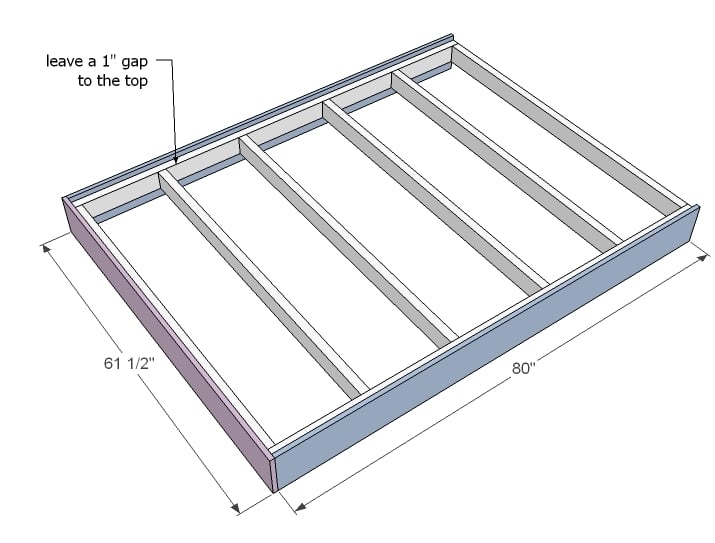
Siderails
Now these are your pretty boards. Either screw from the inside with 2″ screws and glue or use finish nails from the outsides.
Step 9
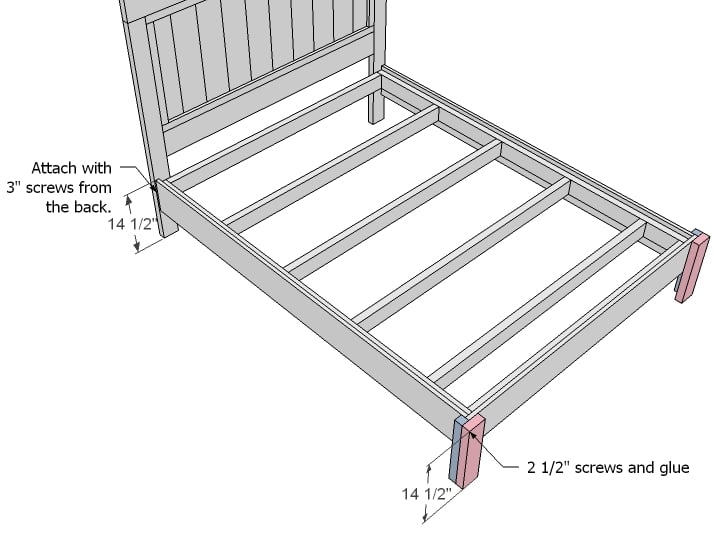
Legs and Assembly
Build your bottom legs as shown above and then attach to the bed frame, flush on top. Then mark the legs on the headboard at 14 1/2″ as shown in the diagram and predrill holes from the back of the headboard into the frame boards. Attach with 3″ screws and NO glue.
Step 10
Finishing
Fill any exposed holes or imperfections with wood filler and let dry. Apply a second coat if necessary. Sand with medium grit sandpaper in the direction of the wood. Vacuum and wipe clean. Prime and paint or stain as desired. For use without a box spring, you will need to add plywood on top of the bed frame or wood slats.

Comments
Leah (not verified)
Tue, 02/08/2011 - 21:45
I really love this!!! Happy
I really love this!!! Happy Birthday to your Mom, she will love your present!!!
(& if not... I can get to DJ in hours, I'll take it off her hands! Lol!) Seriously though, this is a great gift. =)
Betsy Wilson (not verified)
Tue, 02/08/2011 - 21:50
A very Happy Birthday it will
A very Happy Birthday it will be for your Mom!! Beautiful Job. I love it in white.
Tiffany (not verified)
Tue, 02/08/2011 - 22:57
I L.O.V.E. this bed! I'm now
I L.O.V.E. this bed! I'm now debating between this one and the farmhouse bed. How hard would it be to add a foot board to this? It's beautiful!
Amber (not verified)
Wed, 02/09/2011 - 01:17
EEkkkk...LOVE this bed. We
EEkkkk...LOVE this bed. We are planning to build the farmhouse bed in Cal. King this spring.....but this would fit our space much better! Any chances I can get measurements for Cal. King size???? Pretty please :)
Gwenevere (not verified)
Wed, 02/09/2011 - 01:51
That moulding finishes the
That moulding finishes the headboard beautifully. I didn't know the farmhouse bed could be improved...I should have known better.
Traci (not verified)
Wed, 02/09/2011 - 02:03
This plan is perfect for
This plan is perfect for someone wanting the Farmhouse look, but in a small room! Footboards tend to overwhelm a small space, as does a high bed. This is the perfect in-between! It also allows you to show off a beautiful comforter, quilt, or duvet. Thanks for posting!
Dianne (not verified)
Wed, 02/09/2011 - 02:07
This is gorgeous! What a
This is gorgeous! What a wonderful gift for your mom! I agree with Gwenevere...the moulding makes the bed. (haha no pun intended) :)
Heather (not verified)
Wed, 02/09/2011 - 02:57
Gorgeous! Your mom is going
Gorgeous! Your mom is going to love it!
Whitney (not verified)
Wed, 02/09/2011 - 02:57
AH! Freaking love it! Big
AH! Freaking love it! Big WOW!
Jaci (not verified)
Wed, 02/09/2011 - 02:58
What a wonderful gift, Anna.
What a wonderful gift, Anna. Happy Birthday, Anna's Mom!
Looking forward to spring when I can excavate my garage and get to work on all the plans I've marked. Got my jig for Christmas...I'm ready! Thanks for the inspiration.
peever (not verified)
Wed, 02/09/2011 - 03:16
What'a nice present! I'll
What'a nice present! I'll take that in a twin, please! :)
Jeanette (not verified)
Wed, 02/09/2011 - 03:23
I love it! Do you know how
I love it! Do you know how much the measurements would need to be increased for a king size?
Kisha (not verified)
Wed, 02/09/2011 - 03:23
My husband, who builds arched
My husband, who builds arched top mandolins as a hobby--and by the way, do you have any idea how hard it is to build furniture with someone who is accustomed to perfection to one hundredth of an inch?--is always telling me that nails are cheating anyway, and that a properly clamped glue joint is much stronger than nails anyway. And that is why the headboard that we've been "working on" for months for our daughter's room is also glued only. That doesn't have anything to do with why it's taking us months, though. That's just because we started remodeling the bathroom instead of working on it. :) We really need to get back on that, now that I think about it. :)
Beautiful bed!
Cakelady (not verified)
Wed, 02/09/2011 - 03:50
That is gorgeous. Don't show
That is gorgeous. Don't show it to my DH. I am in the middle of making the Fh Bed with Arch. He might demand this instead!
Thanks for sharing!
Jennifer (not verified)
Wed, 02/09/2011 - 04:03
Its Perfect! LOVE it!
Its Perfect! LOVE it!
Elizabeth (not verified)
Wed, 02/09/2011 - 04:12
What a beautiful bed!!
What a beautiful bed!!
Nan Tovar (not verified)
Wed, 02/09/2011 - 04:26
Awww, that's so nice!
Awww, that's so nice! Wonderful bed, Ana!
Happy Birthday, Ana's Mom :)
Will have to post the headboard my hubs made,
we feel like grownups, we have a headboard :)
Kevin M (not verified)
Wed, 02/09/2011 - 05:06
Beautiful work, Ana. I wonder
Beautiful work, Ana. I wonder - could you add lag bolts instead of screws to attach the frame to the headboard for easier reassembly in case of a move?
Heather (not verified)
Wed, 02/09/2011 - 05:09
What an amazing bed!! I want
What an amazing bed!! I want one for myself!
Jamie M. (not verified)
Wed, 02/09/2011 - 05:32
I have been looking for the
I have been looking for the perfect bed for my 8 year old and I think this is it!! Although I would love this in King Size so I could make it for me :).
Happy Birthday to your Mom!!
Lana (not verified)
Wed, 02/09/2011 - 06:11
Love it!!!! And your Mom
Love it!!!! And your Mom will too!!
I totally think you should distress it...but I would do that to anything that stands still long enough!
Jenn Hoff (not verified)
Wed, 02/09/2011 - 06:54
Holy cow! This is gorgeous!
Holy cow! This is gorgeous! Your mother is sure to love it.
Ok, this is a little off-topic, but may I just say how beautiful you are? I've been reading through some old posts and you don't seem to get that! It's weird, I have two friends from Alaska who also drop-dead gorgeous, and they didn't realize it, either. The whole state must just be chock-full of good looks and talent for you all to feel that way! Guess it keeps you humble, though. :) Anyway, I think you're lovely.
And I love this headboard!
Donna (not verified)
Wed, 02/09/2011 - 06:58
This is beautiful!!! My next
This is beautiful!!! My next project.
Shani (not verified)
Wed, 02/09/2011 - 07:07
SO GORGEOUS! I love the
SO GORGEOUS! I love the moulding. Now I'm itching to do this bed for my daughter instead of working on all the other projects I already have on the go.
MarlaAndWilliam (not verified)
Wed, 02/09/2011 - 08:03
I don't like distressing
I don't like distressing white furniture - it makes it look too "country" for my taste... fresh crisp white is so much more modern. I would leave it as-is!
bhoppy (not verified)
Wed, 02/09/2011 - 08:08
What a beautiful bed! I bet
What a beautiful bed! I bet your mom will cry:-)
Annalea (not verified)
Wed, 02/09/2011 - 08:50
No way. I was just looking
No way. I was just looking at this bed in the PB catalog, and trying to figure out how to build it! lol Hooray for your Mom getting a beautiful bed for her birthday, and hooray for posting the plans so I can build one. :o) Thank you!
Kim Breier (not verified)
Wed, 02/09/2011 - 08:56
Oooh, LOVE THIS! How about
Oooh, LOVE THIS! How about some nightstands and dresser? :)
shelley (not verified)
Wed, 02/09/2011 - 09:20
Sooo, Beautiful! Your mom
Sooo, Beautiful! Your mom is going to be so happy! Please, please, please, could you explain how to modify plans to a king and a twin size? Pretty please?
Sarah (not verified)
Wed, 02/09/2011 - 10:03
LOVE this!!! Truly, I'm in
LOVE this!!! Truly, I'm in love! I'd been planning to make a Farmhouse Bed, but will do this version instead.
Question, though...why would you have to lay plywood over the slats in order to use the box springs? Could you not lay your box springs and mattress on top of those slats?
Thanks for all you do, Ana!!
Astyn (not verified)
Wed, 02/09/2011 - 10:43
I second the previous
I second the previous comments. King please?
Thanks for sharing, your mom will love it.
Leslie (not verified)
Wed, 02/09/2011 - 11:05
THIRD!!! (on the king sized
THIRD!!! (on the king sized dimensions.) I'm so excited, this bed is beautiful and exactly what I want.
Denise (not verified)
Wed, 02/09/2011 - 11:26
So do you need to put a sheet
So do you need to put a sheet of plywood over this bed frame, or can you just put a mattress right over it?
By the way, I'm a first time commenter, and I would like to just say that I love your blog, and I plan to build a bed soon, I just need to decide which :-)
Lia (not verified)
Wed, 02/09/2011 - 13:20
Your mom and I have the same
Your mom and I have the same birthday! That's exciting! I love this bed!
Theresa (not verified)
Wed, 02/09/2011 - 14:51
Just Beautiful. I love the
Just Beautiful. I love the white. I wouldnt distress it. Every bed you make gets better and better. I need one but cant decided which one I want. Make our day and post a photo of Moms happy face. She is going to LOVE this.
spiceylg (not verified)
Wed, 02/09/2011 - 16:02
I lost my Mom years ago, so
I lost my Mom years ago, so I'm so glad you made the time for this precious birthday present. Happy birthday to your Mom, it's beautiful!
alison (not verified)
Wed, 02/09/2011 - 17:29
Happy Birthday to your mom!
Happy Birthday to your mom! What a beautiful bed.
I confess I read "two coats of Antique Whilte" as "Ana White" and thought they named a paint after you for just a second and was THRILLED.
Long time lurker, first time commenter: I have rubbed my hands together and mouth-breathed at the screen here so many times. We're in the midst of rebuilding after a fire, living in a rental, without ANY tools. I was just getting my courage up to try a simple project before my life got turned upside down.
I love the site and how you have lit the fire (in a good way!) of so many people and helped them to create things they never would have tried. I can't wait to make my first bookcase.
Amanda H. (not verified)
Wed, 02/09/2011 - 18:58
Happy Birthday to your mom!
Happy Birthday to your mom!
This is PERFECT for my space. I actually squealed when I saw the it. I would like to be added to the list of "king me please" plan seekers. Thank you for all you do!
Anneke (not verified)
Wed, 02/09/2011 - 19:52
I am SO excited!!! I love
I am SO excited!!! I love PB's Farmhouse Canopy, but for some reason the plans here didn't seem formal enough for our room. This is perfect!!! My plan would be to make this king size with a matching footboard and canopy stained very dark espresso or black. I need to post our girl's beds we FINALLY just finished (SO happy with the end result!) and start thinking about doing this bed before getting into summer projects...raised garden beds and hello chaise lounge! (maybe a play house too.....too many on my to-do list!). Thanks Ana and Happy Birthday to your mom!
Marnie (not verified)
Wed, 02/09/2011 - 21:01
The bed is stunning!
The bed is stunning! Congratulations and Happy Birthday to your Mom. I think we share a birthday, Feb. 9th.
IPlayOutsideTheBox (not verified)
Thu, 02/10/2011 - 03:10
........and my 'to-do list'
........and my 'to-do list' grows on!!! Beautiful!
orangesugar (not verified)
Fri, 02/11/2011 - 04:17
That is such a pretty bed.
That is such a pretty bed. Any chance you could share about your spray booth? We are spraying furniture in the basement and just hung plastic everywhere.
Sabrina (not verified)
Fri, 02/11/2011 - 12:53
Here's another request to add
Here's another request to add a Cal-King version of this bed, please!
nicole (not verified)
Mon, 02/14/2011 - 04:27
I too, would like the plan
I too, would like the plan for a king size bed!!!!!! I can't wait to add this to my bedroom.
Dixisue (not verified)
Fri, 02/25/2011 - 06:12
Hello Ana, Just found your
Hello Ana,
Just found your website and love it! Happy belated birthday to your mom, I am sure she loves her new bed!
I was also wondering if you have the conversion for the king sized bed as well. Do you think using spruce would be alright to use for this piece?
Thanks a ton and keep up the awesome work!
Gina Britt (not verified)
Sat, 02/26/2011 - 04:03
This is to Whitney, I know
This is to Whitney, I know you from Naples.......if anyone knows her please forward this message, we were good friends.
Gina Britt
Anneke (not verified)
Sat, 02/26/2011 - 22:37
I am going to build this in a
I am going to build this in a king size but I am wondering how far to take the moulding. Does is go all around the back??? Just to the sides??? Or something like "fake wrapping" around the edges??? I hope that makes sense. Just looking for suggestions while being cost concious! :-)
Melissa (not verified)
Sun, 03/06/2011 - 09:57
Hi Ana, I am looking to
Hi Ana,
I am looking to make a daybed for our home office and came across this style.
I am hoping you could help me modify this style into a daybed? I would like to have the back of the bed higher than the sides (if that makes sense!)... I am trying to conver this myself but not doing so good!
Thanks
Melissa
Christa (not verified)
Tue, 03/08/2011 - 06:00
I'm going to get the lumber
I'm going to get the lumber for the queen farmhouse bed today and am pretty set on making it. I do however, love this. I wonder if I can just add the molding the original farmhouse bed plans and get relatively the same look? I will investigate!
Midori (not verified)
Sat, 03/12/2011 - 08:35
Ana - This bed is so amazing
Ana - This bed is so amazing and beautiful!! My husband and I have been looking for plans for a bed like this for our bedroom. Do you happen to have the dimensions for a California King listed somewhere on your site?