
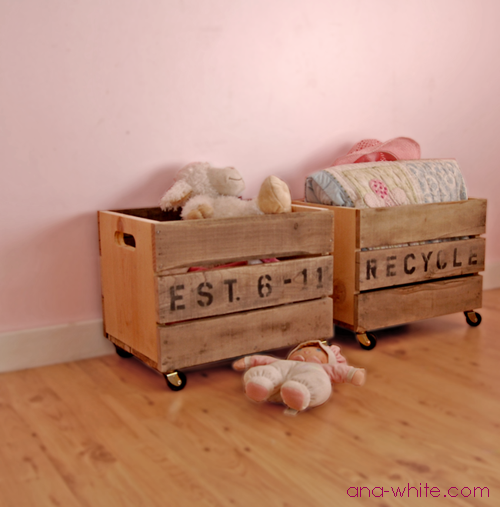

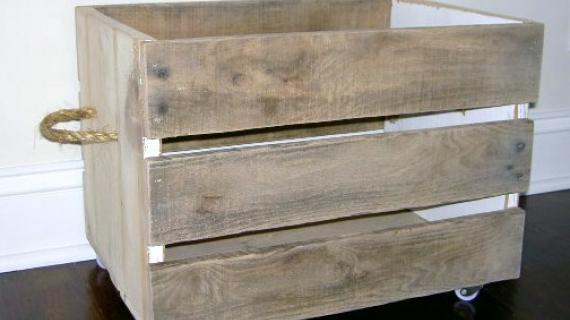
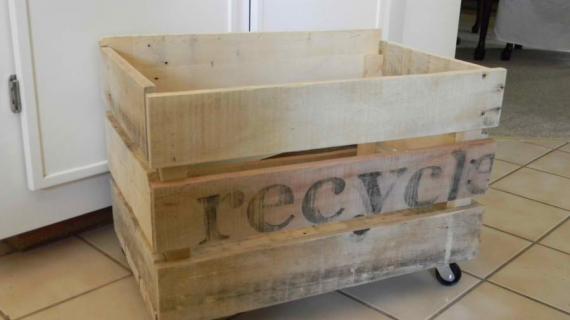
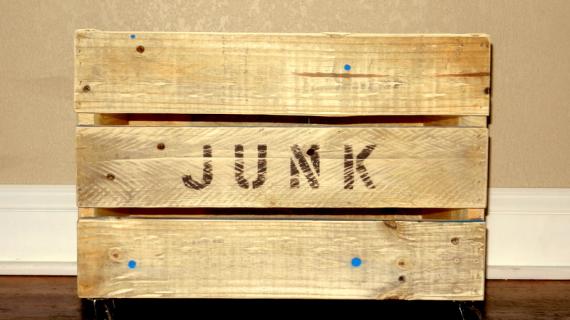
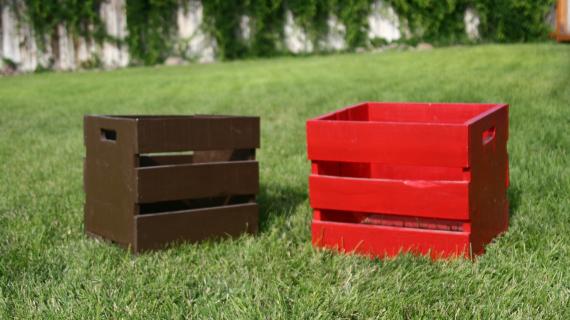
Build wood crates on wheels - to add extra storage in a mudroom, under tables or consoles, or just as beautiful storage. These easy to build wood crates on wheels are sturdy and durable. Free plans with diagrams, lots of reader submitted photos and more from Ana-White.com
Related: Wood Crate Building Guide
Preparation
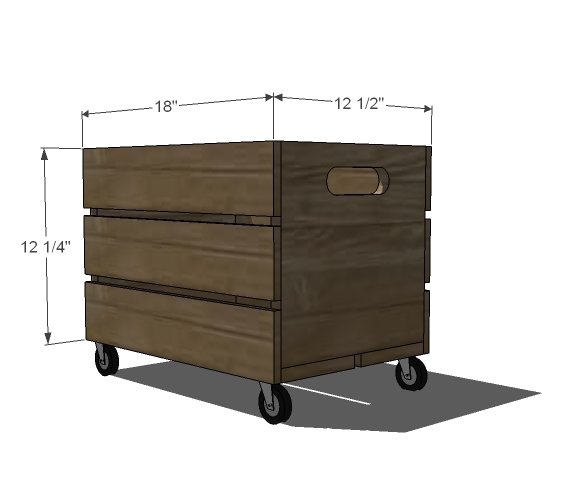
Shopping List for ONE Rolling Wood Crate
- 1 - 1x12 @ 2 feet long
- 1 - 1x6 @ 3 feet long
- 1 - 1x4 @ 6 feet long
- 2" self tapping star bit screws
- wood glue
- 4 caster wheels with 3/4" long screws
- 2 – 1×12 @ 11 1/2″
- 2 – 1×6 @ 18″
- 6 – 1×4 @ 18″


Instructions
Step 1
Preparation
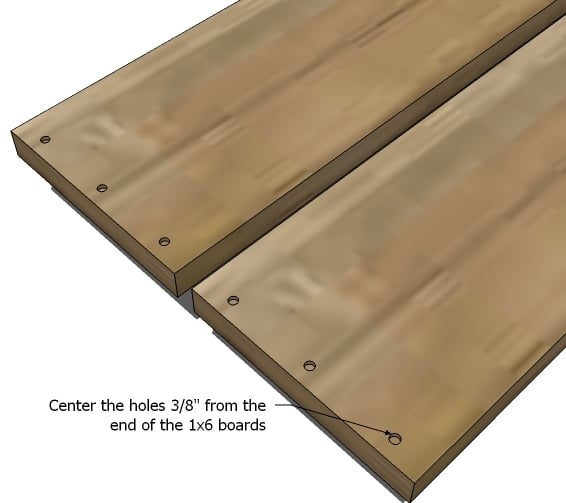
If you have a pallet, follow the instructions in this post to reclaim the boards. Otherwise, cut all of your boards. Drill holes on the ends of the 1x6s, two per end, with a countersink bit.
Step 2
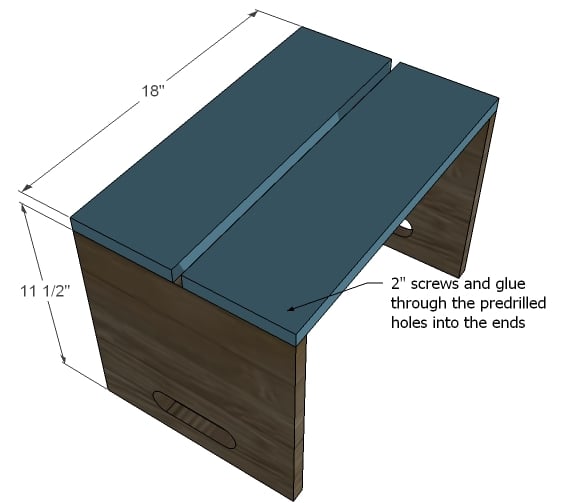
Build the Bottom and Ends
Insert screws into holes. Apply glue to the joint. Screw the bottom boards to the sides, keeping the outside flush.
Step 3
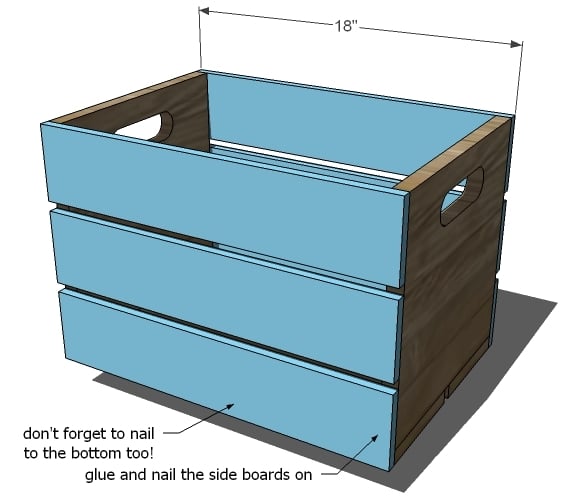
Sides
Apply glue to the edges of the bottom and ends. Be careful not to apply glue in the spaces between the side boards, as glue will not take stain. Use 2″ nails and glue to nail the side boards on.
Step 4

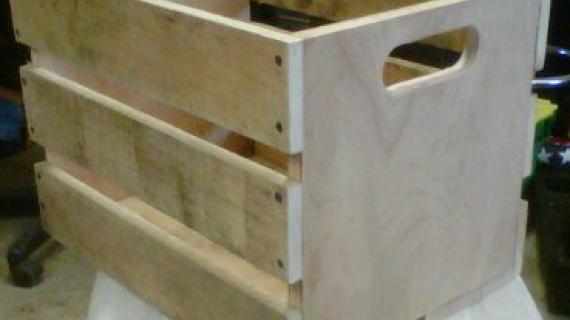
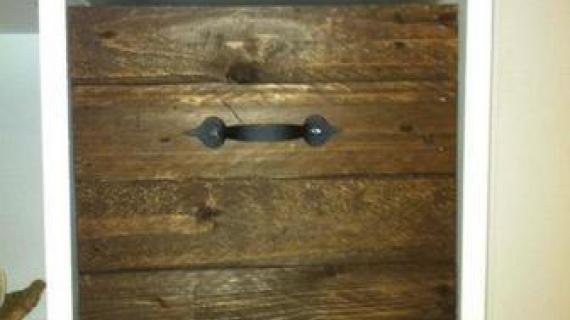
Handles
Mark then ends as shown above. Then drill holes with the 1 1/2″ spade bit on center with the marks. Cut between the marks with a saw to create handles.
Step 5
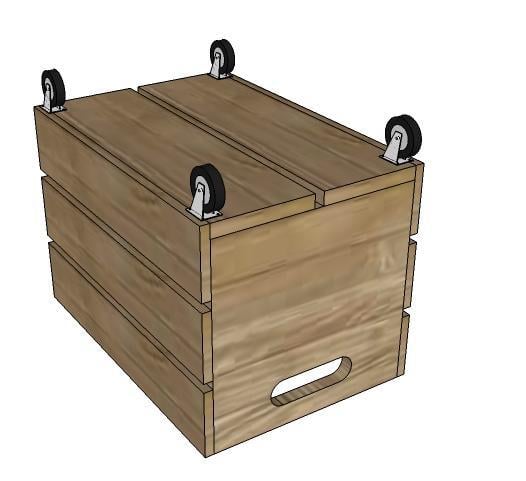
Attach caster wheels to base with 3/4" screws.


Comments
Ana White (not verified)
Mon, 09/13/2010 - 16:53
Just wanted to comment that
Just wanted to comment that my crates are actually unfinished. After being so nervous about the stencils, then totally ooopsing there, I'm terrified to ruin the beauty of these with a finish.
KD (not verified)
Mon, 09/13/2010 - 16:56
love it. It's funny, that's
love it. It's funny, that's what my husband and I had inscribed on our wedding rings (Established 2002)
Melissa (not verified)
Mon, 09/13/2010 - 17:47
Any suggestions where to
Any suggestions where to acquire some free pallets in/near Fairbanks or North Pole area? I really want to make some of these :)
Ana White (not verified)
Mon, 09/13/2010 - 18:05
Hi Melissa, getting pallets
Hi Melissa, getting pallets should be super easy to do as so much is imported to Alaska on pallets, but very little leaves Alaska on pallets. Try calling warehouses, stores, and asking at shipping companies. Even using broken pallets would work for this project.
Parri (not verified)
Mon, 09/13/2010 - 19:09
need to make one of these for
need to make one of these for the workshop to hold all the little wood scraps!
lyndyjo (not verified)
Tue, 09/14/2010 - 02:56
Love these! I do see the
Love these! I do see the bumper car danger. My youngest is just starting to walk and he would love one of these to push around :)
chrisandpatience (not verified)
Tue, 09/14/2010 - 08:10
I just picked up 3 amazing
I just picked up 3 amazing pallets. Thank you Ana, for making me a wood working junkie. Can't wait to show you my creations.
HammerTime (not verified)
Tue, 09/14/2010 - 08:11
How cool! I can just see a
How cool! I can just see a little handle on one side to pull it...
megnstuff (not verified)
Tue, 09/14/2010 - 09:07
I am building these for my
I am building these for my basement/playroom/family room area. I love them. My boys will love to play in them and they just might even love putting their toys away in them!
I can't wait to make these. I promise to post pics as soon as we get them done!
fawnjenee (not verified)
Tue, 09/14/2010 - 15:01
These are fantastic. I bet
These are fantastic. I bet they are going to be everywhere. Can't wait for the bragging board on this one!
lwooters (not verified)
Wed, 09/15/2010 - 04:39
absolutely in LOVE with
absolutely in LOVE with these! sending the hubby out today to do some pallet swiping! I'm thinking scraps in the woodshop would go perfectly in here. Ever think about doing plans for something like this? http://www.callingalldogs.com/encloseddogbedcatlitterbox.aspx for those of us with furry friends?
Cath (not verified)
Wed, 09/15/2010 - 22:21
Oh gosh I love this! Any idea
Oh gosh I love this! Any idea in a purpose for them in a college dorm room? I think this is beautiful but I'm not sure it'd be useful for me :P
AmyLynn (not verified)
Thu, 09/16/2010 - 08:27
So many ideas for places to
So many ideas for places to put these! This is going to be a fabulous trash can in my craft room, three wonderful recycle bins (paper, plastic & glass) in my mudroom, a bin to store the kids' (cats') blankets and toys in their play room, a perfect place to throw all my little 'building blocks' that our nieces and nephews play with when they come over...the possibilities are endless! What a fabulous idea. A while ago, a barn collapsed at my dad's house and I've been trying to think of things to do with the wood from that. A reclaimed wood headboard is on the list, but do you have any idea how many of these I'll be able to make with a barn? I'm so excited!!!!
Stacking Cubes… (not verified)
Thu, 09/16/2010 - 08:32
[...] Measure and cut the
[...] Measure and cut the handles out with a jigsaw. Prefer a rounded corner on the handles? Visit this post for instructions on how to do that. Just make sure the top of the handle is at least 1 1/2″ from the [...]
AmyLynn (not verified)
Thu, 09/16/2010 - 08:43
YES!!! I think I'm going to
YES!!! I think I'm going to have to try to find a plan to alter into this!
AmyLynn (not verified)
Thu, 09/16/2010 - 08:45
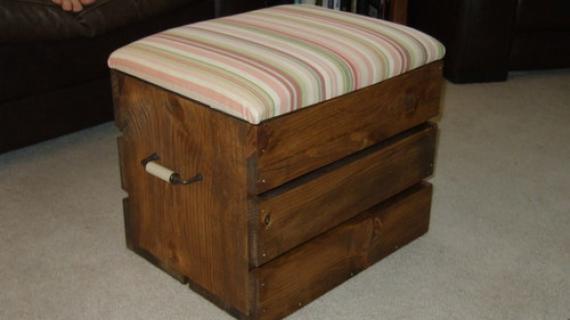
You could add a simple lid
You could add a simple lid and use it as an ottoman.
lwooters (not verified)
Thu, 09/16/2010 - 10:03
AmyLynn, do you have a blog?
AmyLynn, do you have a blog? I want to see!
AmyLynn (not verified)
Thu, 09/16/2010 - 15:46
I don't have a blog...I've
I don't have a blog...I've been contemplating starting one though. If I do, I'll let you know.
Letter Lady (not verified)
Sat, 11/06/2010 - 17:31
Thanks again Ana for your
Thanks again Ana for your inspiration. I've been collecting pallets for some time now to make little stools and thought I try this crate - turned out great. I can't figure out how to attach a photo so here's the link to my blog post. You really are amazing with your ideas - please keep up the great work. Thanks Jaime
http://thatsmyletter.blogspot.com/2010/11/c-is-for-crate.html
Lacy (not verified)
Fri, 11/12/2010 - 15:35
Thanks so much!! I just made
Thanks so much!! I just made my first crate . It is also the first thing I've made from your site (which i love)!!
Build Your Own… (not verified)
Sun, 11/14/2010 - 21:37
[...] And by the time we were
[...] And by the time we were done, both Lydia and I were making plans to build our own sofas. Also pictured reclaimed wood carts. [...]
Storage Star ~… (not verified)
Wed, 11/17/2010 - 06:55
[...] Vintage Crate Carts
[...] Vintage Crate Carts [...]
Can it be spri… (not verified)
Mon, 11/22/2010 - 16:07
[...] Project # 2: Basic
[...] Project # 2: Basic Vintage Crate Toy Boxes [...]
DIY Classic To… (not verified)
Mon, 11/22/2010 - 22:19
[...] Our vintage crate carts
[...] Our vintage crate carts were handy, so we just traced the holes in the ends, drilled holes and cut out the handles with a jig saw. You can see exactly how that is done in this post. [...]
Taron (not verified)
Sun, 11/28/2010 - 19:50
I just wanted to start off by
I just wanted to start off by saying how much i like this idea. As I was searching the web for more ideas, i came across an article about repurposing old pallets and I thought I'd pass it on. Apparently there is some danger in using the pallets. Hope this is helpful.
http://www.poetichome.com/2010/08/30/toxic-exposure-the-danger-of-repur…
Beautifully FR… (not verified)
Thu, 12/09/2010 - 10:20
[...] is no end to the amount
[...] is no end to the amount of things that I am constantly trying to organize and manage. This “box“ made from pallets gave me the nudge to get my saw and safety glasses and go out to the [...]
The Crate Tren… (not verified)
Fri, 12/10/2010 - 02:14
[...] Another homeowner who
[...] Another homeowner who chose the DIY route is Ana White who happens to have a hammer on her hip for this tutorial. I love her crates that she has handmade shown above. Great work! Learn more here. [...]
The Crate Tren… (not verified)
Sat, 12/11/2010 - 04:12
[...] Another homeowner who
[...] Another homeowner who chose the DIY route is Ana White who happens to have a hammer on her hip for this tutorial. I love her crates that she has handmade shown above. Great work! Learn more here. [...]
Build a Kids L… (not verified)
Tue, 12/28/2010 - 22:05
[...] If you want, you can
[...] If you want, you can add handles and round the corners. The handles are actually quite useful if you want to transport the shelf (I did from the garage to the house and found them much more than just decorative). Corners are rounded 2″ down and 2″ in from the outside corners with a jigsaw. To cut a handle, please read these instructions. [...]
Nancy Saller (not verified)
Wed, 12/29/2010 - 08:41
I have a great deal of
I have a great deal of confidence in my sewing room but the garage belongs to my husband. I sure do admire your projects though! Maybe someday I'll try some of them. Thanks so much for your shared talent!
Christina G. (not verified)
Wed, 01/19/2011 - 18:20
Hey Anna, im so excited
Hey Anna,
im so excited about your site, and cant wait to get my project on... i have found so many things on your site that i can not wait to get into my house (1st) and start building some great stuff... thanks SO much.
i do have a question, some of the plans that i have tried to save as a PDF for future quick reference they come up blank... is there another place i can find them? Thanks again... your the super best
Christina G. (not verified)
Wed, 01/19/2011 - 18:23
oops totally spelled your
oops totally spelled your name wrong... SO SORRY!!! please forgive me...
$150 storage sofa « (not verified)
Thu, 01/20/2011 - 18:45
[...] And by the time we were
[...] And by the time we were done, both Lydia and I were making plans to build our own sofas. Also pictured reclaimed wood carts. [...]
Rustic Crate S… (not verified)
Mon, 02/07/2011 - 05:03
[...] to find any of the cool
[...] to find any of the cool storage crates around my area, so – what to do?!?! After finding a crate made from pallet board on Ana White’s website – I knew I could make my [...]
Sky (not verified)
Thu, 02/17/2011 - 13:04
ok i have called costco,
ok i have called costco, walmart, and target, non of which will give me any pallets. some say they send them back to the distributor and some say they recycle them and another says they just dont give them away and hung up before i could say "i'll buy them" any other thoughts on where to acquire some!
joeyh
Wed, 10/29/2014 - 07:51
pallets
I get my pallets from a printing company they always have alot of them, commercial printing companies.
Jesse Bailey (not verified)
Tue, 03/01/2011 - 10:47
Sky, look on craigslist.com.
Sky, look on craigslist.com. Don't try major retailers -- your chances are better with smaller places that think it is a pain to deal with the pallets.
Sincerely,
Jesse
MrsD2008
Tue, 04/19/2011 - 08:13
Hoping...
I am hoping I can start this project this weekend! I will need my husbands help learning how to use the tools (this will be my first attempt at building anything) so I am hoping he lets me hang out in the garage and actually use his tools. But, when I told him about it, he said he needed to work on the truck so it could be inspected on Monday (the 25th) because it's due by the end of the month......not that he could have been doing that during his three day weekend or anything...men!
Anyway--mine are going to be for dog toys. One will say one dogs name and the other will say the other doggies name! And, I would like to paint mine to match my living room (vision), especially if I end up using regular wood instead of a pallet.
Question: I have never stained anything and I am nervous about that. So I think I am going to paint these. My brain says paint THEN stencil dogs names. I would want the crates to be a chocolate brown and the stenciled names would be either a lighter brown or off white. Is my brain correct?
Harry (not verified)
Wed, 02/29/2012 - 09:08
Love your blog
I have been looking around for crates to be used as props, and stumbled into your blog. I love it and can't stop reading it. Thank you for sharing everything.
jRoxDesigns (not verified)
Wed, 09/12/2012 - 19:05
I featured your project on my blog today!
I LOVE your toy bin! I just picked up some wooden crates and have been looking for some ideas to turn them into toy storage and your post has given me the perfect inspiration. I wrote about your crates on my blog today for Inspiration Wednesday. I'd love for you to stop by sometime!
http://jroxdesigns.wordpress.com/2012/09/12/toy-crate-storage-inspirati…
- Amber @jRoxDesigns
javaspaces
Sun, 06/14/2020 - 21:25
Missing Images
Hi Ana, for whatever reason, the first 4 images of this project seem to be missing and the browser is displaying an error when I try to click on them. Could you see what might be the problem?