

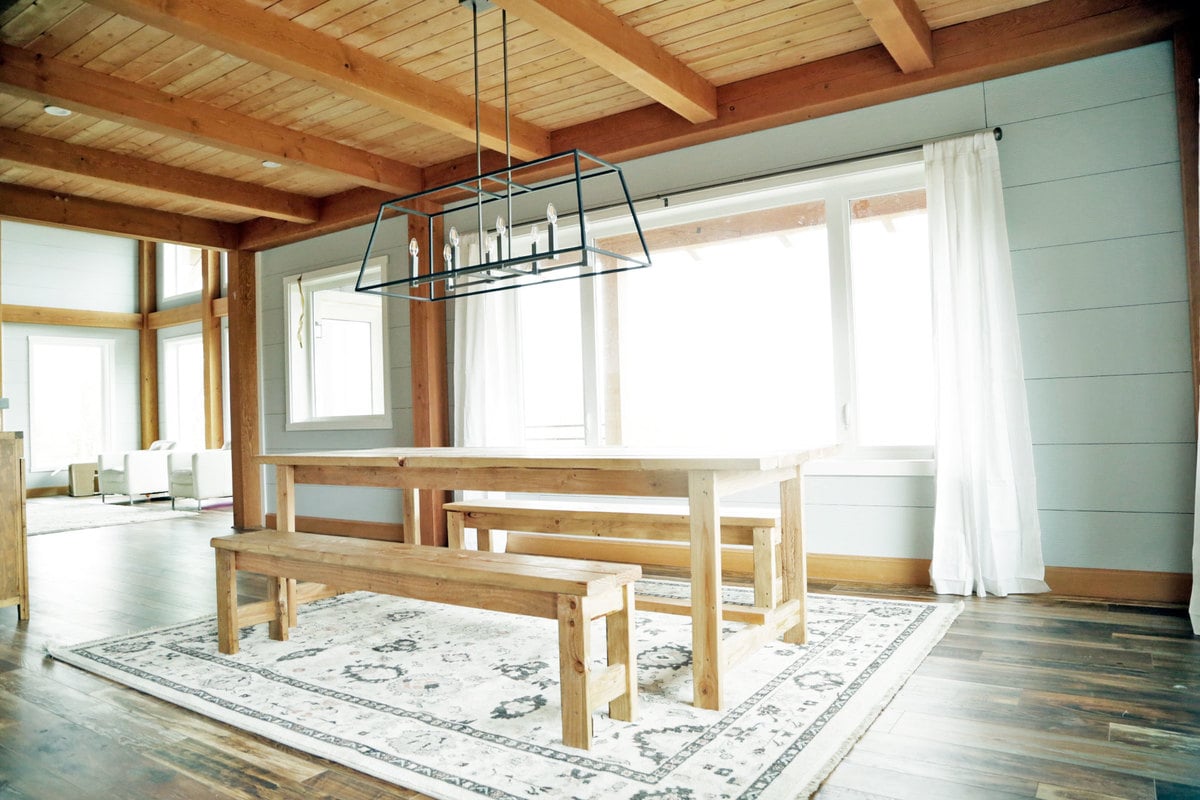
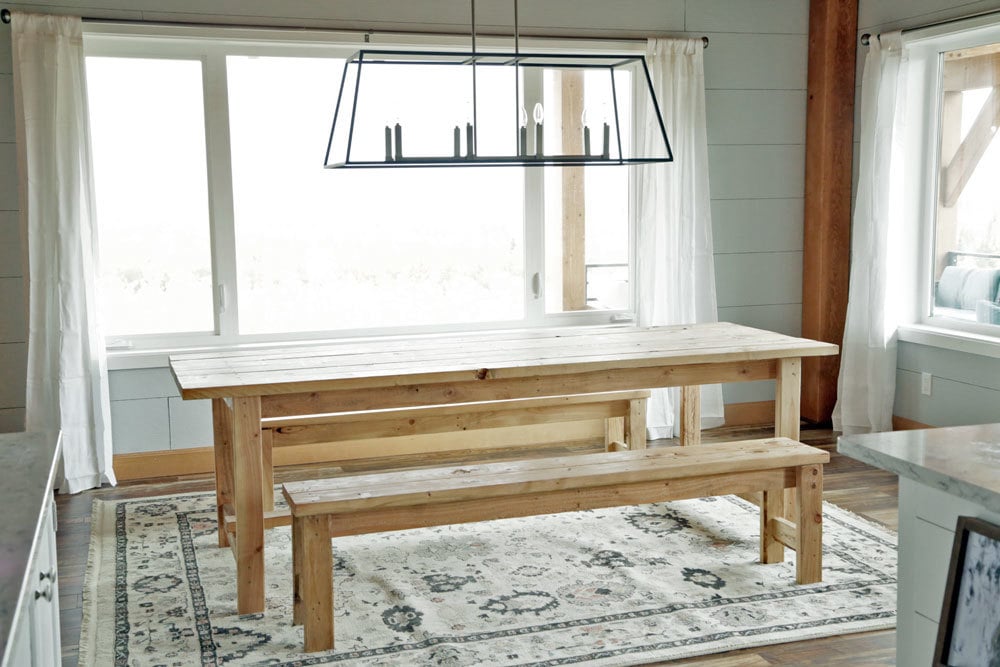
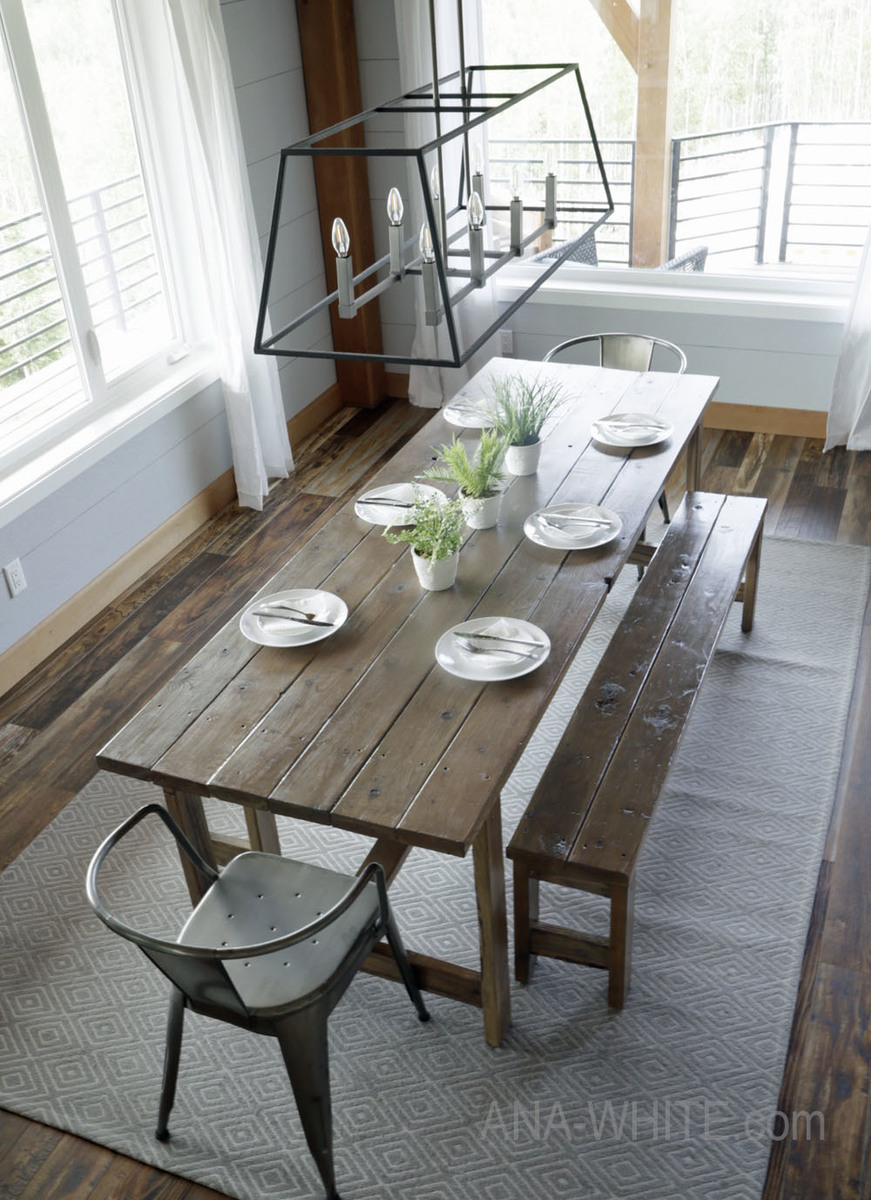
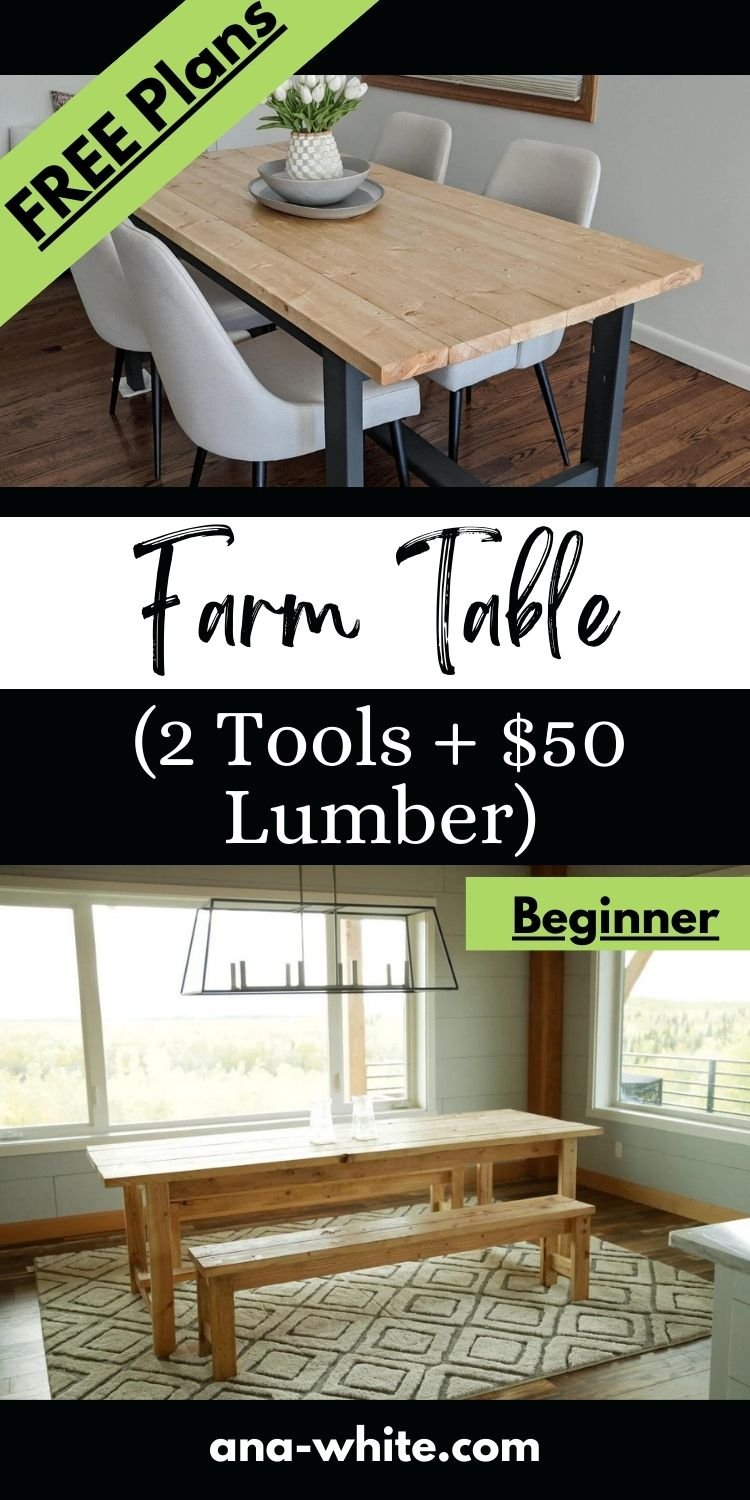
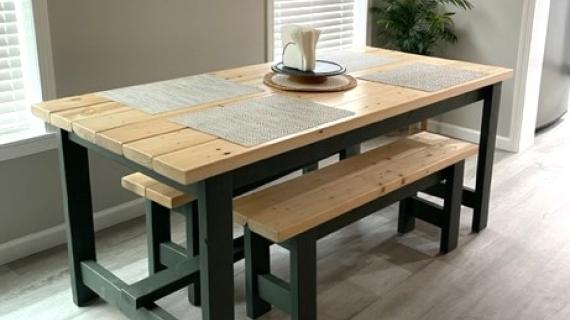
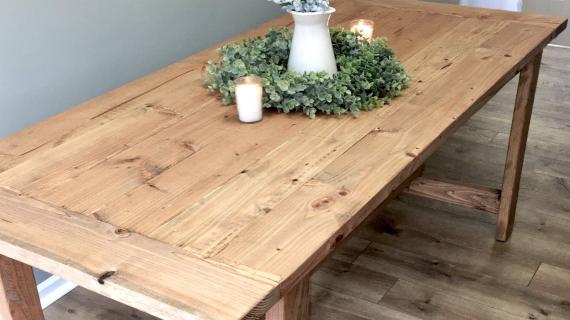
The easiest rustic dining table that you can build! Perfect beginner farm table plans by ana-white.com
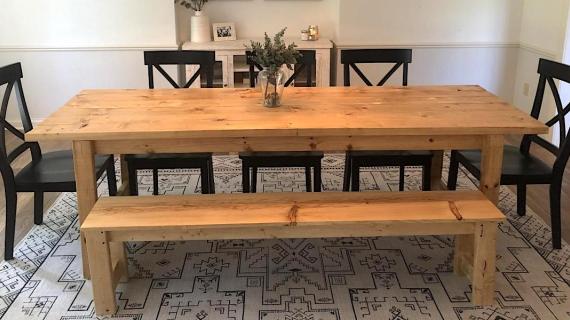
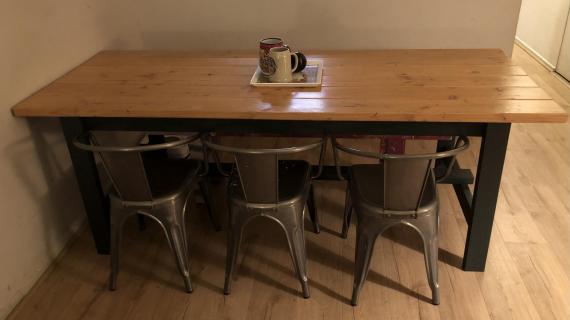
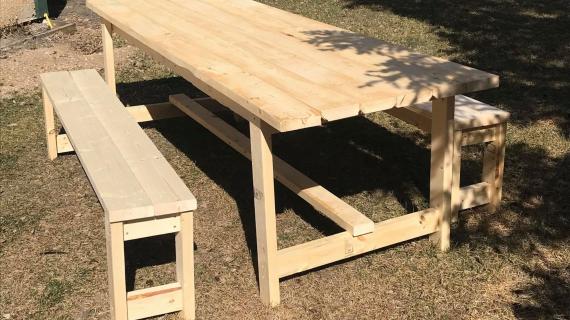
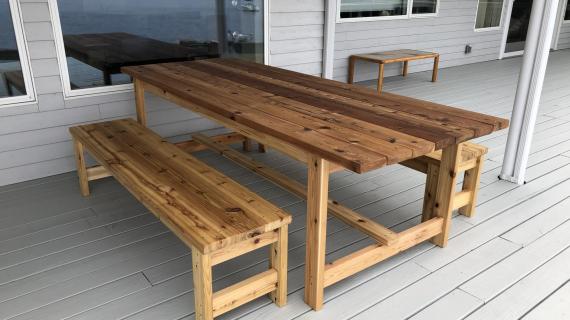
Reader submitted photo by RPECHO97

I have been a long time user and fan of Rustoleum products. This post is sponsored by Rustoleum by all opinions expressed are my own.
UPDATE: Bench plans have been posted here.
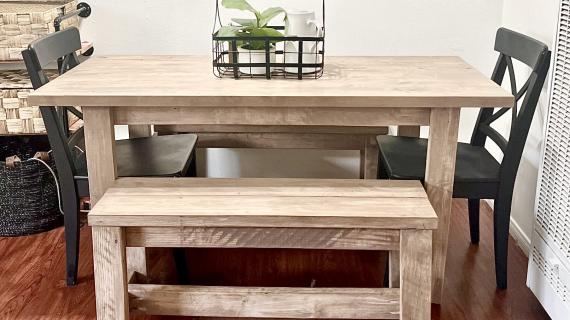
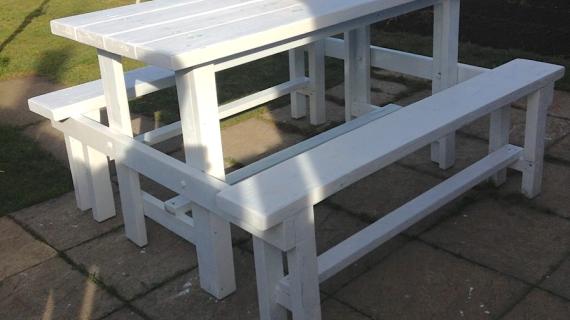
UPDATE 2: We added a tinted poly coat to the table and it now looks like this!

I've been wanting to get the beginner crowd a VERY simple, inexpensive farm table plan for years now. Just because you aren't an expert woodworker with a zillion tools doesn't mean you can't still start somewhere, right?
Well, I finally got my chance!
We are moving into the new house, but with so many, many functional projects to tackle (like closets and pantry cabinets), a beautiful dining table is way down on the priority list. But still, I insisited we need a dining table to move in. Once you give in to the kids eating on the couch, you're done ... or at the very least have to be the bad guy and retrain the family.
So I gave myself three criteria for a new somewhat temporary dining table -
- Must cost less than $50 in lumber
- Must be done in an afternoon
- Can only use 2 tools - a drill and a saw (since most beginners don't have a Kreg Jig yet - and I do stress yet)
This is what I came up with -

And here's how it went down -

I purchased 6 - 2x4s and 6 - 2x6s in stud length.
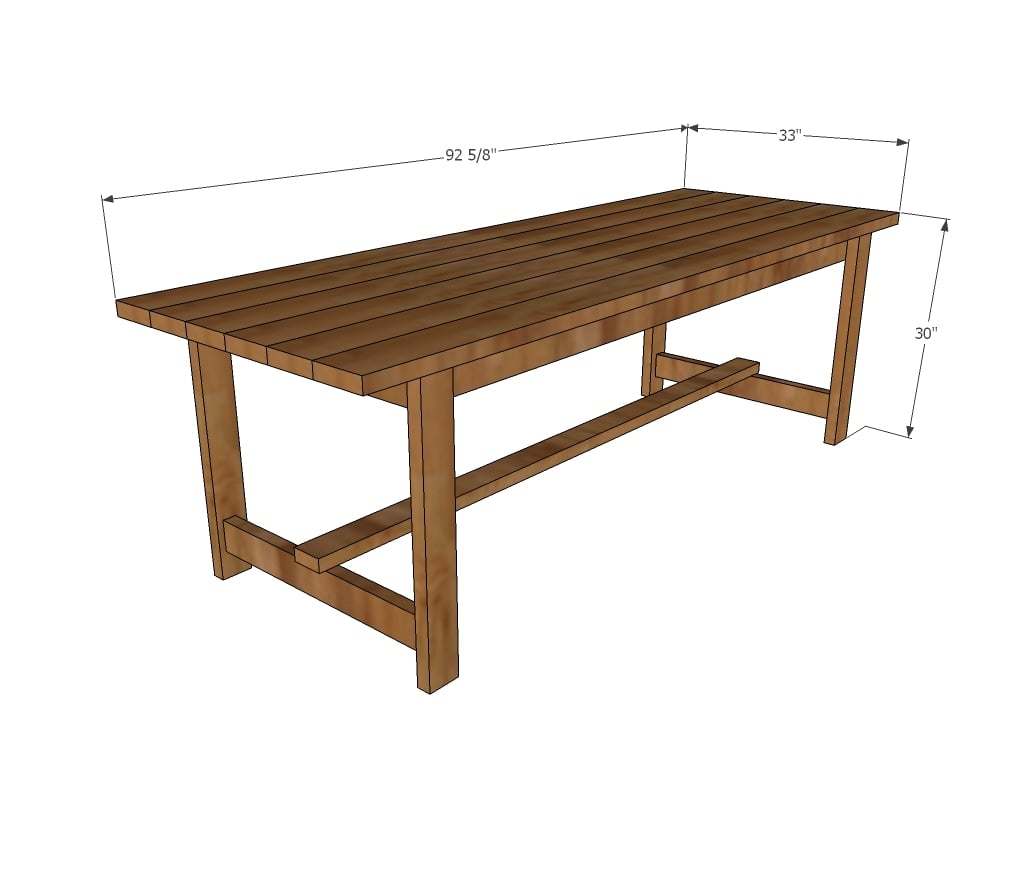
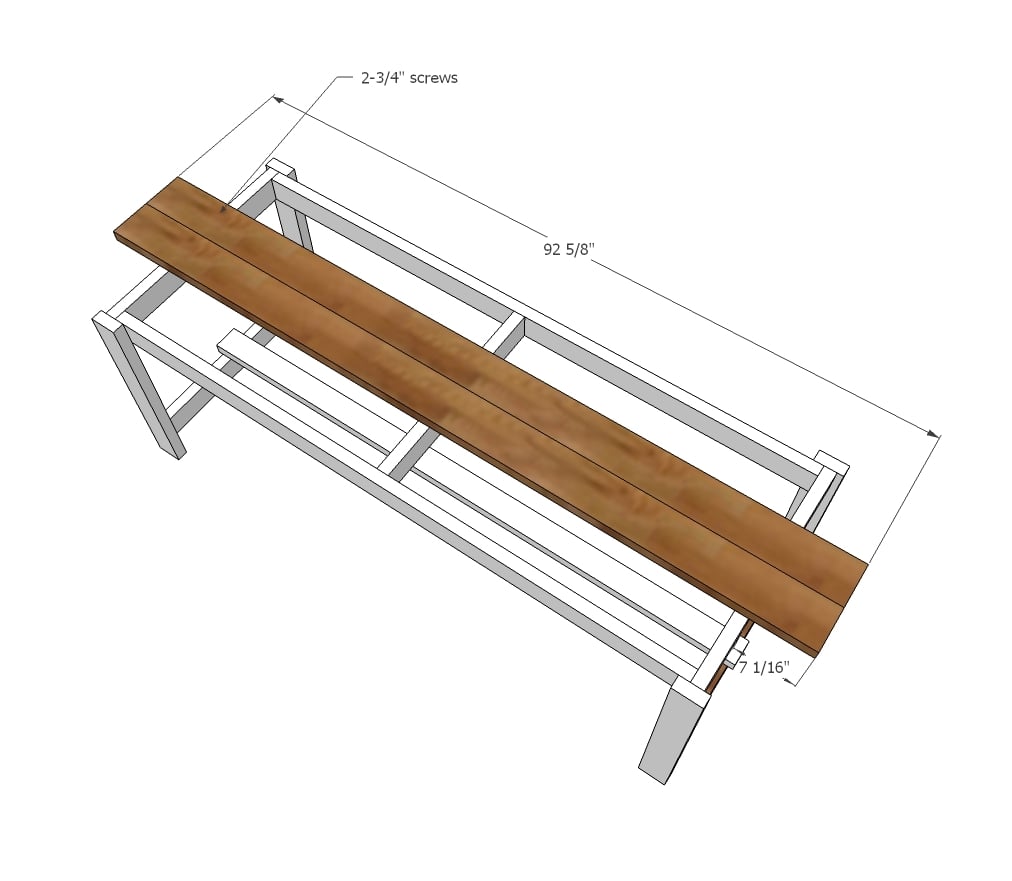
The 2x6s are for the tabletop boards, and since they are all precut exactly the same at stud length, I set them aside - no cutting required. My table will be 92-5/8" (standard stud length) long.

There's only 12 cuts on the entire table, and it's all the 2x4s.
I used a compound miter saw. You can use a circular saw or jigsaw, but do make sure your cuts are very good and straight.
Cutting done, time to build!

For attaching, I'm using 2-3/4" self tapping screws. You'll need about 100. Bonus - these are exterior screws, so I could use my table outdoors too.

Alrighty ... let's build already!
I used scrap pieces of 1x boards to elevate the horizontal boards on the legs. Then I just screwed from the outside.

Two leg sets done!

Then I flipped everything over and added the side aprons. One trick is I will screw at an angle (kinda like a pocket hole screw) in opposite directions, so if the table is wobbled at all, the screws dig in from opposite directions.

Then I flipped everything back over and checked for square.
Way out - like over an inch.
So I pushed the two shorter diagonal corners together until the two diagonals matched.

Then I added the bottom stretcher. The ends overhang 3/4" - be careful that your legs are square when you add the stretcher.

The middle support piece keeps the aprons from spreading, and also give you something to attach the tabletop boards too.

Now for the top - I like to start in the middle and work outward. So I find the middle on both ends,

And then I attached the 2x6 studs to the top with screws. I am careful about screw placement so it looks good in the end.
NOTE: Since we aren't joining tabletop boards together edge to edge, there may be a small gap between boards. You can fill with silicone after final finish, or use a Kreg Jig to build your tabletop first, then attach.

I was going for a rustic real wood look, but decided to sand to take splinters and rough patches out. I started with an 80 grit and finished with a 120 grit.

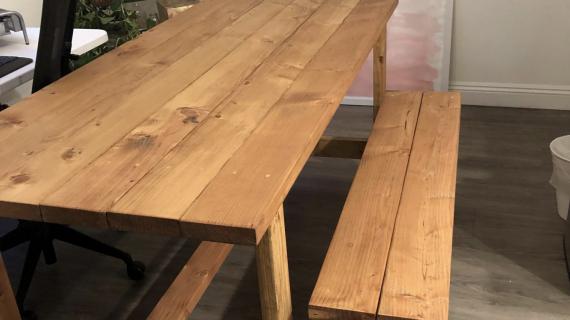
Table is ready for a finish!

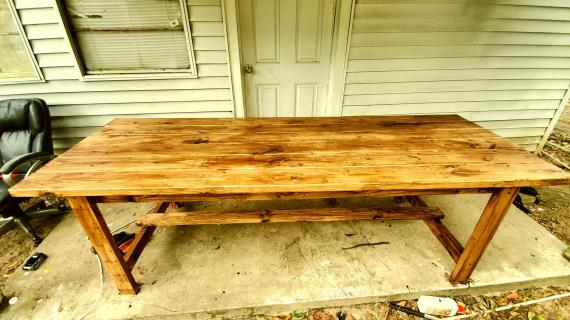
I love Watco Danish Oil because it is a beautiful, durable finish that is easy to apply - so much I wrote an entire post about it!

Danish Oil is a color and finish in one, so all you need is one coat! You can go back and further seal the table (or just the tabletop) if you so desire.

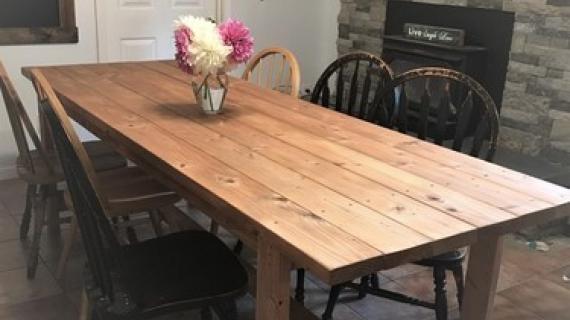
Gotta say, I do love how this one turned out!

You can also watch the video tutorial here -
If you likey, do let me know, and I'll get you those bench plans too! UPDATE: Bench plans have been posted here.
The plans follow, if you do build, please share, it's a great joy seeing your projects too.
Have a good one!
Ana

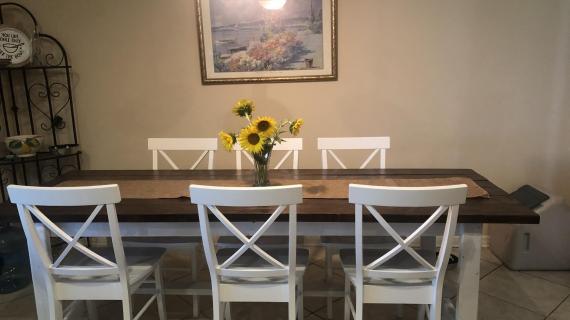
Pin For Later!
Preparation
6 - 2x4 @ 8 feet or 8 foot stud length
6 - 2x6 @ 8 feet or 8 foot stud length
About 100 2-3/4" self tapping wood screw
Wood glue
Clear Silicone or Dark Brown (depending on your finish)
Watco Danish Oil
Color matched wood filler (for filling screw holes after wood staining is dry)
8 - 2x4 @ 28-1/2" - end leg sets
2 - 2x4 @ 75-1/2" - side aprons
1 - 2x4 @ 80" - bottom stretcher
1 - 2x4 @ 25-1/2" (middle support)
6 - 2x6 @ 92-5/8" (tabletop boards)


Instructions
Step 1

Build two of the leg sets with 2x4 boards cut to 28-1/2" long
Step 2
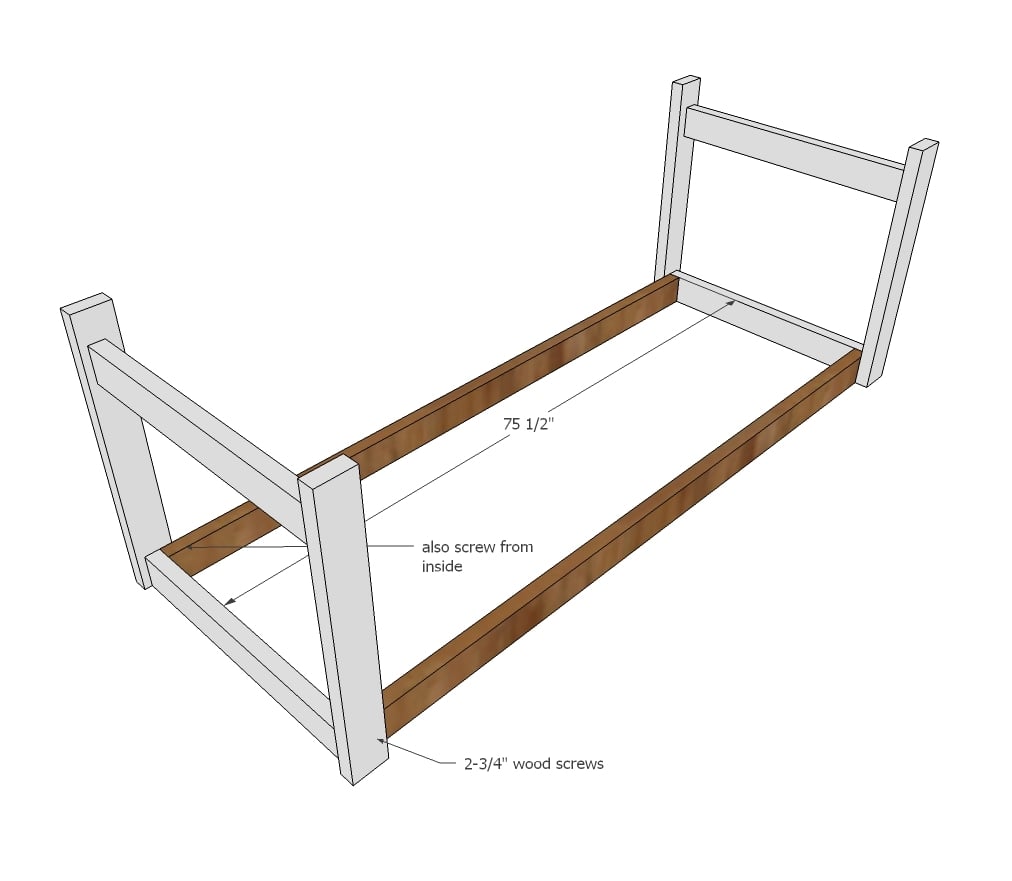
Will leg sets upside down, on a flat level surface (be careful on garage floors as they usually slope) attach aprons to leg sets.
Step 3
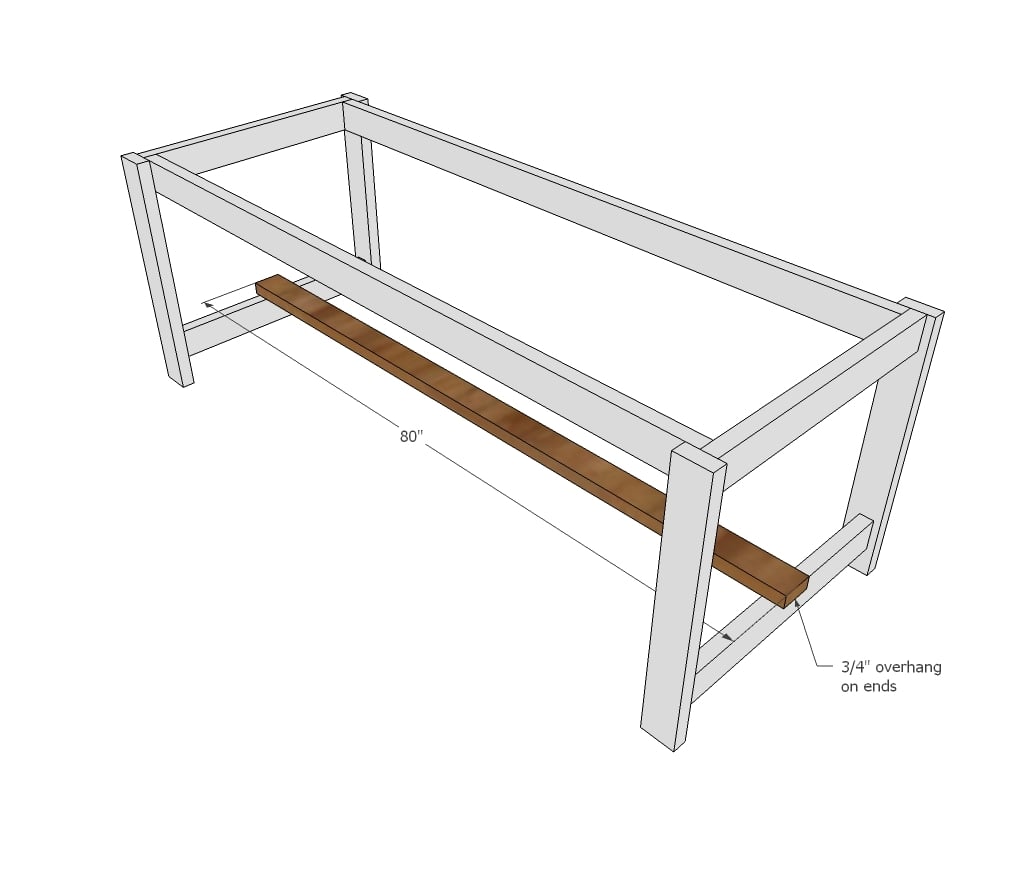
Flip over and adjust for square. Then attach bottom stretcher with equal overhangs on ends of 3/4".
Step 4
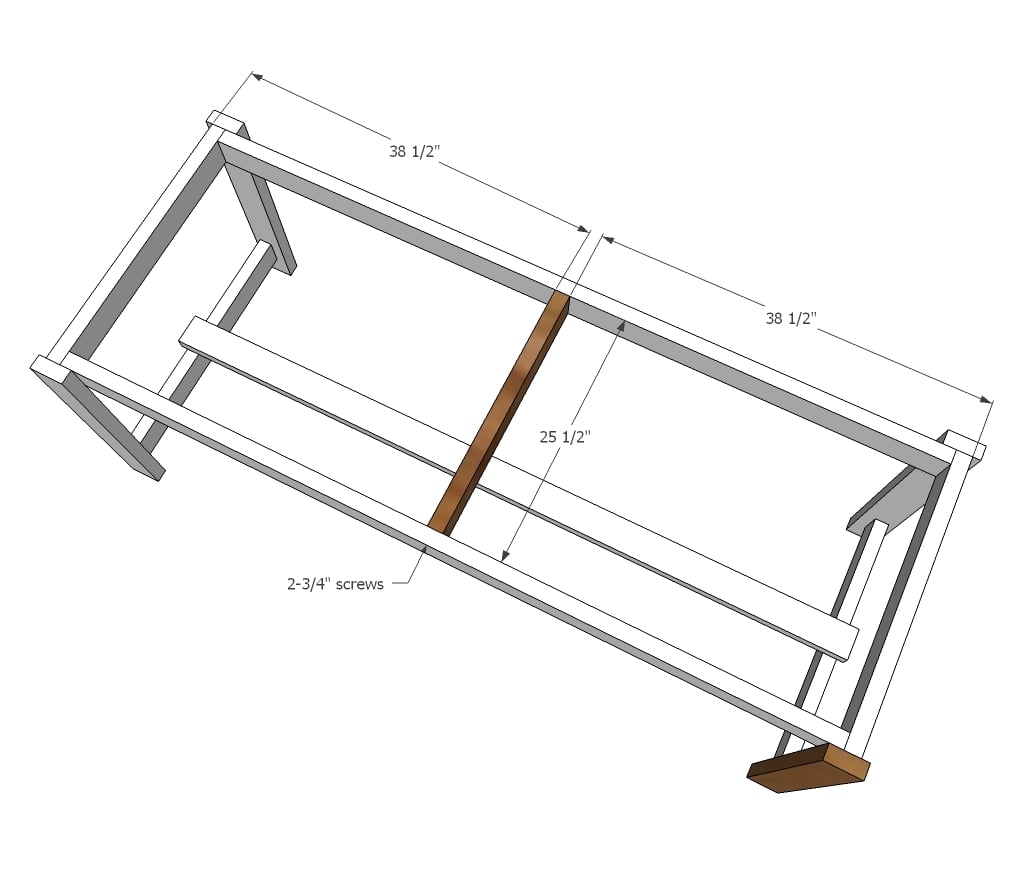
Add center support.
Step 5
Step 6

Attach next boards as close as you can to first boards.
Step 7

Repeat for final boards.
NOTE: I also angle screwed from underneath on inside of apron into the underside of the end tabletop boards for extra support.

Comments
clangardner3
Mon, 09/11/2017 - 13:13
Bench Plans?
Love this! I need to make some custom bench seating for a "tiny" space mountain condo and would love to see the plans for the benches as well. Thank you so much!
In reply to Bench Plans? by clangardner3
Ana White
Mon, 09/11/2017 - 14:16
Thank you I will have the
Thank you I will have the bench plans out this week for you.
Sounds like you have quite an interesting project!
YOOPER1985.
Thu, 03/26/2020 - 09:52
I made a workbench with 3/4…
I made a workbench with 3/4 maple 4' x 8'from lowes. Could also be good for table top. Il have try this table soon
Lbennett
Mon, 09/11/2017 - 20:09
Farmhouse benches
I too love love love this and can't wait for the bench plans! ❤️❤️❤️
ljrandall
Tue, 09/12/2017 - 09:15
Harvey Furniture
This looks like the perfect plan for my Girl Scout troop. They are hoping to build some simple Harvey Furniture to give to families that flooded.
Would you modify plans at all if the table were only 6'? I like the larger table, be we'll need them to be inexpensive, and transportable.
In reply to Harvey Furniture by ljrandall
Ana White
Tue, 09/12/2017 - 11:03
What a great idea!
What a great idea!
I'd buy 2x6 x 12' long for the tabletop boards and simply cut in half.
All other boards are the same, except take 20" off the 2x4 stretcher and long apron cuts.
Good luck!
jordanmichelle
Sun, 08/04/2019 - 16:53
What about the bench ? My…
What about the bench ?
My husband and I would love to make this table at 6 feet too, what changes should we make to the bench plan?
09cydney
Wed, 09/09/2020 - 05:06
I love this table! We just…
I love this table! We just purchased a new home and plan to build the 6ft size this weekend. Are there bench plans that account for the smaller size?
Drew Layman
Sun, 09/17/2017 - 13:16
Silicone
What is the clear silicone for in this plan? Thanks!!
Ahuff9103
Wed, 12/13/2017 - 06:28
Thank you!
Thank you so much for the video instructions and the plans. Mine turned out beautiful and I have received a ton of complements. I am proud to have built it myself and it looks amazing in our new home!
Mike Mercer
Thu, 12/28/2017 - 10:48
Looks great, and I love the colour.
Looks great, I love the colour. And the chairs look great too, as they go well with the table. I hope mine will look as good when it's done. Did you use a darker stain on the table top, or was it painted?
hsockwell
Tue, 12/26/2017 - 23:06
Love the table ... what about the light fixture???
I love how simple yet beautiful the table is! Where did you get the light fixture?
Mike Mercer
Thu, 12/28/2017 - 10:45
I'm just getting started!
Hi Ana,
It's nice to be on your site getting plans and building projects. I was so inspired by you I went out and bought Ryobi tools, and have since built 3 projects all on http://www.Ana-White.com/ by you. I loved building the Potting Table, and better yet my Mother loved it when I gave it to her as a gift. I am now working on the Farm House style Table and Benches. I can't wait to see how they turn out!
Ana I wanted to Thank You! Your designs are simple to understand, the cut lists are great and better yet the instructions you provide are the best. I can't wait to build some Outdoor Couches when the weather gets better.
One day I hope to be doing what your doing, working with projects and making a blog, and who knows maybe I can get people to buy them!
Thanks again Ana!
- Mike.
visualyarn
Sun, 01/07/2018 - 15:14
How to adjust measurements
I've never built anything before, but I really want to make this. My space isn't big enough for the length of this table. My table needs to be 80" Long. My table can still be 33" wide. Is there a tool I could use, or can someone explain how to make adjustments to the measurements in the plans to change this to an 80" table? Your help is greatly appreciated. Thanks!
sikegirl18
Sat, 02/22/2020 - 12:47
We’re you able to find the…
We’re you able to find the adjustments for the table? I’m trying to build one at 6ft long
ParksNstuff
Fri, 02/02/2018 - 14:02
So the plans were awesome and
So the plans were awesome and easy to follow. Only issue was user error on my part. When I bought the wood I didn't ensure the boards were not bowed. This became apparent as I started assembling. Now my completed table is twisted like one of those cinammon twists from Taco Bell. If anyone has any suggestions on how to rectify my issue please let me know .
ParksNstuff
Sat, 02/03/2018 - 22:04
Was wondering what you would
Was wondering what you would suggest to put on the legs to help keep them from scratching up my floor?
ellegirl0247
Tue, 02/27/2018 - 15:30
What screws to buy?
These plans look great and so easy to follow. I was just wondering if there was a link to the right screws to buy!? Thank you!
n@tatum5
Tue, 06/11/2019 - 07:26
Matching Coffee Table Plans?
Thank you, thank you! These directions were so easy to follow and I built a beautiful table for my new patio. :) I love it so much that I want to build a coffee table just like it. Because I am so new to this, I don't want to tweak things on my own and mess up measurements. What suggestions do you have on plans and how to use this design to create a 2 tiered coffee table? Thanks. Niki
mkuhn69
Wed, 06/12/2019 - 04:08
Thanks for the plan - I…
Thanks for the plan - I built this table in a couple of hours. I adapted a few things -- because this is going to be a patio table, I needed to make a center hole cut for the umbrella. Instead of the center support, I made two supports spaced evenly apart. Besides giving me a place for the center hole, it added strength. Additionally, I used a 2x6 for a stretcher, and as able to secure it to the inside of each side, which gave a more finished look and added support.
Flanker7
Thu, 08/15/2019 - 04:46
Awesome Table!!!
This was a fun project to do with family. Had a lot of the equipment to do the work just needed the wood. It was a weekend project that expanded to 4 days. Overall very pleased with the table.
MTFX
Thu, 08/22/2019 - 08:49
Hello, I want to attempt…
Hello,
I want to attempt to make this table for our first home . The design and instructions are great but I was wondering if you could explain what squaring off means? I'm a bit confused by this stage.
" So I pushed the two shorter diagonal corners together until the two diagonals matched."
How do you push the corners together? Do you need to cut the wood shorter? Or do you push them and brace it whilst someone is holding it? Sorry if this is a noob question.
Thanks,
Matt
[email protected]
Sat, 09/28/2019 - 10:42
Square a table
I'm new too, but I found this website, "How to Square a Table in Woodworking" that might be helpful.
https://www.ehow.com/how_5743916_square-table-woodworking.html
Georgia
PaulaG
Tue, 09/10/2019 - 08:22
Couldn't be Easier!
My son and I made your table, and it turned out great!! Thanks for the very simple-to-follow plans!
PeterV
Thu, 09/26/2019 - 07:17
Heightened it and it's great
Thanks so much for this plan. My fiance and I are both 6'2", and her father is 6'7" and we all have trouble with low tables - so I added 10 inches to the leg length. This turned out to be the table I always wanted. Was a little wobbly front to back at first so I added corner braced ($5 for 4 of them at Home depot), and now it's sturdy as a tree.
This was my first woodworking project ever and turned out well.
I'd say to people who are new, DON'T RUSH THE SANDING! That's what makes or breaks the finish.
Cheers.
leahmartin7117
Wed, 10/02/2019 - 13:59
Wood glue
Love the plans! What did you use the wood glue for? Thanks!
HikingStick
Mon, 04/20/2020 - 04:54
Kreg jig
How would a Kreg jig be used on this table? I'm thinking of making one (though wider and longer), and if I'm in for a penny, I'm in for a pound. Investing in good tools always pays off down the line.
Misty Nobles
Mon, 04/20/2020 - 20:38
wood
What kind of wood did you use?
imjustdelaney
Sat, 05/09/2020 - 22:31
Sturdy for years??
Hi, Ana! Long time troll, but I finally decided to make an account and add some projects since my husband usually has all the carpentry fun. I'd love to make this plan for our new space, but I don't want to get all involved for something "somewhat temporary", as you put it in your post. :) What do you mean by that? I have a 6 year old and 11 year old who are...well let's just say, "This is why we can't have nice things," in our house! Will it stand up to some pretty aggressive use for the childhood years? Thanks for a great site. I always love browsing!
Roymoore5
Wed, 05/13/2020 - 11:15
What is the silicone for…
What is the silicone for. Please explain. Also, will 2 1/2" screws work? Having trouble finding 2 3/4" screws.
LSeymour
Mon, 05/18/2020 - 09:09
I also had a hard time…
I also had a hard time finding 2 3/4" screws so I went with 2 1/2 and it seemed to work fine. I believe the silicone is to fill in any gaps in the table top as the boards are not screwed together. It is optional, some of my boards fit perfectly and others had tiny spaces at certain points. I haven't decided if I will fill them in or just leave them.
valon
Sat, 05/30/2020 - 20:45
Fantastic plan!!
You are amazing and so is this table!! My wife wanted to rent farmhouse tables for our sons first birthday. We needed seating for 40 people. Companies around us wanted $150 and up for one table plus delivery cost!!! So I found Ana. Under $50 and under an hour. Can’t wait to try more of your plans. This was my first ever attempt at building anything lol
bmccav6
Sat, 06/13/2020 - 17:01
Perfect plans for farm table
Made the table and bench! Adjusted for a smaller space. Will nicely fit 6 chairs. Definitely a quick project when it comes to the cuts and screws, but if you plan to sand/stain/poly, it took me a few days. I love this set so much.
Albright777
Wed, 06/17/2020 - 10:00
Question about how you fixed the table to be in square.
Beginner question: When you said the table was not square and you had to adjust. Can you lead me to find a resource to help me figure out what you did? I understand what being square means, (I know it's not just a shape.) I just don't understand how you adjusted it to be square. Thank you in advance for your patience with me. It is appreciated.
candycanes120
Tue, 09/22/2020 - 07:23
Easy!
Thank you for the easy plan instructions! I changed it a bit. Made it conversation height, 27 inches wide and 62 long. I added a couple of additional supports to the top and used 1x6 instead of 2x6. I love it!
sdavis01
Fri, 10/23/2020 - 07:06
This is my first time…
This is my first time building something like this. I need a table ~ 30 x 60.....so perhaps 27 x 62 could work. Would you mind letting me know how you did your table....what length cuts, etc? I would REALLY appreciate it! We just moved into a new house and my kitchen table does not fit!! Thank you very much!
cdewan
Fri, 10/02/2020 - 12:51
Do I need the stretcher?
Hi! First of all, THANK YOU! I'm new to all this, and your plans are SO clear and approachable: I'm using your site basically to teach myself Woodworking 101.
I just built this farmhouse table and discovered, the hard way, that it was too big to get into my house, haha. I took off the stretcher so I could get the table around the tight corners, and then I wondered: WHAT IS THE PURPOSE OF THE STRETCHER? Do I need it?
Also, why does it have that 3/4" overhang?
Thanks again!
cwatson
Wed, 11/25/2020 - 11:13
How do I post my Project as a Brag?
Hi there, I just finished this project and would love to post a brag post with the community. How do I do that?
Charles
jblin
Mon, 01/04/2021 - 00:04
I second this
👆
jblin
Mon, 01/04/2021 - 00:03
Fresh build- table + 2 benches for $200
Hi Ana-
Thanks for this! My partner and I built today- we made it 6’ long instead of 8’ for our space, but left the framing the same dimensions. We opted for a bit wider so we went with (5) 2x8x6 boards for the table top and (2) 2x8x5 for the 2 benches. In Oregon the lumber, glue, screws , sandpaper, stain and wood filler came to $198.00 vs the $90 ($50 for table, $20 (x2) for benches. I’m guessing inflation and location.
Needless to say we love it!! I have to finish sanding it the will stain it. Haven’t decided if we’ll paint the legs and framing white or stain the whole thing! Cheers!
moallen
Fri, 03/19/2021 - 20:00
Great plan for a sturdy table
I loved this plan. So easy to do. I wasn’t going to use it as a dining table but more for a table for the guinea pig cage to get off the floor. I made mine 6ft long and followed the instructions that you left as a reply on another person’s comment.
alexaskey06
Fri, 02/25/2022 - 08:19
Modifications for shorter length
Thank you for this plan! I would like to modify the length in order to use this as a simple laundry room folding/utility table. What adjustments need to be made to the aprons and spacer to make the table top 40" in length? I also plan to make it about 6" taller to save our backs!
Thanks!
Alex