


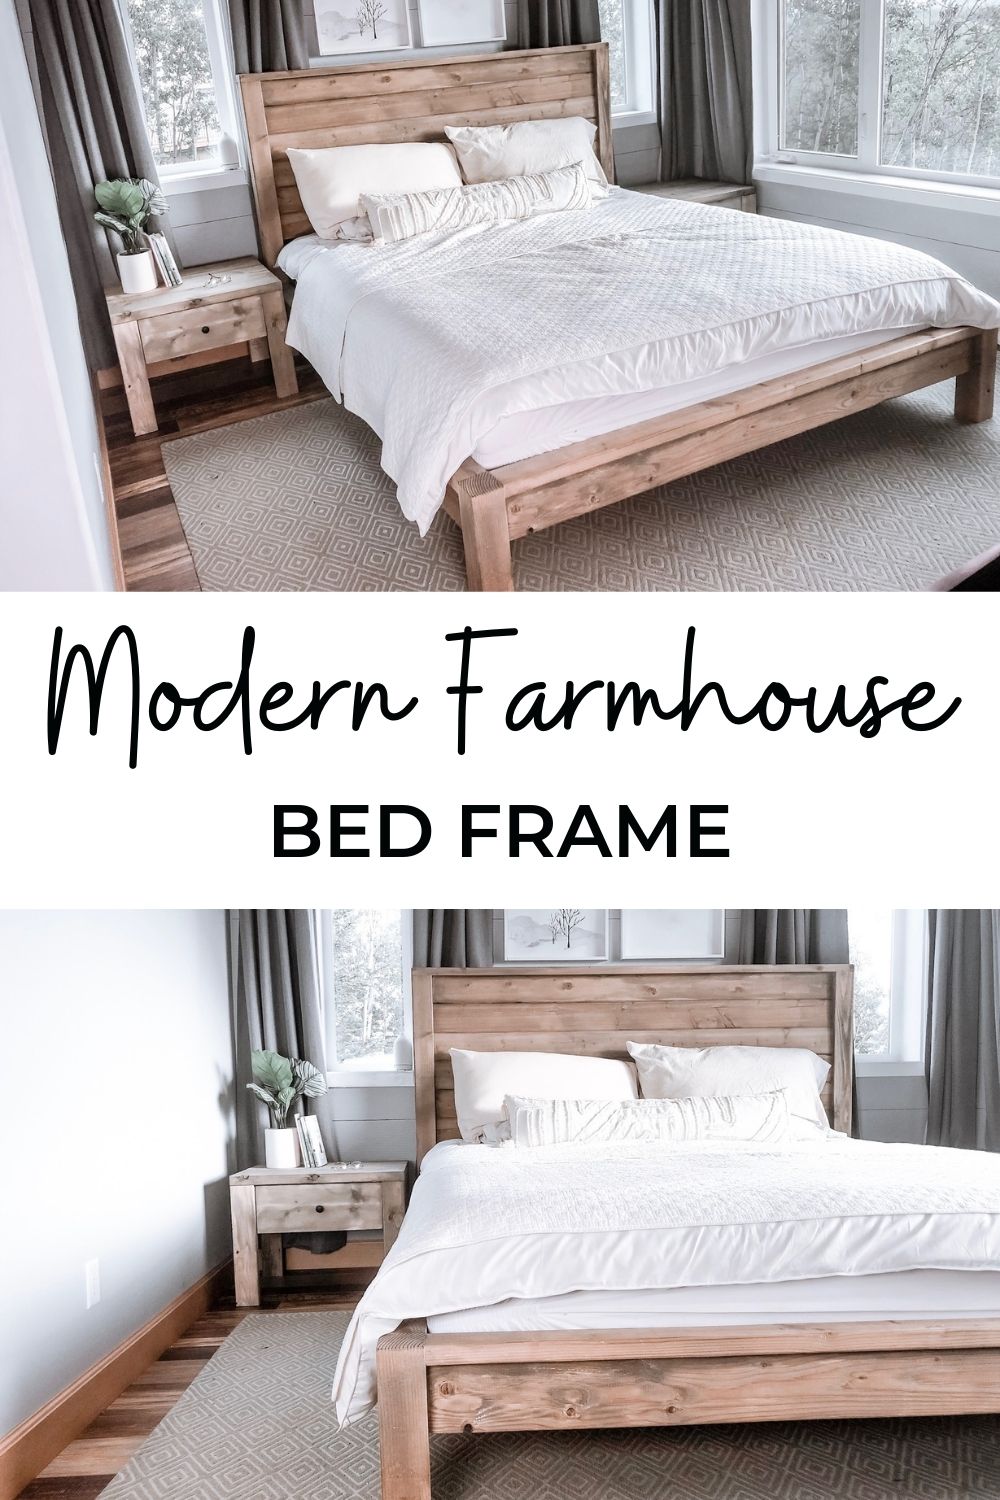
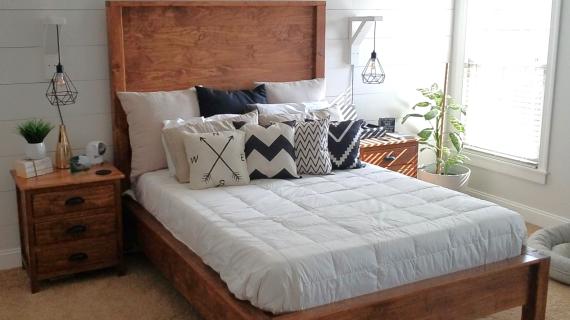
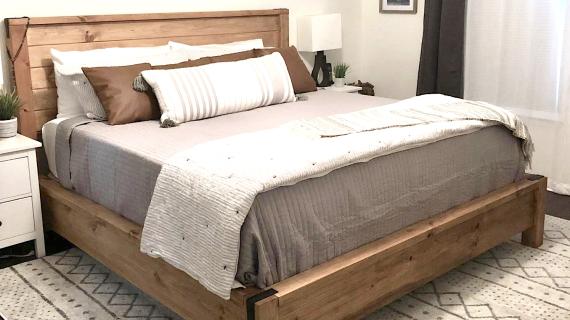
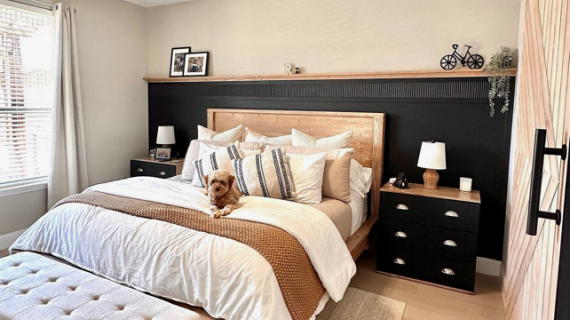
Build your own wood bed frame! This modern farmhouse style bed is easy to build with off the shelf materials and basic tools. You'll love our step by step diagrams, shopping list and cut list for all standard mattress sizes, and lots of reader submitted photos. Designed by Ana White.

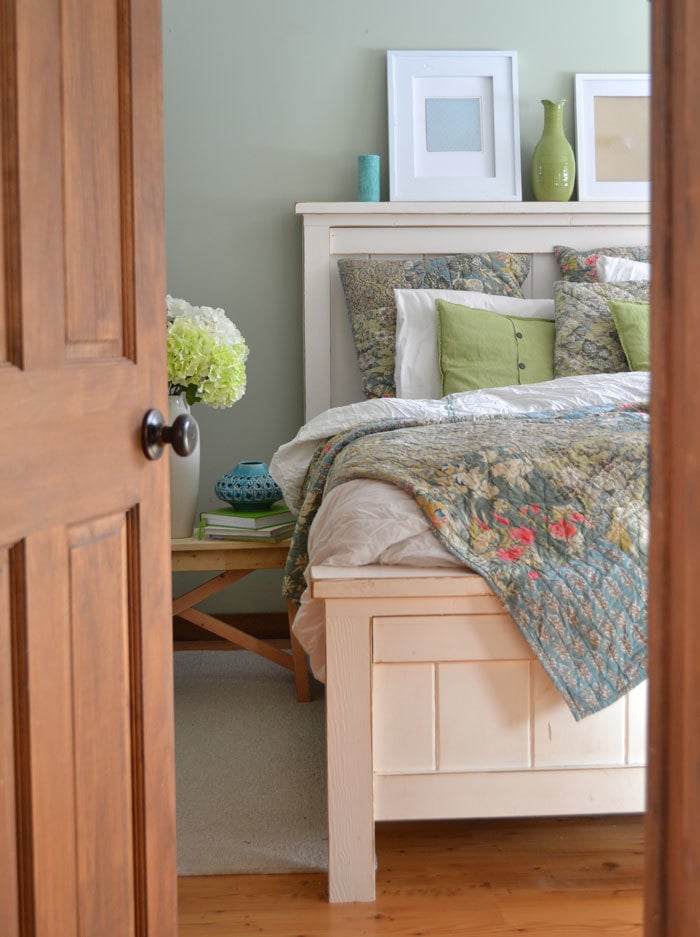
The right bed makes the room. In a bedroom, the bed dominates the room, grounds it, and is the focal point. All the other bedroom furniture simply compliments the bed.
So when it comes to designing a bedroom, I always start with the bed. And it better be grand!
Why Build Your Own Bed?
But the problem is, a beautiful bed can be very expensive - as in thousands of dollars. But the good news is beds are fairly easy to build, and for the size of the bed, astonishingly inexpensive. Most beds we build (including this one) include a platform (so no need for a box spring) - saving you even more money.
You can save upwards of 90 PERCENT OFF when you build your own bed!
If saving money isn't incentive enough, consider being about to choose a custom finish, being able to customize the size, building a sturdier bed - there's lots of reasons to go DIY. And let's not forget - a solid wood bed is so beautiful!
What Happened to the Original Farmhouse Bed?
We just moved into a new home, and our original DIY farmhouse bed wouldn't fit between the windows.
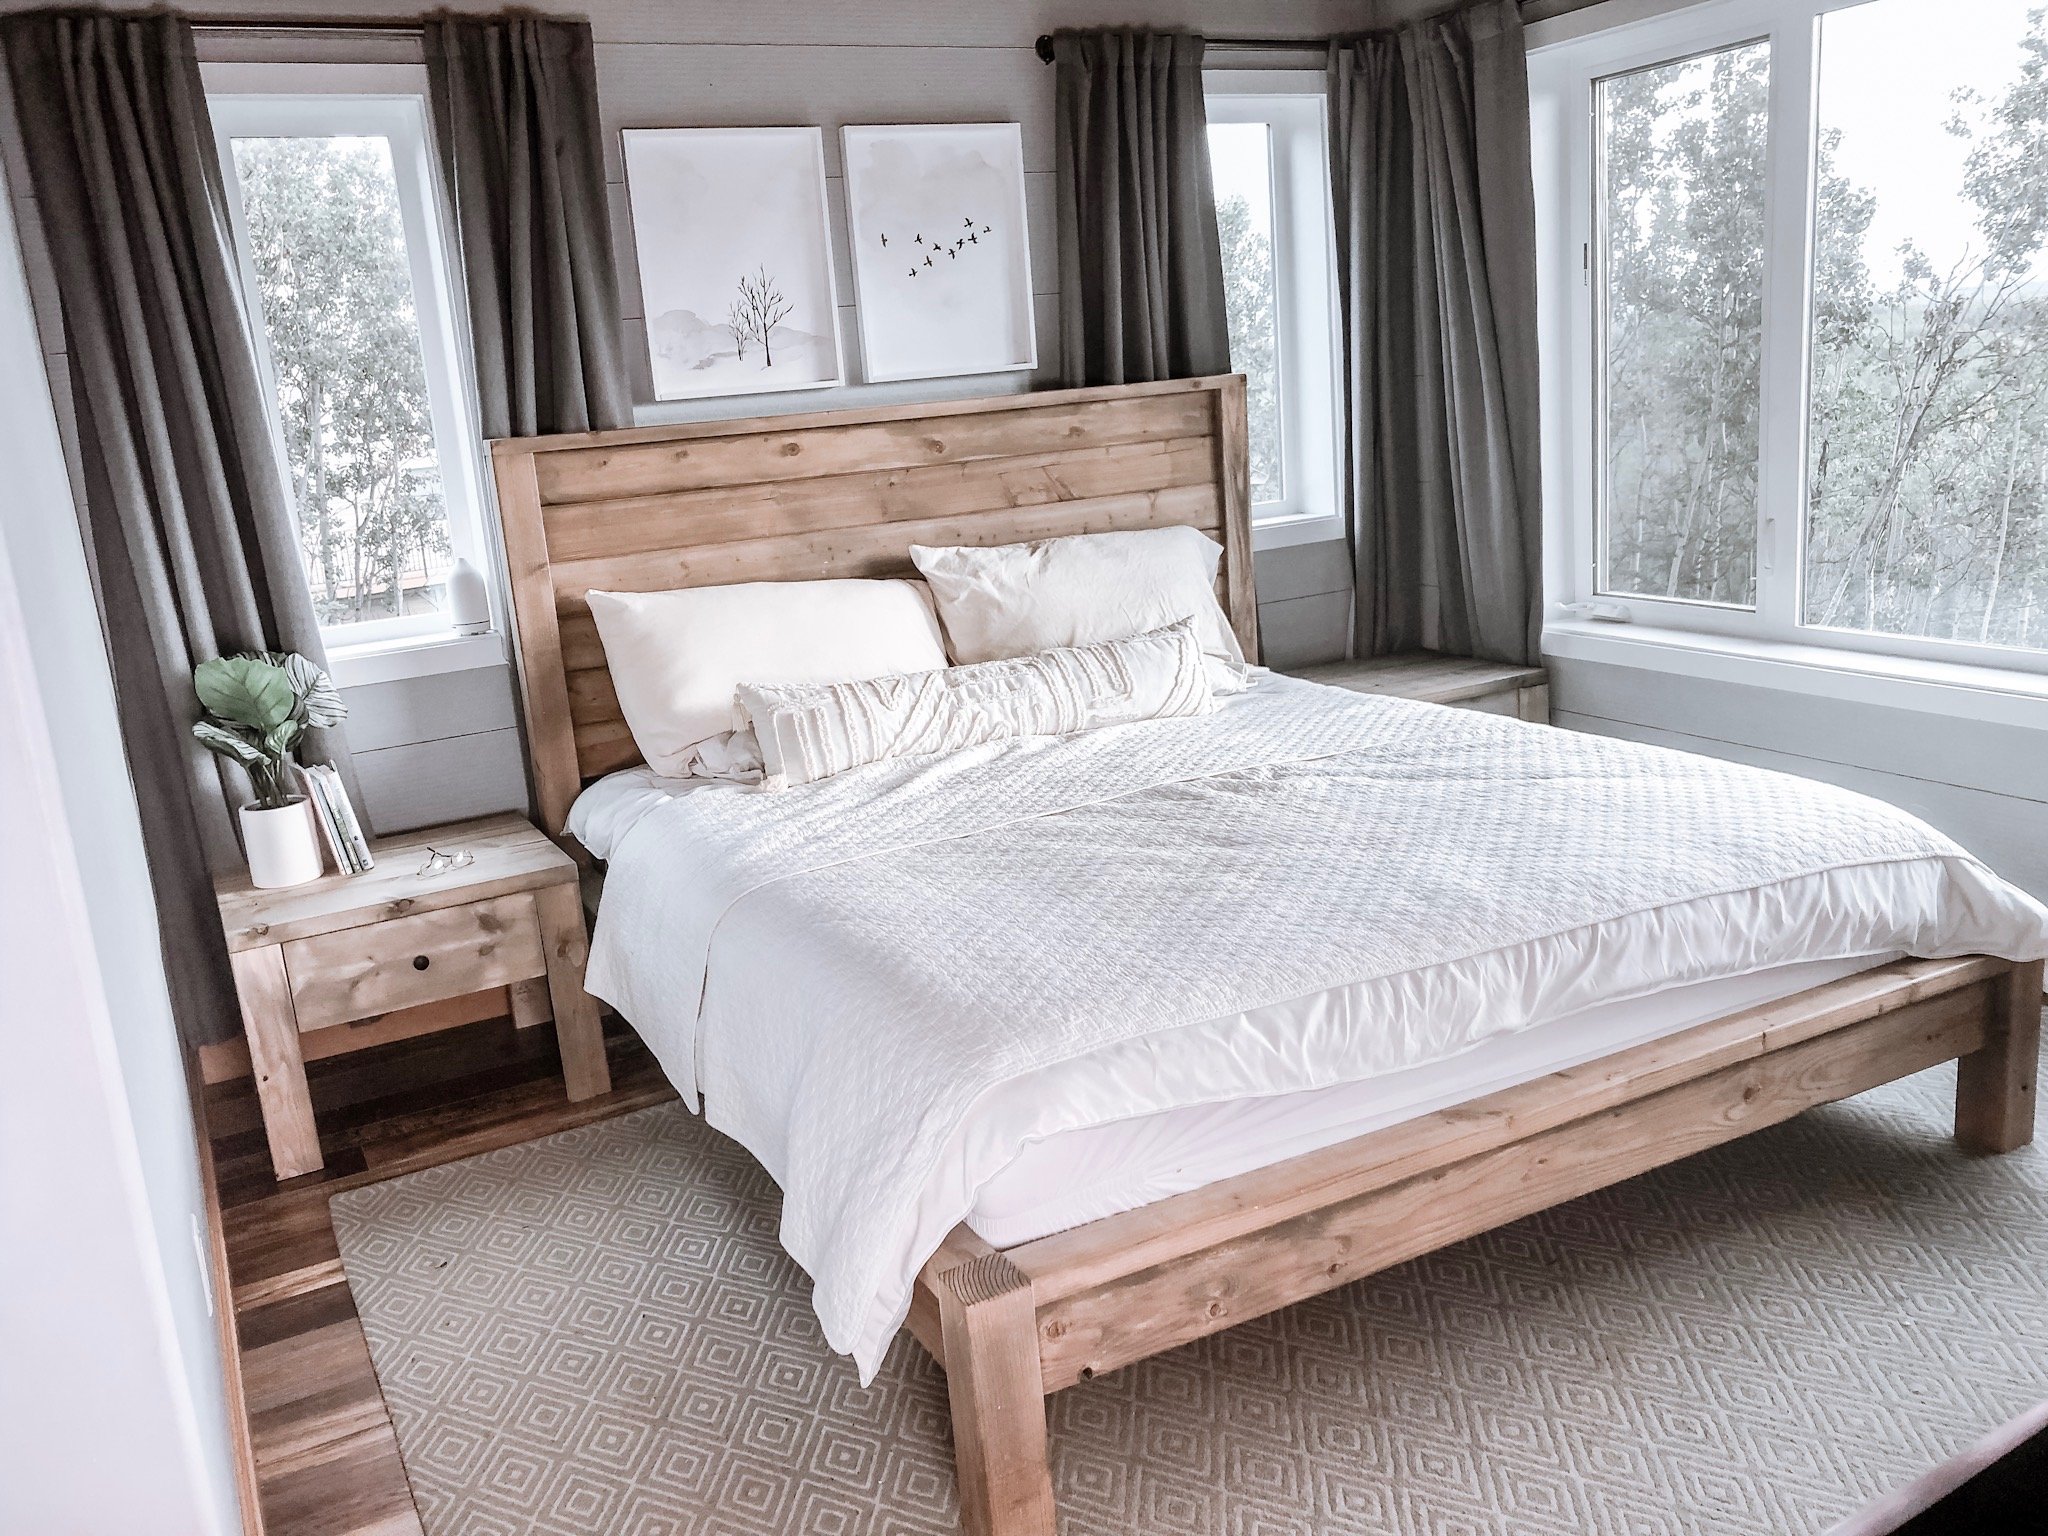
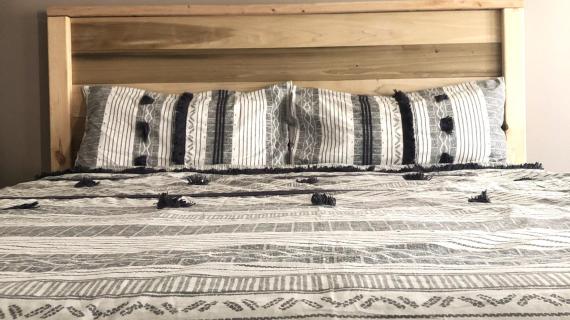
But I still wanted that "farmhouse" look - the square styling, the planked headboard, the beefy legs. But maybe a little more modern.
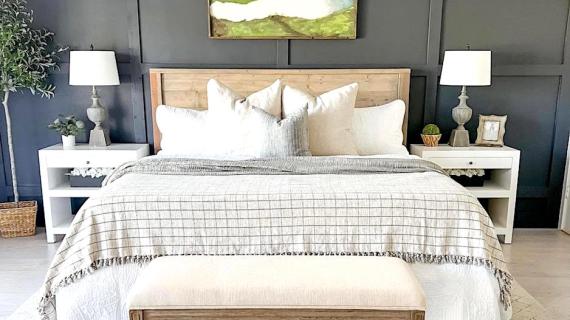
Modern Farmhouse Bed Design
Using off the shelf 2x4s, 2x6s, 4x4s and leftover tongue and groove from our house ceiling (you can also use 1x6s or other materials), we built this new, modern farmhouse bed.
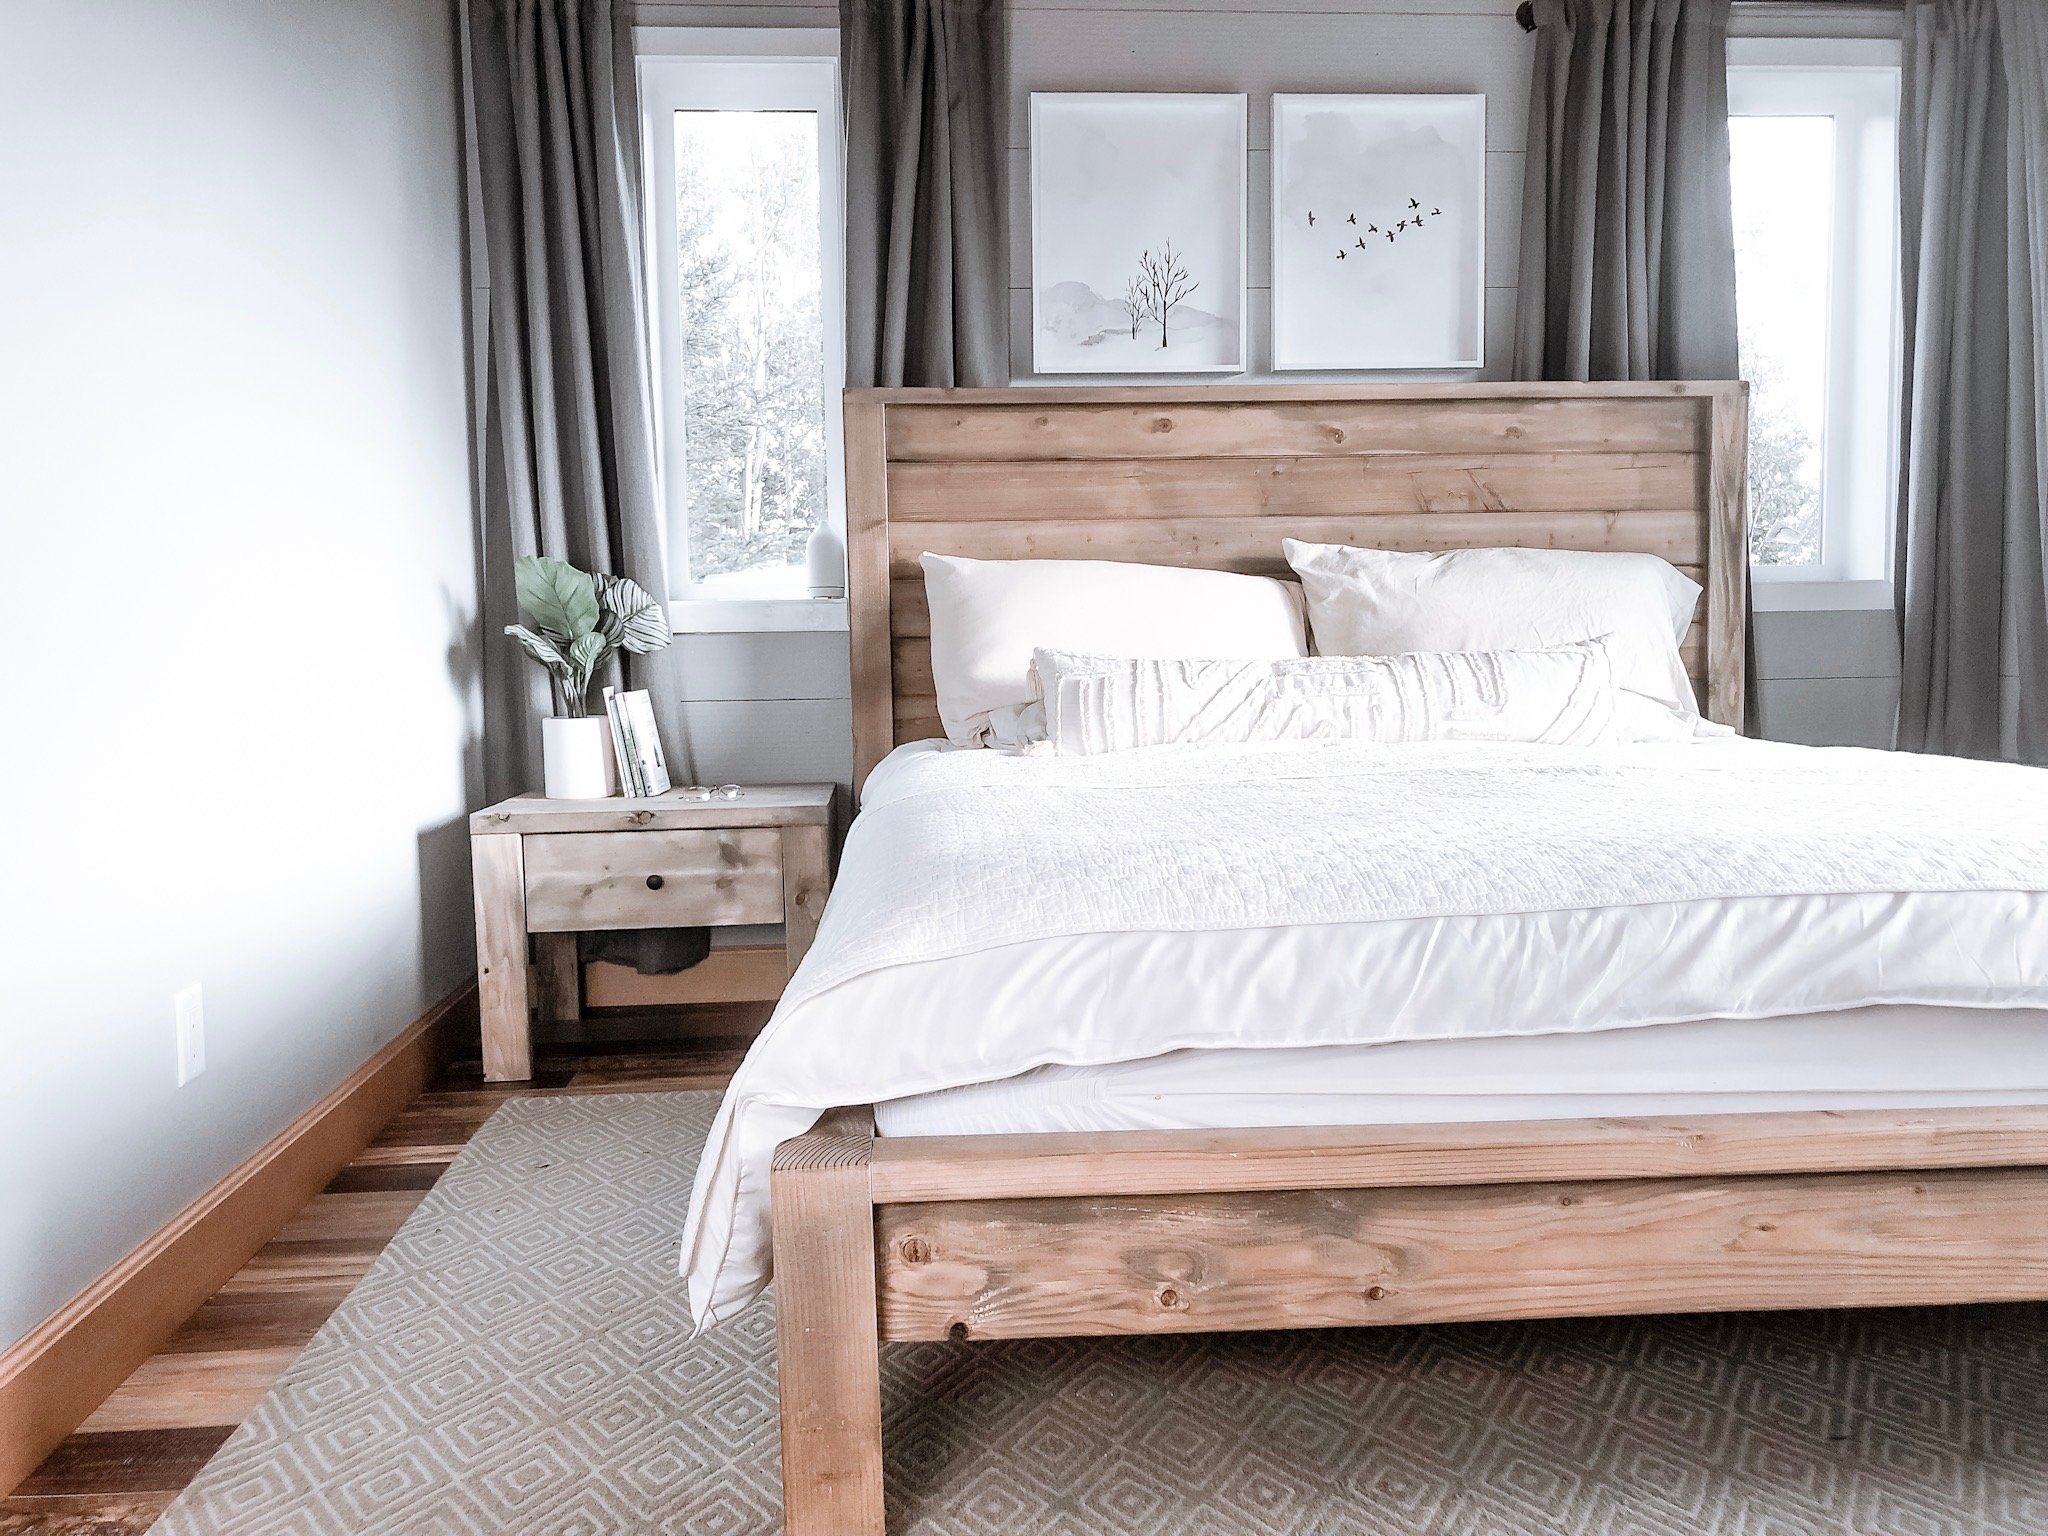
We ran the planking horizontal this time, and traded the footboard and siderails in for a platform base. The results are all that rustic charm, but in a simplified version that is just as sturdy and beautiful as the original.
This bed also ended up being easier to build and less expensive than the original farmhouse bed, thanks to the simplified design, less cuts and less joints, and less trim boards.
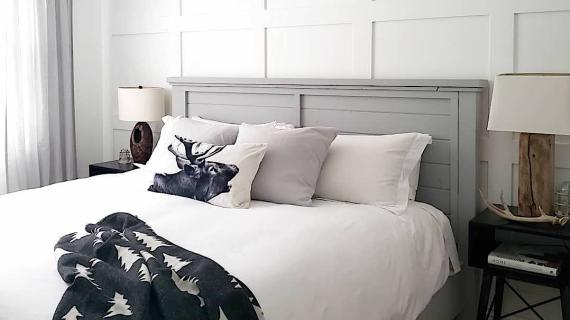
Matching Nightstands
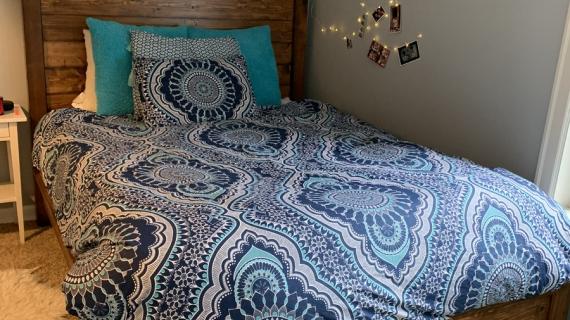
This bed really made our room amazing when paired with our matching Modern Farmhouse Nightstands
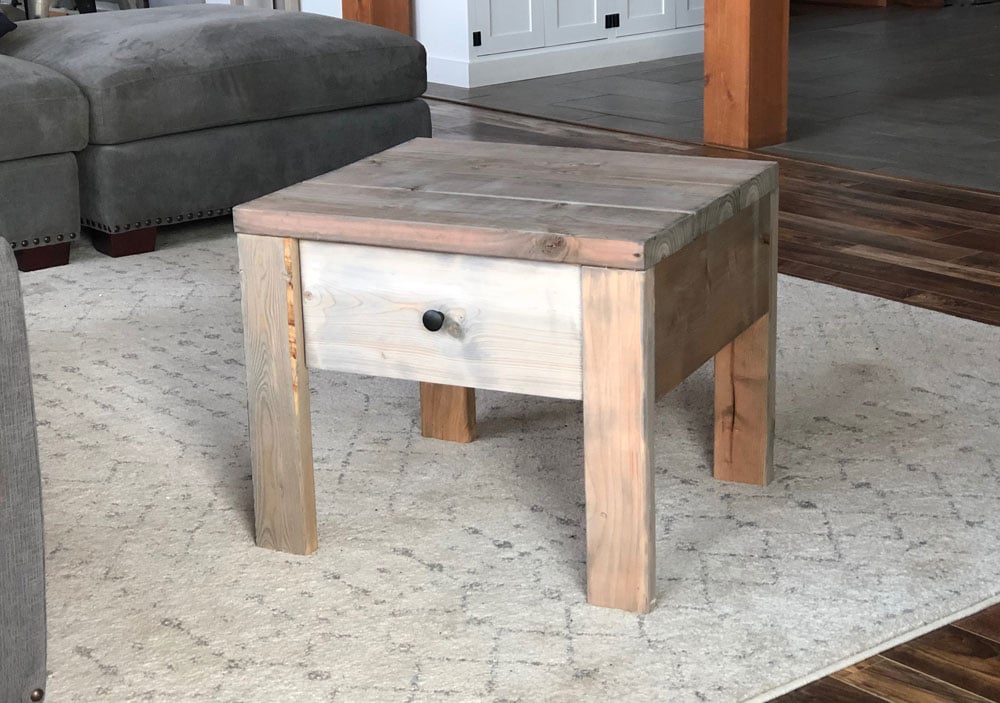
You can find plans for the matching nightstands here.
Weathered Wood Finish
We kept the finish simple with Varathane Weathered Wood Accelerator - it ages the wood in minutes and creates a natural looking grey finish.

Video Tutorial of Modern Farmhouse Bed Build
We did a video on the build of this bed, do watch - lots of little tricks and tips -
Modern Farmhouse Bed Plans
The step by step plan follows, with diagrams and shopping lists and cut list. For your convenience, the plans include everything you need to make this bed in a twin, full, queen or king (both standard and california king). Thank you for using our plans, it is much appreciated.
Pin For Later!
Preparation
TWIN SHOPPING LIST - Mattress Size 39" x 75"
- 2 - 4x4 @ 6 feet long
- 11 - 2x4 @ 8 feet or stud length (includes mattress slats)
- 3 - 2x6 @ 8 feet or stud length
- 5 - 1x6 boards or tongue and groove paneling @ 4 feet long
- 1 - 2x2 @ 6 feet long
- 2-3/4" self tapping screws
- 1-1/4" brad nails
- 2-1/2" pocket hole screws
- 1-1/4" pocket hole screws (optional)
FULL SHOPPING LIST - Mattress Size 54" x 75"
- 2 - 4x4 @ 6 feet long
- 5 - 2x4 @ 8 feet or stud length (cut the 75" boards from these)
- 7 - 2x4 @ 10 feet (cut slats and rest of boards from these)
- 4 - 2x6 @ 8 feet or stud length
- 5 - 1x6 boards or tongue and groove paneling @ 54" long
- 1 - 2x2 @ 6 feet long
- 2-3/4" self tapping screws
- 1-1/4" brad nails
- 2-1/2" pocket hole screws
- 1-1/4" pocket hole screws (optional)
QUEEN SHOPPING LIST - Mattress Size 60" x 80"
- 2 - 4x4 @ 6 feet long
- 6 - 2x4 @ 8 feet or stud length (cut the 75" boards from these)
- 1 - 2x4 @ 10 feet (cut 60" boards from these)
- 5 - 2x4 or 1x4 @ 12 feet long (cut slats from these)
- 4 - 2x6 @ 8 feet or stud length
- 5 - 1x6 boards or tongue and groove paneling @ 60" long
- 1 - 2x2 @ 6 feet long
- 2-3/4" self tapping screws
- 1-1/4" brad nails
- 2-1/2" pocket hole screws
- 1-1/4" pocket hole screws (optional)
STANDARD KING SHOPPING LIST - Mattress Size 76" x 80"
- 2 - 4x4 @ 6 feet long
- 8 - 2x4 @ 8 feet or stud length (cut the 75" boards from these)
- 11 - 2x4 or 1x4 @ 8 feet or stud length (cut slats from these)
- 4 - 2x6 @ 8 feet or stud length
- 5 - 1x6 boards or tongue and groove paneling @ 76" long
- 1 - 2x2 @ 6 feet long
- 2-3/4" self tapping screws
- 1-1/4" brad nails
- 2-1/2" pocket hole screws
- 1-1/4" pocket hole screws (optional)
CALIFORNIA KING SHOPPING LIST - Mattress Size 72" x 84"
- 2 - 4x4 @ 6 feet long
- 8 - 2x4 @ 8 feet or stud length (cut the 75" boards from these)
- 11 - 2x4 or 1x4 @ 8 feet or stud length (cut slats from these)
- 4 - 2x6 @ 8 feet or stud length
- 5 - 1x6 boards or tongue and groove paneling @ 72" long
- 1 - 2x2 @ 6 feet long
- 2-3/4" self tapping screws
- 1-1/4" brad nails
- 2-1/2" pocket hole screws
- 1-1/4" pocket hole screws (optional)
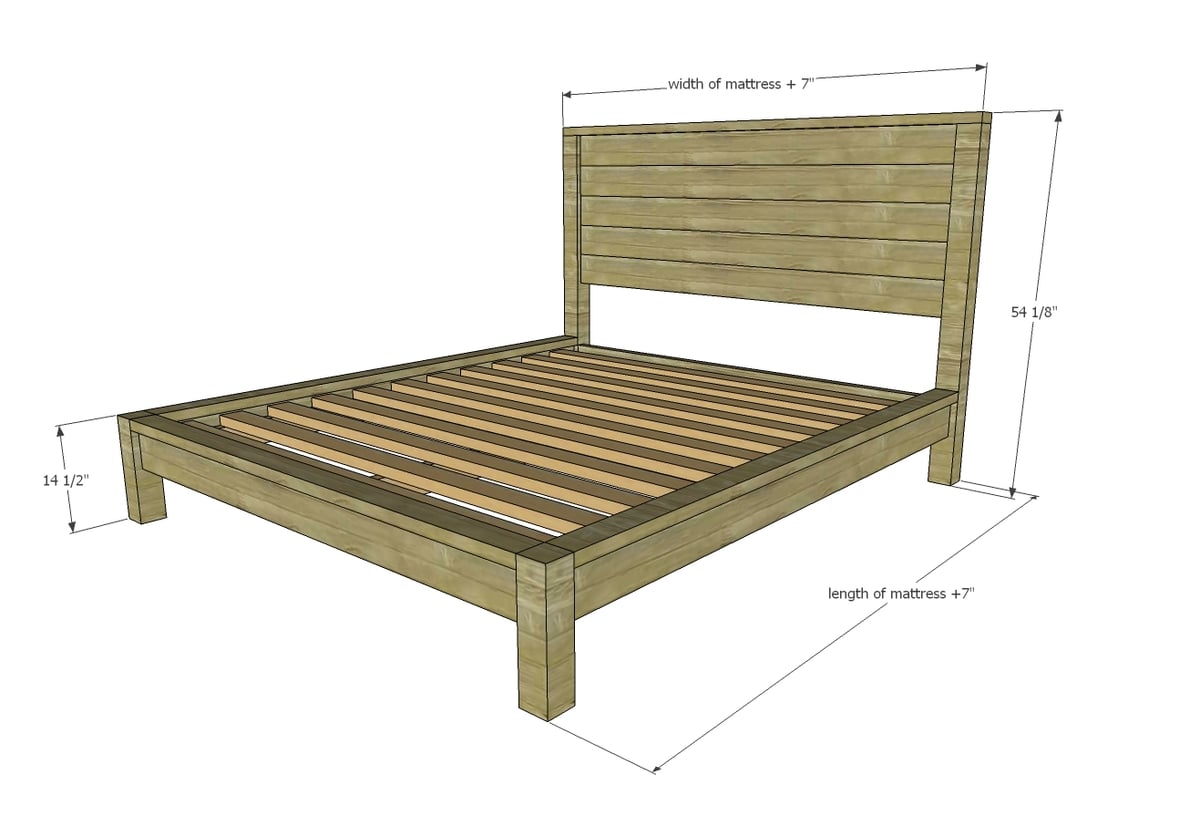
TWIN CUT LIST - Mattress Size 39" x 75"
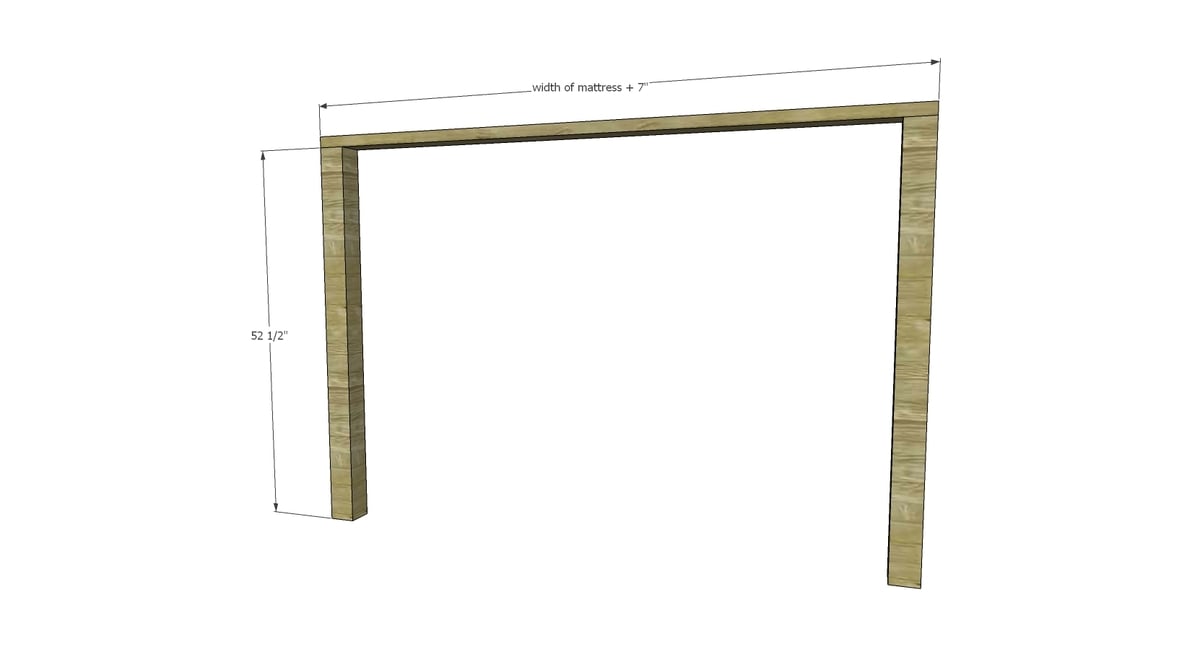
- 2 - 4x4 @ 52-1/2" - Headboard Legs
- 1 - 2x4 @ 46" - Top of headboard
- 2 - 2x2 @ 27-1/2"
- 5 - 1x6 or 1x6 tongue and groove @ 39" - Headboard planking
- 1 - 2x6 @ 39"
- 2 - 2x4 @ 75" - Siderail Top
- 2 - 2x6 @ 75" - Siderail
- 2 - 4x4 @ 14-1/2" - Footboard Legs
- 1 - 2x4 @ 39" - Footboard Top
- 1 - 2x6 @ 39" - Footboard Base
- 2 - 2x4 @ 75" - Cleats
- 11 - 1x4 or 2x4 @~41" - Slats (cut to fit)
FULL CUT LIST - Mattress Size 54" x 75"
- 2 - 4x4 @ 52-1/2" - Headboard Legs
- 1 - 2x4 @ 61" - Top of headboard
- 2 - 2x2 @ 27-1/2" - headboard cleats
- 5 - 1x6 or 1x6 tongue and groove @ 54" - Headboard planking
- 1 - 2x6 @ 54"
- 2 - 2x4 @ 75" - Siderail Top
- 2 - 2x6 @ 75" - Siderail
- 2 - 4x4 @ 14-1/2" - Footboard Legs
- 1 - 2x4 @ 54" - Footboard Top
- 1 - 2x6 @ 54" - Footboard Base
- 2 - 2x4 @ 75" - Cleats
- 1 - 2x4 @ ~76" - Center Cleat (cut to fit)
- 11 - 1x4 or 2x4 @ ~56" - Slats (measure and cut to fit)
QUEEN CUT LIST - Mattress Size 60" x 80"
- 2 - 4x4 @ 52-1/2" - Headboard Legs
- 1 - 2x4 @ 67" - Top of headboard
- 2 - 2x2 @ 27-1/2"
- 5 - 1x6 or 1x6 tongue and groove @ 60" - Headboard planking
- 1 - 2x6 @ 60"
- 2 - 2x4 @ 80" - Siderail Top
- 2 - 2x6 @ 80" - Siderail
- 2 - 4x4 @ 14-1/2" - Footboard Legs
- 1 - 2x4 @ 60" - Footboard Top
- 1 - 2x6 @ 60" - Footboard Base
- 2 - 2x4 @ 80" - Cleats
- 1 - 2x4 @ ~81" - Center Cleat (cut to fit)
- 10 - 1x4 or 2x4 @ ~62" - Slats (measure and cut to fit)
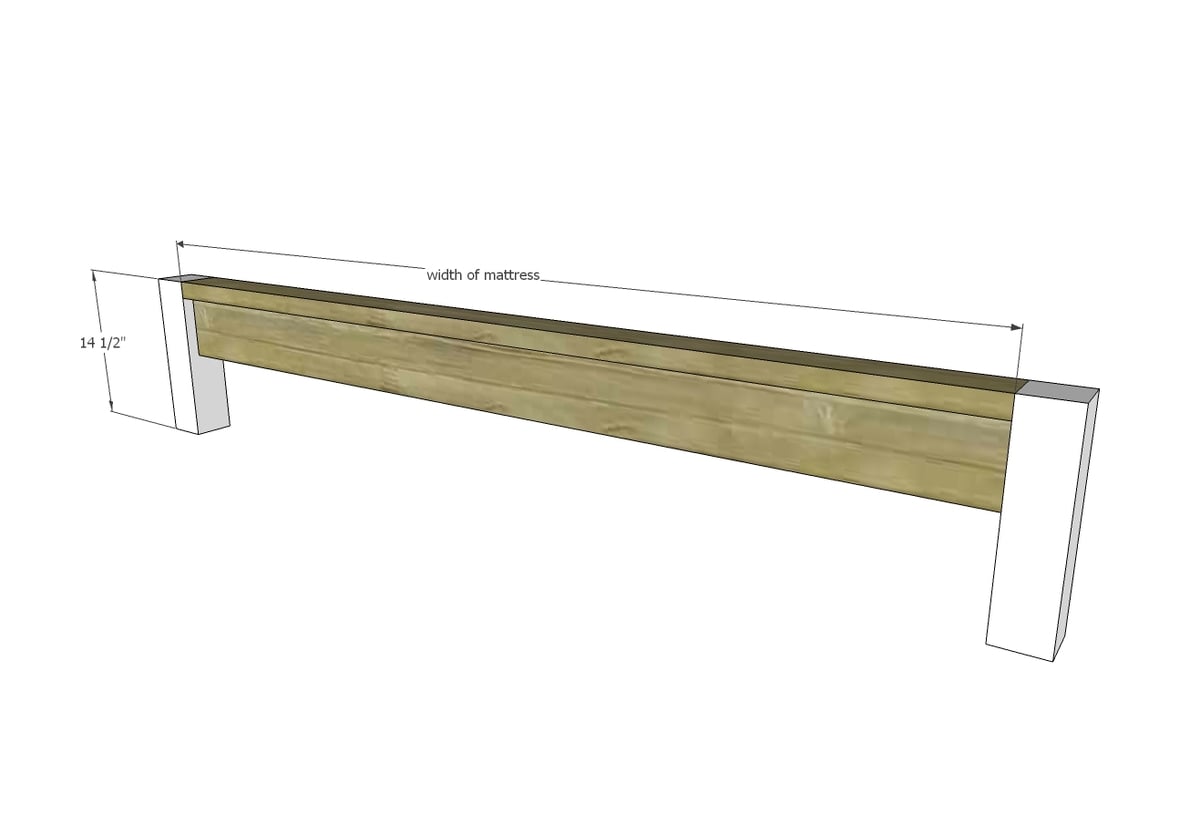
STANDARD KING CUT LIST - Mattress Size 76" x 80"
- 2 - 4x4 @ 52-1/2" - Headboard Legs
- 1 - 2x4 @ 83" - Top of headboard
- 2 - 2x2 @ 27-1/2"
- 5 - 1x6 or 1x6 tongue and groove @ 76"- Headboard planking
- 1 - 2x6 @ 76"
- 2 - 2x4 @ 80" - Siderail Top
- 2 - 2x6 @ 80" - Siderail
- 2 - 4x4 @ 14-1/2" - Footboard Legs
- 1 - 2x4 @ 76" - Footboard Top
- 1 - 2x6 @ 76" - Footboard Base
- 2 - 2x4 @ 80" - Cleats
- 1 - 2x4 @ ~81" - Center Cleat (cut to fit)
- 11 - 1x4 or 2x4 @ ~82" - Slats (measure and cut to fit)
CALIFORNIA KING CUT LIST - Mattress Size 72" x 84"
- 2 - 4x4 @ 52-1/2" - Headboard Legs
- 1 - 2x4 @ 79" - Top of headboard
- 2 - 2x2 @ 27-1/2"
- 5 - 1x6 or 1x6 tongue and groove @ 72" - Headboard planking
- 1 - 2x6 @ 72"
- 2 - 2x4 @ 84" - Siderail Top
- 2 - 2x6 @ 84" - Siderail
- 2 - 4x4 @ 14-1/2" - Footboard Legs
- 1 - 2x4 @ 72" - Footboard Top
- 1 - 2x6 @ 72" - Footboard Base
- 2 - 2x4 @ 84" - Cleats
- 1 - 2x4 @ ~85" - Center Cleat (cut to fit)
- 11 - 1x4 or 2x4 @ ~86" - Slats (measure and cut to fit)


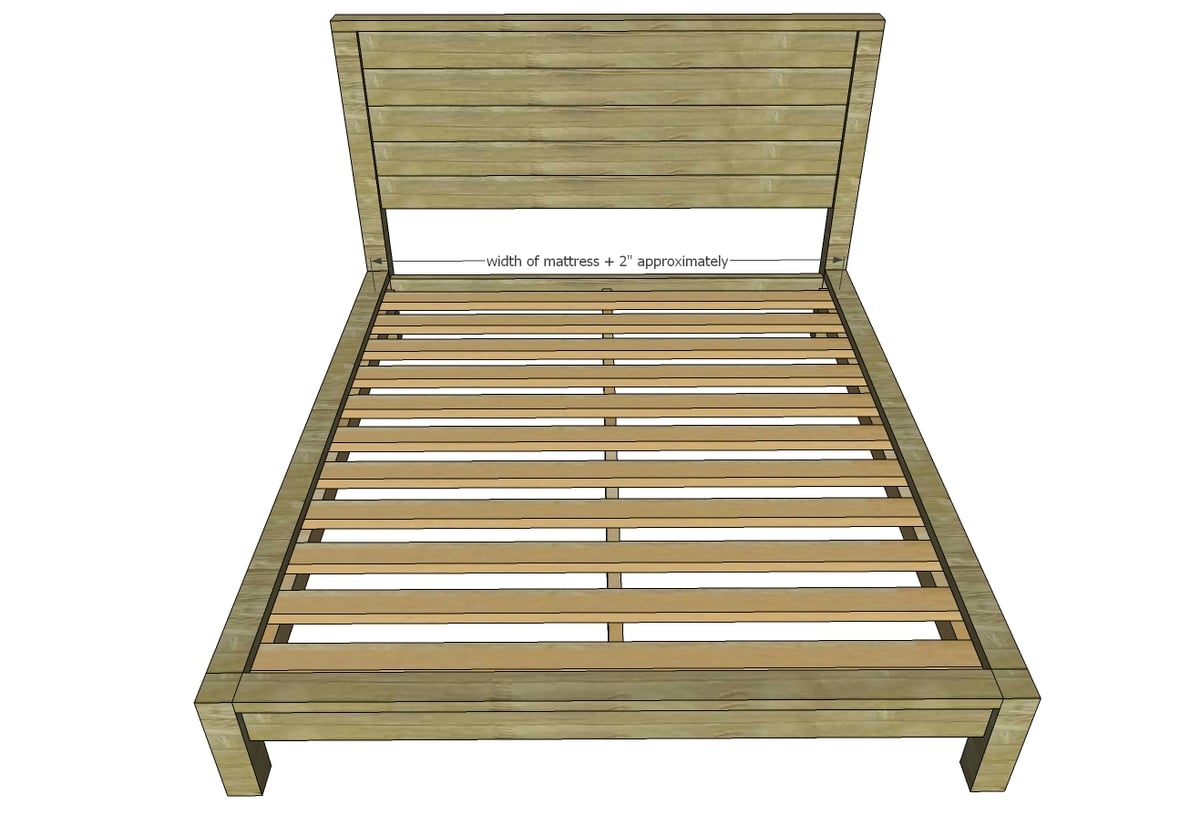
Instructions
Step 1
Attach top 2x4 to legs - we just screwed through top with 2-3/4" self tapping screws.
Step 2
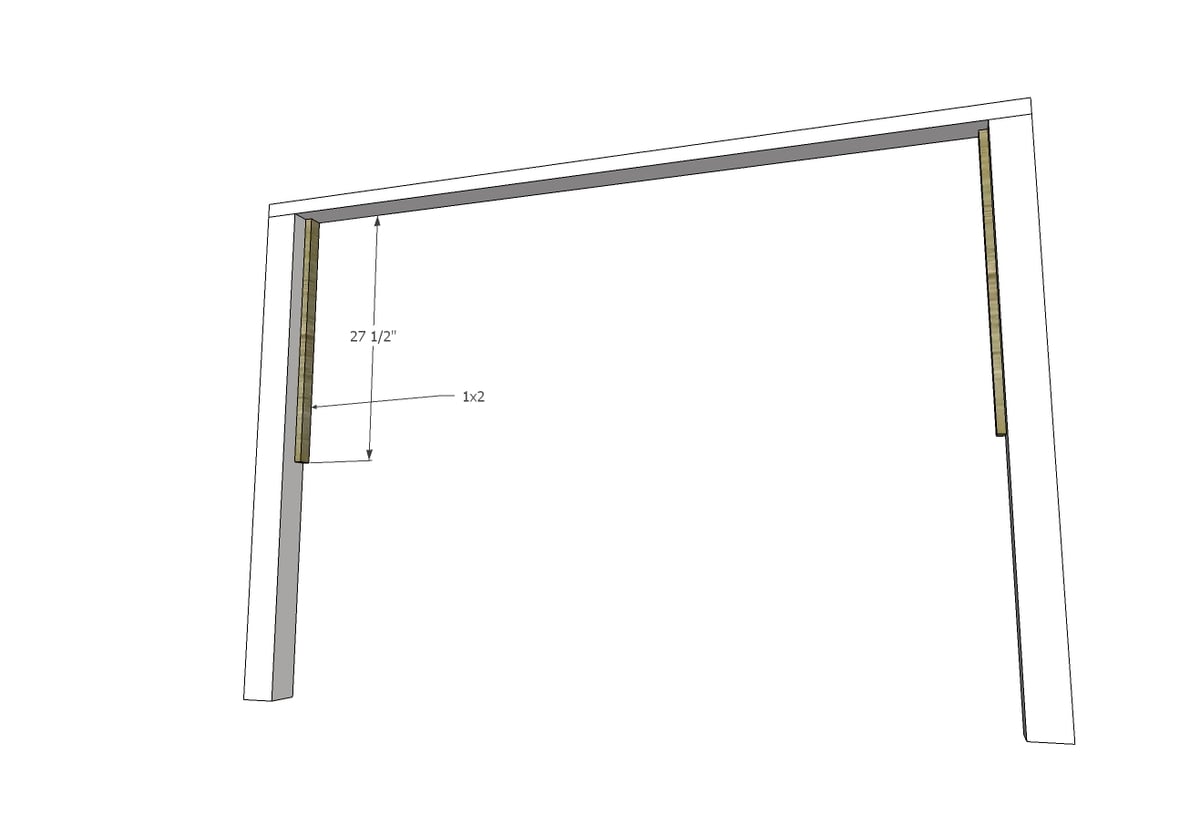
Screw 2x2 cleats to the 4x4 legs with 2-3/4" screws and glue.
NOTE: The diagram shows a 1x2. Either will work but the 2x2 is stronger.
Step 3
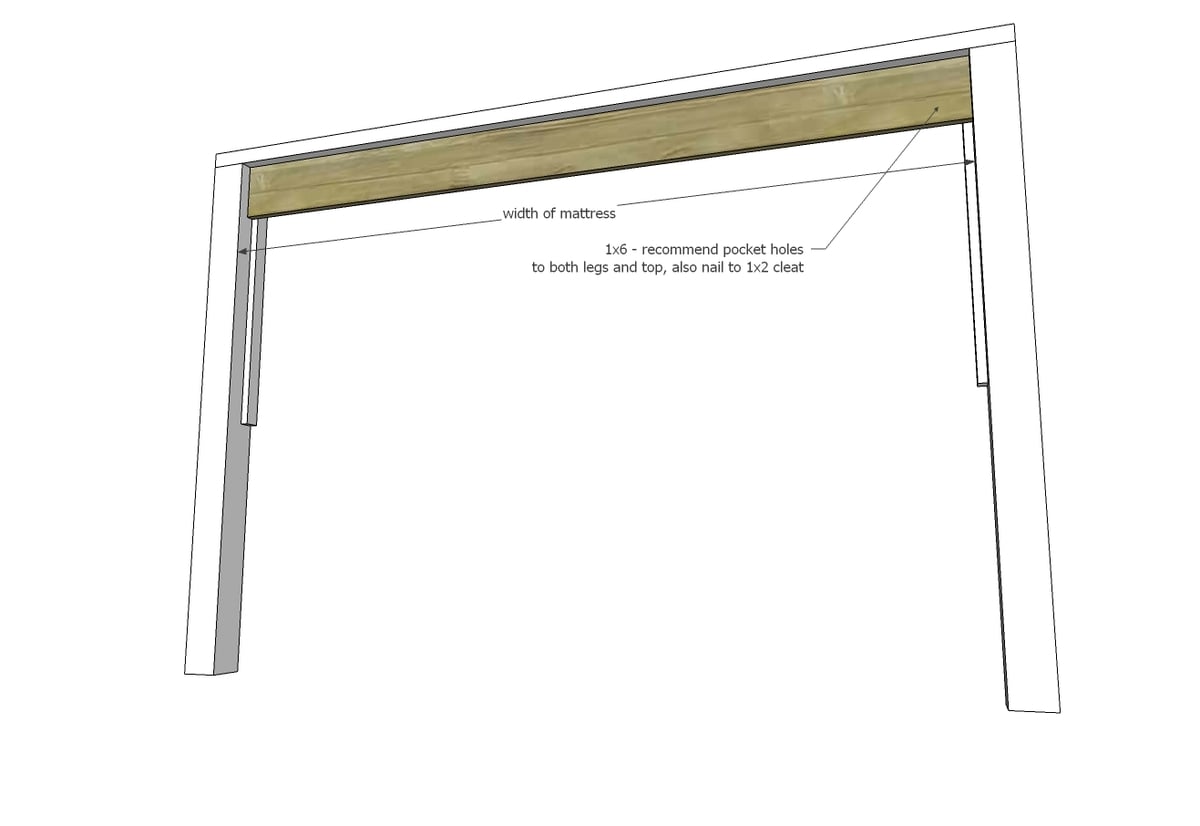
Attach first plank board to cleats, top and legs. If using tongue and groove, place groove side up, tongue side down. Pocket holes (3/4" setting, 1-1/4" screws) recommended for attaching to legs and top.
Step 4
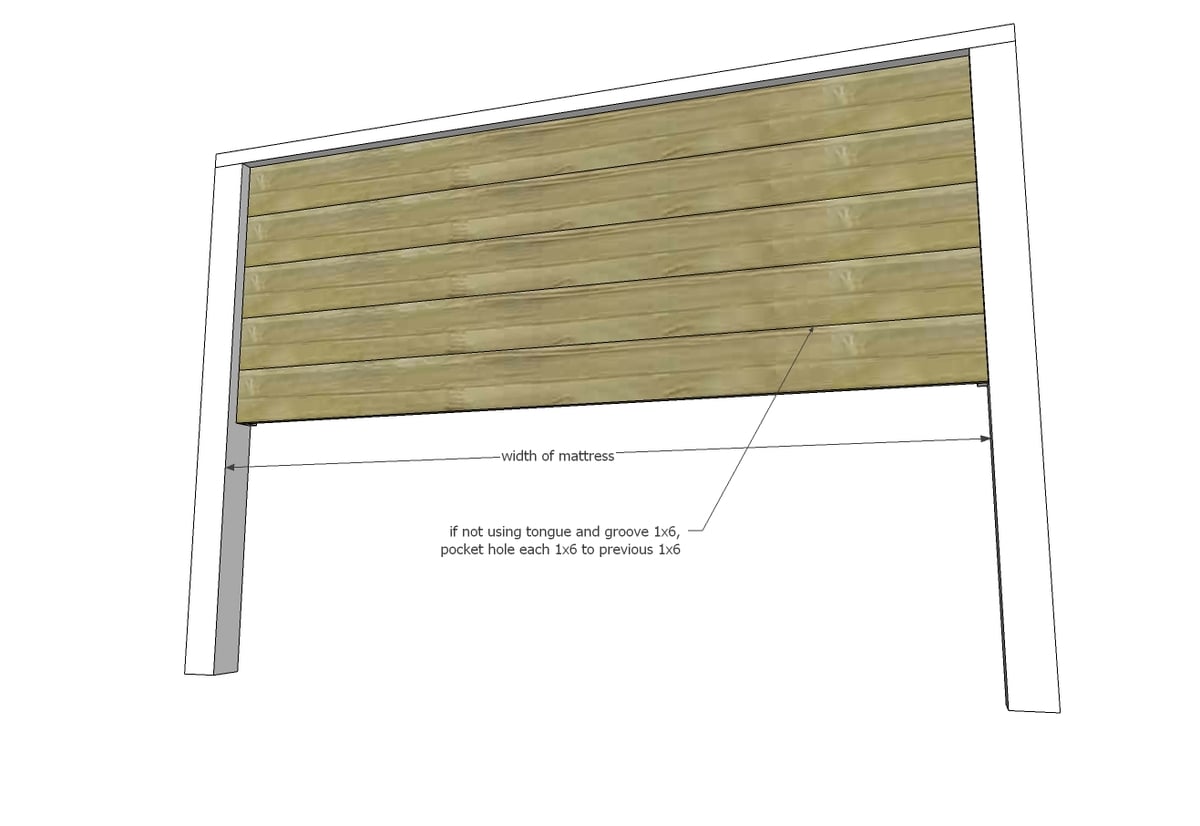
Attach remaining planking boards. If not using tongue and groove, you will need to attach each 1x6 to the 1x6 before it with 3/4" pocket holes and 1-1/4" pocket hole screws.
Step 5
Step 6
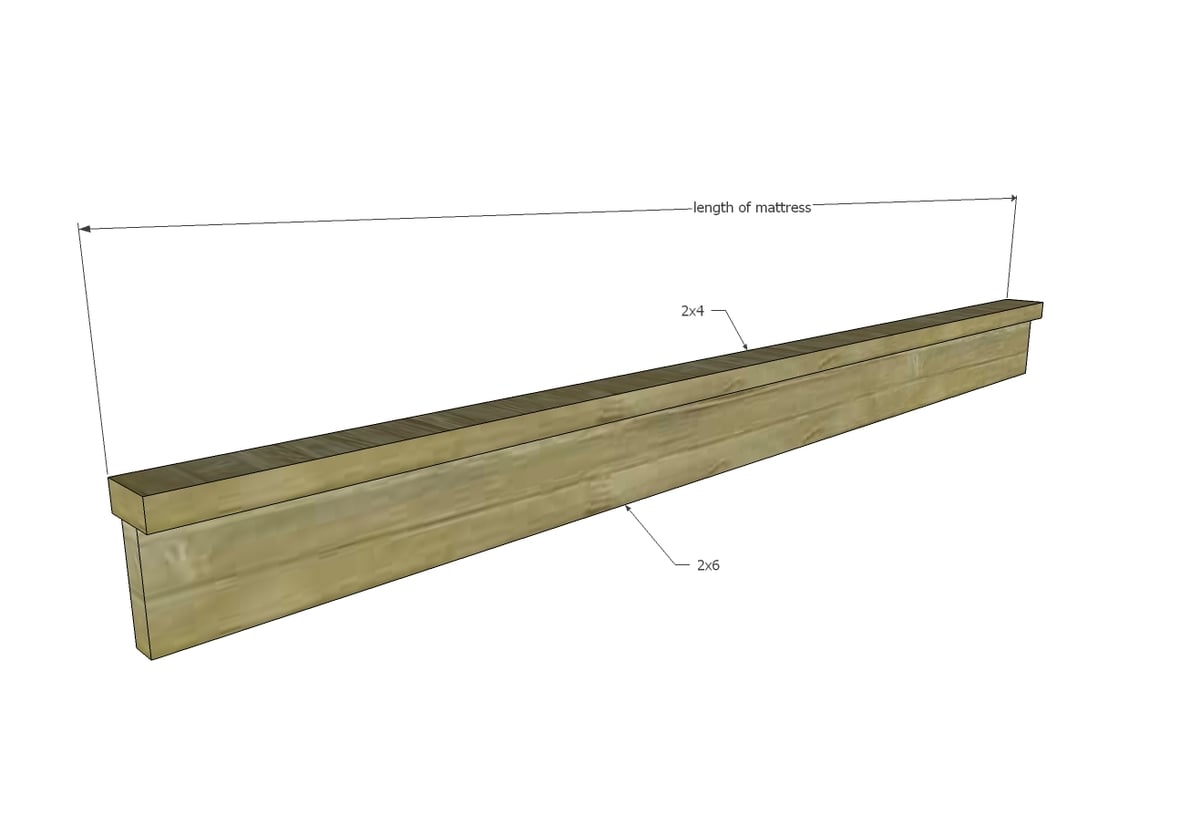
Build two of the siderails by attaching 2x6 to 2x4 with pocket holes. We centered the 2x4 on the 2x6. I also drilled pocket holes to attach the 2x4 (place carefully so won't be covered by 2x6) and 2x6 to the legs in later steps (see step 8).
Step 7
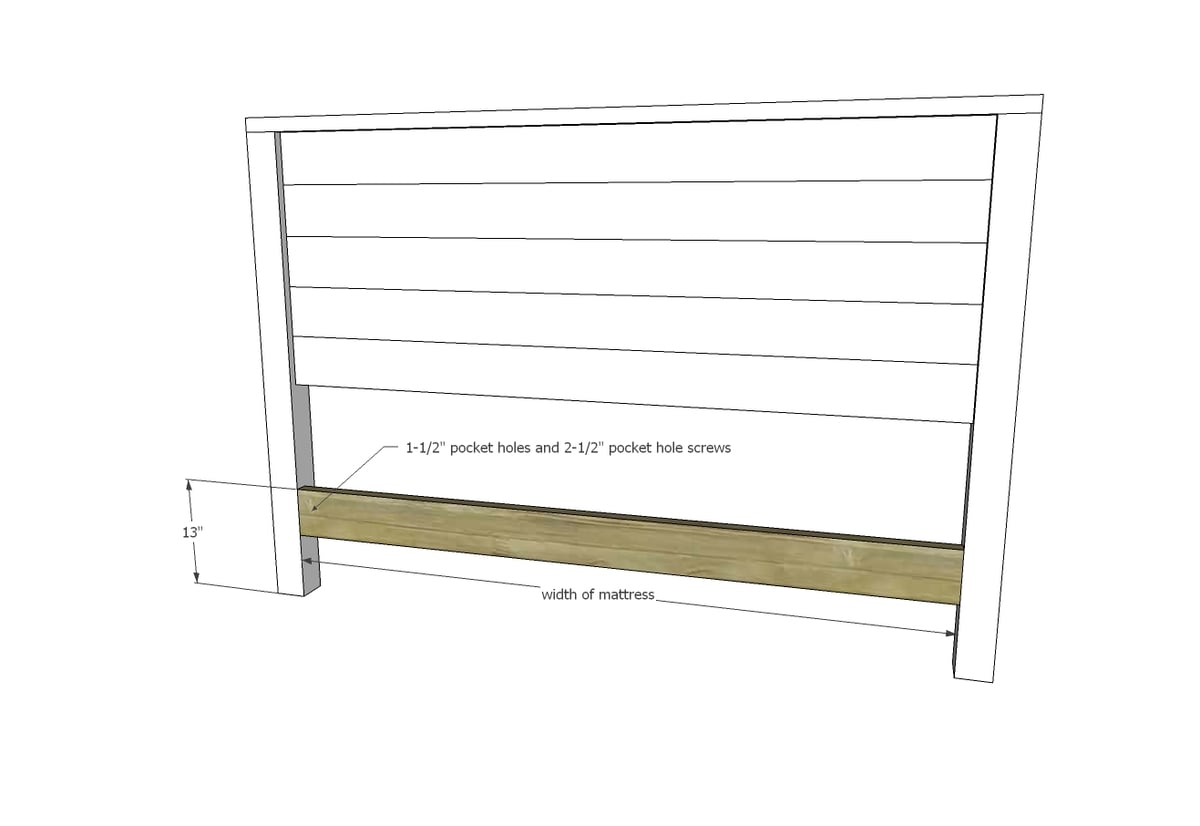
Build the footboard as you did the siderail, then attach to legs.
Step 8

Attach siderails to the legs with 2-1/2" pocket hole screws or metal brackets.
Step 9
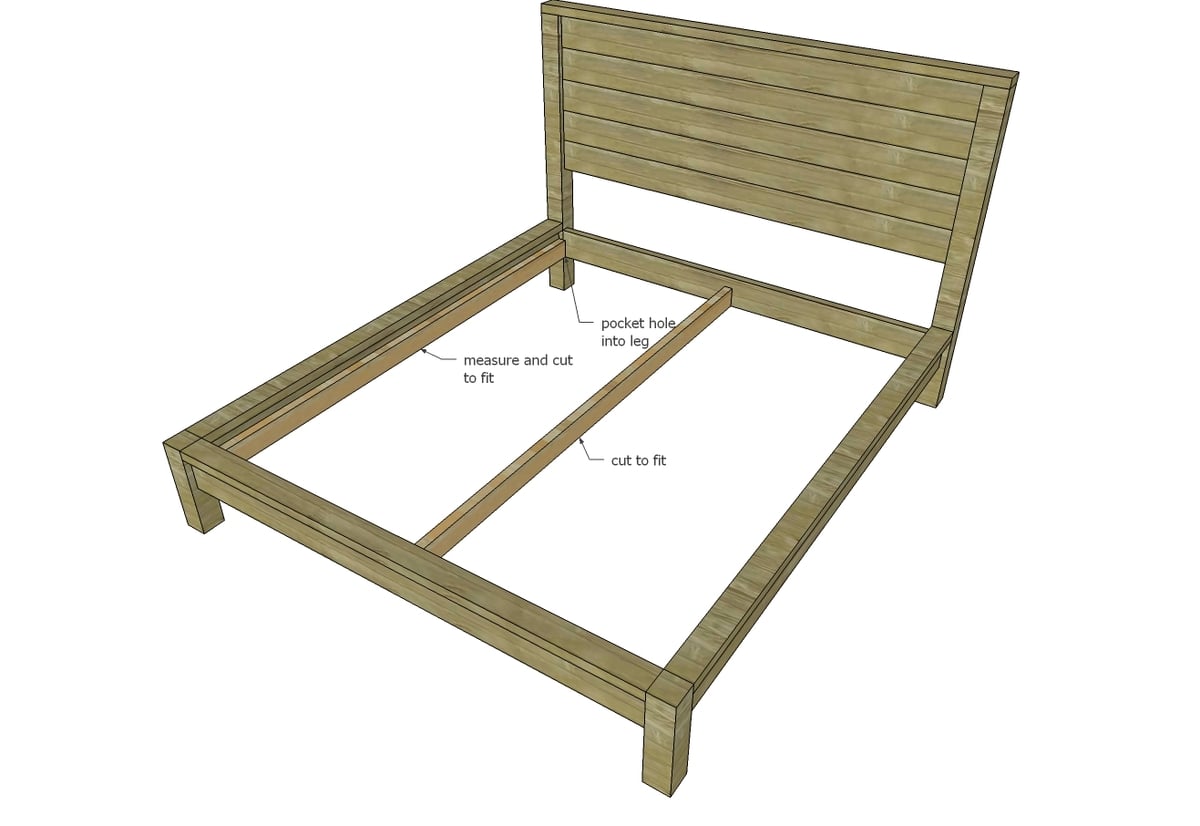
Add cleats with 2-3/4" self tapping wood screws. Center cleat optional for twin bed.
For additional support center legs can be added to the center cleat.
TWIN: No center support is needed
Step 10
Lay slats over cleats and screw down.

Comments
itsyitz
Thu, 11/30/2017 - 07:00
Looks Beautiful. Post needs editing.
Steps 11-27 are missing (i assume not needed).
Also what is the approximate project cost?
In reply to Looks Beautiful. Post needs editing. by itsyitz
Ana White
Thu, 11/30/2017 - 12:13
Thanks for letting us know.
Thanks for letting us know. Our website sometimes shows empty steps - all steps are here. We spent about $100-$150 on this bed.
mattd745
Mon, 12/04/2017 - 17:20
Set
Do you have any plans for a bedroom set with this as the bed? We love the plans for this bed frame but need a bedside table and dresser to make too.
In reply to Set by mattd745
Ana White
Tue, 12/12/2017 - 11:00
We will be making nightstands
We will be making nightstands soon!
mattd745
Thu, 12/14/2017 - 00:22
Awesome! Can’t wait to build
Awesome! Can’t wait to build this set and then figure out a dresser.
canuck
Tue, 01/30/2018 - 18:58
Are they out?
Are the night stand plans out? I didn't see them but may have missed them!
In reply to Are they out? by canuck
Ana White
Fri, 02/02/2018 - 12:30
We haven't built any yet for
We haven't built any yet for this room, stay tuned!
In reply to We haven't built any yet for by Ana White
Jenks82
Thu, 05/16/2019 - 13:28
Side Tab;es Available?
We're also considering this bed or buying online since you can match side tables. Do you have side table plans now?
LerissaB
Thu, 12/14/2017 - 06:53
Question about mattress?
I am planning to build this bed for my daughter...it looks like there is no box spring...does it not need one? What do you recommend?
Thanks!!
woodje12
Tue, 12/19/2017 - 10:05
Can build as a platform instead
We are about to tackle this project and instead of a box spring we are building a platform. We bought a Casper mattress and any sturdy, flat surface works for that mattress. Therefore we're avoiding a box spring and raising the sides a couple inches from the stock plans then putting in a plywood platform between the rails (with supports in the middle of course). Good luck!
canuck
Mon, 01/29/2018 - 21:46
photo?
Woodje12, do you have a photo of the finished bed? I'm about to start building tomorrow and also want to raise it up a bit... and I was thinking of using 1x10s as the side rails instead of 1x6s. I'm new to woodworking and would love to see an example before I go buy everything!
woodje12
Tue, 01/30/2018 - 03:49
Photos coming up in Brag Your Build
I've been meaning to post photos. I was also going to do 1 x 10's too but man was that going to be heavy. As it is, this thing could take a direct mortar hit! It is solid for sure. Take a look, I went up 2 inches from the plan and I could have pushed it a little more without affecting the syle IMHO but the wife wasn't so sure at the time.
canuck
Tue, 01/30/2018 - 19:00
Thank you!
Thank you! I saw your brag build and it looks amazing. Hmm... just have to decide which to sizes to buy tomorrow... might be a game-time decision!
woodje12
Tue, 01/30/2018 - 19:10
Pictures are posted in the Brag Your Build
It appears that my posts are showing up so not sure if this will either but I posted pictures under the Brag Your Build section. Please take a look there. I thought about 1x10's as well but they were so heavy. Even with the 1x6's I think this bed could withstand a direct mortar attack!
canuck
Wed, 01/31/2018 - 14:32
1x vs 2x?
One last question for you... did you use 1x6s or 2x6s? The plan calls for 2x6s (and I was thinking of going wiht 2x10s) but I"m having a hard time finding them in decent shape. 1x6s or 1x10s are more readily available but I wasn't sure if they're strong enough as the rails... any thoughts? Thanks!
Jendaily
Sun, 01/07/2018 - 08:24
Love this!
I want to make this for my son's room. What are the dimensions for an XL twin bed?
jlvhawk3
Mon, 01/22/2018 - 14:12
Cut List Error??
I believe there may be an issue in the cut list with the following line:
I'm thinking this is supposed to be the 2x6 underneath the 2x4 top?
omega21
Wed, 01/31/2018 - 04:53
Such a lovely post!
Thank you so much for the detailed pictures and instructions. Really anyone can build his own bed from scratch following this. Your style really takes Woodworking to the next level. Keep up the good work. My elder bro is working on a new design which he thinks will blow! I always watch his craft as I follow the threads. They are awesome and I help him with some ideas. While surfing today, I came across this thing which I found very useful for him and for some other friends. Please check it, you may be interested as well. http://bit.ly/woodycraft
Cstacy007
Fri, 03/16/2018 - 13:46
For some reason i have a gap
For some reason i have a gap at the end of the headboard plank and the top of the bed. i added an additional tongue/grove plank on the headboard for a total of 6 planks and still ended up with a gap (bottom of tongue/groove and top of my bed) that might eat pillows ;)
Is my 8" mattress not tall enough? did your bed in the picture have a box spring as well? trying to come up with a solution since i can't get behind the frame anymore without taking the bed and side rails off of the headboard.
my browser is currently not letting me paste the picture to give you a visual example :(
Brian Famous
Fri, 03/16/2018 - 14:31
It looks like they had 7 planks...
Zooming in on the pictures provided, they definitely have a box spring - but it looks like they used 7 tongue and groove planks instead of the 5 the directions state.
CaitSteen
Thu, 08/01/2019 - 09:11
Off the shelf? Pine?
What does she mean by "off the shelf 2x4, 2x6..."? What kind of wood are you guys using? I was thinking of using pine as I've heard that pine is good for furniture making due to the light color of the wood (easy to stain) and the light weight of the wood while being sturdy. I need some recommendations!
Anna in Atlanta
Sat, 08/10/2019 - 13:31
Any Ideas for Building Lighter Weight furniture?
I have loved Ana's plans for almost as long as she's been putting them on the web (long before Grace!). I want to build a bed, but am worried about how heavy everything is, built with 2x4s & 4x4s. What if the headboard & footboard were centered with patterned sheetwood (like faux beadboard sheets, or similar) instead of the 1" tongue & groove? How would that work?
I'm also wondering if anybody has attached the siderails to head- and footboards with metal hardware instead of pocket screws, for taking the bed apart to move it multiple times.
Thank you, Ana, for sharing so much over the years. How your family has grown!
pianomanharry
Wed, 08/14/2019 - 07:27
frame connectors
I am in the middle of building this bed right now. Instead of screws, I did buy metal bed frame connectors on Amazon that is coming this week. I’ll let you know how they work.
nellerzicious
Thu, 06/18/2020 - 09:09
Metal bed fittings
Did you end up building the bed with metal bed frame connectors? I bought the non mortise bed rail fittings but they didn't come with instructions. Did you figure out how to fit everything together the right way? I would love to hear what you did!
throwawayaccount
Mon, 09/09/2019 - 09:20
How is everyone's bed…
How is everyone's bed holding up? I see that the design has no center posts...so I added some to my build. I feel as if that should of been apart of the original plans.
lovekm
Sat, 12/28/2019 - 21:20
We have a king size bed and…
We have a king size bed and did add a center post. This bed is rock solid!
okstout4
Tue, 06/16/2020 - 07:33
Do you mean a post to hold…
Do you mean a post to hold the center rail on a larger bed? Watch the video, she used a plank like she used on the headboard.
chris1252
Thu, 11/14/2019 - 08:16
Questions
Has anyone made this bed with hardware that lets you disassemble the frame when moving it?
stefspruce
Fri, 08/27/2021 - 07:49
I am just finished up with…
I am just finished up with adding bed rail brackets to the ends instead of screwing with pocket holes. This allows to remove the side rails and take it a part for moving purposes. I got the idea from a bed frame build done by a piece of rainbow. That and the support for the center slat to make it removable.
lovekm
Sat, 12/28/2019 - 21:19
Success!
We have made this bed, and we love it! What is the name of the rug and where did you get it...thank you!
vtowers
Sat, 02/29/2020 - 13:58
Help - a bit confused on my headboard build
I’m mid-build on the first of two beds, and would appreciate helping me learn how to do a better job on the second.
I had a really hard time attaching my tongue and groove to the headboard legs with pocket holes because the 2x2 cleats were in the way. I had to drill out half circles in the cleats so the screws wouldn’t get hung up on the edge.
Additionally I wasn’t sure how to attach the tongue and groove to the cleats themselves; it wasn’t called out explicitly. I used a couple of screws through the back of the cleats, which worked fine, but wasn’t sure if that’s what was intended. (I also didn’t attach them to the cleats until after all my pocket screws into the legs were in place.)
Should I have skipped the cleats since I was using pocket holes to attach to the top plate and legs? I watched the video a ton of times and saw that no cleats were used on the legs for that version, but the tongue and groove was also much thicker than mine. I felt the cleats were appropriate to add structure, but had to feel my way through to a solid build. (I added a 3rd cleat down the center attached to the top and to the tongue and groove to tie it together a bit more and keep it from giving a little in the center.)
What should I have done differently? Did anyone else have this issue and solve for it differently? Thanks!
okstout4
Tue, 06/16/2020 - 07:45
2x2’s on Headboard
I know this is a bit late, but for others who might stop by it could help. This was a bit of my confusion as well. They didn’t use 2x2’s on their piece (it wasn’t shown in the video anyways). They used pocket holes as they stated, but the instructions had them added. We just screwed the 2x2 to the legs, then screwed the planks to the 2x2. So I think you can do either 2x2’s or do the pocket holes and screw them to the legs.
Bdrinkh20_
Sun, 05/17/2020 - 19:35
Hi! Just bought the needed…
Hi! Just bought the needed materials and cut down to size. But, I noticed that your plan called for 8- 2x4 and I'm only noticing 7-2x4s being used for the Standard king. Anyone else come across this problem of having an extra 2x4?
debbie005
Wed, 05/20/2020 - 18:38
finish on the modern farmhouse bed
Ana
My husband and myself are doing this bed and would love to know how you got the finish that you have on it? The Varathan for weathered wood looks like it makes it really grey. Did you do anything else over top of this or sand it off a little?
grhoden
Sat, 05/30/2020 - 19:43
Weight?
What does this king bed weight?
grhoden
Sat, 05/30/2020 - 19:43
Weight?
What does this king bed weight?
offroad_lumberjack
Tue, 06/02/2020 - 02:22
modern farmhouse bed frame question
are brad nails needed for this build? i saw them in the shopping list, but wasnt stated during any of the steps? if not, I can tackle this project soon. still dont have a brad nailer or miter saw, but have almost every other tool out there! love the rustic themes
okstout4
Tue, 06/16/2020 - 07:48
Brad Nails
I believe the brad nails were only used for the top of the headboard. We used screws everywhere else.
okstout4
Tue, 06/16/2020 - 08:22
Brad Nails
Sorry, I couldn’t edit my comment. Actually, the instructions don’t state where to add brad nails.
okstout4
Tue, 06/16/2020 - 08:21
Video and Instructions
Personally, I felt this plan was a bit confusing. The video showed a 2x2 being used to assist adding the tongue and grove, but it was never attached to the headboard in your build, but is on the instructions. Plus it says we needed brad nails, but no where does instructions state to use them. There were some sheets that had size of wood mentioned and some pages did not. For example, the footboard has the leg height, but I felt could be helpful to have the wood sizes mentioned like on Step 6. I somehow thought the bottom part of Step 7 wasn’t a 2x6 or I missed buying it from the shopping list. Step 9 shows the cleets on each side, but didn’t indicate where you were to put them. We are attaching ours to the bottom side of the 2x6. That would leave extra room for the slats to lay. However (and I think the directions mentioned it) but that doesn’t leave much room to add two pocket holes for screws to attach the side rail to the headboard. Plus I think also hard to screw slats to the cleets due to the top over hang. The video shows you screwing the sides to the headboard, but slats are not there. Then you see slats later, so I’m guessing you added them after it was attached to the headboard? My other issue is that we would have to add the slats before attaching the sides to the headboard. We’re using 2x4’s and there is no way we’re going to be able to add them in after the bottom is attached to the headboard. If we do, the part towards the headboard will be difficult. So just so everyone knows, the video doesn’t match the instructions. Great bed over all, but I felt the instructions needed a little more work.
[email protected]
Tue, 07/14/2020 - 09:31
I’m having issues with not…
I’m having issues with not using a boxspring. The gap between the headboard & mattress is just to great. What if I raise the foot & rails up to accommodate this gap? How far up would the 14 1/2 have to go for a 11 inch mattress?
[email protected]
Tue, 07/14/2020 - 09:31
I’m having issues with not…
I’m having issues with not using a boxspring. The gap between the headboard & mattress is just to great. What if I raise the foot & rails up to accommodate this gap? How far up would the 14 1/2 have to go for a 11 inch mattress?
fastandbad
Mon, 07/27/2020 - 07:50
Nice Bed but instructions need to be corrected!
Hi there. i appreciate this site, and I appreciate the free plans, and i think the bed looks great. However, if Ana White or whomever runs the site would review the comments, they would see that there are several issues with the assembly of the bed that several users have mentioned, and the plans have not been updated to address these issues.
I guess it's a case of "you get what you pay for", but I think it would help the site and the users if this information was corrected. I am speaking specifically of the pocket holes that have to be created before adding the back slats, and direction for creating the pocket holes in the wood before assembling the cross members. Thanks.
[email protected]
Mon, 10/05/2020 - 09:07
What type of wood should I use?
What would is recommended for this project? Pine?
paige682
Tue, 10/20/2020 - 10:50
What color stain did you use…
What color stain did you use for this bed frame ? Thanks in advance
getyourowneyepatch
Sun, 01/17/2021 - 17:08
Question about plans. How do…
Question about plans. How do I attach the tongue and groove planks to headboard legs after I have already attached the 2" x 2" cleats? The pocket hole screws won't clear the cleat.
Appreciate your help.
Thanks
JWhitehead3
Sat, 09/04/2021 - 10:54
By now you've probably…
By now you've probably figured something out, but for any future builders, I did not attach the 2"x2" cleats and the headboard is fine without the cleats. I attached tongue and groove boards to the legs with pocket screws using 2x2's sitting underneath (the front side) for spacing of the tongue and groovr boards.
Rjoyce06
Sun, 03/28/2021 - 09:25
Wood accelerator application
How many coats of the wood accelerator did you use? When I put one it comes out almost like a silver color and not really a weathered look. I've never used wood accelerator before so any help you be greatly appreciated.
CP Wms Sr
Mon, 10/11/2021 - 18:52
Thank you for sharing so openly...
Thank you for sharing so openly, it is very inspiring. I plan on taking the foot of this bed and using it on booth ends of the bed and lift it so I can fit a trendle under it. With a king sized bed on top I will have to offset the center supports a bit but I do not think it will hurt the function. A twin is 5" shorter so that is easy but a twin is exactly half the size of a king....hope to build this week will send pictures if we do.
wheelerlance64
Wed, 11/03/2021 - 14:01
Positioning?
I am wanting to build this for a standard king. My only concern is that I have a rather narrow bedroom ( room for this bed for sure but only about 18-24" on each side to walk by) I was wondering how much wider this frame is than the actual mattress. According to the cad drawings it is as wide as the mattress but in the cover photo from Ana's own bed it looks wider. So does the mattress sit inside the frame or on top of the 2x4 side rails?
Would love some feedback on this.