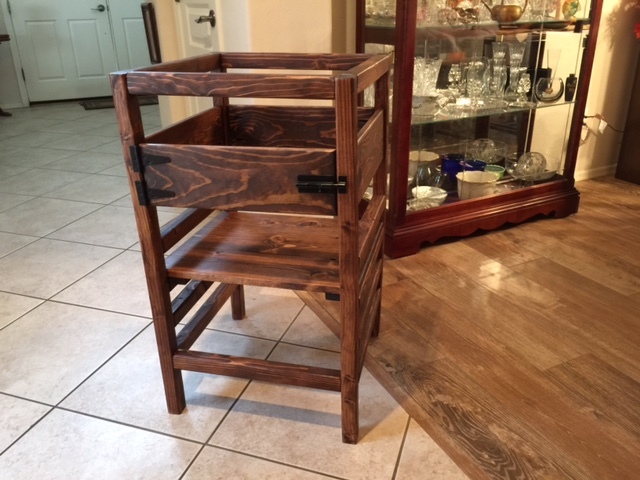
This tower is from two or three plans found on Pinterest as well as the plans on Ana White. The materials are from 2 x 2 or 1 x 5. Length of legs are 34 inches, all cross members are 17 inches basically your cutting list is :
Quantity Size Description
4 2 x 2 x 34 Legs. You can change this to taller or shorter.
14 2 x 2 x 17 Cross members
3 1 x 6 x 17 Safety sides
1 1 x 6 x 16 7/8 Door (optional)
3 1 x 6 x 16 7/8 Floor
2 1 x 2 x 17 Floor Braces
1 set Hinges (Optional)
1 Latch (Optional)
1 ¾ x ¼ x 3 Door stop (Optional)
Distanced between parts-I used Ana Whites dimensions.
Basic unit.
- Cut, sand, rout, sand, to size.Do not rout the floor as yet.Save that for later.
- Drill Holes for fasteners on the cross members.I used the Kreg unit for this.Be careful as the 2½ screws can come out on the finished side (the point) if you tighten too much.
- For the Safety sides, drill using the Kreg unit.
- Finish sanding.I finished with 220 grit.
- I stained before I assembled.Worked great.If you are going to spray paint, assemble and paint.See floor assembly now if you are going to paint.
- Assemble is easy.Use glue if you want.Fasten 2 cross members to the legs at the top.You now have 4 legs and 2 cross members fastened but do not have cross members fastening all four legs together.They are two separate units.
- Now measure for the cross members for the floor and attach.Install the top cross members first and work your way down.
- If using the safety sides, attach these.Install the door if you want at this time.I waited unit I finished spraying the finish to install the door.Install the doorstop when you want.
- Now attach the remaining cross members to form the basic unit.
- Admire what you have accomplished.
Floor Assembly
- I did not use the Kreg drill to assemble the floor.I used glue and 1 ¼ inch nails to assemble the floor.
- Lay the floorboards on the cross member as if the unit was finished. Scribe a light line on the bottom of the floorboards next to the cross members the floor is sitting on.
- Remove the floorboards and turn upside down.Put some glue between the boards and clamp.Lay the braces near the line you drew about 1/8 to ¼ inside the lines.This is important-you must have wiggle room for the floor to wiggle.
- Fasten the braces to the floorboards.After the glue dries, check to see that it fits.
- Sand, rout and sand the floor.
- Stain the floor.
Final Finish
1. I love rattle can finishes. Deft is my favorite. Use what you like. Take your time.
I stained all the wood before assembly. Sprayed with Deft after assembly.