My wife and I saw a large table and chairs at a local antique store priced at $1000...
It was nice and probably worth what they were asking, but after a failed attempt to negotiate the price down to a more reasonable number, I decided to build a table. I was in the thinking stage when it hit. I've been wanting to tear down this random privacy fence in the back yard ever since we moved in a few years ago and so...... a table was born from an old fence..
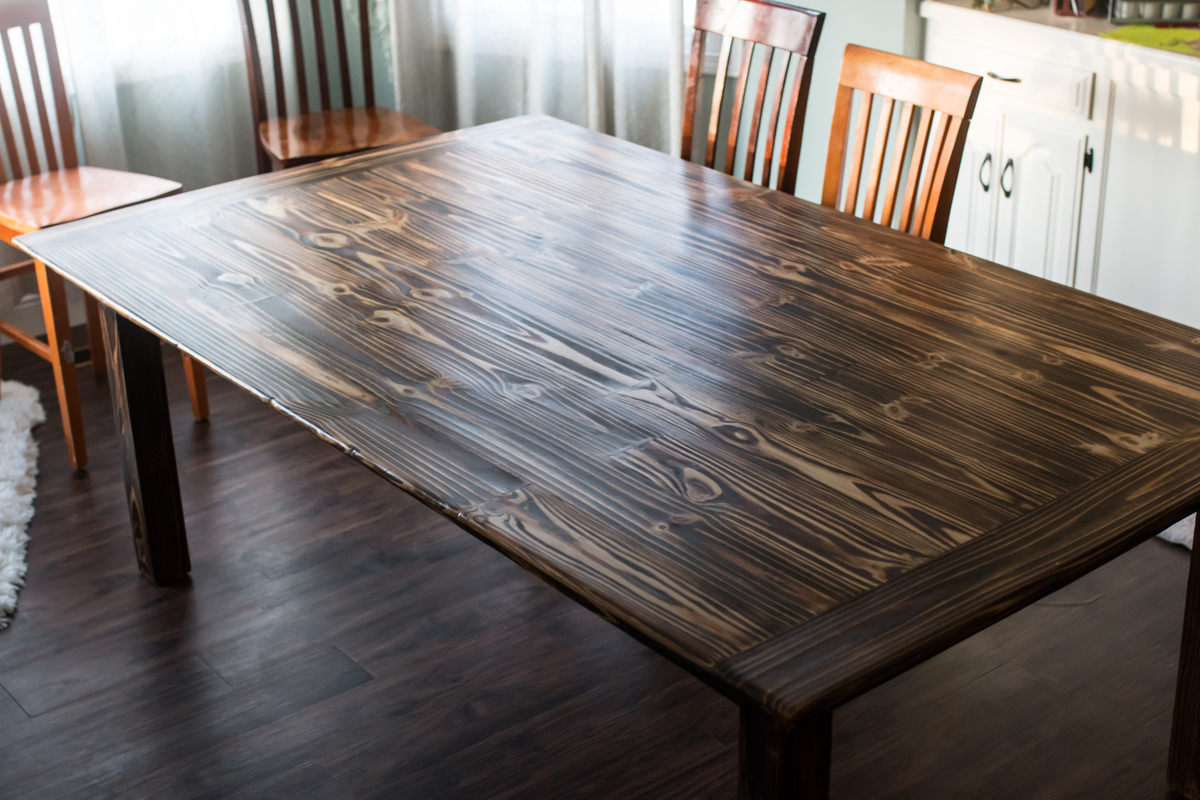
You cant tell in the pictures but this table seats 12 comfortably. ( 4 on each side and 2 on each end). it is 7' by 4'
Estimated Cost
I visited the store to determine cost even though I made mine from an old fence. I believe you could make this table for well under $200 ( that's for a huge table)
Estimated Time Investment
Weekend Project (10-20 Hours)
Finish Used
blow torch and polyurethane
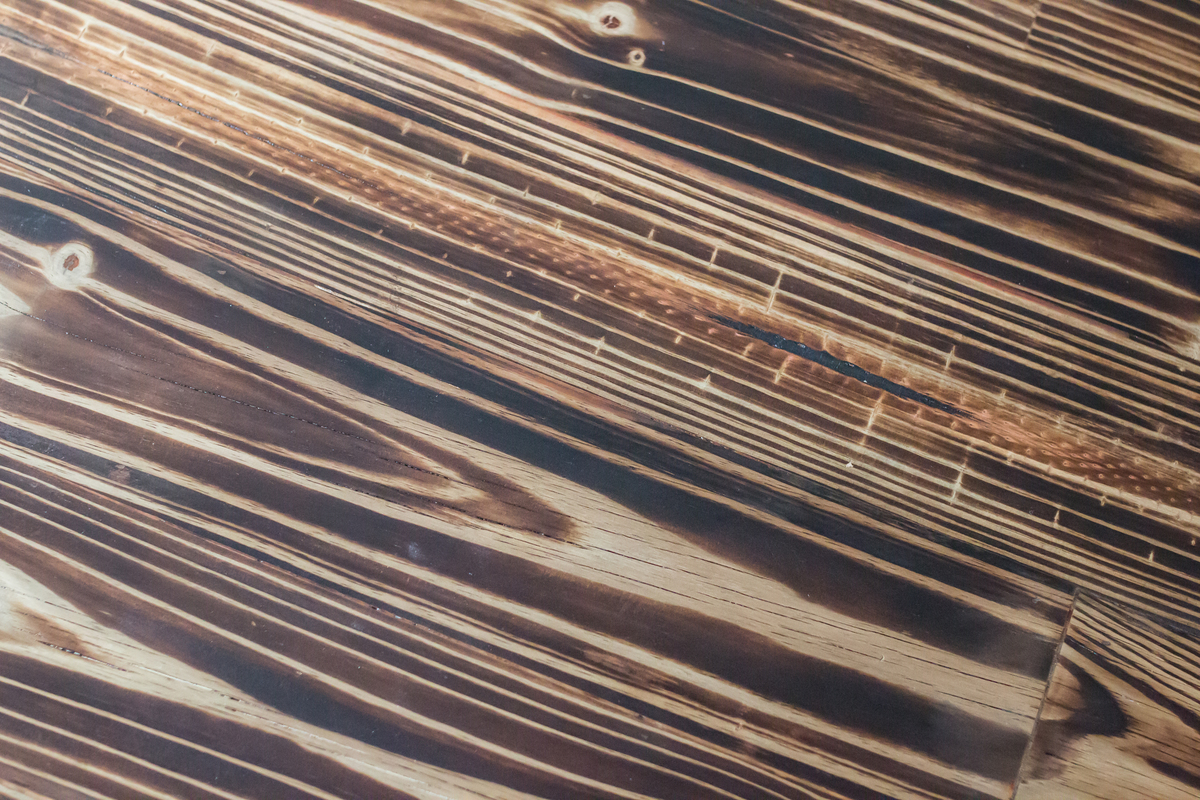
run torch over your assembled table about 2-3 inches above surface and keep it moving, try on a test board first you catch on quick. Do all your sanding before the torch no sanding after torch before poly.
after torching, put first coat of poly. light scuff before second/third coat.. thats it.
run torch over your assembled table about 2-3 inches above surface and keep it moving, try on a test board first you catch on quick. Do all your sanding before the torch no sanding after torch before poly.
after torching, put first coat of poly. light scuff before second/third coat.. thats it.
Recommended Skill Level
Beginner
Comments
samghickey
Mon, 02/02/2015 - 04:49
construction
4x4 fence post legs notched to hold 2x4 frame topped with a 3/4 in plywood. ( necessary since many boards were cupped or bowed, needed to have something to glue to.)
fence boards werent long enough for length of table so they were staggered as pictured. I had to do alot of planing and run all the fence planks though a table saw to square them as much as I could. ( also not as necessary if you buy wood from your local hardware store.)
The frame has 3 cross braces, and corner braces all the way around. plywood screwed to bracing/frame
planks laid out on plywood and glued plus brad nailed to hold them while glue dried.
routered edges of table top and started sanding, LOts of sanding , belt sanding with 80 grit then orbital sander stepping up to eventual 400 grit. I then cut skirts for the top of the legs 3 and 1/2 in skirts to cover screw holes. and a 1 in skirt to cover the rough edge of the plywood, ( both plywood and table top have a 2 in and 3in overhang respectively. Once everything was sanded to suit. I torched it and hit it with poly..
Ana White Admin
Mon, 02/02/2015 - 11:07
Beautiful!
Love that is was repurposed from an old fence and the finish is amazing! Thanks for sharing!
MrCoffee
Mon, 02/02/2015 - 16:53
Great work
I love the way the finish came out on this. Great job.
ssellers
Tue, 02/03/2015 - 08:34
BEAUTIFUL FINISH
This table is absolutely beautiful!! I am thinking of doing something similar but on a slightly smaller scale. Would you be able to post your plans? I'd love to see the brace work on the bottom/sides of the piece.
Also, how difficult was it to work the blowtorch? Any tips on what I should do (or not do) when trying it out on my own?
Thanks for the post!
Michael K
Tue, 02/03/2015 - 15:21
Great Job!
Your project came out great! The wood grain is so prominent. My guess is that torching accentuates the wood grain so that it stands out more. Excellent stuff.
samghickey
Tue, 02/10/2015 - 21:10
torching
just try torching on a test piece first, it was suprisingly easy to do.
Plans...... I didn't make any. ( booo ) I used a 2x4 frame and 45 degree corner braces with 3 cross members. since most of the wood was extremely weathered, there was a lot of planing and sanding to do. Even then I put down a piece of plywood as an underlay for the planks to glue to. I punched the planks down with brad nails to allow the glue to dry because the planks took some effort to keep them flat. I have since built a matching coffee table 4' by 4' with yellow pine from the lumber yard, Not nearly as much work to put together since all the boards were reasonable straight/flat.