Bookshelf Hidden Doors Over Closet

Hidden door bookshelves hide a furnace closet. Built by Kraig Faulkner
Built from Plan(s)
Recommended Skill Level
Advanced
Hidden door bookshelves hide a furnace closet. Built by Kraig Faulkner
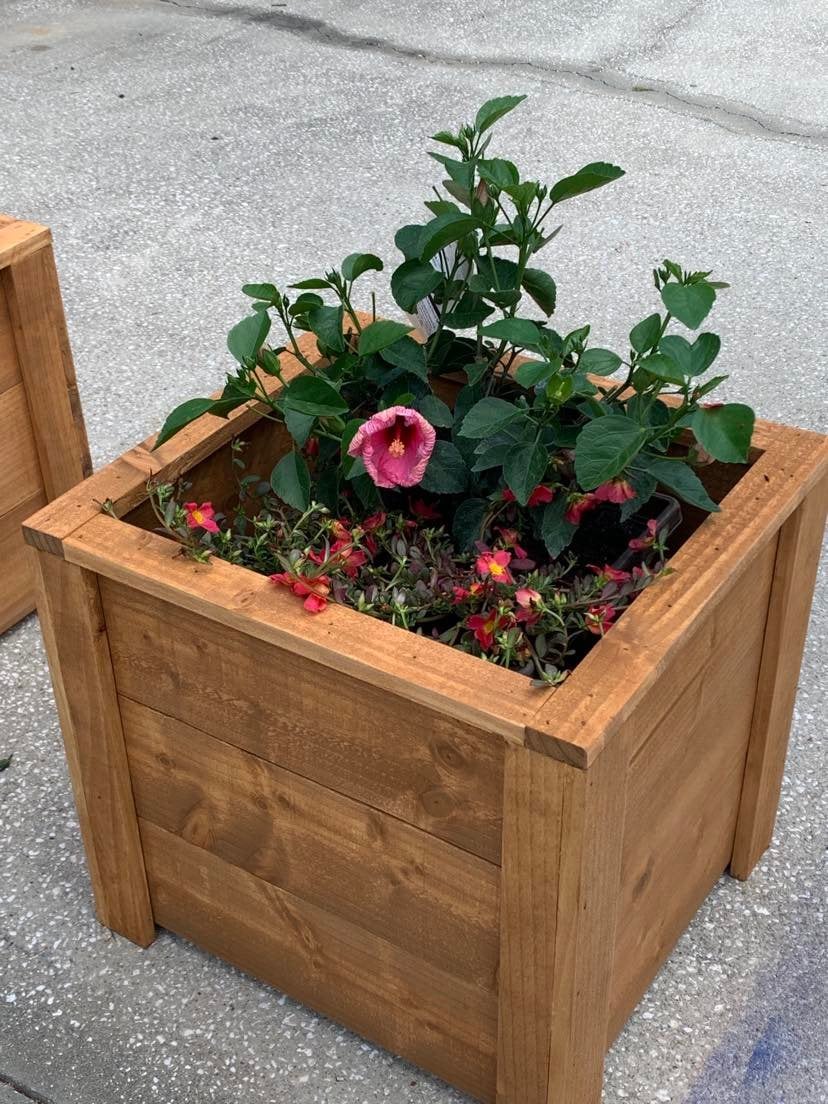
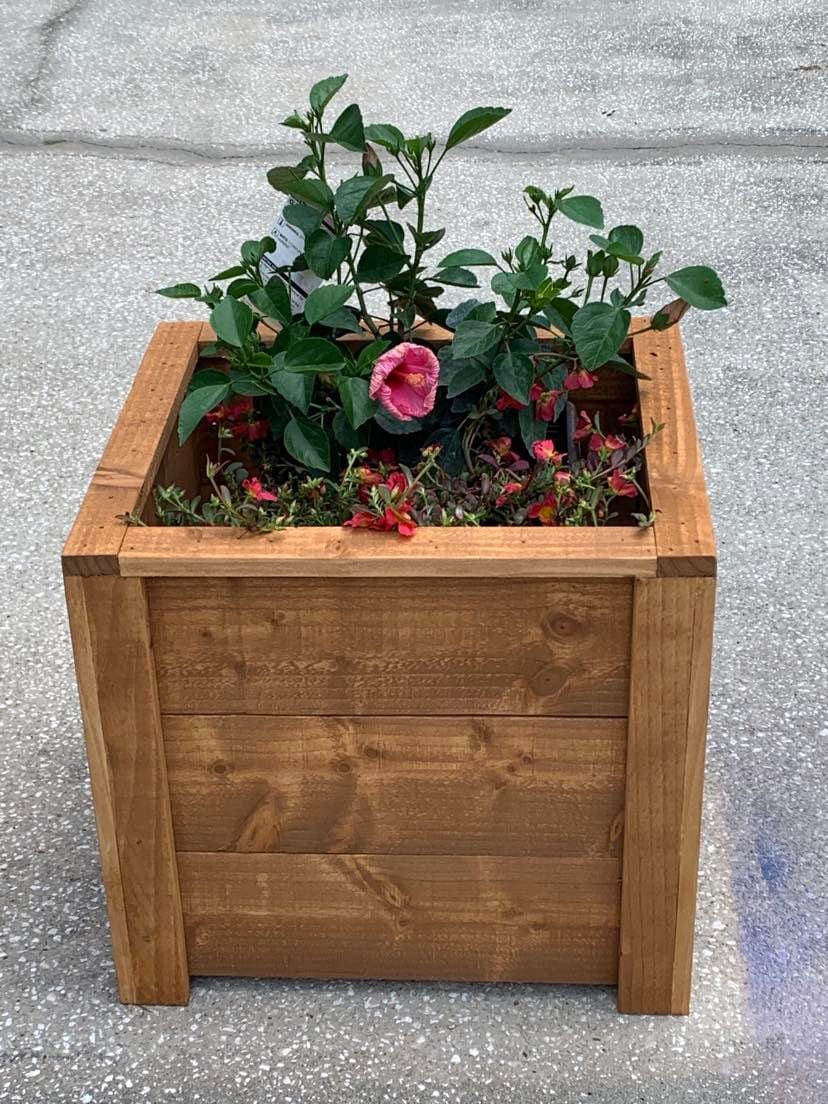
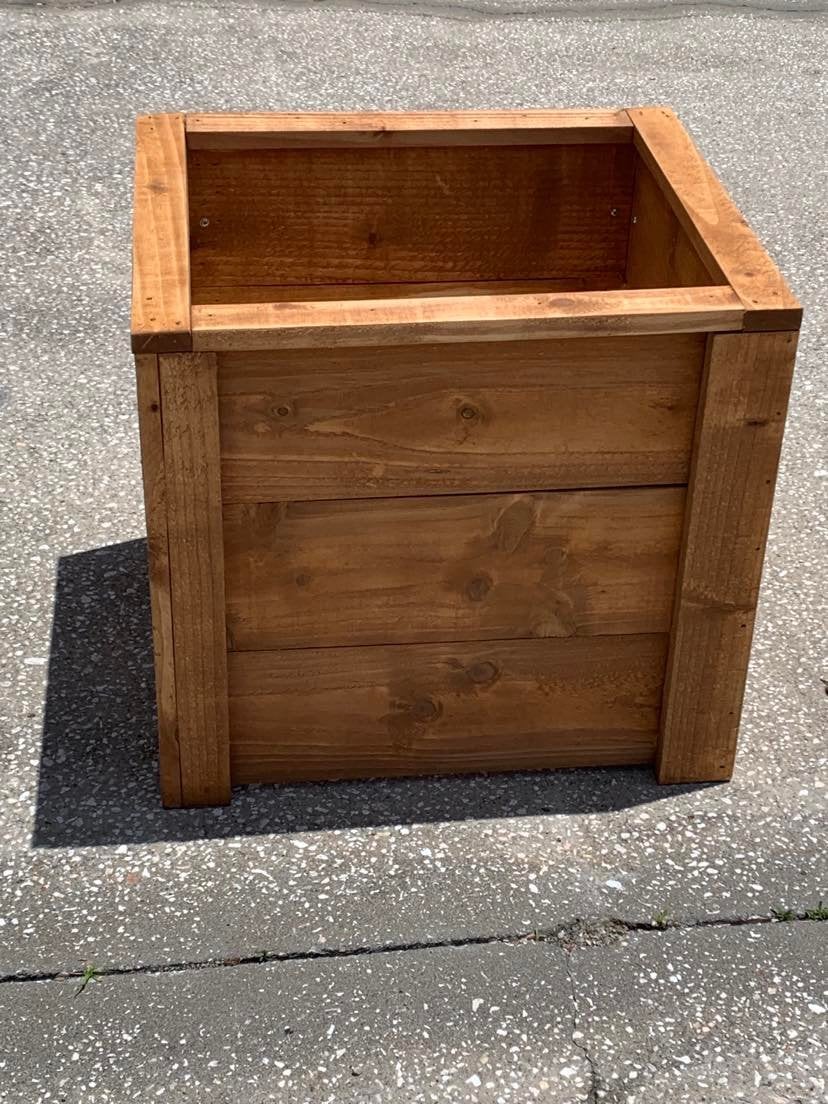
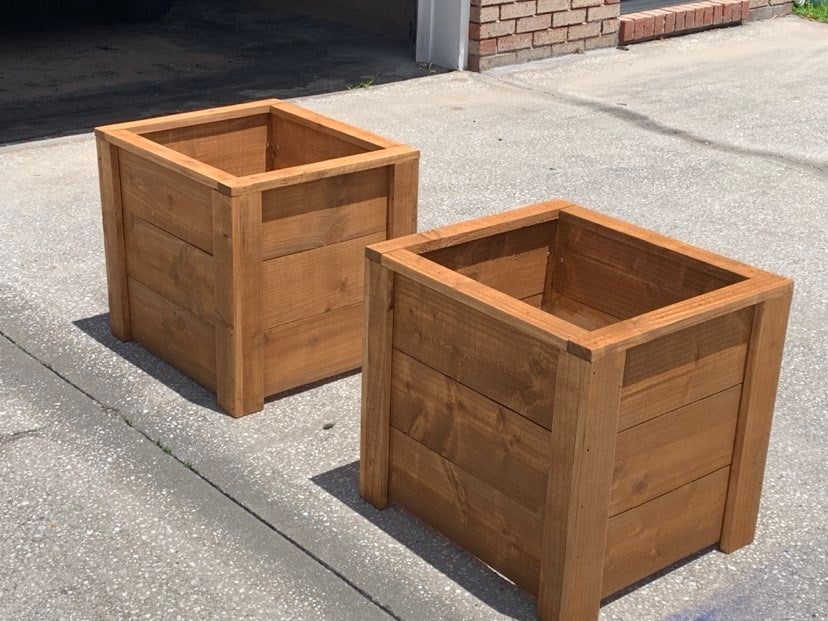
Thanks Ana, I built your planter box, actually built 2 of them, one for each mom. The were a huge hit and I already have people asking me to build them one.
So loved building this planter box. Thanks for all you do for your fellow woodworkers!
Dale G
Callahan, FL
Tue, 05/10/2022 - 07:05
Love these, wonderful idea for a mother's day gift, thank you for sharing!
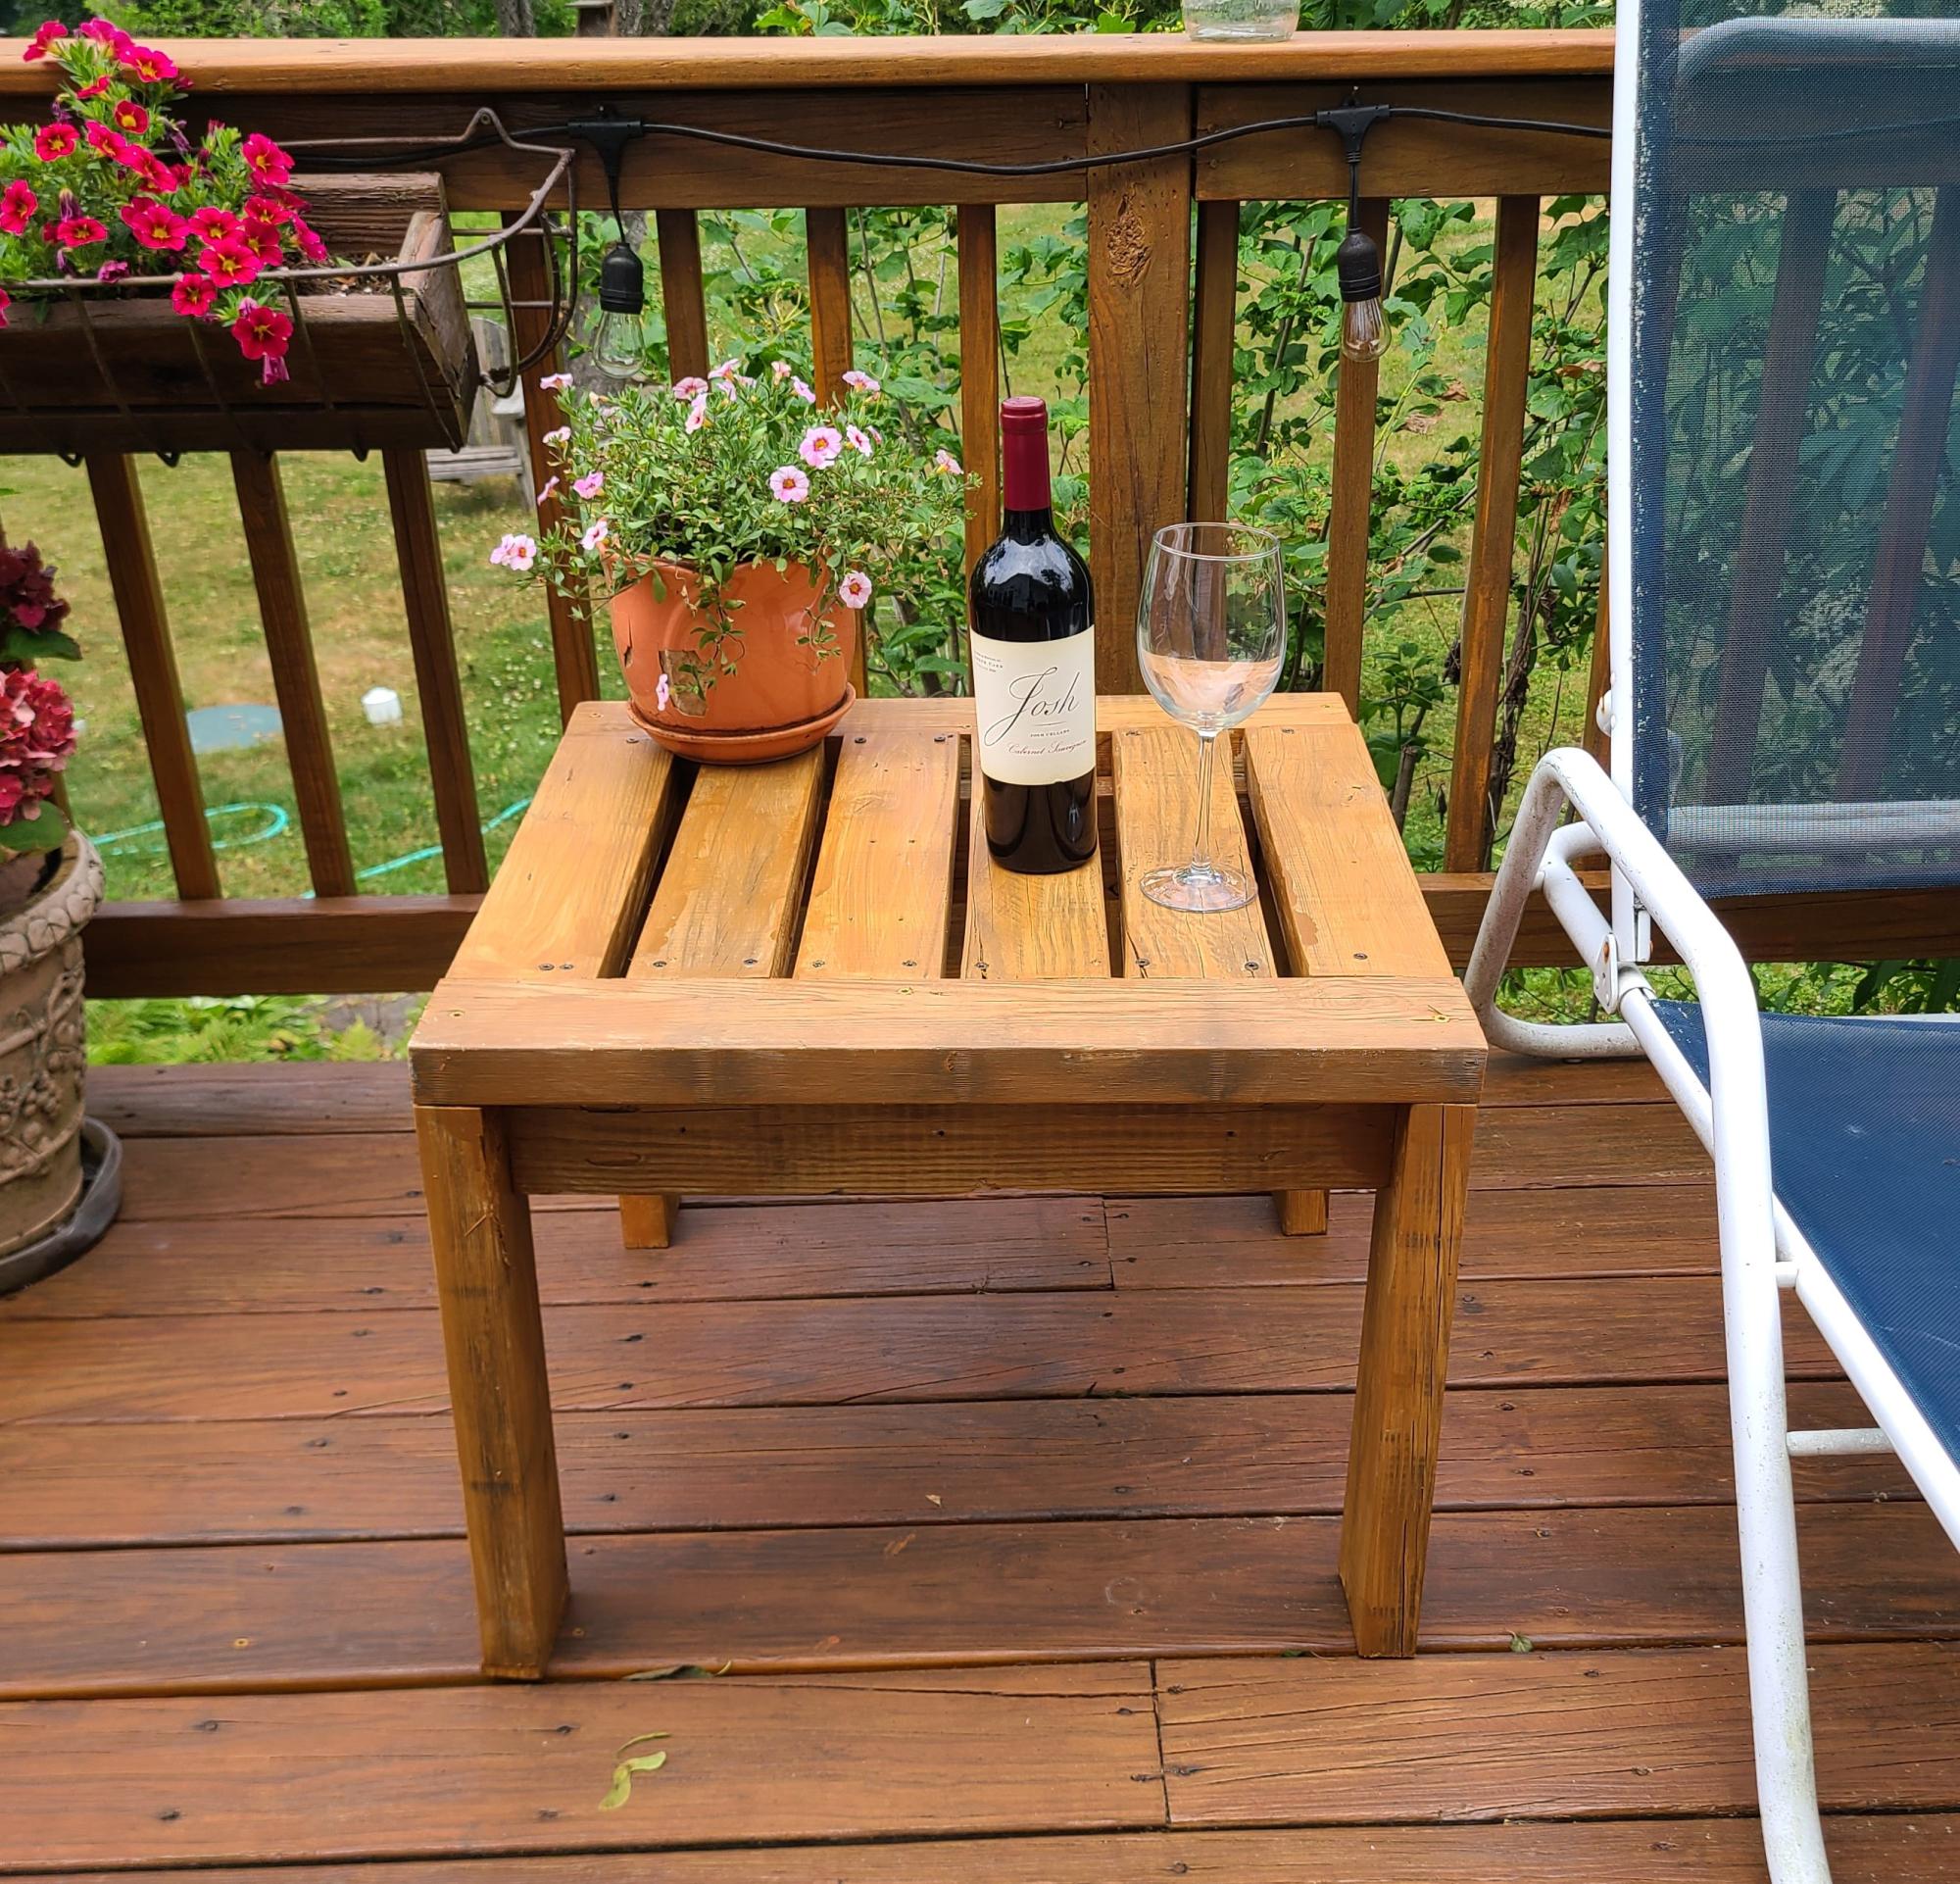
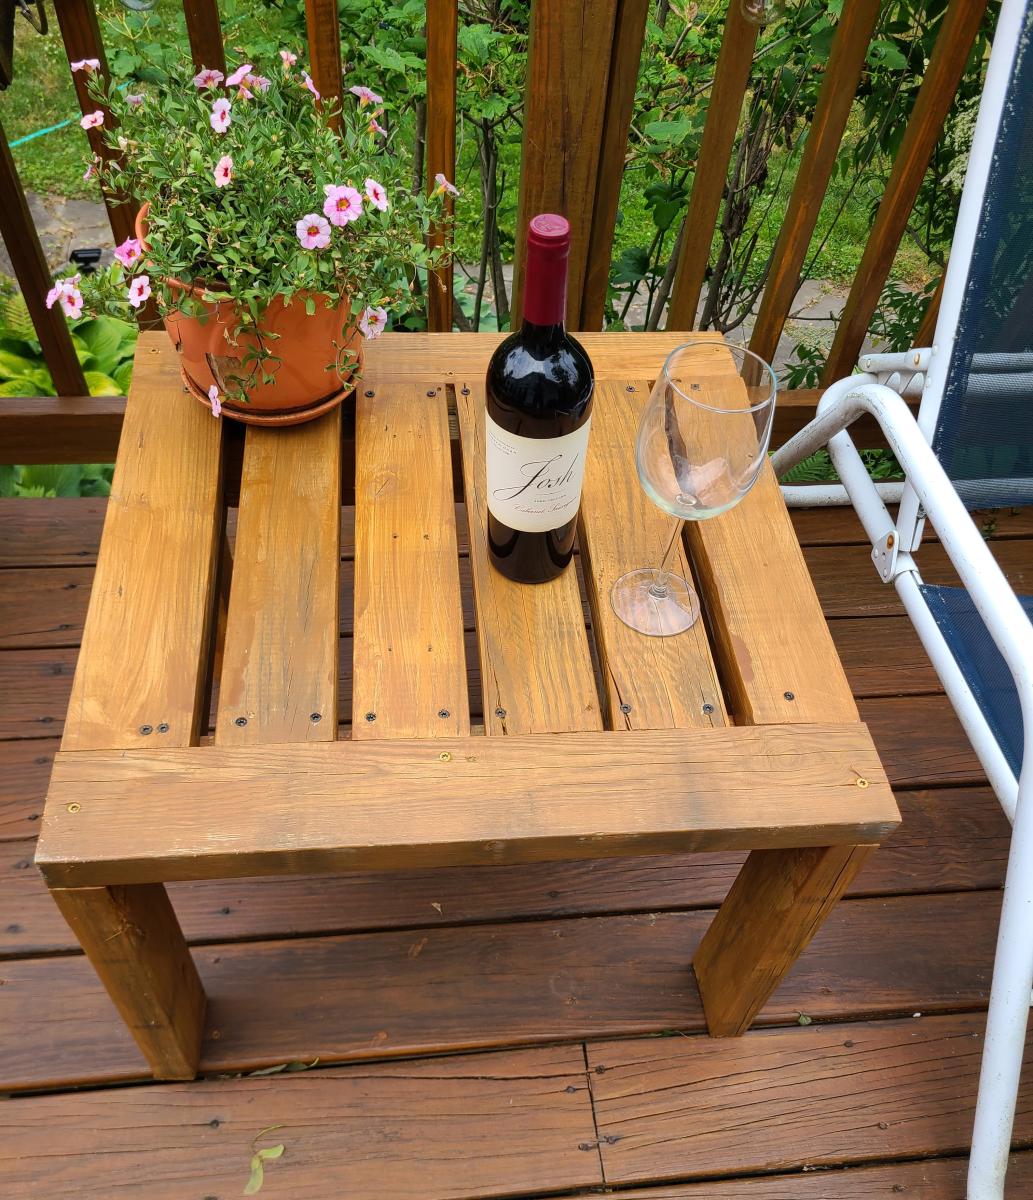
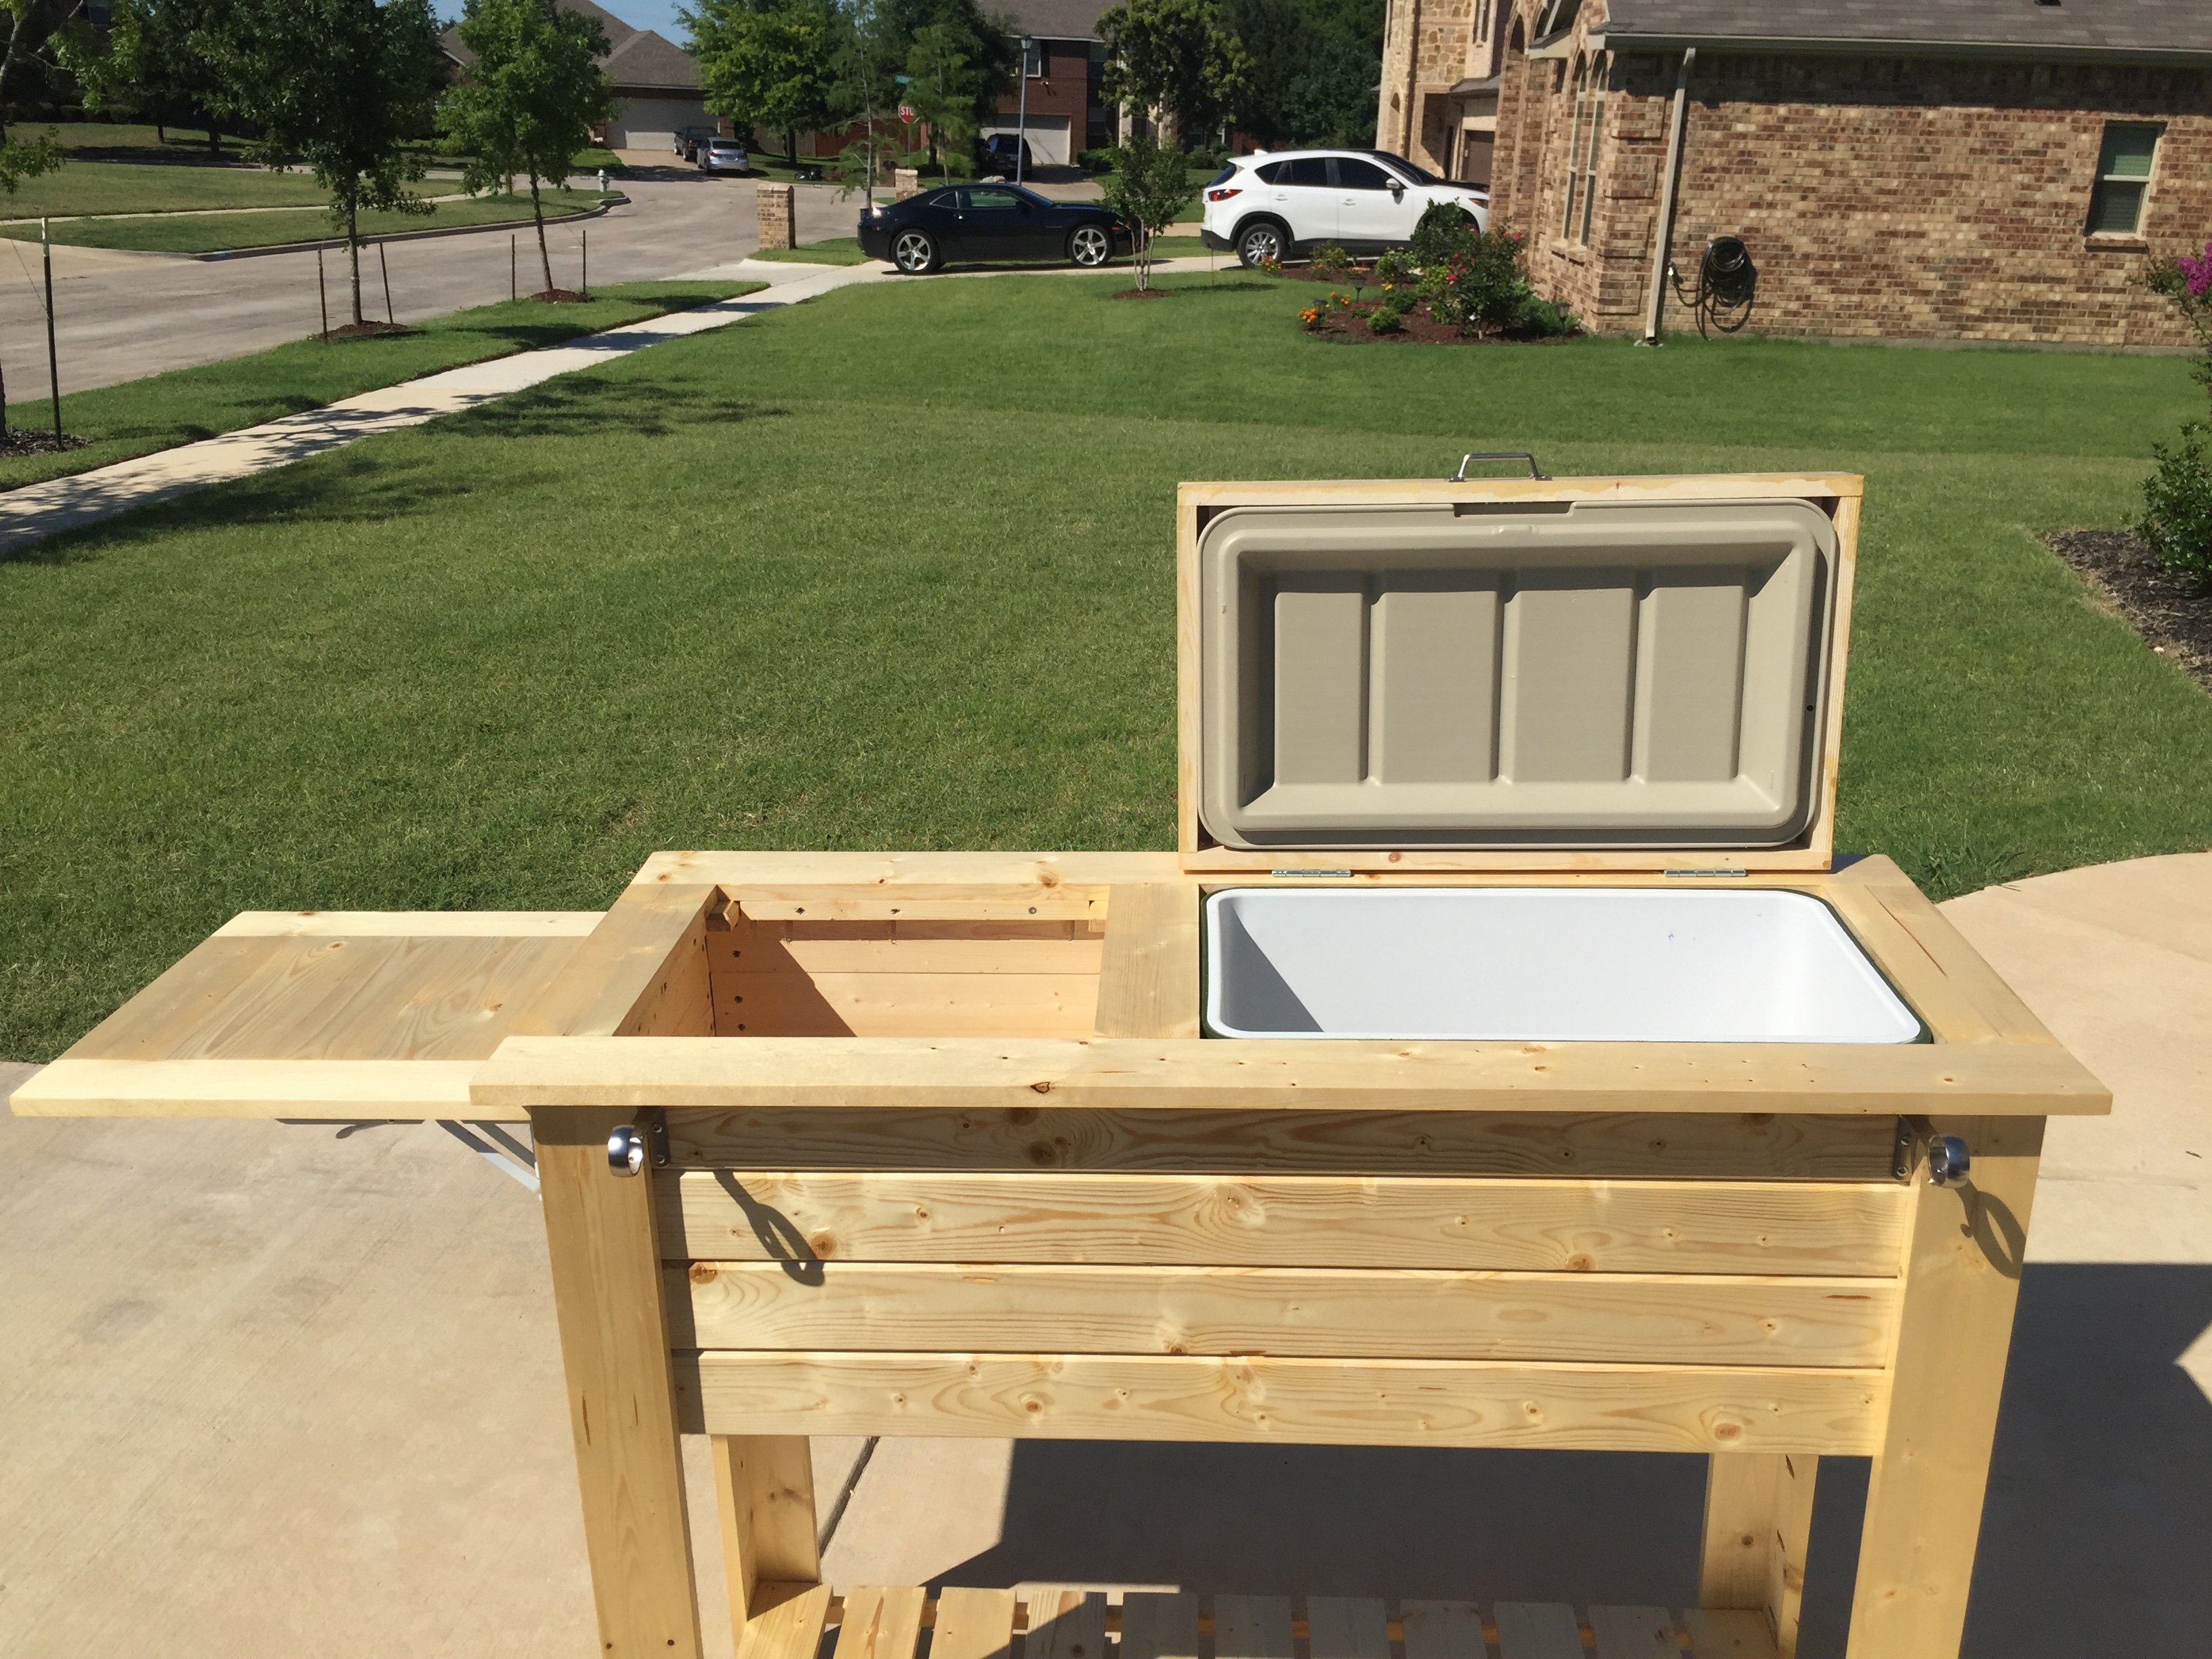
I built these deck end tabled from reclaimed decking.
Greg P
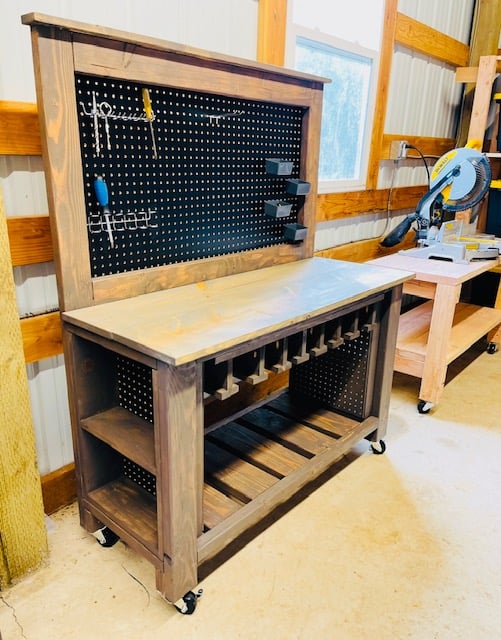
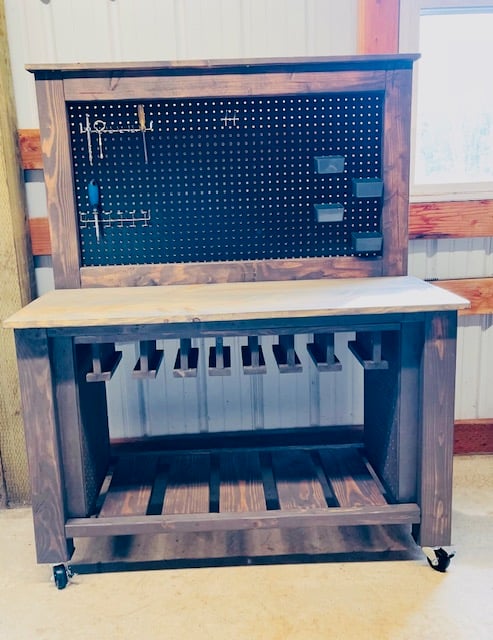
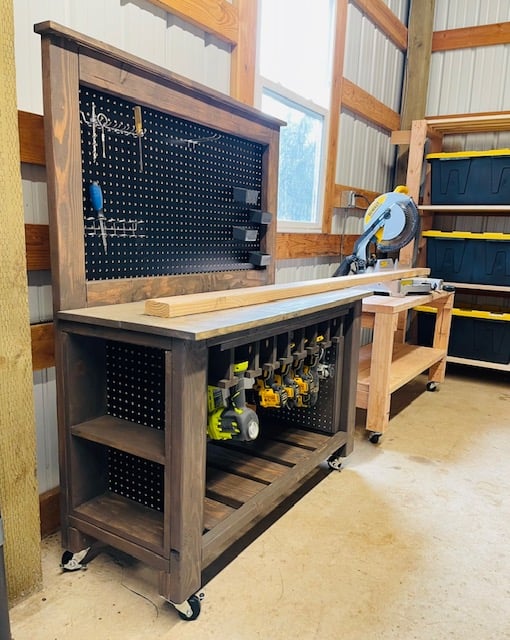
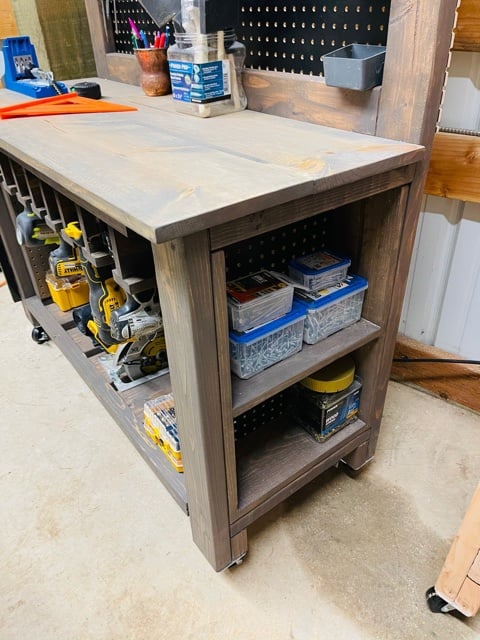
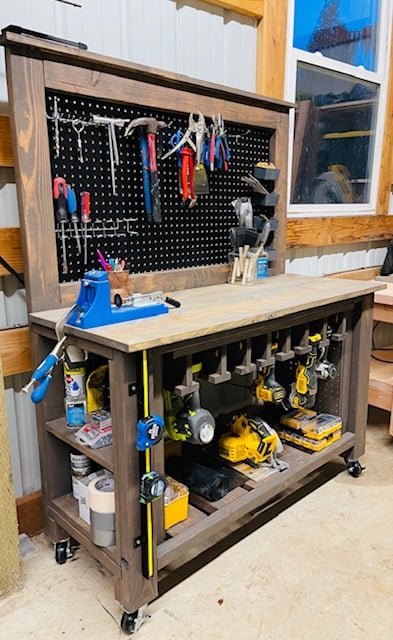
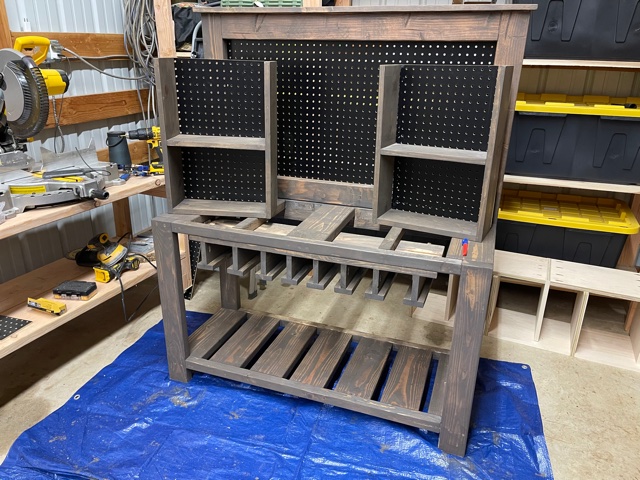
I took Ana's Farmhouse potting bench plan and made it a workbench with some mods. I added the tool storage and adjusted it for different widths depending on the tools. I added some support under the tabletop to attach the tool storage piece. On the ends, instead of the X detail I built shelves for each end for added storage for screws and paint. Finally the pegboard back allows for more storage! The height is consistent with the height of my chop saw on my other workbench for when I need to chop longer boards. I am very happy with how this project turned out and it is now full and in use!
Fri, 01/29/2021 - 10:28
Nice job on this! I think the mods really are great and practical, you're a genius!
Mon, 05/09/2022 - 07:21
True inspiration! Love love love it and stealing it for my garage!!

It took a while to come together and made several modifications but it is a great coop and was a major selling point of the house when we were relocated. I had added a main tray under the roosts and a door to srape the poop out. This made keeping the coop clean very easy.

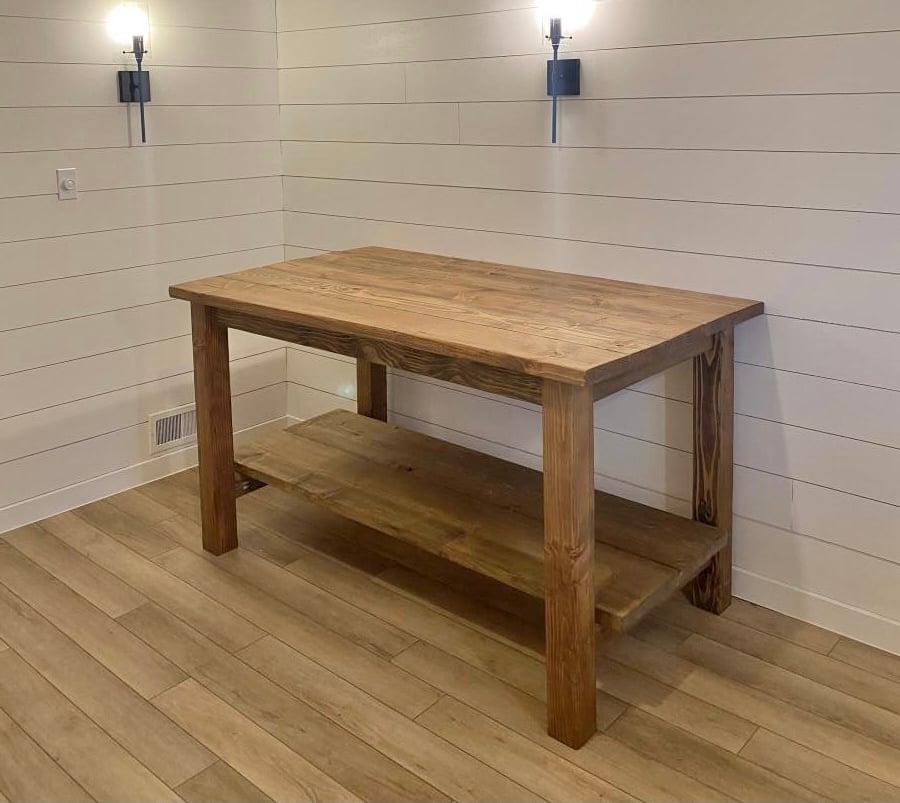
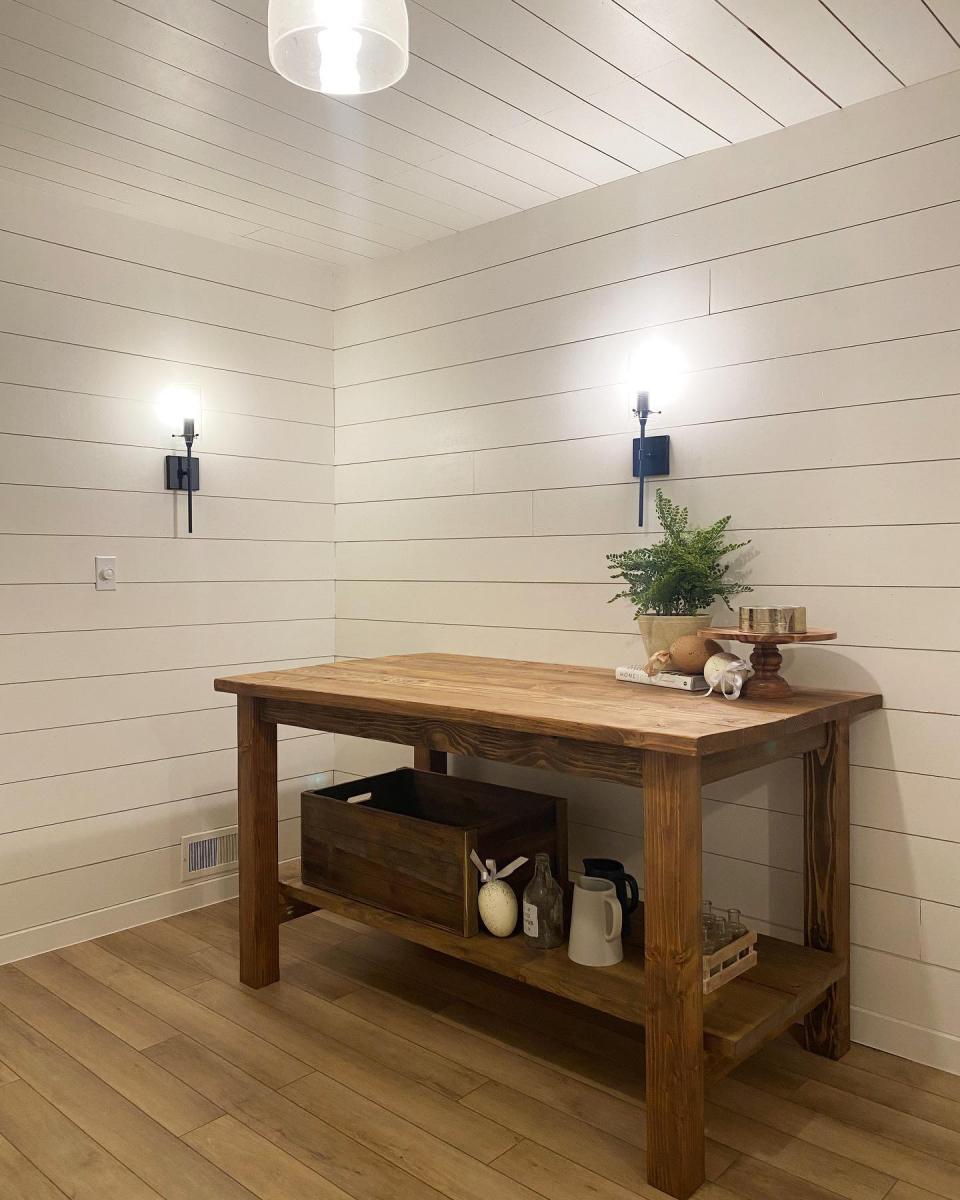
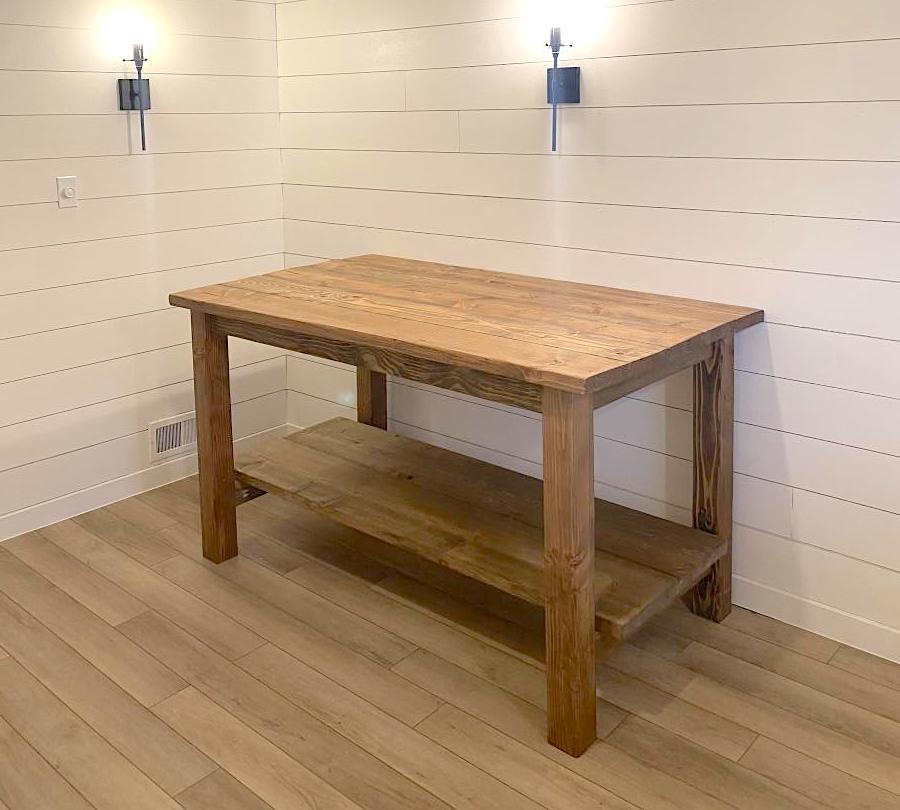
The counter height farmhouse table plans were so helpful! Thank you Ana White! I replaced plywood on top with 2x8s and added a shelf underneath the table for some kitchen storage! I am in love thanks again😍 Follow me on Instagram @abbbclark_homeee for more home renovations, decor and DIY!
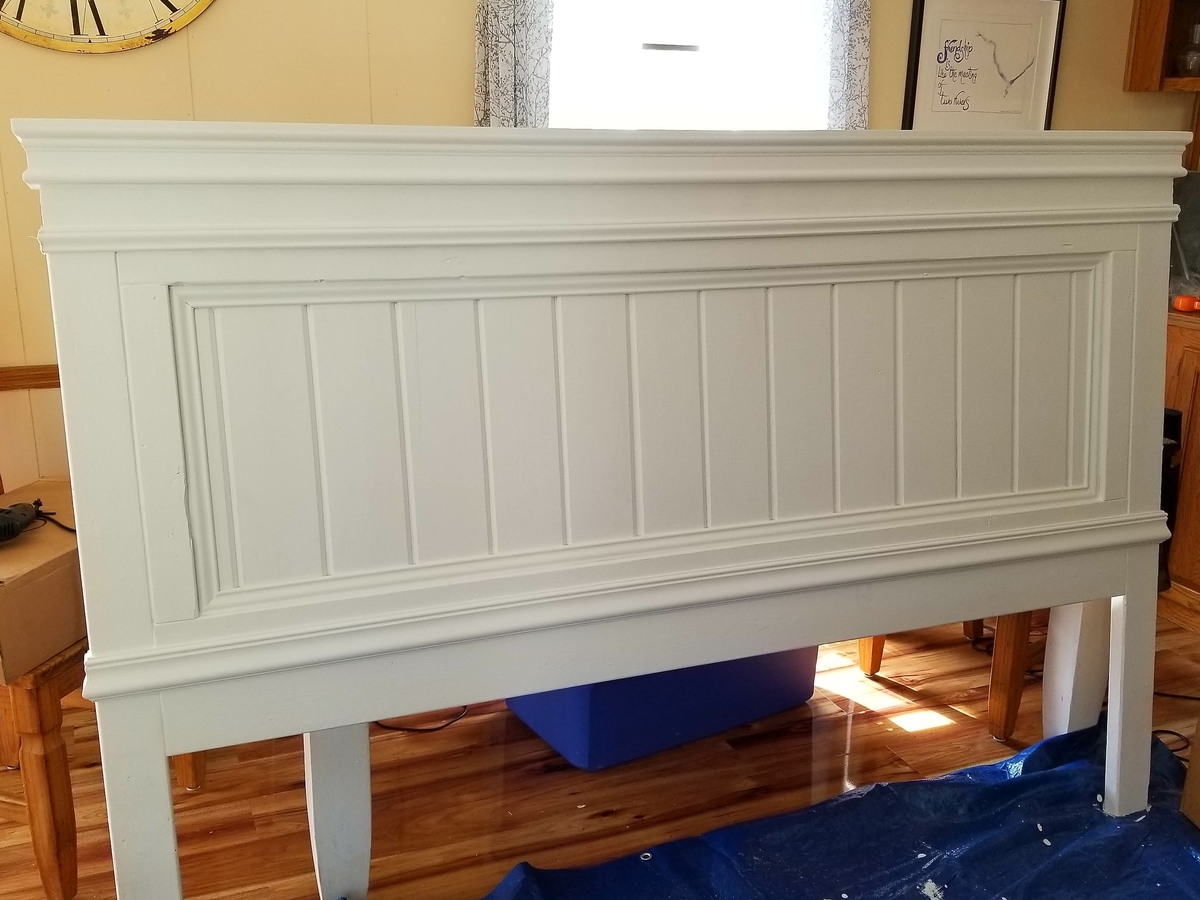
Fancy Farmhouse Headboard with Modified Trim. There was a lot of trial and error as this was my first ever project, but now I'm hooked! We only needed a headboard to attach to our King platform frame.
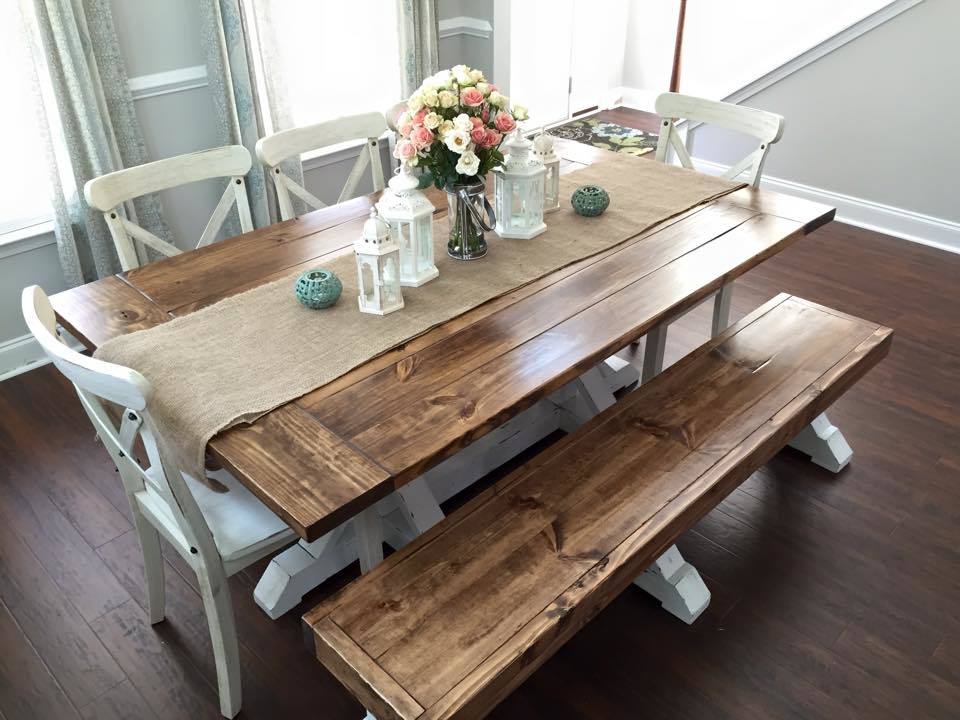
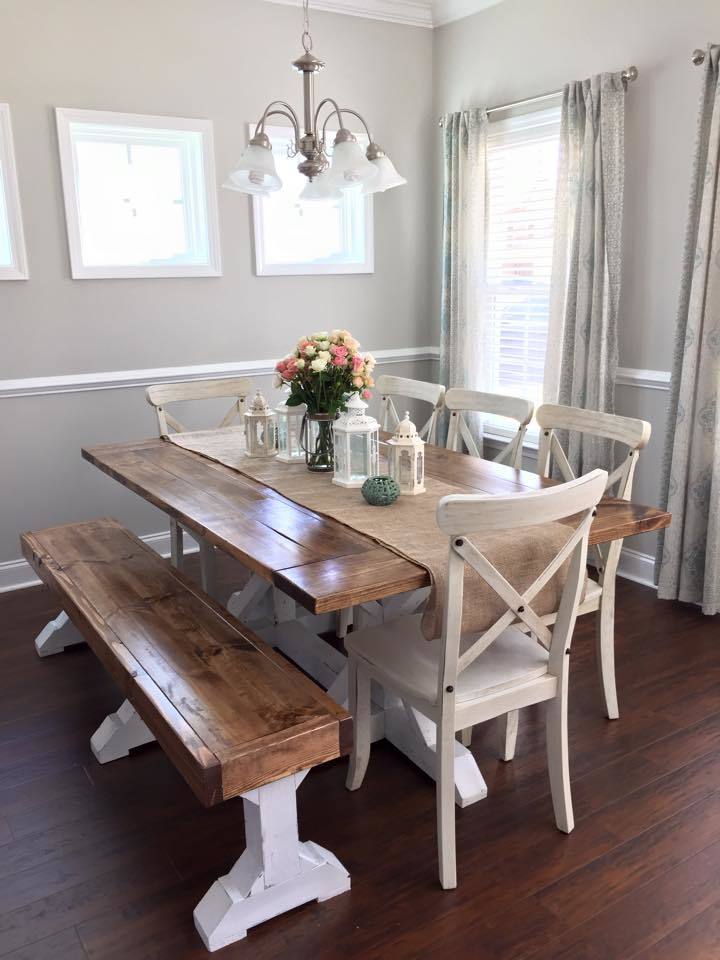
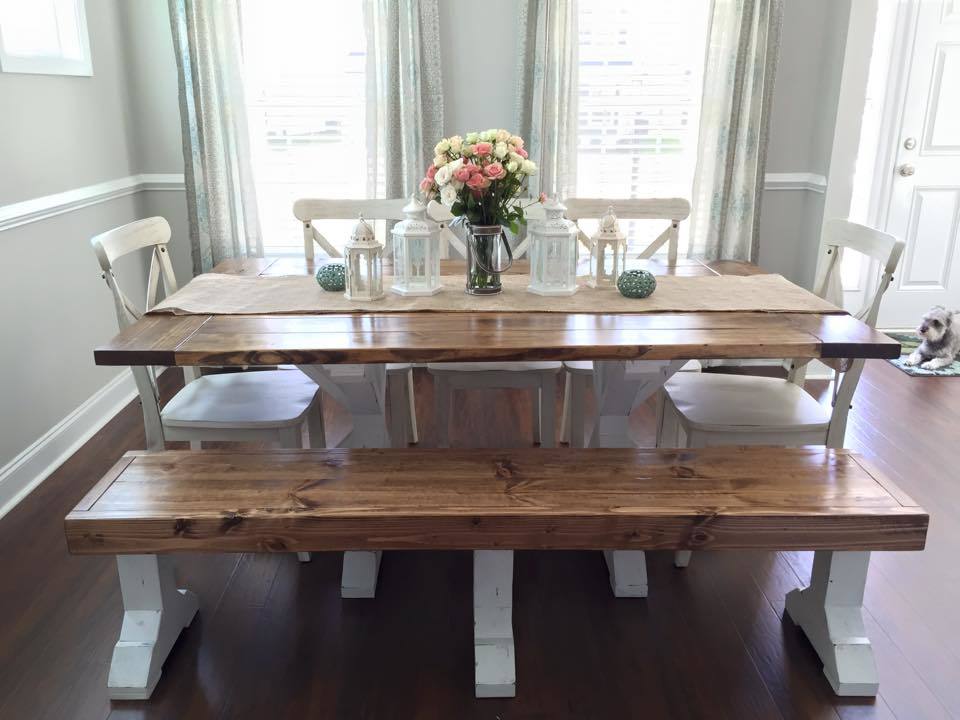
We wanted a farmhouse dining table but didn't want to be confined by 4 corner legs or supports at the end of the table so I combined the farmhouse top from this site with another farmhouse table base that I found at shanty2chic through a link on this site. We couldn't be happier with how it turned out! I didn't follow any of the plans exactly but adjusted them so we had a table that fit well in our dining room, still fit several guests and was a good eating height. The bench was also modified from the plans I found at shanty 2 chic.
Wed, 04/29/2015 - 12:28
Here is a link to the plans I used for the table base: http://www.shanty-2-chic.com/2014/05/restoration-hardware-inspired-dini…
And for the bench: http://www.shanty-2-chic.com/2014/06/diy-benches-for-my-dining-table.ht…
I made some modifications to the table length/width to fit our dining room space better which is just a matter of preference. I then changed the length of the bench to fit our table. Other than those small changes which didn't effect the integrity of the plans, these are what I went by.
Wed, 04/29/2015 - 13:34
Thank you so much! This is exactly what we've been looking for. I love that the legs/base are completely under the table so not to interrupt or block causing wasted space.
Fri, 05/08/2015 - 14:56
We are going to build this same table for our house. I'm curious where the chair came from that you used with the table? Thanks!
Using the counter height planter plans from Janettx. Thanks!

Mon, 09/20/2021 - 13:24
Nice job!!! I'm still using mine. I ended up putting 12"x12" pavers under each leg to extend their life. After the 2nd year now we get bumper crop out of ours each season.

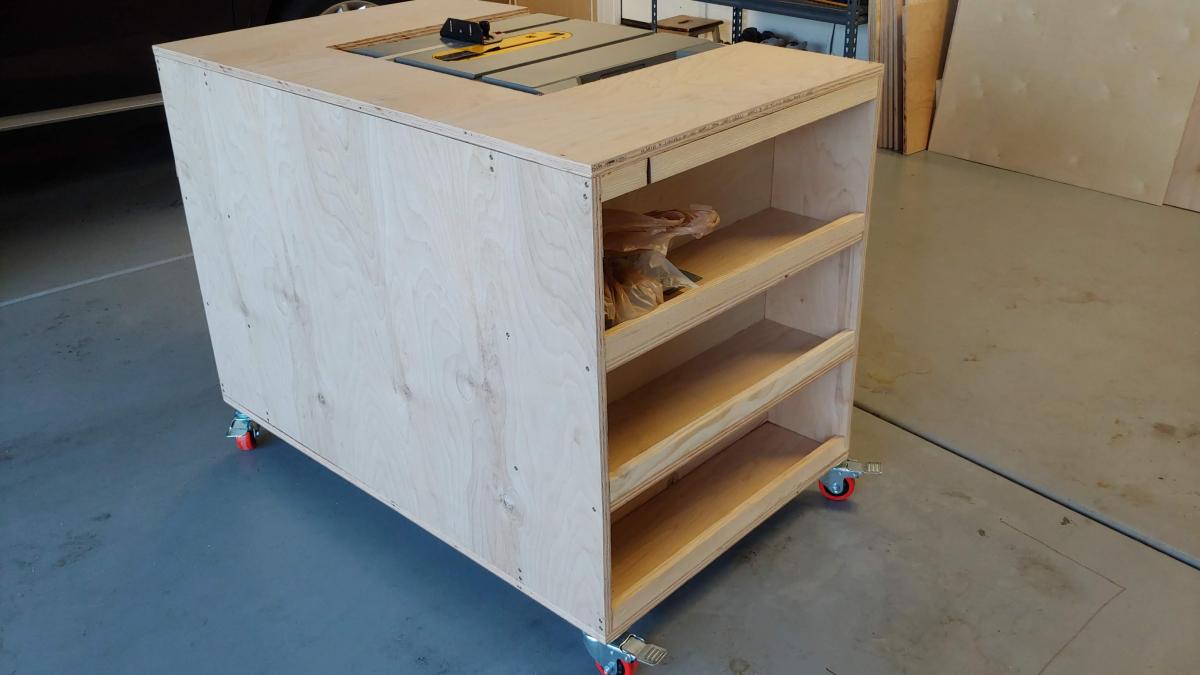
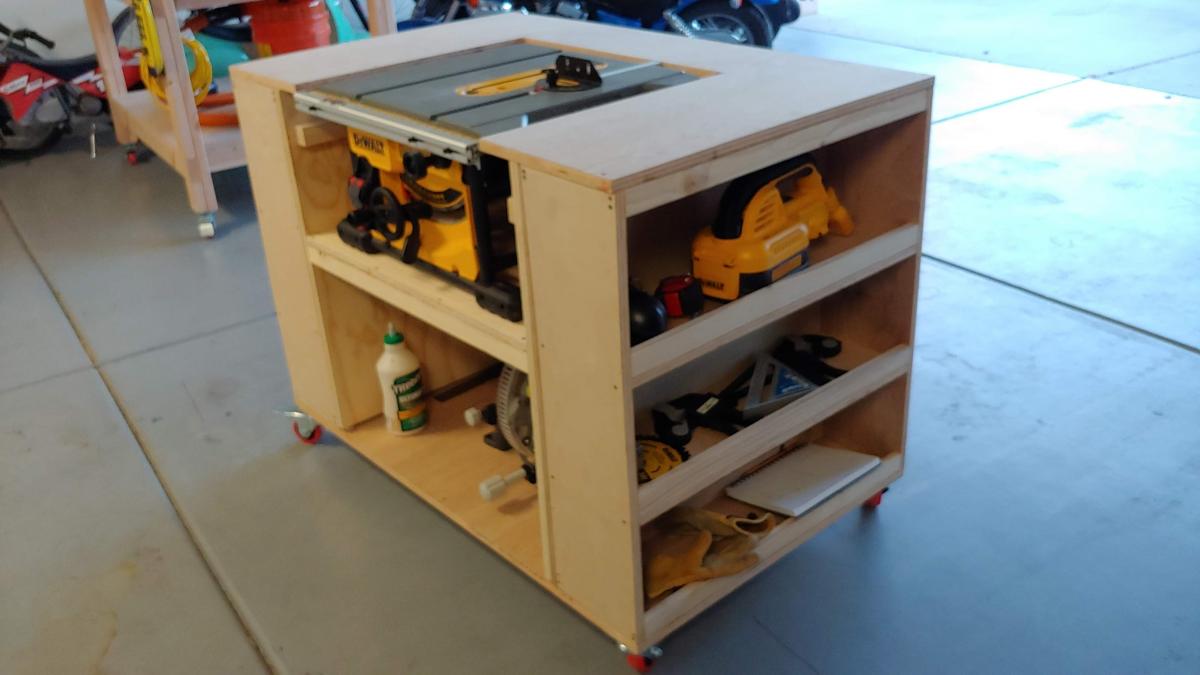
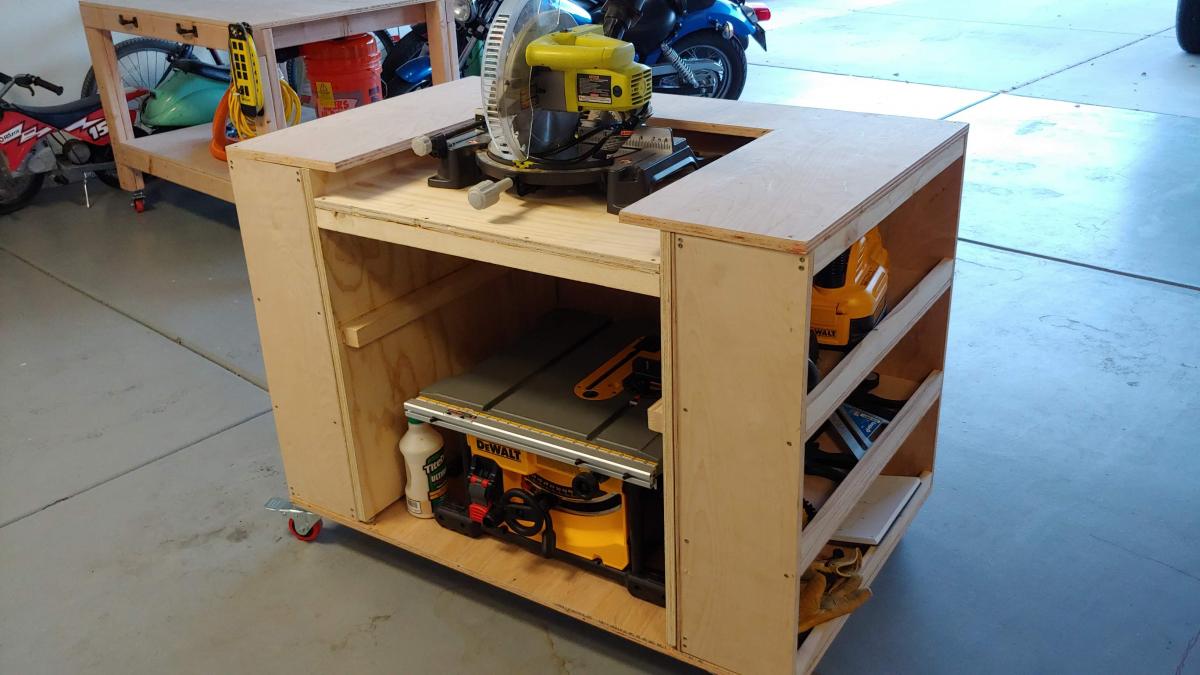
Used part of the Ultimate Roll Away Workbench with Miter Saw Stand to just build one of the roll-away workbenches to work with my miter saw and table saw. I'm very happy with how it turned out.

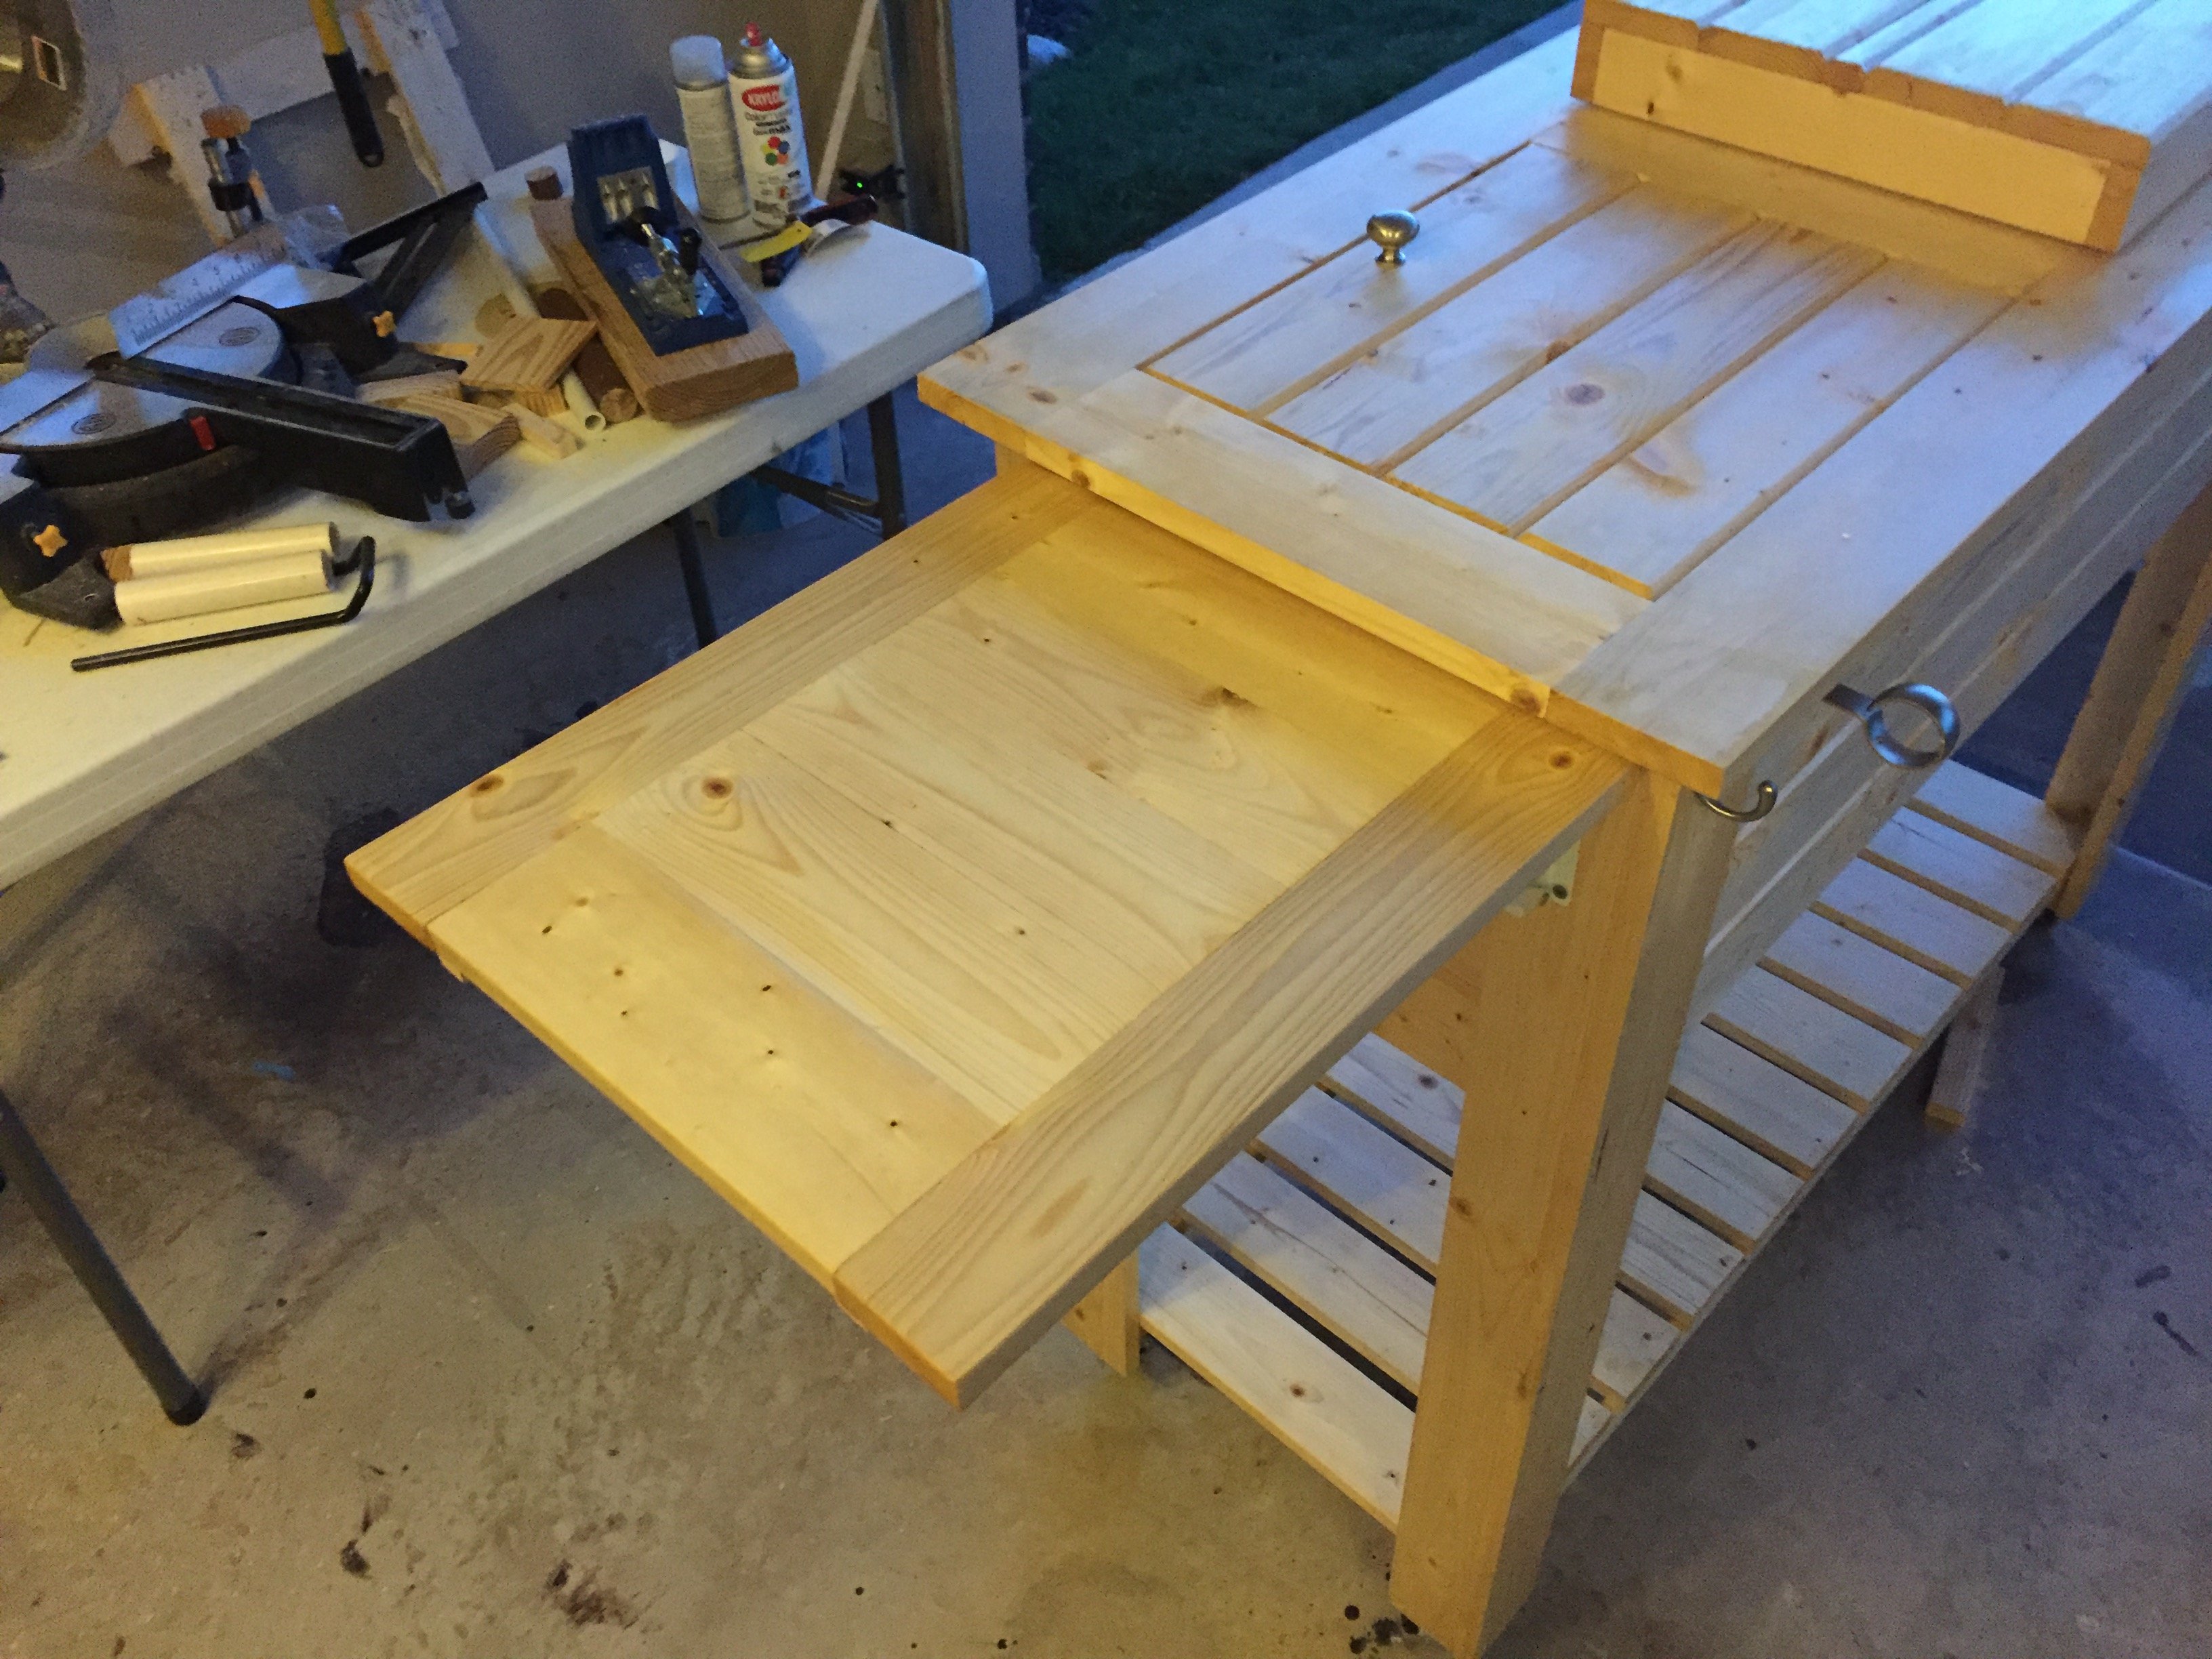
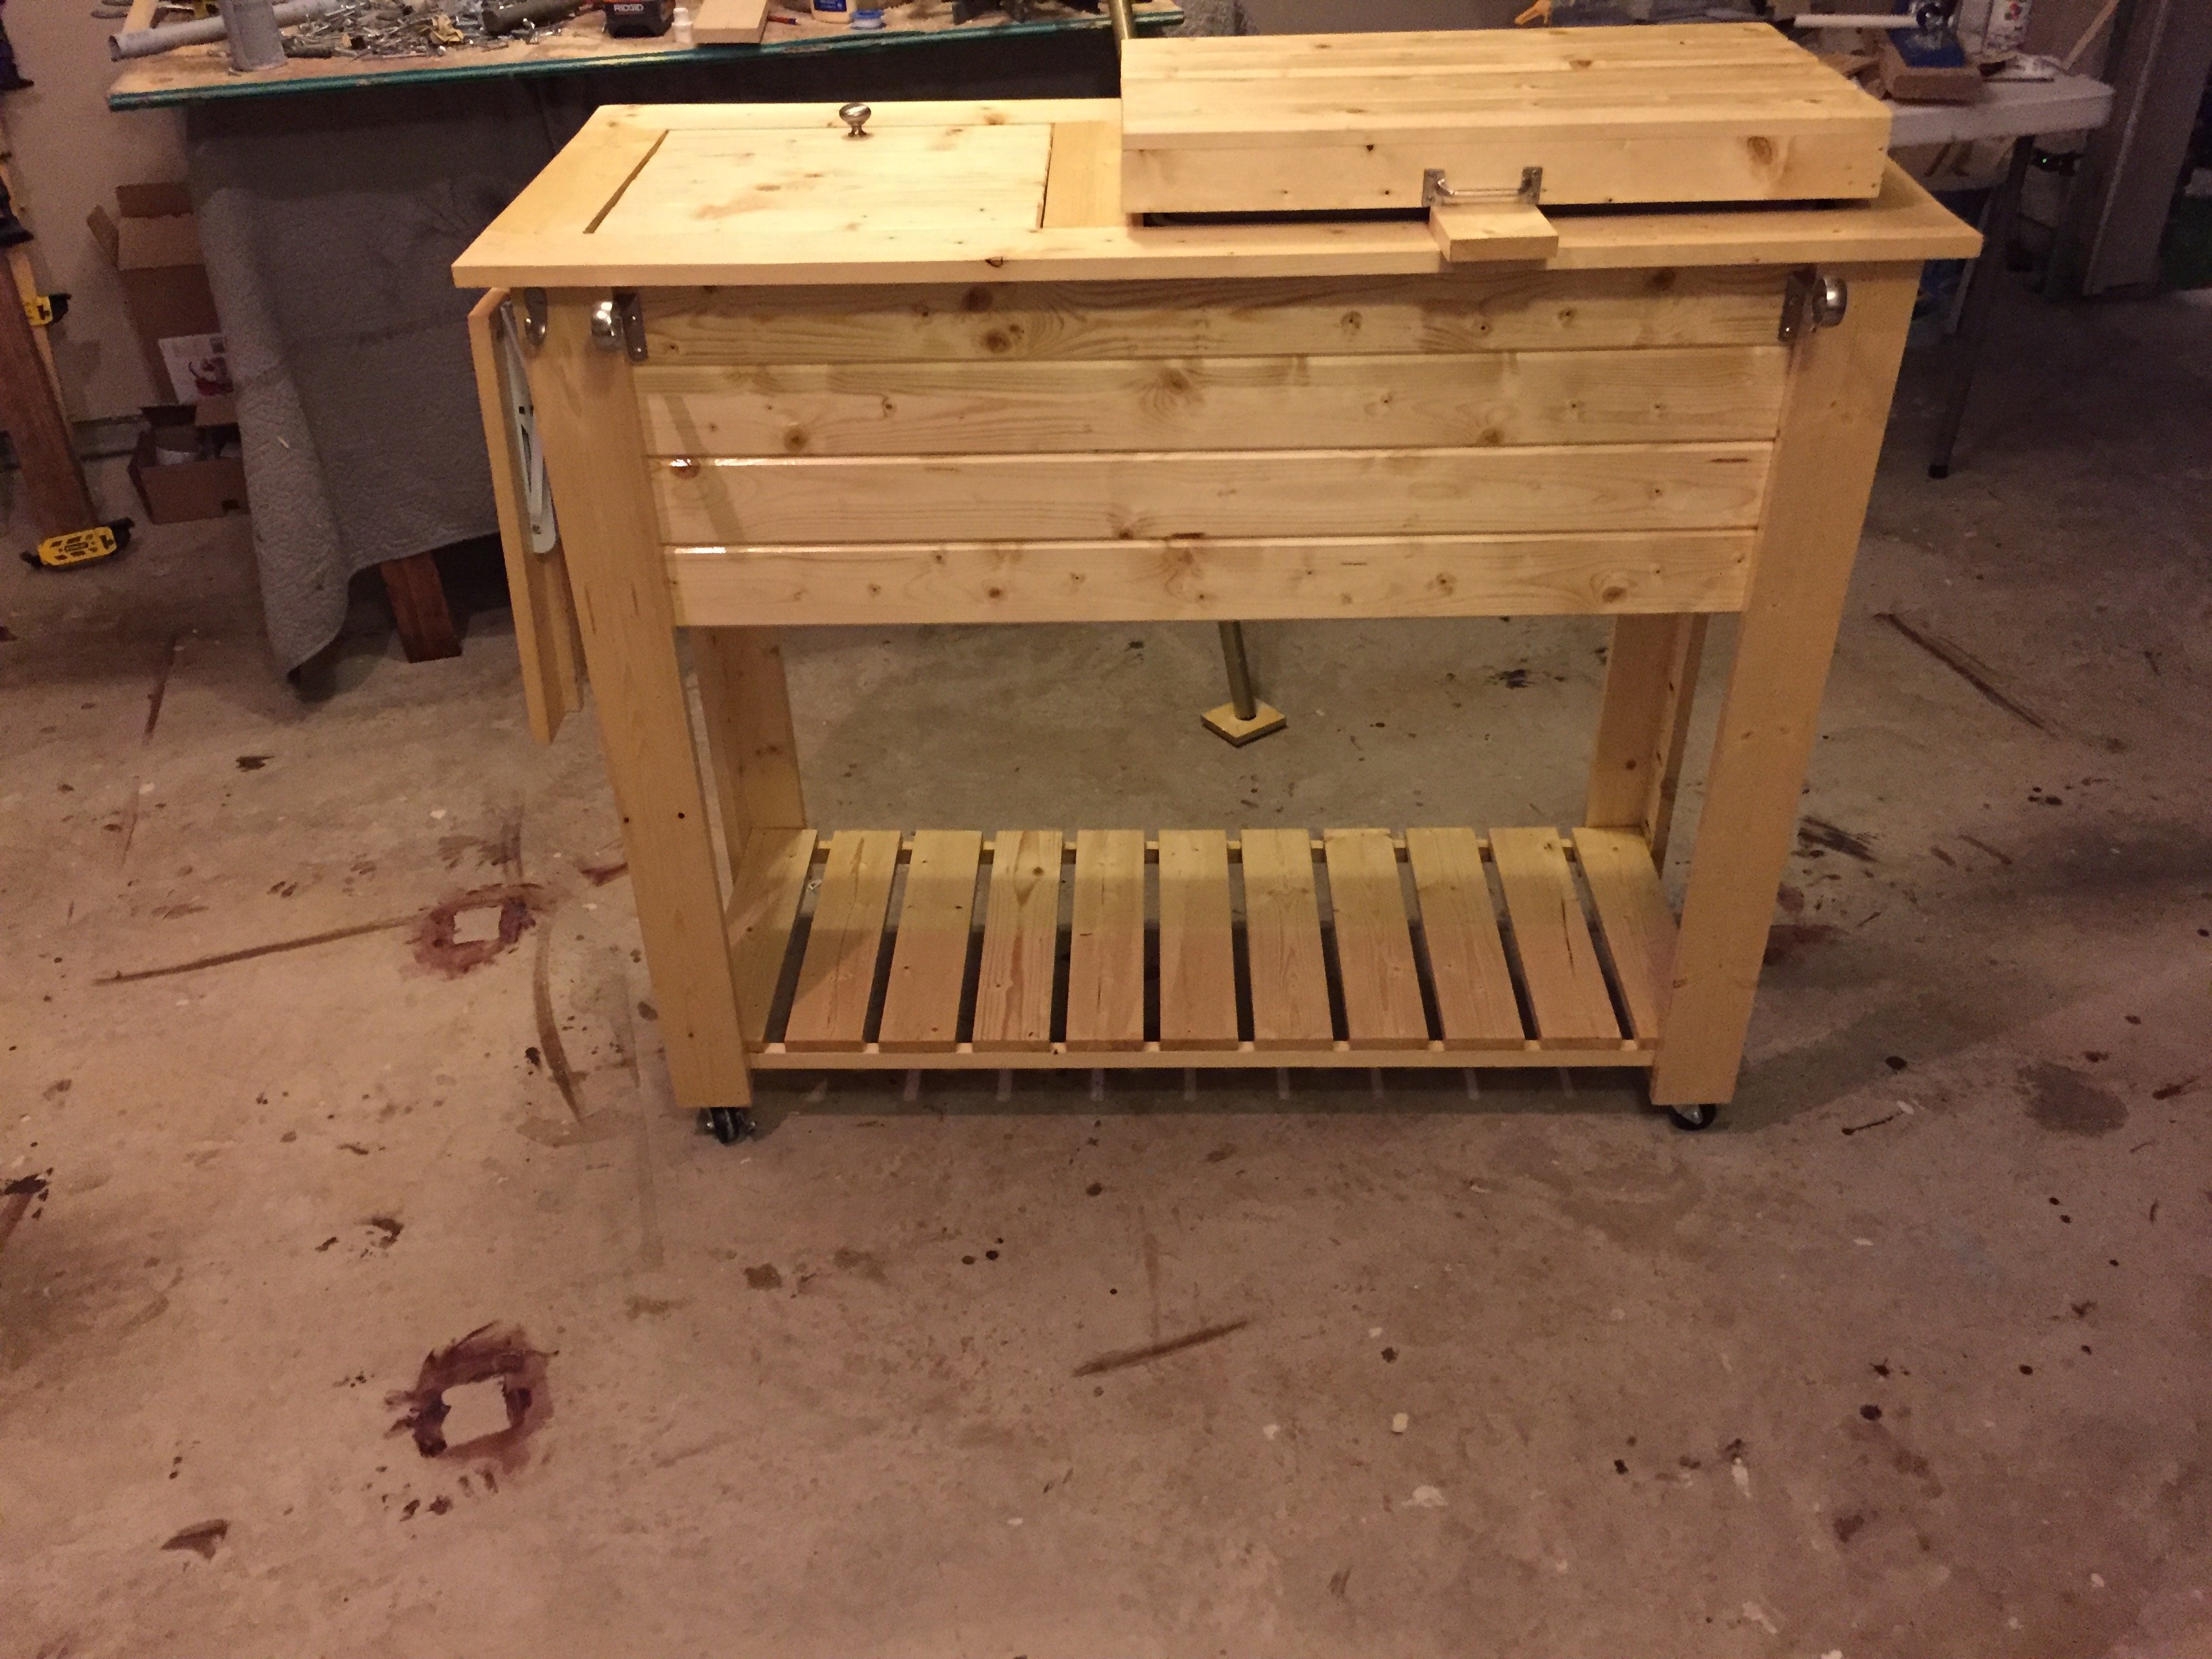
Great project! I'm new to wood working and have been looking for simple but challenging builds. Needless to say this fit the bill... This grill cart was a great starter build and ultimately became a Father's Day gift! My Pops loved it!
I did add a couple of custom pieces: a foldable table top extension and towel bar... things Dad will undoubtedly need as he's an outdoorsman who loves to BBQ!
Thanks for the idea/design plans!


Love the results of my first building project.....a pair of redwood adirondack chairs. Angled cuts were a great way for a beginner to learn to use the miter saw.

Sat, 09/07/2013 - 19:59
Love these gorgeous redwood chairs! The color and grain on that wood is awesome, and the clear coat is perfect for it. You did a great job on this build! I popped over to your blog and I enjoyed your post on this build very much. Well done!

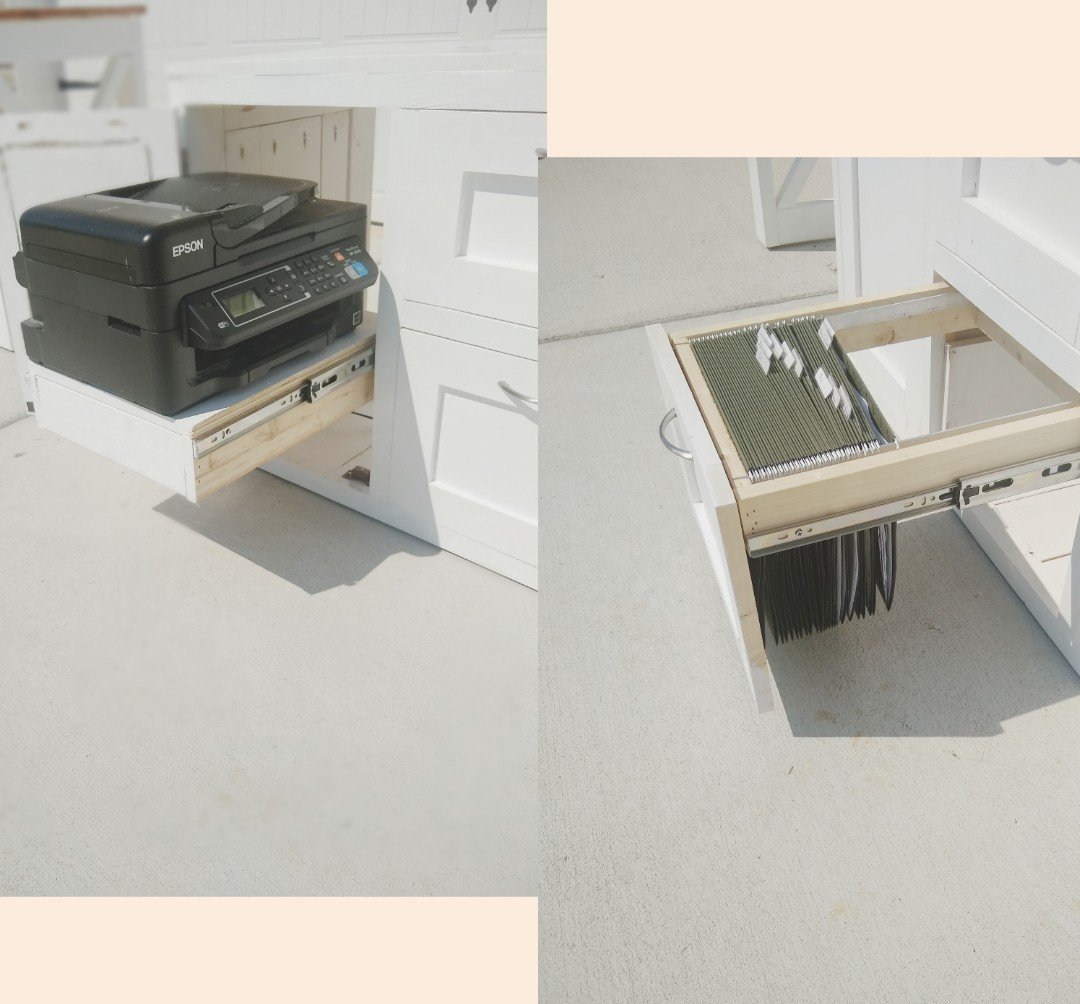
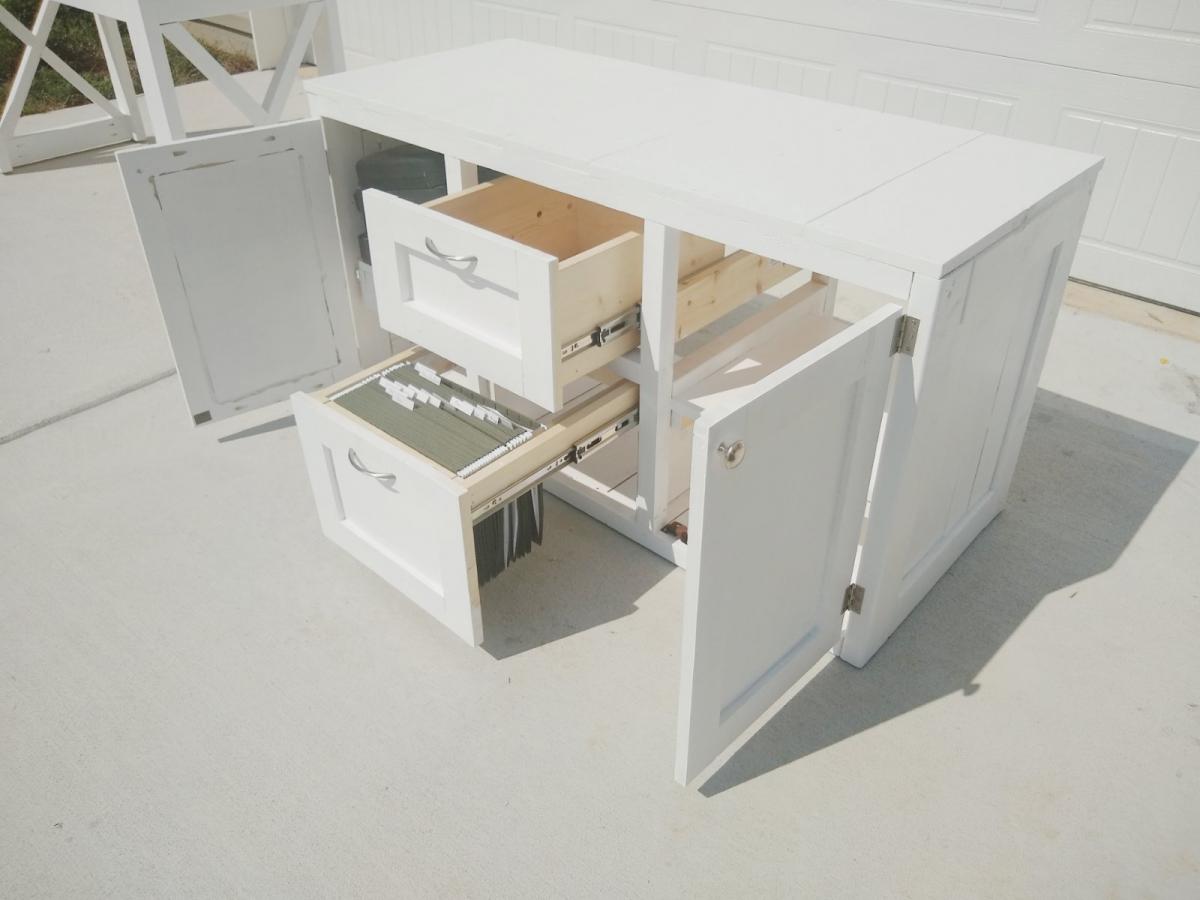
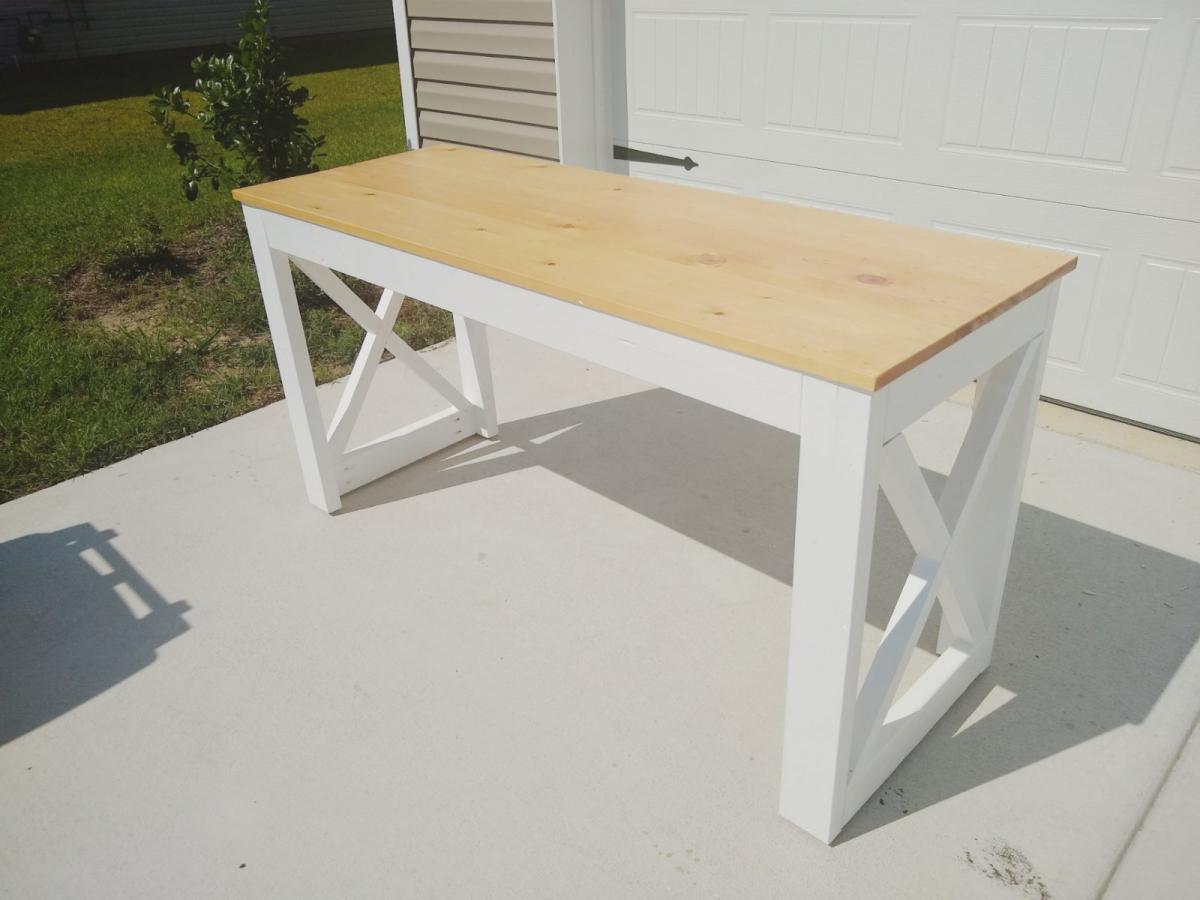
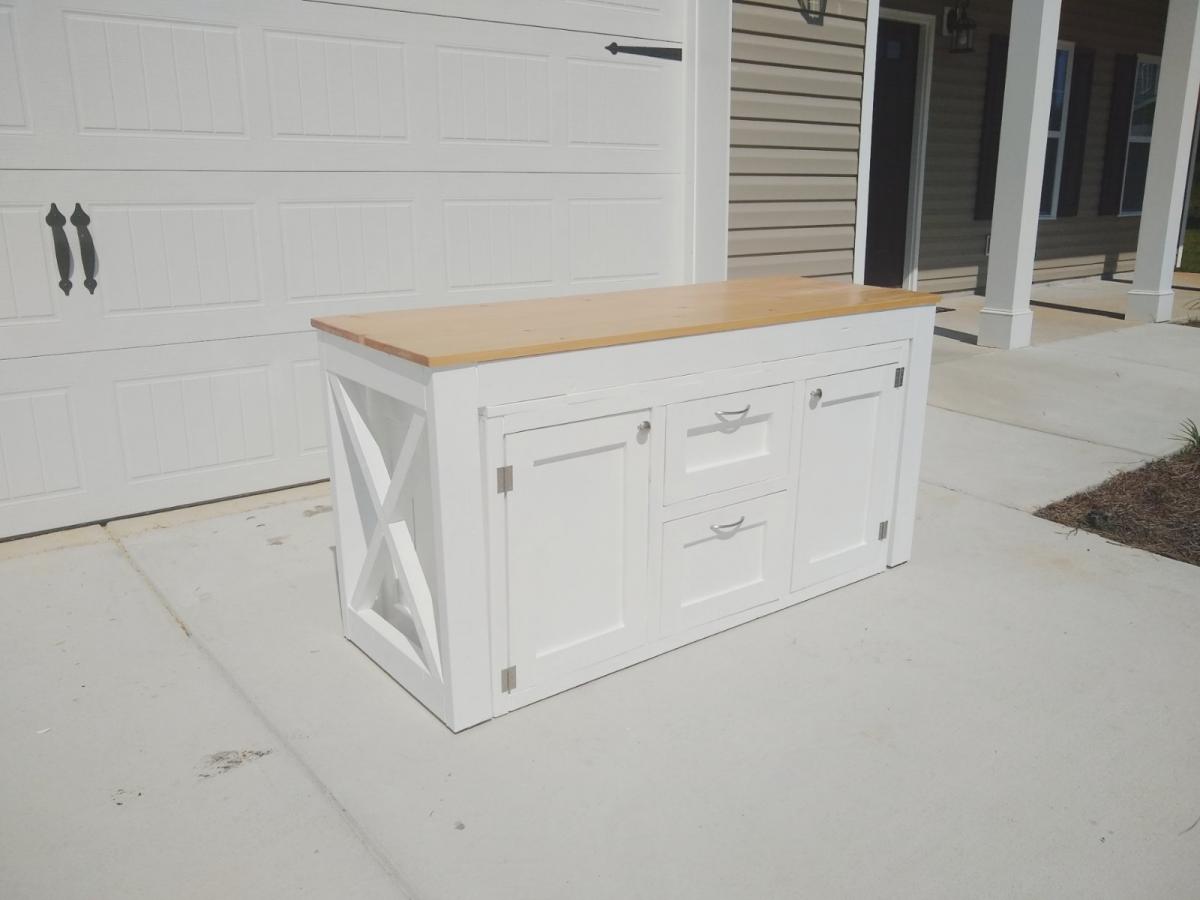
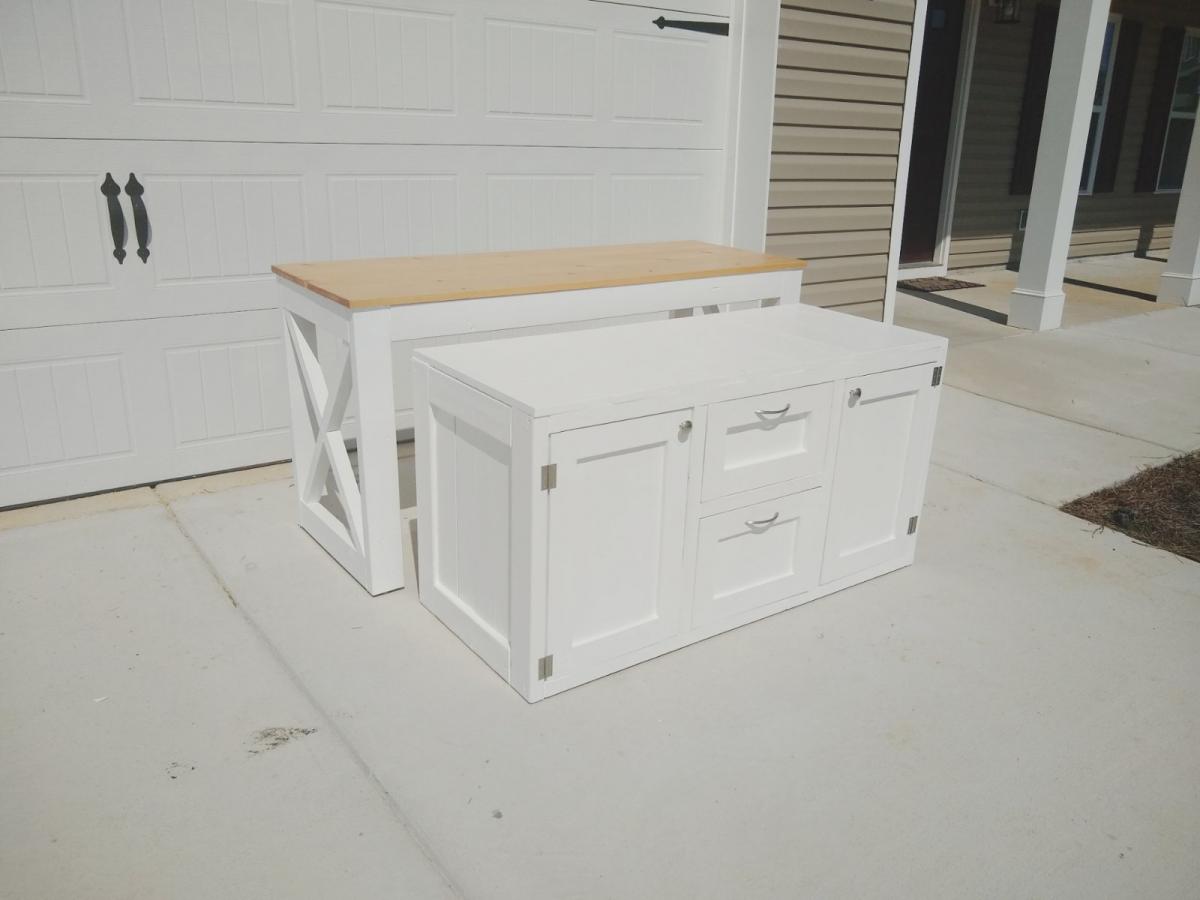
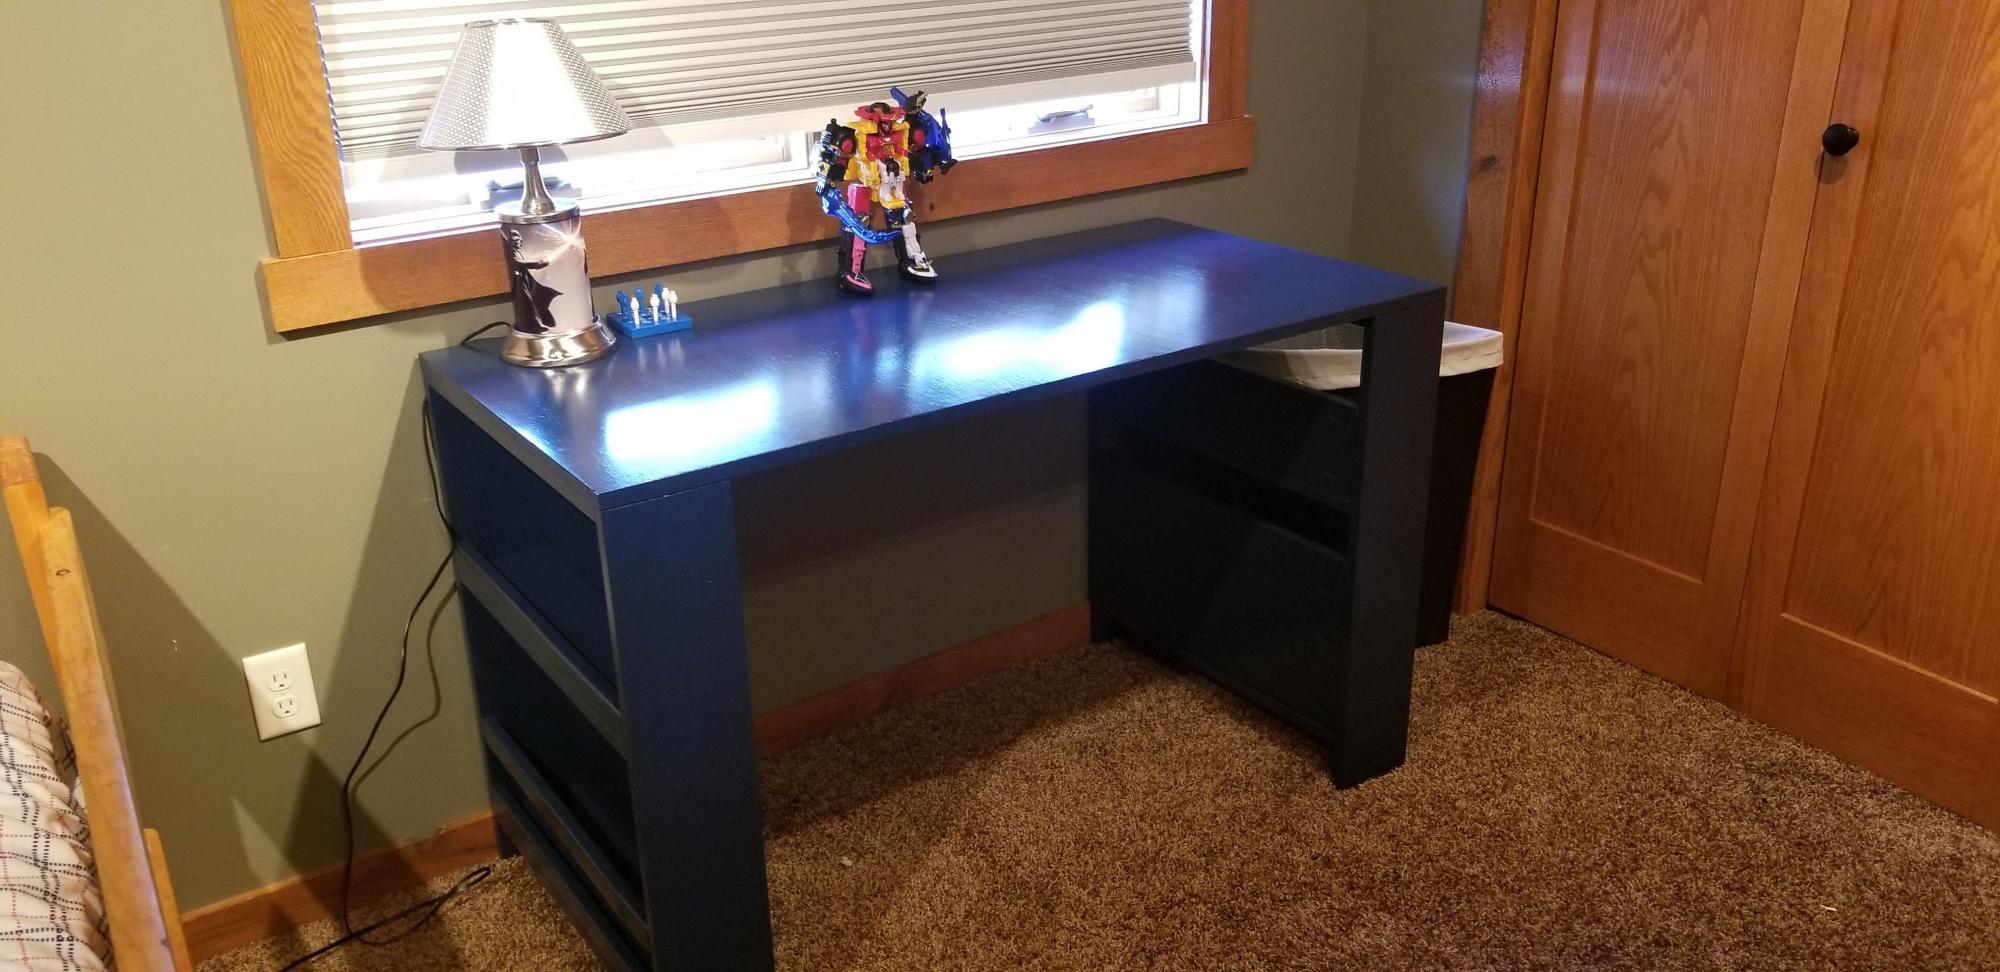
So loving this nesting office station❤️! We will have a sofa sleeper in the office as well. So we needed a desk that could be moved to the wall when the sofa sleeper is being used by guest. I saw a post from Ana for her Nesting Grill Station and I came up with the idea to make this nesting office station. The cabinet includes a file folder drawer (which is from Ana's mail boss plans), a regular drawer, cabinet doors with shelves. One of the shelves is a pull out shelf for the printer. I think it came together great! Design for nesting desk inspired by these plans: https://www.ana-white.com/woodworking-projects/nesting-grill-station https://www.ana-white.com/woodworking-projects/mail-boss
Wed, 07/15/2020 - 04:40
I love this! Very creative and practical design and oh so pretty. Nice job!
Mon, 08/31/2020 - 09:47
This looks so good. Great work. Do you mind sharing how you concealed the wheels? Do you have wheels on both pieces?
Sat, 10/03/2020 - 08:35
Hi, Thank you! Actually I didn't add wheels to the design since this will be in an office with thick carpeting. I added adjustable metal foot pads to the bottom of the desk.

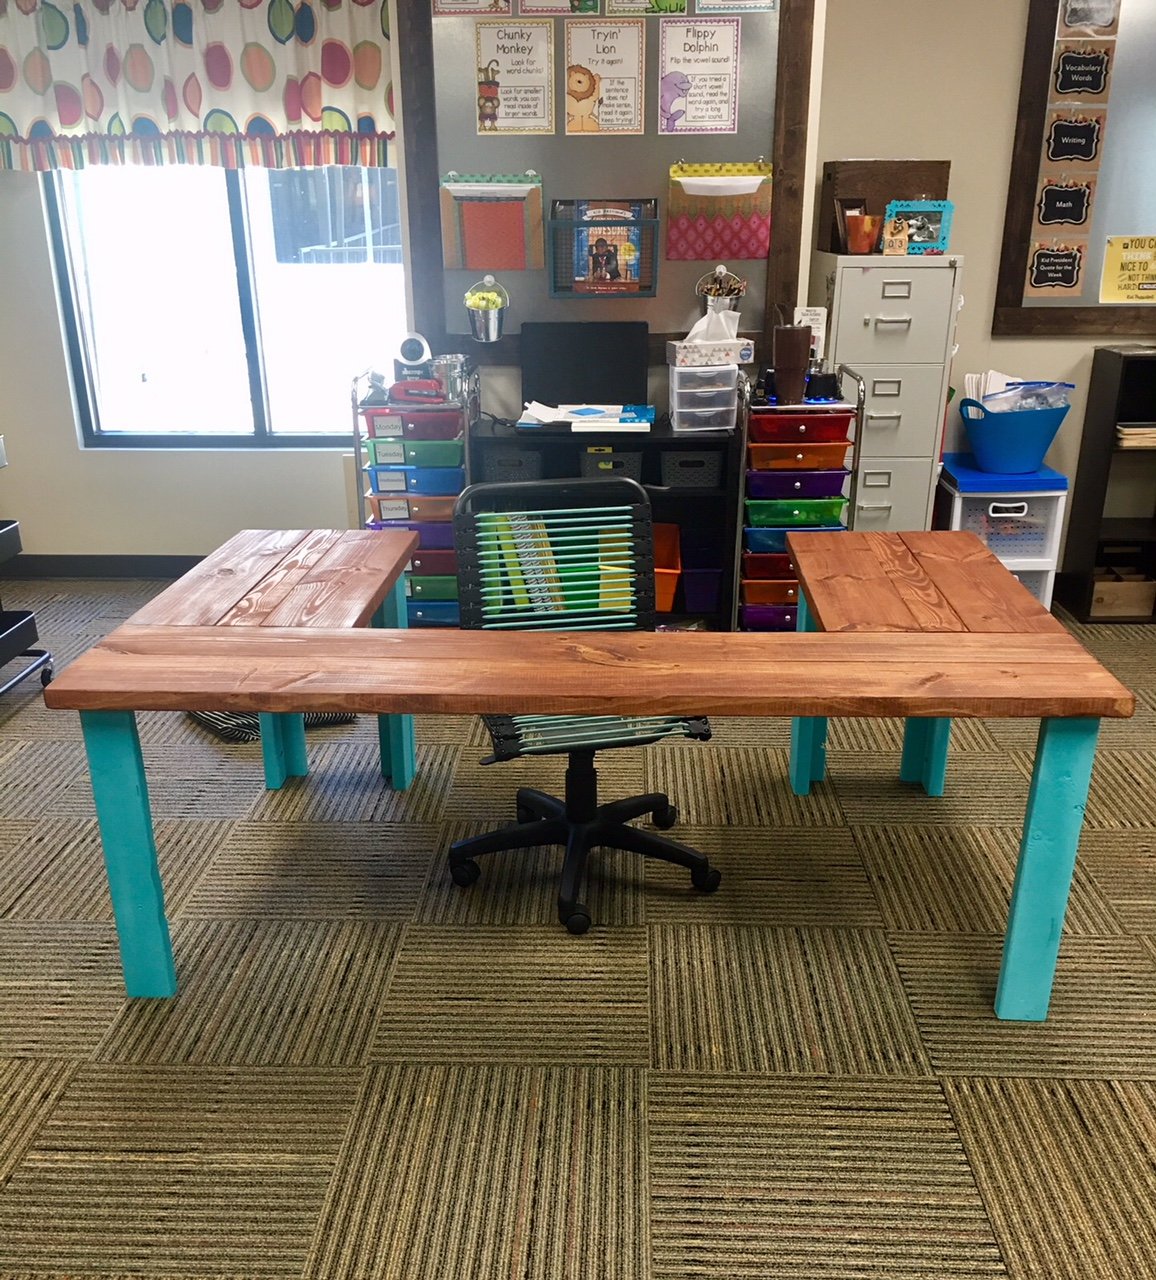
Been a while since I had time to actually build anything worth posting about! My wife wanted some items for her Kindergarten classroom this year, so built several items, most inspired by the Farmhouse family.
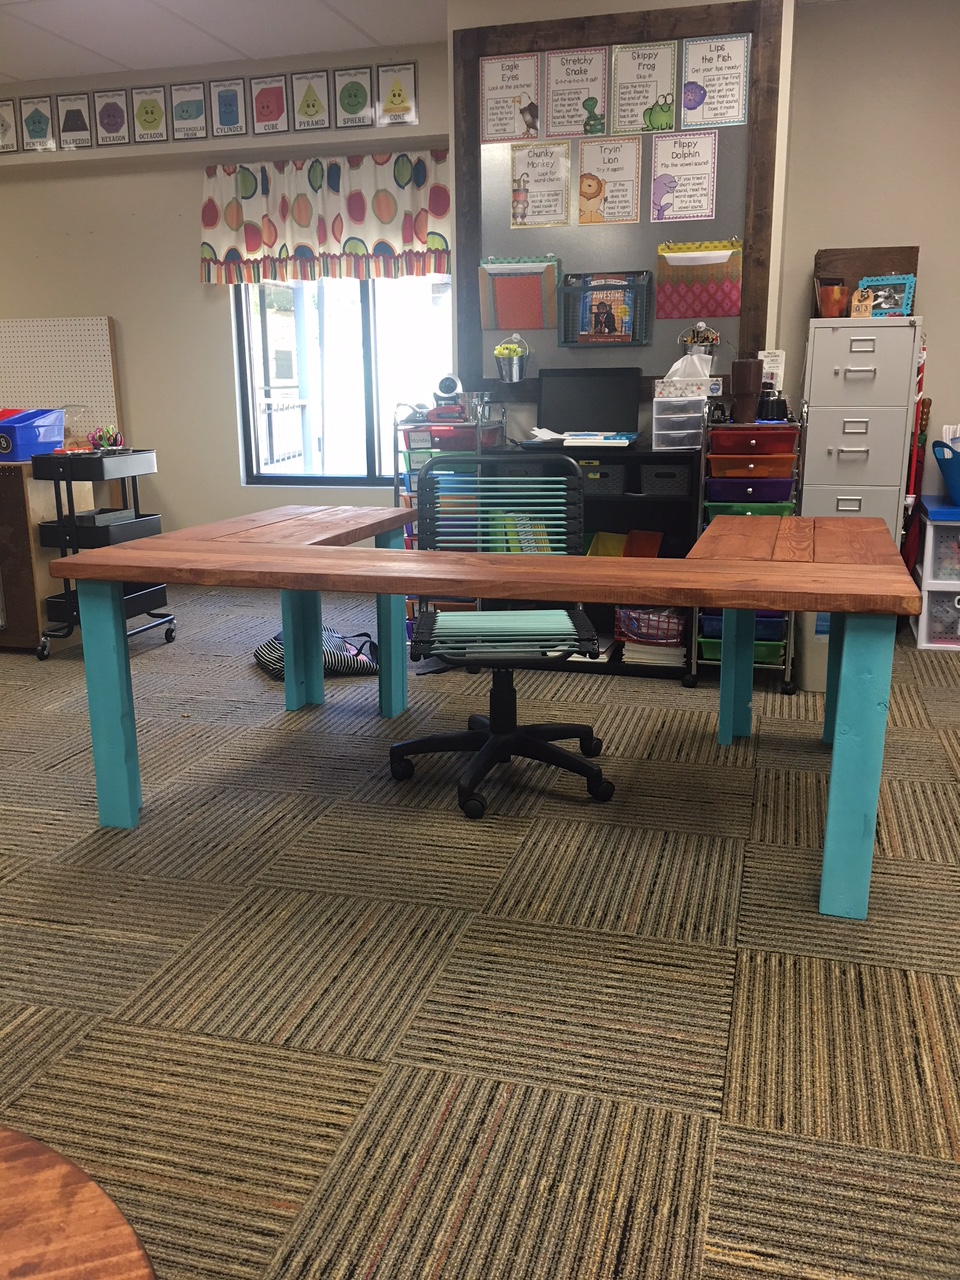
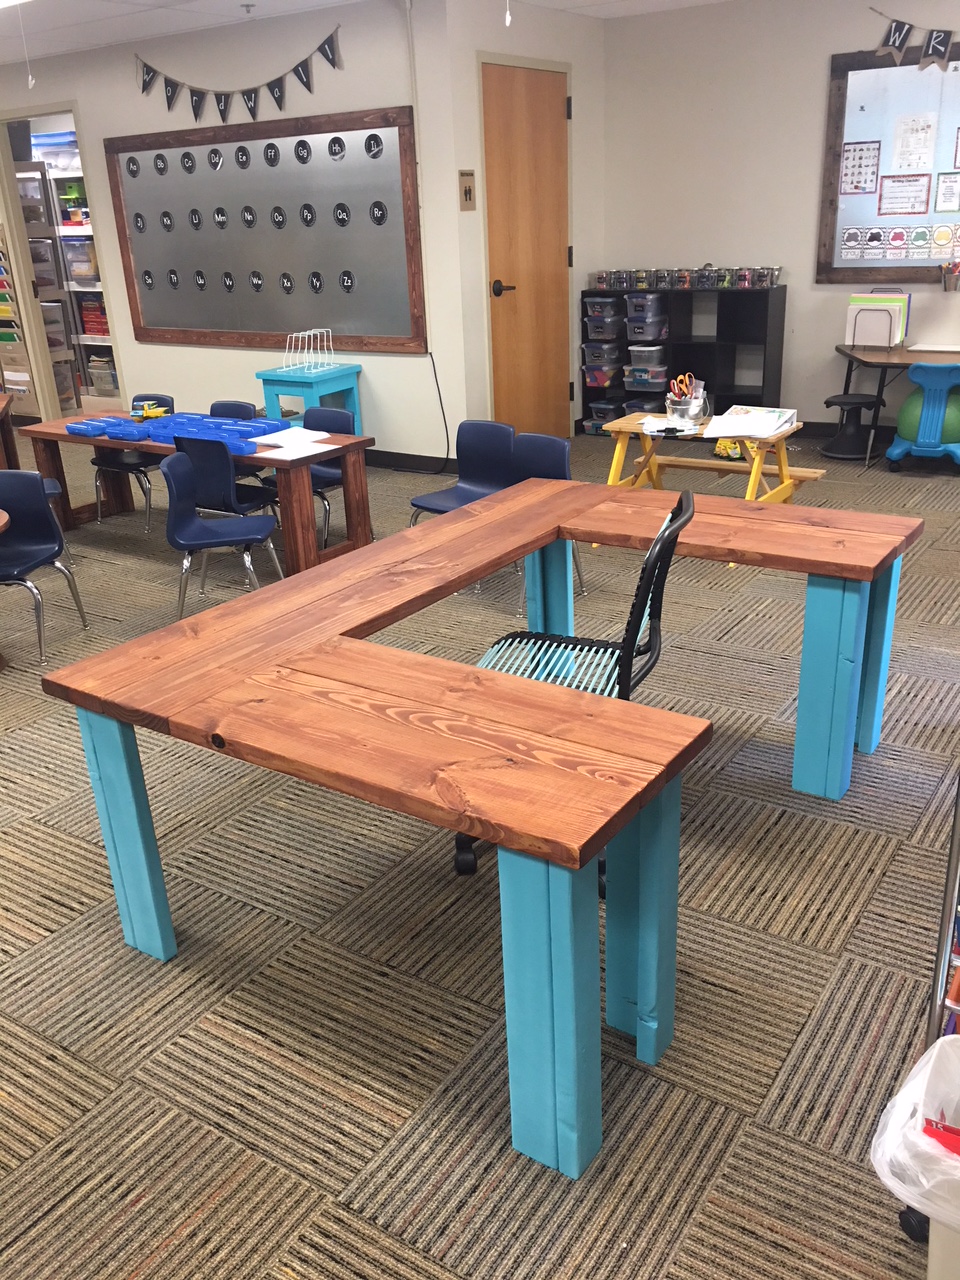
Sat, 06/29/2019 - 05:47
I love this! Can you give me the plans and list of materials for constructing it?
Sun, 06/30/2019 - 12:33
I am also a teacher and would love to build this desk for my reading class. Do you have plans?
Mon, 07/01/2019 - 18:05
I love this table for my classroom. Can you share the plans or the dimensions?
-Stephanie
Sun, 07/07/2019 - 09:46
I would love plans/dimensions for this! I was thinking I could also paint the top with wipe off board paint.
Sun, 07/07/2019 - 14:59
I would love to make one for my classroom. Can you share the plans and materials list for this table?? Thanks!!
Mon, 07/08/2019 - 19:11
I am looking to make this for my fourth grade classroom - can you provide the dimensions you used? Thank you so much.
Wed, 07/10/2019 - 11:59
Love this!
I would love this for my classroom! Can you share the plans and materials.
Thank You!
Mon, 07/22/2019 - 18:25
Anyone have any luck with figuring out the dimensions??
Thu, 07/25/2019 - 17:20
Has anyone gotten the plans for this table? I have contacted Ana White and tried other ways also. I would love for someone to share.
Thank you
Teri
Mon, 08/19/2019 - 12:09
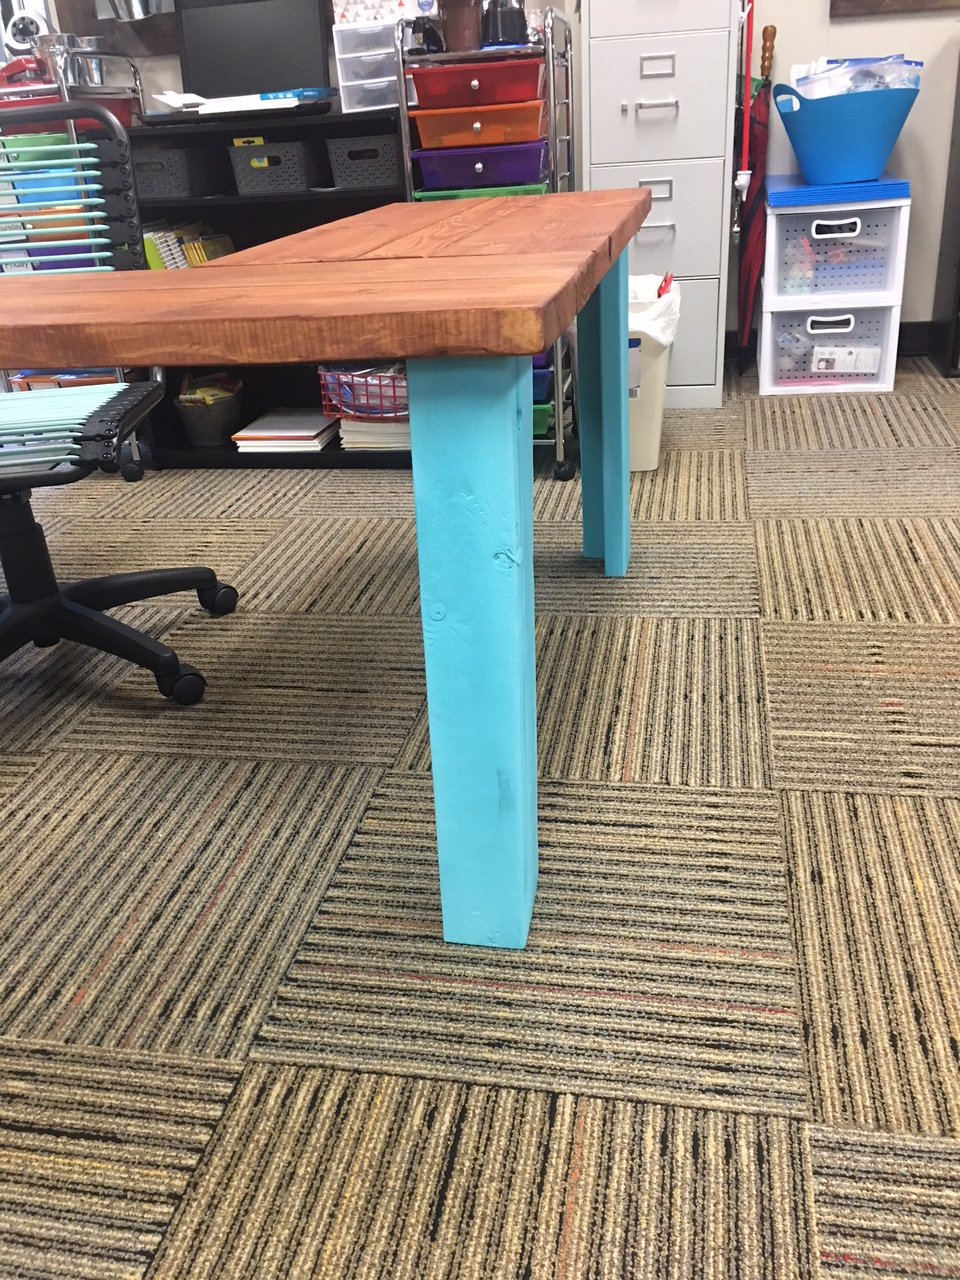
I am guessing the corner posts are 2 x 4s, the top is 2 x 10s. It looks like the width is 6’ (looking at the floor carpet tiles being 24” square). So 2 - 2 x 10s side by side for the main part of the desk top and 2 - 2 x10s perpendicular on each side of the chair. I guess the height is subject to choice and the length of each side would also be subject to choice or to the length of the 2 x 10s to be economical.
an educated guess would be 4 - 8’ 2x10s for the top and 6 - 6’ 2 x 4s for the legs?
Anyone else have any input here? Open to suggestions.....
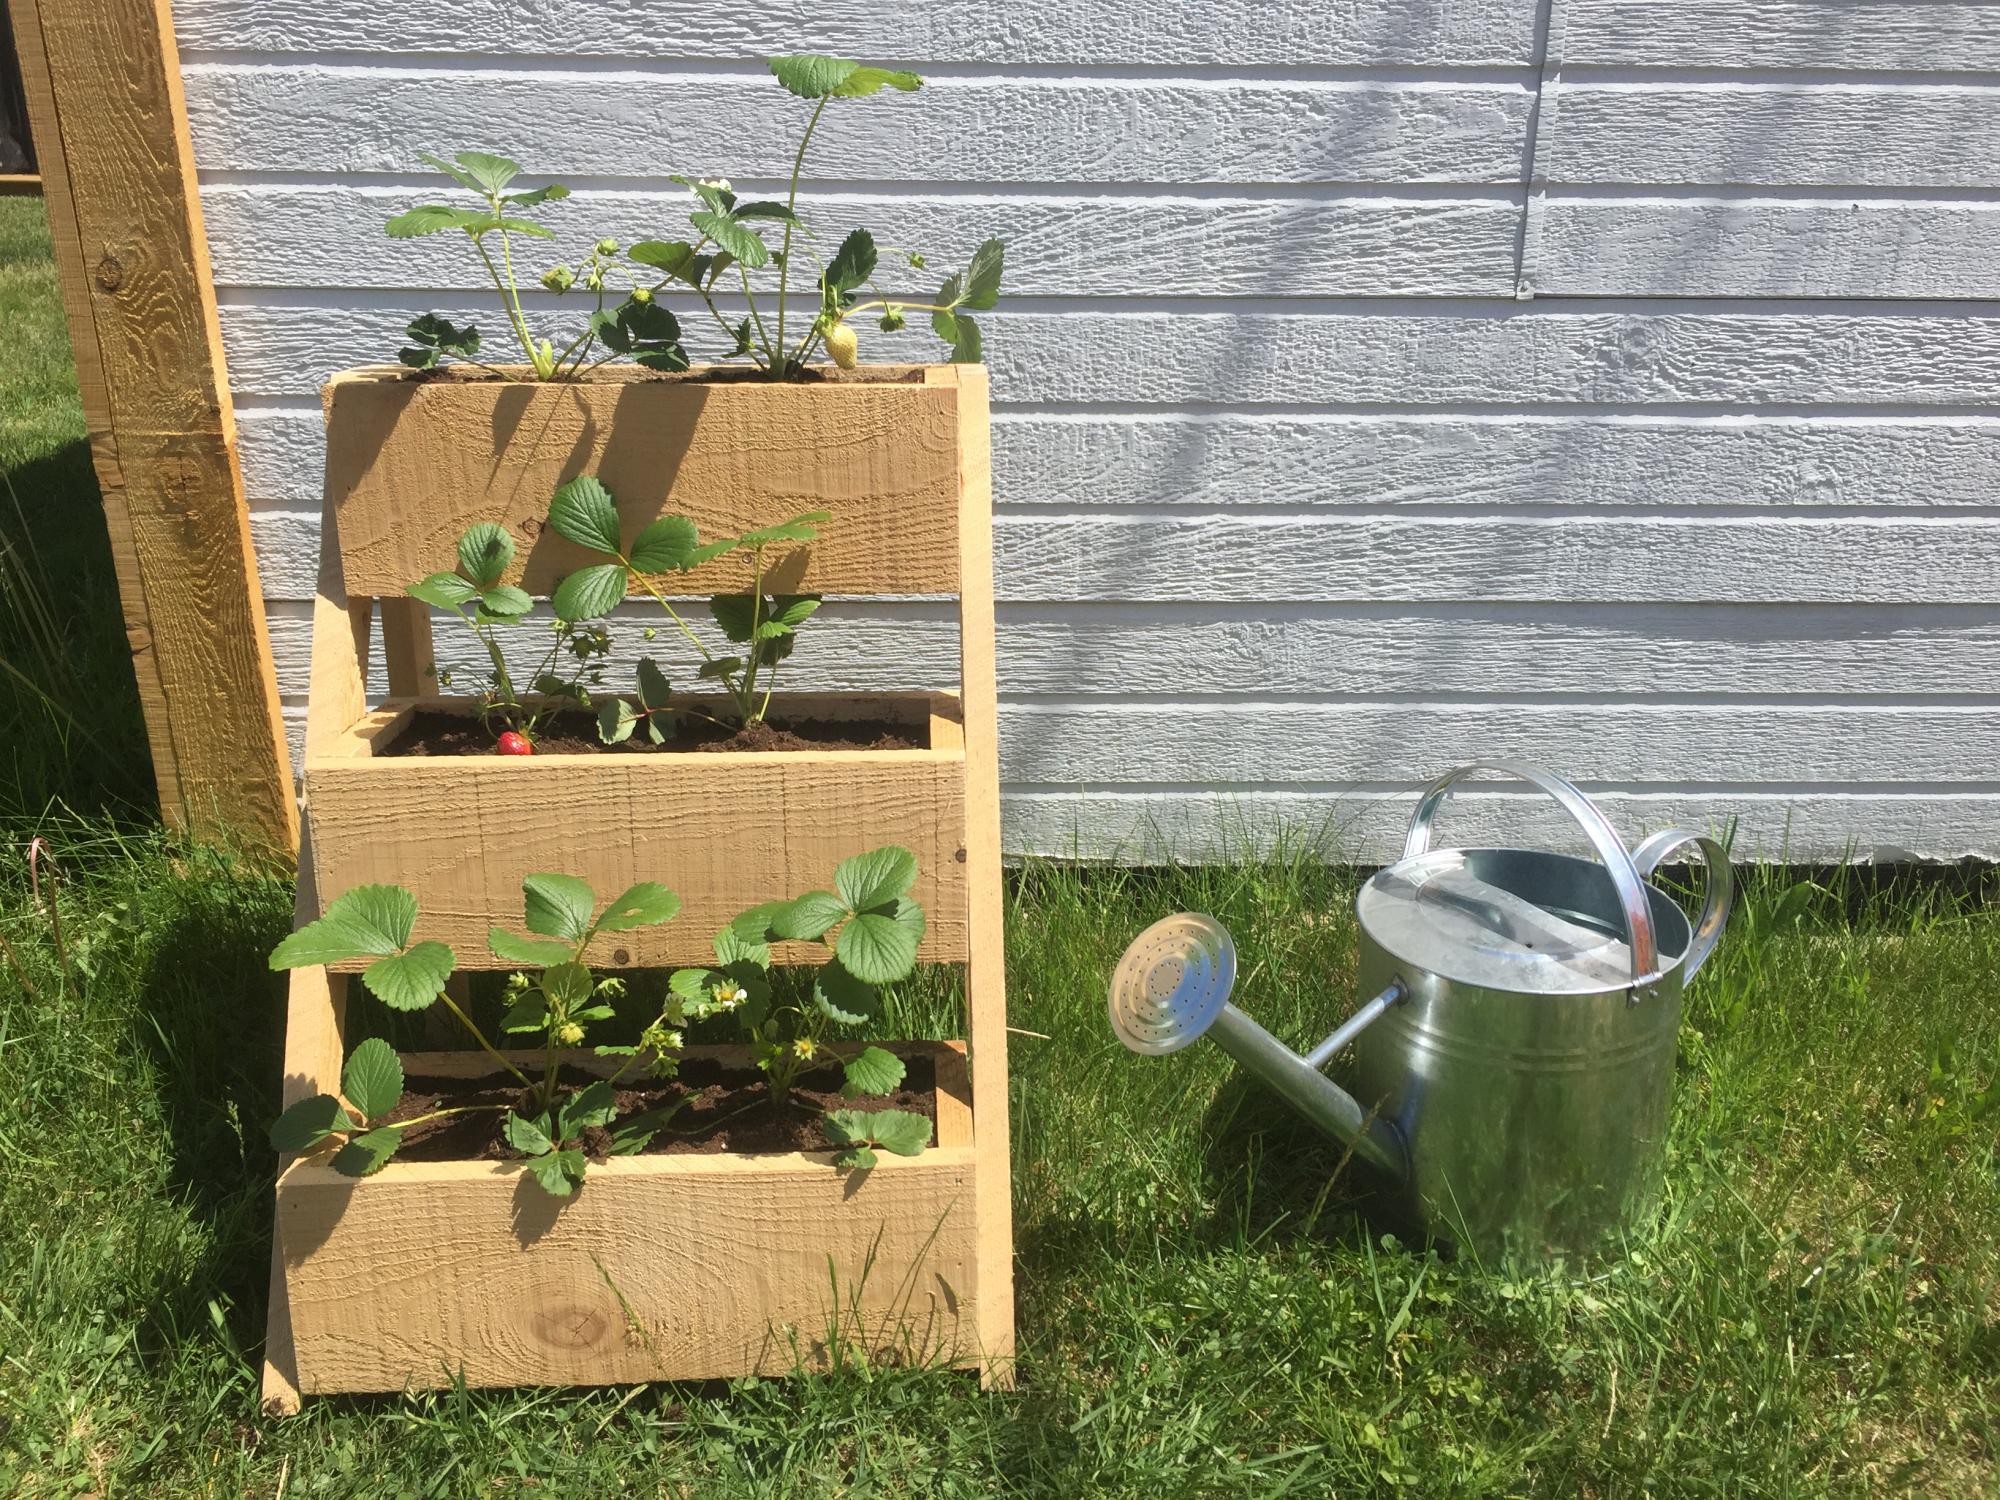
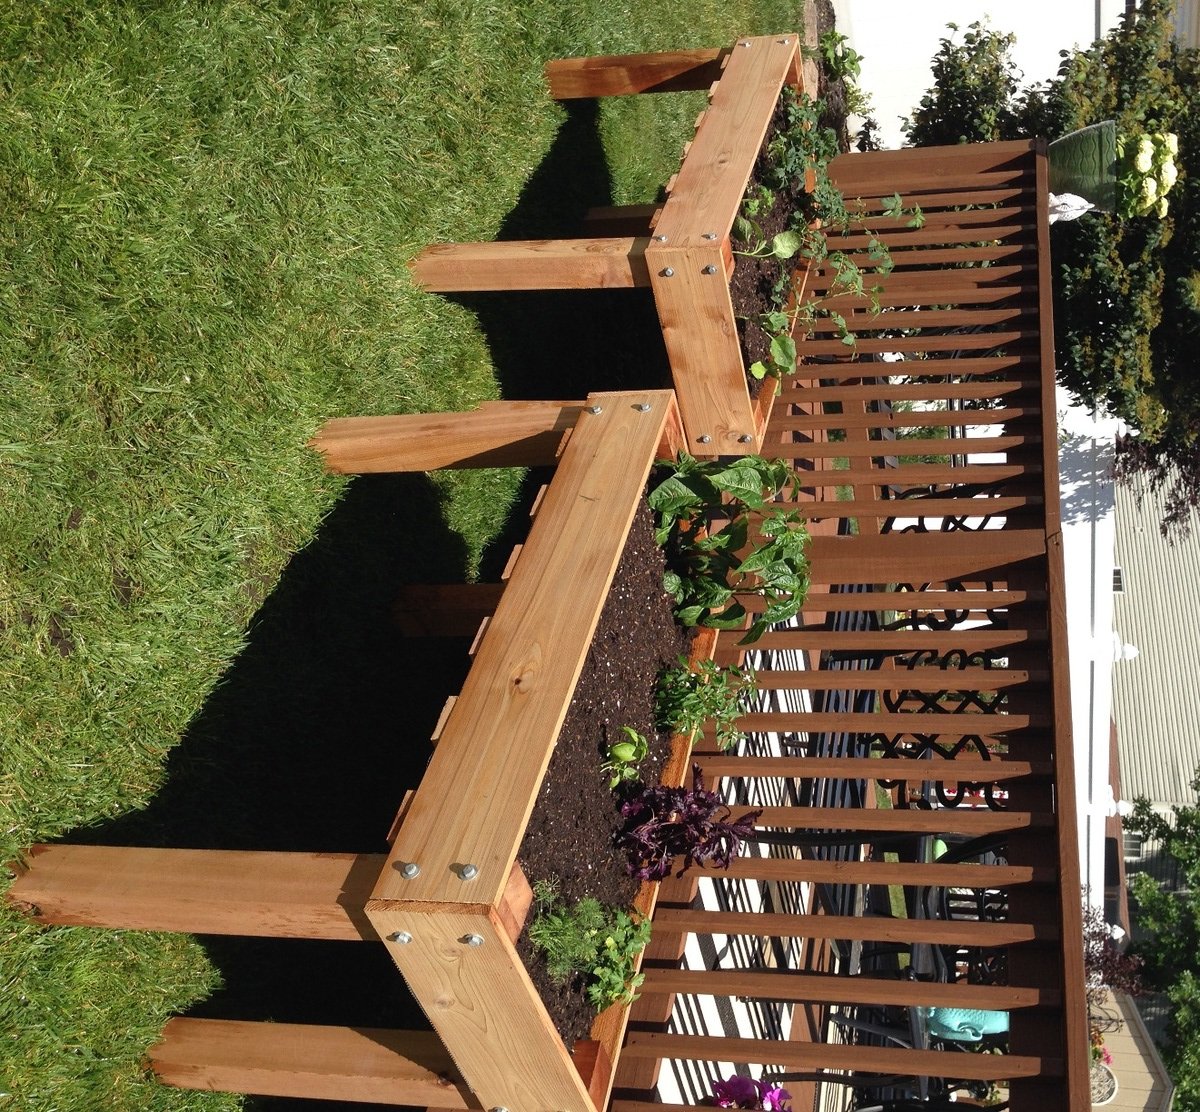
I built this tiered planter for my strawberry plants.
My son requested a desk for Christmas, this was an easy to make plan for a simple desk for a child.

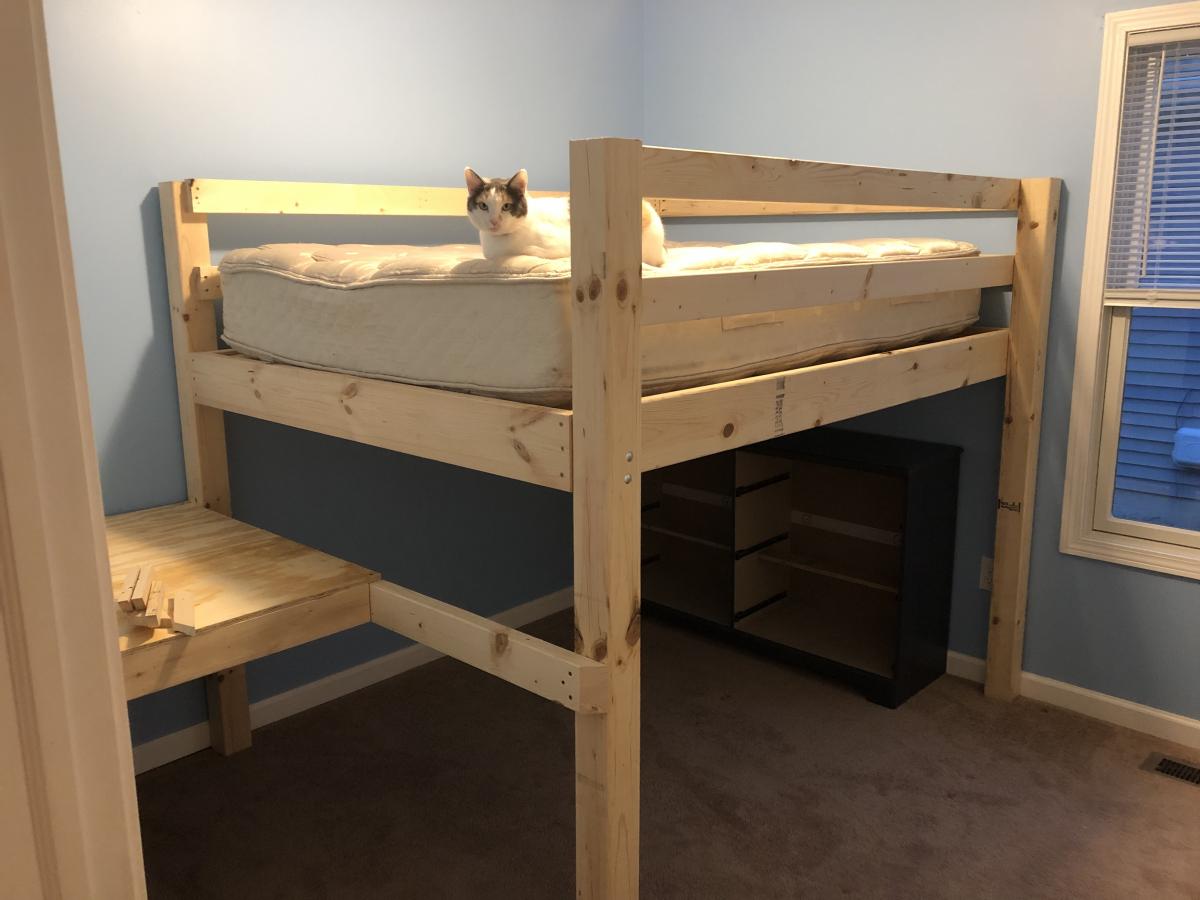
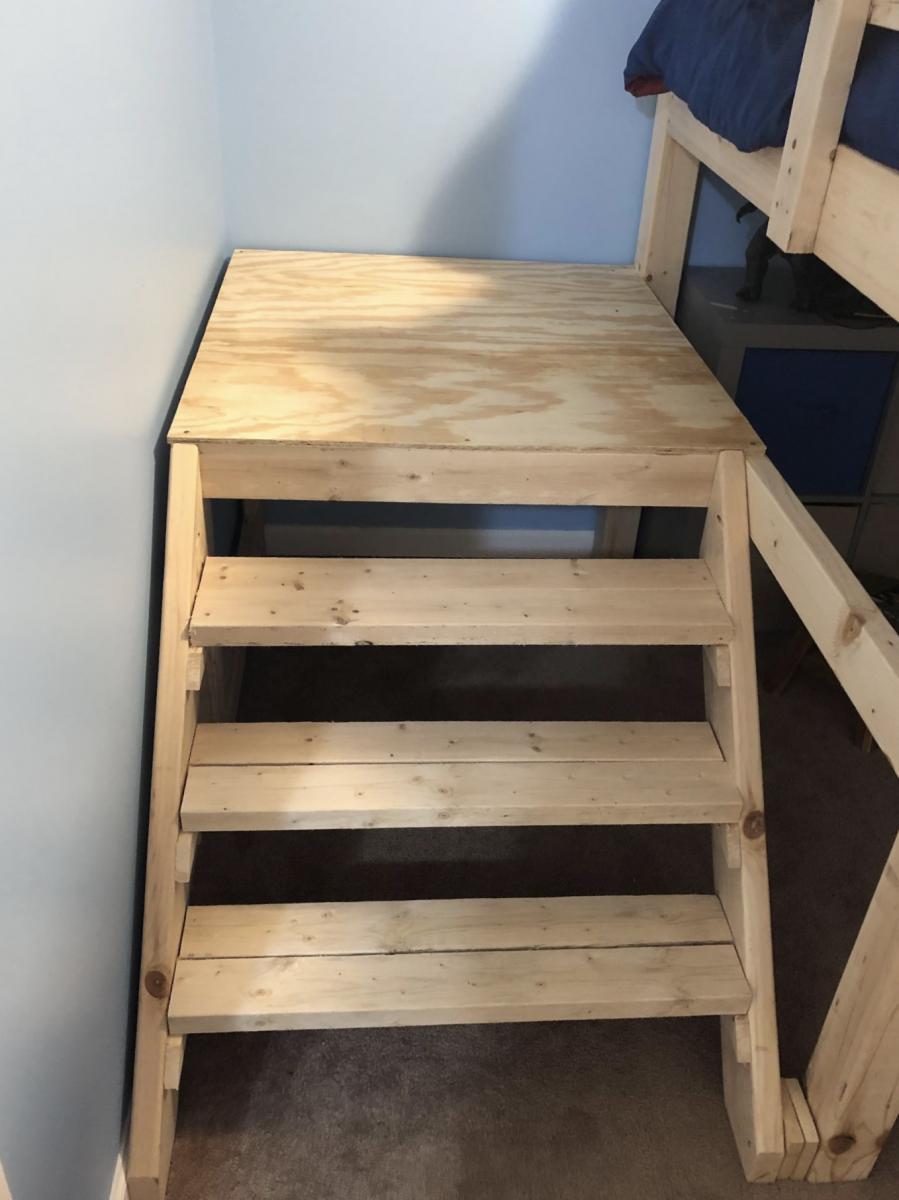
Built a full size loft bed for my kids but wanted something safer than having them climb up and down a ladder so used the Camp Loft Bed plans to add the platform and stairs. It is much easier for the kids. Going to finish by covering the platform and stairs with carpet.

Wed, 10/02/2019 - 09:51
I really like how the platform is only half way so the stairs are inset, this is very smart and good use of space.
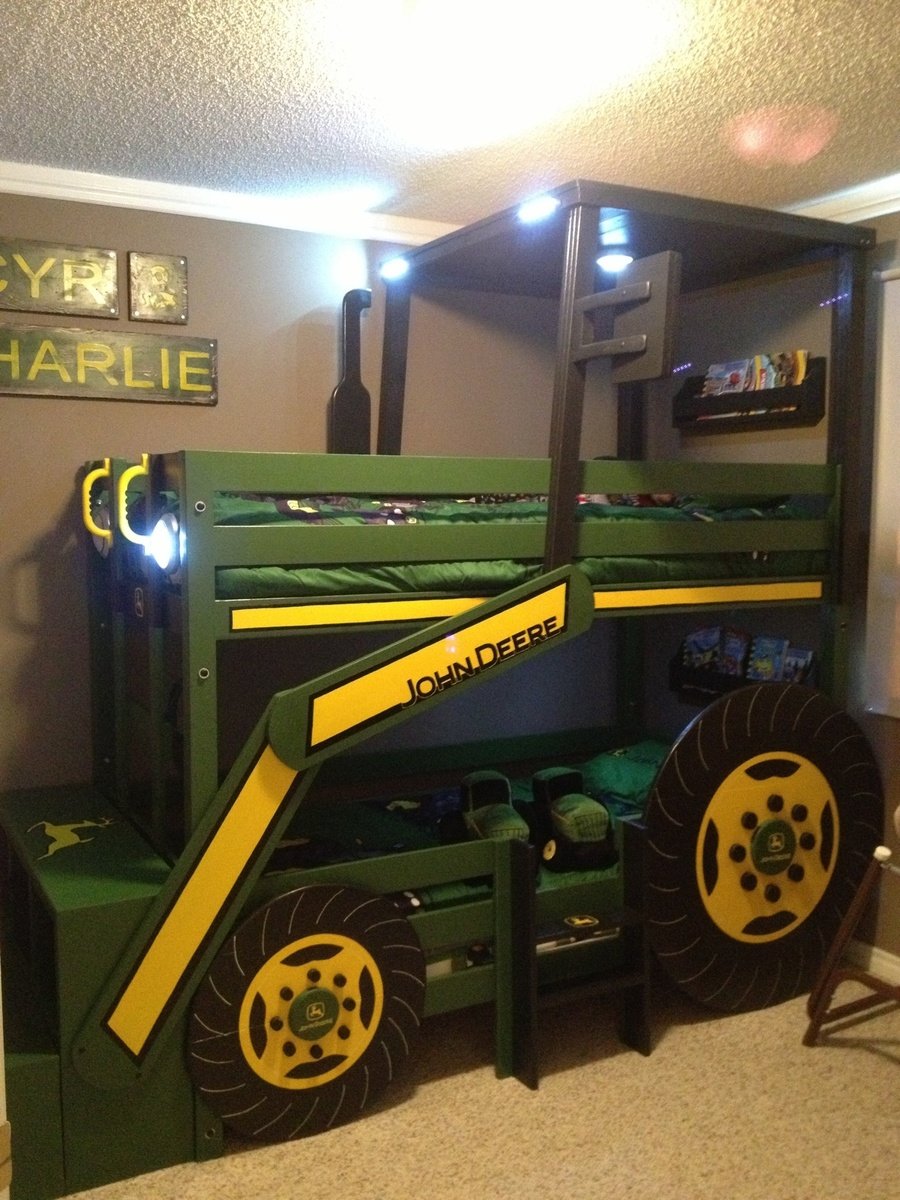
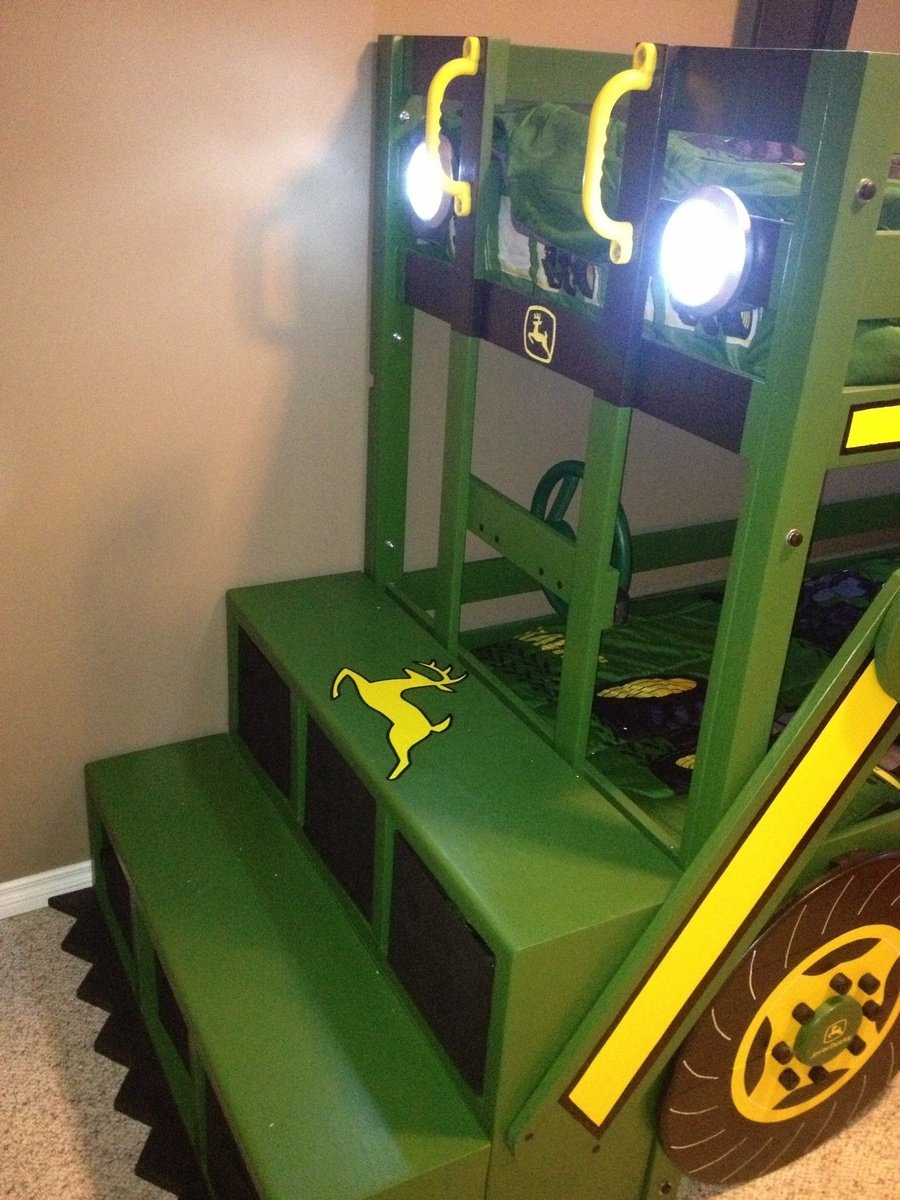
With another baby boy arriving in August, my one and three year olds are moving to a "big boy" room. My oldest decided he wanted a bunk bed and as they both are obsessed with tractors, when I saw the "John Deere Tractor Bunk Bed" plan, I was sold.
We would be needing a twin sized bunk bed though not a toddler. I used the classic bunk bed plans and simply modified them to suit our needs. I moved the ladder to the front, added a rail on the bottom bunk and added a small ladder to the side for my one year old to climb into the bottom bunk.
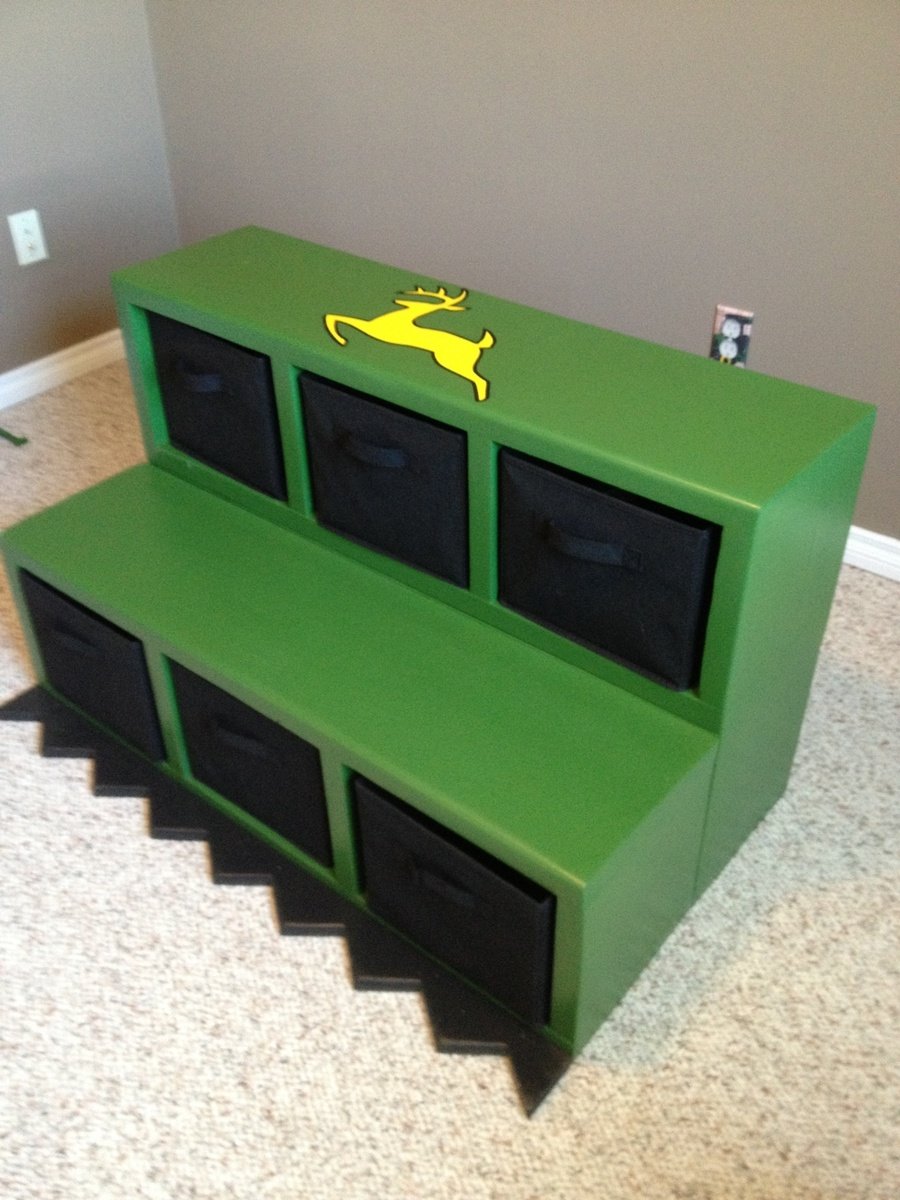
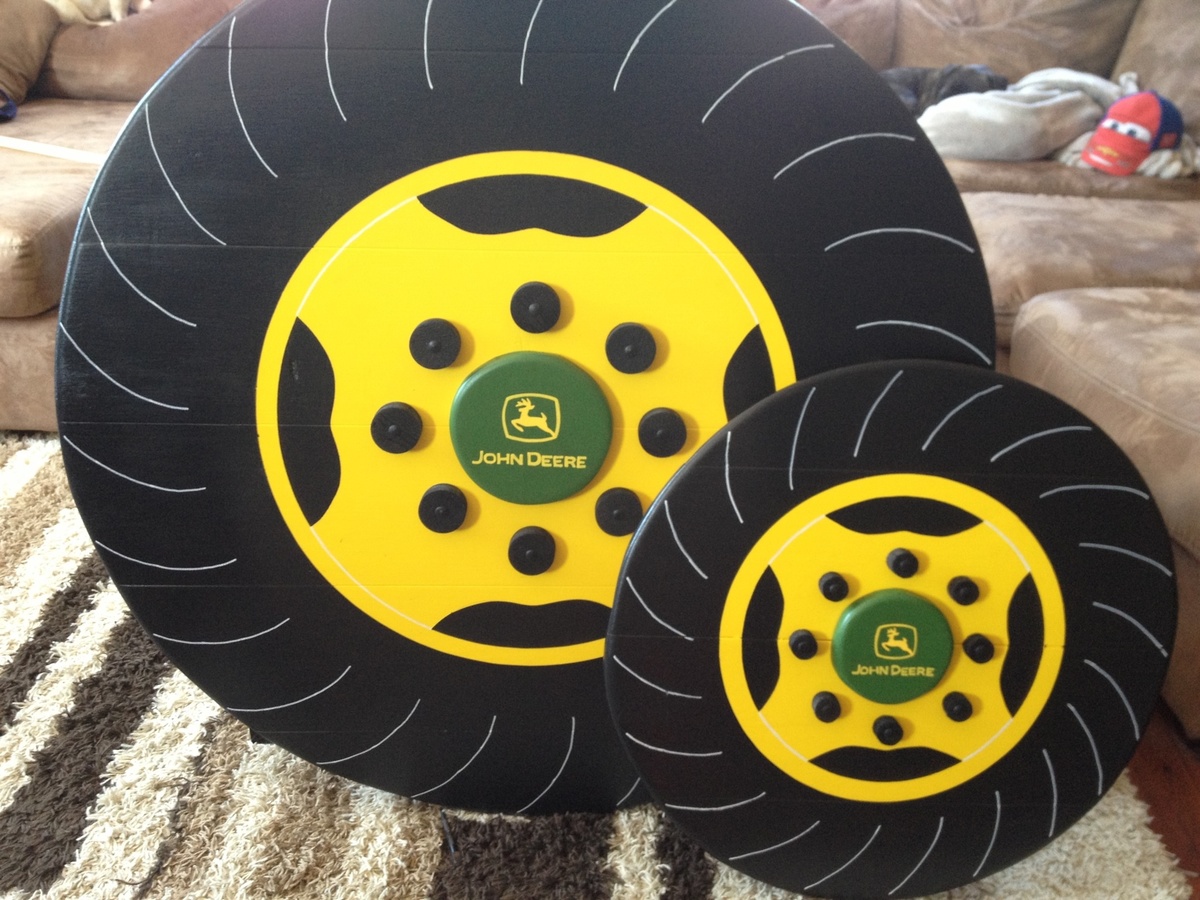
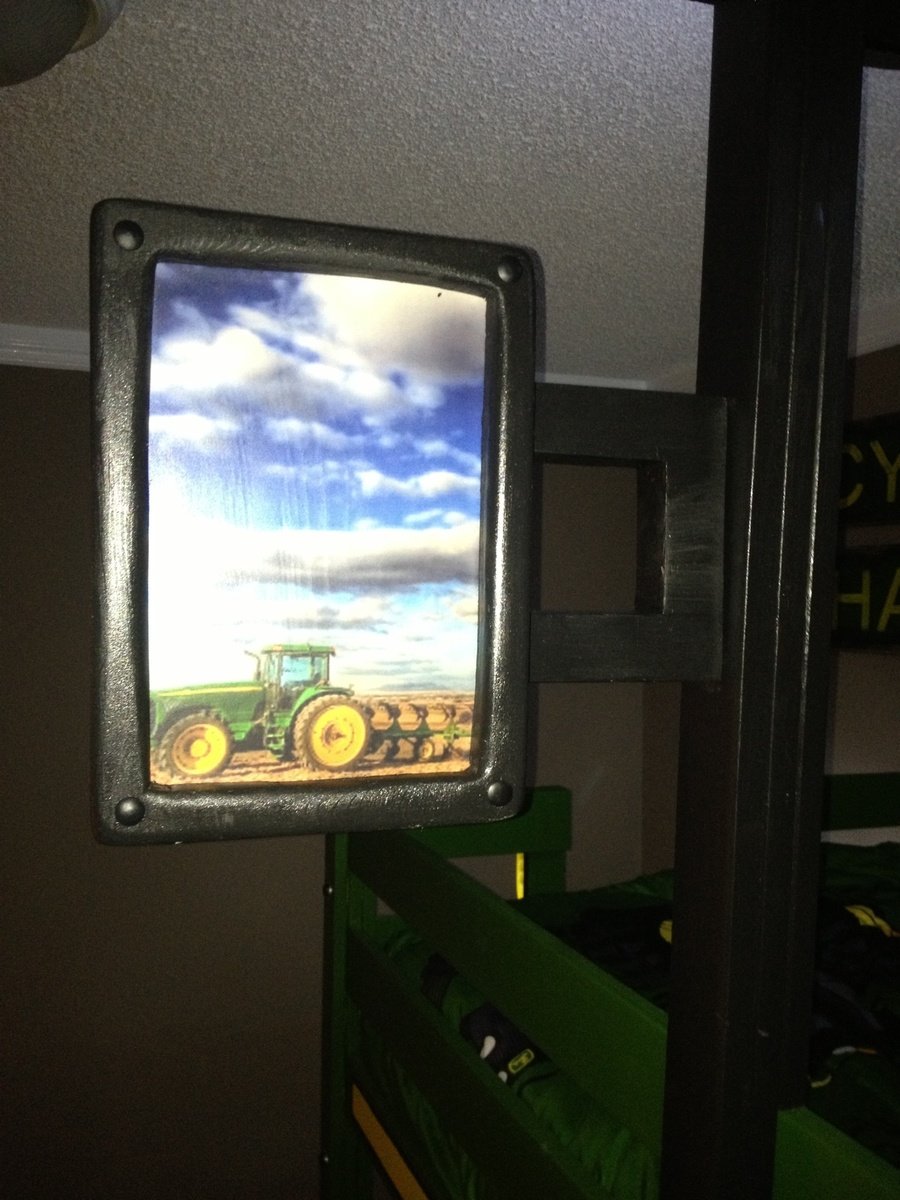
Once the the frame of the bed was complete, I added the tractor accessories. A couple of storage cubby shelves with fabric baskets for toy tractors which act as stairs up to the ladder and make the tractor bucket at the front. Also, the wheels which are made from joined 1x6s as I find plywood hard to sand and paint to the quality of finish I like. A cab & roof from 1x4s framed together. A side mirror that I decoupaged a picture of another tractor on. I used push lights for the headlights as well as a reading light above each bed (they're on timers so they'll turn themselves off). A steering wheel (play equipment access from toys r us). Also, I built and mounted by the head of both beds a "flat wall book holder" so they would have somewhere to store a few books.
My boys and I are fairly new to building so I spent a lot of time planning and measuring to ensure it would all come together in the end. It paid off because it all went smoothly (even with "help" from my boys). It's not perfect but they're very happy with the result. We also built a John Deere themed "Just my size closet" and even finished with over a month to spare before the new baby arrives! :)
Just want to say a quick thank you to Ana both for the amazing plans and also the inspiration to take on these projects. The time spent with my boys building as well as the resulting treasures are priceless and I would have never realized what we were capable of had I not stumbled upon your website and been so inspired by you and everything you've accomplished. Thank you!

Thu, 10/09/2014 - 14:12
I am new to this and I was wondering were to find the measurements for the twin size bed? I would love to make this for my boys!!
Mon, 10/20/2014 - 13:10
HI! You did an amazing job with this! Is there any way you can post the plans or send them to me? Thanks in advance.
Mon, 11/03/2014 - 07:48
Sorry for the slow response to those requesting plans. For main structure of the bunk bed, I used Ana's "Classic Bunk Bed" plans. For all of the add-ons, I made up my own plans. I'm pretty low tech so unfortunately they're just pencil & paper plans but I'd be happy to scan and email them to you if you're interested. Just message me and I'll send them your way. :)
Fri, 11/21/2014 - 13:26
Can you please email me your plans? [email protected]. Thanks!
Thu, 07/09/2015 - 19:48
I was just wondering if you by chance got three bunk bed plans?? If so would you be willing too send them my way??? [email protected] thanks so much
Thu, 05/26/2016 - 14:54
I know that it has been a while, but did you ever get plans for this bed? If so, will you please forward them to me at [email protected]? Thank you!

In reply to Plans please! by kerrihicken
Sun, 02/12/2017 - 07:36
if you recieved plans for this can you please forward them to me [email protected]
Fri, 01/02/2015 - 12:36
If you wouldn't mind sharing with me also I would love a copy. Email ... [email protected] This is by far the BEST tractor bed I have seen online! You did an awesome job!!!!! Hopefully I can recreate!!!!
Mon, 01/05/2015 - 08:44
I love this! You did an amazing job! Could you please send the plans to [email protected]
Thank you so much!!
Wed, 01/28/2015 - 14:08
Hi Veronica, Well done fantastic job! Two little men who want to move in together because of a new addition on the way. Their request though is a John Deere Bunk Bed! would be grateful if you could forward on your plans if you have time, Kindest regards.
In reply to Plan Request by Veronica P
Thu, 01/29/2015 - 07:18
Hi, I would love to get a copy of the plans used to make this bunk bed for my grand kids. Have two grandkids and a third one due the middle of February so got to get a bed made quickly for them to have a great bed to sleep in when staying with nana and pa. Plans can be emailed to me at [email protected] 731-415-9666. Thanks Diana
Mon, 02/02/2015 - 07:31
This looks so great. Could I get a copy of your plans? Thanks [email protected]
Mon, 02/09/2015 - 21:06
I would love to receive a copy of of the Plans for the John Deere bunk bed. My email is [email protected]
Tue, 03/03/2015 - 10:43
Can you please email me the plans. I have a 4yr old that is obsessed with John Deere. We would like to make this for his birthday. [email protected]
Thu, 03/05/2015 - 22:31
Just love the whole thing very beautiful & I was wondering if you could send me the plans for the whole set up. My email is [email protected] thanks
Mon, 04/06/2015 - 21:04
Hi Veronica, like everyone else i love your plans, could you possibly email them to me? Thanks in advance.
Thu, 05/28/2015 - 10:35
Please send me the plans for the John Deere Bunk Bed. I love it.
Fri, 05/29/2015 - 09:06
Please send me your plans for the John Deere Bunk Bed in the twin size. [email protected]
Sun, 05/31/2015 - 23:36
Will you please email me the plans for the John Deere tractor bunk bed? Thank you. You did awesome
Tue, 06/09/2015 - 08:06
Hi! Can you please forward me your plans for the john deere tractor bed to [email protected]?
Thank you so much and awesome idea!

In reply to Plan Request by Veronica P
Fri, 06/12/2015 - 19:31
Please, please email these plans to me! My son will love this!!!! Email is [email protected]. Thank you!!!
Thu, 06/18/2015 - 14:04
Thanks for being willing to share your plans. Your tractor bed is amazing. I have 2 boys who would LOVE a bed like this. Could you please send your plans to [email protected]?
Thank you so much
Sun, 09/06/2015 - 10:06
Dear Veronica,
Our grandson, 6 years old, will absolutely adore this bed. He loved riding on Grandpa's real JD tractor. Please send me your plans for the attachments. They are just darling and I could not do any better. Thanks for your generosity!
Fri, 01/15/2016 - 10:52
Can you please send me your plans? i am stumped on the arms of the tractor
Wed, 07/13/2016 - 12:12
Veronica P this bunk bed is amazing! Could you email me your low tech paper and pencil plans please? :) [email protected]
Fri, 09/13/2019 - 21:11
Hi Veronica. My 3 year old just loves the tractor bunk bed. I was wondering if you would mind sending me the plans you have. It would be greatly appreciated. My email is [email protected]
Thanks in advance
Wed, 10/16/2019 - 17:56
If you're still sharing, we would love a copy of your add-ons plans.
Thanks,
MyMaw and PawPaw
Sun, 08/23/2020 - 11:32
What an awesome build! We would love a copy of your plans if you could please share. Thanks!
[email protected]
Mon, 12/15/2014 - 20:19
Would you please email me these plans for your bunk bed? Thanks A lot!!! email to [email protected]
Thu, 05/26/2016 - 15:00
Hi! I know that it has been a while, but I see a message where Veronica says she emailed you the plans. If you still have them, will you please send them to [email protected]. Thank you!
Tue, 12/16/2014 - 19:22
Is there any way I could have email plans? [email protected] . Thank you.
Sun, 12/21/2014 - 00:35
Please email the plans for this to [email protected]
Thank you in advance!
Tue, 12/23/2014 - 07:33
Hi Veronica! I would love an email of the plans to make this bed. My sons thinks it is out of this world!!! Thanks for all you effort and wonderful job.
Sat, 12/27/2014 - 15:12
Would you please consider emailing the plans to me? We have started this for my son today and would love your insight on some measurements. Such a wonderful idea, thank you for sharing! [email protected]
Tue, 01/06/2015 - 08:21
Hello all. I've tried emailing plans to all those who've requested them. I had some trouble attaching the files as they were large so if you didn't receive them, please let me know and I can resend. Thanks
Tue, 01/06/2015 - 11:53
Hi Veronica. I did not receive an email. Woul you have time to try again? If you email me your address I can send you my fax number if that's easier too. Thank you so much! I can not tell you how much I appreciate your dedication to this! [email protected]
Sun, 11/01/2015 - 16:58
Hi
I didnt receive any plans. couldyou send methem please
Thanks
Jason

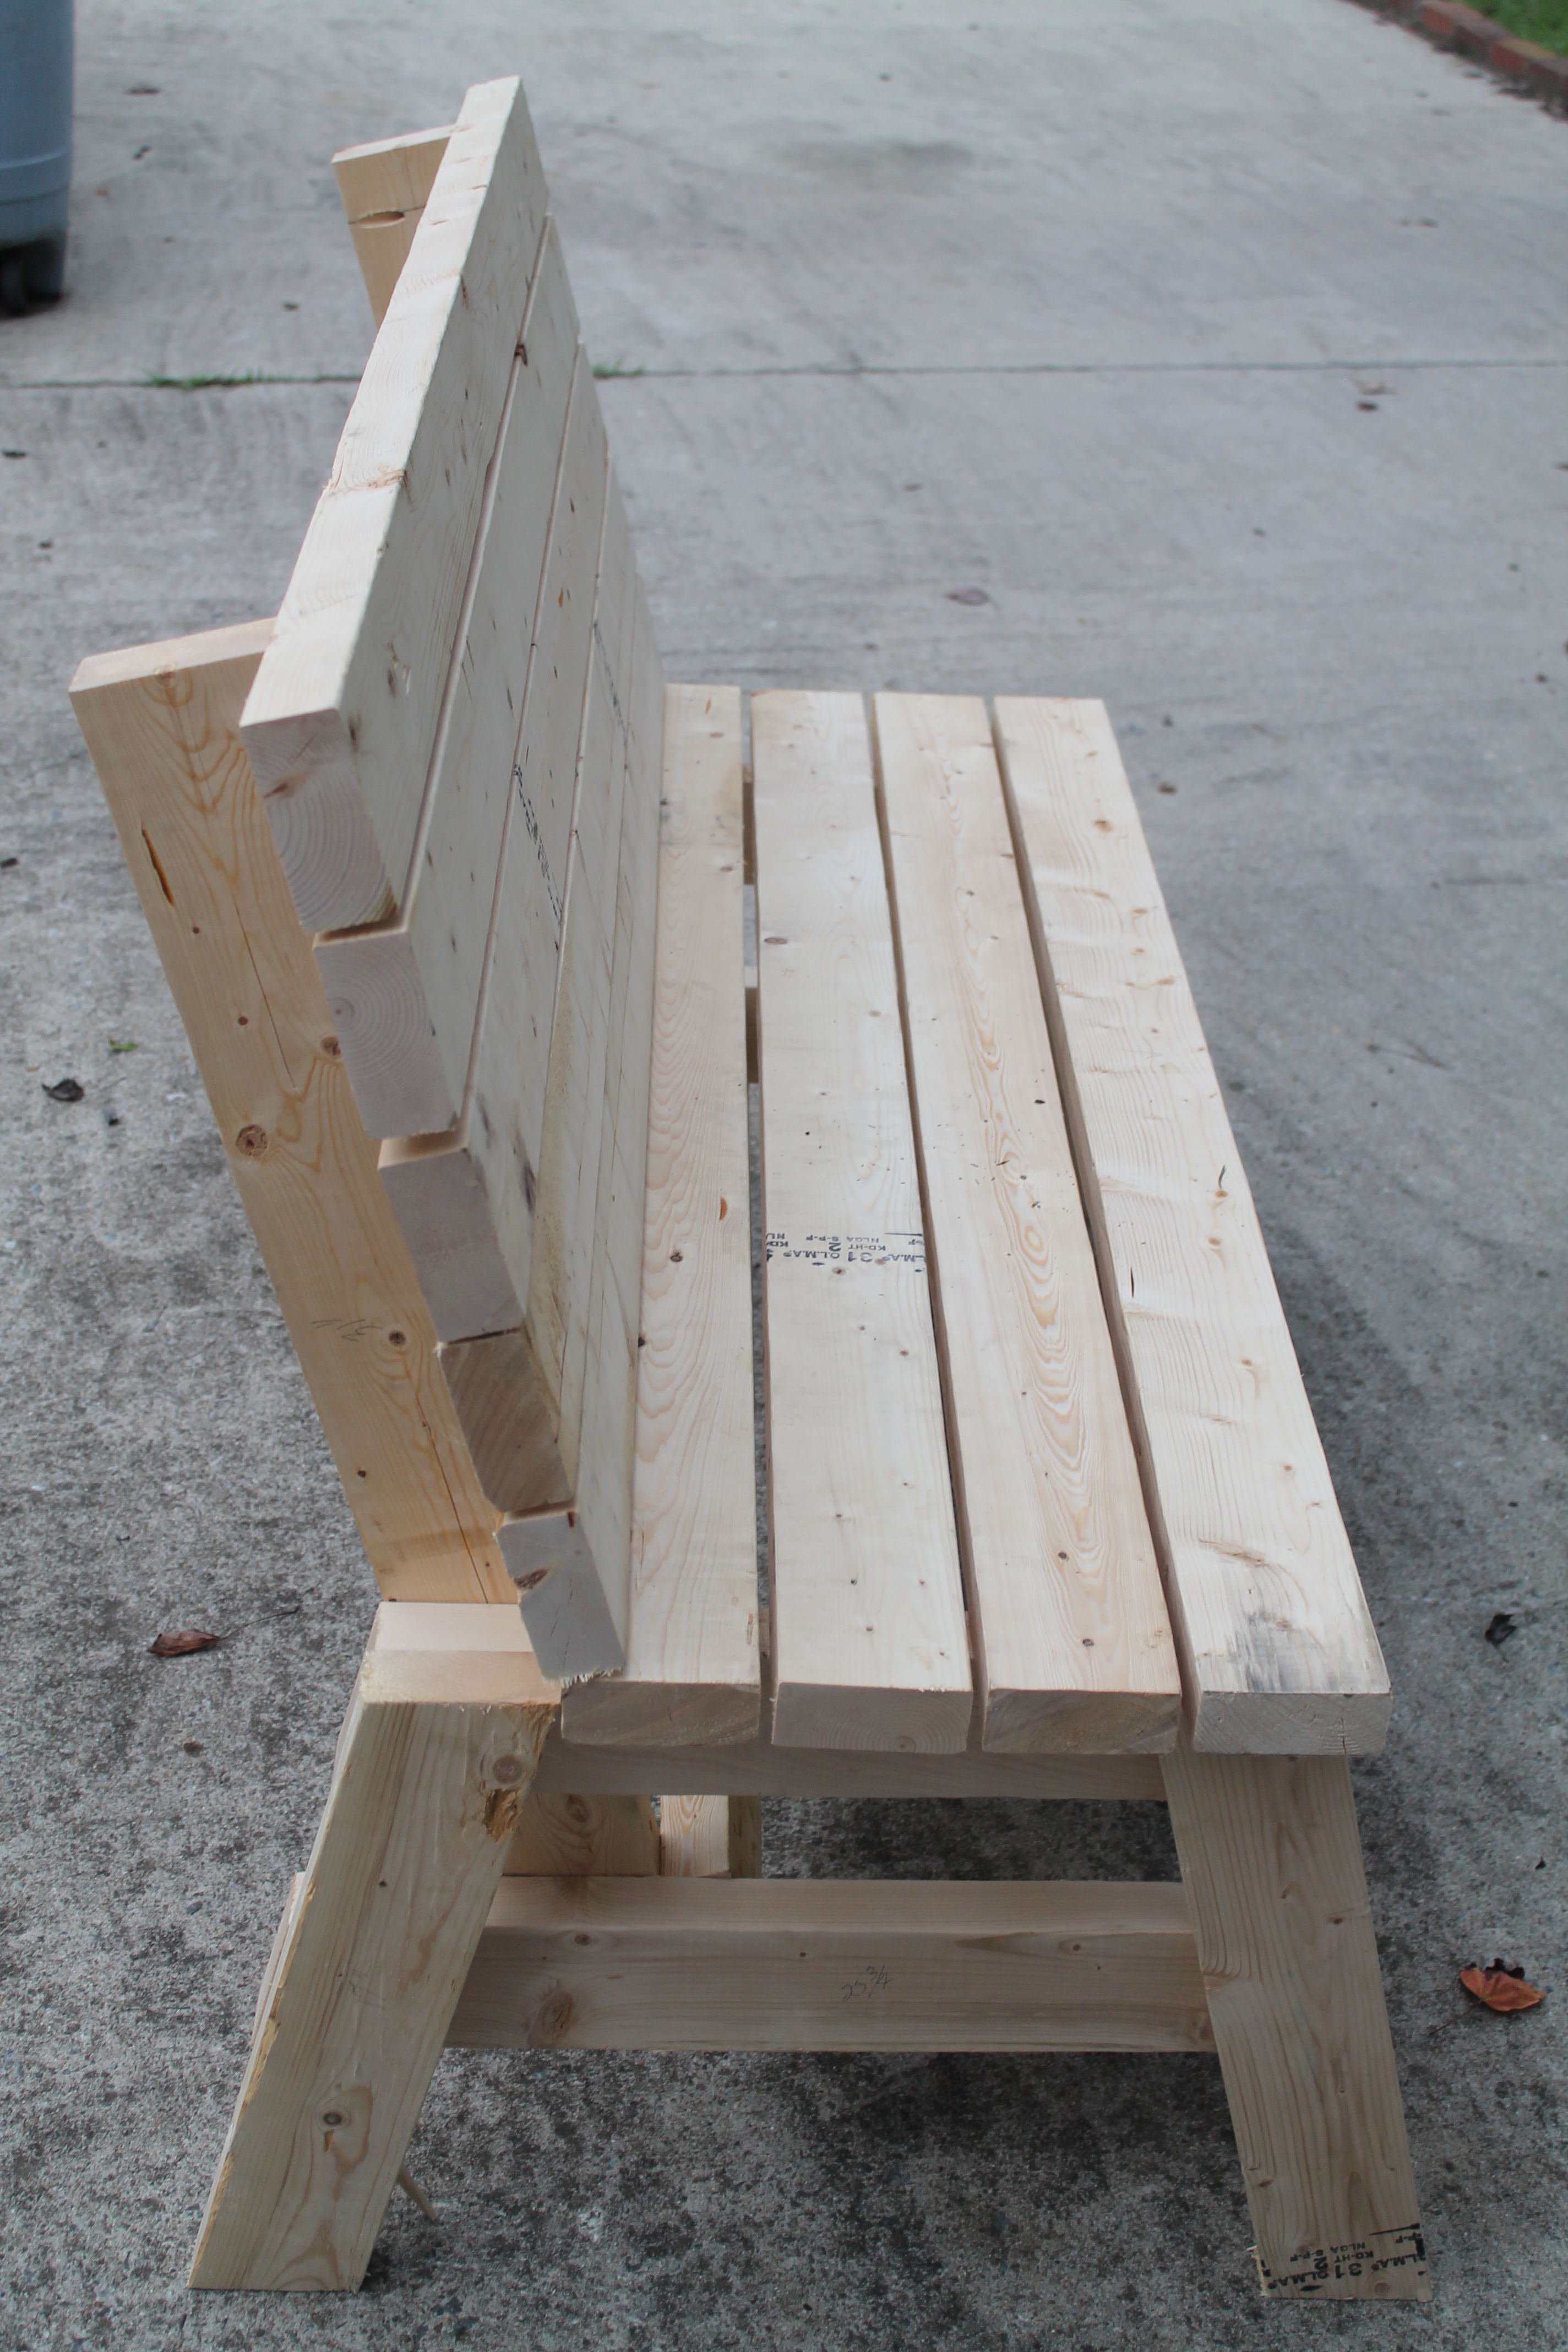
I made this in an afternoon. Loved this project. It is made with 2x4's using a Kregs Jig and mitre saw (plus additional tools like a drill and square). This was my frist time using the Kregs Jig and I am sold!!
The free plans were taken from another website. They are very detailed and there is even a video (I recommend it as he gives a great tip for making sure the back stays equal/level to each other before putting the back on). Even though you can build this by yourself, I did have help for the heavier sides once they were assembled. I plan to build the additional side table soon and finish them both with sanding and staining when the weather seems less iffy for rain.
If you are looking for a good beginner project that doesn't take forever or have complicated steps, this is your project.
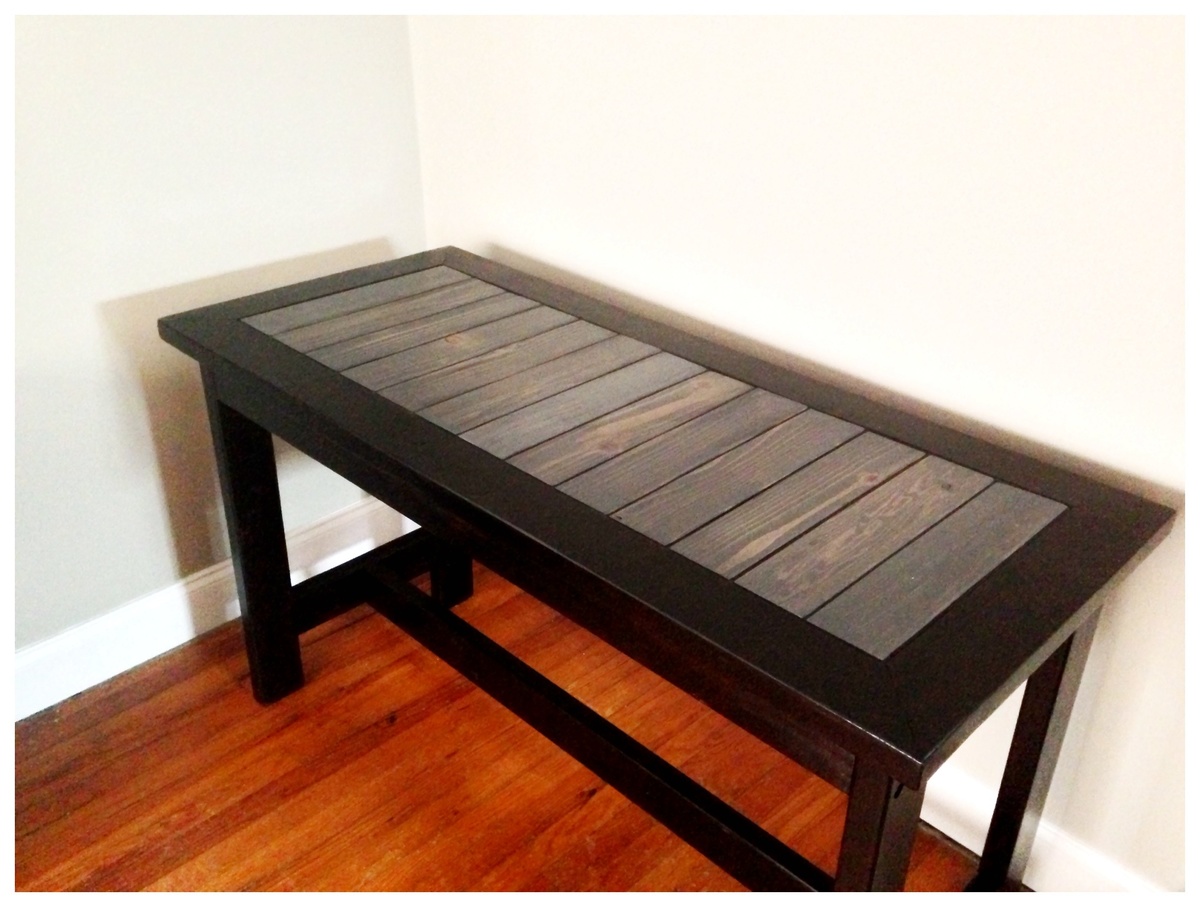
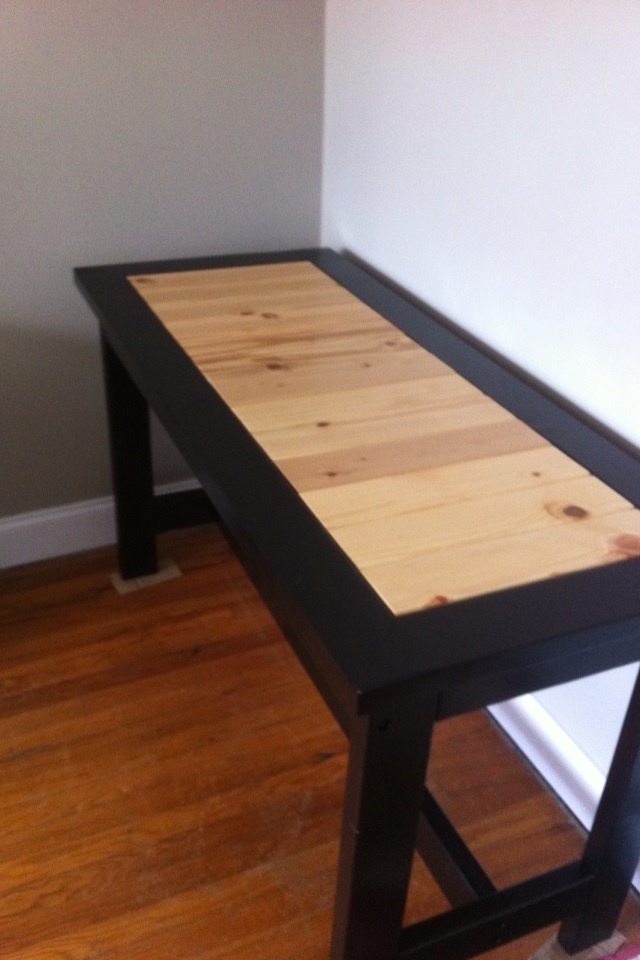
My new fav stain. Minwax Expresso Polyshades in satin.
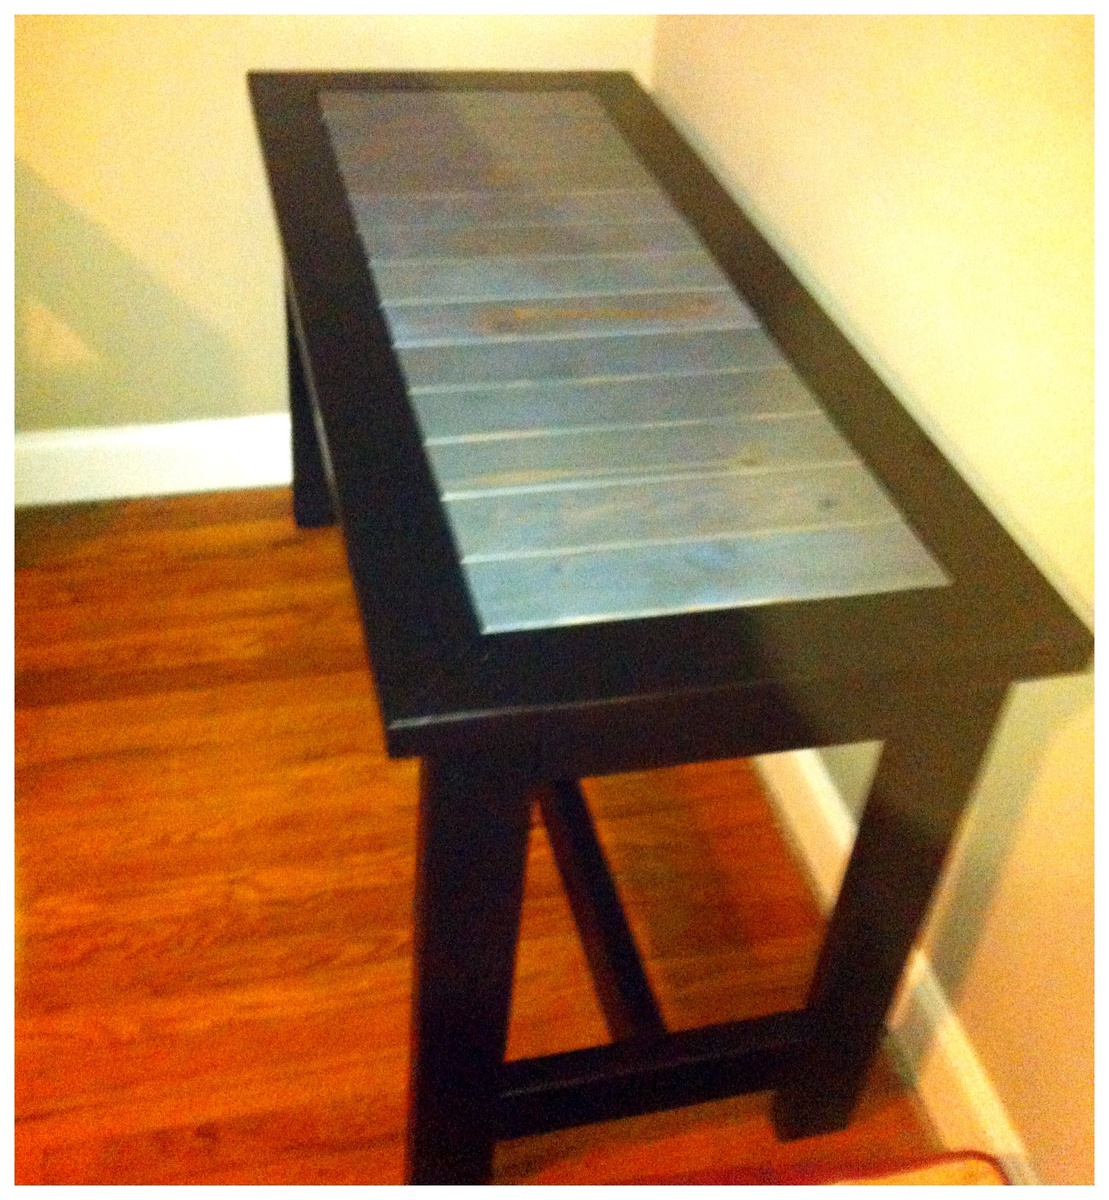
Followed the 2x4 desk design but had so many scrap pieces of 2x4 (from other projects) , ended up changing the direction of the table top.
Finished with Minwax gray and even though it looks blue , I like it...
Going to make some benches to match , weather pèrmitting :)
Didn't take long to build , just a couple of hours - staining was the killer. Needed 3 coats to get that rich dark even look.
Sun, 03/24/2013 - 13:20
I really like the way this came out. Looks very nice
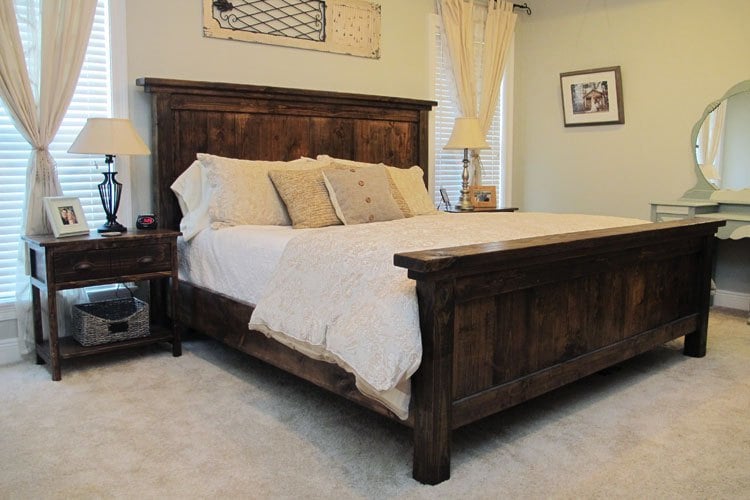
We built this Farmhouse Bed in 1 weekend for less than $200!

Fri, 02/20/2015 - 19:26
Beautiful! Both the bed and bedside table turned out great!


Comments
Brian Famous
Thu, 01/23/2020 - 07:05
Great idea! Do the…
Great idea! Do the bookshelves swing freely when weighed down with books? What type of hinges did you use?
Ana White Admin
Wed, 09/09/2020 - 12:20
Very Cool!
Thanks for sharing your amazing project!
charkue
Thu, 09/17/2020 - 08:01
Looks Awesome + Safety Note
I'm currently working on a basement renovation project. I'm probably going to incorporate a feature like this for my mechanicals, too.
One important safety note for anyone who wants to do this: It's recommended that your furnace be a minimum of 30" away from any combustible materials. That includes walls and partitions. The image of this project displayed is right next to the furnace, which is not a good idea.