Community Brag Posts

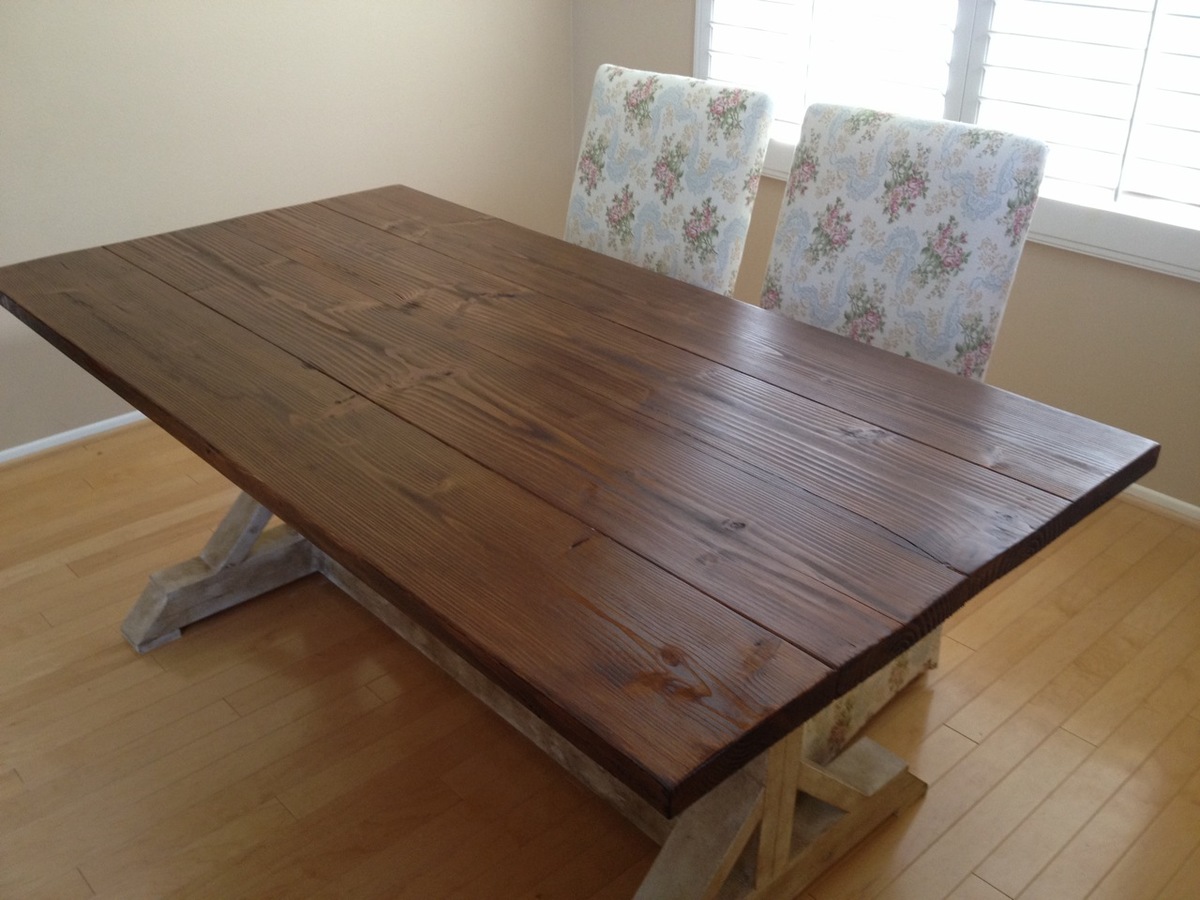
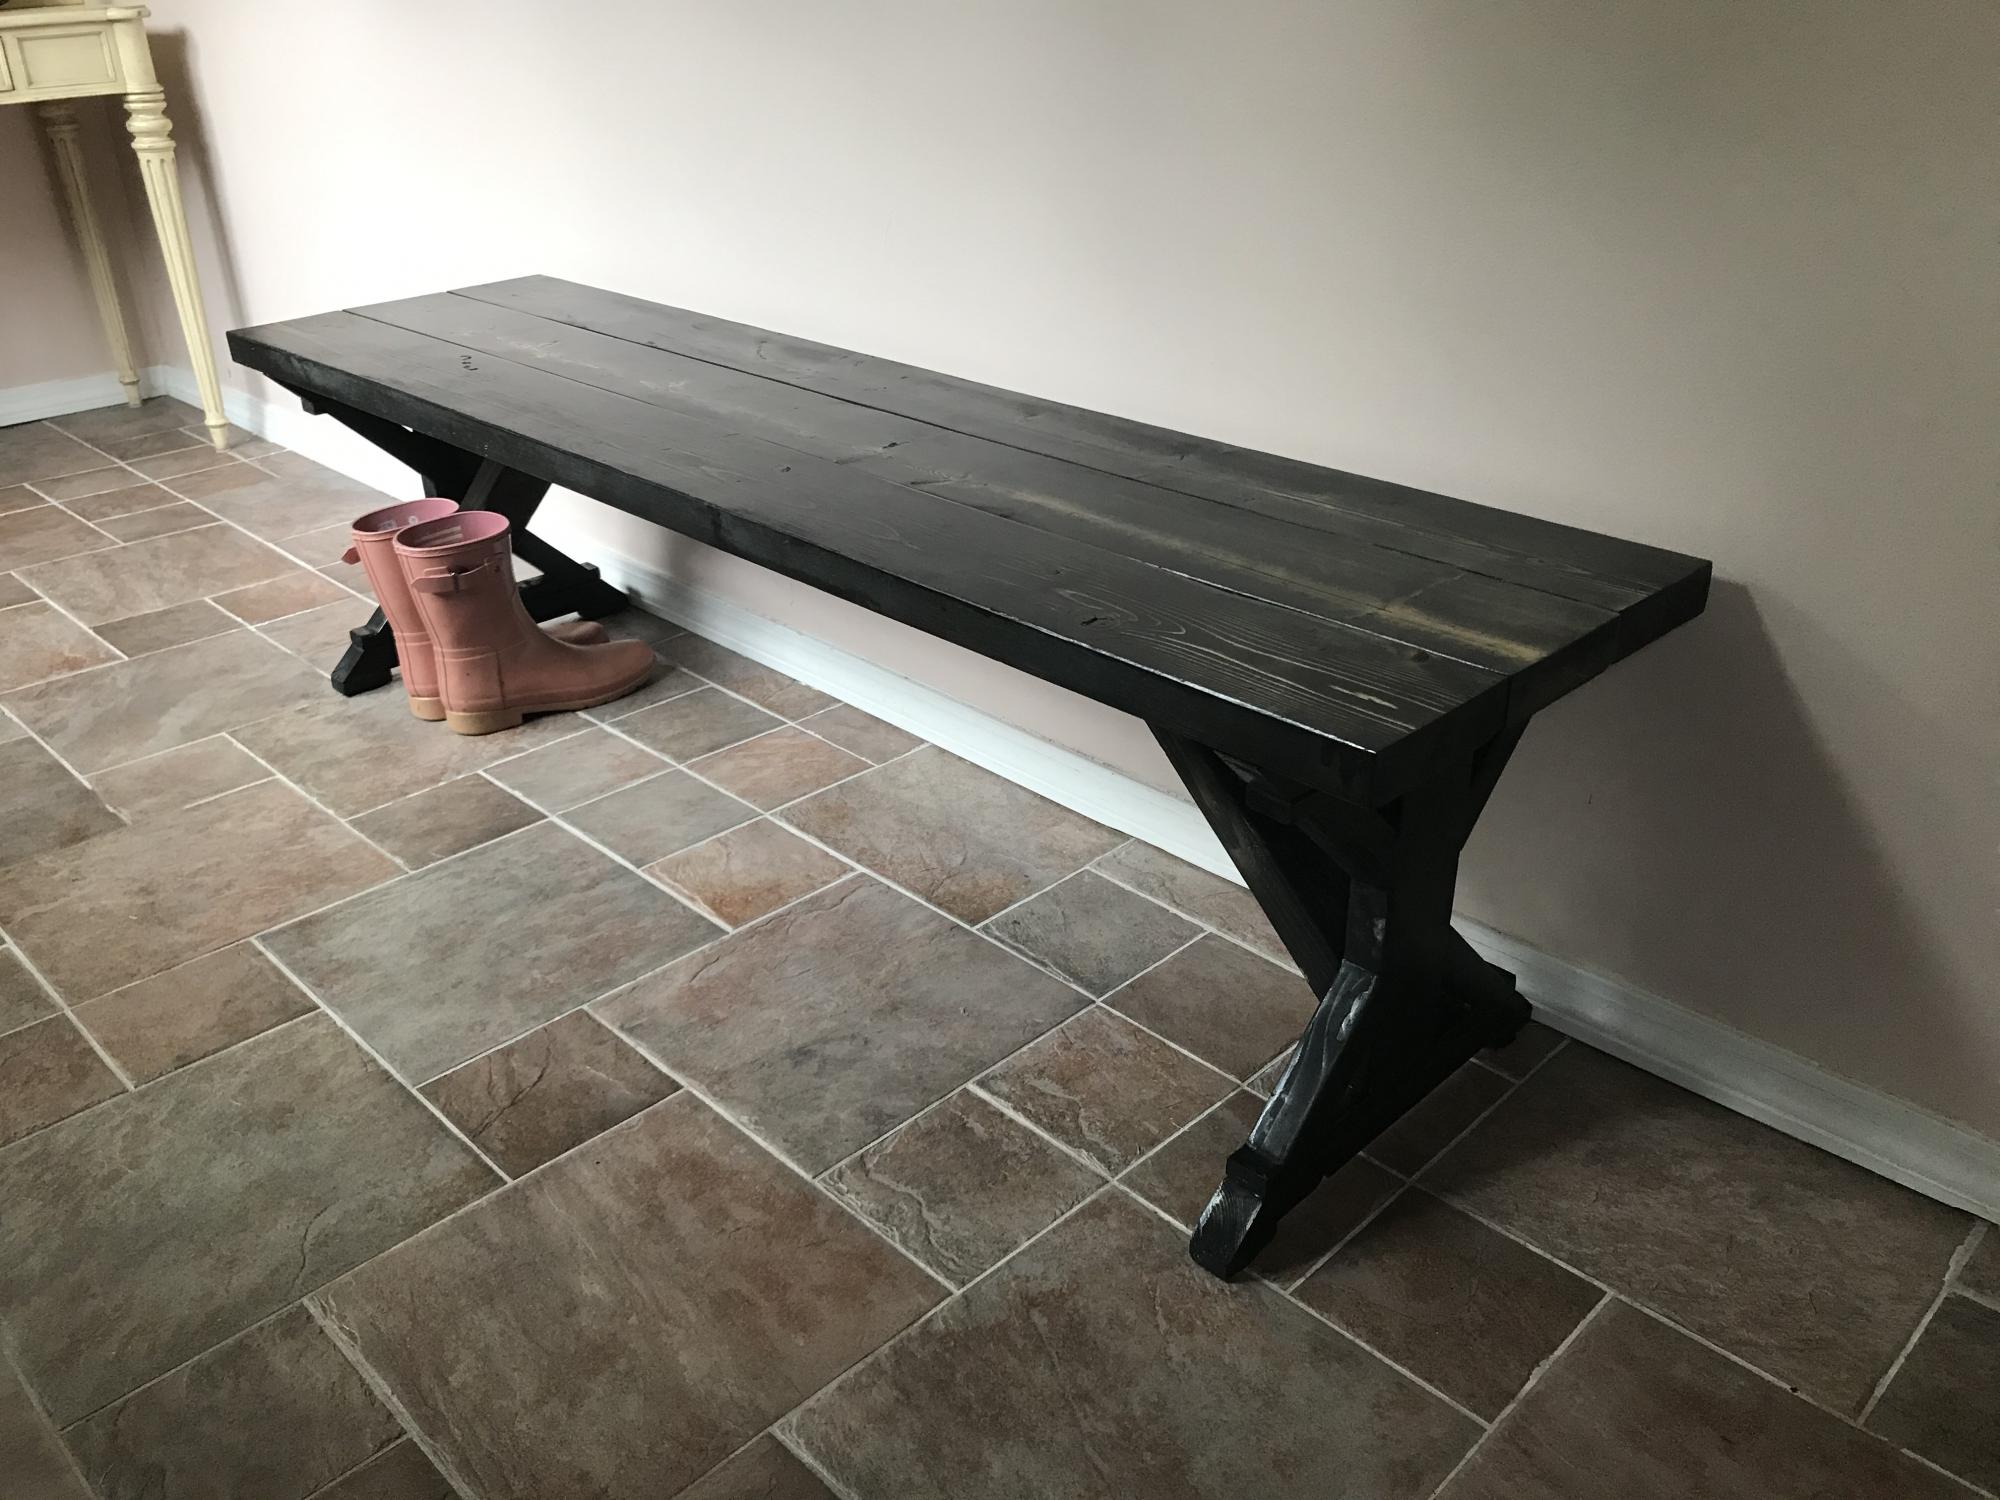
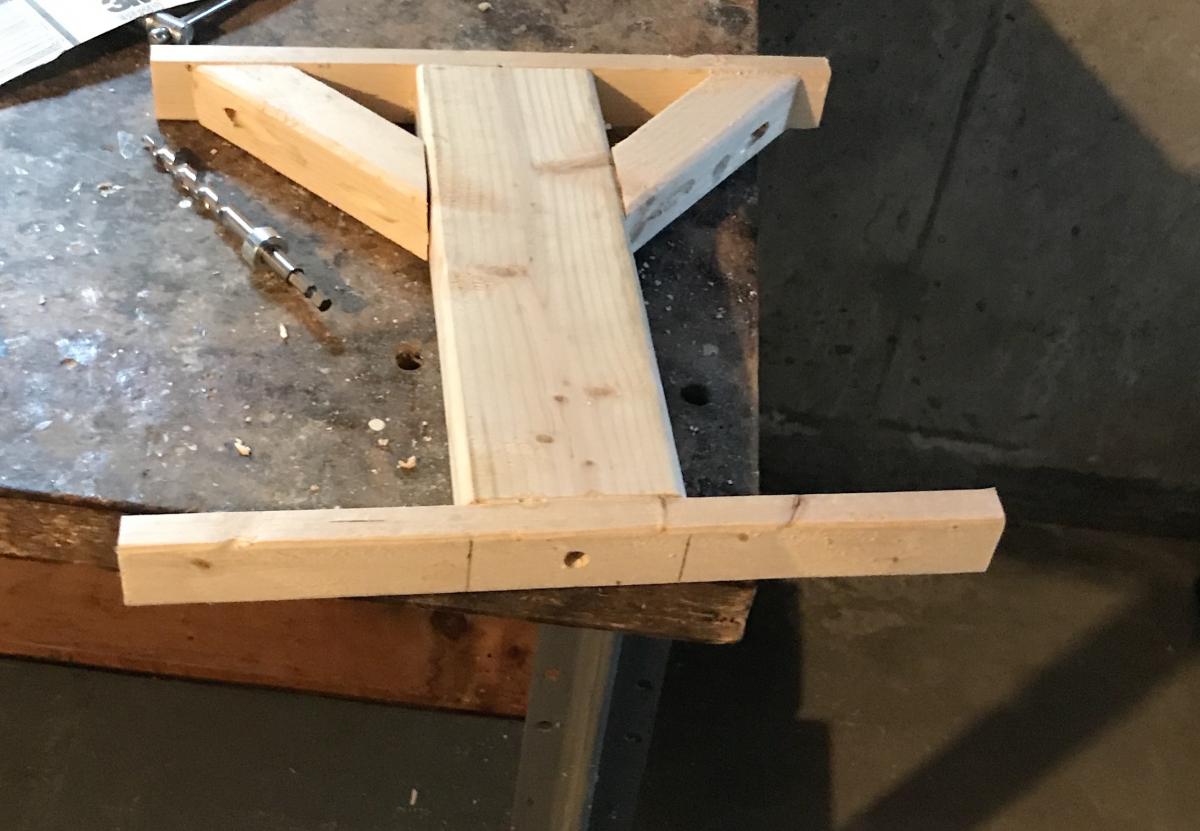
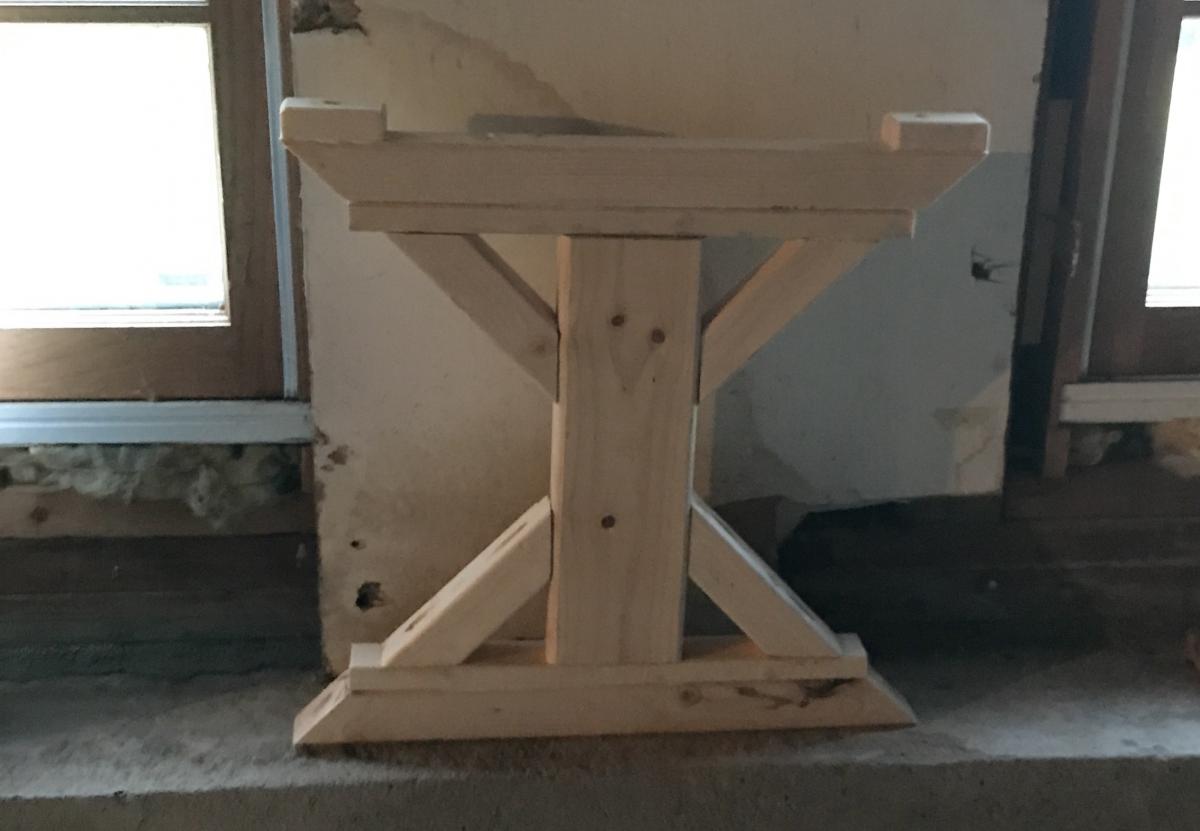
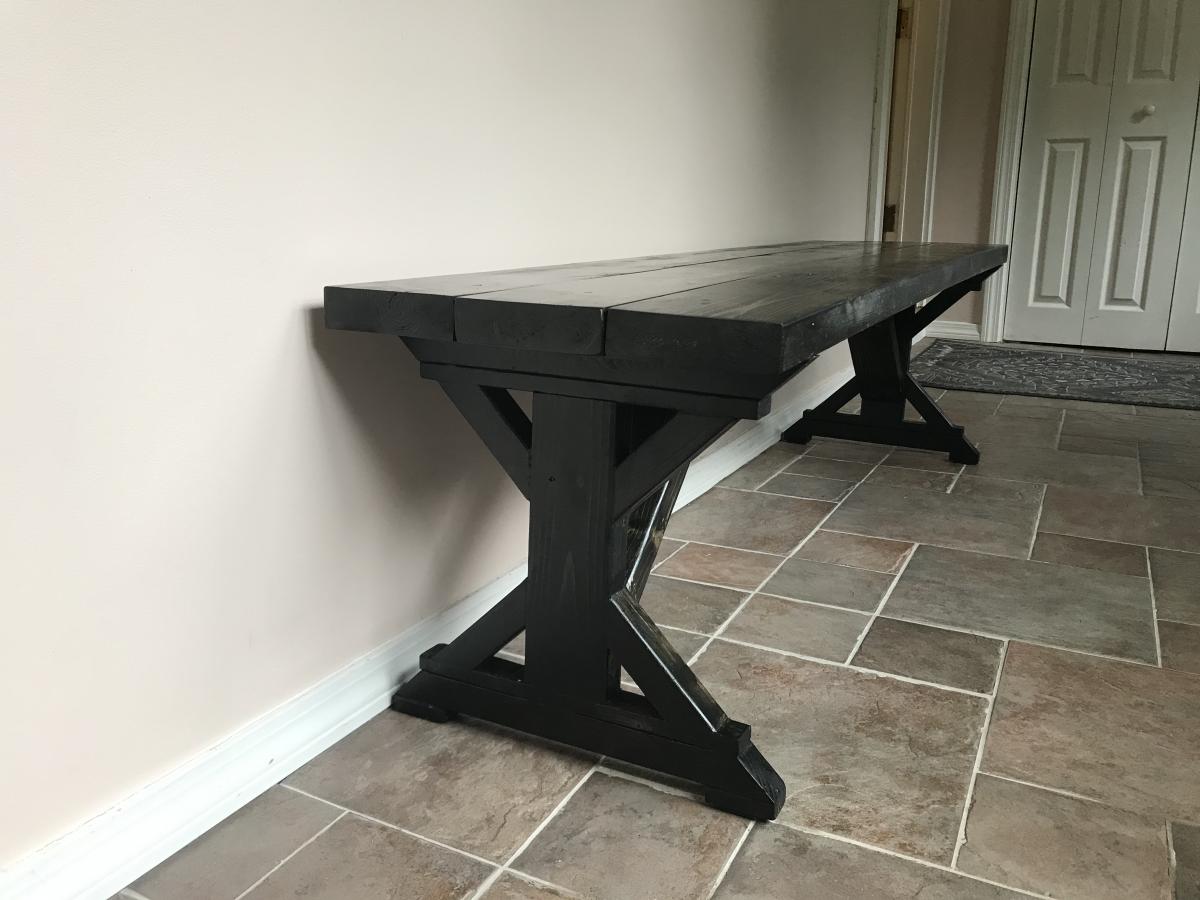
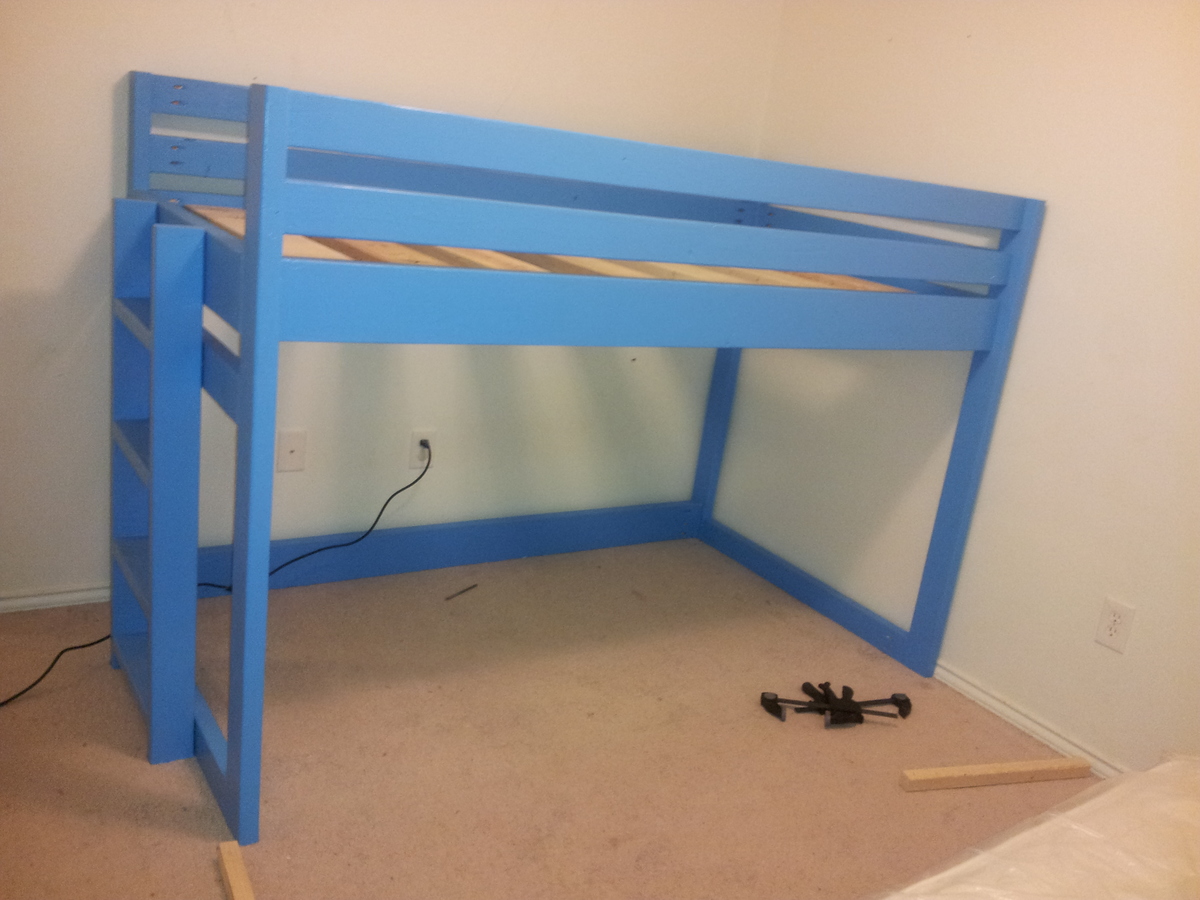
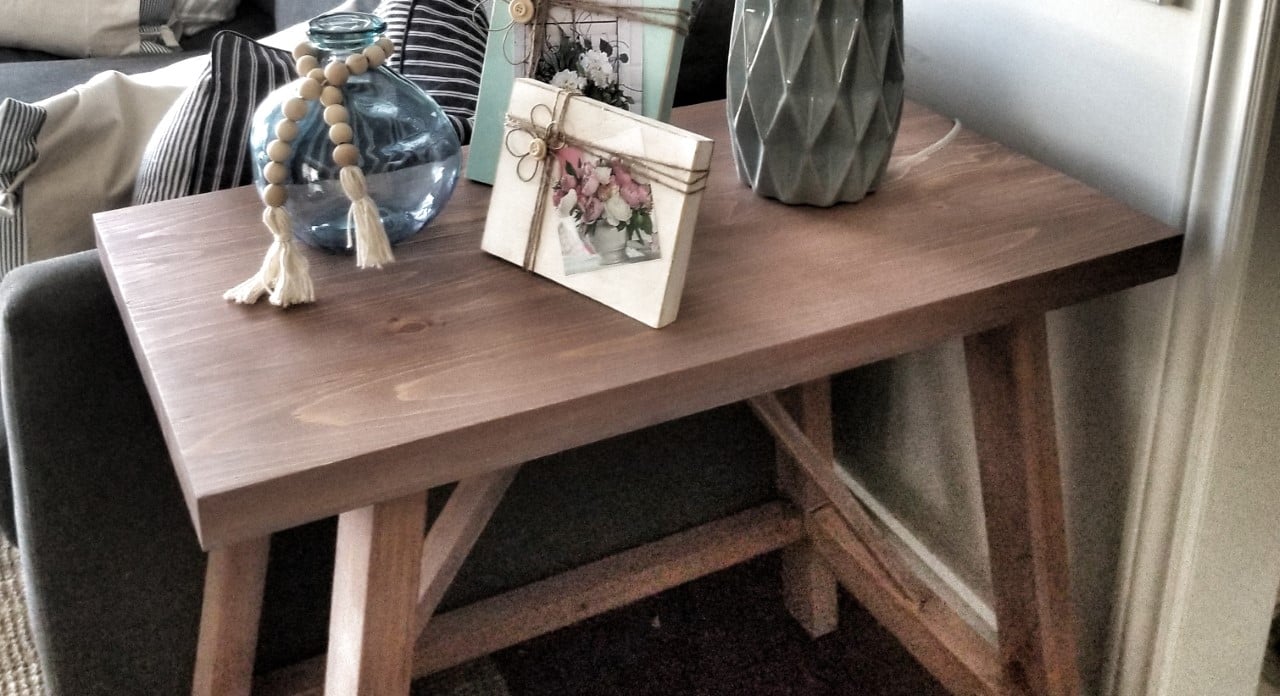
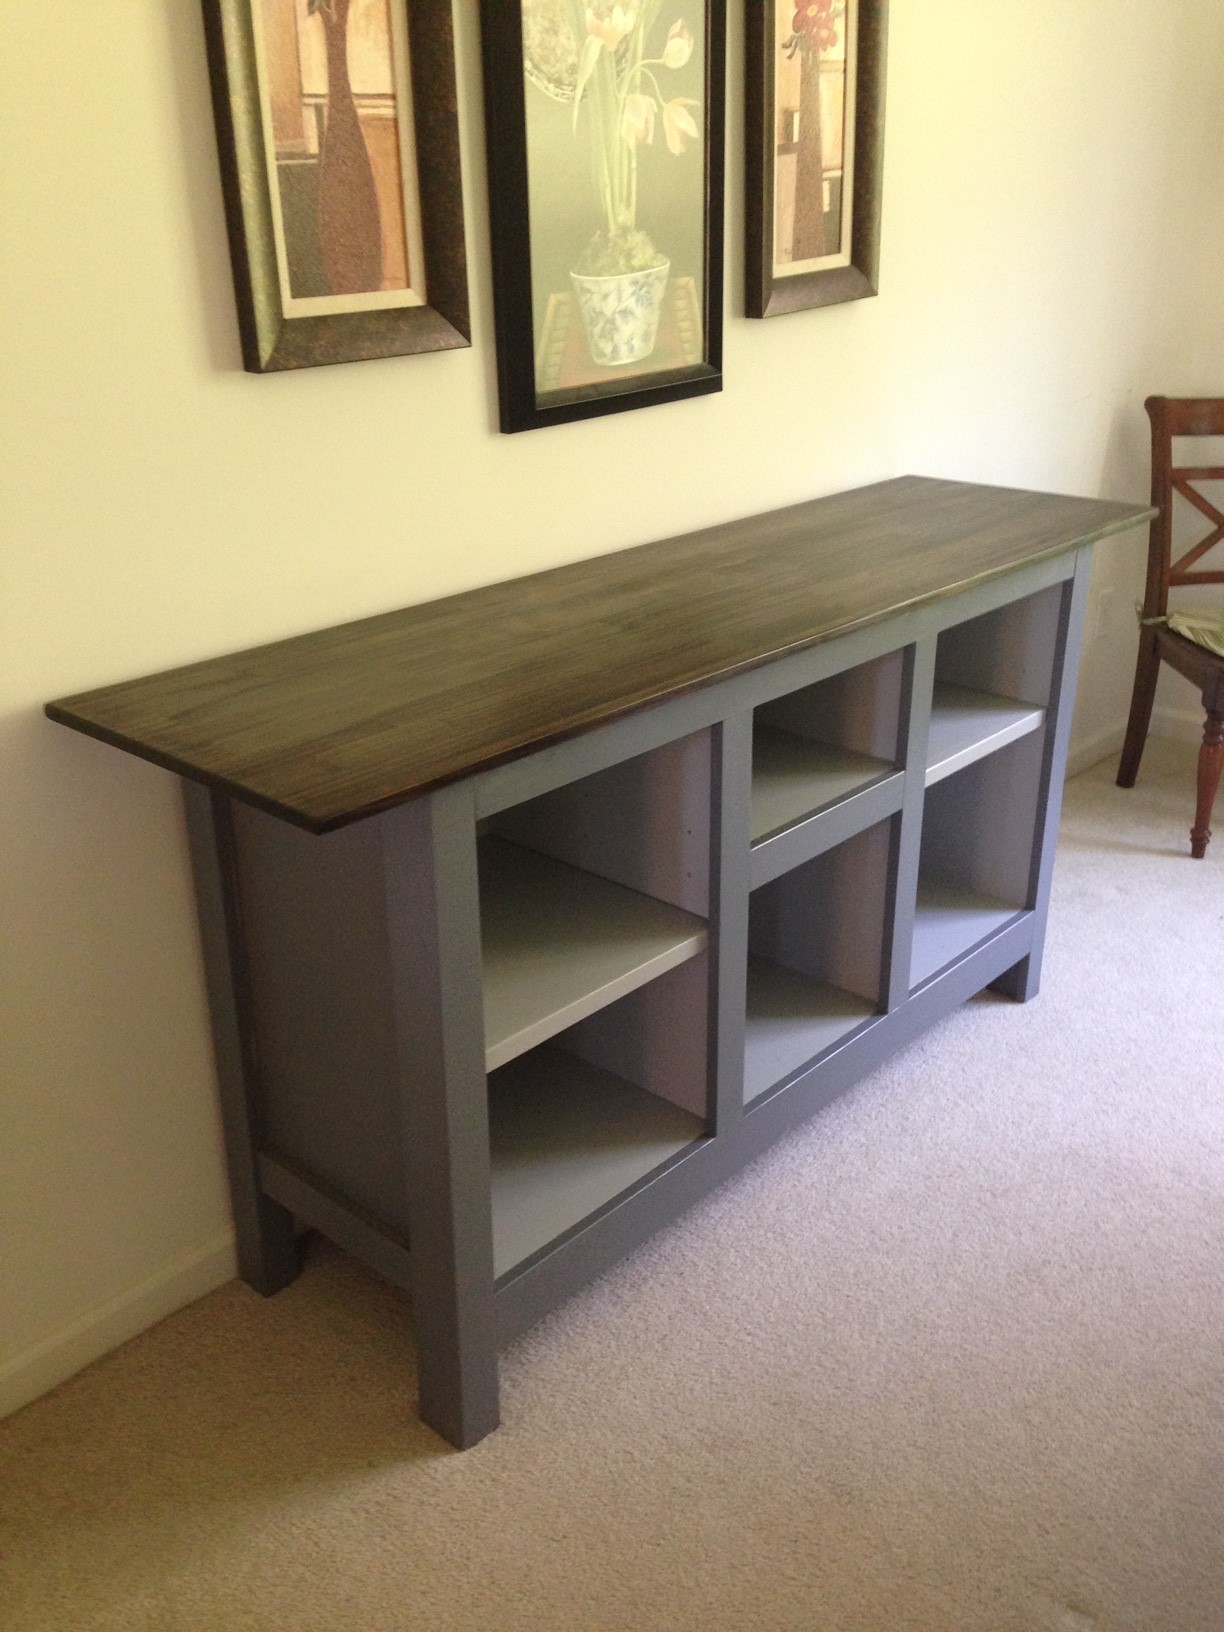
Fancy X Farmhouse Table

Submitted by kristine on Mon, 09/17/2012 - 12:35

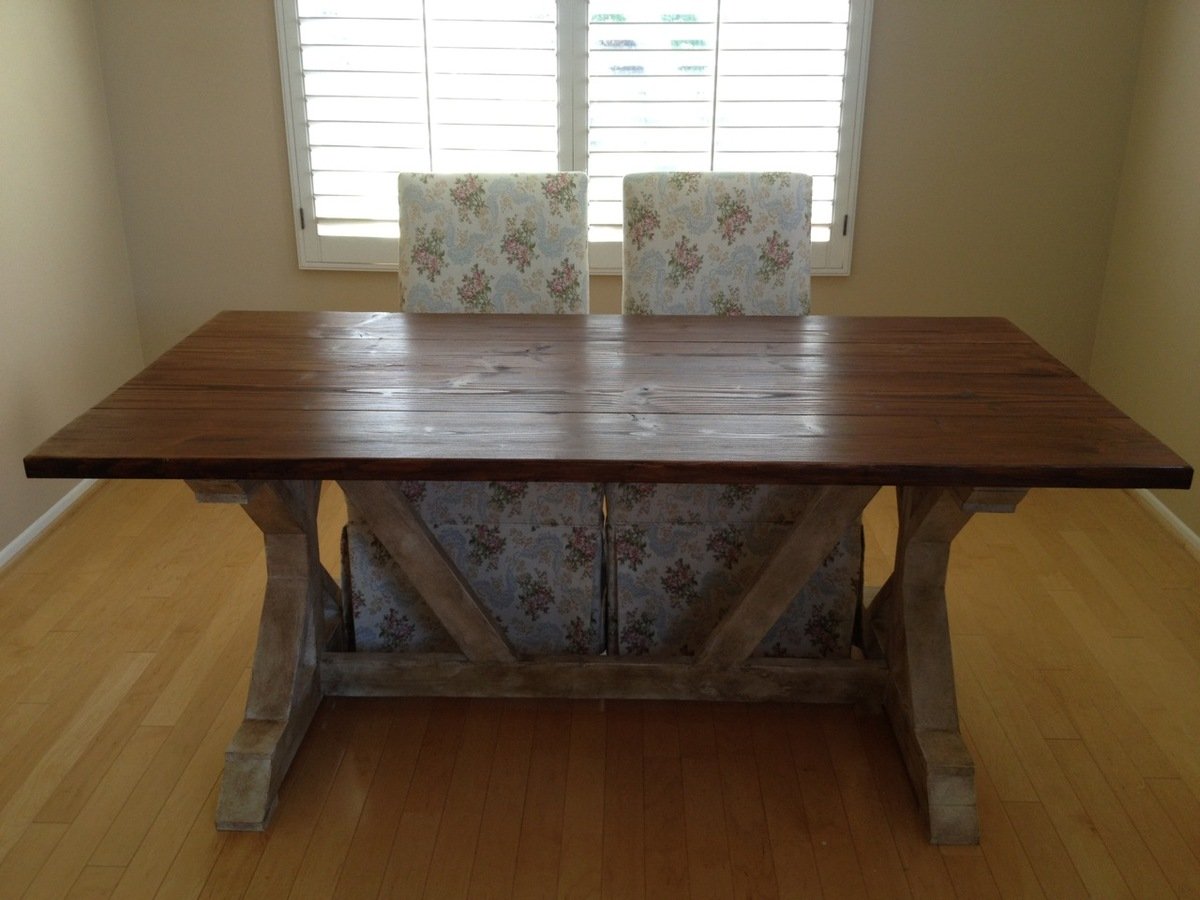
This was the hubby's second project off this site. Our dining room has been empty for the past 6 months that we moved in to our first home, so it was only appropriate for him to build something for this very empty space.

We did end up modifying the plans a bit... making it smaller (instead of 8 ft, it's 6ft) since we didn't need a huge table with just the 2 of us and the pups living in our home.

Built from Plan(s)
Estimated Cost
$100
Estimated Time Investment
Week Long Project (20 Hours or More)
Finish Used
Table Top - Varthane Stain + Poly in Early American
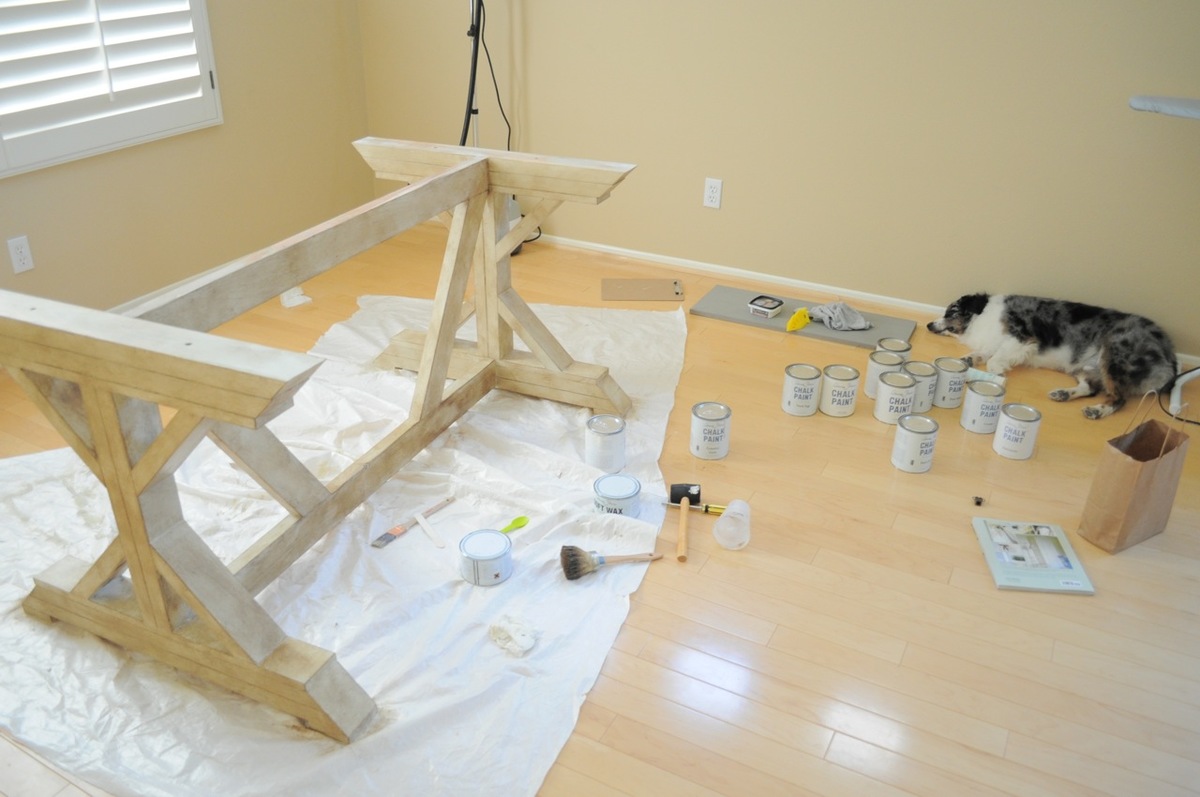
Table Base - Annie Sloan Chalk Paint in Countrey Grey and Old White plus Dark Wax for the antiquing
Recommended Skill Level
Beginner

Comments

Rusty Cottage

Tue, 09/18/2012 - 05:32

how many cans of chaulk paint did you need? The one picture has about 11 cans! I haven't finished my two projects that I have constructed....how much paint and stain does everyone use???

The finish is amazing!

kristine

Sat, 01/26/2013 - 12:38

oh sorry! didn't realize that there was a comment here. it took less than 1 can of chalk paint. i don't even think i used up half the can of chalk paint for this. the can may be small, but you get a lot of use out of it. i just had a bunch of chalk paint laying around because i was trying to figure out what color to use and i was also using them for other projects. as for the wax, this project didn't take use up too much wax either. i'm still on the same clear and dark wax cans that i first bought and i've used them on at least 5 other projects. so you really get a lot of use out of them!

winwinglades

Fri, 04/26/2013 - 14:13

Your table looks great! Question: as you made your table 2ft shorter, I understand that the diagonal pieces also need to be shortened. What are there final measurements? I'm trying to do the same, but am a newbie!
Thanks for your help!

winwinglades

Fri, 04/26/2013 - 14:07

Your table looks great! Question: as you made your table 2ft shorter, I understand that the diagonal pieces also need to be shortened. What are there final measurements? I'm trying to do the same, but am a newbie!
Thanks for your help!

Kmccoi

Wed, 06/25/2014 - 21:27

Hi! Did you use some of old white and mainly grey? Wondering paint ratio on Annie Sloan paint. Thanks!!!

Weatherly sectional

Submitted by JoseO1998 on Tue, 07/15/2014 - 02:18

First I built the 3 weatherly style sectional, then I added the two-seat bench with table in between to square off a seating area in our yard... Family and friends loved them for 4th of July and I really appreciate the plans!!! Thx Ana White ;)

Built from Plan(s)
Estimated Time Investment
Week Long Project (20 Hours or More)
Finish Used
Outdoor white paint
Recommended Skill Level
Intermediate

Comments

MarieCorbin

Mon, 05/11/2015 - 05:45

I love how you did the arms on your version. I was thinking of building this set, but wanted more traditional arms you could actually rest you arm on or set a cup on. Your finished product looks awesome!

Adirondack Charis

Submitted by djp33d on Fri, 10/21/2016 - 14:54

Connected Adirondack Chairs from Spring of 2015

Estimated Cost
Used reclaimed pallets and two boxes of screws. So really only cost were the screws.
Estimated Time Investment
Day Project (6-9 Hours)
Recommended Skill Level
Intermediate

Comments

Tidy Up End Table

Submitted by ethidda on Wed, 09/19/2012 - 11:41

A simple Tidy Up end table. It was super easy to make, and fit between my desk and the day bed perfectly.

Built from Plan(s)
Estimated Cost
$20
Estimated Time Investment
Afternoon Project (3-6 Hours)
Finish Used
"Danish Oil" without any stain, two coats.
Recommended Skill Level
Starter Project

Walkin Closet for my Wife

Submitted by Indy69 on Mon, 10/24/2016 - 09:52

I built this closet system based on the plans here.  So easy and so basic, just putting them all together to make a very nice looking closet setup.  I used 12 sheets of birch plywood, and premium select 1x2 pine.  All stained in Minwax Jacobean and satin clear througout with semi-gloss clear on the drawer fronts.

For the rods, I used chainlink top bars, which cost $6 for a 10' piece, and used #0000 steel wool to buff them out and then polished them.  For the 45 degree corners, I used 1" electrical conduit, and placed two 45 degree bend in each piece, and again steel wool and polished them as well. 

For the drawers, I used soft-close slides.  When using these, I highly recommend installing the rear brackets as well, as they make installation so much easier.  16 pairs of soft-close drawer slides with brackets cost $120 for all of them on Amazon.


Estimated Cost
Under $1,000
Estimated Time Investment
Week Long Project (20 Hours or More)
Finish Used
Minwax Jacobean in satin and semi-gloss
Recommended Skill Level
Intermediate

Comments

Fancy Farmhouse Bench

Submitted by Varonec on Mon, 07/20/2020 - 06:40

Made this for the mud room. Been wanting a place to sit while we put our shoes on and take them off. This was a mod on the 63" version of the Fancy Farmhouse bench. I saw a mod similar to this but even more reinforced supports. I used Pocket holes for this first time with the project. from a distance you can't see the covered up screws on the top. I dunno if this was the best way but I wanted a solid connection for the bench and it's legs. instead of a bottom support beam I went with 20" diagonal 2x4's so we could put our shoes underneath the bench.

Built from Plan(s)
Estimated Cost
50
Estimated Time Investment
Weekend Project (10-20 Hours)
Finish Used
Ebony Stain
Recommended Skill Level
Beginner

My 17 year old stole my project!

Submitted by Bonnaroo on Sun, 09/23/2012 - 13:23

This project started off as a way for me to get some much needed "me" time and create a sense of accomplishment. However, after purchasing the wood & cutting it into lengths, my "Lego Maniac" 17 year old son decided he wanted to take over! He begged me to let him assemble the units. Since he single-handedly assembled our IKEA kitchen remodel, I decided to let him have his way.

We spent one day painting the cut pieces. I think it looks nicer having them painted first and patching up holes, rather than deal with drips and such with the numerous spaces and sections. We had a wonderful time chatting the whole day and painting. O.K., this is just as good for the soul as "me" time.

That evening, after the paint had dried, we couldn't help ourselves...we NEEDED to assemble one section. So we started with the corner unit. And after one major "re-do", we had it figured out. My son, Jacob, ran with it from there and he and his cousin finished it, wood patched, sanded, and re-painted.

All told, it took him (us) about 3 days to complete. We found the cushions at Lowe's and the entire project cost us about $500.00! HUGE savings and some serious mother-son time!

Sense of accomplishment doubled!

Estimated Cost
$500.00
Estimated Time Investment
Week Long Project (20 Hours or More)
Finish Used
flat paint in Robin's Egg Blue
Recommended Skill Level
Beginner

Comments

DIY Wood Bed Frame With Reclaimed Wood Legs

Inspired by Ana's Farmhouse Bed I adjusted my plans to work with the scrap wood I had on hand and an old reclaimed wood post I snagged from my neighbor's garbage. To make the scraps of wood work for this large piece I added 3/4" rope in between the wood pieces. I like how the rope also helps tie it into the room as we created a wood and rope accent wall in this same room. You can see the full project here, http://thespacebetweenblog.net/2013/09/10/how-to-make-a-wood-bed-frame/. And since this was my first furniture build I also posted about the top tips and tricks I learned in the process, http://thespacebetweenblog.net/2013/09/12/wood-bed-frame-making-tips/.

Estimated Time Investment
Afternoon Project (3-6 Hours)
Finish Used
Driftwood color stain
Recommended Skill Level
Intermediate

Comments

Modified loft beds

Submitted by Sb1212 on Wed, 10/26/2016 - 21:53

I built these beds for my son and daughter. They picked out their paint color and fabric for the curtains. I apologize for the picture being side ways. It uploaded up that way for some reason. 

Estimated Cost
$180
Estimated Time Investment
Weekend Project (10-20 Hours)
Recommended Skill Level
Beginner

Truss end table

Submitted by carolq on Mon, 07/20/2020 - 22:49

This 2 X 4 truss end table is a fun build. I'm going to make a pair and finish them with a farmhouse finish to use as night tables at the cottage!

Built from Plan(s)
Estimated Cost
$30
Estimated Time Investment
Day Project (6-9 Hours)
Finish Used
pickled finish
Recommended Skill Level
Intermediate

Wood Chaise Lounge Chairs

Submitted by TexCin on Tue, 09/25/2012 - 14:31

We built two of these wood chaise lounge chairs from Ana's plans. We wanted to make sure they could endure the Texas weather so we sanded, primed and painted them. We used wood we had left over from other projects so our costs were limited to screws and chair pads....about $125 (chair pads are expensive).

Estimated Cost
$125
Estimated Time Investment
Week Long Project (20 Hours or More)
Finish Used
We used primer and paint.
Recommended Skill Level
Intermediate

Comments

First Project - the work bench

Submitted by twinlife on Tue, 07/22/2014 - 00:44

I've been a long time creeper, pinner, favoriter of this site. I finally got a garage sufficient to build. Of course, the first project had to be an actual work bench for the many projects to come.

33" was a bit short for my tastes so I adjusted the leg height to 40". Also half way through my project I realized that my 2x4's were not true 2x4's. This became problematic with the four support beams for the top board. I was able to cut some proper length boards from some backup/emergency lumber. I still plan on figuring out what I want to do with the stain but that was all time allotted for!

Built from Plan(s)
Estimated Cost
$50
Estimated Time Investment
Afternoon Project (3-6 Hours)
Finish Used
Still deciding
Recommended Skill Level
Starter Project

Great plans

Submitted by Anonymous (not verified) on Sun, 10/30/2016 - 17:31

These plans are easy to build. Built it in about a day. It was around $100 plus paint. 

Estimated Cost
$100
Estimated Time Investment
Day Project (6-9 Hours)
Finish Used
Antique white paint.
Recommended Skill Level
Beginner

Adirondack chairs

Submitted by jcaleb on Thu, 07/23/2020 - 09:27

I love these chairs and they were pretty easy to make.

Finish Used
Varathane Dark walnut oil based stain and 2 coats of Varathane Spar Urethane high gloss.

Play Fences

My first ever building project! I learned a few important lessons: it's really hard to make a straight cut with a jig saw, and you have to use large hinges (the tiny hinges I put on there first ripped right out). It was a great learning experience, the fences really were easy to build, and my two-year-old LOVES them! Now I'm ready for my next project. :)

Estimated Cost
$10 for the wood, I had to get some other supplies too!
Estimated Time Investment
An Hour or Two (0-2 Hours)
Finish Used
none
Recommended Skill Level
Starter Project

Comments

Rusty Cottage

Mon, 10/01/2012 - 04:44

Use a carpenter's square (shown in the "getting started" section to draw a straight line where you will cut. Now for the secret to straight cuts... line up the blade of you jig saw with the cut line and then slide the carpenter square up to the jig saw base and hold it firm so it acts as a straight edge and make your cut.

Step Stool

Submitted by s_barr on Thu, 07/24/2014 - 08:54

I needed a step stool for my son to be able to reach the bathroom sink to brush teeth and wash hands. This plan was exactly what I was looking for. As I do with all first time projects, I built this out of inexpensive pine. It is very sturdy, and holds me without a problem. I routed the edges of the treads, and used 1x3 material for the braces as opposed to the 1x2 called for in the plan. The plan was easy to follow and the cutting list worked perfectly. The most challenging part was creating the curves with the jig saw, but truly wasn't bad at all.

Built from Plan(s)
Estimated Time Investment
Afternoon Project (3-6 Hours)
Finish Used
As I am contemplating switching out our carpeted stairway to hardwood, I wanted to play with the white and stained look. I used semi gloss Valspar paint, and Minwax English Chestnut stain. I also applied 3 coats of polyurethane to provide added protection from water.
Recommended Skill Level
Beginner

Night Stands

Submitted by Anonymous (not verified) on Thu, 11/03/2016 - 08:17

I finished these night stands this past spring. I followed the Kentwood night stand plan from Ana-White, but made a few design changes. I decided to arc the doors to give the tables a little more character. The material I chose was 3/4" pine. The table bases are finished off with 3 coats of Sherwin Williams paint, and the tops are walnut stained with 3 coats of poly. The contrast between the base and the top came out great, the stands look beautiful in our bedroom and offer lots of storage.  

Estimated Time Investment
Weekend Project (10-20 Hours)
Finish Used
Paint, Walnut stain and poly.
Recommended Skill Level
Beginner

Buffet table

Submitted by MPoliski on Sat, 07/25/2020 - 10:32

Modified this to use plywood sides shelves with glued up pine top and poplar legs.

Estimated Time Investment
Week Long Project (20 Hours or More)
Finish Used
Minwax Coastal Gray and Minwax Antique Walnut (top)
Recommended Skill Level
Intermediate

My Version - 4 Cubby Bookshelf

Submitted by Jake on Thu, 10/04/2012 - 10:56

I was inspired by Ana's 4 Hole Cubby Bookshelf and a bookshelf I saw on line one night. So I incorporated the two somewhat. I took stair parts for the corner legs and connected them to form a frame with 1x3 on the bottom and 1x2 around the top. Then installed the inside side walls such that the ends are inset. I added a top with an inch or so of overhang on the sides and front. I also made the two shelves adjustable with my new Kreg Shelf Pin jig. It was so easy and accurate. Dimensions are about the same as the 4 Hole Cubby but I admit I winged it at times. Came out very nice and now the wife wants to add another shelf and I think there is plenty of room.

Built from Plan(s)
Estimated Cost
About $50. I overbought the wood and the legs and top cost $16 so I think $50 is a good guess.
Estimated Time Investment
Day Project (6-9 Hours)
Finish Used
Stain - Minwax Gunstock 231
Paint - Rust-o-leum Moss Green enamel spray
Recommended Skill Level
Intermediate

Comments

Jake

Fri, 10/05/2012 - 04:50

If you have not noticed I put the top on facing the back of the bookshelf. How stupid can I be? I'll answer that question. I am often stupid but at least not dangerous. I will add trim to the front to hide the stuff I don't want you to see and then post a new photo.

Gaby Kitchen Island

Submitted by DWL on Sun, 07/27/2014 - 17:15

I used Ana's Gaby Kitchen Island plans and shortened the island to fit our small kitchen. I did not have reclaimed wood, so I used a vinegar and steel wool solution to transform the fir and pine into a completely unexpected look. For the top, I trimmed the edges of the 2 x 6s with my table saw to get a smoother top surface, then routered the edges with a 1/2 inch round over bit (thanks Steve Ramsey). I used white pine down the middle to make up for the edges I removed which looks like a cool custom stripe. (I also used the white pine for the side supports so hopefully there's some cohesion.)

Thank you Ana for the inspiration and great project! Can't wait for the next one :)

Estimated Time Investment
Weekend Project (10-20 Hours)
Finish Used
Vinegar and Steel Wool Solution for color; Min Wax Finishing Paste.
Recommended Skill Level
Beginner