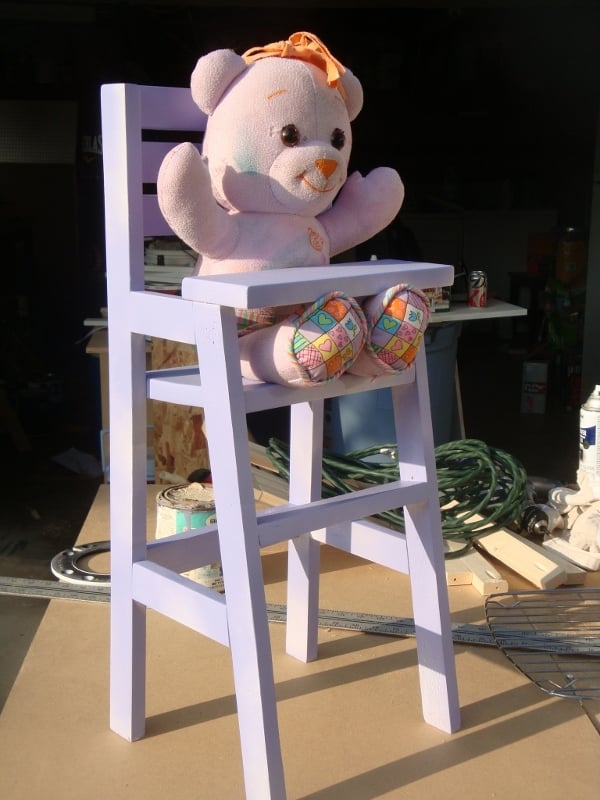
Community Brag Posts

Doll High Chair

Submitted by angiemicn on Wed, 02/08/2012 - 01:20

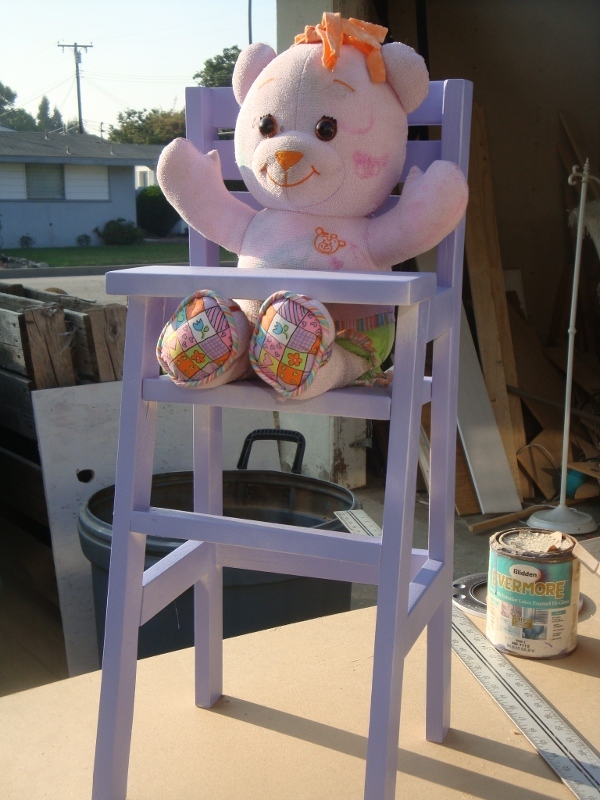
I love this design, Ana has created the perfect toy, esp to give as Birthday presents! The size is perfect, very sturdy, I put mine together with Kreg Jig. I've made 7 so far, the first time I made it, I didn't have a 1x8, and ended up Jigging 2 1x4's together. Worked so well, I do it every time now. I like to make these, fully sanding the piece before I put it together, and letting my niece or whoever is recieving it, paint it themselves. It's a great way to spend an afternoon with your aunt
Blog is under construction, I will be posting additional high chairs as I make them

Built from Plan(s)
Estimated Cost
15 if I bought the wood, use scraps and leftover screws
Estimated Time Investment
Afternoon Project (3-6 Hours)
Finish Used
Kilz primer, and semigloss paint. This is a project I let the kids paint, and I always tell them, "It always dries different." When they go down for their nap or bed, I come behind and touch it up.
My nieces have used glitter pens to write their names on them, and I've spray Poly'd which holds up well
Recommended Skill Level
Intermediate

Comments

Loft bed

Submitted by Anonymous (not verified) on Sun, 02/28/2016 - 18:35

I loved making this bed. This was my first experience using a Kreg Jig and it was great! We added three inches to the height of the bed so that my daughter could stand up for the next two years or so without bonking her head. We opted for rungs instead of stairs to save more space. We also used 2x4s cut to width for bed slats instead of a bunkie board.

Estimated Cost
$90 for all lumber, wood condition, stain and PH screws
Estimated Time Investment
Weekend Project (10-20 Hours)
Finish Used
Minwax wood conditioner
Minwax Ipswich Pine
Recommended Skill Level
Starter Project

American Girl Doll House

Submitted by Anonymous (not verified) on Sun, 10/06/2019 - 18:59

This Project was a Challenge mostly because of its size. Standing 6ft Tall and 4ft wide it was hard to handle at times but easy enough and fun to build.
I followed Ana's Three Story American Girl or 18" Dollhouse plans.
We also made the American Girl or 18" Doll Sofa or Couch.

Estimated Cost
$150
Estimated Time Investment
Weekend Project (10-20 Hours)
Finish Used
I used White Latex Paint and Walnut Mini Wax stain for the floors
Recommended Skill Level
Beginner

Headboard

I used the Farm House Headboard plan to make this headboard. I had to mix the stain to match a dresser I already had. I used a mix of Minwax pecan, red oak, and jacobean stains for the base coat and then Minwax red chestnut for 2 additional coats. I then used 2 coats of fast drying poly to top coat with. The wood is pine stud grade. I did modify it a bit by adding an additional vertical cross member in the center and I had to add a 1" x 12" at the bottom because the style of the bed frame. I built it in an afternoon but it took several days to stain and top coat.

Estimated Cost
$100
Estimated Time Investment
Week Long Project (20 Hours or More)
Finish Used
One coat of a custom mix of Minwax pecan, red oak, and jacobean stains. Two coats of Minwax red chestnut stain. Two coats of Minwax polyurethane. I sanded between the coats of polyurethane using 320 grain sandpaper. All finishes were done with brushes. I wiped down the stain applications with cotton cloths after waiting 15 minutes.
Recommended Skill Level
Starter Project

A letter shelf

A built these shelves for my nieces birthdays. I reversed the color schemes to keep them separate. The plans provided are great! I would certainly use the added 1 x 2 supports if hanging on the wall because the shelf is heavy (about 14 pounds).

Built from Plan(s)
Estimated Time Investment
Afternoon Project (3-6 Hours)
Finish Used
Valspar paint sample from Lowes
Recommended Skill Level
Beginner

Beach Cottage Dresser

Submitted by Emendia on Mon, 12/23/2013 - 23:18

This was my first dresser. The original plans say to lay the dresser on its back and center the drawer fronts then nail in place; in my opinion it is faster and more accurate to hold them in place and have a helper nail them in place. Also, the original plans suggest a certain jig for installing the slides which requires a locking c-clamp to hold the jig in place. Well, in my opinion the locking c clamp, along with a magnetic small torpedo level is faster and easier than the jig. A six in steel rule with a slider clamp is also helpful.This was fun project - learned a lot!  Thanks Ana & Patrick!

Estimated Cost
$250
Estimated Time Investment
Weekend Project (10-20 Hours)
Finish Used
DIY chalk paint, knobs from World Plus Market, and lightly distressed along edges so antique white primer would show through along edges. Base for chalk paint is latex plus calcium carbonate. Be sure to dissolve chalk in water before mixing into paint! I did two coats of antique white tinted primer, followed by two coats of chalk paint, then sealed with wax Also, the chalk will whiten your final color, so buy paint a couple of shades darker than what you would like your final finish to be.
Recommended Skill Level
Intermediate

Comments

Emendia

Tue, 12/24/2013 - 08:23

Oh, another lesson I learned: The drawers are made by attaching drawer fronts to the boxes. This makes the front 1.5 inches thick - this means most drawer knobs won't fit unless you use a Forstner or spade bit to bore a hole on the back side of the drawer face - in turn you may need to do this before you assemble the drawer!

Full Length Mirror

Submitted by AndyH on Fri, 03/04/2016 - 18:03

A $10 Mirror framed out with some 1 by 2, 1 by 3 and 1 by 4.

Stained black and then 2 coats of white paint sanding after each to give a rustic/antique look.

Estimated Cost
$35
Estimated Time Investment
Day Project (6-9 Hours)
Finish Used
Stained in black and then two coats of white paint sanded between coats to give antique finish.
Recommended Skill Level
Beginner

Leaning Desk

Submitted by Anonymous (not verified) on Sun, 10/13/2019 - 12:59

I needed a desk to get my computer off the kitchen table. After remodeling my bedroom and sealing a doorway to make the wall space, I needed something that would take up a little amount of floor space. Of course I couldn't find exactly what I wanted so I decided to build it. Found this little gem of a plan and modified it to my liking and needs. I’ve had it up for about a year and I love it.

Built from Plan(s)
Estimated Cost
50.00
Estimated Time Investment
Weekend Project (10-20 Hours)
Finish Used
White washed with a water based pay finish.
Recommended Skill Level
Intermediate

Daybed Mash-up of Plans

Submitted by Anonymous (not verified) on Mon, 07/03/2023 - 12:35

I mashed together several twin bed plans - farmhouse bed, simple twin bed and Hailey Storage bed to create this farmhouse style daybed. It's a very sturdy and heavy piece of furniture.

Built from Plan(s)

Distressed Fancy X Farmhouse Table

Submitted by Anonymous (not verified) on Mon, 03/07/2016 - 04:50

We used the Fancy X Farmhouse plans and matching bench to create a wonderful new farmhouse table and bench for the lake house. We distressed the tops of the bench and table and stained them Weathered Grey with the base of the table and bench stained Ash.  We absolutely love it!

Estimated Cost
Less than $200 for both pieces
Estimated Time Investment
Weekend Project (10-20 Hours)
Finish Used
We used a stain called weathered grey on the top and sanded some of the stain away in areas that would be typically used a lot and in the areas that showed bare wood we added the Ash stain and rubbed it in and lightly sanded the whole tops before applying final polyurethane coats. The bases were stained Ash.
Recommended Skill Level
Advanced

Comments

Square Picnic Table with Umbrella

Submitted by Anonymous (not verified) on Fri, 07/07/2023 - 11:06

Used your plans to make a sturdy, durable hardwood picnic table for a friend. Top is black cherry (1 1/4") and base/seats are white oak (1 1/4"). The seats are one piece, 11" wide from a white oakoy cut and sawed on our property! Sealed with two coats of Spar Urethane.

Chip McCoy

Built from Plan(s)

Pallet Bookshelves

Submitted by kristilmay on Fri, 02/24/2012 - 10:12

My daughter's room has a strange little cut-out section in one of its corners. We debated for a while over how to make it look like it's supposed to be there. After discussing all of our options, I remembered that we had a wood pallet in our garage. I also remembered seeing a great plan on Ana White's website for a book shelf made from a pallet, so I decided to give it a try. Fortunately cutting the pallet down in half made it the perfect size for this corner. Sarah loves books and drawing, so it makes a perfect little reading/art area. I love how it turned out, especially since it was FREE!

Estimated Cost
FREE
Estimated Time Investment
An Hour or Two (0-2 Hours)
Finish Used
White Paint
Recommended Skill Level
Starter Project

Comments

Two Drawer/Shelf Modern Nightstand

Submitted by asalex1217 on Sat, 12/28/2013 - 19:58

Great design, easy to follow!

Estimated Time Investment
Weekend Project (10-20 Hours)
Finish Used
black glossy paint
(*be sure to sand well!)
Recommended Skill Level
Beginner

Comments

Easy and Fun!

We saw this table here on Ana-White and loved it so much that we decided to take a shot at it. We have done smaller projects with wood before but nothing like this. In all honesty, it was super easy and fun!

Built from Plan(s)
Estimated Cost
$180-200
Estimated Time Investment
Weekend Project (10-20 Hours)
Finish Used
One layer of Special Walnut and two layers of MinMax's polycrylic with a light sanding in between coats.
Recommended Skill Level
Beginner

Modern Chaise Lounge

Submitted by Anonymous (not verified) on Sat, 07/08/2023 - 10:13

Modified lounger, made from 75mm x 38mm (cls) timber, sealed with 3 coats of exterior varnish.

Had great fun making this one, already on with making my second lounger.

A bit of wood

Briana Side Table

Submitted by cyeates on Mon, 02/27/2012 - 19:24

This was my first attempt at doing a project with a drawer. It definitely took time to make sure everything was level so that the drawer would side in and out smoothly. You can't see see it in these pictures but I used bead board in place of the plywood on the back and on the sides. I also used 1x8s glued and screwed together instead of the 3/4" plywood. I can't take credit for the finish on the project though. My wife is the one in charge of making my projects look great. She's the one that did the fun antiqued finish on the side table.

Estimated Time Investment
Weekend Project (10-20 Hours)
Finish Used
White paint with glaze/stain finish
Recommended Skill Level
Intermediate

Comments

Guest (not verified)

Thu, 03/08/2012 - 23:48

I enjoyed these consultation and expression onward to greasing one's palms and showing the hold. In that respect nonentity of more than worldwide sake that elevating youngsters! Devotes Pine Tree State more or less themes since emerging soundness programing.

Tryde Media Console

Submitted by mashhawkes on Mon, 12/30/2013 - 13:26

I built this for my little brothers living room because he desperatly needed something for his tv to sit on beside his safe (he has a true bachelor pad) i used the plans for the tryde media console and the finish on it was done with a torch. I put 2 coats of clear satin poly. The project too about 6 hours to complete. i love how it turned out !

Built from Plan(s)
Estimated Cost
$80
Estimated Time Investment
Afternoon Project (3-6 Hours)
Finish Used
Torch with 2 coats of satin poly.
Recommended Skill Level
Beginner

Comments

Kitchen Update

Submitted by jaykruger on Mon, 03/14/2016 - 09:13

I did a 15" deep x 36 wall cabinet over the drawers and the rest of the uppers are 12deep x 42"

Lowers are standard 24" deep

Still deciding on countertops

Decided on pour in place concrete for the counter tops

Estimated Time Investment
Week Long Project (20 Hours or More)
Finish Used
Home depot bear paint, with water based poly
Recommended Skill Level
Intermediate

Comments

crundell

Sat, 03/26/2016 - 06:56

You did a really nice job on these.  Did you also use Ana's plans to make the doors or did you order them?

Ana White Inspired Farmhouse Table - "The Gathering Place"

This is my first made-from-scratch table, and I'm really proud of the result!

I made this table for my amazing in-laws. They just moved into a beautiful new home with a spacious, open dining area, and they've been looking for a large table that our growing family can gather around.

We customized Ana's design by making the table larger and by transforming the ends of the table into extendable 10" table leaves.

The final dimensions are:

Height: 2.5'

Width: 3.4'

Length (fully extended): 10'

It took two weeks to make, predominately evenings and weekends, and/or whenever my baby girl was asleep! 

Estimated Cost
$300
Estimated Time Investment
Week Long Project (20 Hours or More)
Finish Used
I used an Espresso-colored stain with a water-based satin sealer. The water-based sealer provides a crystal-clear finish so that the Espresso color is untainted, and since the sealer is thin, the table retains the natural feel of the wood, (though the whole table was sanded so there aren't any splinters. Don't want it THAT natural!)

I let it air dry outside for 48+ hours to ensure the stain was completely dry before being sealed, and to detract from the stain smell.
Recommended Skill Level
Intermediate
Back