1-board Cedar Desk Accessory Set

Difficulty
Beginner Projects
| Print this plan

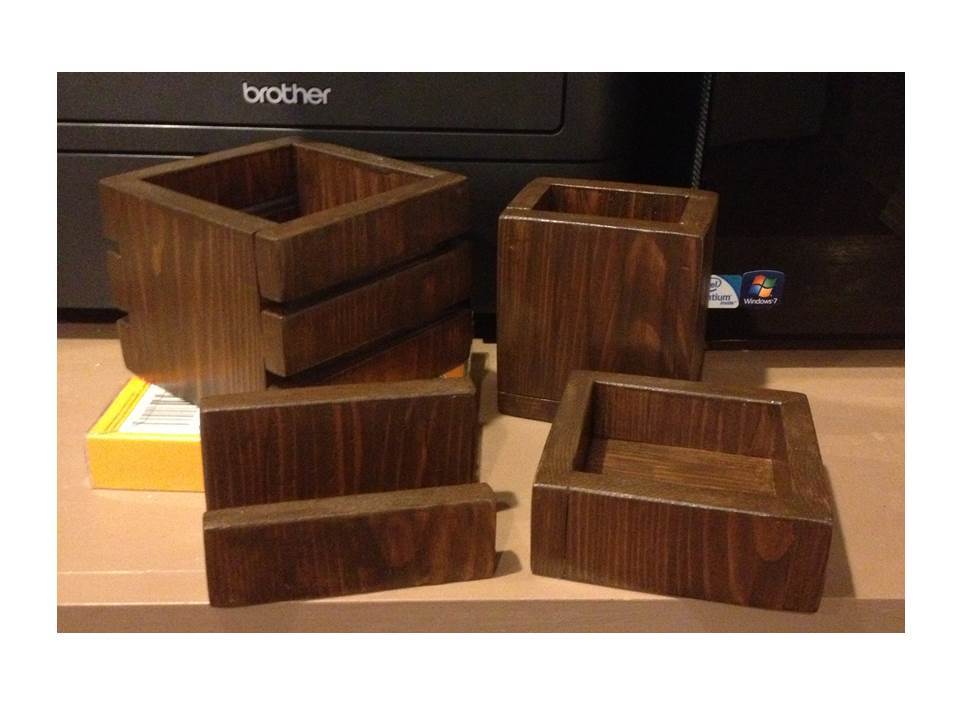
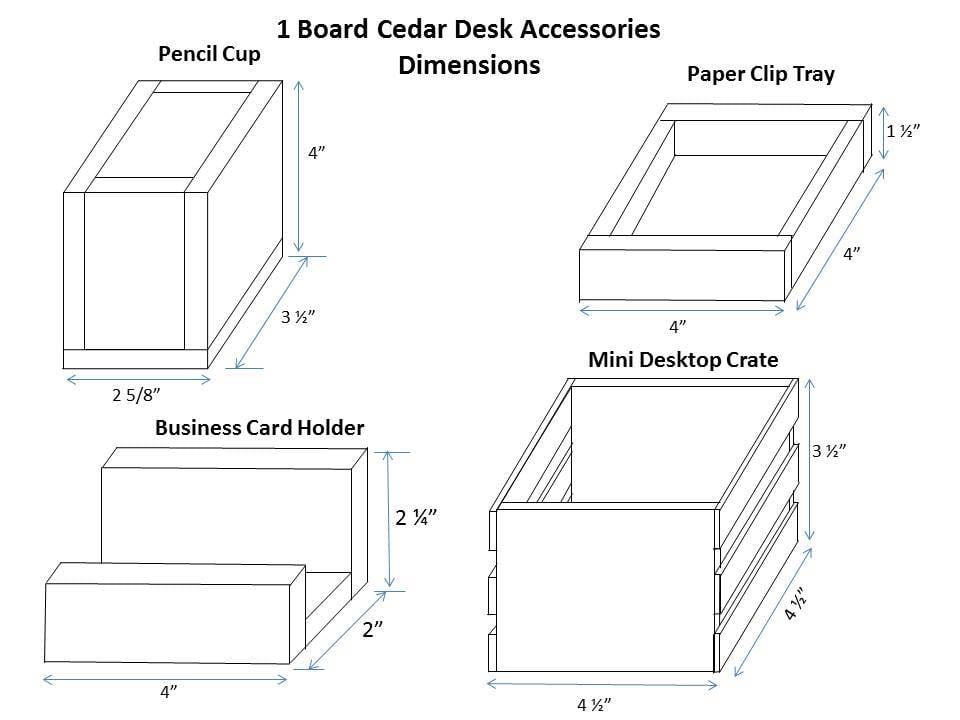
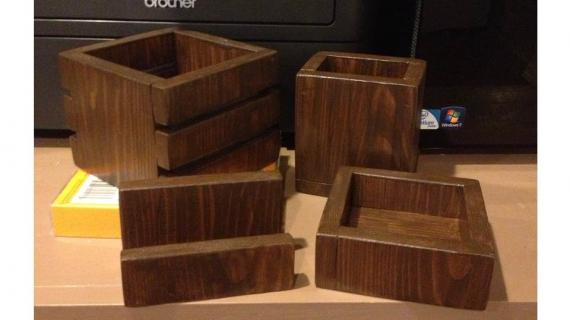
Build a 1-board Cedar Desk Accessory Set.
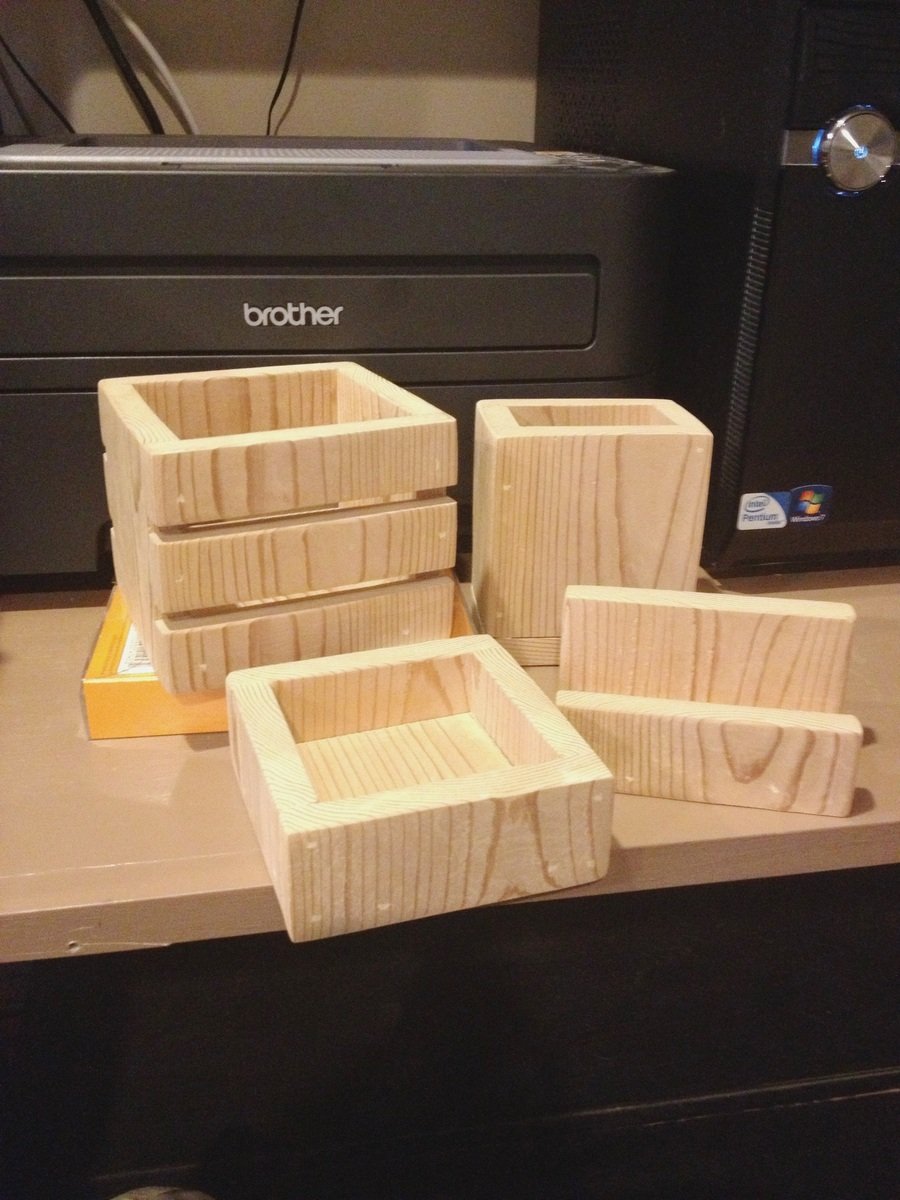
From just 1 cedar fence picket, you can build a 4-piece desk accessory set. The set includes pencil cup, paper clip tray, business card holder, and mini desktop crate (great for post-it notes, markers, etc). The goal for this plan was to create something that would make a nice gift, would require only 1 board (cedar fence picket is about $3 for wood), requires no angles or rip cuts, and can be built using just your miter saw and nailgun or brad nailer. A palm sander is also highly recommended. You can make the whole set in just 1 afternoon.
Each piece has individual instructions and cut lists, so you can choose individual pieces to build if you like. Each instruction shows the total length of board needed to build that piece. The full set takes about 43” worth of the board. I looked up a lot of accessory sizes on Staples, Office Depot, Office Max, and Amazon, to make sure the plan sizes are comparable to standard desktop accessories, so none of them would have a large “footprint” on your desktop.
The picture shows the set built from a cedar fence picket. This is the board I used:

http://www.lowes.com/pd_5447-14963-5447_0__?productId=4746391&Ntt=picke…

You could also substitute ½” x 5 ½” craft board if you like. You would need two 24” pieces.

This was my second build using cedar, and for this one I selected the flattest board I could. This board was really very nice and was pretty flat. There are a few places in the plan where measuring before you cut is recommended. This will help everything fit nicely and help to account for any variation in board sizes. Also, sanding all the little pieces before assembly will help make the build and finishing easier. I sanded the picket on both sides with 80-grit then 220-grit, to get them nice and smooth before cutting. Cedar makes really fine sawdust, so I was sure to wear a mask while sanding.

I stained this set after building, but your build will go even easier if you sand and stain or finish your pieces before assembling. Then all it should need is touch-up after assembly. I think I’ll do that on the next set.

Back story: This summer I’m on a mission to make things from as much of my scrap wood as possible. I had several odd-sized pieces of 3/8” craft board, 3/8” wainscoat paneling, 3/8” plywood, ¼” plywood, and ½” craft board in my garage, and I wanted to make some nice gifts from them. I was able to make several sets of these desk accessories using those odd pieces. I made drawings and cut lists to recreate those in a plan using just 3/8” craft boards, ¼” plywood, and a scrap piece of S4S. (I still have those drawings and can post a plan for those too if anyone is interested.) But, I found that nailing into the ½” thick pieces of board was much easier than the 3/8”, and decided to make a few plan changes, so a whole set could be made with only the ½” board, and only 1 piece of it would be needed.

Update: A .pdf copy of the full plan has been attached, and is just below the General Instructions section.

Dimensions

Preparation

Shopping List

1 cedar fence picket, 1/2" x 5 1/2" x 6'
wood glue
1" finish nails
Finishing materials for desired finish

Cut List

Cut List from ½” x 5 ½” Cedar Fence Picket

Pencil Cup:
2 pc @ 3 ½”, then cut to 3 ½” (front/back, then cut remaining
part down to 1 5/8” for sides)
1 pc @ 3 ½”, then cut to 2 5/8” (bottom, cut to fit, should be
~2 5/8” x 3 ½”)
Total board length needed (includes blade widths): 10 7/8”

Business Card Holder:
1 pc @ 1 ¼”, then cut to 4” (front, 1 ¼” x 4”)
1 pc @ 1”, then cut to 4” (bottom, 1” x 4”)
1 pc @ 2 ¼”, then cut to 4” (back, 2 ¼” x 4”)
Total board length needed (includes blade widths): 4 7/8”

Mini Desktop Crate:
3 pc @ 3 ½” then cut to 3 ½” wide
6 pc @ 1” then cut to 4 ½” wide (cut to length after step 1b)
Total board length needed (includes blade widths): 17 5/8”

Paper Clip Tray:
2 pc @ 1 ½”, then cut to 4” (front/back, 1 ½” x 4”)
2 pc @ 1 ½”, then cut to 3” (sides, 1 ½” x 3”)
1 pc @ 3”, then cut to 3” (bottom, 3” x 3”)
Total board length needed (includes blade widths): 9 5/8”

Cutting Instructions

Sand boards before cutting.

Measure each piece, then cut, then measure the next piece. Don’t mark them all at once, because the blade takes 1/8” for each cut, and there will be a lot of cuts on this board.

Cut Lists for each piece show the parts to cut as you build, to get the best fit.

Tools
Tape Measure
Speed Square
Pencil
Safety Glasses
Miter Saw
Brad Nailer
Power Sander
General Instructions

Please read through the entire plan and all comments before beginning this project. It is also advisable to review the Getting Started Section. Take all necessary precautions to build safely and smartly. Work on a clean level surface, free of imperfections or debris. Always use straight boards. Check for square after each step. Always predrill holes before attaching with screws. Use glue with finish nails for a stronger hold. Wipe excess glue off bare wood for stained projects, as dried glue will not take stain. Be safe, have fun, and ask for help if you need it. Good luck!

Tips:
Sand pieces before assembly.

Try finishing pieces before assembly, to make final finishing easier.

Instructions

Step 1

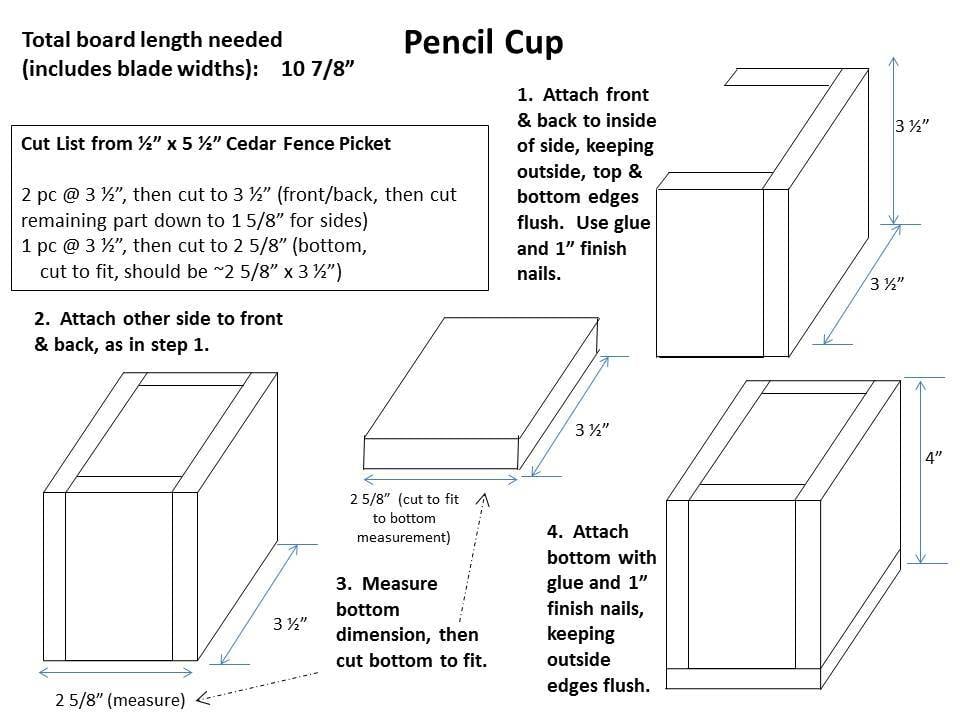
This diagram shows the cut list, and steps for assembly for the Pencil Cup.

Step 2

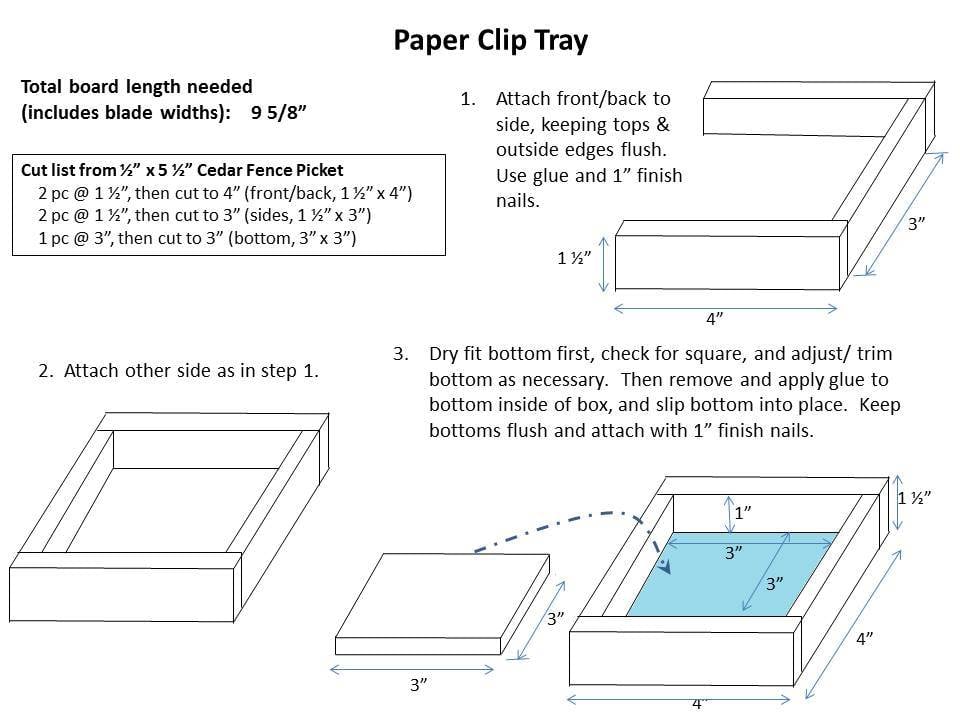
This diagram shows the cut list, and steps for assembly for the Paper Clip Tray.

Step 3

This diagram shows the cut list, and steps for assembly for the Business Card Holder.
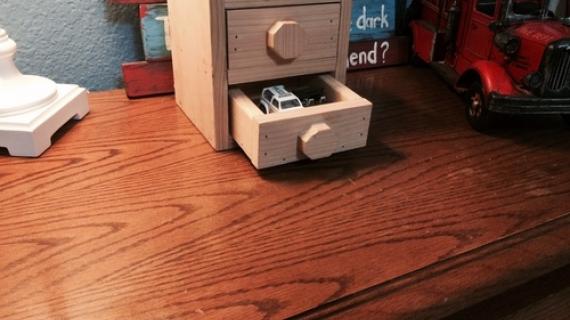
Step 4

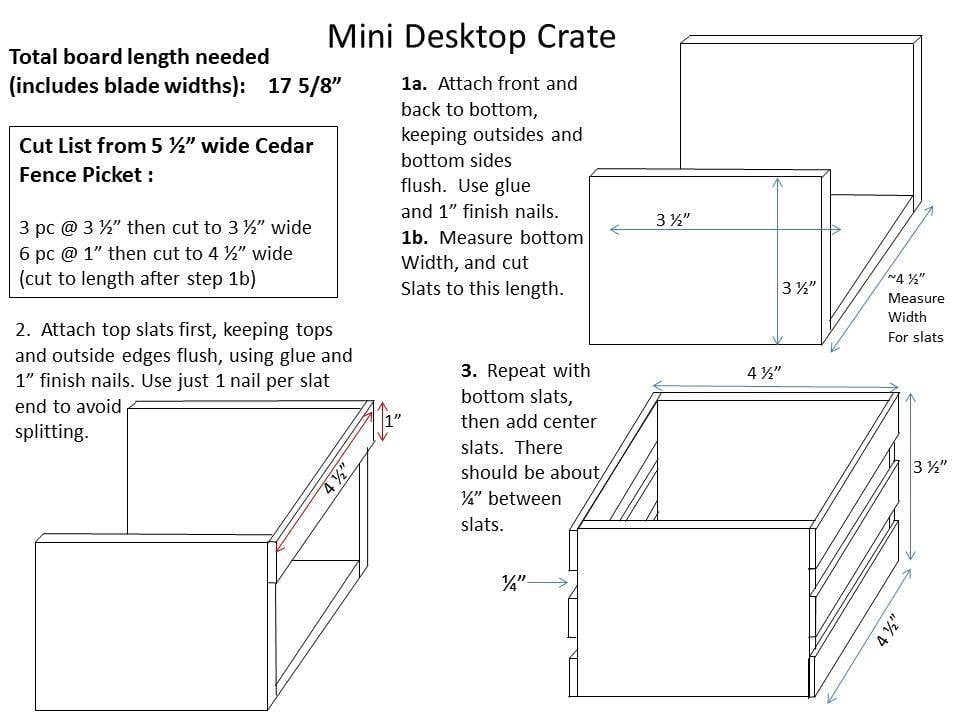
This diagram shows the cut list, and steps for assembly for the Mini Desktop Crate.

Finishing Instructions
Preparation Instructions
Fill all holes with wood filler and let dry. Apply additional coats of wood filler as needed. When wood filler is completely dry, sand the project in the direction of the wood grain with 120 grit sandpaper. Vacuum sanded project to remove sanding residue. Remove all sanding residue on work surfaces as well. Wipe project clean with damp cloth.

It is always recommended to apply a test coat on a hidden area or scrap piece to ensure color evenness and adhesion. Use primer or wood conditioner as needed.
Finish Used
For the finish, I followed Ana’s tutorial for the Minwax Express Color in Walnut, on cedar. The only variation was I put the stain on all the nooks and crannies of the assembled pieces with a small paint brush instead of a rag, which worked really well and got the stain on nice and evenly. My first cedar build was going to receive just poly, but after seeing the walnut finish on these pieces, I went back and stained that one too! After all the stain was complete, 1 coat of Minwax Oil Modified Water Based Poly was added as a top coat.

Comments

JoanneS

Mon, 08/19/2013 - 17:40

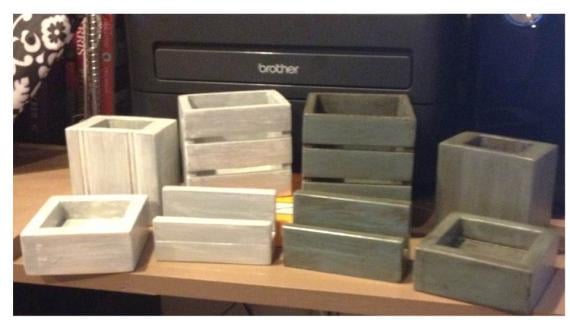
Thank you very much for your nice comment! You're right, the walnut stain does make it really nice for a guy's desk. I'm getting ready to post the inspiration pieces that I made from my scrap wood. Those are for the girls at work, and have a more feminine touch on the painted finish. The finish really makes the difference! :)

yurra-bazain

Tue, 08/27/2013 - 16:52

=D I added a link to these plans from my humble little blog. I hope someone will find it and will be inspired to make some for themselves or someone that could use them! Thank you for sharing these plans!

Frequently Asked Questions

Wood Questions

What kind of wood should I use?
Most of our plans use standard construction lumber like pine or fir. It's affordable, easy to work with, and easy to find. It's also rapidly renewing and biodegradable, so a great eco friendly choice!

Can I use hardwoods instead?
Yes—just keep in mind they're heavier, cost more, and can be tougher on tools and harder to join together and finish. I recommend not tackling a hardwood project until after you have built several softwood projects.

What if my boards are warped?
Choose the straightest boards at the store. You can often work around slight warps by cutting them into shorter pieces.

What wood should I use for outdoor furniture?
Use red-toned or pressure-treated 2x lumber for framing, and cedar or cedar fence pickets for the decking. Outdoor furniture should be built like a deck—your local home center can help recommend the right wood for your climate.

Will my wood move or warp after I build?
Potentially, especially in humid climates. Let your wood acclimate indoors before building. Once acclimated and kept in a stable environment, movement should be minimal. Remember, most houses are built using framing lumber - it's all about keeping moisture down indoors.

Cutting Questions

Do I need a miter saw?
A miter saw is great, creating fast, safe, and precise cuts, even for beginners. But most plans can be built with a circular saw and a straight edge. If using a circular saw to cut, take time to practice, and get good at making cuts, before cutting your project boards.

How do I get clean cuts with a circular saw?
Clamp your board, measure twice, cut slow, and use a sharp blade. This takes practice, so spend some time making cuts. I go through becoming proficient at freehand cutting in my course, it is worth taking if you want to master this skill.

Will the store cut my wood?
Yes—most stores will do rough cuts to help you transport your materials home. But from store to store, the quality of cuts could greatly vary.

Joinery Questions

What screws should I use?
We recommend star-head self tapping screws for framing, most common sizes are 2-1/2", 1-3/4". Pre-drill if close to the edge or you find your wood is splitting.

Do I have to use pocket holes?
Pocket holes are the cheapest, easiest and fastest way to do some joints - like edge to edge or a hidden fastener joint. There are other methods, but these can be time consuming and expensive. We recommend using pocket holes as indicated in plans for best results.

How do I keep things square?
Use a speed square and measure diagonals after each step. Always clamp joints before screwing to keep them tight and flush.

Finishing Questions

Stain or paint before or after building?
A quick sand before and a full finish after gives the best results. Pre-finish if you're doing two-tone or detailed finishes.

What type of finish?
Use oil-based or water-based stain. For paint, cabinet-grade latex or enamel works great. High use surfaces on indoor projects should get a coat of polyurethane, I recommend a Helsman or Spar or other flexible poly that won't crack or peel with wood movement. For exterior projects, use a finish suitable for exterior fences.

How to get a smooth finish?
Start with a well sanded project. Sand between coats (220 grit), wipe clean, and apply light coats with a foam brush or roller.

Plan Questions

Can I change the size?
Many people do, and that's the great thing about building your own furniture! But do keep in mind going bigger might mean more supports are required, and often plans are optimized for minimal material waste.

Are these beginner-friendly?
Yes—plans are written with simple tools and clear steps in mind, with every effort to make plans as simple as possible.

Can I sell what I build?
Absolutely! Just don’t resell or repost the plans themselves.

General Questions

What tools do I really need?
A drill, circular saw, tape measure, square, and a few clamps will get you through most projects.

Do I need a workshop?
Nope! A driveway or small patio is plenty to get started, just make sure you have a level place to work. If you find you are building several projects a year, creating a small workbench is a great way to store tools and have a dedicated workspace.

What if I mess up?
Wood filler, sanding, or flipping boards goes a long way. Mistakes are part of the process!

What can I do to make my projects look more professional?
Start with straight boards, make accurate cuts, clamp all joints, and line up everything neatly. Sand thoroughly, use a neutral finish, and apply it in light coats for a clean look.

I've never built anything before. Where should I start?
Start with a few smaller softwood projects to get hands-on experience. Or if you're tackling a big project, buy a little extra lumber and practice your cuts and joints first. If possible, work with someone who has a bit of experience.

Care & Maintenance

How long will my furniture last?
With good joinery and regular care, your DIY furniture can last for decades. I have pieces in my own home that are over 20 years old and still going strong! One of the best parts about DIY furniture is that it’s easy to repaint, refinish, or repair—so your projects can grow and adapt with you.

How should I care for outdoor furniture?
Lightly pressure wash or hose it down once or twice a year. Tighten screws and reapply finish as needed to protect it—just like a deck or fence. A little upkeep goes a long way in extending the life of your furniture.

How about indoor furniture?
Regularly dust or wipe with a damp cloth. If it starts to look worn, a light sanding and touch-up paint or stain can refresh it in no time. DIY pieces are meant to be durable and fixable—so don’t be afraid to give them some love now and then.

Want to Build with Confidence?

Check out my ebook: 12 Skills to Build Your Own Furniture
It walks you through the core skills every builder needs—measuring, cutting, joinery, and finishing—so you can build beautiful furniture that lasts.

Still Have Questions?

Email us anytime at [email protected] and we’ll be happy to help!