
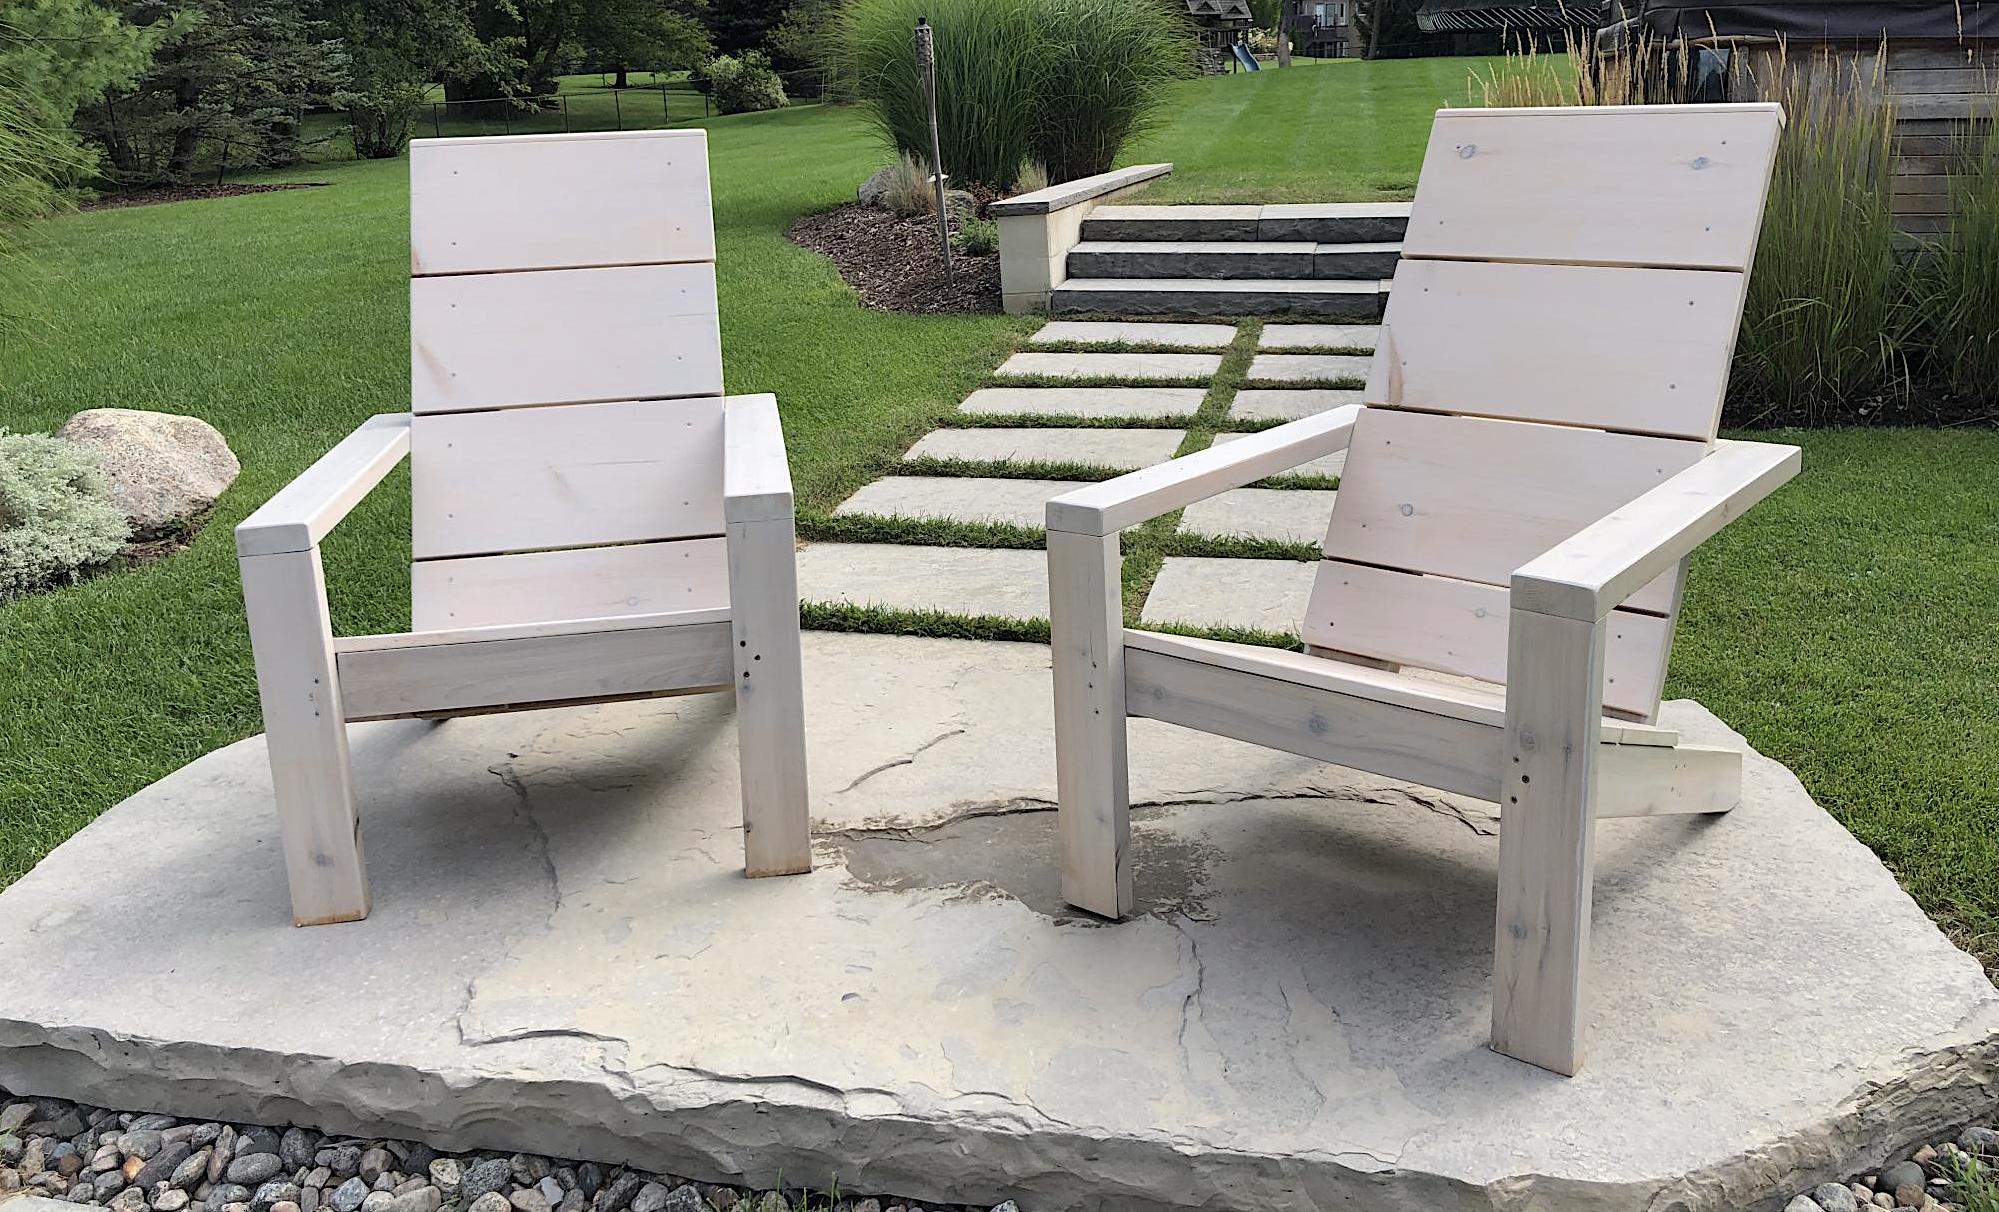

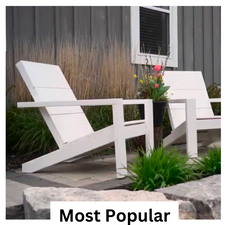
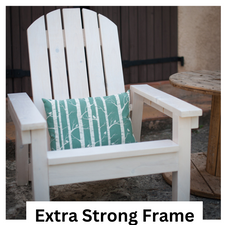
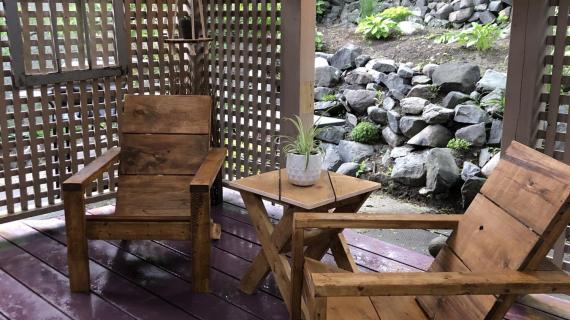
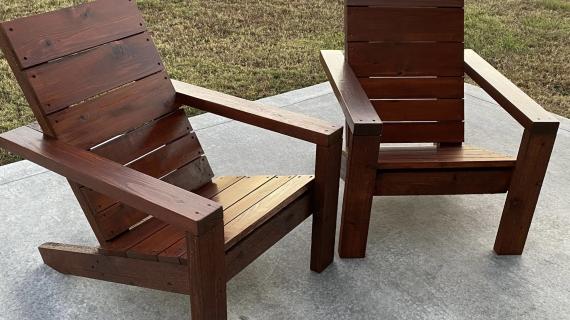
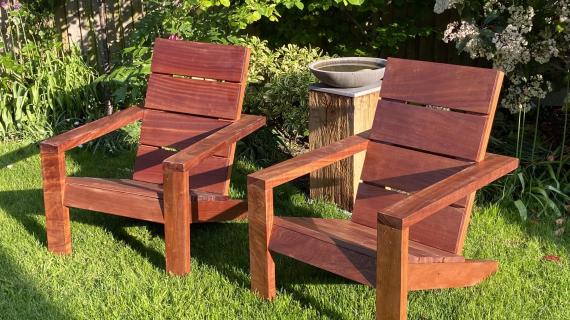
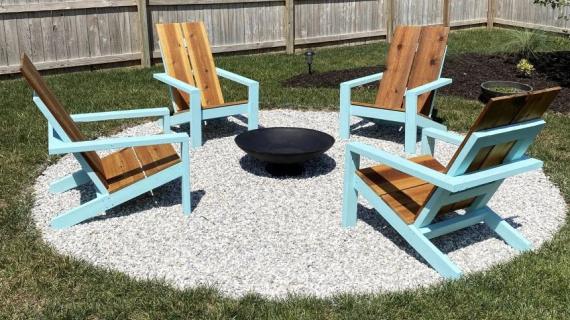
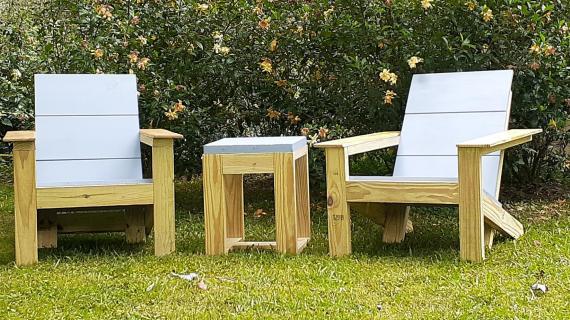
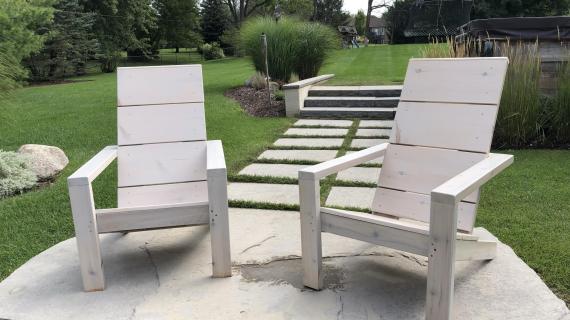
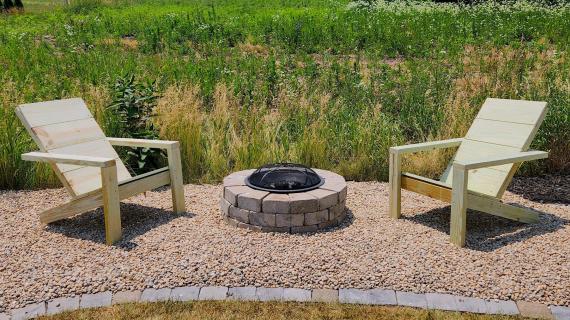
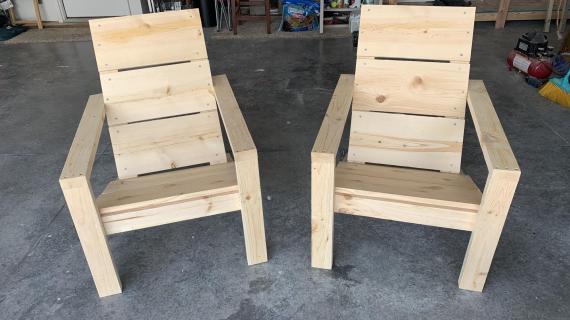
The MOST POPULAR Adirondack Chairs plans! This is an easy build that shouldn't take too long, and the chair is super comfortable and sturdy! Free plans by Ana-White.com

More Free Adirondack Chair Plans from Ana White
Why I Built These Chairs
I've been wanting to add some comfortable outdoor seating to our yard in uncovered areas, but it gets to be alot to manage cushions and pillows, trying to keep everything dry, bringing the cushions in when it snows, finding somewhere to store it all ...
I didn't want to go with plastic chairs, as they blow away in the wind, and I'm forever chasing them down and eventually, picking up pieces of plastic and throwing them away.
So I thought, what if I could build the most comfortable Adirondack chairs ever, that don't need a cushion, that are too heavy to blow away in the wind?
2x4 Essential Adirondack Chair Features
- 2x4 frame is sturdy and solid
- Building plans are easy to follow and assemble (about an hour a chair)
- About $30 in lumber per chair
- Very comfortable without a cushion or pillow
- Modern styling still has the "Adirondack" look and feel, but with clean lines
- Can be painted or stained any color
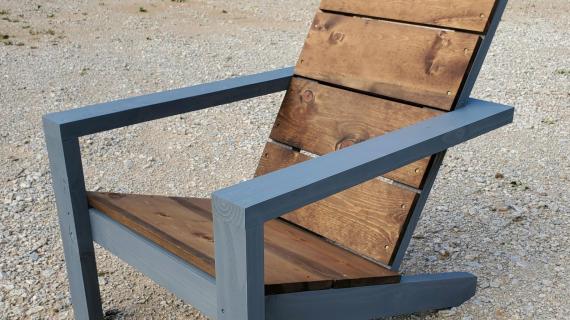
How I Built My Chairs
In this video I go through all the steps to build my 2x4 Modern Adirondack Chairs
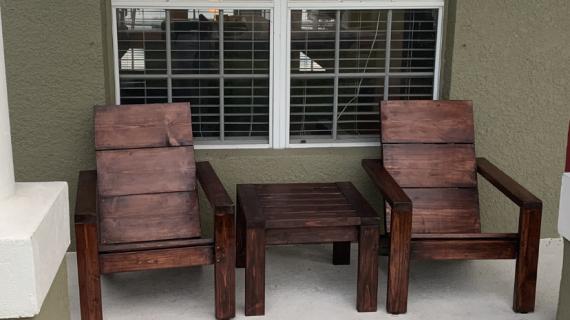
Free Adirondack Chair Plans
The free plans for this chair follow. Please share a photo when you are done so we can see how your project turned out!
Pin For Later!

Here's Some Tips to Build Better Outdoor Furniture
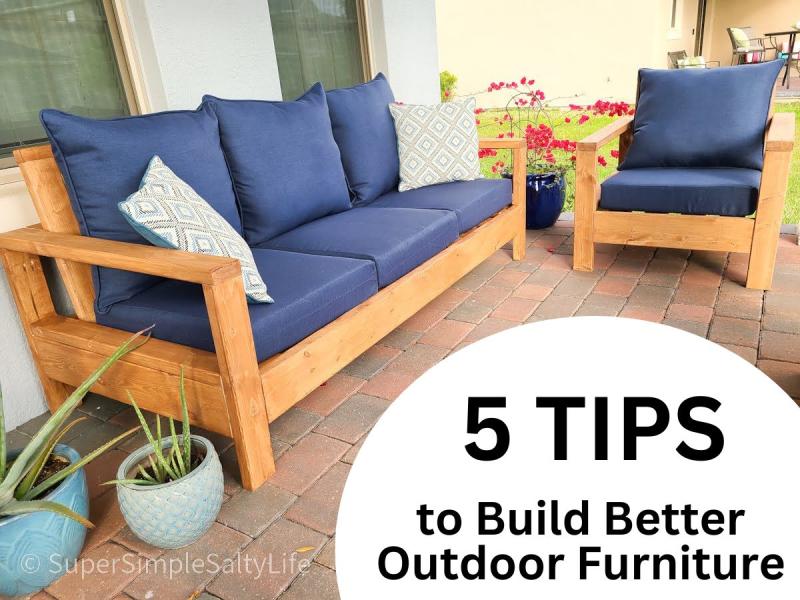
Want to build better outdoor furniture? Over the twenty years I've been building, maintaining, and enjoying my own outdoor furniture, I've learned a few tips that can help build longer lasting furniture.
Preparation
- 3 - 2x4 @ 104-5/8" long (OR 4 - 2x4 @ 8 feet long or 92-5/9" long)
- 1 - 1x10 @ 10 feet long*
- 4 - 2-1/2" Kreg Pocket Hole Screws
- 24 - 2-1/2" long self tapping exterior screws (look for the screws with the star bit heads, can be up to 3" long)
- 30 - 1-1/2" long self tapping exterior screws (same type as the longer screws, can be slightly shorter or longer (up to 2"), these screws are just used to attach the seat boards to the frame)
*If building more than one chair, you only need 9 feet of 1x10 boards per chair. So for two chairs, you could purchase one 8' long 1x10 and one 10' long 1x10.
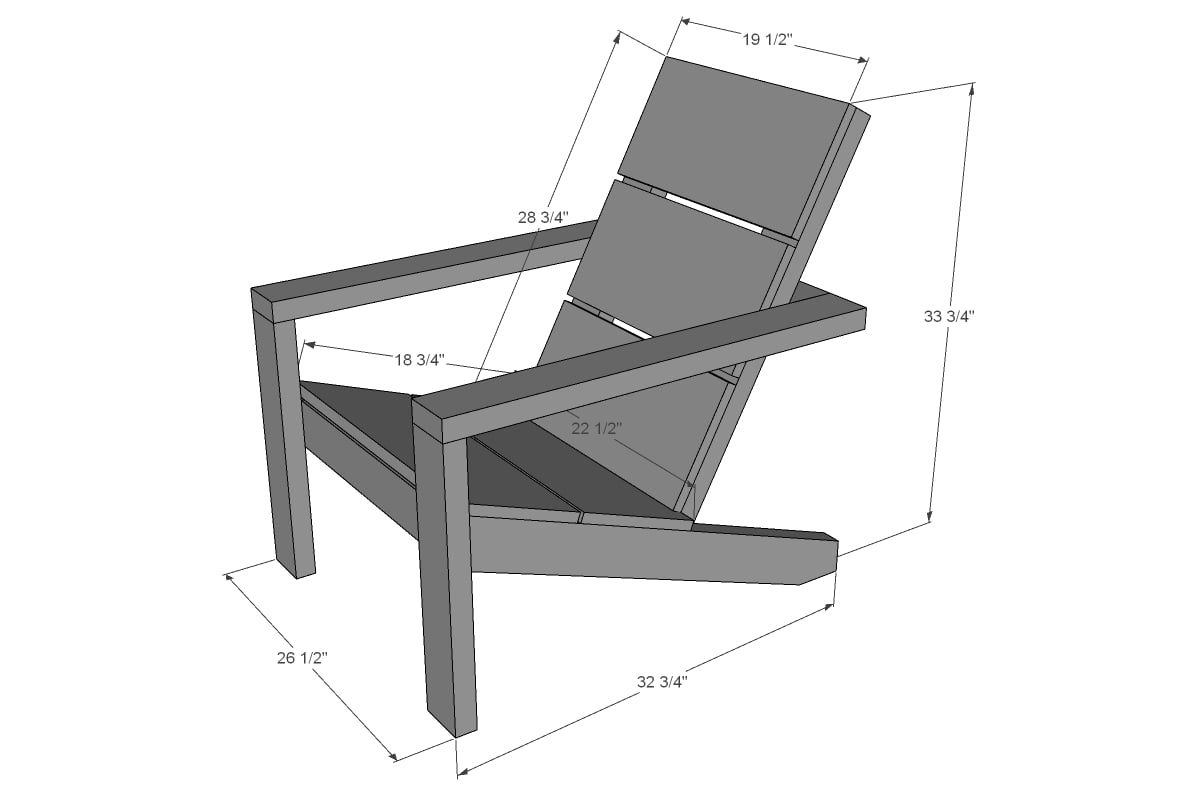
- 5 - 2x4 @ 19-1/2" - legs and horizontal supports
- 2 - 2x4 @ 31-3/4" - arms
- 2 - 2x4 @ 33-1/4" - both ends cut at 20 degrees off square, ends ARE parallel, long point to short point measurement
- 2 - 2x4 @ 32-3/4" - back supports
- 2 - 1x10 @ 22-1/2" - seat
- 3 - 1x10 @ 19-1/2" - back
It may be easier to pre-finish your boards before cutting.


Work on a flat level surface.
Instructions
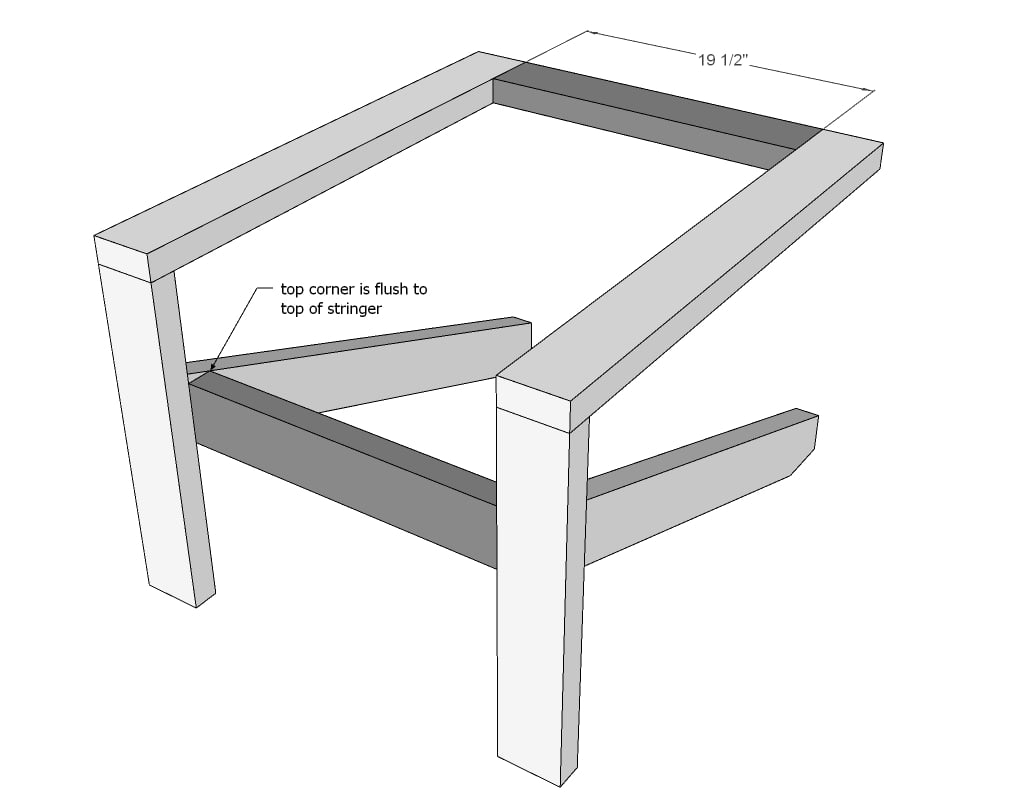
Step 1

As shown in the video, cut the chair stringers at a 90 degree angle at the foot of the stringer with a circular saw.
Build the arms with the 2-1/2" long screws and exterior wood glue.
Make sure the two arms are built the same but in mirror as shown in the diagram.
Step 2
Drill two 1-1/2" pocket holes on both ends of two of the 19-1/2" long 2x4s. Attach with 2-1/2" screws to the Adirondack chair frame.
Step 3
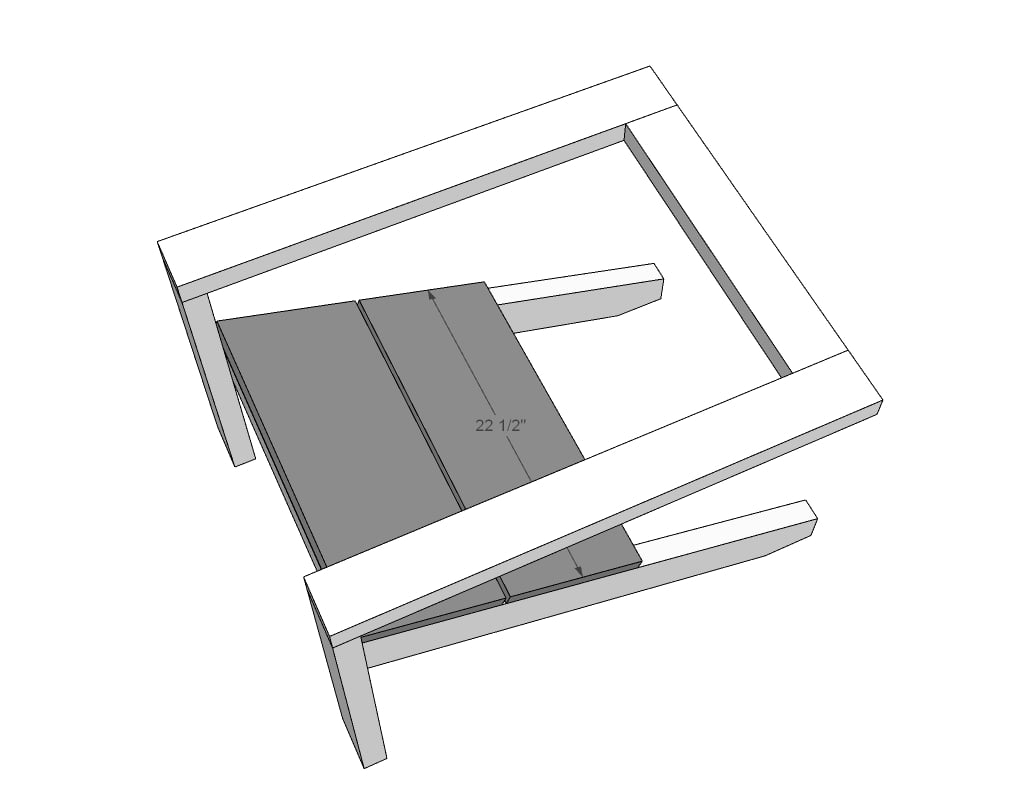
Lay the seat boards on the 2x4 frame and attach with three 1-1/2" long screws per end of each 1x10 to the seat frame. Leave about 1/4" gap in between the seat frame for water drainage.
Step 4

Place the remaining 2x4 @ 19-1/2" long under the back of the chair as shown in the diagram.
Place one seat support in the chair and hold flush to the bottom of the stringer.
Attach with screws to the stringer and to the back support.
Move to the other side of the chair and repeat with the second back support.
Remove the 2x4 @ 19-1/2" long.
Step 5

Attach the 2x4 @ 19-1/2" to the base of the chair with screws.
Step 6
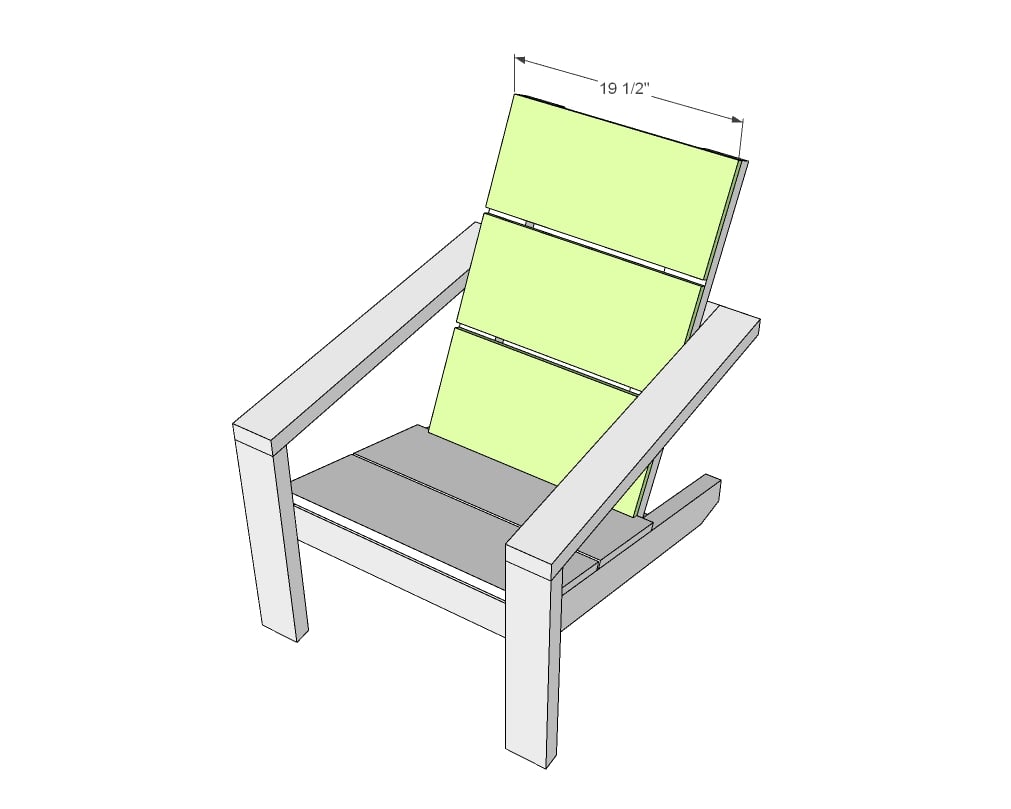
Starting at the top and working downward, attach the seat back boards to the back of the chair. Make sure you leave a gap at the base of the back to allow for good water drainage. Evenly split the gaps for best visual presentation.

Comments
Ray_B
Mon, 04/27/2020 - 07:42
Alternative plans available?
These plans are awesome, however these will probably be too difficult for my wife and I to get (climb) out of. Can you recommend some other simple chair plans as an alternative?
Thank you!
Elizabeth Morton
Mon, 05/04/2020 - 07:19
We are in the same situation…
We are in the same situation and would need the chairs a little higher off the ground please.
Love the design and the simplicity of the build!
Beautiful work as always!
Thank you
luiessir
Sun, 05/31/2020 - 23:44
Buenos días desde España Ray…
Buenos días desde España Ray-B:
Creo que podrías incrementar las medidas del larguero y de la pata en un porcentaje estimativo, creo que un 10 % no estaría mal, te quedarían las patas con 1 3/8 y el larguero con 3 21/64 (verifícalo, calcular pulgadas es complicado a los que usamos el sistema métrico decimal), las medidas de las demás piezas no varían.
En todo caso, es mejor pasarte con el incremento que quedarte corto, si te excedes, no tienes más que poner un listón delgado sobre el suelo junto a las patas y marcar con él el sobrante de cada una de ellas.
¡Internet es una hermosa herramienta!.
luiessir
Mon, 06/01/2020 - 06:47
Sorry Ray B: Increasing the…
Sorry Ray B:
Increasing the legs by 10% would be 15 1/8 and the crossbar with 36 37/64.
I think what I put in earlier was the increment.
Perdona Ray B:
Incrementando un 10 % las patas quedarían con 15 1/8 y el larguero con 36 37/64.
Creo que lo que puse anteriormente era el incremento.
Jeremy68
Tue, 06/16/2020 - 15:20
Please refer to my happy…
Please refer to my happy accident
OliveGrace
Mon, 08/17/2020 - 14:41
I have the same problem. …
I have the same problem. Does Ana every reply?
Leslie Esparza
Sat, 11/21/2020 - 08:04
Alternate Plan Ideas
Hi Ray!
It looks like another commenter posted some suggestions for alterations. Here's what he posted:
Modification for those who are a bit challenged by height or age:
Reduce the angle on the long bottom board to 10 degrees, lengthen board to 38 inches, shorten front legs to 16 1/2".
I'm going to try this out. I'm building some chairs for my backyard and want to build a couple for my parents, who are both tall and in their 70's. I'll let you know how it goes in case it can help you!
I have already made a chair with the dimensions that Ana posted and it WAS surprising comfortable. I think that the arms make it easier to get in and out of, however, I do think it would help to raise it a little for my parents. We'll see!
In reply to Alternate Plan Ideas by Leslie Esparza
tdk_dpt
Wed, 04/21/2021 - 10:42
Leslie, did you try to make…
Leslie, did you try to make a chair with your new dimensions? I am curious, too. I was thinking of just adding 2 inches to the height of the front legs as well as the longer back legs. I assume it would "raise" everything up 2 inches and keep the seat slope the same?
mfcosi
Thu, 03/04/2021 - 12:39
Try this one: https://ana…
Try this one:
https://ana-white.com/woodworking-projects/modern-outdoor-chair-2x4s-an…
rpower1
Mon, 04/27/2020 - 11:21
Stain
What stain did you use? Love the color.
In reply to Stain by rpower1
Bronwyn
Tue, 04/28/2020 - 16:23
Yes, can you please share…
Yes, can you please share what stain this is? Thanks!
Elizabeth Morton
Mon, 05/04/2020 - 07:22
Is the stain also a wood…
Is the stain also a wood protector?
Since the wood is not for outdoor use, what would you recommend for extending the life of the chairs?
Jeremy68
Tue, 06/16/2020 - 14:57
I'd recommend an oil stain,…
I'd recommend an oil stain, hard to come by nowadays but well worth the effort of finding it. An oil stain will do two the three years easy, water based garbage is an every year ordeal. Ummm, did I say garbage, oops, I meant garbage, oh, got it right the first time.
Jeremy68
Tue, 06/16/2020 - 14:59
I can't say what Ana used…
I can't say what Ana used but i was able to replicate and possibly enhance by what I typed in my comment.
jollysson1
Fri, 05/01/2020 - 08:35
Child chair plans?
Anna,
Do you have plans in this style for a childs chair? I have cut wood for two adult chairs for my son and daughter-in-law who are expecting our first grandchild...I would also like to make a chair for him!!! (Perhaps it is as easy as making all cuts 5 inches less???) Thanks
ghoffman88
Thu, 05/28/2020 - 16:26
Did you have any success…
Did you have any success making kid chairs?
Wolfeman6
Fri, 05/01/2020 - 17:30
What kinda of stain did you…
What kinda of stain did you use?
dscwmitchell
Sun, 05/03/2020 - 16:42
Just did the first of…
Just did the first of several of these and they are great!! I used pallet wood and leftover framing lumber and for the seat I used PVC trim boards. I think it turned out great and only took me a couple hours start to finish.
I'd attach a couple of pictures if I could figure out how to post them here.
AntonioCruz
Fri, 05/08/2020 - 15:20
Hi, I'm from Portugal…
Hi, I'm from Portugal. Thanks for your work. Can you have this instructions in cms? If you have send to me, please. [email protected]
Jeremy68
Tue, 06/16/2020 - 15:01
Dude it's 1'=2.54cm, I'm…
Dude it's 1'=2.54cm, I'm from Canada and we are metric all the way but it really is a simple conversion.
Jeremy68
Tue, 06/16/2020 - 15:02
1", not foot
1", not foot
carlhendricksen
Sat, 05/09/2020 - 14:05
Chair modificatioins
Awesome plan!
Modification for those who are a bit challenged by eight or age:
Reduce the angle on the long bottom board to 10 degrees, lengthen board to 38 inches, shorten front legs to 16 1/2".
DCecil43
Mon, 05/11/2020 - 12:08
Treated vs. Untreated
I'm wondering if untreated 2x4s with an exterior Cabot paint stain would work for the outdoors. Thoughts?
PJ07
Thu, 05/28/2020 - 14:19
That is my plan this weekend…
That is my plan this weekend so if anyone thinks not a good idea I'd love to hear.
Jeremy68
Tue, 06/16/2020 - 15:06
Any lumber works, untreated…
Any lumber works, untreated just needs to maintained. Water based blows, oil is best. A good soak in oil and you have a couple of years, water based in a sunny environment and get ready to reapply annually
baboosmith23
Fri, 05/15/2020 - 13:12
Stain color
Can you tell me what color stain you used
kcloud
Sat, 05/16/2020 - 18:59
Did you use treated boards…
Did you use treated boards since it will be outdoors?
bh625
Mon, 05/18/2020 - 21:18
First Project!
For my first ever wood-working project, it went pretty well! I’m so thankful for the video and the info broken down into simple, concise portions. The diagrams were helpful, but the video was definitely a must have for me. Thank you for this beautiful modern design!
DanT
Mon, 05/25/2020 - 10:19
Plan change
Ana - Love this plan... however one small correction needs to be made. On the diagram for step 1, the "foot" measurement of 3 1/2 i believe is mistaken. It should be just about 3" if cut 20 deg off square. No biggie, but it threw me off first time through. Thanks!
PJ07
Thu, 05/28/2020 - 14:21
Thank you! The diagram here…
Thank you! The diagram here and in the video have different measurements so I was wondering that myself.
littlecanton
Mon, 05/25/2020 - 10:37
Family Project
My 12 year old son and I made two of these and absolutely love them. Thank you so much for a great plan and family project
James-handyguy
Tue, 05/26/2020 - 17:14
Great chair plan, simple and…
Great chair plan, simple and sturdy.
abbydavviss
Sun, 05/31/2020 - 11:01
This was great! Thanks!
This was great! Thanks!
luiessir
Sun, 05/31/2020 - 22:41
Gracias por el sencillo y…
Gracias por el sencillo y sólido diseño Ana Blanco, ¡Internet es una hermosa herramienta!.
fessehaye2
Thu, 06/04/2020 - 09:36
I'm beginner in the wood…
I'm beginner in the wood working field and have just completed my very first project following one of your post and built two Modern Adirondack Chairs. Wife and kids really love it and are asking me to build more.
Tamaurizio
Mon, 06/08/2020 - 21:11
Adirondack Chairs
Here are the Adirondack Chairs I made following your great plans: https://www.dropbox.com/s/di8ne57lpbve9x9/Adirondack-Chairs.jpg?dl=0
Thanks
Jeremy68
Tue, 06/16/2020 - 15:25
Love the contrasting colours…
Love the contrasting colours bud.
Jeremy68
Thu, 06/11/2020 - 12:42
cant find 1x10's
I am about to build one of these, love thew look of the 1x10" but alas in my area nobody sells 1x10", has anyone given any thought to building this with 1x8" lumber?
Jeremy68
Tue, 06/16/2020 - 14:53
Trust yourself first.
I'm replying to my own post, faux pas I know, but my local lumber retailer lied to me, they have 1x10's, they just didn't know that modern lumber doesn't adhere to true length and width, scary yes?
JuliaP
Sat, 06/13/2020 - 04:23
stability of armrests
Hi, I love the design of these chairs and am planning to build a couple. I noticed some people have added posts to reinforce the backrest. Do you think the original design is sturdy enough for kids/adults to sit on the armrests?
thanks!
lalitisbhatia
Mon, 06/15/2020 - 06:55
Thanks for this plan -…
Thanks for this plan - turned out really good and only took a couple of days
Jeremy68
Tue, 06/16/2020 - 14:50
Shou-sugi-ban
For all those asking about the stain colour, I was able to replicate ( as far as I can tell from a picture, by a light burn, sand, and then an application of a clear wood sealer. Also, through a happy accident I achieved a few degrees of less incline through putting the back support 2x's @ 90 degrees out from plan, so if you are looking for an easier exit chair, this may help, though it does look bulkier. I stained my first chair a black brown semi translucent, i wiped it on, then wiped it off, which I think looks a bit heavy for the Rustic Modern design, love to show but have no idea how to post pics on here so no go.
Im about to embark on my second chair with a few minor tweaks, 45's on the arm fronts, ditto on the back, 2-4" wider to accommodate us big ol' Alberta Boys, one more section higher. again for us big ol' boys, and the modified Shou-sugi-ban on the seat facings. I'm thinking with the awesome plans that Ana has provided and a few unnecessary but form based tweaks I will be able to, as a total amatuer (with subgrade equipment) be able to build something worthy of any firepit.
Jeremy68
Tue, 06/16/2020 - 15:17
Shou-sugi-ban
Ok, i knowwwwwww this is horrible, never comment on your own posts EVER, but, saying that, here goes.
Just a bit of info if you are going to Shou-sugi-ban your wood, it is a form of wood preservation that come from Japan, it's usually performed on cedar but has the same basic effect on any wood. So, what I'm basically saying here is if you choose this method you are also elongating the life of your wood. I'm going to experiment with burning just the one side of the wood and both and seeing which fairs better, the issue is we'll all be well away from caring once the results are in.
You can use a basic propane torch for this job, it will take a bit but you'll get er' done.
Jeremy68
Tue, 06/16/2020 - 15:30
Plus, who doesn't love…
Plus, who doesn't love saying Shou-sugi-ban?
If you are the one person who doesn't then I don't want to know you.
In reply to Shou-sugi-ban by Jeremy68
Kemberlieg66
Sun, 10/03/2021 - 13:07
I love this method of…
I love this method of preserving wood. I just bought me a brand new torch and it’s a big one. This is one of my favorite methods to use. It gives beautiful results 😊
Jeremy68
Tue, 06/16/2020 - 15:41
Ack, I never like to be this…
Ack, I never like to be this guy but I just noticed there are filters applied to the first pic on here, look to the second pic for a true representation of the stain colour and hue. But trust me on this, evenly run a propane torch over your wood, sand until happy and then clear coat and you'll be happy.
Jeremy68
Tue, 06/16/2020 - 15:51
I'm truly overstepping my…
I'm truly overstepping my bounds here but if you will give me this one last input I'd truly appreciate it. Unless you are running a bump stop mitre saw your 1x10's will all be fractions off perfect. This being said, choose the most interesting wood grain for the top seat facia, taking into account how everything lines up vertically. Our line of sight and our years of indoctrination have taught our brains to see top to bottom, left to right, so put the most interesting board on top, with a caveat of lining up over all. That's all, sorry for intruding.
pgsbigdata
Wed, 06/17/2020 - 09:39
Type of wood
Hi Ana, What kind of wood ? White Pine with sealant ? Or anything else?
Wendy KT
Wed, 07/01/2020 - 12:16
How do you keep the sap from bleeding?
Help! How do I stop the sap from bleeding out of the pine? I made 2 of these chairs and we love them. I used 2 coats of Minwax Classic Gray stain and then I applied 2 coats of wipe-on poly. But as of this morning there are little white sticky sap dots all over the boards. How are the rest of you keeping that from happening?
jelliott1276
Fri, 07/03/2020 - 18:17
Stain
Stain, what color oil based stain is that, love that color!!