

How to build laundry basket organizers! Clean up your laundry room with these simple laundry basket dressers made from a single sheet of plywood. Free step by step plans from Ana-White.com
Photo by SCHWEIZERFAMILY
Why We Designed and Built this Project
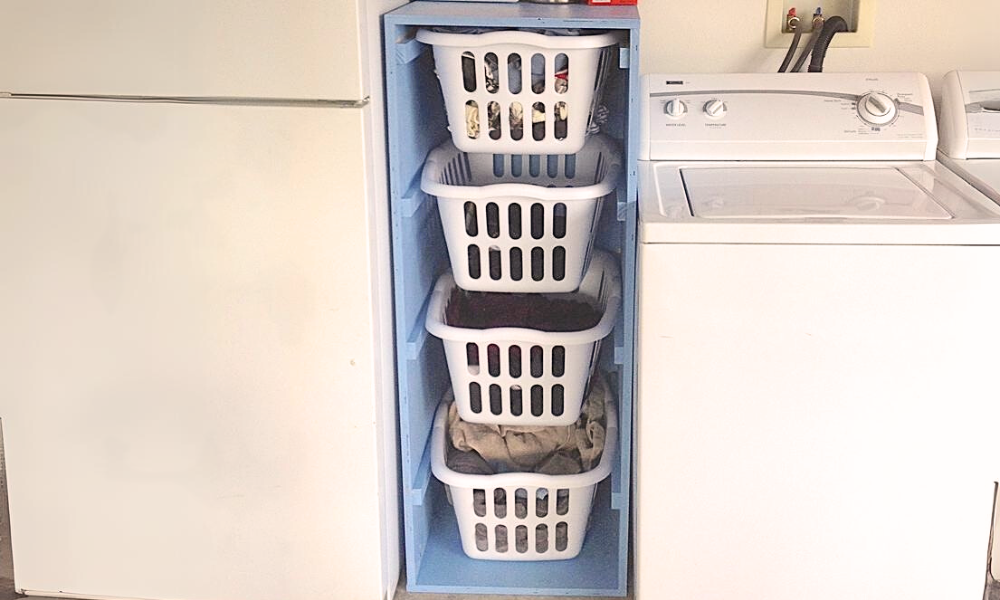
Tower Size Laundry Basket Organizer
Easy to Build
More Photos and Details
More Laundry Basket Organizer Plans to Consider
- Open Frame Laundry Basket Organizer - this no plywood version is easy to build and inexpensive
- Console Sized Laundry Basket Organizer - this one is plywood based, but more of a console size than a tower size
Pin For Later!
Preparation
- 1 - Sheet 3/4" plywood or MDF
- 2 - 1x2 @ 8 feet long
- 2" self tapoing star bit screws or 1 1/4" pocket hole screws
- 1 1/4" brad nails
- Glue
- Paint
- 4 Laundry Baskets, 16" x 24" (I use the Sterilite ones but measure and make sure the baskets you buy will fit)
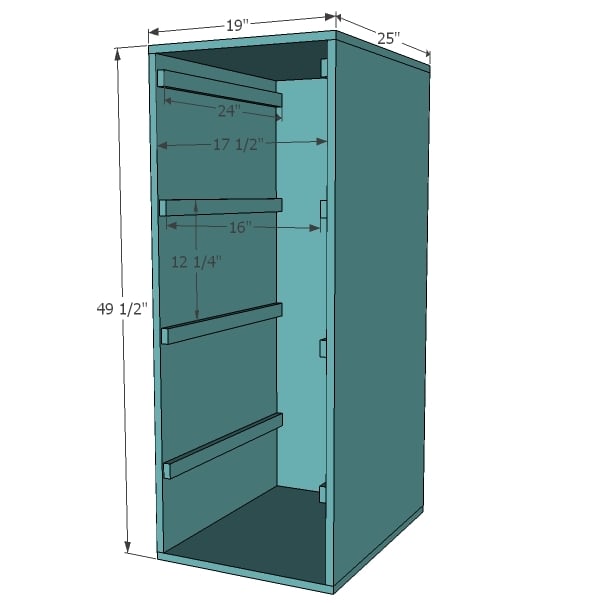
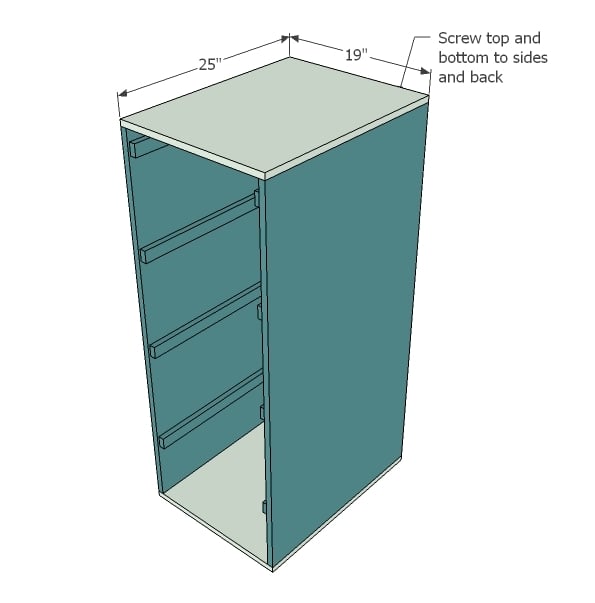
3/4" plywood cut as follows and shown in cutting diagram:
- Back: 17 1/2" x 48" Sides (2): 25" x 48"
- Top & Bottom (2): 19" x 25"
8 - 1x2 @ 24" (it's okay if they are a tiny bit short to get all the cuts on the same boards)


Please read through the entire plan and all comments before beginning this project. It is also advisable to review the Getting Started Section. Take all necessary precautions to build safely and smartly. Work on a clean level surface, free of imperfections or debris. Always use straight boards. Check for square after each step. Always predrill holes before attaching with screws. Use glue with finish nails for a stronger hold. Wipe excess glue off bare wood for stained projects, as dried glue will not take stain. Be safe, have fun, and ask for help if you need it. Good luck!
Instructions
Step 1

Okeedok! Here we go. Just start at one end of the plywood, measure in 17 1/2" and make a straight line and cut. Then measure in 25", mark a line and cut. Repeat two more times. From the last 25" strip, cut into two pieces 19" wide for the top and bottom. Because the saw blade takes up space when cutting, you cannot just mark all cuts and have at it. You must measure, cut, then measure, cut and so on. If you have a hardware store that will make these cuts for you, by all means, beg and plead. It's much easier to carry the pieces than a full sheet of 3/4".
Step 2
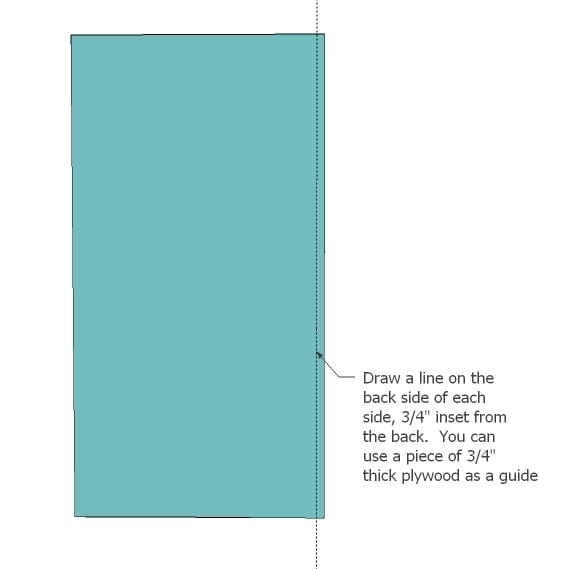
Get the two sides out and determine what side is uglier, and what edge is ugliest. Or shall we say less attractive. Anyway, make a mark down the edge 3/4" as shown in diagram. This will be the backs side. Do this on both sides.
Step 3
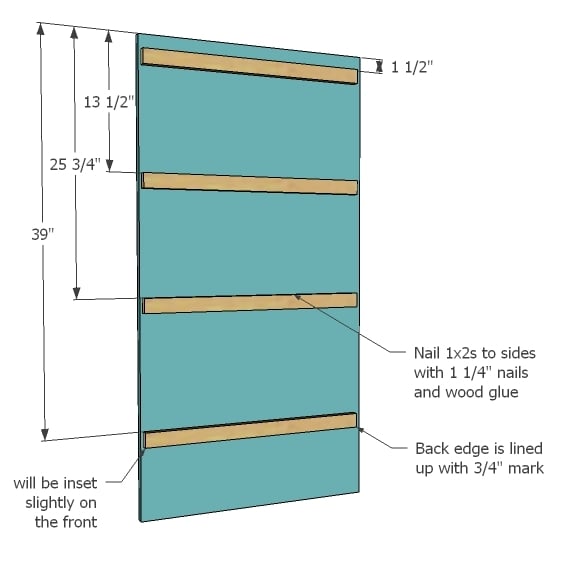
Now mark each side down as shown in the diagram. Make sure you make at least two marks so your cleats go on nice and square. Apply glue to back edge of cleats, and nail down with 1 1/4" nails. Note that the two sides are done in mirror.
Step 4
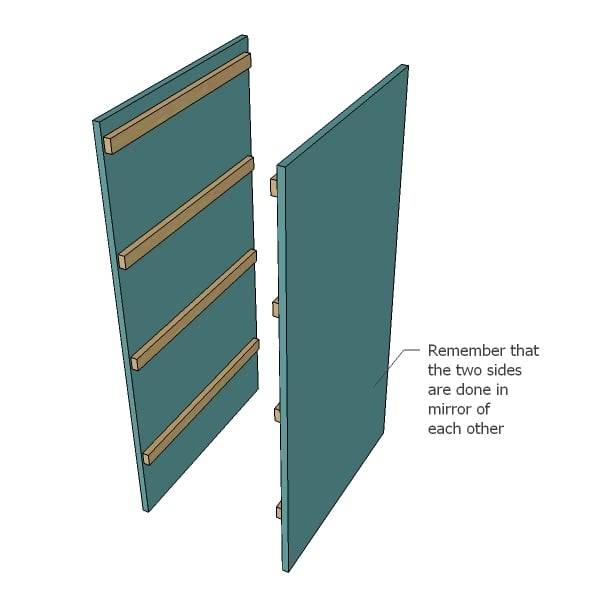
Just to illustrate the mirror requirement. If you make two the same ... you'll be making two Laundry Basket Dressers, which might not be a bad thing at all!!
Step 5
Step 6
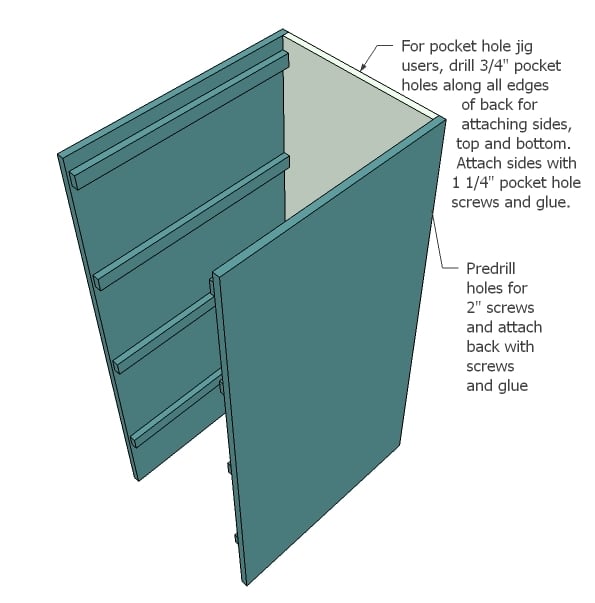
And the last step is to just add the tops. This should be pretty easy, just keep your outside edges flush and use glue. And that's it! How simple is that?
It is always recommended to apply a test coat on a hidden area or scrap piece to ensure color evenness and adhesion. Use primer or wood conditioner as needed.

Comments
Donna @ Edible… (not verified)
Thu, 03/01/2012 - 11:40
This is great! I love the
This is great! I love the fact that the laundry is all sorted out and that you can take the "drawers" out easily.
pecma01
Thu, 03/01/2012 - 11:42
Recycling too
I just might have to build these for my recycling... my town is not on single stream so many bins are needed!
Guest (not verified)
Thu, 03/01/2012 - 12:10
Every time I see these, my
Every time I see these, my thought is "But do they have issues once the baskets are heavy with tons of clothes?" Anybody know?
Becca W (not verified)
Thu, 03/01/2012 - 12:27
We made the original basket
We made the original basket dresser with 3 drawers for one of our sons. We have had it about a year, and have had no problems with it! Our boys have moved it around, stuffed it with clothes (and toys!), and even climbed on it some. It has held up really well. We are considering making a few more for the laundry room :)
Guest (not verified)
Thu, 03/01/2012 - 13:01
I would love to know this
I would love to know this too!!!
Guest (not verified)
Wed, 04/11/2012 - 19:00
Should be ok
Using 3/4 inch plywood with a full thickness backing this should be plenty sturdy. If your going to be using it for extremely heavy stuff for some reason you could line the inside of the back edge where it connects to the sides with a full length 1x1 for stability. But that would most likely be way overkill for this sort of project. The MDF wood is PLENTY strong on its own. Make sure any connected point is both glued and nailed/screwed.
bhoppy
Thu, 03/01/2012 - 12:40
Wish I had room to build more
Wish I had room to build more of these! Love the 4 by plans!
I made the orignal one with 3 baskets and have had all three baskets overfilled and stuffed some more full of laundry and have never had any problems.
tannisg
Thu, 03/01/2012 - 16:31
priorities in order..
Sadly I spent the afternoon pining over these and price-checking the baskets to fit in them and measuring my space to figure out how I can make it work, instead of actually folding the laundry that is currently in baskets all over my family room ;)
These are awesome though - I am motivated to make it work!!
In reply to priorities in order.. by tannisg
birdsandsoap
Thu, 03/01/2012 - 19:24
I think we are on the same
I think we are on the same wavelength! :) I'd rather plan ways to organize my home and build cool organizers than actually put the stuff away!
Guest (not verified)
Thu, 03/01/2012 - 21:36
Love this! Question. What do
Love this! Question. What do the B, C and other tags stand for??
I have a system now for clean, dirty, whites, colors. Is it something similar?
Brook@BeingBrook (not verified)
Thu, 03/01/2012 - 22:24
Names
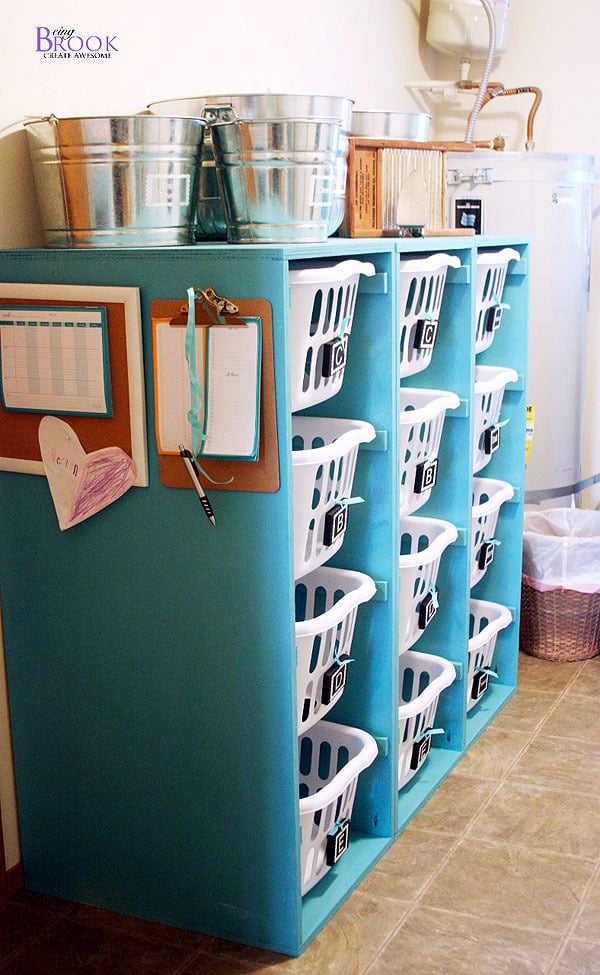
The B,C,D,E are the first letter of each of my kids names! We use the laundry dressers for clean laundry. Each person has a basket for their clean clothes and then one for towels and one for sheets. The kids each have an additional basket for their mudroom type items and things they leave strewn about the house. Our laundry room comes in from the garage so it's our mudroom too.
I have three baskets on top of the washer/dryer for dirty laundry.
momof08 (not verified)
Sun, 06/17/2012 - 10:12
Brooke, Love it especially
Brooke,
Love it especially since I also have 8 kids, I have decided that all my older kids will be doing their OWN laundry, I'm tired of having all the laundry piled in huge heaps on the laundry room floor. I am going out today, with my list of materials, and build these. Can't wait to see how they turn out!
anydayerymN
Fri, 03/02/2012 - 03:39
Women Shoes
Hi
I am further to this forum, so immediately beg an enchanting confusion:)
How scads pairs of shoes do you have?
How much do you accept new shoes?
Amuse especially women to observe on this topic.
RhettJimmy (not verified)
Fri, 03/02/2012 - 23:05
Why buy the 1"x2"s? Your
Why buy the 1"x2"s? Your cutting diagram shows a 10"x25" piece of scrap that could be ripped into 8 - 1"x3/4" pieces that would already be the right length! I'm going to be building a few of these after my wife sees your design... ;-)
Sergey (not verified)
Sun, 03/04/2012 - 20:00
where are the legs?
Laundry room sounds like a risk for water spillage.
Maybe small legs like 1/4'' will allow for some ventilation down there.
On the other hand the dirt will start getting under the dresser.
What will happen if water gets under those dressers, will it soak and warp the wood?
mebohn
Mon, 03/05/2012 - 05:26
Answer to your legs question - casters
You can throw some little wheels on the bottom if you want for a bit of a lift, then you could pull the laundry dressers out to sweep. I believe the original plans did have wheels. I made it without, b/c I don't need it to roll, but I believe a lot of people did add them and it's fantastic.
payne.kj
Mon, 03/05/2012 - 06:01
what kind of plywood did you
what kind of plywood did you use?
Brook @ BeingBrook (not verified)
Mon, 03/05/2012 - 15:05
Wood
I used AC Plywood. If you were worried about water spillage then you could put the dressers on wheels. We had a dresser in that spot before and it was always really dusty underneath and the kids would lose things and we'd have to move the whole dresser so we just set the dressers on the ground.
Guest (not verified)
Fri, 03/23/2012 - 05:04
Love these but we aren't handy
I wish you could buy these already made!
Karlee
Fri, 04/06/2012 - 18:55
Oh my!! This must be what
Oh my!! This must be what heaven looks like!!!
sir_brady
Sat, 04/14/2012 - 19:18
Dimesions are wrong.
my own fault for not double checking, but the dimesions used in the drawings are for a SEVENTEEN by 24 basket, not a 16 x 24... learned this the hardway after adding 1 inch to the back and tops to fit my 17 inch basket. only afterwards when it doesnt fit did i bother actually thinking about the math...
just a heads up
on a side note... first time using a circular saw and a kreg jig,. and everything worked and went together awesomely!
luckily the too big dresser will be easy to fix with another set of 1x2's, which i already have because i bought the material to make 2 of them!
Brook @ BeingBrook (not verified)
Wed, 04/25/2012 - 16:47
Oh no!!
I used the Sterilite 1.5 Bushel baskets and they are 17" at the widest point. Laundry baskets are hard to measure since they curve outward towards the middle. So glad you got the plan to work for your basket.
redflyer (not verified)
Sun, 04/15/2012 - 06:33
This could make a great toy sorter as well.
Sometimes storage for toys costs a small fortune. This is a great way to do that, rather then putting name tags on the front you could put pictures of the toys that belong in that bin to help your kids learn to clean up after themselves.
CharlotteE (not verified)
Sun, 04/22/2012 - 18:38
Can you paint the boards
Can you paint the boards before you screw them together?
Brook @ BeingBrook (not verified)
Wed, 04/25/2012 - 10:08
Yes!
I painted all the wood when it was flat and then just did touch ups when it was all built. So much easier to paint flat lumber with a roller.
craftytammie (not verified)
Sat, 04/28/2012 - 10:34
i am so glad to read that
i am so glad to read that this is for 17 inch baskets, because my husband cut all the pieces and i hadn't checked our baskets yet!! ours are the sterlite baskets from target, and the tag says they are 17 1/4". phew.
Jaime Ramsey (not verified)
Fri, 05/04/2012 - 07:55
This is straight out of my dreams!
I'm obsessed with laundry baskets! I use them for everything. I've even gone so far as to buy the really nice, heavy duty ones. And they must match! I've been saying for years now that I need to build some sort of "dresser" for them. And here it is! Can't wait to get started! Thank you!
Tara Hines (not verified)
Tue, 06/19/2012 - 12:11
Just built these-- small correction
My dad and I just built two of these, and I love them. However, Look the plans over when attaching your rungs-- plans say to attach the last rung at 39" from the top, but this puts the basket an entire inch different than the others are spaced, and it would actually rest on the floor of the dresser instead of the rung. We attached at 38" from the top, and they are fairly evenly spaced this way (within 1/4"). Just look over the plans, make your marks, and then decide for yourself.
I used plywood and bought some 3/4" wide molding to put around the front so the raw plywood edge doesn't show. For about $5, it really dresses them up and makes them look higher quality/more finished.
Thank you so much for the plans-- normally I would see something like this and then try to recreate it, which takes a lot more time. It was great having all that work already done for me!
Arijoy (not verified)
Wed, 09/26/2012 - 05:31
I love this! And plan on
I love this! And plan on making it soon. How difficult would it be to add a door and maybe drawers on the bottom for height?
thelydster14
Mon, 08/10/2015 - 17:54
Where did you get the laundry baskets from?
I was looking for some laundry baskets, beacuse I might be interested in doing this project, and yours look nice and sturdy. I was wondering where I could find them?