

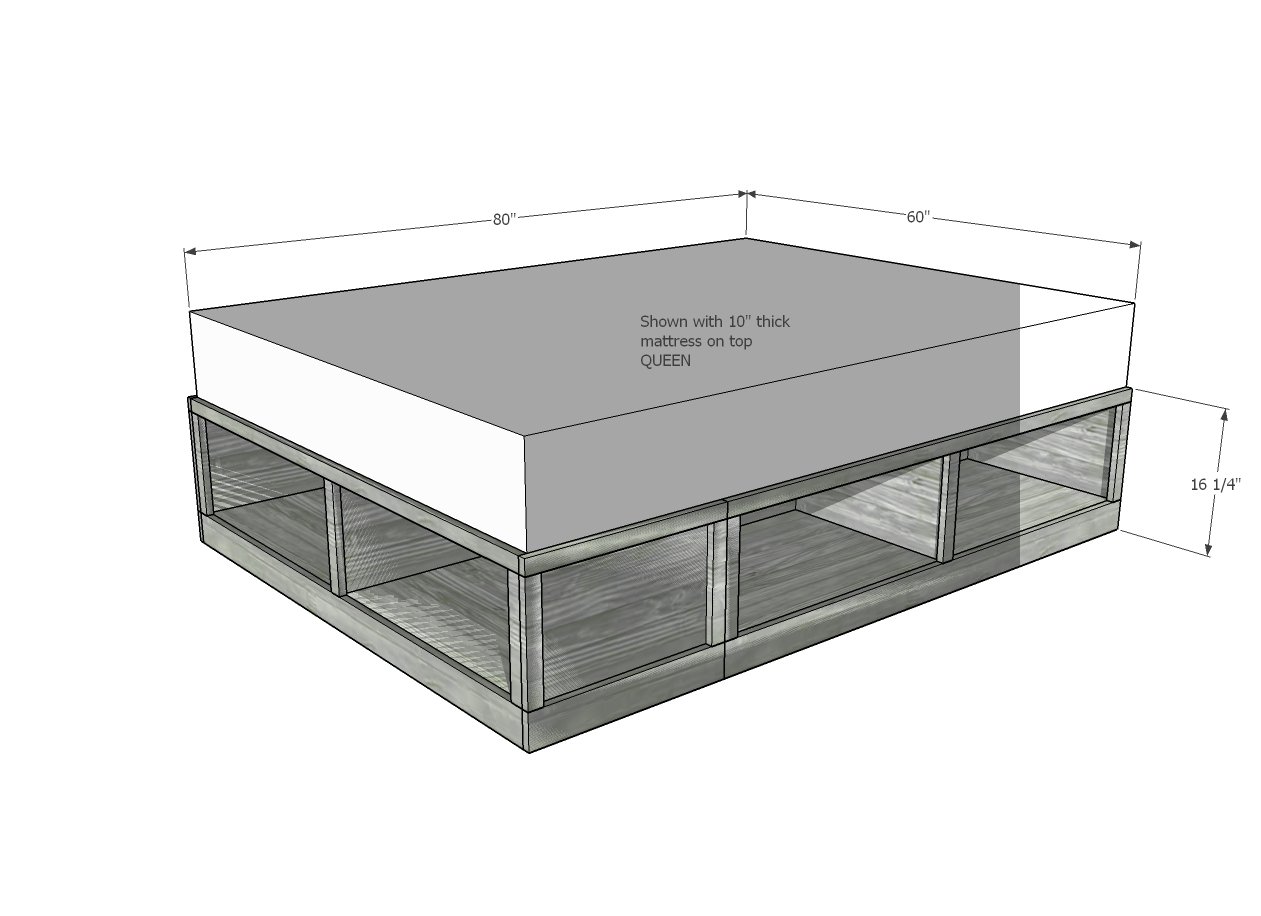
It's simple to build a storage bed! Just build three benches. Our free plans show you exactly how.
This plan is also available in a Standard King version.
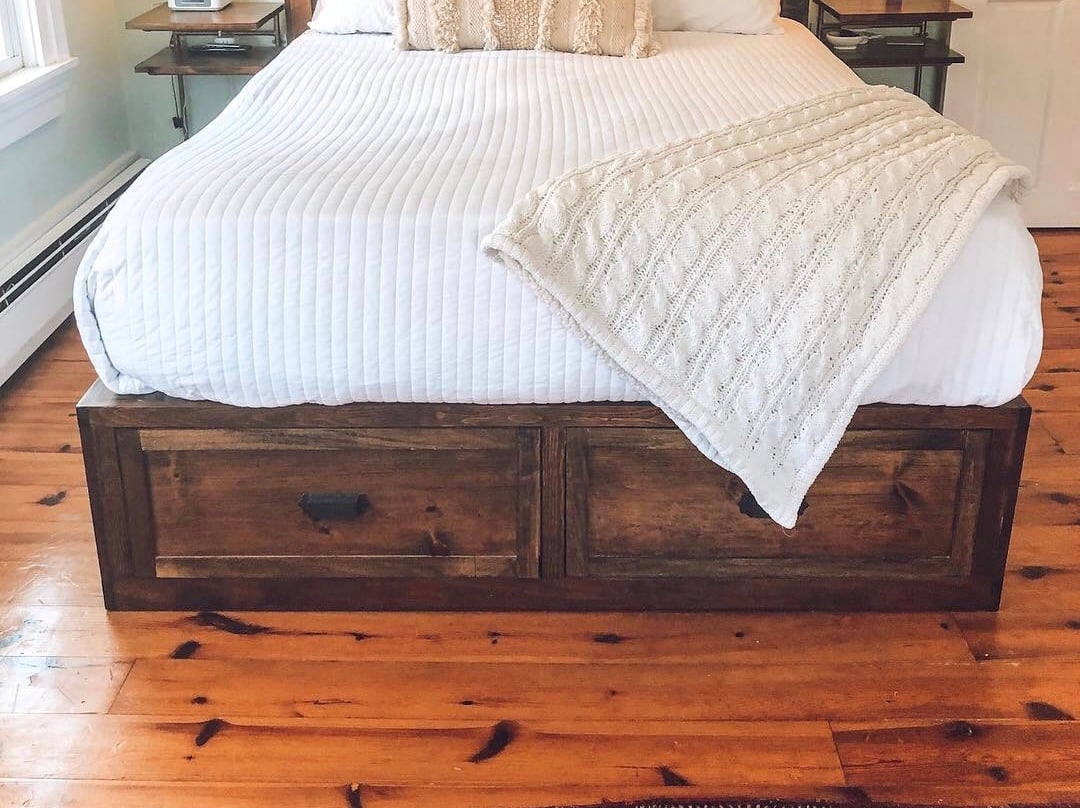
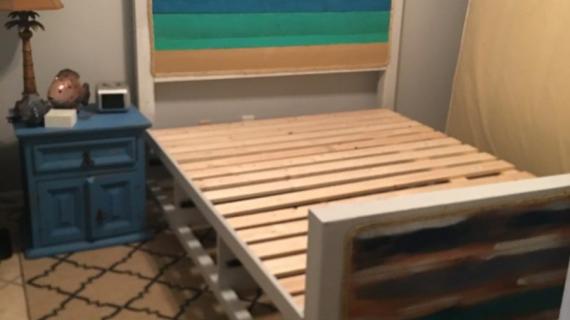
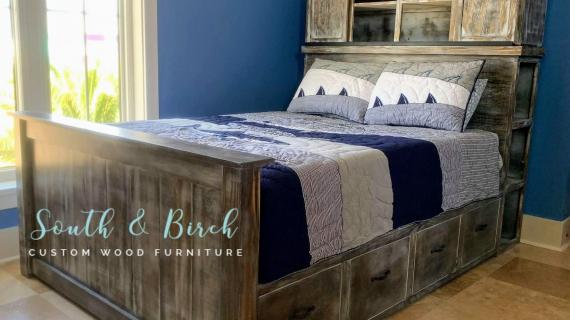
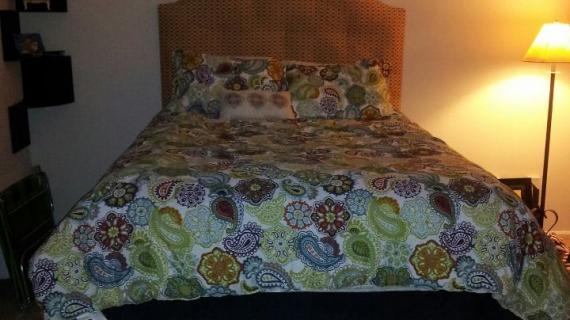
Reader submitted photo by One Delightful Home
We love this simple to build storage bed! It's simply three benches that are easy to move into the room. The cubbies are nice and deep and oversized, perfect for baskets or bins.
This is an updated plan. The old plans are still available here.
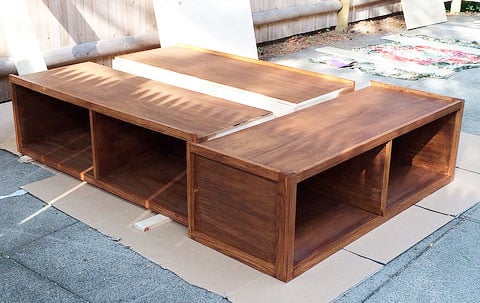
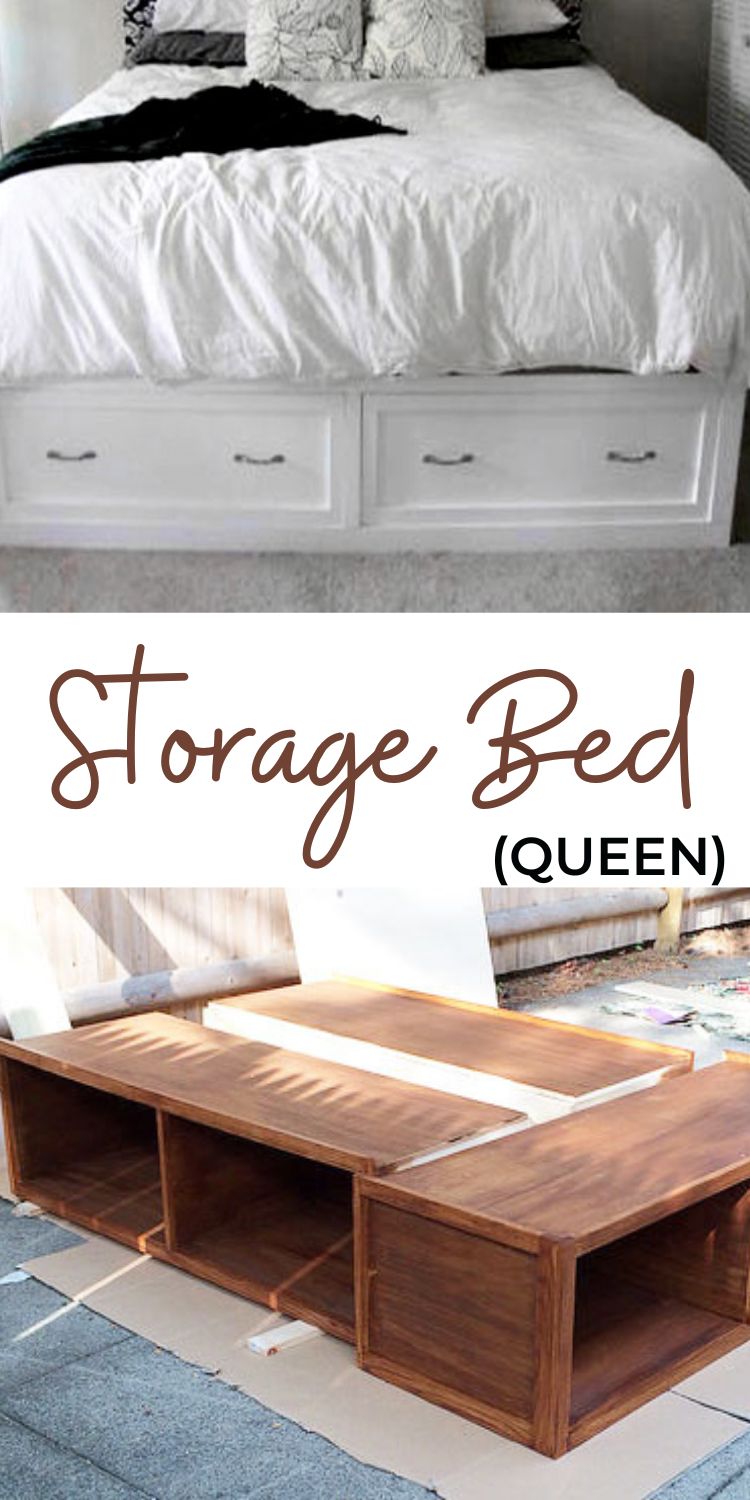
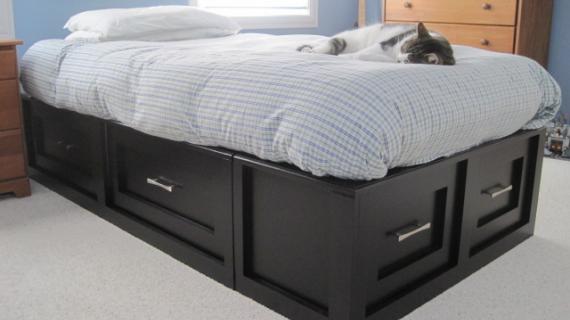
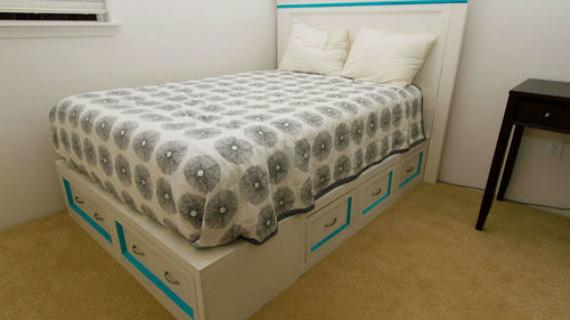
Pin For Later!
Preparation
- 3 - 4x8 Sheets of 3/4" Cabinet Grade Plywood, MDF or AC Plywood*
- 1 - 4x8 Sheet of 1/4" thick plywood
- 4 - 1x2 @ 8 feet long
- 3 - 1x4 @ 8 feet long
*For a stained finish, cabinet grade plywood is recommended. For a painted finish you can use MDF (not fun to work with but inexpensive) or AC Plywood (will need more sanding but also less expensive)
OPTIONAL DRAWERS SHOPPING LIST
- 3 - 1x4 @ 8 feet long
- 6 - 1x6 @ 8 feet long
- 1 - sheet of 1/4" thick plywood
- 6 - 18" drawer slides
- 2 - 1x12 @ 8 feet long
Carcasses
- 3 - 3/4" plywood @ 19-3/4" x 60"
- 9 - 3/4" plywood @ 19-3/4" x 14-3/4"
- 6 - 3/4" plywood @ 19-3/4" x 28-7/8"
- 3 - 1/4" plywood @ 15-1/2" x 60"
Face Frames
- 3 - 1x2 @ 60"
- 3 - 1x4 @ 60"
- 9 - 1x2 @ 11-1/4"
End Bench
- 2 - 1x4 @ 20-3/4"
- 2 - 1x2 @ 20-3/4"
- 4 - 1x2 @ 11-1/4"
Center Support
- 2 - Scrap plywood strip @ 60" x ~7-1/2"
- Scrap plywood pieces 20" long
OPTIONAL DRAWERS - Should be built to fit openings and drawer slides
- 12 - 1x4 @ 18" - drawer slide cleats
- 12 - 1x6 @ 18" - drawer box sides
- 12 - 1x6 @ ~24-7/8" - drawer box front and back - ADJUST TO FIT YOUR OPENINGS AND DRAWER SLIDES
- 6 - 1/4" plywood @ 18" x ~26-3/8" - drawer bottoms - cut to fit the drawer bottom
- 6 - 1x12 @ 27-1/2" - Drawer Faces
For three sheets of 3/4" plywood:
- Rip lengthwise into 6 strips, 8 feet long by 19-3/4" wide
- From these strips, first cut the 60" long pieces
- From scraps, cut remaining pieces
- There will be three scraps, 8 feet long by about 7-1/2" wide. Save this scrap piece and use as the cleat at the back of the side benches
For the 1/4" plywood
- Cut 60" x 48" piece
- From this piece, rip into three pieces, 60" x 15-1/2"
For the trim and face frame pieces, a compound miter saw is recommended for nice cuts.


When fastening, you can use 2" nails or 2" screws, unless otherwise directed. Always use glue. Remember, you need to make 3 benches.
Instructions
Step 1
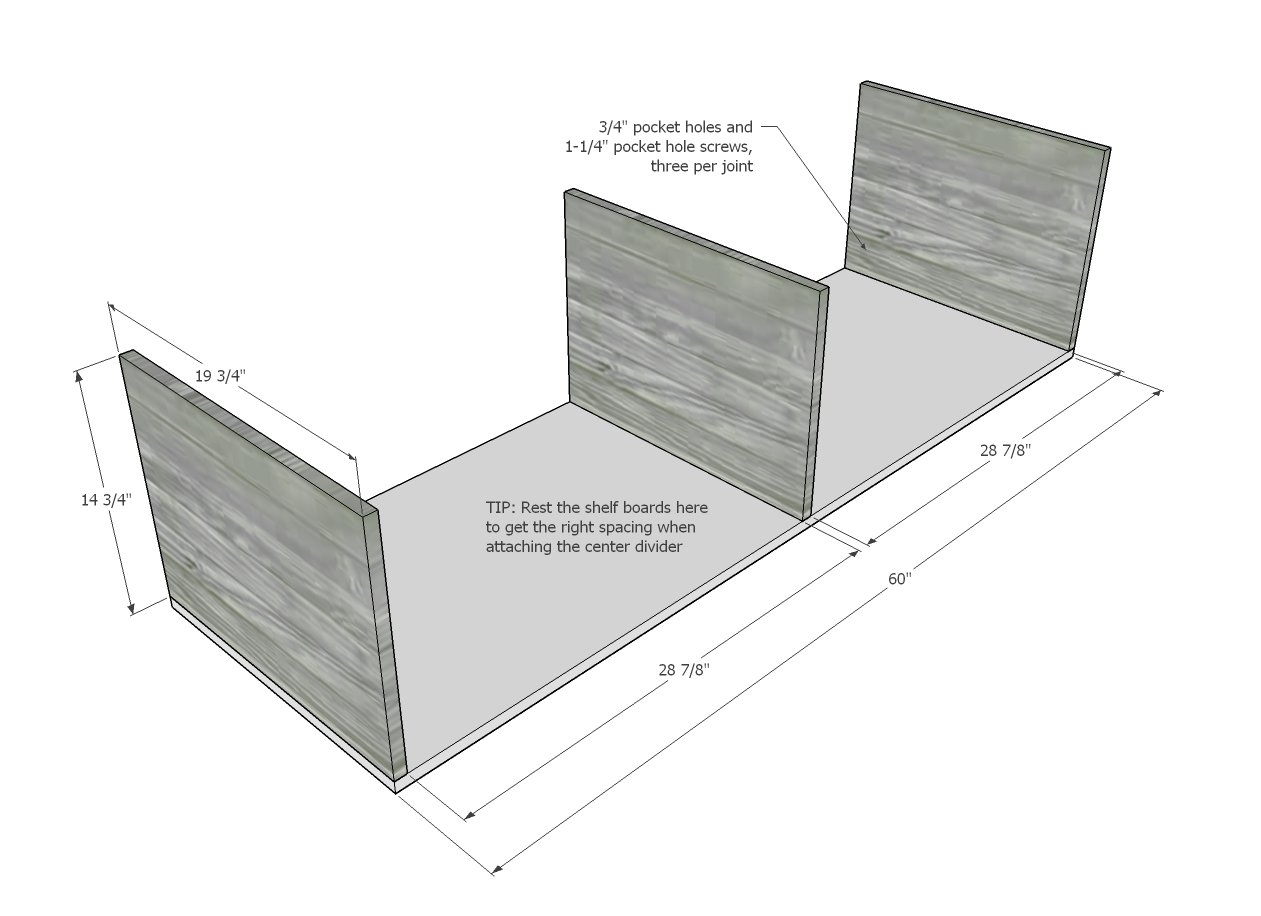
Attach the bench ends and divider to the bench top with 3/4" pocket holes and 1-1/4" pocket hole screws. Pocket holes should be placed about an inch from each edge and centered, three per joint is plenty.
TIP: Use the shelf boards (attached in next step) as a spacer to guide placing the divider perfectly centered.
BUILD THREE BENCHES.
Step 2
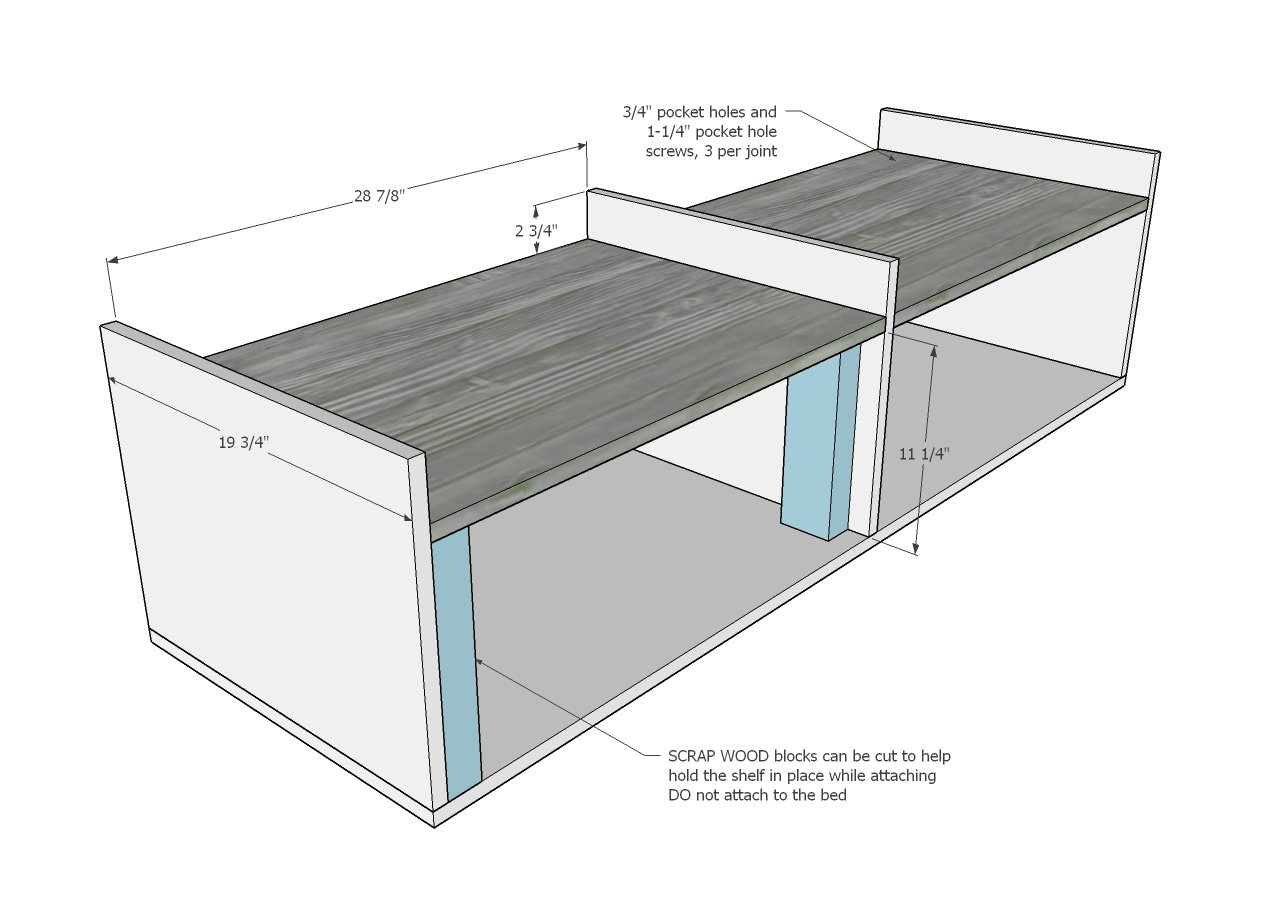
Drill 3/4" pocket holes on each end of the shelves.
Attach to the sides and dividers.
Scrap wood blocks can be cut to help with assembly as shown in diagram.
CONTINUE FOR ALL THREE BENCHES
Step 3
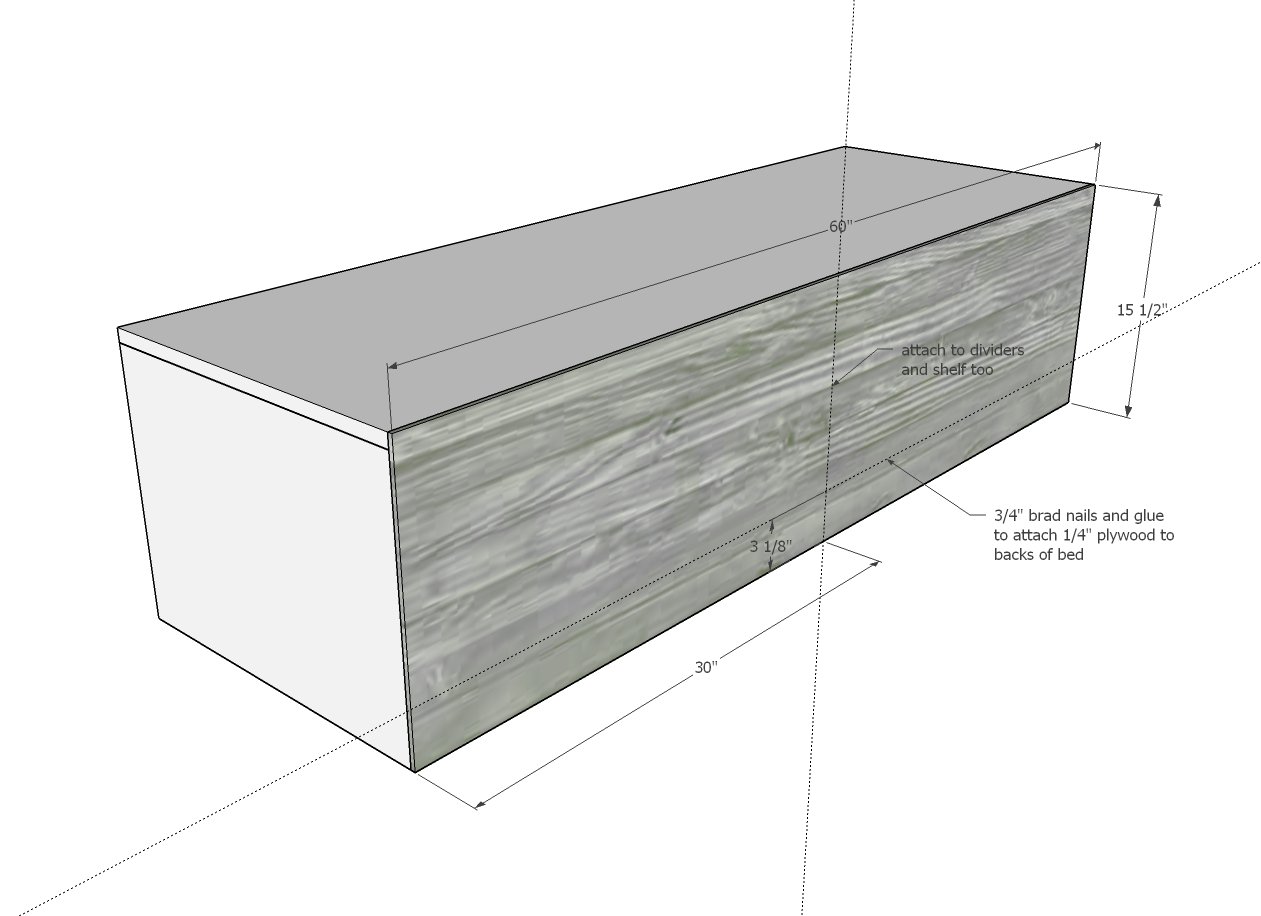
Nail and glue 1/4" plywood backs to all three benches.
CONTINUE FOR ALL THREE BENCHES
Step 4
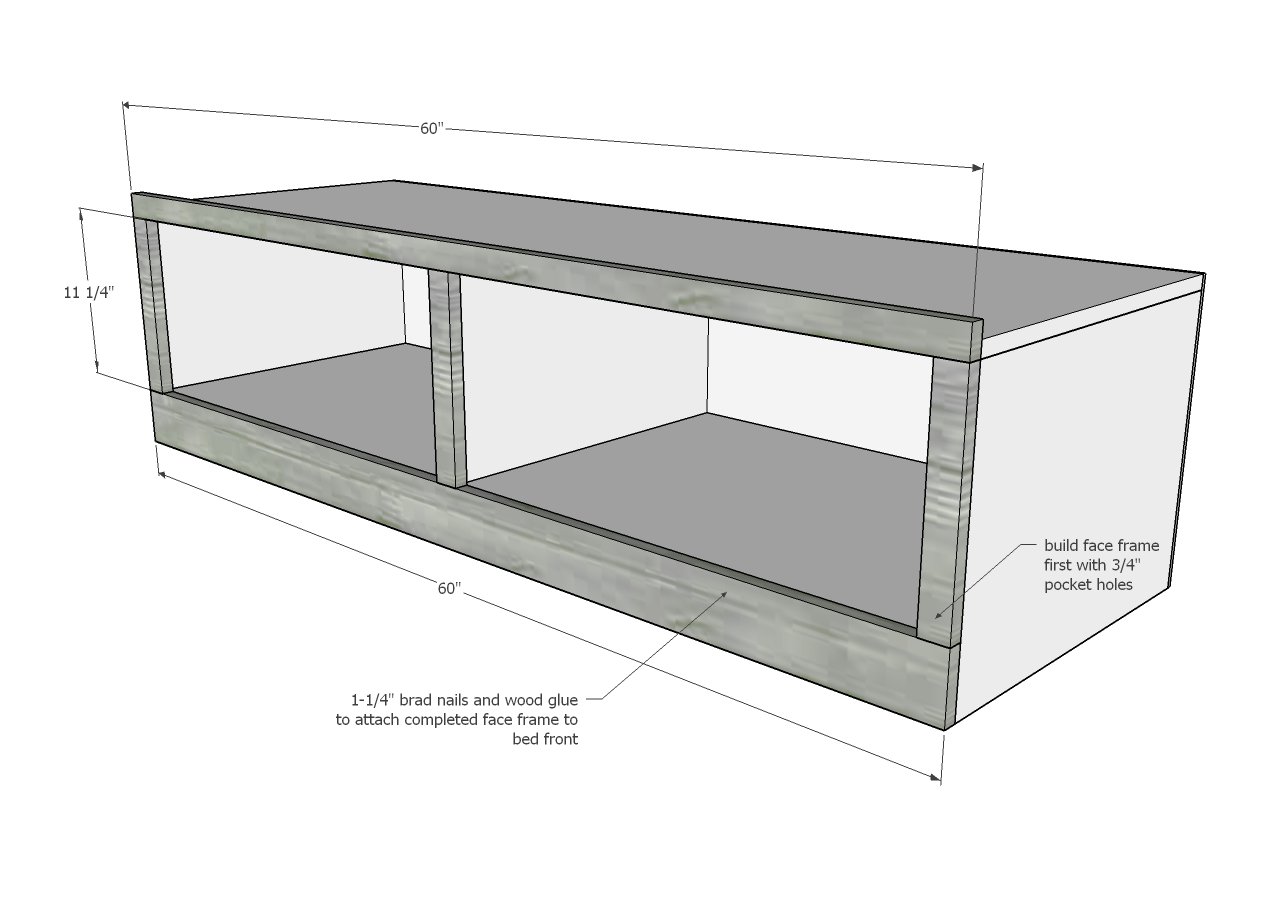
Cut the 1x boards with a miter saw. Build face frames on a flat workbench.
Nail completed face frames to all three benches.
Step 5

END BENCH ONLY
For just the end bench, build two face frames to trim out ends. Nail and glue to the ends of the end bench only.
Step 6
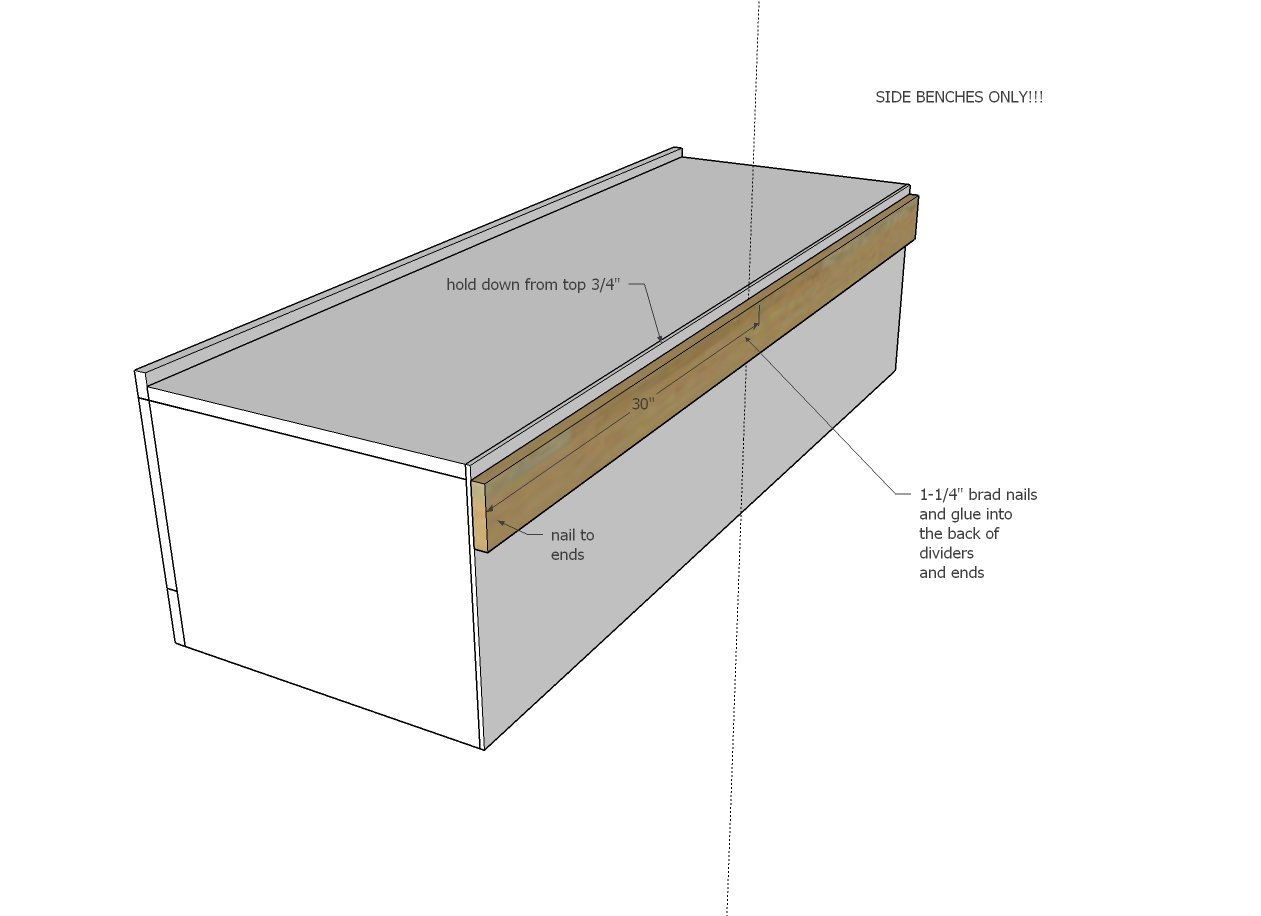
SIDE BENCHES ONLY
Attach 1x4 cleat to the back of the SIDE BENCHES ONLY, held down 3/4" from top of bed. Nail into the divider and end backs with glue.
Step 7
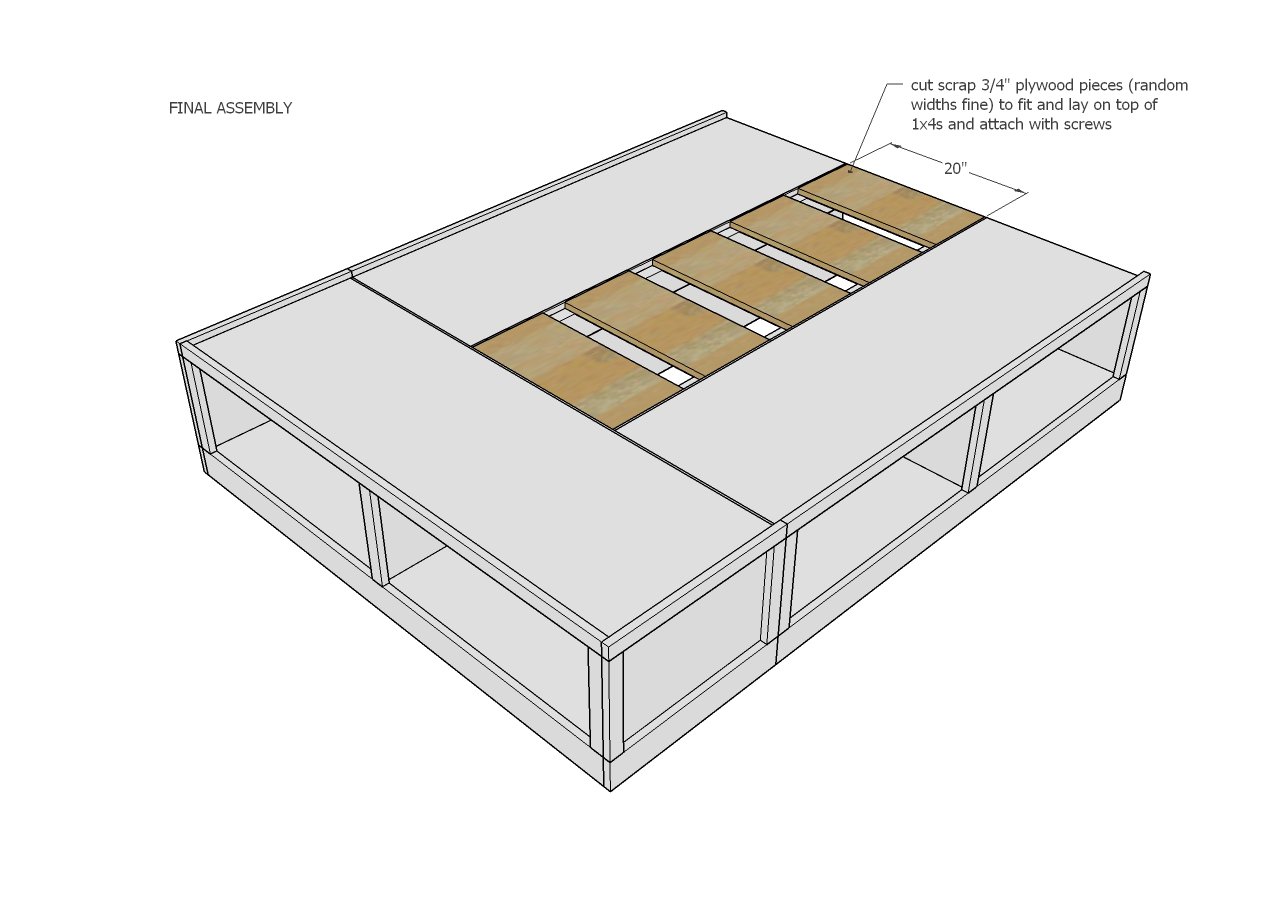
Arrange the three benches in room.
You can screw together if desired.
Lay scrap wood plywood (can be random sized) in the opening in the center of the bed. We recommend screwing down (so it's easy to disassemble the bed at a later time). You can use 1-1/4" pocket hole screws, 1-1/2" self tapping screws would be less expensive.
Step 8
OPTIONAL DRAWERS
Draw a line on 1x4s, 1" up from bottom edge of 1x4.
Attach drawer slides to the 1x4, with front edge of drawer slide cabinet member flush with front edge of 1x4.
The holes in the center of the drawer slide should line up with your pencil mark, 1" up from bottom edge of 1x4 - so you know your slides are being installed level.
Remember that the opposing drawer slide needs to be installed in mirror.
Set the 1x4s inside the cubbies and nail to the sides of the cubbies with 1-1/4" brad nails. The front edge should be lined up with the front edge of your plywood carcasses.
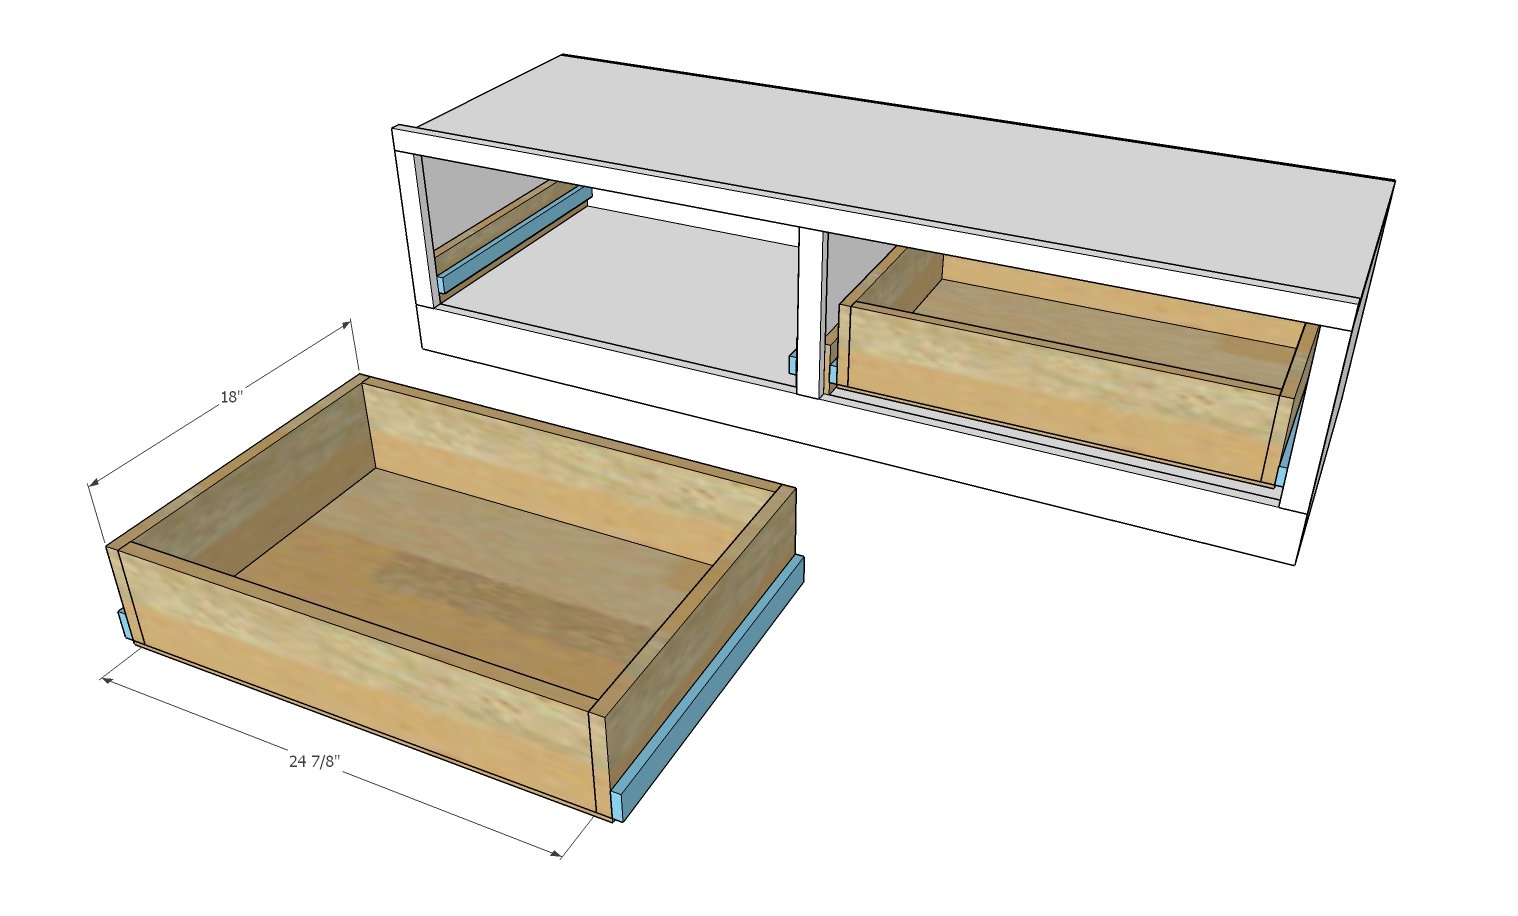
Build the drawer boxes from 1x6s as shown. The sides should always be 18" to match your drawer slides. The fronts and backs may need to be altered in length to fit your openings and your drawer slides.
Build the boxes with 3/4" pocket holes on the outsides and 1-1/4" pocket hole screws.
Nail 1/4" plywood to bottom of drawer box with glue and 3/4" brad nails.
Install the drawer member slides on the drawer boxes.
Fit drawers inside the drawer slides.
Step 9
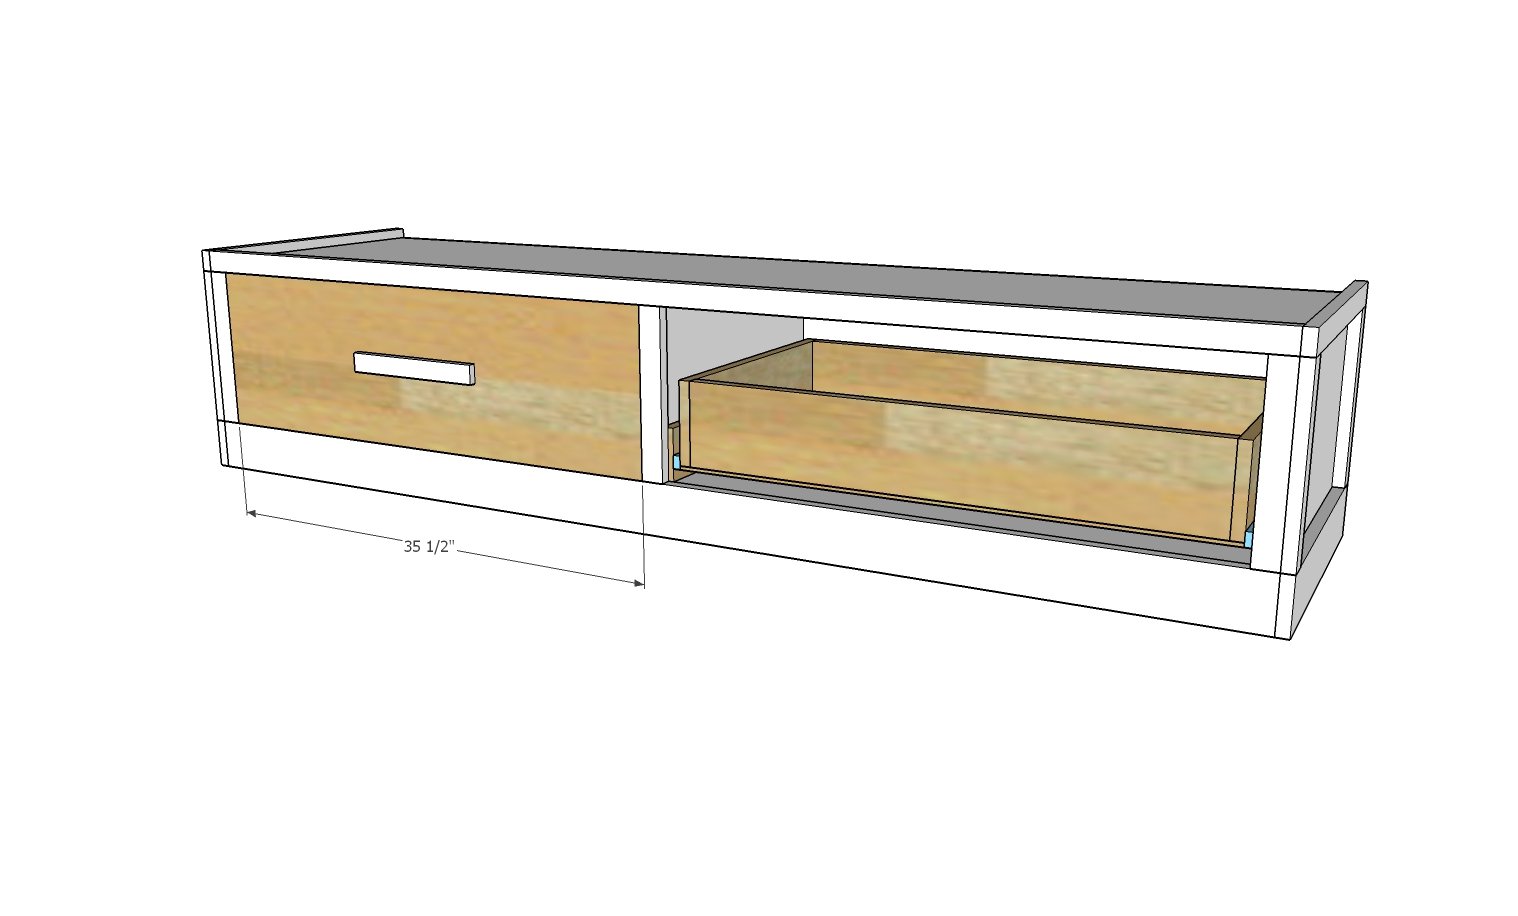
Measure and cut the drawer faces to fit.
You may need to cut the drawer down in size with a table saw.
Nail drawer face in a few places to front of drawer box with even gap around all four sides. Avoid nailing where hardware will be placed.
Remove drawer and further secure with 1-1/4" screws (you can use pocket hole screws) from inside of drawer. Avoid screws where hardware will be placed.


Comments
Patience Jane (not verified)
Wed, 07/28/2010 - 13:27
Hi Ana, Your site is
Hi Ana,
Your site is AMAZING!!! I have been looking for cheap and easy ways to furnish our house since the military doesn't pay enough to cough up over a grand for a bed. I'd like to know however if I could double drawers on the bottom, so instead of having one set of drawers I'd have two. I realize it would be somewhat high, but I think I could probably find an easy set of steps to get into the bed on this site. How would I go about doing this? This is the link to the bed that I wanted but I don't want to pay this much for it. Thanks so much.
http://www.bedroomfurniturenmore.com/Common/Product/CatProduct.aspx?ID=…
Neil (not verified)
Sat, 08/21/2010 - 12:54
Hi Ana,Thanks for your work
Hi Ana,
Thanks for your work with the plans. I was considering making the storage bed but I wanted to use an American Dark Walnut Plywood. The edges are an issue and I have heard of edge banding although that would likely dramatically increase the project time. Is there any way you could suggest to make this bed using solid wood. Would you use pocket holes to secure boards together to get the desired width for the benches? Just curious. I wanted to use solid wood if possible.
Bedroom comple… (not verified)
Sun, 09/19/2010 - 19:08
[...] plunge, and so far it
[...] plunge, and so far it looks amazing at a fraction of the cost! Ryan did modify the plans for the queen size storage bed (he was afraid the 3/4 inch hardwood plywood wouldnt move well). So he built it all from 2x4s, [...]
stefanie (not verified)
Fri, 11/26/2010 - 10:51
Ana- Are these plans for a
Ana-
Are these plans for a twin stratton bed? Do you have drawer plans for twin stratton?
Do you think you could use slats to eliminate the "mildew" problem under the mattress?
Love your site! Thanks for all the great plans. I hope to post some photos soon!
kim (not verified)
Thu, 12/09/2010 - 07:29
just wanted to let you know
just wanted to let you know that the measurements are off if you are using plywood because it isn't really 3/4 of an inch thick. this is what i think they should be:
A) 58 5/8" x 15"
B) stays the same
C) stays the same
D) 19 5/16" x 58 5/8"
E) 19 5/16" x 12 1/2"
that is what i've come across so far as i'm building this project.
Guest (not verified)
Fri, 06/24/2011 - 15:07
3/4" plywood actually
3/4" plywood actually measures 23/32"
My measurements were:
A) 58 9/16" x 15"
D) 19 9/32" x 58 9/16"
E) 19 9/32" x 12 1/2"
I usually build in metric so I can avoid spending so much time doing fractions!
Malinda meyer (not verified)
Mon, 12/13/2010 - 06:24
Does anyone have the link to
Does anyone have the link to make this in the twin bed with the drawer sizes to go with...
Thank You,
Malinda
PJLangevins (not verified)
Mon, 01/03/2011 - 13:41
Finally built this, used
Finally built this, used rough grade plywood from Home Depot and had them do all the cutting. Only $20.00 for all the cuts. Am thinking a sanding when it warms up (have to do work outside, only have a small workshop), then a dark paint to match some stained things we have in our bedroom.
I did take some liberties with the plans... 2x4's are way to much for this structure, glued and screwed 1x4 instead. Being over 250 it seems fine.
Also found a great buy at Canadian Tire, square baskets the fit 2 wide where the drawers are to go. Baskets are $9.99 each. I was going to post a couple of pictures but only have them on my Blackberry.
Peter & Pam Langevin
kara (not verified)
Fri, 01/28/2011 - 12:06
How can mildew form under an
How can mildew form under an indoor bed? Would setting the mattress on the benches without the plywood in the middle help that at all? I'm a bit confused.
make your own … (not verified)
Wed, 02/16/2011 - 08:04
[...]
[...] http://ana-white.com/2009/11/plan-knock-off-of-pottery-barn-stratton.ht… [...]
emily (not verified)
Thu, 02/17/2011 - 10:21
Ana, My son is going to make
Ana,
My son is going to make this in woodshop. I am concerned about the third to last comment where Kim said the measurements are not right. Is she correct? Are these plans not going to work right? I would hate for him to get going and then not have it work out and then he gets a bad grade plus wastes my money:) I know the plywood is not 3/4" thick and 1x2's and 1x3's are not really that size either. What do you think? HELP!
Thanks,
Emily
[email protected]
jake (not verified)
Wed, 03/23/2011 - 12:46
Made two of the Beds
Great plans Ana.
I made two of the beds, and posted the projects on my website:
http://www.jkulstad.com
I made a few (very minor) modifications:
1) Made the center support using a drop-in-place 2x2 frame
2) Altered the height of the trim to provide a "lip" to keep the mattress from moving
3) Cut additional slots into the top for the mattress to "breathe"
4) Added 2x2s to the bottom corners to support a "bumper"
5) Reduced the height by 1" (on the second bed)
Thank you for such a great website!
Guest (not verified)
Mon, 04/04/2011 - 11:50
Can you use any Queen Headboard?
I would love to do this to my current bed, but I would love to keep the headboard I have. Will that work? Are there plans for a headboard for this bed, that I might be missing? Thank you very much.
jkulstad
Fri, 09/09/2011 - 17:32
yes... you should be able use any queen-sized headboard
I installed a pretty generic queen-sized headboard on this bed. The plywood provides a strong base to bolt through. keep in mind you may need to alter the installation if you are using drawers.
morrisondwm (not verified)
Mon, 05/09/2011 - 14:27
Dining Banquette
We're wanting to put a large banquette in our dining area and I'm wondering if these 'benches' would work as a starting point. Any thoughts?
MyMaGo (not verified)
Sun, 05/22/2011 - 08:37
Bigger pictures
Is there anywhere to find bigger pictures from the instructions? When I click on them it brings up a pop up window with the image but it isn't any larger and I can't see the dimensions at all.
Thanks.
chrisevan
Tue, 05/31/2011 - 06:19
Printable Plans
Every link that I click on for printable plans, redirects me to "Page Not Found". Can anyone help me? Thanks
mmmers (not verified)
Thu, 06/09/2011 - 14:41
Just wondering if these
Just wondering if these drawers can fit metal runners or slides? Something about drawers that don't have hardware doesn't appeal to me. I like the idea of the baskets, but not for clothes.
Lauri
Tue, 07/26/2011 - 10:37
I can't read any dimensions
Hi Anna,
I was noticing that since you moved the old plans to this new site I can't read any of the plan dimensions. Zooming in either online or on the PDF doesn't work - the image quality is too low. For example, in step 3 of this plan, I am trying to read the measurement for centering the divider but there is just no way. I will work it out for myself but it is kinda disappointing as I have been planning on building this plan for well over a year and when I first printed it (lost that print out) the images were large and easy to read.
TexasBishops
Fri, 08/12/2011 - 19:04
Stratton bed question
Hi Ana,
I'm new and want to build the stratton queen bed with drawers. My problem is that I cannot read the measurements on the colored drawings. I've tried the PDF versions and also tried expanding the font size. Nothing works for me. I must be missing something. Can you or someone who's been using your plans help me with this? Thanks so much.
Jeanean Bishop
Guest (not verified)
Sun, 08/28/2011 - 17:53
please add larger images. I
please add larger images. I can't read the plans. :(
Guest (not verified)
Mon, 08/29/2011 - 09:12
Using baskets?
Would it be feasible to build this and use baskets instead of the drawers? Are the drawers adding strength to the structure?
Guest (not verified)
Mon, 08/29/2011 - 10:10
same problem qith dimensions
Can the images be made larger so that the measurements can be read clearly?
Guest (not verified)
Wed, 08/31/2011 - 19:07
full size plans
Love this bed but was wondering if you have the plans for it in a full size? Or has anyone been able to figure out how to change the plans to build a full size?
Thanks,
Kathy
Guest (not verified)
Wed, 12/28/2011 - 18:29
Where to get Dimensions
My Dad and I built this over Christmas break this past weekends, it looks amazing! I found an older posting with images that you can click on to get a better visual, using the way back machine ;-) http://web.archive.org/web/20101213234929/http://ana-white.com/2009/11/…
Hope that helps
krys (not verified)
Sun, 01/08/2012 - 10:28
i love this design but...
i would love one with three drawers on each side and a space to store bulky items in the middle with a door kind of thing at the end i think i am going to try to figure out how to do that... has anyone found plans that have this feature? or a head bored that has the shelving at the top of the captain bed? thanks.
TheGoodGeek (not verified)
Mon, 01/30/2012 - 21:12
Finding legible plans
Go to the original Wordpress blog at:
http://furniturehacked.wordpress.com/category/stratton/
Slide down to the very bottom of that page. Slide up to the First big black exclamation point. That's the beginning of the Queen Stratton bed instructions. If you slide up a bit more you will find the drawer instructions.
I found clicking on each image to display the larger size, then copying and pasting into Word, got me the clearest images.
Ashlyn (not verified)
Sat, 03/31/2012 - 12:13
Staining instead of painting?
So, I was wondering if staining this bed instead of painting it (as all the people who have made it so far seem to have done) is an option. I understand that oak and pine don't hold stains in the same way, but would it look bad? Or do people just generally paint this because they want everything to completely match (I don't have a problem with a little mismatch - adds interest!)?
In reply to Staining instead of painting? by Ashlyn (not verified)
claydowling
Sat, 04/07/2012 - 18:18
Stain is fine
The surface on most plywood you'll buy at a home center is pine, so you'll actually be fine, with all of your woods taking stains pretty uniformly. I made a similar bed for my daughter, and finished it with amber shellac. It gives it a golden color. The beauty of using shellac is that it applies uniformly and dries quickly. The downside is that you have very few color selections. There's blonde, amber and garnet. Of the three, exactly one is available in a can in a store. The rest you have to track down the raw flakes and mix with denatured alcohol.
wimsy (not verified)
Thu, 06/21/2012 - 07:10
Shellac
Can you please tel me where to find the shellac you recommended? I don't like to use stain on plywood because it's too blotchy, and the preconditioner doesn't help much. Thanks! wimsy
In reply to Stain is fine by claydowling
claydowling
Thu, 06/21/2012 - 08:58
Buying Shellac
You can pick up shellac at any home store, hardware store, or paint store.
Guest (not verified)
Sat, 04/07/2012 - 10:04
Awesoe plans but I have 1 questions
Ana:
These are awesome plans and plan on starting as soon as school's out but I have a question. Couldn't you make the side benches deeper for larger drawers and remove the need for a spacer or would that cause problems?
marie421 (not verified)
Tue, 07/31/2012 - 11:27
double the amount of drawers
Hello never done any wood work but love this bed and want to try, but i think i would want more storage were can i find the directions on how to double the amount of drawers...
Christopher Lambert (not verified)
Fri, 08/31/2012 - 12:31
replace the back of bench
I will be using your design to build this bed. I currently hive a medal frame with no headboard and we need the storage for our things.
I do have one statement. I think that if you are adding drawers to the design then the back of each bench could be open as long as you provide lateral and vertical support. The spacer in the middle will help support the weight. You could cut 3 to 4 inch strips of plywood (or any 3/4" inch scrap) to conserve wood and spend even less. What do you think?
I really like you plans and will use them as a guide. I will also be building your closet organizer as well. I am so glad I found you.
Very Respectfully,
Christopher.
Christopher Lambert (not verified)
Fri, 08/31/2012 - 12:32
replace the back of bench
I will be using your design to build this bed. I currently hive a medal frame with no headboard and we need the storage for our things.
I do have one statement. I think that if you are adding drawers to the design then the back of each bench could be open as long as you provide lateral and vertical support. The spacer in the middle will help support the weight. You could cut 3 to 4 inch strips of plywood (or any 3/4" inch scrap) to conserve wood and spend even less. What do you think?
I really like you plans and will use them as a guide. I will also be building your closet organizer as well. I am so glad I found you.
Very Respectfully,
Christopher.
natasha
Mon, 10/08/2012 - 07:49
adjustments shown
Hi I was wondering if the downloaded pattern has all the adjustments mentioned in the comments or if I need to add them?
and if theres away to add 5" of height to this, and it still be sturdy ?
would love some help I will be starting this, this week !!
chrisevan
Sun, 10/14/2012 - 06:07
New Comments????
I keep receiving these e-mails stating that there is a new comment, but when you click on the link..........NOTHING NEW. Is there something wrong with the site?
Guest: Kelly (not verified)
Fri, 12/21/2012 - 09:18
Screws for Stratton Bed
Hello. I'm jumping in to the woodworking game with this project. I know -- CRAZY!! Anyway, Lowes has agreed to cut the plywood for me (thank you), and I'm going to put it together. I've studied the plans for days, but I have a few questions.
1) I was looking at screws, and while the plans say 2", they don't list the size (10, 12, etc.). Given I think I'm going to be screwing into the edge of plywood (see question below), I would think I would need a thinner screw, but I wasn't sure, and the gentleman at Lowes wouldn't say.
2) Also, I have the Kreg jig coming ... if I use it on this, or decide to use the countersink bits I got, do I need to use special wood or Kreg screws, or will any do. You mention in your TOOLS AND TIPS section using "gold" screws -- do you mean brass?
3) And forgive my ignorance but how many screws would you use to join the plywood edges?
4) Any suggestions for making those first two joints -- right angles with huge pieces of plywood sounds awkward ...
5) I know I must predrill the holes, (and I assume it's with a slightly smaller drill bit than the screw size), but do I screw into the edge of the plywood?
Thank you so much for your help! Am so excited to make this bed!
Happy Holidays!
Kelly
Alanna.Smith (not verified)
Tue, 01/01/2013 - 20:37
MDF vs Plywood
Will MDF work with this project? I know it is weaker than plywood but it is also a lot cheaper. Anyone have any suggestions?
Thyri
Tue, 04/09/2013 - 00:12
Why waste space
I'm thinking about building this as I want to upgrade to a queen size bed from a full size. If I do, I thinking I may alter the the bench at the foot of the bed to have 2 smaller drawers, but have the center of the bench open in the back and have a door in the center of the front of the bench. That way that long space in the center of the bed can be used for storing things like camping gear or skis. I may want to put a frame around the openings to make up for the support that's being lost from not having a center divider and solid wood across the back.
csloane
Sat, 05/18/2013 - 08:53
mid cabinet support
Why is there no support for the cabinets in the middle. Over time, this should cause stress on each cabinet. 60 inch width is too wide not to have something supporting the middle of the cabinet. Probably best to add two supports.
jacksmom
Wed, 07/17/2013 - 14:29
Weight Limits and ability to move this bed?
Is there a way that I can make this disassemble-able? My husband is in the military and I KNOW we'll be moving at some point. Is there an easy way to get the benches/spacer in 2 pieces for transport?
Also, I'll be building this for our guest room. Our most frequent guests are the in-laws and they are larger people. Any idea about the weight limit?
MrKriez
Fri, 07/26/2013 - 19:03
Question about boards
I scanned through the comments and didn't see my question asked so hopefully someone can help me. It's listed for the plywood to use hardwood. Should the other boards be matching? Say you are using oak plywood, should the 1x2, 1x3, and 2x4 be oak as well? And are those just the listed sizes or need they be exact (how a 2x4 isn't really 2x4)
Lauri
Sat, 07/27/2013 - 19:02
Jacksmom
You can easily set it up so it will disassemble into 4 pieces. I did not attach the benches to each other - only to the centre spacer. I created a ledge for the centre spacer on each bench so that the centre spacer only is screwed to the base in 4 places. Thus you only have to take out 4 screws to take the whole thing apart. The bed is very sturdy. I don't think it would have any problem supporting a lot of weight.
furniturelady
Fri, 08/23/2013 - 18:16
Making the bed now - with some modifications
So I decided to make this bed as I already have two storage beds, but they just don't work like I want. For those of you wanting to modify the plans - modify away! I'm made mine taller (to fit two rows of drawers or a cupboard if you don't like drawers) and I'm leaving the bottom bench open in the middle for a cupboard that opens to the long storage area underneath. My other two beds that are storage beds I got for free as one was just the drawers for a queen - stuck them together and they make a full (I use a boxspring on that one); the other is an old waterbed which is rock-solid, just not my style. So let me just say that these plans will accommodate most any alterations as long as you add a bit more structure if going higher or longer. And just remember folks, that the storage area you want in the middle is dark and narrow - I've gotten stuck in there a few times, so be careful!
sandraholt
Mon, 11/18/2013 - 19:35
Full Sized Plans
At the top of these plans, there's a mention of a full sized version of these plans as in for full sized mattresses. Has anyone found those? I can only find queen and king sizes.
Will87
Fri, 01/10/2014 - 19:00
These plans do not say what
These plans do not say what to do with "D" and dose not mention how to build the drawers.
Sweettia
Wed, 02/19/2014 - 14:53
I'm pretty sure "D" goes
I'm pretty sure "D" goes between steps 1 and 3. It is the shelf located at the bottom of each "bench" before you attach the cubby divider (part E)
Hope that helps!
Deemonti
Wed, 01/15/2014 - 06:42
images
Am I missing something here? All the images on this page are very small, low res and the numbers are impossible to read. When I print it out it's completely illegible.
Please help!
Thyri
Wed, 02/19/2014 - 17:47
Legible plans
If you look up at the top of the post, a little below the subject/title there's a link labeled "PDF version" with an Acrobat Reader symbol by it. That's the version you'll want to print. :)