

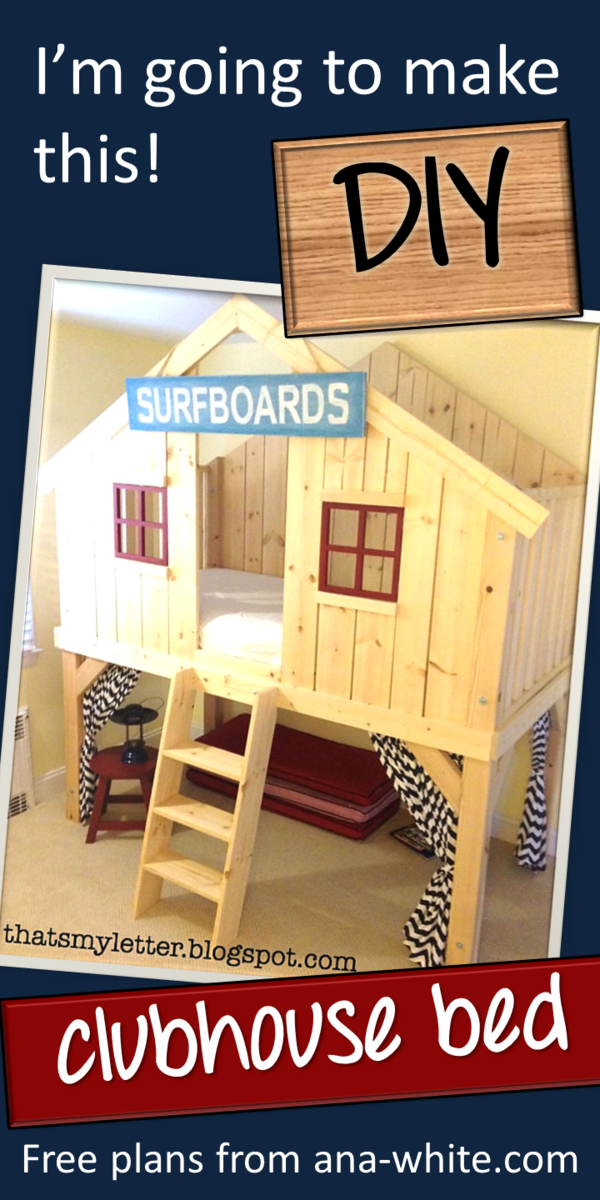
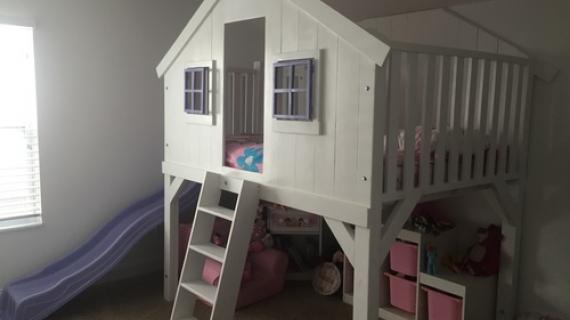
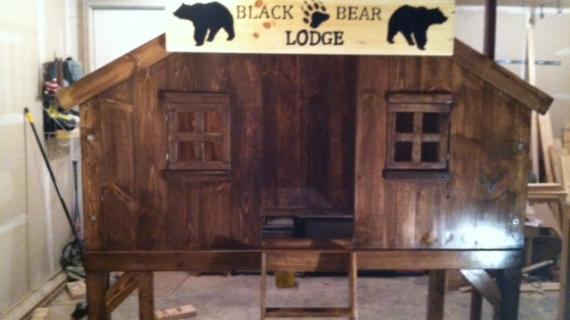
Build a clubhouse bed! Free plans from ana-white.com


Do NOT be like me.
Last winter, stuck inside for months and months while we waited for the sun to return to Alaska, Grace and I were really missing her original playhouse bed.
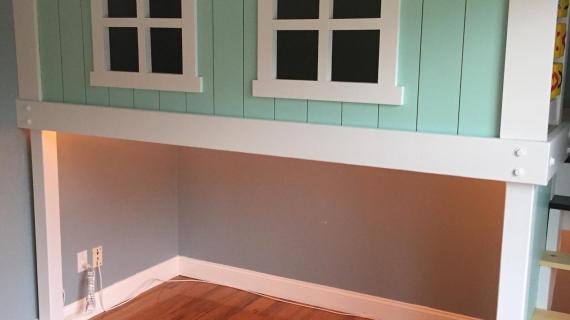
Now that I blog, our spare bedroom has turned into my office slash room of shame and the only place we have for guests to sleep is Grace's bed. A couple of years ago we decided NOT to force our guests to sleep up in Grace's playhouse bed and replaced it with the Hailey storage bed.
All has been good, and it's great having somewhere for guests to stay.
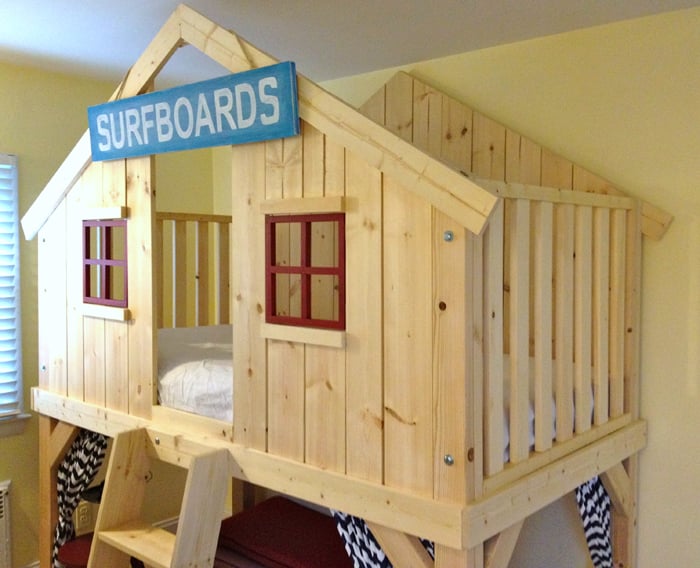
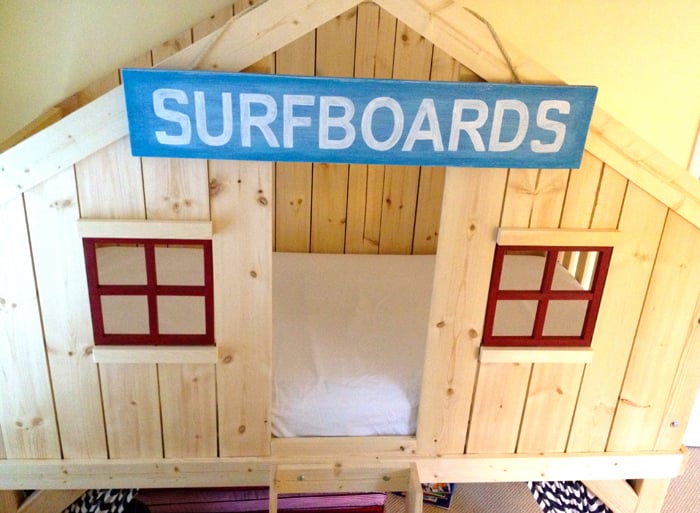
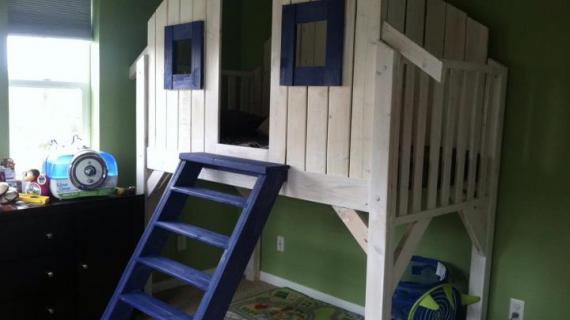
But then last winter, Grace saw the Eli Fort Bed in Pottery Barn Kid's catalog and asked if we could build it for her.
I drew the plans up.
And they sat on my computer for months.
And months.
When my dear friend Jaime from That's My Letter wrote me saying it was her Buddy Boy's turn to get a new bed and, I knew Jaime would get the bed done and posted and shared.
We worked on refining the plans, and you will thank Jaime when you build this bed for her brilliant suggestion to sister up 2x4 legs for added strength. This also allows for the bed to be assembled in easy pieces.
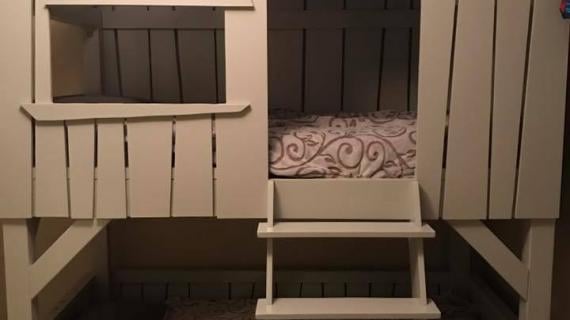
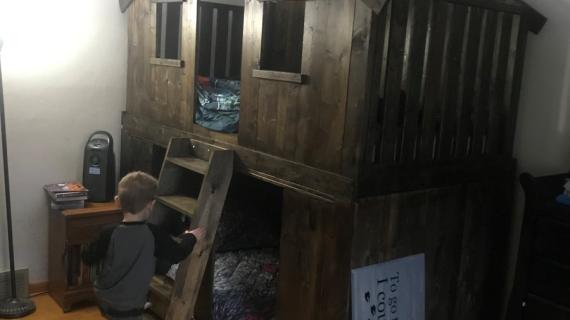
One week later, the clubhouse bed is done.
Be like Jaime.
DIY this bed today.
Your kids are growing every day, and one sad sad day, they won't want a clubhouse bed anymore :(
Well, if I haven't lost you already - no offense taken - Jaime really built an amazing bed! - I have one request: Please stop over and read all the details from Jaime on how she built this bed.
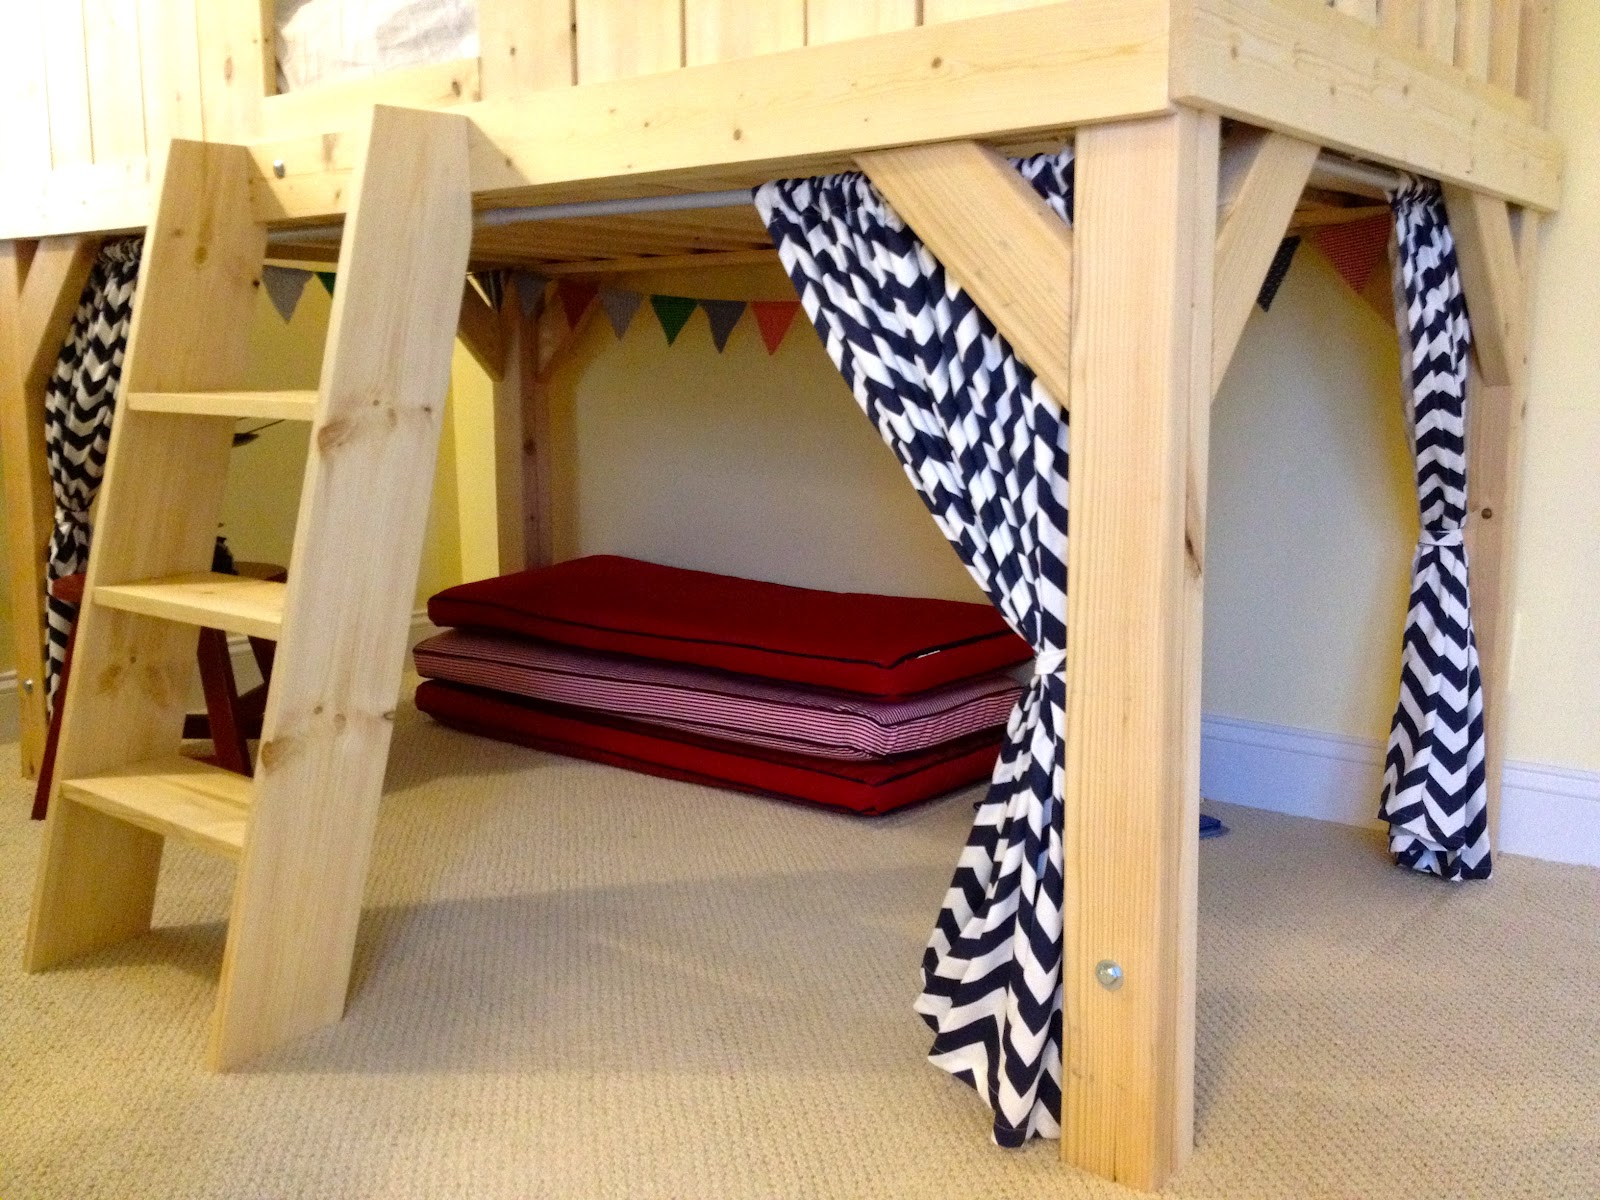
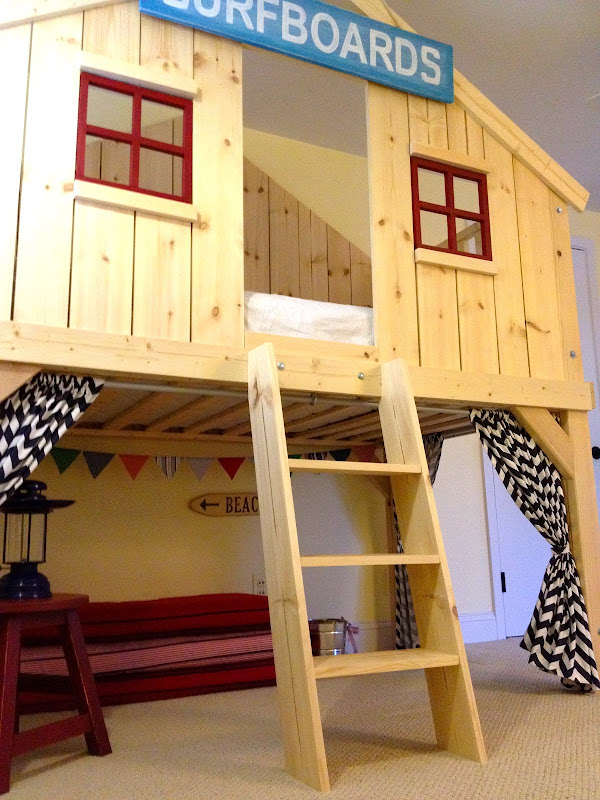
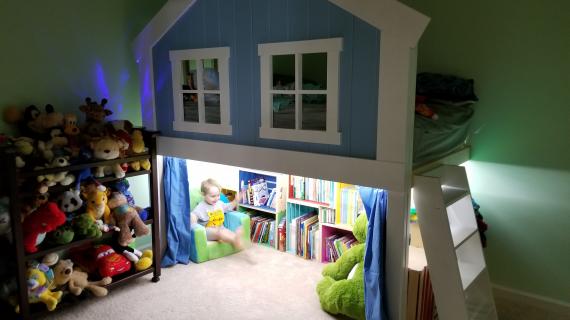
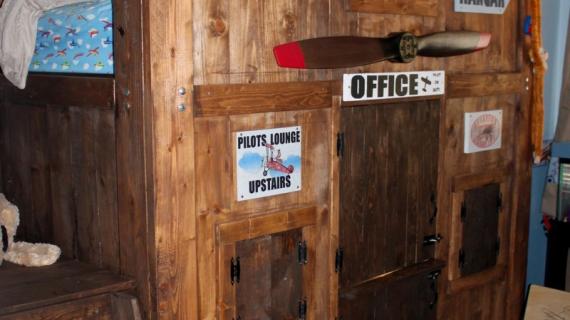
Jaime added a fort area underneath. She sewed those cute curtains! You can check out the details here.

And she made this surfboard sign too! Check out her tutorial here.

And she added window grids that hinge open! You can get the instructions on making these window grids here.
So PIN THIS project right now to your DIY board and make it happen!
And of course the plans follow! Thank you Jaime!
Preparation
2 – 2x2 @ 8 feet long
4 – 1x3 @ 8 feet long
8 – 2x4 @ 8 feet long
5 – 1x4 @ 8 feet long
2 - 1x2 @ 8 feet long
15 – 1x6 @ 8 feet long
1 ¼ and 2 ½ PH screws
1 1/4 finish nails
Wood glue
3” screws or bolts for assembly
2” screws for slats
Slats (7 – 1x3 @ 8 feet long)
NOTE: Jaime recommends the following changes to the shopping list because her 1x6 board ran a little wide on the front and she wanted gaps between the wood slats.
- add 2 - 1x5 @ 8'
- decrease 1x6 quantity to 14
NOTE: This plan assumes your 1x6 boards are less than 5 1/2" wide. Jaime found that she needed to substitute two of the 1x6 boards on front and back for 1x5 boards to create gaps between the wood slats.
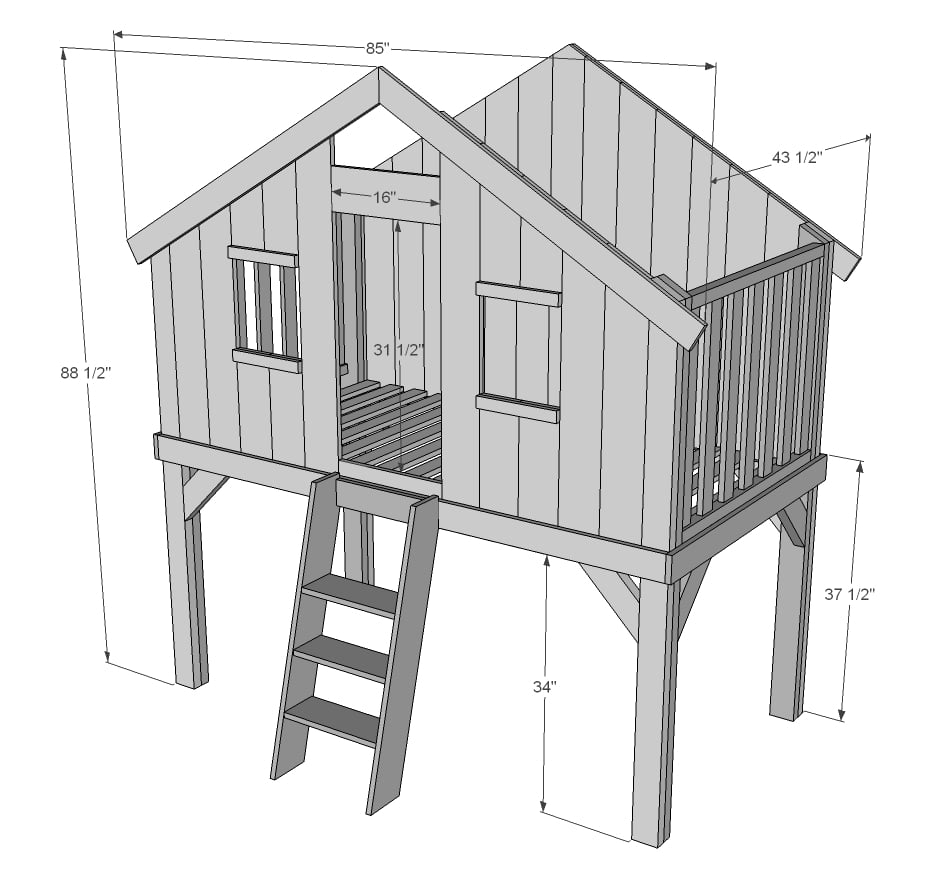
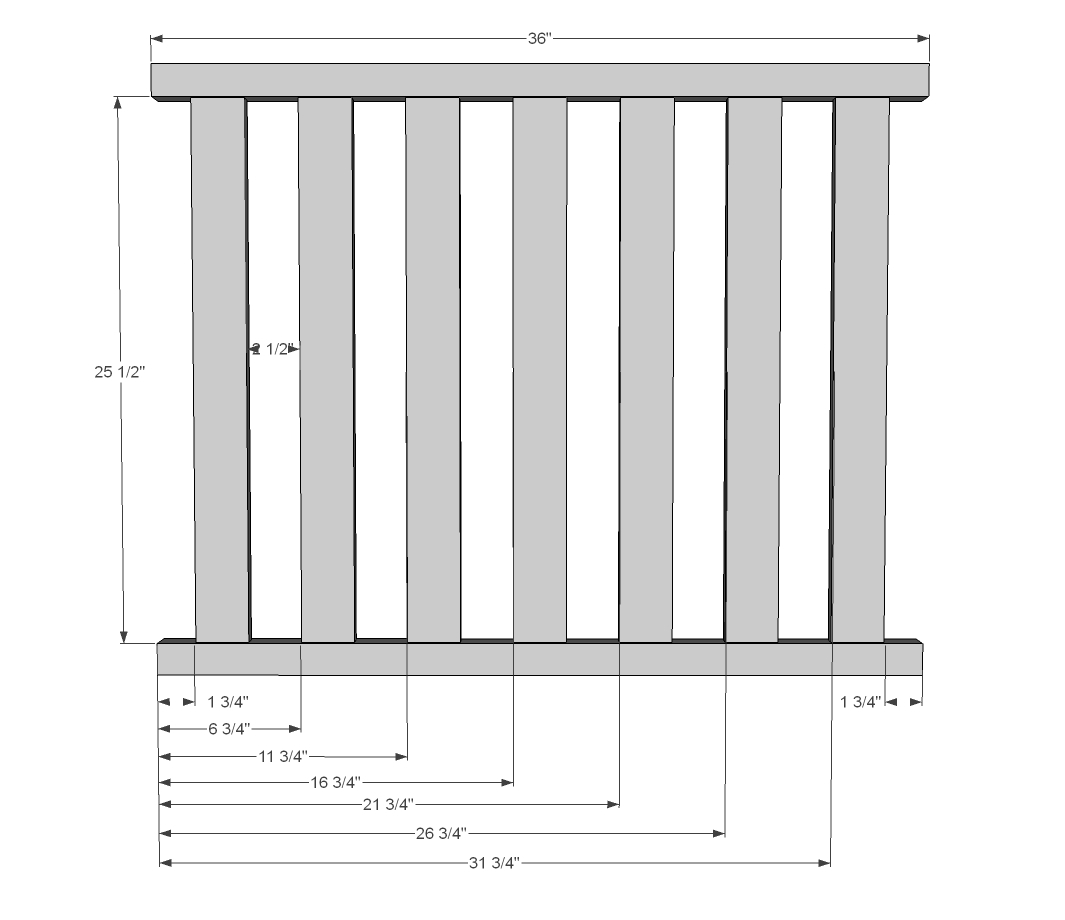
SIDE WALLS (BUILD 2)
4 – 2x2 @ 36”
14 – 1x3 @ 25 ½”
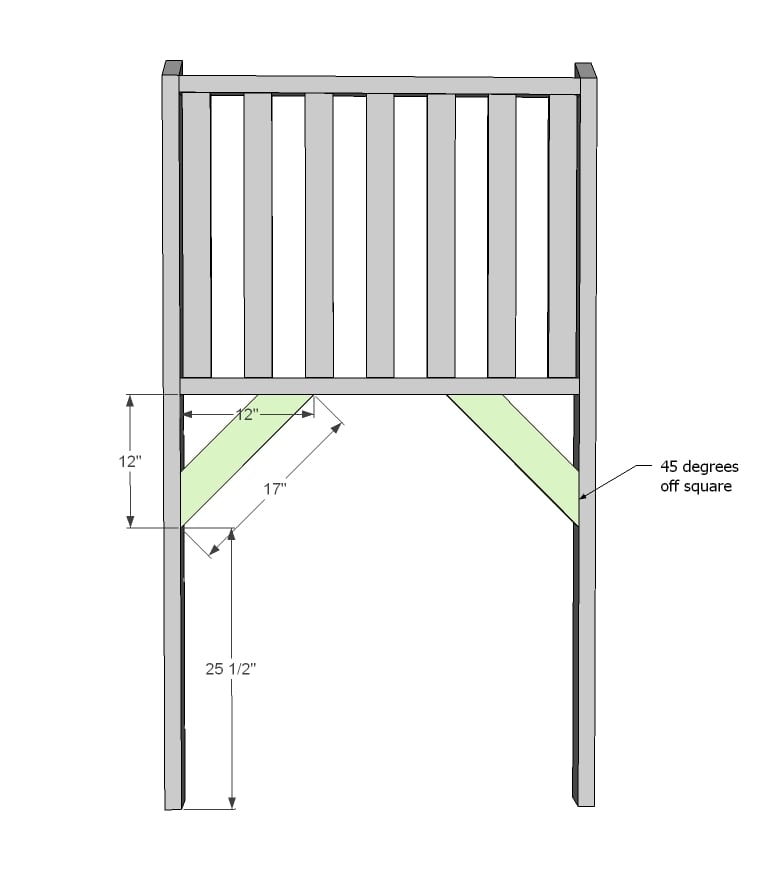
4 – 2x4 @ 68” (top end cut at 30 degrees off square, long point measurement)
4 – 2x4 @ 17” (both ends cut at 45 degrees off square, NOT parallel)
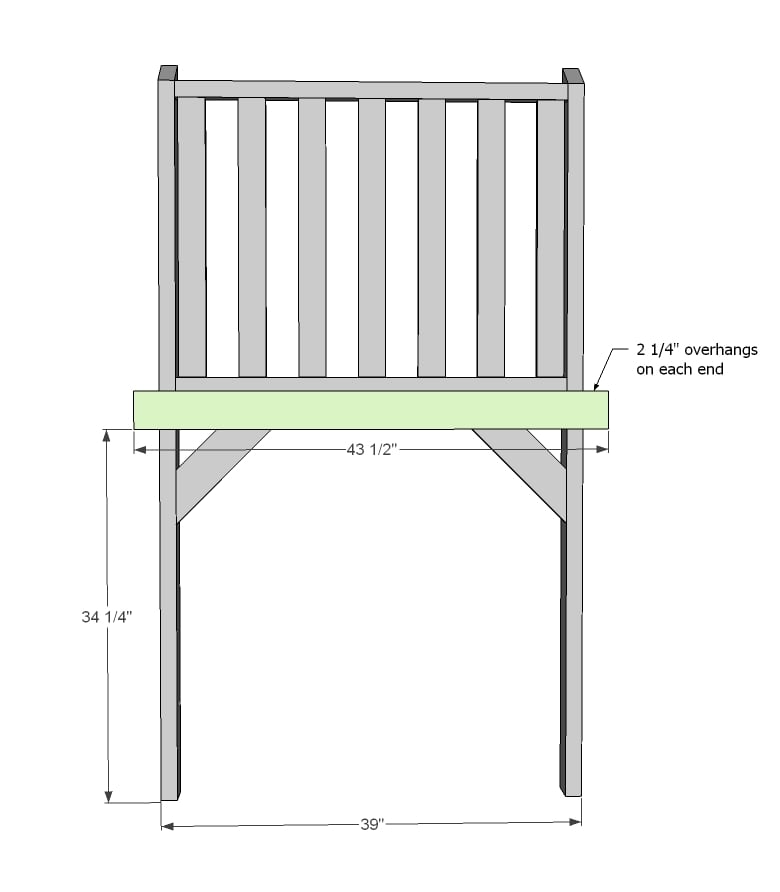
2 – 1x4 @ 43 ½”
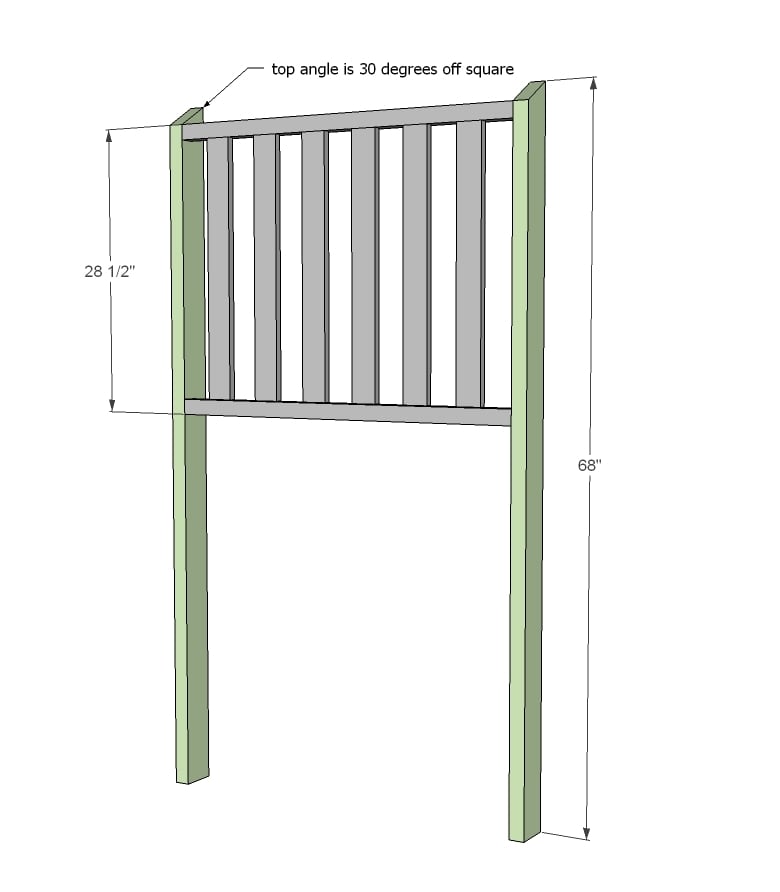
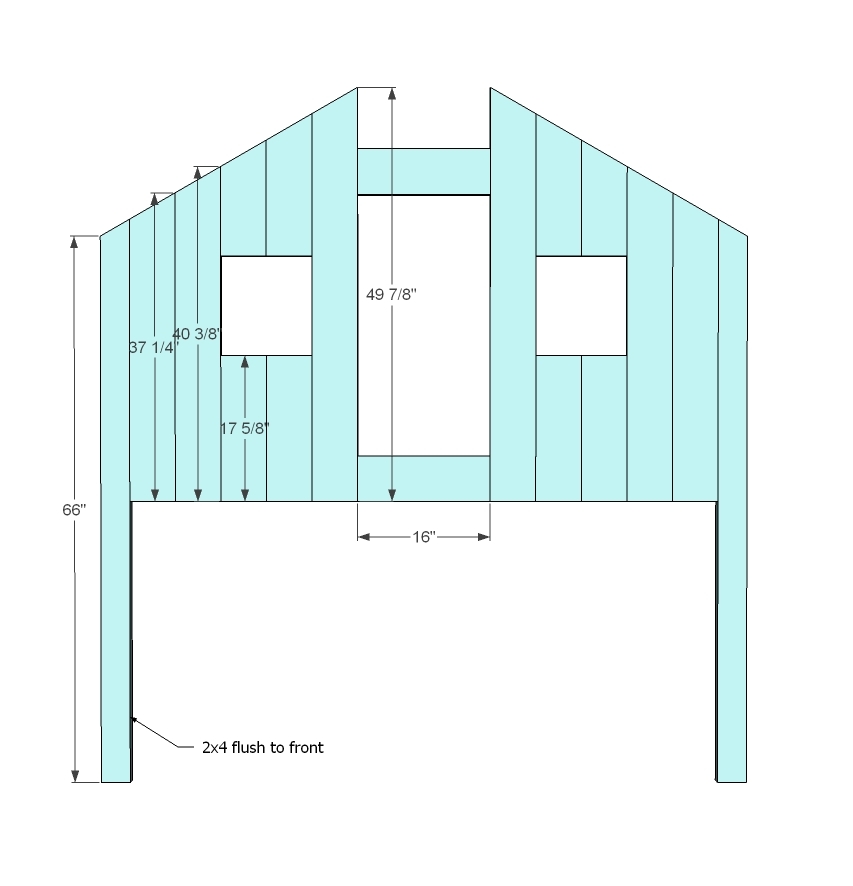
BACK WALL
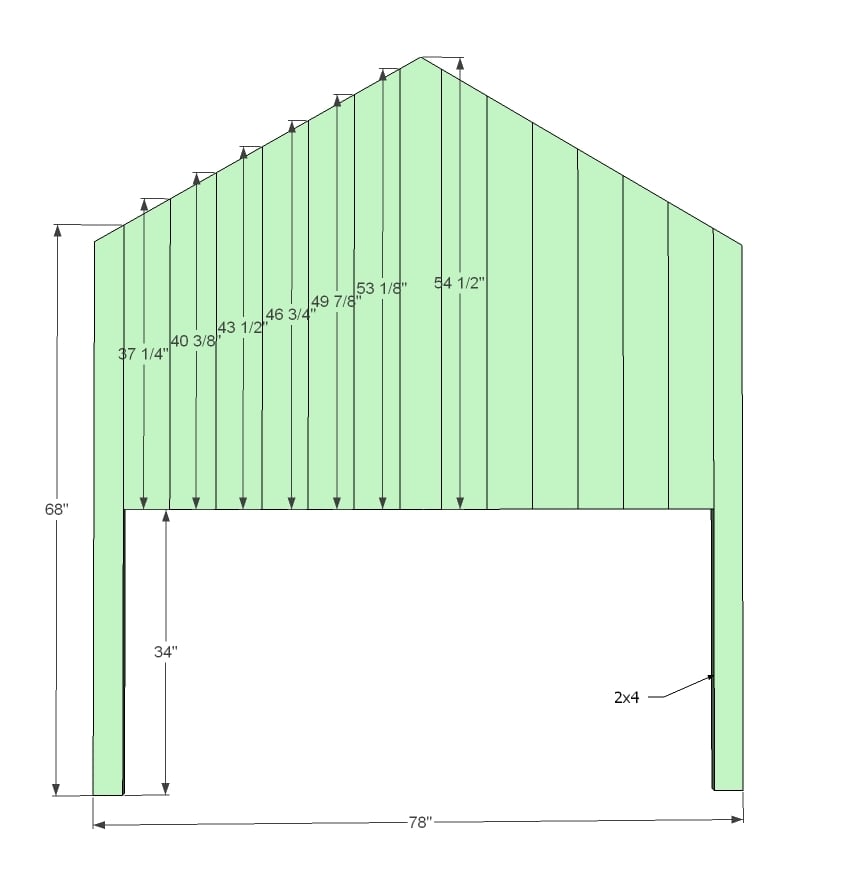
2 – 2x4 @ 68” (top end cut at 30 degrees off square, long point measurement)
2 – 1x6 @ 37 1/4” (top end cut at 30 degrees off square, long point measurement)
2 – 1x5 (Jaime recommends using the 1x5s here instead of 1x6) @ 40 3/8” (top end cut at 30 degrees off square, long point measurement)
2 – 1x6 @ 43 1/2” (top end cut at 30 degrees off square, long point measurement)
2 – 1x6 @ 46 3/4” (top end cut at 30 degrees off square, long point measurement)
2 – 1x6 @ 49 7/8” (top end cut at 30 degrees off square, long point measurement)
2 – 1x6 @ 53 1/8” (top end cut at 30 degrees off square, long point measurement)
1 – 1x6 @ 54 1/2” (top end cut to dogeared point 30 degrees off square, long point measurement)
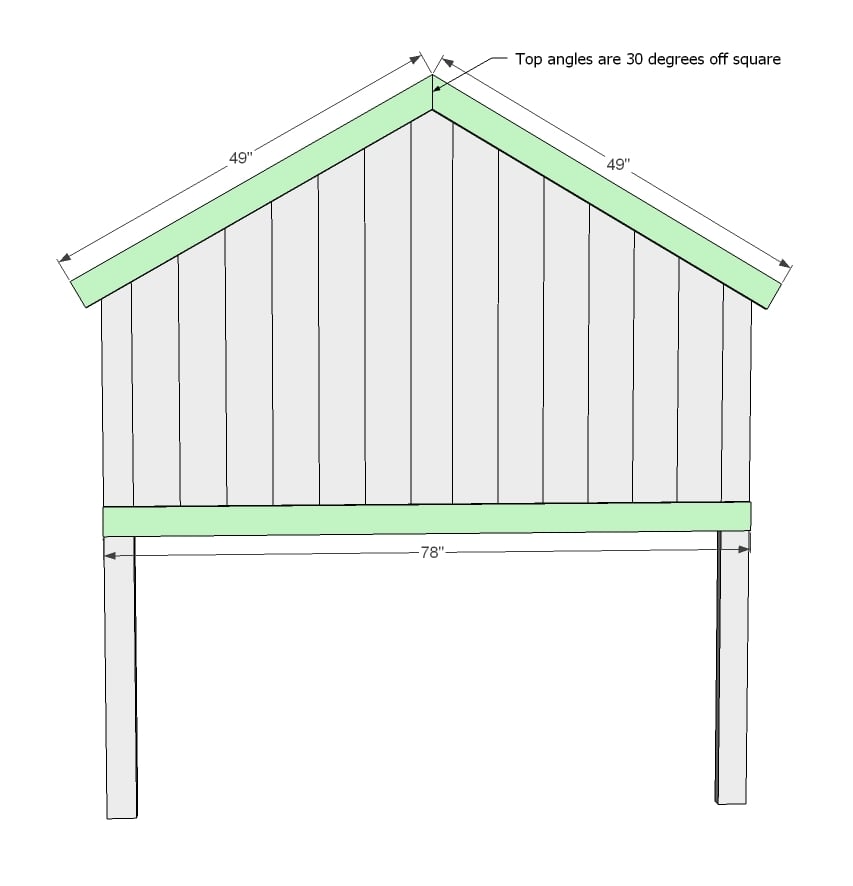
1 – 1x4 @ 78”
2 – 1x4 @ 49” (one end cut at 30 degrees off square, long point measurement)
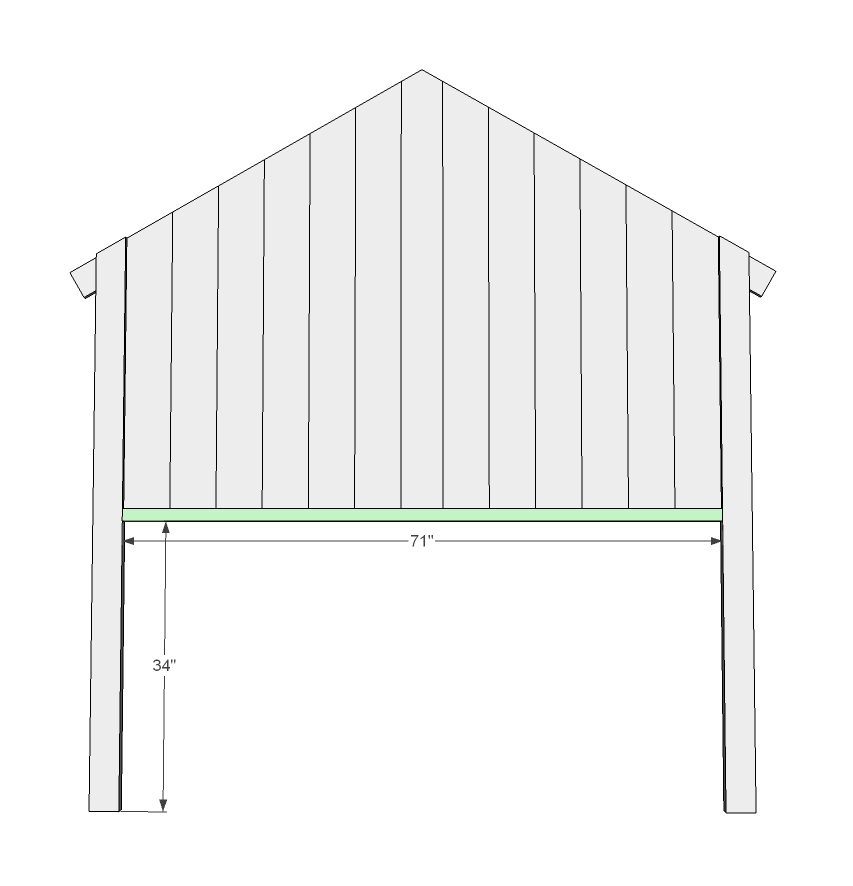
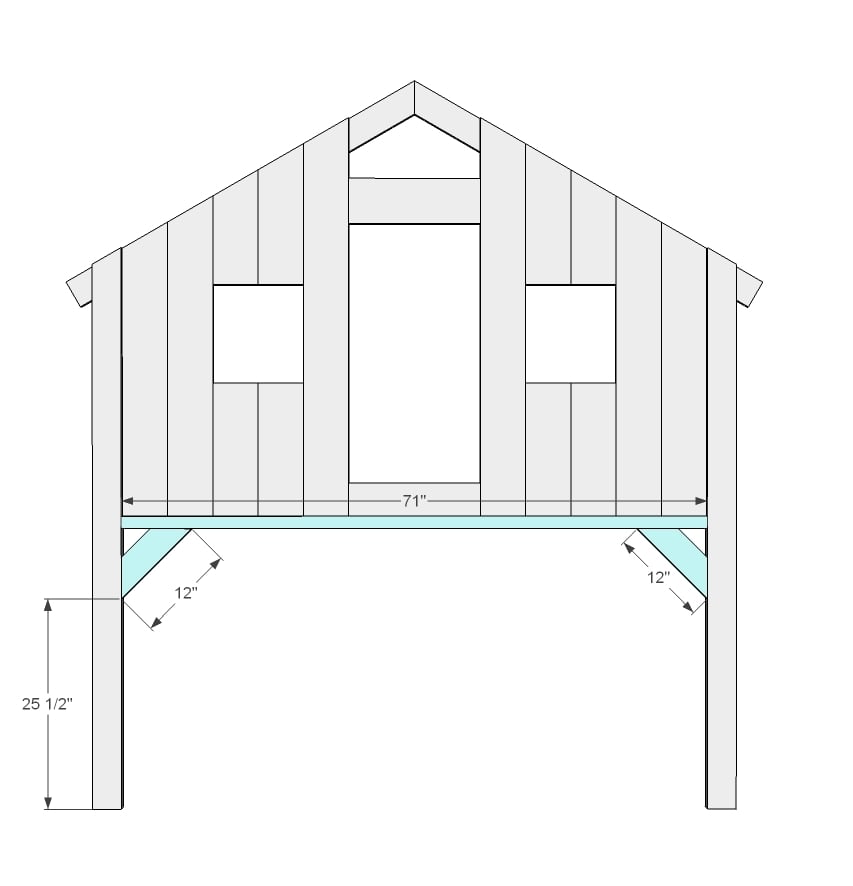
1 – 1x2 @ 71”(slat rail ledge)
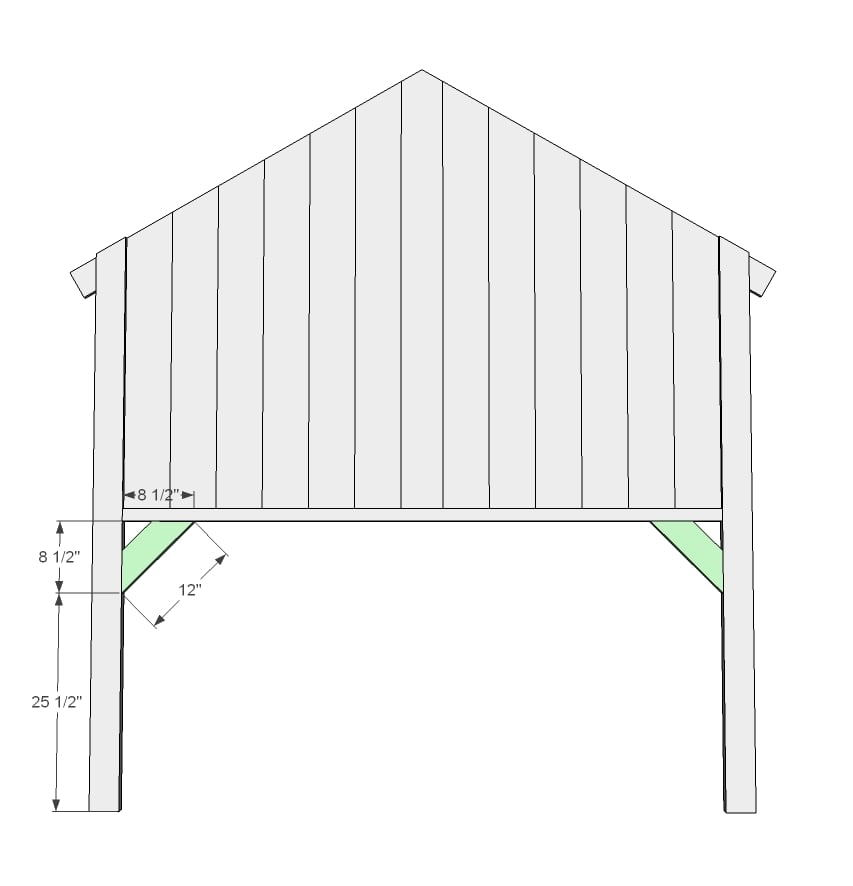
2 – 2x4 @ 12” (both ends cut at 45 degrees off square, ends NOT parallel)
FRONT WALL
2 – 2x4 @ 68” (top end cut at 30 degrees off square, long point measurement)
2 – 1x6 @ 37 1/4” (top end cut at 30 degrees off square, long point measurement)
2 – 1x6 @ 40 3/8” (Jaime recommends swapping these out for the 1x5 boards) (top end cut at 30 degrees off square, long point measurement)
2 – 1x6 @ 13 7/8” (top end cut at 30 degrees off square, long point measurement)
2 – 1x6 @ 17 1/8” (top end cut at 30 degrees off square, long point measurement)
4 – 1x6 @ 17 5/8” (under windows)
2 – 1x6 @ 49 7/8” (top end cut at 30 degrees off square, long point measurement)
2 – 1x6 @ 16” (doorway)
1 – 1x4 @ 78”
2 – 1x4 @ 49” (one end cut at 30 degrees off square, long point measurement)
4 – 1x2 @ 13” (window trim - recommend cutting to fit)
1 – 1x2 @ 71” (slat rail ledge)
2 – 2x4 @ 12” (both ends cut at 45 degrees off square, ends NOT parallel)
- add 2 - 1x2 @ 14.5" (lower window trim interior - add to inside of windows)
LADDER
2 – 1x6 @ 38” (both ends cut at 15 degrees off square, ends are parallel)
3 – 1x6 @ 14 ½”
1 – 1x4 @ 14 ½”
SLATS
Recommend cutting 1x3 @ 40 1/2” long
Please read through the entire plan and all comments before beginning this project. It is also advisable to review the Getting Started Section. Take all necessary precautions to build safely and smartly. Work on a clean level surface, free of imperfections or debris. Always use straight boards. Check for square after each step. Always predrill holes before attaching with screws. Use glue with finish nails for a stronger hold. Wipe excess glue off bare wood for stained projects, as dried glue will not take stain. Be safe, have fun, and ask for help if you need it. Good luck!
Instructions
Step 1
Build the walls with 3/4" PHs and 1 1/4" PH screws. Use scrap 1x3 to help with spacing. Fill upper holes with either PH plugs or wood filler.
Step 2
Now add the legs.
Step 3
And then add the cross supports. Jaime used 2 1/2" PH screws through 1 1/2" PHs to attach.
Step 4
And the trim to the base.
NOTE: Attach 34” up NOT 34 ¼”
Step 5
Step 6
Attach top and bottom trim.
Step 7
This is for the slat system. You can use a 2x2 here too.
Step 8
And the cross supports.
Step 9
Lay out your front wall as you did the back wall.
Step 10

And add the trim.
Step 11
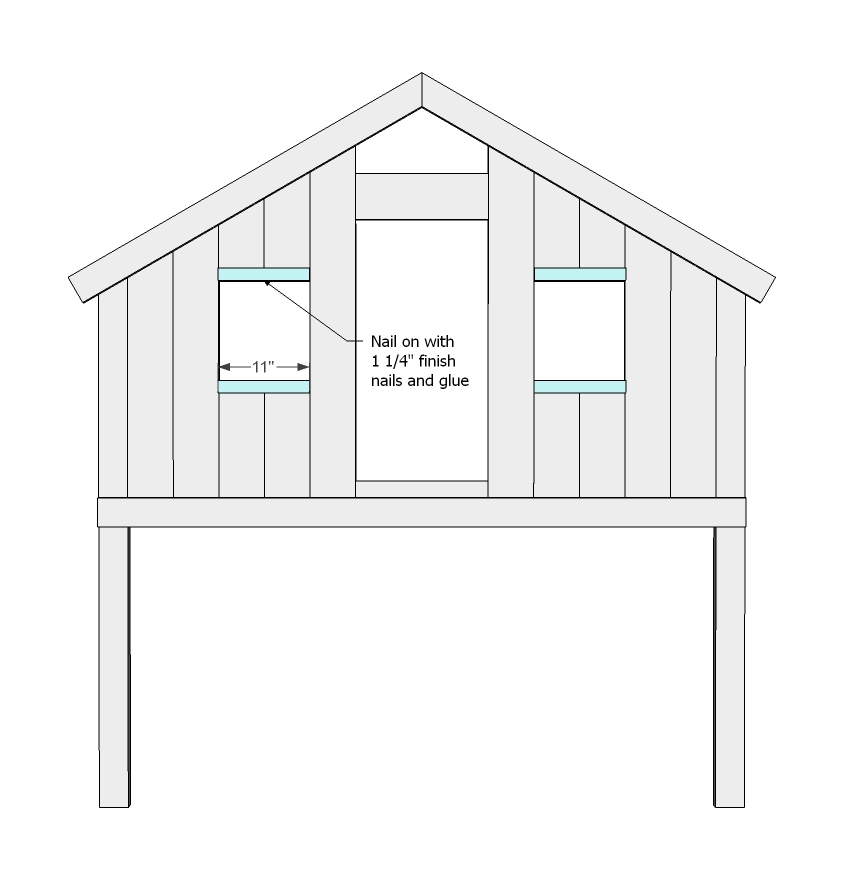
I'd cut the window trim a little long here.
NOTES FROM JAIME:
screw on front trim from inside then screw added interior window trim from inside from strength (my kids will definitely lean on this sill and without any side support in the slats I needed to add the extra longer interior trim piece).
- I also added a short 1x2 @ 4" piece across the top point on the interior to hold the joint where the angled trim pieces meet, not to mention it provides a sturdy hook for decor.
Step 12
And the bottom supports and cross supports.
Step 13

Now move the pieces into the room. For the large walls, try going in upside down, and getting one leg through at a time.
NOTES FROM JAIME: I used 3/8" lag bolts @ 3 1/2" in 3 spots on each leg
Step 14
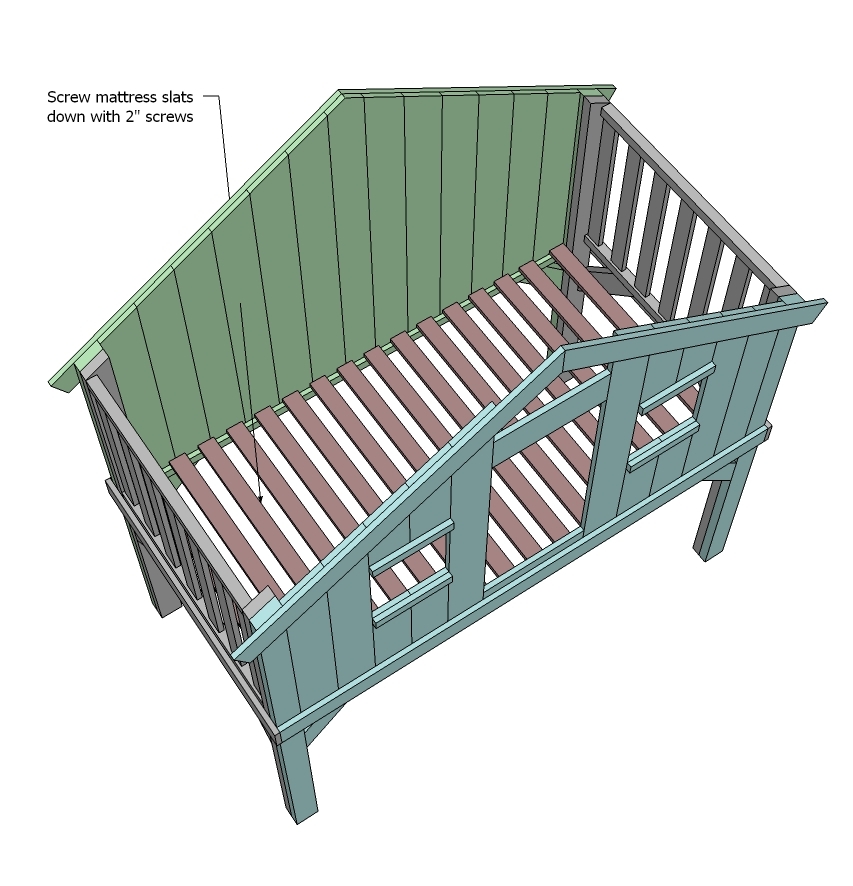
Add the slats or bunkie board or box spring.
Step 15
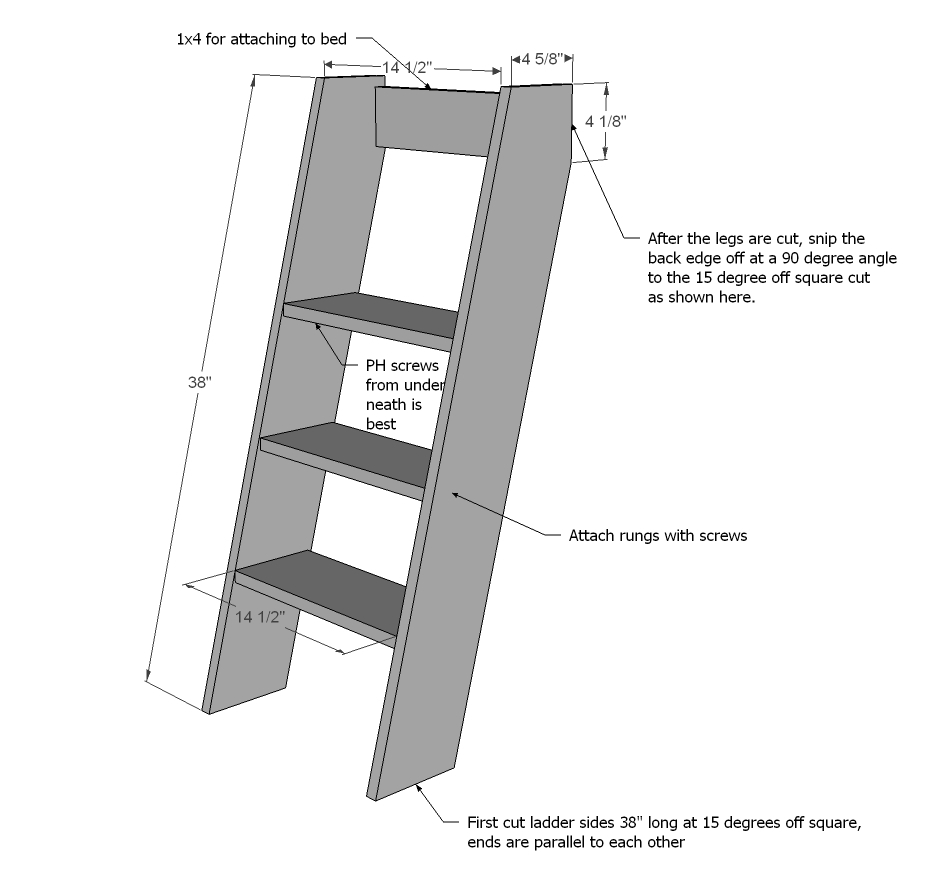
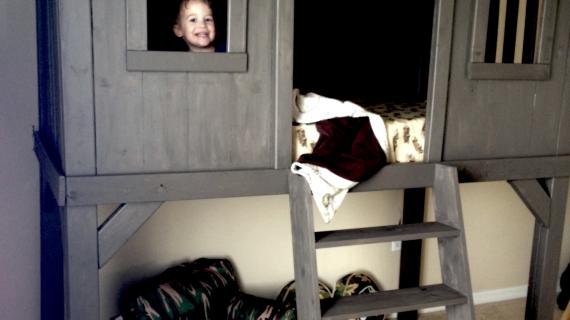
And then build your ladder and attach.
NOTES FROM JAIME: gap between rungs is 8", attached with 2 - 3/8" carriage bolts @ 3"
Step 16

For the window grid tutorial and lots other tips and construction photos please read Jaime's build post here.
It is always recommended to apply a test coat on a hidden area or scrap piece to ensure color evenness and adhesion. Use primer or wood conditioner as needed.

Comments
Jaime Costiglio (not verified)
Tue, 05/22/2012 - 10:47
thanks to Ana
A huge thank you to Ana for drawing up these plans. It was truly the most fun to build, and I would do it again in a heartbeat! Your kids will thank you (later of course!).
markw
Tue, 05/22/2012 - 12:15
Doorway adjustment
If we have a heavy sleeper on a school day, or perhaps even sick kid, a parent might have to fit through that door, and 16" isn't very wide ( at least its narrow for me). I may need adjust the width and placement of the door to keep it safe, yet accessible for an adult. Maybe even a half door or gate for the little guy?
Ana White
Tue, 05/22/2012 - 12:48
Hi Mark we do bunk openings
Hi Mark we do bunk openings for safety regulations but that's the great thing about DIY! You can build to suit your needs!
Brook @ BeingBrook (not verified)
Tue, 05/22/2012 - 16:07
Amazing!
Awesome plans Ana! What a super cool bed! Jaime you did an amazing job. Love the chevron curtains and all the special little touches like the windows!
spiceylg
Wed, 05/23/2012 - 08:42
Awesome
Awesome build and plans. You guys are a great team. This is adorable! What lucky blessed you all have!
Okay (not verified)
Thu, 05/24/2012 - 00:57
Super
Great plan, my kids will love it.
Monique (not verified)
Fri, 05/25/2012 - 17:33
Question
What was the overall cost of this project? My son NEEDS a bed like this, but we havent gotten around to it yet. What a fantastic plan, fantastic build!!!
Jaime Costiglio (not verified)
Fri, 06/01/2012 - 14:01
Cost
Monique the cost for lumber was about $200 using furring strips for the mattress slats. Add hardware, poly, sandpaper, etc. and probably close to $300. Good luck, you're son will love it!
Anthony Nelson (not verified)
Thu, 05/31/2012 - 20:56
Shopping list error
I just started working on this project. My boys love the idea and want one for each of them so if it goes well I will probably be building 2. I have found one error in the shopping list however. To give you 7 slats on the side and meet the measurements given you will need 5 - 1x3 @ 8 feet long. Hope this helps any others who start til build this project as well. I hope to post pictures as I complete the project. Thanks for your great plans.
In reply to Shopping list error by Anthony Nelson (not verified)
jaimecostiglio
Fri, 06/01/2012 - 14:09
Add one more 1x3x8
Thanks Anthony for noting the shopping list error. It's so helpful to have others do the build and make it work better for everyone. You are correct in that you will need a total of 5 - 1x3x8 boards. Good luck with the build and please submit any other notes you come across.
Dan76 (not verified)
Fri, 11/16/2012 - 18:24
Shopping List question
Do you need seven 1x4x8 boards (instead of 5)? The shopping list only says 5, but I can't figure out how that works. The two side walls take up a total of one 1x4; the back wall needs one 78" 1x4, and two 49" 1x4s, for a total of three; and the front wall needs the same, for another three boards. That's 7 1x4s. Should the 49" boards actually be 48"? An 8-ft. long board would give us two 48" boards. Thanks for your help, these plans are fantastic.
Dan
Rachael Cabos (not verified)
Mon, 06/04/2012 - 22:42
Adjustments
My daughter wants us to build this for her but she has a full bed instead of a twin. Any help?
Tinia
Tue, 06/05/2012 - 09:31
Inspired! Thank you!
I will use this as inspiration for my vision. I want to build my two boys an indoor playhouse. I will just take out the bed. Add a slide and a short climbing wall somewhere.
Does anyone know where I can find good plans for building a slide???
Stold (not verified)
Fri, 07/20/2012 - 06:29
I would just try finding a
I would just try finding a used one from an outdoor set. I prefer the plastic rounded edge(less injuries). I see a lot of them on our local sell lists. And I think you could get a paint for the plastic if you wanted it in a different color.
Calafia (not verified)
Wed, 06/13/2012 - 06:32
Queen bed
How would one modify this for a queen bed?
Akiko (not verified)
Tue, 06/26/2012 - 13:47
Missing PDF file
I would have loved to make this for my 5 year old son. He became excited when he saw it. However, I can not download the PDF file, because it is missing. Is it possible to re-link the file, or email it to me?
Thank you!
Akiko (not verified)
Tue, 06/26/2012 - 14:04
PDF is there.. O_O
I thought I'd try again.. I'm stubborn!.. haha! Before it was telling me that the page I was looking for was gone. But now it's there.. must have been a hiccup in the system! Should take the time to say thanks too for such a great site.. and the dent this site is removing from my wallet!
Thanks a million! ^_^
Lutes (not verified)
Wed, 06/27/2012 - 21:35
Queen bed
I would be VERY interested to see what the modifications would be for a queen bed also. My son's 5th birthday is next week and was thinking about having this made for him, but he's got a queen size bed...hmmm....
Inga (not verified)
Tue, 07/10/2012 - 21:53
Question from an inspired newcomer...
I'm new to all of this. I just discovered Ana's site late last night (via "Shanty2chic") and feel so inspired from your work. Everything you do looks so gorgous! I'll get to my point... I have a 3 bedroom house and would like to keep a nursery/guestroom for one of my rooms (I have 4 small kids) so this means I need to put 3 kids in one room. I love this CLubhouse bed-saw it in Potterybarn, but I can't swing the empty space (I need 3 beds). I have been in love with this bed of PBarns - the "speedboat II" - do you think making this bed is possible. Would you every make "plans" for it in the future??? Thanks for inspiring me so much. Good luck with your momplex!
Stold (not verified)
Fri, 07/20/2012 - 06:32
Do you have high ceilings?
Do you have high ceilings? Making it higher and putting a single with trundle under it would look nice. And the kids could rotate so there would be less fighting.
MattH (not verified)
Fri, 07/13/2012 - 21:05
Ana - Do you use Google
Ana - Do you use Google Sketch-Up for your CAD designs? Just wondering. I've been using SketchUp to design and build my woodworking projects for a few years now - latest projects, just built a mission-style sewing corner desk for my wife, and a set of beadboard-inspired bunkbeds for the kids.... anyway, just stumbled across your site, thanks for the good ideas! I think I'm going to make your cube bookcase....
In reply to Ana - Do you use Google by MattH (not verified)
moms got this
Thu, 07/19/2012 - 13:30
Thank you for mentioning this
Thank you for mentioning this sight.. I cant wait to check it out
In reply to Ana - Do you use Google by MattH (not verified)
jigganancy
Mon, 08/27/2012 - 11:16
Yes, google sketch up. She
Yes, google sketch up. She has posts where so talks about Google Sketch-Up
moms got this
Thu, 07/19/2012 - 13:28
Just wanted to say thx for
Just wanted to say thx for the plans! in the process of the build now. I have adjusted them to a larger scale and using it for an outside play house. Added a slide n a few other surprises. Hope to have it complete in the next couple weeks.
Jacqueline Jones (not verified)
Sun, 07/29/2012 - 19:49
Over-all height of the bed
When I look at the picture of your finished bed, the peak of the clubhouse is right at the ceiling. Your plans, however, show 34" from the slats to the floor. That is pretty darn low to the ground. My husband has made the two sides and the back of the clubhouse so far and his measurements are spot on. However, ours looks considerably lower to the ground than yours. We have average ceiling heights. The peak of the clubhouse will not be near the ceiling. I was hoping to put a twin bed under it...I'm a little bummed that we can't.
Trever (not verified)
Sat, 10/13/2012 - 06:34
Sheets
This may be a silly question, but how in the world do you make the bed? Access to the mattress seems quite limited. I really want to make one of these beds for my son as well, but I am worried about making things difficult for my wife when she changes the sheets.
viv (not verified)
Sat, 10/13/2012 - 15:17
bunk bed
i love this clubhouse , was wondering if you could share how to modify it to turn it into bunk bed sleeping two persons one up and one down . thanks in advance . viv
Loraine (not verified)
Sun, 11/25/2012 - 11:08
I love this but am thinking
I love this but am thinking about modifying to look like a barn with barn angles on the peaks and room for another twin on the floor underneath. Maybe with walls on the sides and a sliding barn door for the front bottom. I was also thinking about a ladder on the side and a slide in the front where the ladder is. Then it would match Ana's new barn shaped bookcase and soon to come barn doll house. I have a 4 year old girl and a 1 year old boy sharing a room and they love barns and farm animals. Any suggestions? or a plan to modify this Ana?
Matt D (not verified)
Wed, 11/28/2012 - 16:45
Thanks for the plans
My son loves his new bed.
forestlinden
Fri, 03/22/2013 - 14:59
Great project! Happy kid in the house! Thank you for the plans!
Just finished a slightly modified version of this bed for my son (the obvious modification is that I added a roof.)
Here's a couple photos: http://screencast.com/t/hKadiRbe
http://screencast.com/t/57IWjFVT
Thanks much for the plans, Ana :)
All the best,
~Forest
lindsay1126
Sat, 08/03/2013 - 11:42
full size modification
Has anyone succesfully done this? How would I go about making those changes? If anyone has updated plans PLEASE send them to me. [email protected]
afrozdad
Wed, 02/19/2014 - 19:32
Width of Front / Back wall doesn't add up
In Step 6, the width of the bed is shown as 78 inches on the outside including legs. In the next step, step 7, the width of the bed is shown as 71 inches on the inside excluding legs. Given that the legs are made of 2x4s, this doesn't add up. Either the inner width should be 70" (78 - 4 - 4) or the outer width should be 79" (71 + 4 + 4). Which one is it?
TeacahDad
Thu, 07/23/2015 - 11:02
Two-by-fours
Two-by-fours aren't 2"x4".
StewartTX
Sat, 03/08/2014 - 14:59
Bigger in Texas
We decided to build this a bit bigger and taller. I will caution you to be careful as we came inches to not making it through our doorways. We expanded the depth 15" to make it a full bed and we extended the length of the legs to allow for 48" clearance underneath.
We also went with a rock wall instead of a ladder. I 1st built the angle too steep; recommend at least a 30 degree angle on a wall. Kid's love it; mom not so much when attempting to make the bed! :)
We went with military theme - green rope lights, camo netting for a roof, and sandbags filled with old clothes from my high school years for a bunker underneath.
Great project! Thanks for the idea!
jvuijk
Sat, 03/15/2014 - 14:09
Pocket Hole Screws
I repeatedly see "PH screws" listed in the plan.
Does this require something like the Kreg Jig I have seen in other plans?
Cacheturtle
Wed, 05/28/2014 - 17:28
Sanding
I bought my lumber from Home Depot. The boos for both sides look like they are ruff cut. Did you sand each cut piece before attaching sides together? Also, where were the slats attached? Was it in the center of the 2x2, front, or back?
Building Momma'
Sat, 11/08/2014 - 17:07
Got a few Questions about Amounts
Was a 50 pack of 2-1/2" Pocket Hole Screws enough or should I get 2 or 3 or more packs?
How Much wood filler should I purchase? Quart? Pint? ½ pint?
And I was wondering about how much stain would I need? Or if I go with paint, how much paint would I need?
z2angelic
Mon, 04/13/2015 - 20:27
Adjustments
Looking at making this for my sun this summer. Don't really have any wood working experience so I'm a major noob. Is this for a standard sized twin bed? Also if we wanted to make it a little higher (like 48" underneath) but keeping the overall height the same how would we do it or is it better to not try?
RachelWesley
Fri, 10/09/2015 - 09:31
changing the sheets?????
I love this bed but I'm concerned that changing the sheets or making the bed is a headache.... ?? I thought about adding a slide to the side, although I'm not sure I could get my toddler to sleep in the bed when so much fun could be had. :)
Lovinglifeasmom
Sun, 01/24/2016 - 16:47
Help please, what screws for what pieces?
Would someone please be able to break down which screws are used for what part if the treehouse? It'd be truly appreciated! My husband has purchased all lumber and materials and has begun cutting but we want to be sure to use the proper screws in the proper places! Thank you in advance for any help!!!
jillianjanae17
Sun, 10/06/2019 - 22:38
Bunk bed??
I saw another post where they put a bottom bunk on this bed. What’s the best way to add a bed on the bottom?
kaycee_ann14
Mon, 02/10/2020 - 12:11
I'm not sure if I'm just…
I'm not sure if I'm just missing it but where do you use the finishing nails?