
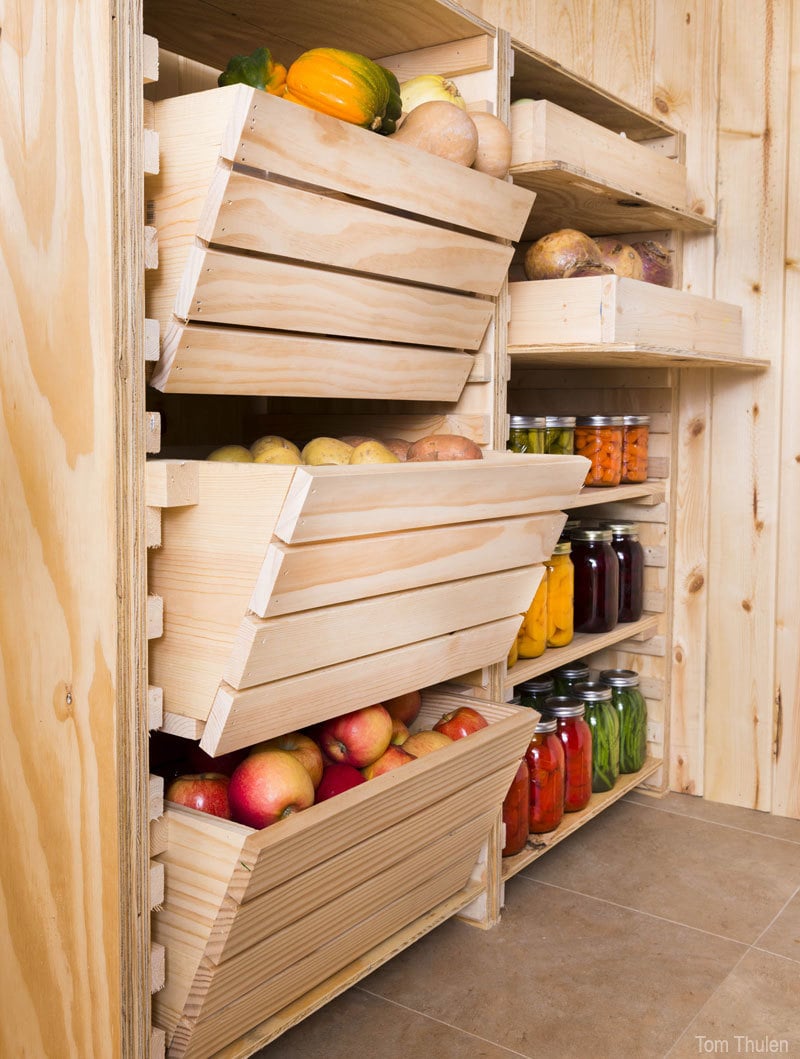
Hobby Farms - Root Cellar Storage
What kind of wood should I use?
Most of our plans use standard construction lumber like pine or fir. It's affordable, easy to work with, and easy to find. It's also rapidly renewing and biodegradable, so a great eco friendly choice!
Can I use hardwoods instead?
Yes—just keep in mind they're heavier, cost more, and can be tougher on tools and harder to join together and finish. I recommend not tackling a hardwood project until after you have built several softwood projects.
What if my boards are warped?
Choose the straightest boards at the store. You can often work around slight warps by cutting them into shorter pieces.
What wood should I use for outdoor furniture?
Use red-toned or pressure-treated 2x lumber for framing, and cedar or cedar fence pickets for the decking. Outdoor furniture should be built like a deck—your local home center can help recommend the right wood for your climate.
Will my wood move or warp after I build?
Potentially, especially in humid climates. Let your wood acclimate indoors before building. Once acclimated and kept in a stable environment, movement should be minimal. Remember, most houses are built using framing lumber - it's all about keeping moisture down indoors.
Do I need a miter saw?
A miter saw is great, creating fast, safe, and precise cuts, even for beginners. But most plans can be built with a circular saw and a straight edge. If using a circular saw to cut, take time to practice, and get good at making cuts, before cutting your project boards.
How do I get clean cuts with a circular saw?
Clamp your board, measure twice, cut slow, and use a sharp blade. This takes practice, so spend some time making cuts. I go through becoming proficient at freehand cutting in my course, it is worth taking if you want to master this skill.
Will the store cut my wood?
Yes—most stores will do rough cuts to help you transport your materials home. But from store to store, the quality of cuts could greatly vary.
What screws should I use?
We recommend star-head self tapping screws for framing, most common sizes are 2-1/2", 1-3/4". Pre-drill if close to the edge or you find your wood is splitting.
Do I have to use pocket holes?
Pocket holes are the cheapest, easiest and fastest way to do some joints - like edge to edge or a hidden fastener joint. There are other methods, but these can be time consuming and expensive. We recommend using pocket holes as indicated in plans for best results.
How do I keep things square?
Use a speed square and measure diagonals after each step. Always clamp joints before screwing to keep them tight and flush.
Stain or paint before or after building?
A quick sand before and a full finish after gives the best results. Pre-finish if you're doing two-tone or detailed finishes.
What type of finish?
Use oil-based or water-based stain. For paint, cabinet-grade latex or enamel works great. High use surfaces on indoor projects should get a coat of polyurethane, I recommend a Helsman or Spar or other flexible poly that won't crack or peel with wood movement. For exterior projects, use a finish suitable for exterior fences.
How to get a smooth finish?
Start with a well sanded project. Sand between coats (220 grit), wipe clean, and apply light coats with a foam brush or roller.
Can I change the size?
Many people do, and that's the great thing about building your own furniture! But do keep in mind going bigger might mean more supports are required, and often plans are optimized for minimal material waste.
Are these beginner-friendly?
Yes—plans are written with simple tools and clear steps in mind, with every effort to make plans as simple as possible.
Can I sell what I build?
Absolutely! Just don’t resell or repost the plans themselves.
What tools do I really need?
A drill, circular saw, tape measure, square, and a few clamps will get you through most projects.
Do I need a workshop?
Nope! A driveway or small patio is plenty to get started, just make sure you have a level place to work. If you find you are building several projects a year, creating a small workbench is a great way to store tools and have a dedicated workspace.
What if I mess up?
Wood filler, sanding, or flipping boards goes a long way. Mistakes are part of the process!
What can I do to make my projects look more professional?
Start with straight boards, make accurate cuts, clamp all joints, and line up everything neatly. Sand thoroughly, use a neutral finish, and apply it in light coats for a clean look.
I've never built anything before. Where should I start?
Start with a few smaller softwood projects to get hands-on experience. Or if you're tackling a big project, buy a little extra lumber and practice your cuts and joints first. If possible, work with someone who has a bit of experience.
How long will my furniture last?
With good joinery and regular care, your DIY furniture can last for decades. I have pieces in my own home that are over 20 years old and still going strong! One of the best parts about DIY furniture is that it’s easy to repaint, refinish, or repair—so your projects can grow and adapt with you.
How should I care for outdoor furniture?
Lightly pressure wash or hose it down once or twice a year. Tighten screws and reapply finish as needed to protect it—just like a deck or fence. A little upkeep goes a long way in extending the life of your furniture.
How about indoor furniture?
Regularly dust or wipe with a damp cloth. If it starts to look worn, a light sanding and touch-up paint or stain can refresh it in no time. DIY pieces are meant to be durable and fixable—so don’t be afraid to give them some love now and then.
Check out my ebook: 12 Skills to Build Your Own Furniture
It walks you through the core skills every builder needs—measuring, cutting, joinery, and finishing—so you can build beautiful furniture that lasts.
Email us anytime at [email protected] and we’ll be happy to help!
Comments
Shar'lee
Mon, 01/19/2015 - 02:54
Pantry heaven
I have the pantry from hell and I have been trying for years to work out how to fix it as it is in a narrow under stair room - this will work perfectly with a few amendments. I love this site, thanks Ana.
OnBlissStreet
Wed, 01/21/2015 - 06:05
Wow!
This is like a dream come true for me!!! Thanks for sharing!
[email protected]
Tue, 10/20/2015 - 15:02
not good
First picture shown on step 5...
Plank is 3" and there is 6 of them (6x3=18)
And plan sayes it is 16", not counting the gap between the planks...
Plan sucks, dont build it!
In reply to not good by [email protected]
solomonson
Wed, 10/21/2015 - 08:16
You mean the plan is actually
You mean the plan is actually poor, or you think the measurements are incorrect? If the latter, I don't see what you see. There are 6 1x3s, which would measure a total of 15", since 1x3s are 2.5" wide (assuming your 1x3s are actually 2.5". A lot of them vary). The plan says to allow for 1/8" in between them, which would be 5/8". So for a total of 15 5/8". Not quite 16", but certainly not 18".
If the plan is actually poorly designed, I'm sure Ana and everyone else would appreciate hearing exactly how so.
In reply to not good by [email protected]
RenoRustic
Wed, 10/21/2015 - 08:28
They Don't Suck...
Really? If you're going to slam someone's plans for having incorrect measurements, be sure you understand lumber dimensions yourself first. A 1x3 board is actually .75" x 2.5". Six boards @ 2.5" each is 15". Add in the 1/8" gap and your 16" cut will work fine. People spend a lot of time and effort to create these plans, which have been provided free to you, so show a little tact next time you don't understand something. The plan doesn't suck.