
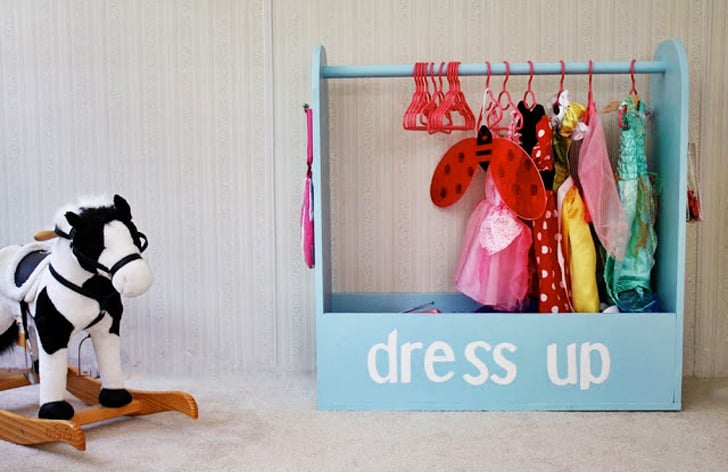

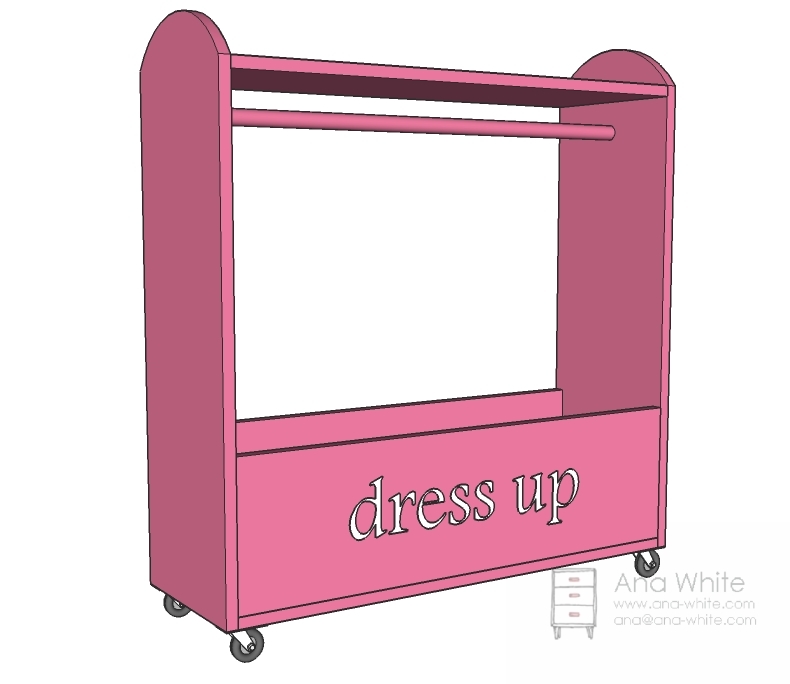
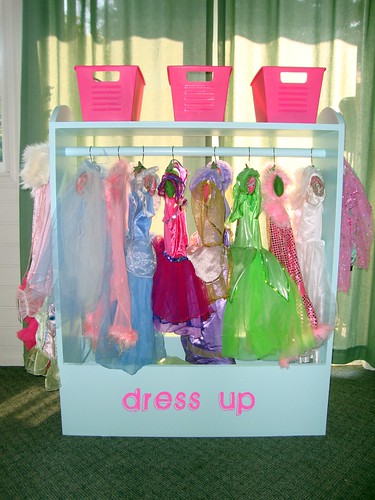
Organize and store all the dresses! This dress up storage project features a hanging closet rod and lots of storage for all the accessories and the shoes in the open base. Designed and built by Craftiness is Not Optional, free detailed plans below.


Preparation
- 1 – 10 foot 1×12 board
- 1 – 6 foot 1×10 board
- 36″ long 1-1/4″ diameter dowel or wood closet rod
- 2″ self tapping wood screws (about 20)
- 2 – 1×12 @ 36″ (Sides, round top corners 3″ down with a jigsaw)
- 1 – 1×12 @ 34 1/2″ (Bottom)
- 2 – 1×10 @ 34 1/2″ (Sides of Storage Box)
- 1 – 1-1/4″ diameter dowel or closet rod @ 34 1/2″ (Closet rod)
If you have a compound miter saw, make all cuts on it. If not, use a circular saw with a guide.
Cut the corners with a jigsaw and sand the jigsaw cut smooth.


Instructions
Step 1
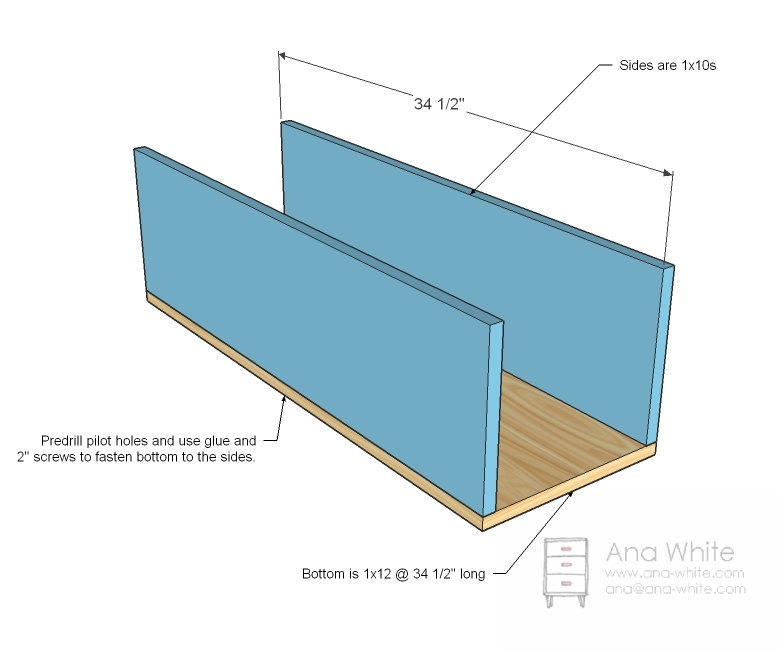
Storage Box
Predrill holes along the long edges of the bottom with a countersink bit. Then apply glue to the bottom edge of the storage box sides and screw the bottom to the storage box sides with 2″ screws and glue.
Step 2
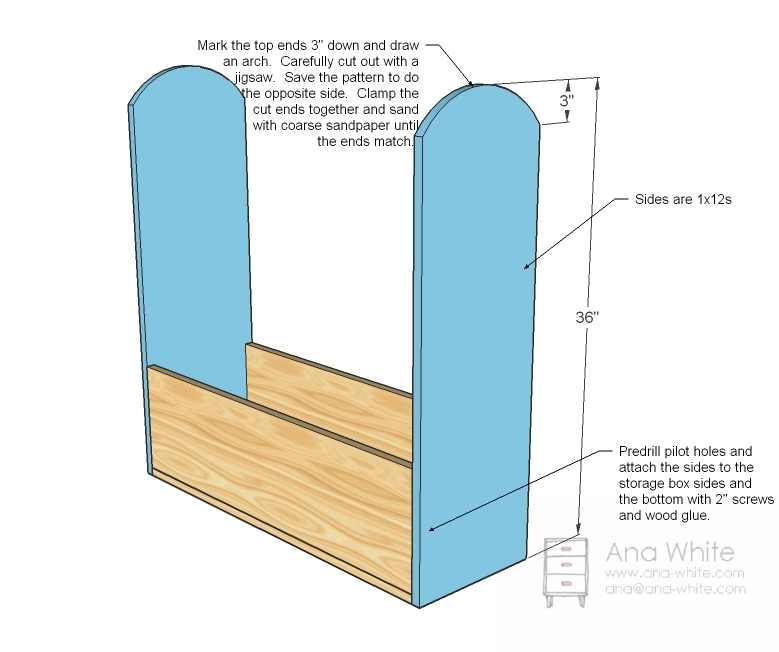
Sides
Cut the arch shape from the sides as shown above. I’ve done this quite a bit, and it’s easier said than done to get two arches that match exactly with a jigsaw. What I do is create a pattern by folding a sheet of 12″ x 12″ scrapbooking paper in half and cutting out an arch shape. Then I trace this pattern on to the wood and carefully cut to the outside of the traced line with a jigsaw. Then I clamp the two boards together, and sand, sand sand with coarse sandpaper until the ends match. Another trick if you just can’t get the ends to match is to round the cut edges, so it’s not such a sharp line – then it’s more difficult for the human eye to see that the ends are not a perfect match.
Once you’ve cut the ends, predrill pilot holes along the bottom and side edges 10″ up (I center mine 3/8″ in) and screw the sides to the storage box. Oh, apply glue to the ends of the storage box first, and keep your outside edges flush.
Step 3
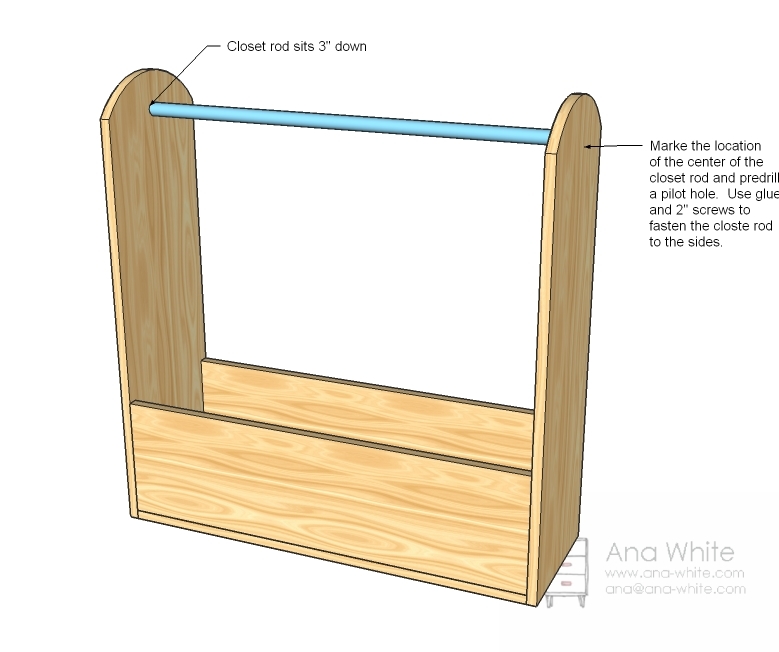
Closet Rod
Now there are several different ways you could attach the closet rod, but I liked the idea of actually gluing and screwing it in place because the top would then have some support to keep the sides in place. So measure down 3″ and to the center of your tops and predrill pilot holes. My trick . . . thread your screws through so the end is just barely showing through. Then line the screw tip showing through to the center of the dowel. Apply glue and screw it together. Do the same on the other side.
Step 4
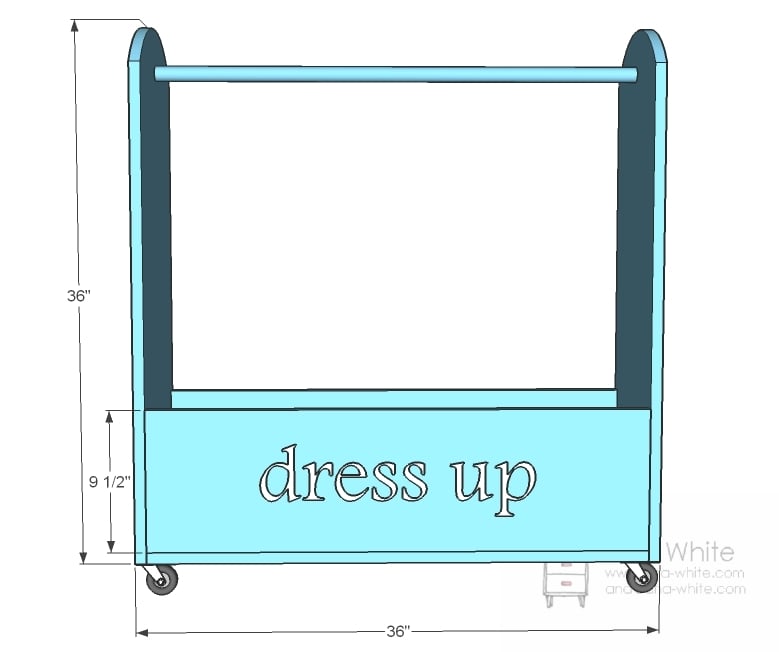
And here is what we’ve got with 2″ caster wheels and 6″ letters. Is this just for princesses? Because I LOVE this, even for a big girl closet! Hmmmm . . . now you got me thinking.
Step 5

Comments
Kristi @ Creat… (not verified)
Wed, 11/24/2010 - 09:59
This is so cute! And looks
This is so cute! And looks simple enough! Might have to put it on the to do list!!
Lauralee (not verified)
Wed, 11/24/2010 - 10:10
How awesome! It's so simple,
How awesome! It's so simple, and yet, I never thought of it! I wish I had this when my eldest was little. I suppose it's as good a time as any to get my two year old organized though! YAY! Thanks, Ana!
martin12 (not verified)
Sat, 07/14/2012 - 06:49
How awesome! It's so simple,
How awesome! It's so simple, and yet, I never thought of it! I wish I had this when my eldest was little. I suppose it's as good a time as any to get my two year old organized though! YAY! Thanks, Ana!
Bauchmuskeltraining
Rachel (not verified)
Wed, 11/24/2010 - 10:14
Oh my! I love this. I was
Oh my! I love this. I was just wondering how to organize all of the huge tutus and princess gowns yesterday. I will be building this for sure! Thanks!
Amy Jill (not verified)
Wed, 11/24/2010 - 10:22
I'm thinking my kids wouldn't
I'm thinking my kids wouldn't actually hang things on hangers. BUT they WOULD hang stuff on hooks. Could I not build up the back to the height of the unit and install hooks? Hmmmm. My boys are going to LOVE this.
martin12 (not verified)
Sat, 07/14/2012 - 06:51
I'm thinking my kids wouldn't
I'm thinking my kids wouldn't actually hang things on hangers. BUT they WOULD hang stuff on hooks. Could I not build up the back to the height of the unit and install hooks? Hmmmm. My boys are going to LOVE this.
Bauchmuskeltraining
Theresa (not verified)
Wed, 11/24/2010 - 11:12
Yay! Thanks Ana for helping
Yay! Thanks Ana for helping me out with my request! :) :)
Jessica Harris (not verified)
Wed, 11/24/2010 - 11:40
OMG! This is the plan I NEED!
OMG! This is the plan I NEED! My boys have two huge tubs in the playroom FULL of costume nonsense. They usually dump everything out to find anything! I am so excited and I have all the wood in my garage waiting already! Thank you ANA! This will be an awesome Christmas for little "Superheros"!
Amy (not verified)
Wed, 11/24/2010 - 12:33
TOTALLY what Jessica said.
TOTALLY what Jessica said. :-) My daughters are "too old" for dress up, but my son is CRAZY about his costumes. This is going to be painted dark blue or red for my house with the words "LET'S PRETEND" on the side. Love love love this!!!!!
Amme (not verified)
Wed, 11/24/2010 - 13:56
Ana, I don't know if this
Ana, I don't know if this deal is everywhere or or just Houston, but Home Depot is going to have their 10" mitre saw with laser for just $79! That's my Christmas present, Yeah! I built the doll bed this week all by myself. I am so proud. Hopfully I will get pics up soon. Thanks so much for all you do. You are so inspiring.
Pam the Goatherd (not verified)
Thu, 11/25/2010 - 12:34
As soon as I saw this I was
As soon as I saw this I was thinking about converting it to a "big girl" closet for my spare bedroom. We live in a mobile home and the closet in our second bedroom is a wart that I have wanted to tear out for years but didn't want to have to spend a small fortune on an armoire to replace it with. This piece in an adult size would be perfect! I'm thinking that I'll make the front of the box out of a a 1"x3" so that shoes can be put in there without having them fall out on the floor and I'll put baskets on the top shelf to hold things like socks and undies. My house is soon going to be full of Ana creations!
Cindy Jones (not verified)
Fri, 11/26/2010 - 16:05
This dress-up storage is just
This dress-up storage is just what we need at my house to hold all my granddaughter fairy dresses! I am so excited to make it for her. We have just begun the childs table and I am about to make the cushion on the chair my husband made me using your plans. I am a fan of yours and check every day for the plan of the day! Thank you so much.
carrie (not verified)
Fri, 11/26/2010 - 19:07
LOVE THIS! I make a dress up
LOVE THIS! I make a dress up play set for my daughter every year for christmas... this will really put her gift over the top this year! Thanks always for sharing your wonderful ideas! Your creativity makes me smile!
SoPurdy (not verified)
Mon, 11/29/2010 - 08:05
I love "Let's pretend!" How
I love "Let's pretend!" How about, "Imagine", "Dream" or simply..."Play"
Christina Jo (not verified)
Mon, 11/29/2010 - 10:34
I actually built this!!! I
I actually built this!!! I still can't believe it - I have to put the dowel on, sand and paint, BUT I BUILT THIS!! First time i've ever tried anything like this. This was my first attemp at building ANYTHING! Ana, thank you so much for this site, you are amazing!
Amy J (not verified)
Mon, 11/29/2010 - 12:34
I am making this for my
I am making this for my daughter for her birthday! I love it with the shelf on top. She can put her princess jewelry box up there and hopefully that will keep her brother out of it! I would make it for Christmas but I am already tackling the play table with rolling carts for that!
Stephanie Kaiser (not verified)
Mon, 11/29/2010 - 21:35
I have four girls and this is
I have four girls and this is an absolute must have!!!! I have been admiring your work and you are inspiring me to really make space and do this. I need to just make it a goal and go from there. But I first need clean sweep to come and get rid of everything in my garage.........LOL! But soon I will be posting pictures of things I have made from your designs. Love what you do it totally rocks!!
Ana White (not verified)
Sun, 12/05/2010 - 21:39
That's Awesome! I'm so happy
That's Awesome! I'm so happy for you! Thanks for taking your time to share! Ana
Sam, Danielle,… (not verified)
Thu, 12/09/2010 - 18:53
My friend asked me to make
My friend asked me to make one for her this week. Used my bradnailer for the bottom with glue, and countersinked some screws on the sides. I did add a decorative wooden piece to the sides. With the clothes hanging, I was thinking to eliminate the front board to accommodate her daughters shoes.
Tip: I always hate using my jigsaw; I'm not the best cutter. I cut before the line, and then clamped the sides together while I run the boards on the table sander, and sand down to the line.
Lyndsey (not verified)
Sun, 12/12/2010 - 10:49
My husband and father-in-law
My husband and father-in-law made this yesterday. I just have to paint it and then it will be done. For the arches, they basically made a big compass by taping thread to a pencil (they actually taped it to the lead of the pencil so that angle of the pencil didn't matter), attaching the other end to the centerpoint they chose (they measured to the middle of the width of the board and 4 inches down because we made ours a little bit taller than the plan) and then allowing the thread to create the arch. They used the same measurements on both boards to make sure the arches match. It looks great!
Sarah R. (not verified)
Sat, 12/18/2010 - 08:08
I built this last night! It
I built this last night! It is a quick and easy project! Of course I didn't read the instructions and screwed tall sides to the bottom first. Oops. Trying to rig it so it was stable while I drilled was comical. Next time I'll read first...
JuliaSays (not verified)
Wed, 12/22/2010 - 16:58
Not sure if my link will
Not sure if my link will work, but here is the dress up center I made:

Ana White (not verified)
Wed, 12/22/2010 - 18:14
WOW! I love that finish!
WOW! I love that finish! Incredible! I've gotta put this on the brag blog!
petrak28 (not verified)
Wed, 12/29/2010 - 18:19
Thank you for the awesome
Thank you for the awesome plans! I built this for my daughter for Christmas.

Stephanie Sherman (not verified)
Thu, 01/06/2011 - 12:22
@ petrak28 : Adorable! We're
@ petrak28 : Adorable! We're making one too. I really like the shade of pink that you used. What paint brand and color # did you use? It's a really nice pink.
foreman352 (not verified)
Tue, 01/18/2011 - 09:30
I love the additional hook on
I love the additional hook on the left side of the unit.
Stacey (not verified)
Wed, 01/26/2011 - 15:47
I had such a wonderful time
I had such a wonderful time making this with my girls! Thank you so much!
Alex (not verified)
Thu, 02/03/2011 - 05:40
This would be awesome to
This would be awesome to modify the scale and use for American Girl Doll accessories and clothes :)
Diane (not verified)
Tue, 02/15/2011 - 23:48
This is fabulous! I however
This is fabulous! I however have zero tools to create one myself. But I did send a link to this to my Uncle who has a wonderful wood shop. I'm really hoping he can create one for my two little princesses!
Thanks for sharing.
Kate (not verified)
Wed, 06/08/2011 - 07:19
I would pay someone to make
I would pay someone to make this for me! I do not have the tools to do this but if someone sold these, they could most certainly make a profit!
eellsinoc (not verified)
Sun, 09/11/2011 - 16:14
Dress up Center
My husband just finished my daughter's Dress Up Station today - she loves it....we are using some tote boxes on the top shelf for jewelry, hats, etc. We also added more hooks on the sides....thanks for the help!
Cindy (not verified)
Tue, 10/11/2011 - 12:09
Dress Up
Love this.
Monica G (not verified)
Thu, 11/03/2011 - 07:33
Thank you!
I was looking for something just like this for my daughters dress up clothes. Thank you for posting this! Now all I have to do is follow the directions! I can't wait to see what it looks like.
R.S. (not verified)
Mon, 11/28/2011 - 08:29
Thank you!!!!
I LOVE this! Can't wait to get it finished!!! I have five kids and space is limited. This is exactly what we need to get organized before Christmas! Thank you!
USNchic (not verified)
Mon, 12/05/2011 - 14:32
Love this!!!
Thank you so much for the plan! My husband made this over the weekend and added shelves, per my request. It turned out perfect!
Guest (not verified)
Tue, 01/31/2012 - 17:16
writing
My husband just built this!! Love it. I painted it, but how did you get the writing on front? The way i tried didnt work at al
Kristine Massie (not verified)
Sun, 05/06/2012 - 09:21
Dress up Station
Hi Ana, Your dress up station inspired me to create our very own dress up station. I am not quite the builder, but I used an old bookshelf to create one. I mentioned you in my blog...hope you get a chance to read it:
Thank you!
http://littleshabbyhistory.blogspot.com/2012/05/princess-station.html
Missy Tate
Fri, 08/31/2012 - 11:59
Made mine for my girls dance things!!
http://ana-white.com/sites/default/files/3154814442_1346273523.JPG
Connie Eldridge (not verified)
Tue, 10/16/2012 - 12:52
LOVE IT!!!!
I made this for my daughter and she just loves it! I have been looking for what seems forever to find something like this for her and was beyond excited when I saw this! My boys even love it and want one for their rooms! Thanks so much for sharing!!!!
Kellie (not verified)
Sun, 11/18/2012 - 06:03
Exactly what I wanted!
My husband and I made this together last night; we made a few little changes, some that you suggested (like the shelf, and the lip on the shelf), made it a little bit taller too. SUCH a great idea. I had found a similar item for purchase at Costco online for the bargain of $160+ tax. So thank you! I think at the end this cost me about $30 to make. My kids will love it! (They're not getting it until Christmas)
Berry Barn Designs (not verified)
Mon, 12/24/2012 - 08:39
Thank you for the easy to
Thank you for the easy to follow plans! I was pestering my dad to create something like this for me to give my girls, but it was so close to Christmas that he wasn't sure he'd have time to piece it all out. Found your plans (and the great theater idea on ThePickyApple.com) and he was able to get it all cut and ready for me to paint and assemble in no time. A few small changes and we have a reversible dress-up storage/puppet theater!
Adam from F&W.de (not verified)
Mon, 01/21/2013 - 23:36
:-)
What a world ... ! Very nice :-) !
jusiolory
Tue, 02/19/2013 - 23:24
great
great
[email protected]
Wed, 05/25/2016 - 03:40
WHAT THIS IS
I noticed many comments about this being for dolls. This is not for dolls! This is for little girls or boys to use for their pretend dress up clothing. When they want to play dress up, all the dresses or costumes are hung along the middle, the bottom holds shoes and boots or whatever and the top holds their jewelry accessories. To make this a true dress up place, add a fair sized mirror to the end for the kids to admire themselves!