Dresser Bookshelf Support for Cabin Bunk System

Difficulty
Advanced
| Print this plan

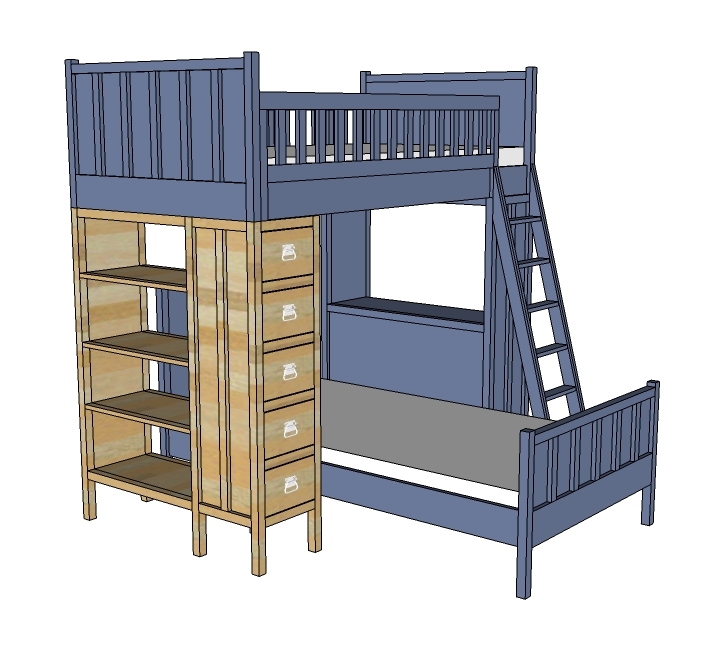
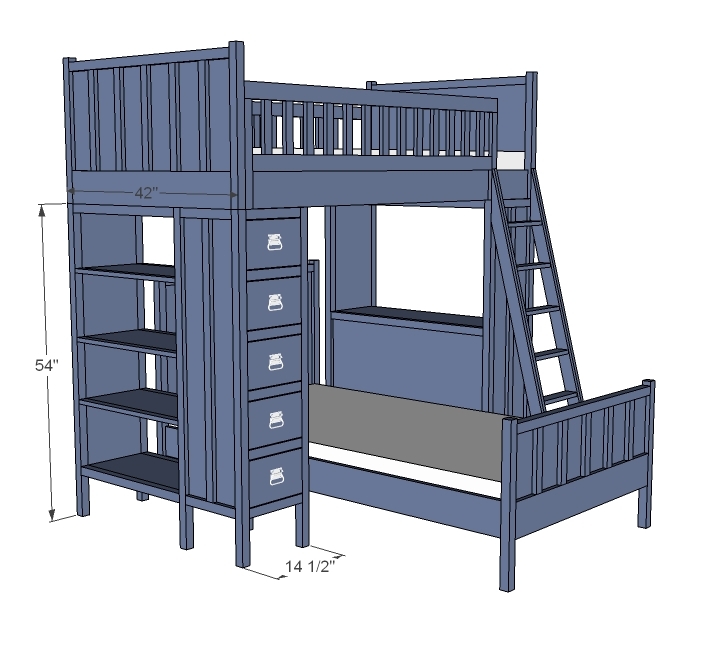
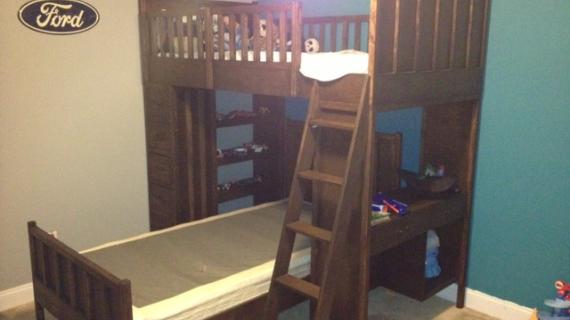
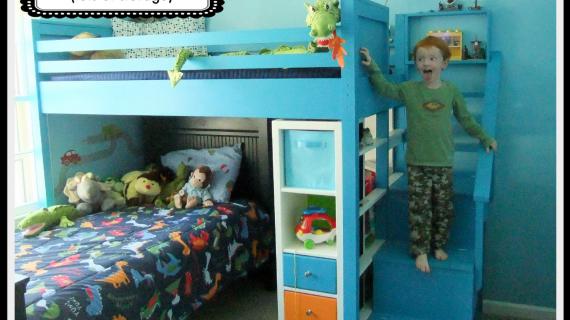
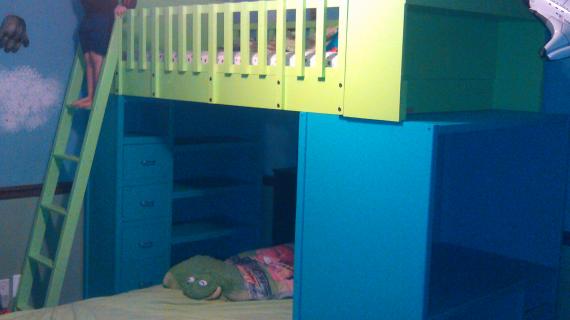
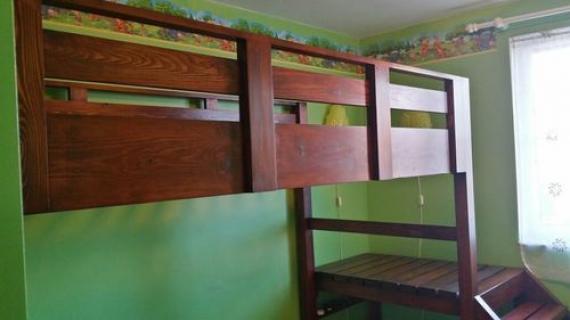
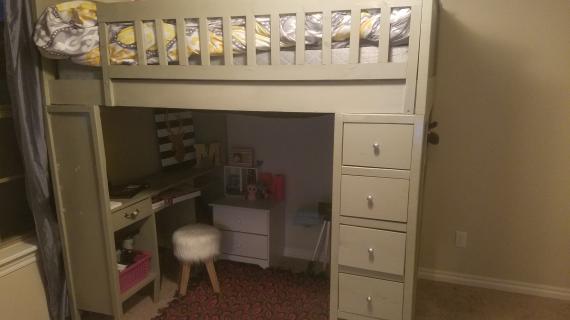
Featuring five shelves and five drawers, this bookshelf/dresser isn't just a smart storage solution.  It's also a top bunk support system.  

Collections

So glad to be back to work today!  This past week, our entire family has had the flu, and most days, I haven't felt clear headed enough to even drive a car, so certainly wouldn't be attempting to post plans under those circumstances.  I've got a ton of emails to catch up on, and lots of plans to work on, so I'll keep this brief, but just wanted to take a second to thank everyone for being patient and a special thank you to those of you who take your time to help others.  You are much appreciated.

For a good tutorial on putting a drawer together and the recommended slides, please see this wood kitchen cabinet organizer drawer plan.


Dimensions
Fits under the Cabin Top Bunk

Preparation

Shopping List

2 - 1x12 @ 8 feet long

1 - 1x12 @ 12 feet long
1 - 1x8 @ 6 feet long
1 - 1x6 @ 8 feet long
1 - 1x6 @ 12 feet long
4 - 1x2 @ 8 feet long
6 - 2x2 @ 8 feet long
1/4" plywood (1/2 sheet for the bottoms of drawers)
5 - 11 - 12" drawer slides
5 knobs or handles
Common Materials
2 1/2 inch screws
3 inch screws
1 1/4 inch finish nails
2 inch finish nails
120 grit sandpaper
primer
wood conditioner
paint
paint brush
Cut List

4 - 1x12 @ 46 5/8"

6 - 1x2 @ 11 1/2" (Width of 1x12s)
6 - 2x2 @ 54" (Legs)
5 - 1x12 @ 26" (Shelves)
4 - 2x2 @ 26" (Shelf Trim)
6 - 1x2 @ 26" (Shelf Trim)
7 - 2x2 @ 11 1/2" (Width of 1x12s)
20 - 1x6 @ 10 1/2" (Drawer Box)
5 - 1x8 @ 11 1/4" (Drawer Faces)
2 - 1x2 @ 43 5/8" (Optional Trim)
Cutting Instructions

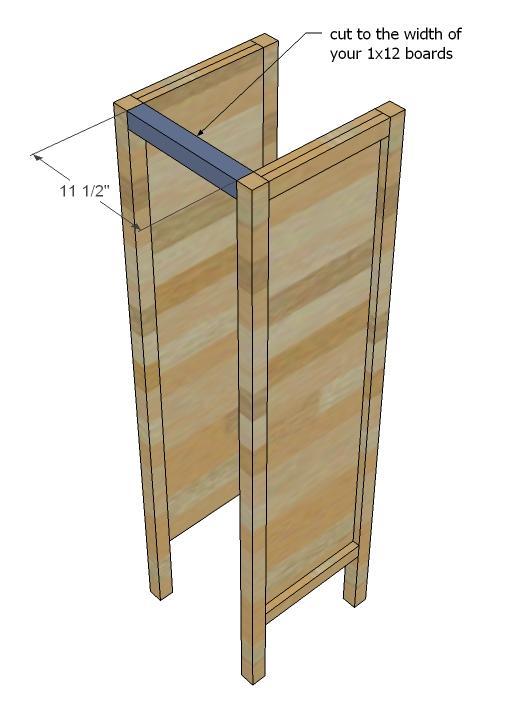
This plan is highly dependant on widths of boards. Make sure that your 1x12s measure 11 1/2" wide (if you have 1x12s ripped from plywood, rip them at 11 1/2" wide) or you will need to adjust cuts as you go. Also, the drawer fronts are for 1x8s that measure 7 1/4" wide, so measure yours and adjust accordingly.

Tools
Tape Measure
Speed Square
Pencil
Safety Glasses
Hearing Protection
Kreg Jig
Drill
Circular Saw
Brad Nailer
Power Sander
Level
Drill Bit Set
General Instructions

Please read through the entire plan and all comments before beginning this project. It is also advisable to review the Getting Started Section. Take all necessary precautions to build safely and smartly. Work on a clean level surface, free of imperfections or debris. Always use straight boards. Check for square after each step. Always predrill holes before attaching with screws. Use glue with finish nails for a stronger hold. Wipe excess glue off bare wood for stained projects, as dried glue will not take stain. Be safe, have fun, and ask for help if you need it.

This plans uses pocket holes. Before joining any boards, identify all necessary pocket holes on each and every board and drill all pocket holes.

Instructions

Step 1

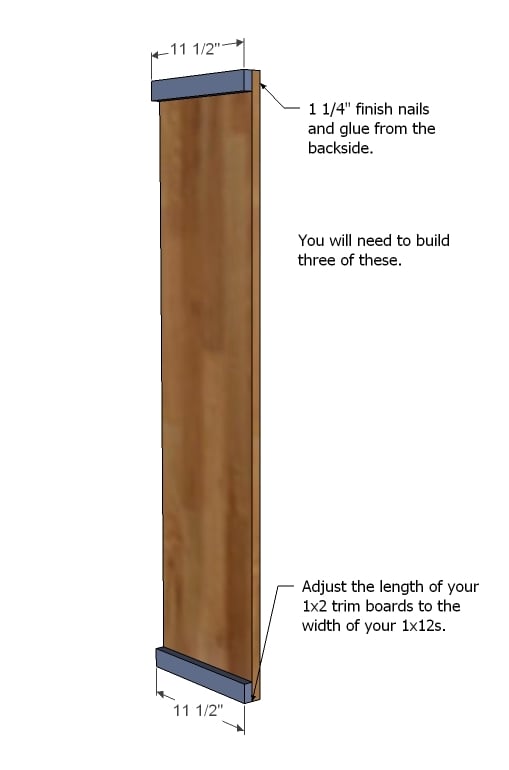
On three of the 1x12s @ 46 5/8" long, trim the top and bottom edges out with 1x2s as shown above. Attach with glue and 1 1/4" finish nails from the back side to hide your nail holes.

Step 2

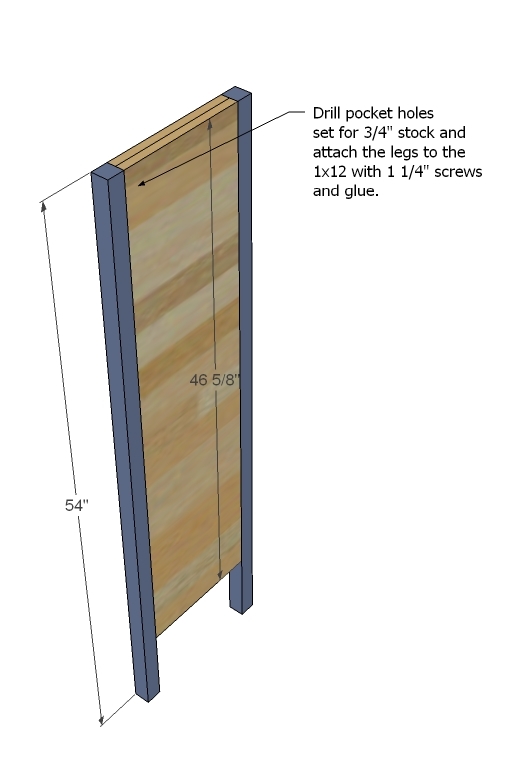
All of the 1x12s @ 46 5/8" should have pocket holes drilled on the insides, on the long edges, approximately every 8-12 inches. On the 1x12s that you trimmed out, attach legs as shown above.

Step 3

You could either use pocket holes for 1 1/2" stock, or 2 1/2" screws countersunk to join two of the leg panels as shown above. For added stability, you could also add the 2x2s shown in step 8 now too. Use glue and adjust for square.

Step 4

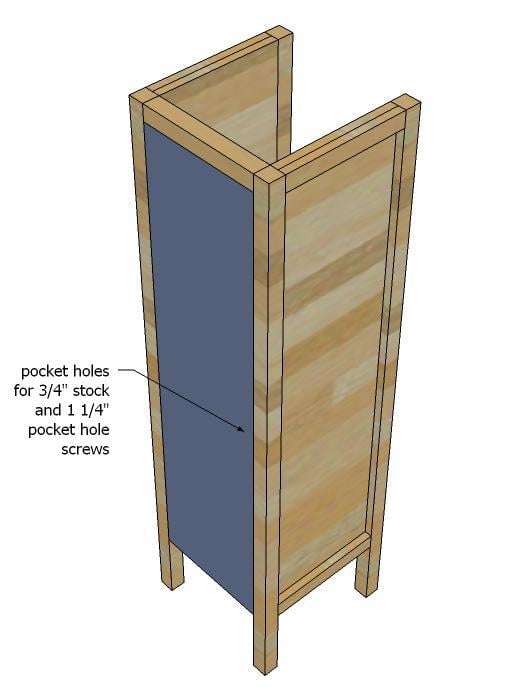
The remaining 1x12 will fill in the back.

Step 5

Step 6

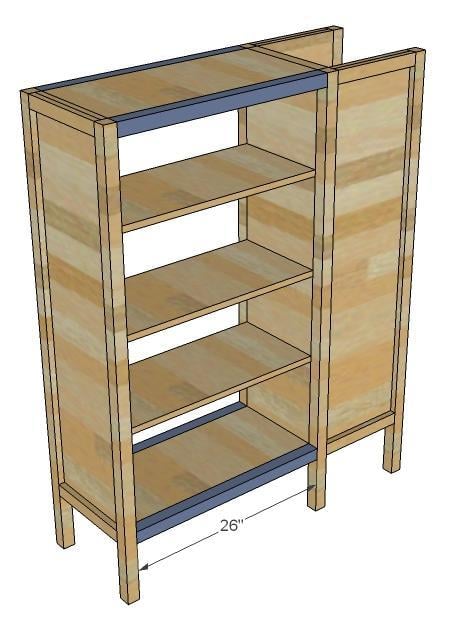
If you have not already attached the trim to the top/bottom shelves, do so with either 2" finish nails and glue, or 1 1/4" pocket hole screws from the underside.

Step 7

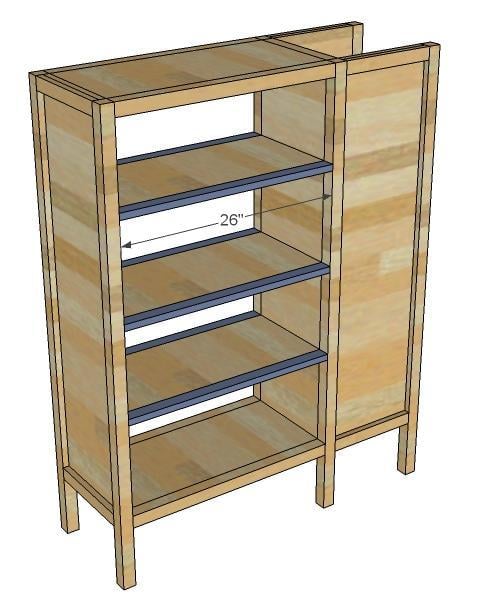
Shelf trim. The difference in this shelf trim is that it is 1x2s instead of 2x2s. You can use 2x2s, it's just the look.

Step 8

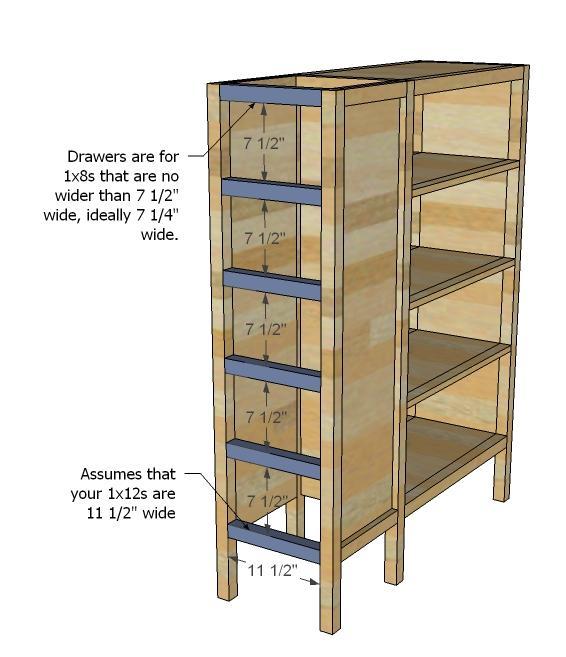
This cabinet is designed for drawers with a 1x8 face. Measure the width of you 1x8s. With a 7 1/4" wide 1x8, you will be able to have drawer faces with 1/8" gaps around all sides. Attach the 2x2 drawer dividers as shown above. These are not supportive (no weight will be resting on them) so you can use 2" finish nails and glue.

Step 9

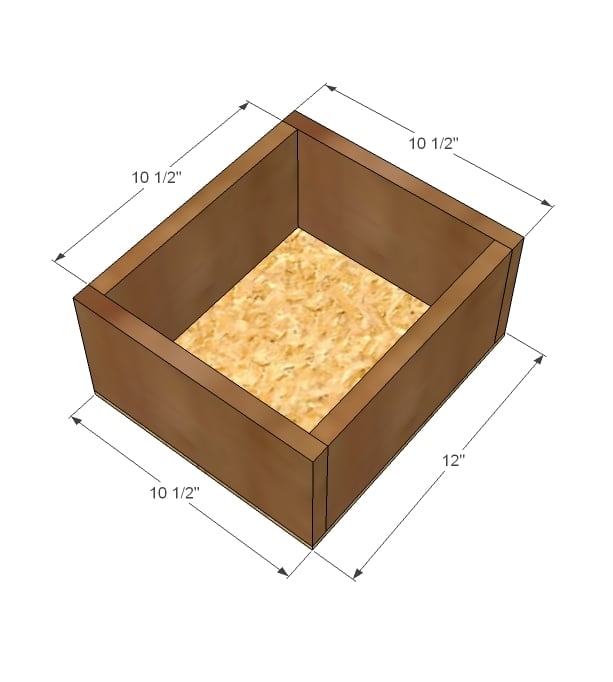
Now it's time to build the drawer boxes. Each box needs to be 1" less in width than the opening for the drawer (for standard drawer slides). Measure first your drawer opening, and then build your drawer to fit.

Attach 1/4" plywood to the bottoms of the drawers. Use the drawer slides that are bottom/side mount so that the weight of the drawer is resting directly on the drawer slide (see below link).

Step 10

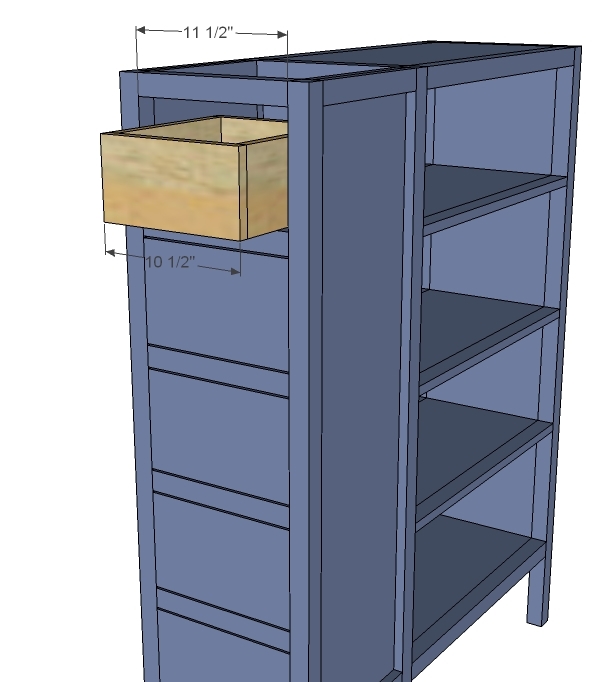
Attach the drawer slide to the drawer boxes and insert the drawer box. Remember, the drawer will get a face, so the drawer box needs to be inset 3/4". Then cut your 1x8 drawer faces to fit the opening (the ideal is 11 1/4" wide) so that there is an even gap around all sides of the drawer face. Attach the drawer face to the drawer box with 1 1/4" nails and glue.

Step 11

Finally, if you desire, you can add 1x2 trim to the sides of the drawer box to give the shelf a more rustic feel. Just use 1 1/4" finish nails and glue.

When you to to assemble the bed, you can simply screw from the top underside of the shelf with 3" screws into the underside of the top bunk.

Finishing Instructions
Preparation Instructions
Fill all holes with wood filler and let dry. Apply additional coats of wood filler as needed. When wood filler is completely dry, sand the project in the direction of the wood grain with 120 grit sandpaper. Vacuum sanded project to remove sanding residue. Remove all sanding residue on work surfaces as well. Wipe project clean with damp cloth.

It is always recommended to apply a test coat on a hidden area or scrap piece to ensure color evenness and adhesion. Use primer or wood conditioner as needed.

Comments

Choleia (not verified)

Mon, 04/04/2011 - 05:46

Hi Ana this is awesome! We built our son the loft bed with the ladder (we didn't have room for the stairs). Do you have any suggestions on how we can add the bookshelf and dresser to the loft bed. Thanks for all that you do!

Guest (not verified)

Mon, 04/04/2011 - 11:42

I saw that you were featured on younghouselove (my other favorite blog other than yours) this morning!

Hopefully, it'll bring many more readers and future builders to your AMAZING website! I've been a follower for about 7 months or so, and the first thing I wake up and read is your blog.  Thanks for inspiring so many people.  Hoping to do my very first build when the weather warms up a bit.  Being a newbie, it's a little scary, but I have a mile-long list of things and before you know it, summer will be over.

Thanks again, Ana.

Gem (not verified)

Wed, 04/06/2011 - 11:32

We're looking at all kinds of bunk-bed/loft plans online to adapt for
our use, this looks very much like what we want to do -- without the
bottom bed, lol.  We have 3 girls we're trying to fit into a smallish
bedroom, and we're actually considering building 3 loft/bunks like
you've drawn, with dresser space one end, desk opposite end, in a I_I
shape across three walls of the room.  I really like the design of the
dresser space in your plans, as the drawers would open out into the room
& leave the under-loft area more open for their own private
dressing area/toys for the younger one.  I also love the shelves, leaves
things more versatile -- could use baskets there for more clothing/toys
storage, or for books too.

Rita Ogle (not verified)

Wed, 04/06/2011 - 11:53

Please tell me what is on the other side of the bed, I didn't see anywhere on the plans where it showed what was on the other side.  Is it a bookcase and what would you recommend doing with it, if you had to place this side against the wall?

Rita Ogle (not verified)

Wed, 04/06/2011 - 11:57

I see now that the plans are broken down in 3 sections, duh!  So sorry to be clueless.  Thanks so much for the excellent plans. 

analyst23

Sat, 10/22/2011 - 08:56

Just getting started on building this and we're going to be using magnetic blackboard paint on the sides of the dresser instead of the trim. My girls are going to be so excited to find out about that little surprise!

Frequently Asked Questions

Wood Questions

What kind of wood should I use?
Most of our plans use standard construction lumber like pine or fir. It's affordable, easy to work with, and easy to find. It's also rapidly renewing and biodegradable, so a great eco friendly choice!

Can I use hardwoods instead?
Yes—just keep in mind they're heavier, cost more, and can be tougher on tools and harder to join together and finish. I recommend not tackling a hardwood project until after you have built several softwood projects.

What if my boards are warped?
Choose the straightest boards at the store. You can often work around slight warps by cutting them into shorter pieces.

What wood should I use for outdoor furniture?
Use red-toned or pressure-treated 2x lumber for framing, and cedar or cedar fence pickets for the decking. Outdoor furniture should be built like a deck—your local home center can help recommend the right wood for your climate.

Will my wood move or warp after I build?
Potentially, especially in humid climates. Let your wood acclimate indoors before building. Once acclimated and kept in a stable environment, movement should be minimal. Remember, most houses are built using framing lumber - it's all about keeping moisture down indoors.

Cutting Questions

Do I need a miter saw?
A miter saw is great, creating fast, safe, and precise cuts, even for beginners. But most plans can be built with a circular saw and a straight edge. If using a circular saw to cut, take time to practice, and get good at making cuts, before cutting your project boards.

How do I get clean cuts with a circular saw?
Clamp your board, measure twice, cut slow, and use a sharp blade. This takes practice, so spend some time making cuts. I go through becoming proficient at freehand cutting in my course, it is worth taking if you want to master this skill.

Will the store cut my wood?
Yes—most stores will do rough cuts to help you transport your materials home. But from store to store, the quality of cuts could greatly vary.

Joinery Questions

What screws should I use?
We recommend star-head self tapping screws for framing, most common sizes are 2-1/2", 1-3/4". Pre-drill if close to the edge or you find your wood is splitting.

Do I have to use pocket holes?
Pocket holes are the cheapest, easiest and fastest way to do some joints - like edge to edge or a hidden fastener joint. There are other methods, but these can be time consuming and expensive. We recommend using pocket holes as indicated in plans for best results.

How do I keep things square?
Use a speed square and measure diagonals after each step. Always clamp joints before screwing to keep them tight and flush.

Finishing Questions

Stain or paint before or after building?
A quick sand before and a full finish after gives the best results. Pre-finish if you're doing two-tone or detailed finishes.

What type of finish?
Use oil-based or water-based stain. For paint, cabinet-grade latex or enamel works great. High use surfaces on indoor projects should get a coat of polyurethane, I recommend a Helsman or Spar or other flexible poly that won't crack or peel with wood movement. For exterior projects, use a finish suitable for exterior fences.

How to get a smooth finish?
Start with a well sanded project. Sand between coats (220 grit), wipe clean, and apply light coats with a foam brush or roller.

Plan Questions

Can I change the size?
Many people do, and that's the great thing about building your own furniture! But do keep in mind going bigger might mean more supports are required, and often plans are optimized for minimal material waste.

Are these beginner-friendly?
Yes—plans are written with simple tools and clear steps in mind, with every effort to make plans as simple as possible.

Can I sell what I build?
Absolutely! Just don’t resell or repost the plans themselves.

General Questions

What tools do I really need?
A drill, circular saw, tape measure, square, and a few clamps will get you through most projects.

Do I need a workshop?
Nope! A driveway or small patio is plenty to get started, just make sure you have a level place to work. If you find you are building several projects a year, creating a small workbench is a great way to store tools and have a dedicated workspace.

What if I mess up?
Wood filler, sanding, or flipping boards goes a long way. Mistakes are part of the process!

What can I do to make my projects look more professional?
Start with straight boards, make accurate cuts, clamp all joints, and line up everything neatly. Sand thoroughly, use a neutral finish, and apply it in light coats for a clean look.

I've never built anything before. Where should I start?
Start with a few smaller softwood projects to get hands-on experience. Or if you're tackling a big project, buy a little extra lumber and practice your cuts and joints first. If possible, work with someone who has a bit of experience.

Care & Maintenance

How long will my furniture last?
With good joinery and regular care, your DIY furniture can last for decades. I have pieces in my own home that are over 20 years old and still going strong! One of the best parts about DIY furniture is that it’s easy to repaint, refinish, or repair—so your projects can grow and adapt with you.

How should I care for outdoor furniture?
Lightly pressure wash or hose it down once or twice a year. Tighten screws and reapply finish as needed to protect it—just like a deck or fence. A little upkeep goes a long way in extending the life of your furniture.

How about indoor furniture?
Regularly dust or wipe with a damp cloth. If it starts to look worn, a light sanding and touch-up paint or stain can refresh it in no time. DIY pieces are meant to be durable and fixable—so don’t be afraid to give them some love now and then.

Want to Build with Confidence?

Check out my ebook: 12 Skills to Build Your Own Furniture
It walks you through the core skills every builder needs—measuring, cutting, joinery, and finishing—so you can build beautiful furniture that lasts.

Still Have Questions?

Email us anytime at [email protected] and we’ll be happy to help!