
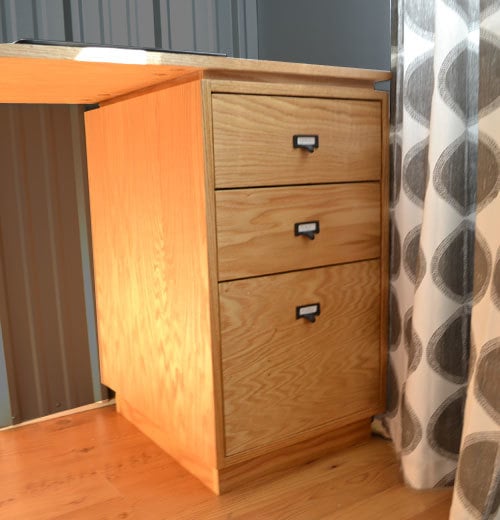

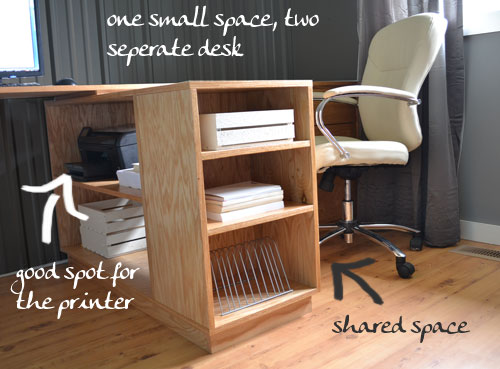
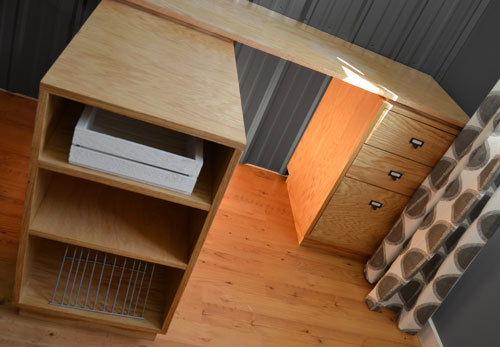
Base cabinet inspired by West Elm Modular Office Collection, made with PureBond Formaldehyde Free Plywood. Bottom drawer sized for files.

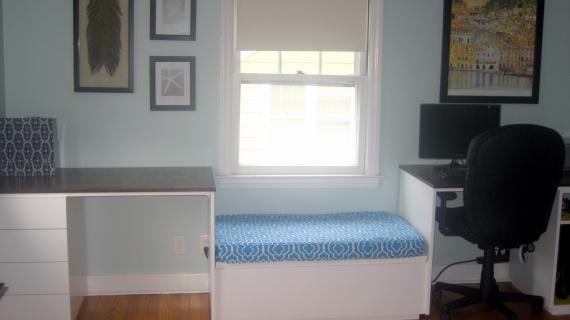
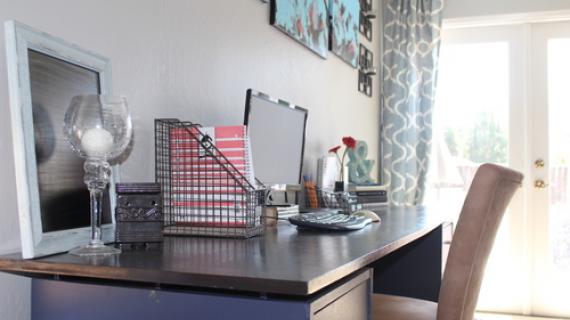
Remember my Formaldehyde free office I'm working on?


Preparation
1 - Sheet 3/4" PureBond Hardwood Plywood (Available at the Home Depot)
1 - Sheet 1/4" PureBond Hardwood Plywood (Available at the Home Depot)
3 - 21" Drawer Slides, Euro Style (the cheapo white ones)
1 - 1x2 @ 6 feet long in matching hardwood (Optional - you can use plywood for this step)
1 - 25' long roll Edge Banding in matching veneer
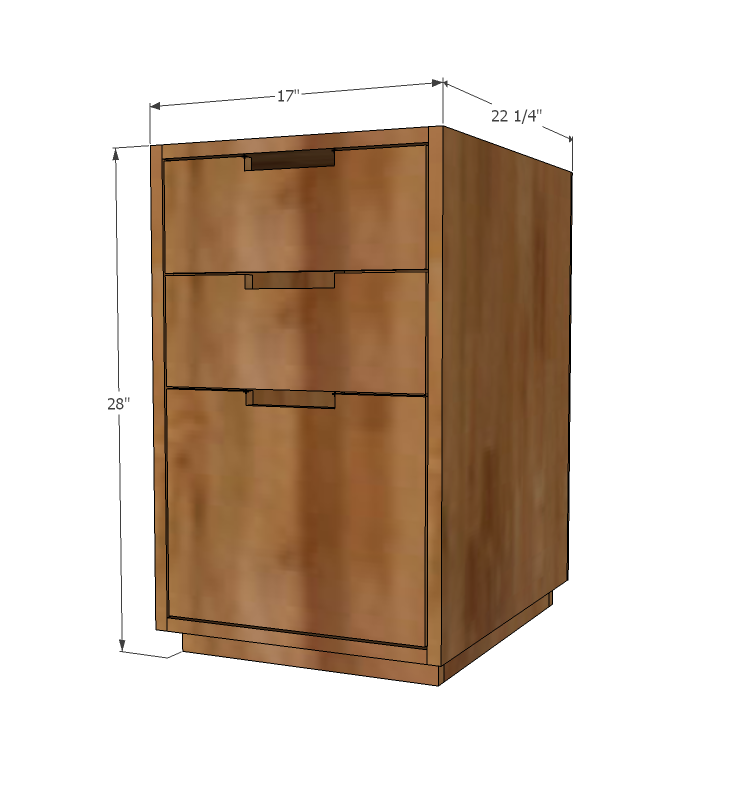
2 - 3/4" PureBond Formaldehyde Free Plywood @ 15 1/2" x 22" (Top/Bottom)
2 - 3/4" PureBond Formaldehyde Free Plywood @ 26 1/2" x 22" (Sides)
1 - 3/4" PureBond Formaldehyde Free Plywood @ 12 1/2" x 15 1/4" (Drawer Face)
2 - 3/4" PureBond Formaldehyde Free Plywood @ 6" x 15 1/4" (Drawer Face)
2 - 3/4" PureBond Formaldehyde Free Plywood @ 21" x 11 1/2" (File Drawer Sides)
2 - 3/4" PureBond Formaldehyde Free Plywood @ 13" x 11 1/2" (File Drawer Front/Back)
4 - 3/4" PureBond Formaldehyde Free Plywood @ 21" x 5" (Small Drawer Sides)
4 - 3/4" PureBond Formaldehyde Free Plywood @ 13" x 5" (Small Drawer Sides)
1 - 1/4" PureBond Formaldehyde Free Plywood @ 17" x 26 1/2" (Back)
3 - 1/4" PureBond Formaldehyde Free Plywood @ 14 1/2" x 21" (Drawer Bottoms)
2 - 1x2 @ 19" (Footer)
2 - 1x2 @ 15 1/2" (Footer)


Please read through the entire plan and all comments before beginning this project. It is also advisable to review the Getting Started Section. Take all necessary precautions to build safely and smartly. Work on a clean level surface, free of imperfections or debris. Always use straight boards. Check for square after each step. Always predrill holes before attaching with screws. Use glue with finish nails for a stronger hold. Wipe excess glue off bare wood for stained projects, as dried glue will not take stain. Be safe, have fun, and ask for help if you need it. Good luck!
Instructions
Step 1
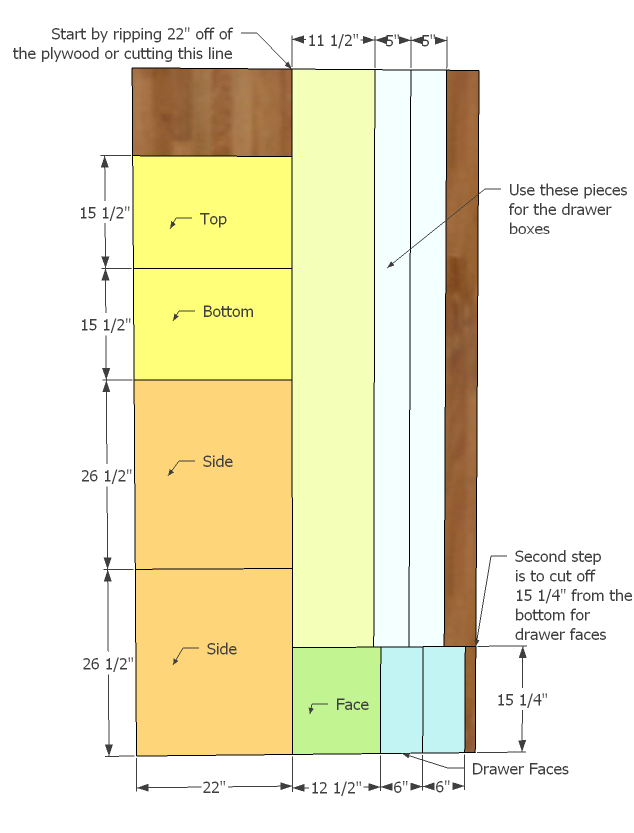
I'd say the most intimidating thing about working with plywood is knowing how to cut it. You want to be very careful, because plywood has a wood grain, and if your pieces aren't cut correctly, you'll end up with mis matched wood grains. And then of course there's taking into account the width of a saw blade, and understanding that a saw blade doesn't cut corners . . .
So follow this plywood cutout as shown above. You can ask your Home Depot to make the rip cuts and then take the strips home - that's what I do to fit everything in my car. Start by ripping 22" off of the plywood. From this piece, you will cut yoru top, bottom and sides. Then from the remaining piece, cut 15 1/4" off of it, approximately 26" wide, as shown in the diagram. You will cut your drawer faces from these pieces. Finally, rip the remaining plywood piece into one 11 1/2" wide strip and two 6" wide strips. If you are using plywood for the footer and not 1x2s, rip the remaining scrap into a 1 1/2" wide strip.
Cut out all pieces now according to the cut list.
Step 2

I've given instructions to use both a Kreg Jig and simple screws throughout. For Kreg Jig users, you will want to set your jig for 3/4" stock and use 1 1/4" pocket holes. If you are using screws, use a countersink bit and 2" screws and glue and take extra measures to check for square. Build your box as shown above.
Step 3
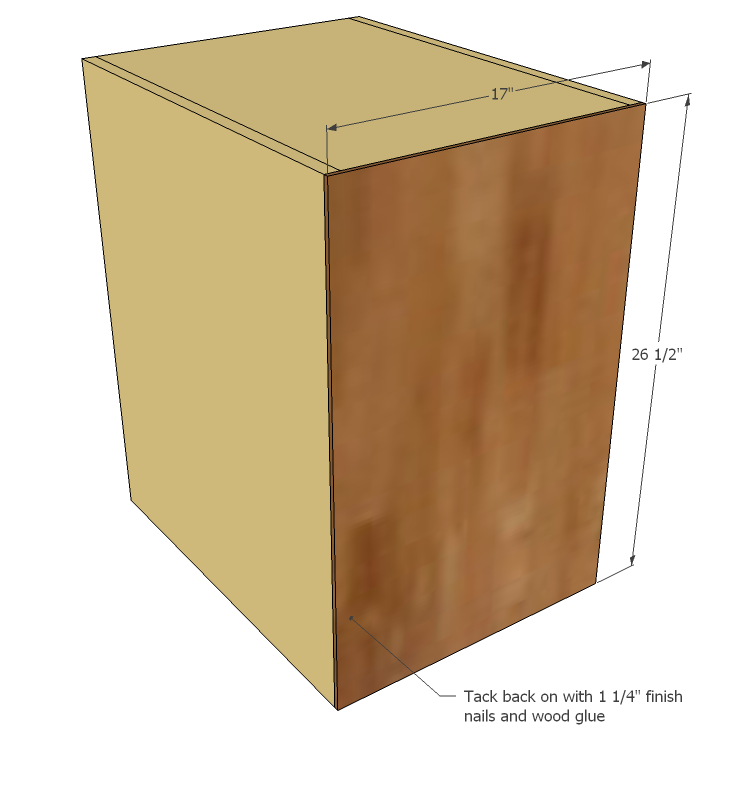
Adjust the box for square and glue and nail the back on.
Step 4
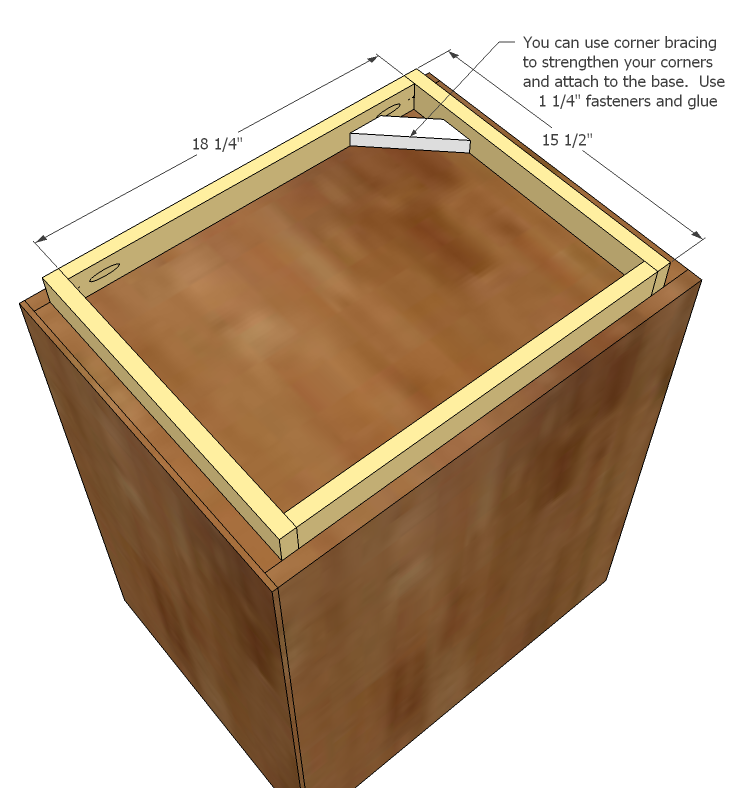
You can use either 1x2s or strips of the 3/4" plywood cut into 1 1/2" widths here. If you have a pocket hole jig, attach with the pocket hole jig, or otherwise, use corner bracing to attach to base.
Step 5
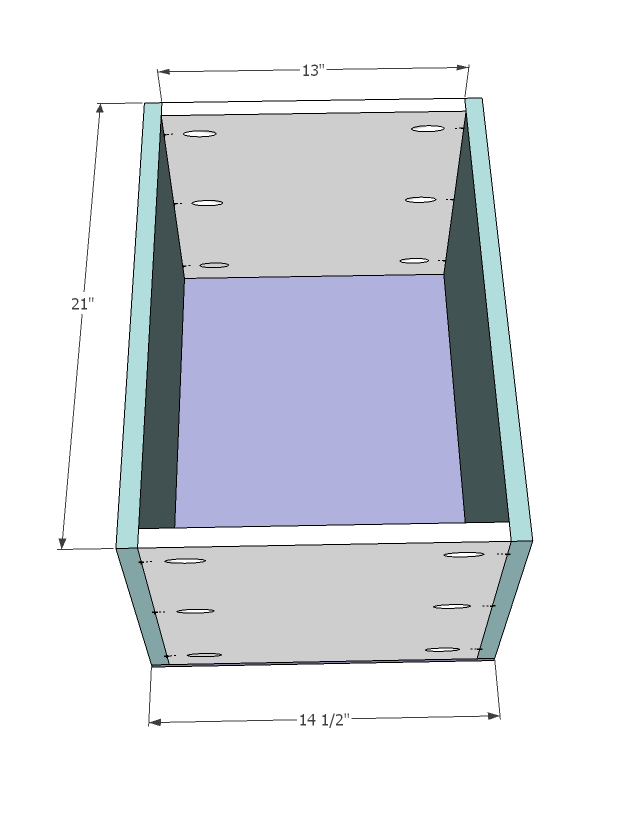
Step 6

Install drawers using the drawer slides. Start with the bottom drawer, install it as close to the bottom as possible and work your way upwards. Note that all drawers need to be installed 3/4" inset from the front to allow for drawer faces.
Step 7
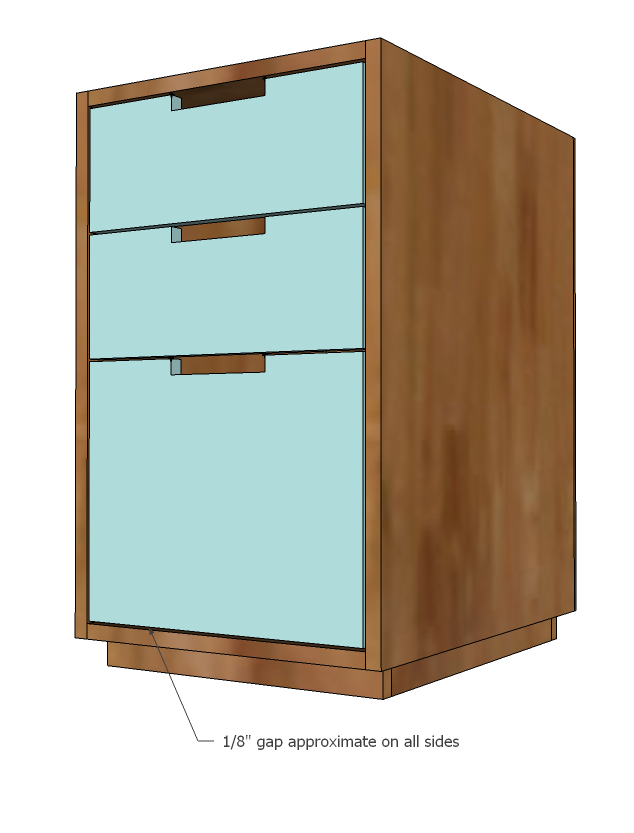
Once all of your drawer boxes are intalled, line the drawer faces up so there is an even gap and attach with 1 1/4" finish nails. Remove drawers and further attach faces with 1 1/4" screws from the inside of the drawers.
It is always recommended to apply a test coat on a hidden area or scrap piece to ensure color evenness and adhesion. Use primer or wood conditioner as needed.

Comments
Ashley @ Desig… (not verified)
Tue, 07/12/2011 - 14:23
LOVE it!
Totally LOVE the desk and how it's turning out!
emmarosemc
Tue, 07/12/2011 - 14:59
how high up are the rails on
how high up are the rails on the inside of the cabinet?
fethiye
Tue, 07/12/2011 - 16:52
drawer face too thick?
Unless I am mistaken, the drawer face is also made from 3/4 plywood. Why not use 1/4 plywood for that, and use the 3/4 plywood for the bottom, where it may be holding weight?
Guest (not verified)
Thu, 07/14/2011 - 13:28
I think you can probably
I think you can probably build the drawers however you want. I use half inch ply for the face and sides and router in a groove for a 1/4" ply bottom.
Mike K (not verified)
Tue, 08/09/2011 - 06:29
edge of plywood - banding?
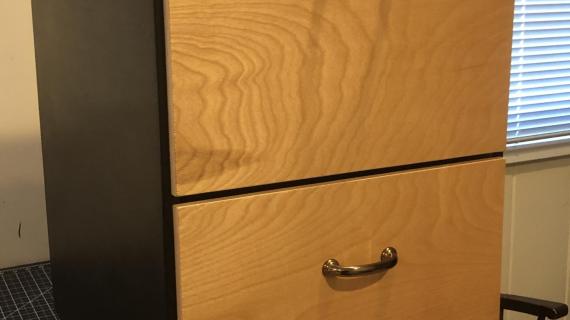
From most posts, you recommend to put an edge banding for plywood to make it look smooth. Here there is nothing saying that? But in the final pictures everything looks smooth. Did you just sand it smooth or was the wood like that?
Supermom77 (not verified)
Sun, 09/18/2011 - 20:53
color
What color would you paint the wall behind the desk if it is made of cherry? Sugestions please.
Guest (not verified)
Tue, 10/04/2011 - 10:33
drawers
can this be made with 2 of the large size drawers without other measurement adjustments? thanks!
Guest (not verified)
Thu, 10/06/2011 - 16:13
I am totally psyched to start
I am totally psyched to start this project. This will be my first major project like this and I have many questions.
Do you use a particular kind of varnish? Since we are going through the trouble of using formaldehyde free wood, I figure it also matters what you put on the wood.
I haven't found any 21" drawer slides. I found both 20" and 22". Would one of these work or am I looking for the wrong thing altogether?
I also can't seem to get the pdf for this project to open. Does it have additional instructions in it? I'm going to need all the help I can get.
Thanks much! I love your site. I think my husband hates it because now I want to do so many different projects. Hopefully, I will make some amazing things and change his mind. :)
Jim Sears (not verified)
Fri, 11/11/2011 - 07:38
Eco Office File Cabinet
This is a very good plan. However, nobody makes a 21" drawer slide as the plans suggest. I used a set of 20" drawer slides instead. But you could increase the size of the carcass sides, top, bottom and the drawer sides by 1", and use 22" slides. But the 20" slides work just fine.
Greg Veltri (not verified)
Thu, 11/29/2012 - 08:00
21" drawer slides
If you google 21" drawer slides you will come up with dozens of suppliers of 21" drawer slides, so yes they do make them. However I could not find them local, had to order them off of Amazon.