Face Framed 1x12 Bookshelf

Grace's Bookshelves - Free easy plans
Difficulty
Beginner Projects
| Print this plan

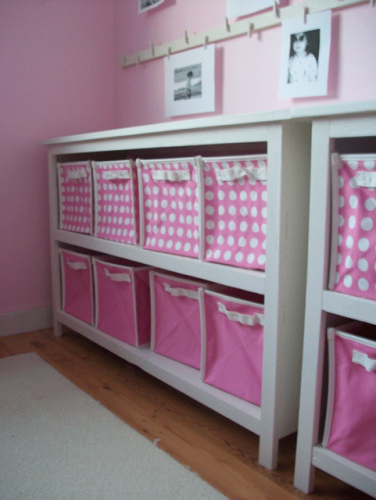
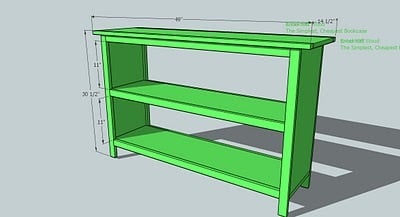
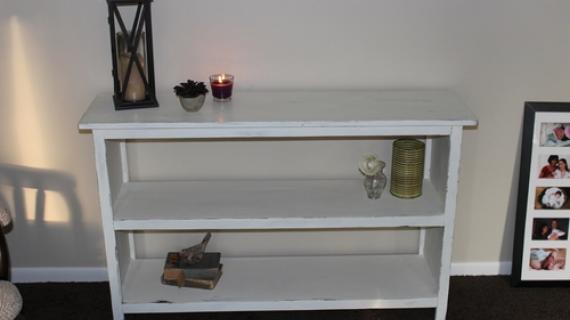
Here's a basic woodworking plan for a bookshelf built using 1x12s.  The face frame on the front and back make up the legs and front and back overhangs.  Free step by step plans from Ana-White.com

Pin For Later! 

Grace's Bookshelves - Plans for Two

Dimensions
dimensions for bookshelf
49" wide x 30" tall x 14 1/2" wide - fits 8 standard fabric drawers/cubes

Preparation

Shopping List
  • 2 - 1×12 pine boards
  • 5 - 1×2 pine boards 
Common Materials
1 1/4 inch screws
1 1/2 inch screws
1 1/4 inch finish nails
2 inch finish nails
120 grit sandpaper
primer
wood conditioner
paint
paint brush
Cut List

A) 2 – 1x12 @ 44″ (Shelves)

B) 2 – 1x12 @ 25 3/4″ (Sides)

C) 2 – 1×2 @ 44″ (Top Supports)

D) 4 – 1×2 @ 29 3/4” (Legs)

E) 4 – 1×2 @ 42 1/2″ (Shelf Trim)

F) 2 – 1×2 @ 11 1/2″ (Bottom Side Trim)

G) 1 – 1x12 @ 49″ (Top)

H) 2 – 1×2 @ 49″ (Top Trim)

Cutting Instructions

THIS PLAN IS FOR 2 BOOKCASES!!! Have Home Depot or Lowes cut your sheet of MDF into 11 1/2″ strips, 8 feet long. Remeber that the saw blade takes up 1/4″ (approximately) so you CANNOT mark the plywood and cut. You must mark one cut, cut, mark the next cut and so forth. General Directions. See the post on choosing your wood type. I built my bookcases out of MDF and had success by not nailing within 1″ of the edges. I used lots of glue. Cut all your boards first and use 2″ nails unless otherwise specified. Always take a square after each step (See HOW-TO section).

Tools
Tape Measure
Speed Square
Pencil
Safety Glasses
Hearing Protection
Drill
Brad Nailer
Power Sander

Instructions

Step 1

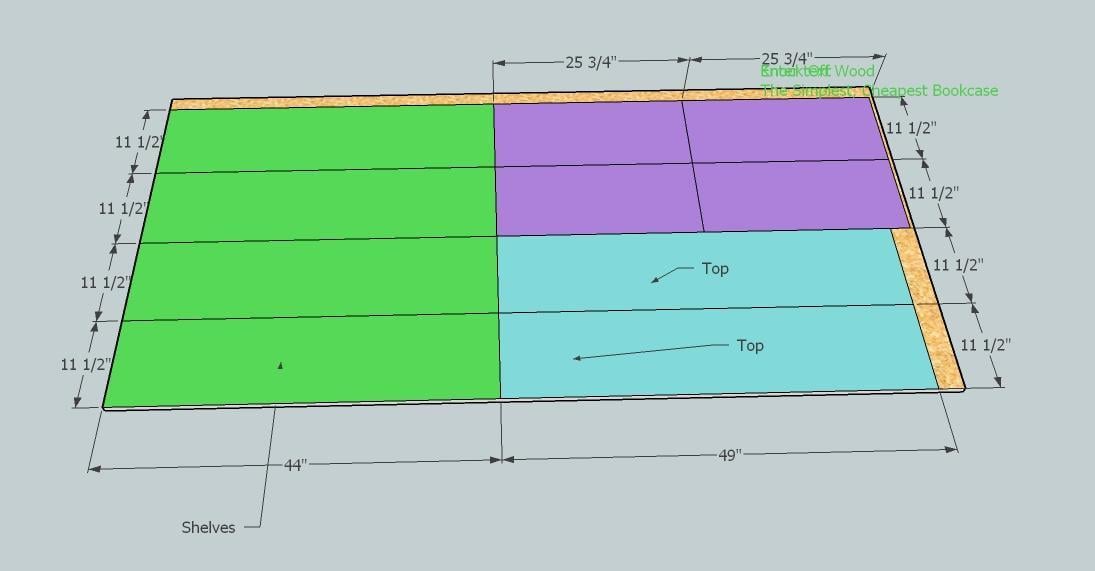
Optional Plywood Ripping Diagram

You can also use plywood or MDF to build this bookshelf.  One sheet of plywood will build two bookshelves.  Here's how to cut the plywood for two bookshelves

Have your plywood or MDF cut into 11 1/2" wide strips to create 1x12 boards. Carefully follow the cutting layout here to conserve boards and get exactly two bookshelves out of 1 sheet of plywood.

Step 2

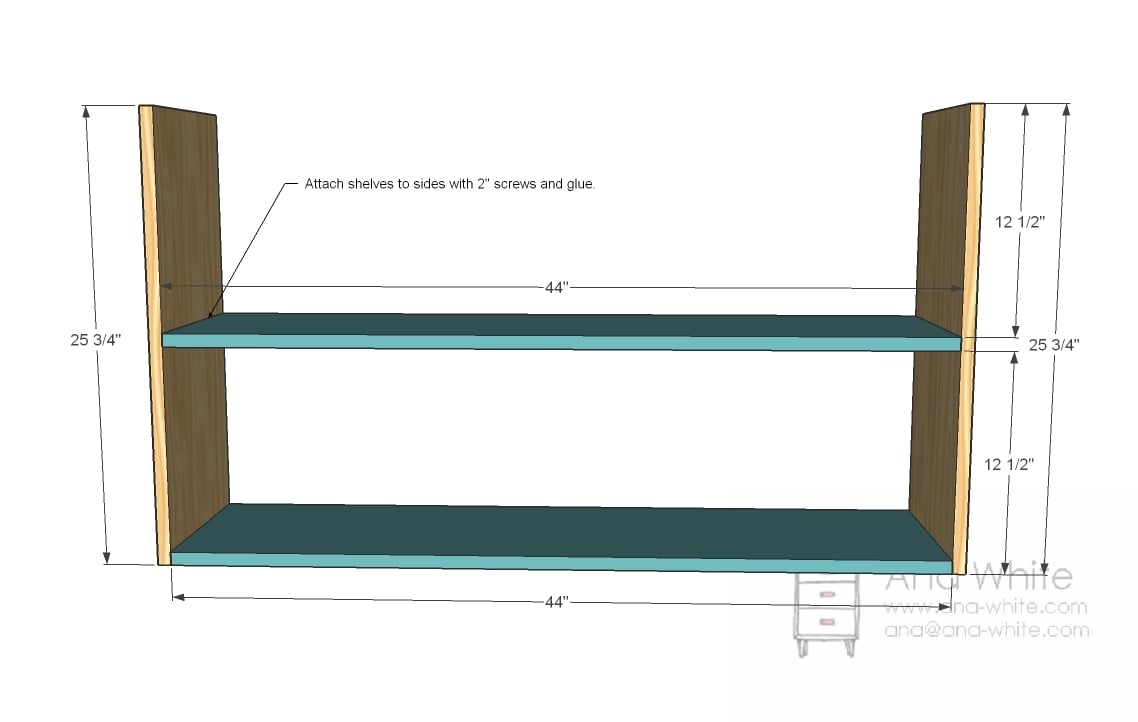
Attach the sides to the shelves with either 2" nails and glue or 2" screws and glue. This shelf is fully framed, so nails will suffice, but screws - though harder to hide - are stronger. 

Step 3

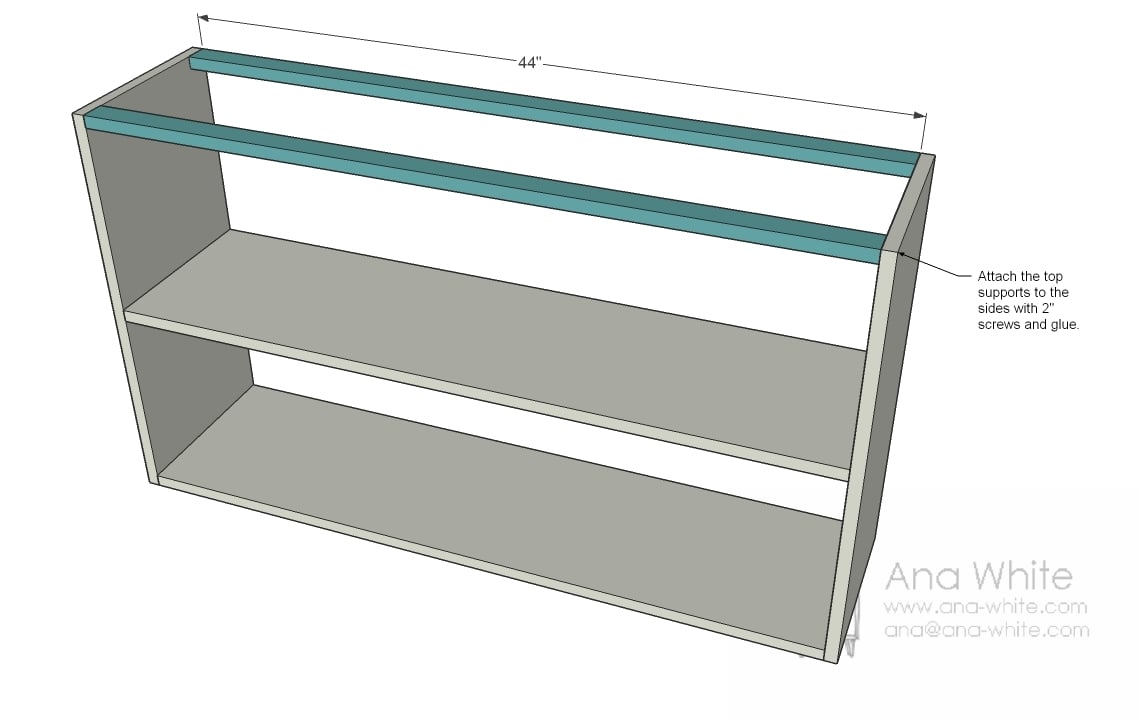
Top Supports. Add the top supports (C, Green) as shown above.

Step 4

Attach the top to the bookcase as shown above. You can fasten through the supports to hide screw/nail holes.

Step 5

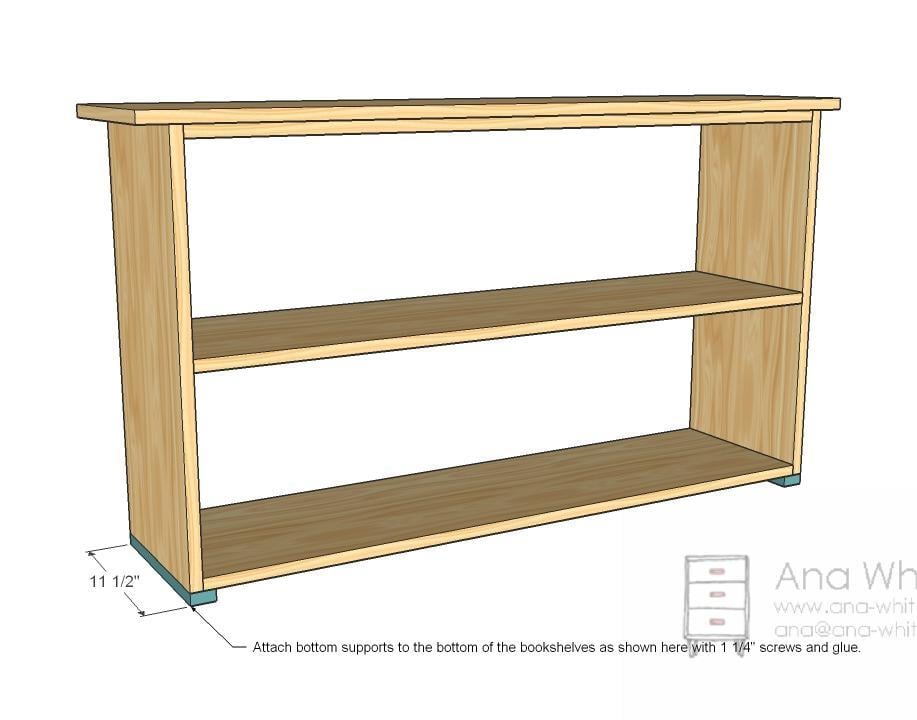
Attach the bottom trim pieces with 1-1/4" brad nails and wood glue.

Step 6

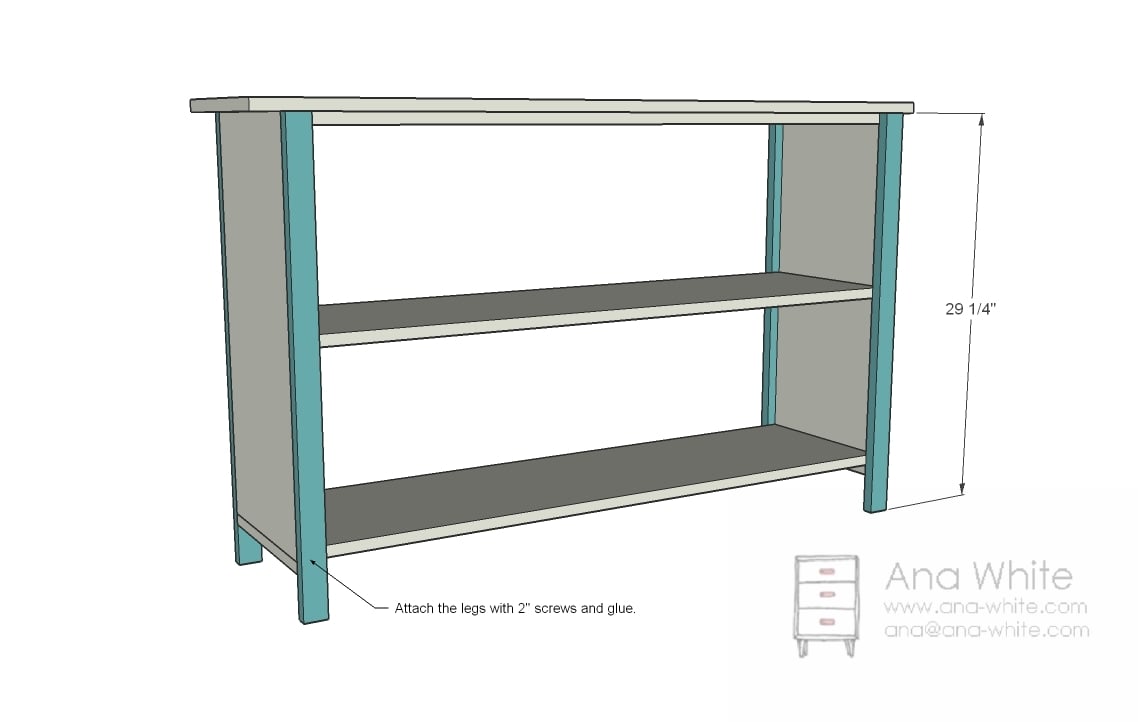
Now it's time for the legs. Flush to the top and outsides. Use 2" finish nails and glue or screws and glue.

Step 7

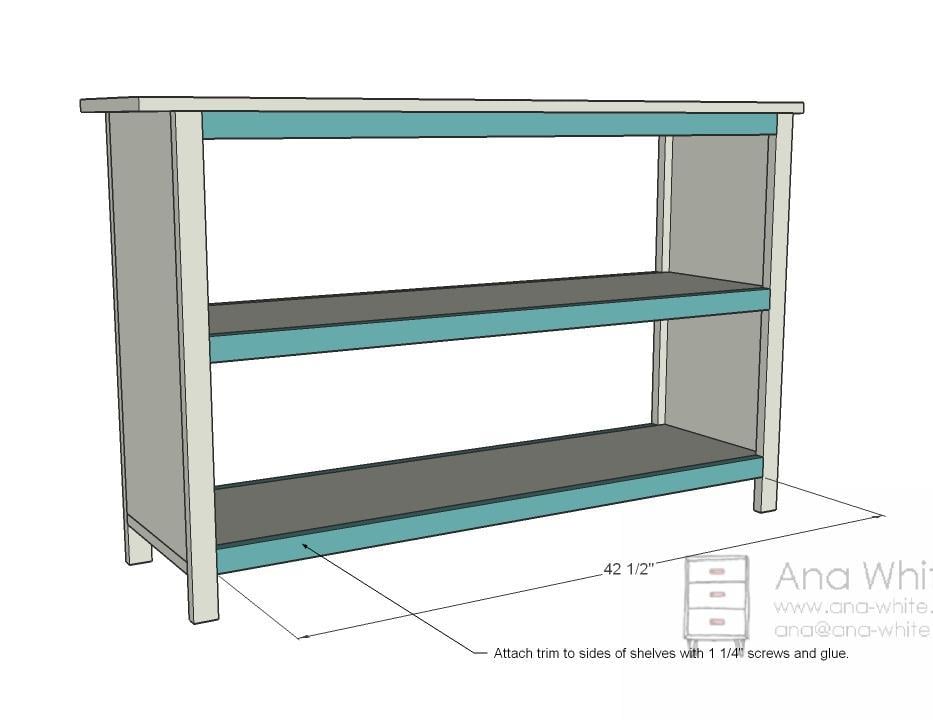
Shelf trim. Attach the shelf trim just like you did the legs. You should also fasten 2" finish nails through the sides of the legs into the shelf trim.

Step 8

Finally, attach the top trim as shown above. I would use finish nails here to hide holes. Don't forget your glue.

Step 9

Fill nail holes with putty and sand and finish as desired.

Comments

Guest (not verified)

Wed, 03/23/2011 - 21:35

Wonderful!! I'm heading to the lumber store first thing in the morning.  :D

Thanks a lot!   : )

Guest (not verified)

Mon, 04/11/2011 - 20:07

Hey Ana!

I love the new site.  I've got a question for you though.  On some of your projects you list the projected cost.  What's the projected cost on this one?  
Thanks for the wonderful plans!  Keep them coming!

Guest (not verified)

Sat, 04/16/2011 - 12:04

These were the first things my hubby and I built off of your site and unfortunately have had a heck of a time with them.  We are not inexperienced builders, have built a home and several pieces of furniture.  We ripped 1x2's from 1x8's because furring strips at HD looked terrible.  We measured several times, read over the plans and found that the shelf trim pieces were too long by almost an 1 1/2 in. . Rather than 42 1/2 in. we had to cut to 41 in. instead. Also, in our case we found that the top side overhang was 1 1/2 in  instead of 1 3/4in.  Not really a big deal, but tedious to have to go back and cut every piece again.  We ended up making three for our sunroom/library and it was time well spent with my hubby!

upersonal (not verified)

Sun, 04/24/2011 - 16:42

I dont find the length of the 1x2 pine boards i need to buy. Can you let me know how many is really needed? It was mentioned 10, but the sum of all measurements for 1x2s added upto 97.16ft which would require me to find 10 10feet 1x2s. I dont find them in homedepot of lowes and even if we find they are more than 4-5$ per piece. Can you please advice based on what you have done.

reply

upersonal (not verified)

Sun, 04/24/2011 - 16:01

I dont find the length of the 1x2 pine boards i need to buy. Can you let me know how many is really needed? You mentioned 10, but the sum of all measurements for 1x2s added upto 97.16ft which would require me to find 10 10feet 1x2s. I dont find them in homedepot of lowes and even if we find they are more than 4-5$ per piece. Please advice.

Guest (not verified)

Sat, 05/07/2011 - 10:28

I also had problems with this. If you go to their website, Lowes has what are called "furring strips" for less than $1 (in my area). They come in at least 8ft. lengths, so even if you need to buy 13- 8ft lengths, it still should come in under $20 for all materials. Obviously, this would change how you made your cuts if Ana was using 10ft long pieces.

Hope that is helpful.

Lindsay (not verified)

Wed, 11/28/2012 - 04:46

Hi Ana! I'm in the process of my FIRST project and am so excited about it! Quick question: I am wanting to stain my finished project. I am using oak hardwood plywood for the majority of the project. The plans call for 1 x2 pine boards for the trim. Will this look okay in the end, using two different woods, if I'm wanting to stain it a dark espresso?

mamachamp

Sun, 07/14/2013 - 14:14

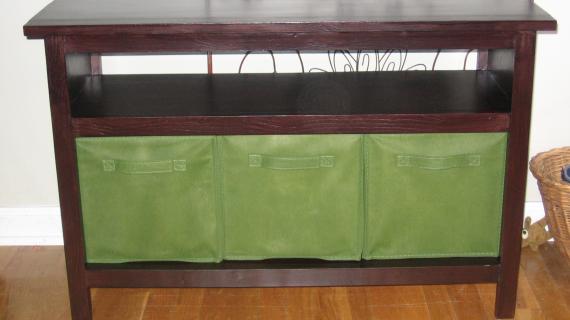
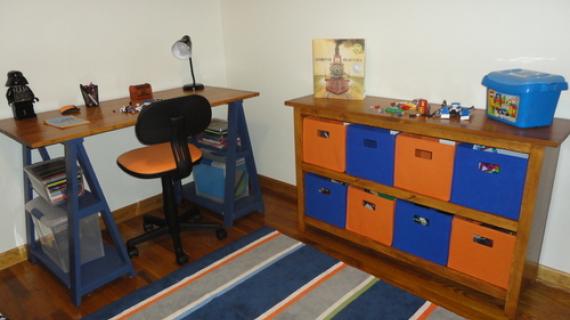
I want to build this a TV stand for my daughter and am VERY new at this. Could you clarify how it to do it using a kreg jig?

Frequently Asked Questions

Wood Questions

What kind of wood should I use?
Most of our plans use standard construction lumber like pine or fir. It's affordable, easy to work with, and easy to find. It's also rapidly renewing and biodegradable, so a great eco friendly choice!

Can I use hardwoods instead?
Yes—just keep in mind they're heavier, cost more, and can be tougher on tools and harder to join together and finish. I recommend not tackling a hardwood project until after you have built several softwood projects.

What if my boards are warped?
Choose the straightest boards at the store. You can often work around slight warps by cutting them into shorter pieces.

What wood should I use for outdoor furniture?
Use red-toned or pressure-treated 2x lumber for framing, and cedar or cedar fence pickets for the decking. Outdoor furniture should be built like a deck—your local home center can help recommend the right wood for your climate.

Will my wood move or warp after I build?
Potentially, especially in humid climates. Let your wood acclimate indoors before building. Once acclimated and kept in a stable environment, movement should be minimal. Remember, most houses are built using framing lumber - it's all about keeping moisture down indoors.

Cutting Questions

Do I need a miter saw?
A miter saw is great, creating fast, safe, and precise cuts, even for beginners. But most plans can be built with a circular saw and a straight edge. If using a circular saw to cut, take time to practice, and get good at making cuts, before cutting your project boards.

How do I get clean cuts with a circular saw?
Clamp your board, measure twice, cut slow, and use a sharp blade. This takes practice, so spend some time making cuts. I go through becoming proficient at freehand cutting in my course, it is worth taking if you want to master this skill.

Will the store cut my wood?
Yes—most stores will do rough cuts to help you transport your materials home. But from store to store, the quality of cuts could greatly vary.

Joinery Questions

What screws should I use?
We recommend star-head self tapping screws for framing, most common sizes are 2-1/2", 1-3/4". Pre-drill if close to the edge or you find your wood is splitting.

Do I have to use pocket holes?
Pocket holes are the cheapest, easiest and fastest way to do some joints - like edge to edge or a hidden fastener joint. There are other methods, but these can be time consuming and expensive. We recommend using pocket holes as indicated in plans for best results.

How do I keep things square?
Use a speed square and measure diagonals after each step. Always clamp joints before screwing to keep them tight and flush.

Finishing Questions

Stain or paint before or after building?
A quick sand before and a full finish after gives the best results. Pre-finish if you're doing two-tone or detailed finishes.

What type of finish?
Use oil-based or water-based stain. For paint, cabinet-grade latex or enamel works great. High use surfaces on indoor projects should get a coat of polyurethane, I recommend a Helsman or Spar or other flexible poly that won't crack or peel with wood movement. For exterior projects, use a finish suitable for exterior fences.

How to get a smooth finish?
Start with a well sanded project. Sand between coats (220 grit), wipe clean, and apply light coats with a foam brush or roller.

Plan Questions

Can I change the size?
Many people do, and that's the great thing about building your own furniture! But do keep in mind going bigger might mean more supports are required, and often plans are optimized for minimal material waste.

Are these beginner-friendly?
Yes—plans are written with simple tools and clear steps in mind, with every effort to make plans as simple as possible.

Can I sell what I build?
Absolutely! Just don’t resell or repost the plans themselves.

General Questions

What tools do I really need?
A drill, circular saw, tape measure, square, and a few clamps will get you through most projects.

Do I need a workshop?
Nope! A driveway or small patio is plenty to get started, just make sure you have a level place to work. If you find you are building several projects a year, creating a small workbench is a great way to store tools and have a dedicated workspace.

What if I mess up?
Wood filler, sanding, or flipping boards goes a long way. Mistakes are part of the process!

What can I do to make my projects look more professional?
Start with straight boards, make accurate cuts, clamp all joints, and line up everything neatly. Sand thoroughly, use a neutral finish, and apply it in light coats for a clean look.

I've never built anything before. Where should I start?
Start with a few smaller softwood projects to get hands-on experience. Or if you're tackling a big project, buy a little extra lumber and practice your cuts and joints first. If possible, work with someone who has a bit of experience.

Care & Maintenance

How long will my furniture last?
With good joinery and regular care, your DIY furniture can last for decades. I have pieces in my own home that are over 20 years old and still going strong! One of the best parts about DIY furniture is that it’s easy to repaint, refinish, or repair—so your projects can grow and adapt with you.

How should I care for outdoor furniture?
Lightly pressure wash or hose it down once or twice a year. Tighten screws and reapply finish as needed to protect it—just like a deck or fence. A little upkeep goes a long way in extending the life of your furniture.

How about indoor furniture?
Regularly dust or wipe with a damp cloth. If it starts to look worn, a light sanding and touch-up paint or stain can refresh it in no time. DIY pieces are meant to be durable and fixable—so don’t be afraid to give them some love now and then.

Want to Build with Confidence?

Check out my ebook: 12 Skills to Build Your Own Furniture
It walks you through the core skills every builder needs—measuring, cutting, joinery, and finishing—so you can build beautiful furniture that lasts.

Still Have Questions?

Email us anytime at [email protected] and we’ll be happy to help!