

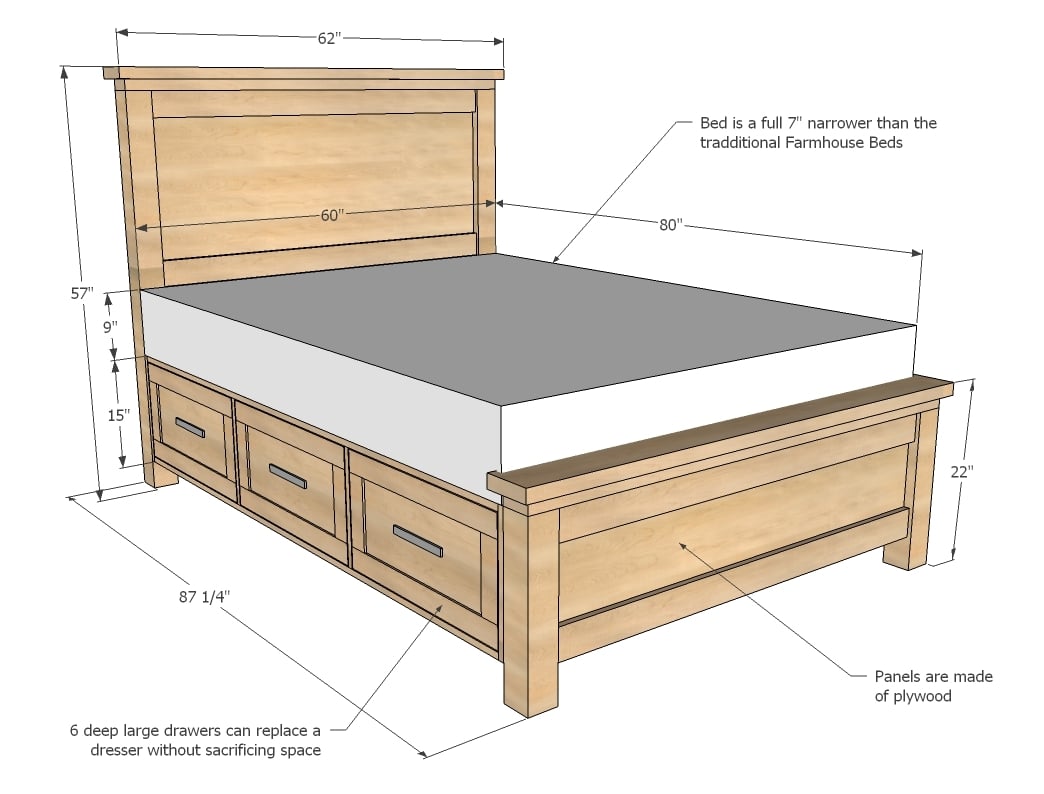
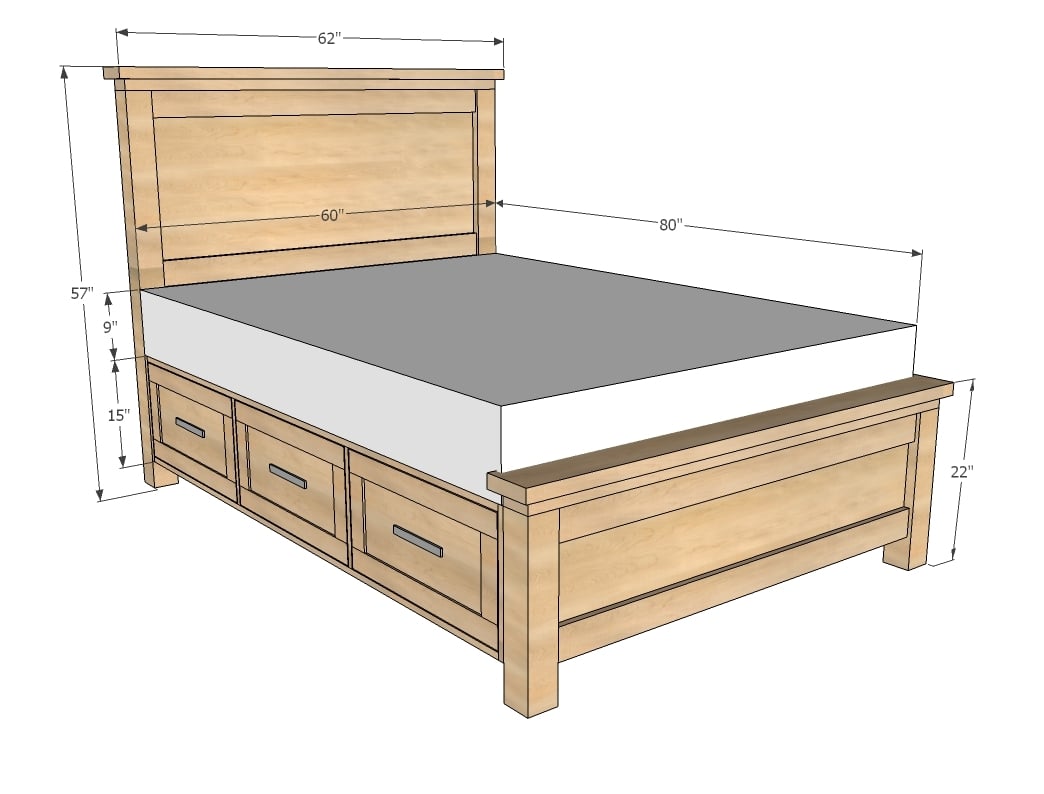
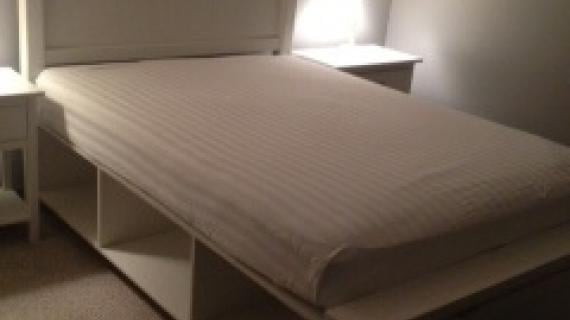
Farmhouse Bed plans for a small space! This bed packs lots of storage in a more compact profile. Detailed step by step plans to help you build your own DIY Farmhouse Bed in queen size.
Also check out our Full and Twin Farmhouse Storage Bed plans.
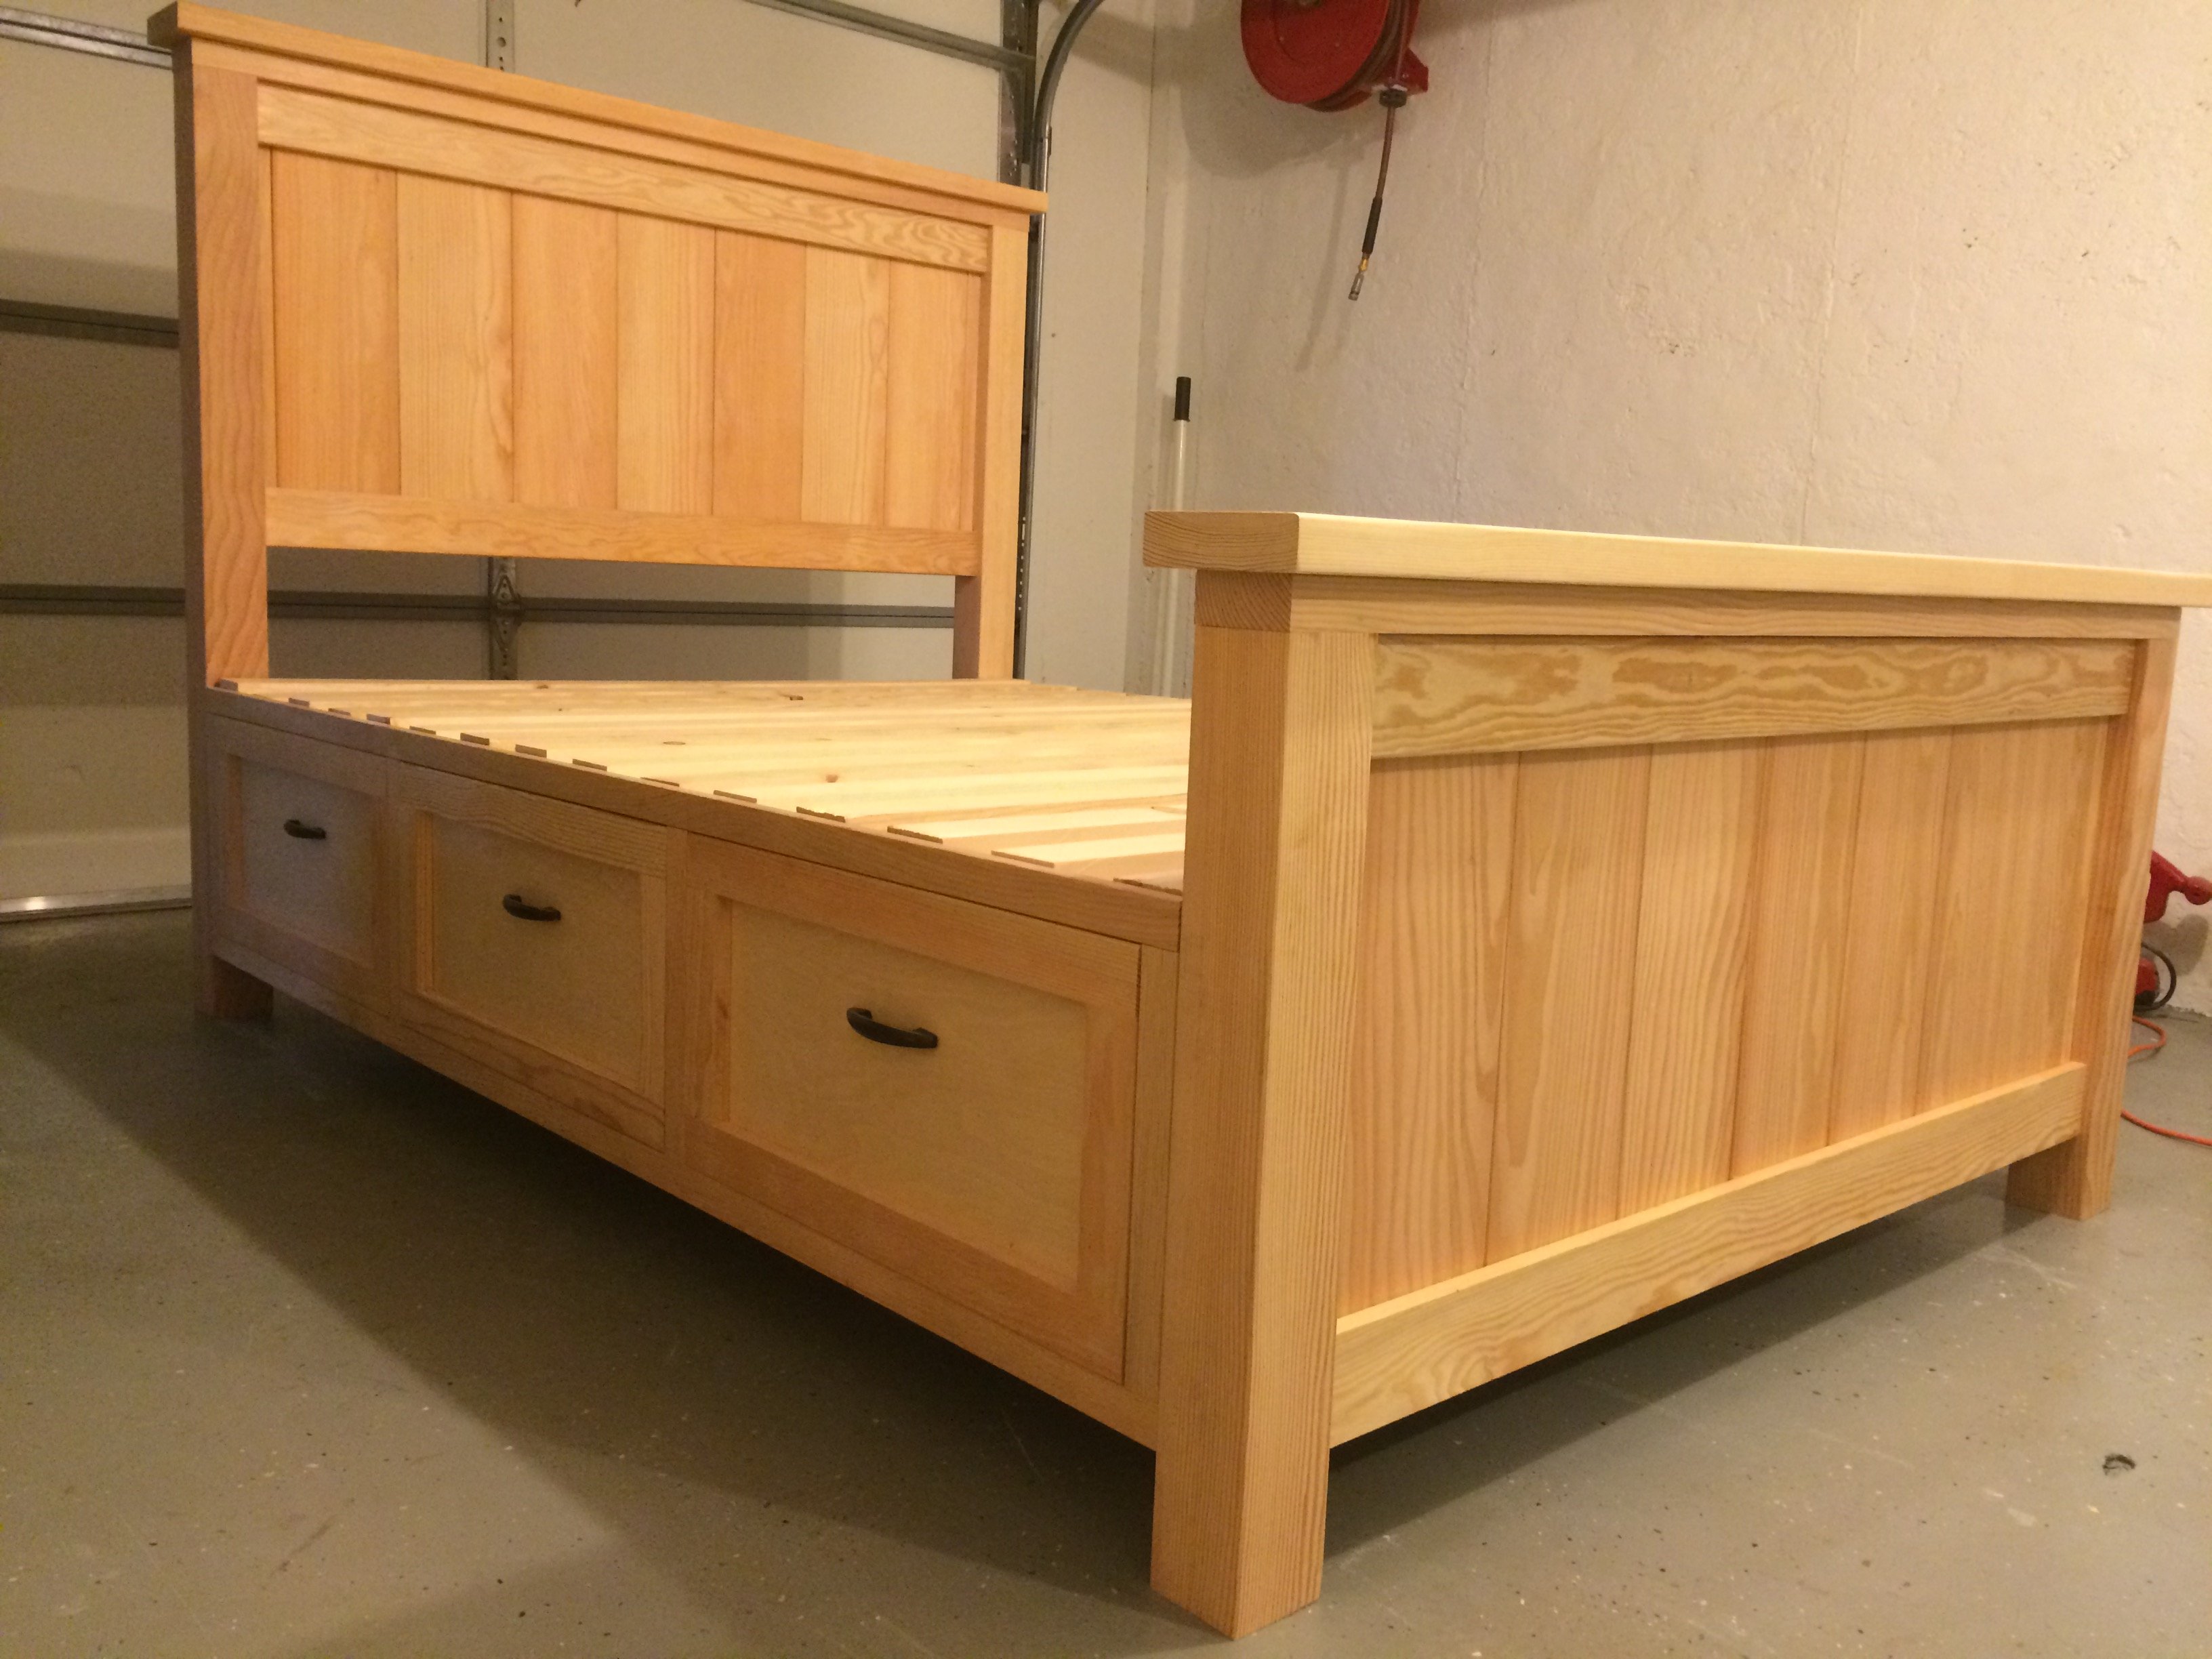
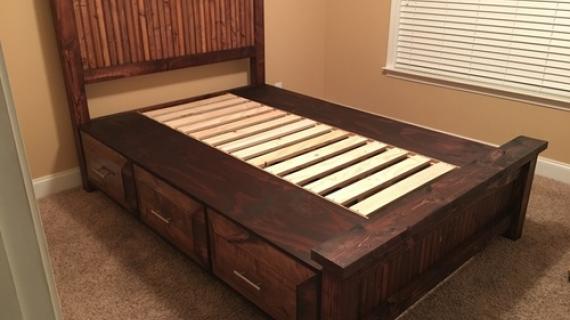
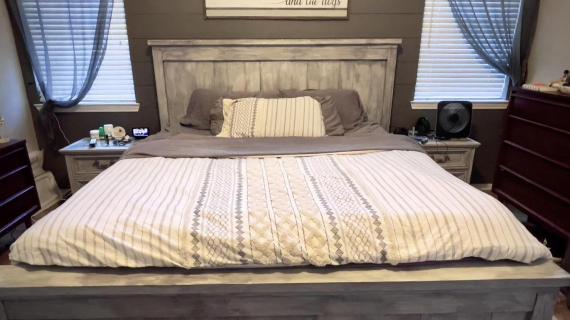
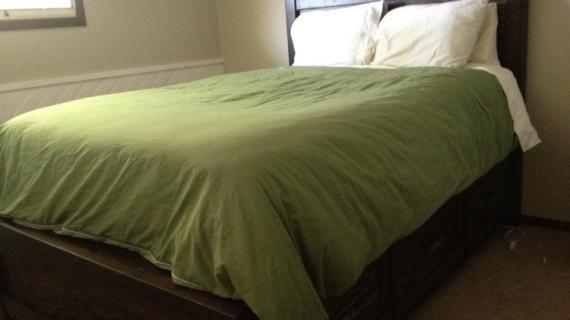
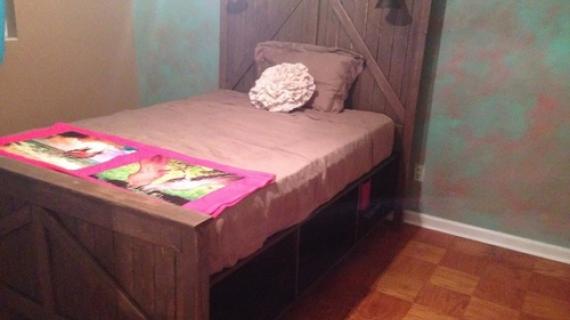
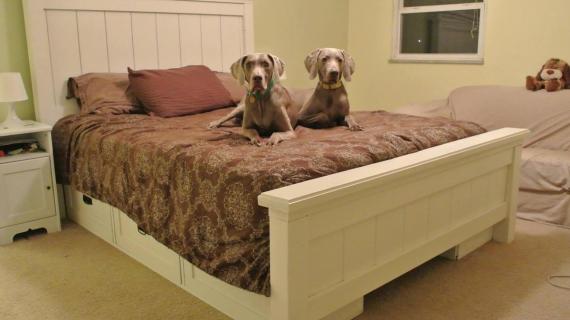
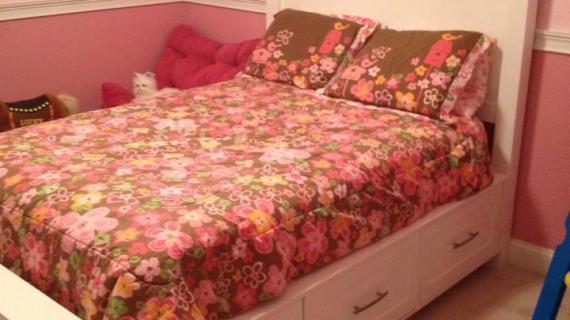
Reader submitted photo by BEEKEEPER has some modifications from plans
So excited to add this plan to the Farmhouse Bed Collection! Thank you for requesting!


Preparation
- 3 - Sheets 3/4" Plywood or other sheet goods
- 1 1/2 - Sheets 1/4" Plywood or other sheet goods
- 2 - 4x4 post, 7 feet long
- 2 - 1x4 @ 10 feet long
- 3 - 2x4 @ 10 feet long (cut longest first!)
- 5 - 1x10 @ 8 feet long (OR 1 sheet of 3/4" plywood cut into 5 strips 9 1/4" wide)
- 6 - Euro Style Drawer Slides (the cheapo white ones) 14" long, medium to heavy duty rating
- 2 - 2x6 @ 6 feet long
- 3 - 2x2 @ 8 feet long
- 9 - 1x3 @ 8 feet long
- 5 - 1/4" hobby stock, 2 1/2" wide @ 8 feet long (OR 1/4" plywood cut into strips 2 1/2" wide)
- 4" Screws (if you are not using a pocket hole jig and will be attaching 4x4 legs to panels with screws)
- 6 Knobs or handles
NOTE: Drawers are optional - can be added later or just used as storage shelves. The shopping list DOES include materials for the drawers, so if not building drawers, please adjust shopping list accordingly
HEADBOARD
- 1 - 3/4" Plywood @ 26" x 53" (Can substitute planked wood for panel to create a more authentic "farmhouse" look)
- 2 - 1x4 @ 53"
- 2 - 4x4 @ 54"
- 2 - 2x4 @ 53"
- 1 - 2x4 @ 60"
- 1 - 2x6 @ 62"
FOOTBOARD
- 1 - 3/4" Plywood @ 15" x 53" (Can substitute planked wood for panel to create a more authentic "farmhouse" look)
- 2 - 1x4 @ 53"
- 2 - 4x4 @ 19"
- 2 - 2x4 @ 53"
- 1 - 2x4 @ 60"
- 1 - 2x6 @ 62"
STORAGE BOXES
- 4 - 3/4" Plywood @ 15 1/2" x 80 1/4"
- 8 - 3/4" Plywood @ 15 1/2" x 13 1/2"
- 2 - 1/4" Plywood @ 80-1/4" x 15"
SUPPORT & CENTER
- 2 - 2x2 @ 80 1/4"
- 4 - 2x2 @ 16 3/4"
- 18 - 1x3 @ 28 1/2" (Slats to mattress specs)
OPTIONAL DRAWER BOXES
- 12 - 1x10* @ 23 1/4"
- 12 - 1x10* @ 14"
- 6 - 1/4" Plywood @ 24 3/4" x 14"
*Plywood cut into 9 1/4" strips can be substituted for 1x10s, use at least 1/2" thick plywood; for direct conversion to cut list use 3/4" thick plywood
OPTIONAL DRAWER FACES
- 6 - 3/4" Plywood @ 25 1/2" x 13 1/4"
- 12 - 1/4" hobby stock, 2 1/2" wide @ 8 1/4"
- 12 - 1/4" hobby stock, 2 1/2" wide @ 25 1/2"


Please read through the entire plan and all comments before beginning this project. It is also advisable to review the Getting Started Section. Take all necessary precautions to build safely and smartly. Work on a clean level surface, free of imperfections or debris. Always use straight boards. Check for square after each step. Always predrill holes before attaching with screws. Use glue with finish nails for a stronger hold. Wipe excess glue off bare wood for stained projects, as dried glue will not take stain. Be safe, have fun, and ask for help if you need it. Good luck!
Instructions
Step 1

Have your hardware store rip the first piece into three equal sized strips, 15 1/2" wide. Then all you have to do is make the cross cuts at home. These cuts are from the 3/4" thick plywood.
NOTE: Measurement should be 15-1/2" x 13-1/2" NOT 13-1/4" - please check with cut list
Step 2

From another sheet of 3/4" plywood, have your hardware store rip into two 15 1/2" strips and one 13 1/4" strip. From these strips cut the following pieces.
NOTE: Measurement should be 15-1/2" x 13-1/2" NOT 13-1/4" - please check with cut list
Step 3
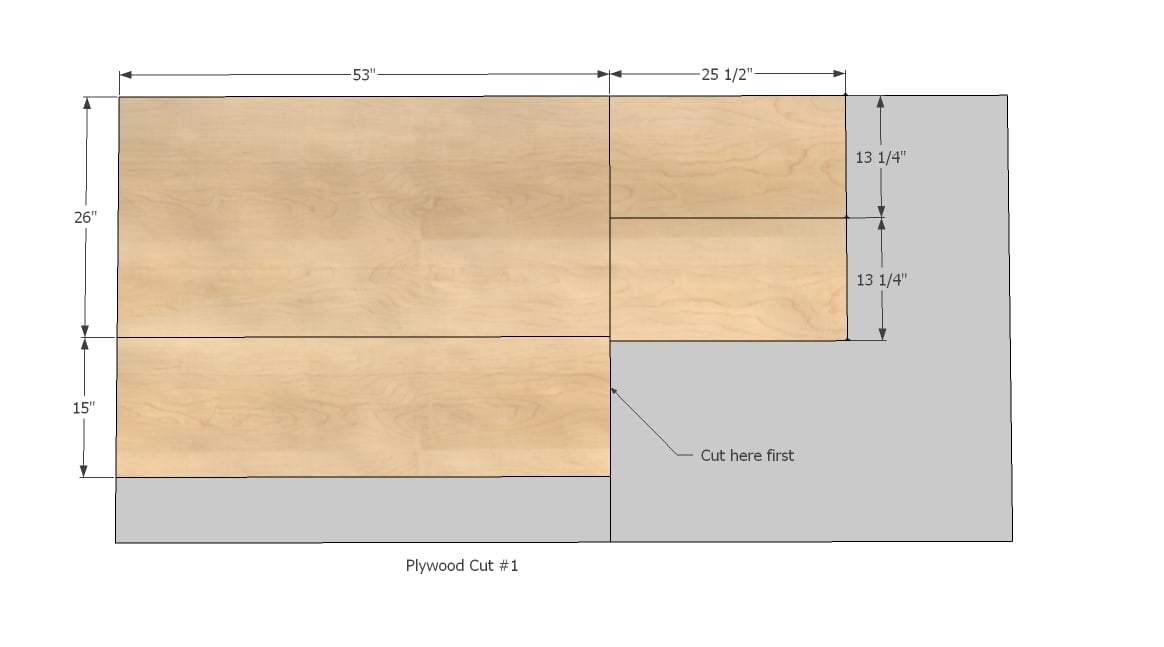
From the final 3/4" piece of plywood, cut it cross wise as noted in the diagram, and then cut your headboard and footboard panel from the larger half. From the remaining pieces, cut your remaining drawer faces as shown above.
Step 4
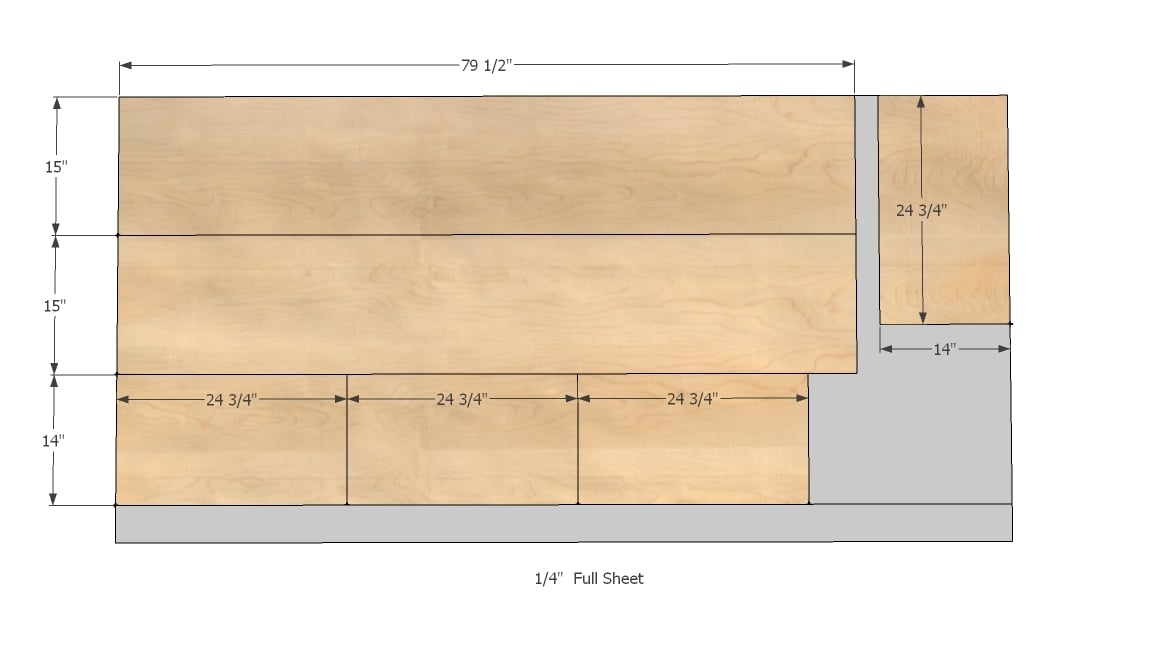
From the 1/4" plywood, cut the following pieces. You will need to either purchase an additional 1/2 sheet of plywood for the two remaining drawer bottoms, or you could use leftover 3/4" stock for the remaining two drawer bottoms.
Step 5

The largest cuts on this diagram should be 80-1/4" long, NOT 79-1/2".
Step 6
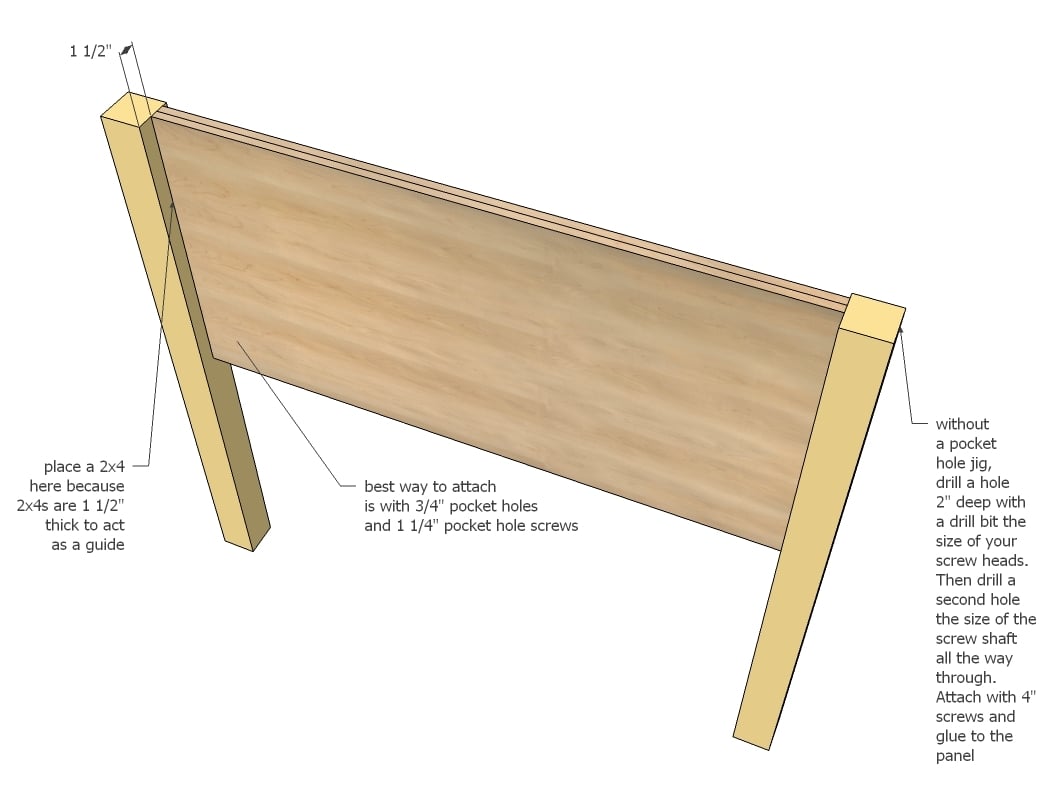
This is a relatively easy task if you have a Kreg Jig - simply drill 3/4" pocket holes along sides of panel and attach to legs. Make sure you are leaving 1 1/2" to the back of the panel as shown above (Very important with footboard).
Step 7
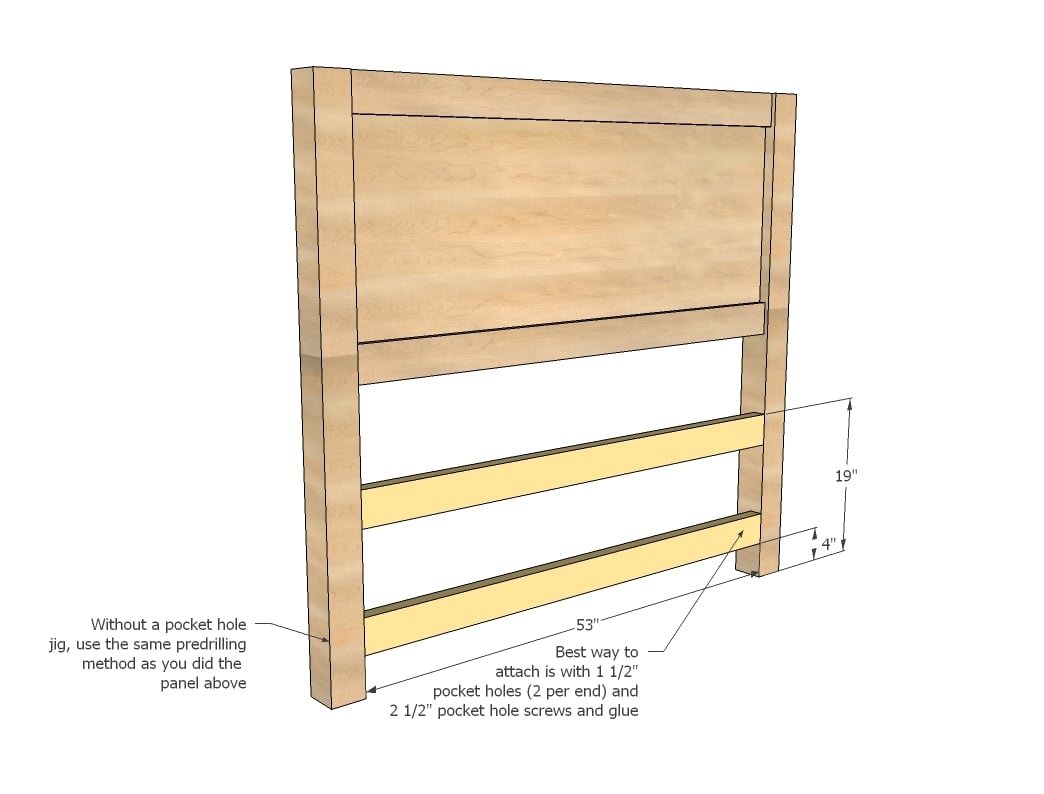
Attach the bottom supports in the same manner as the panel, carefully locating as shown in diagram.
Step 8
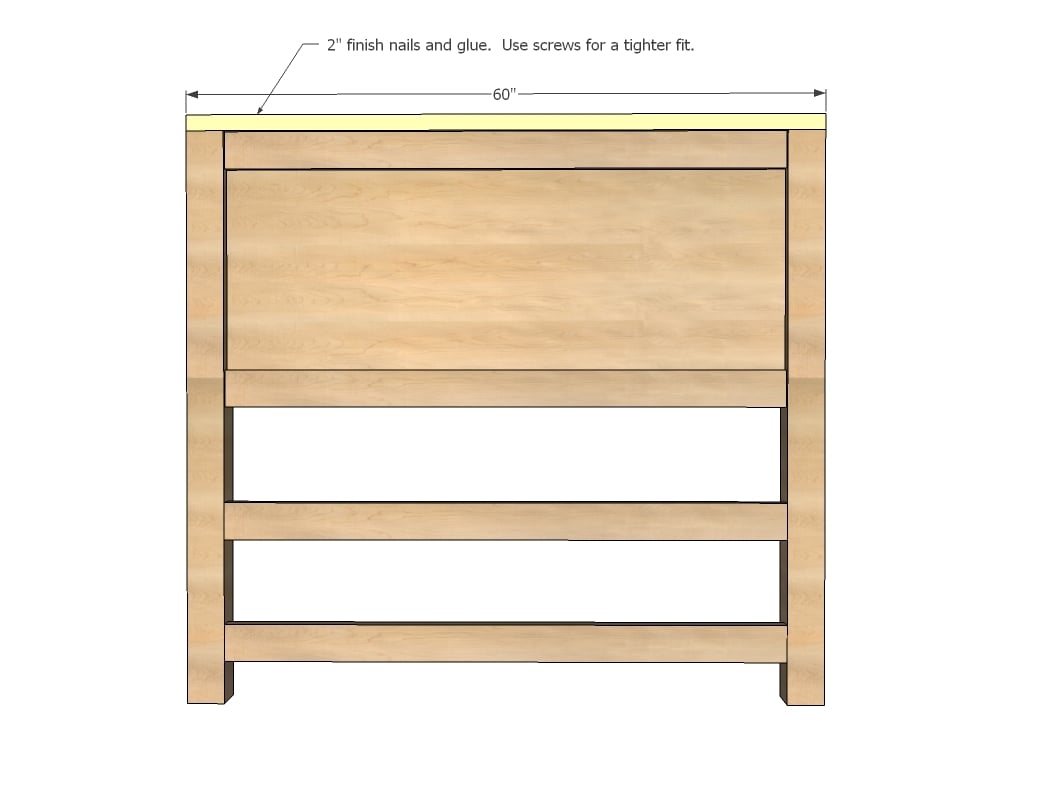
Hooray, an easy step! Attach as shown above.
Step 9
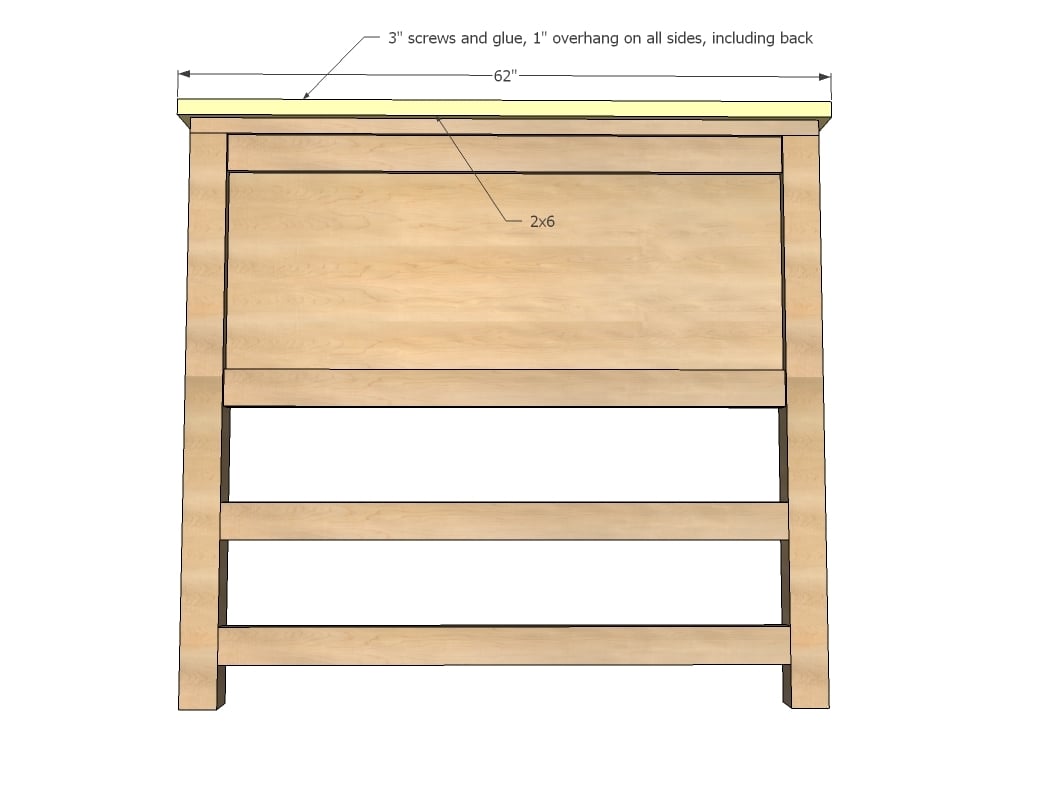
Finally the crown. I'd screw on myself to minimize any gaps.
Step 10
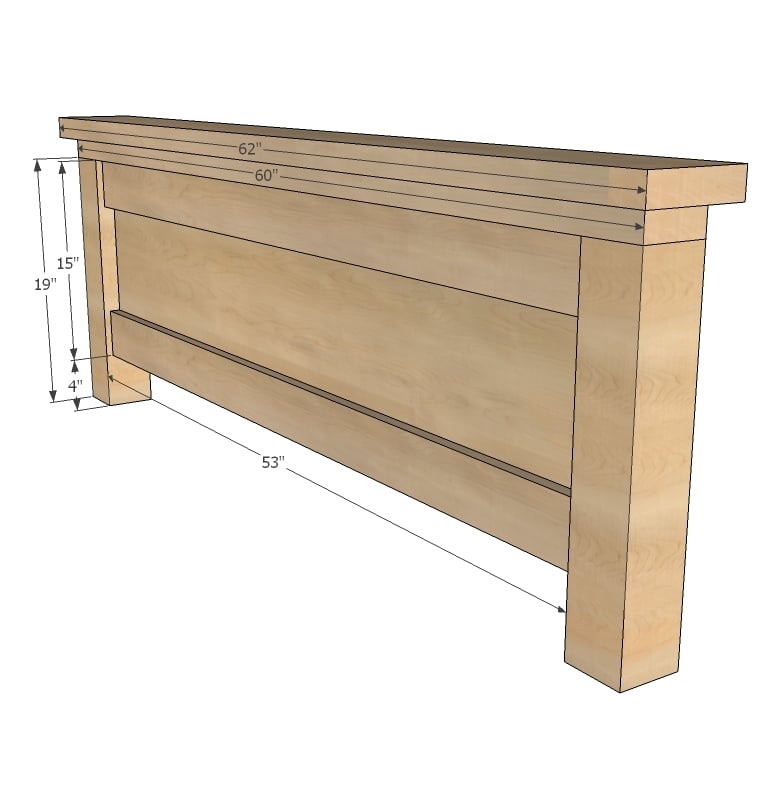
The footboard is built just like the headboard - make sure you leave 1 1/2" to the back of the panel - see next step ...
Step 11

This is so your 2x4 spacers fit just right in the backs. Attach with screws and glue.
Step 12

You can build these with either a pocket hole jig or traditional screws. Build square if you are using drawers or your drawers will not slide right.
Step 13
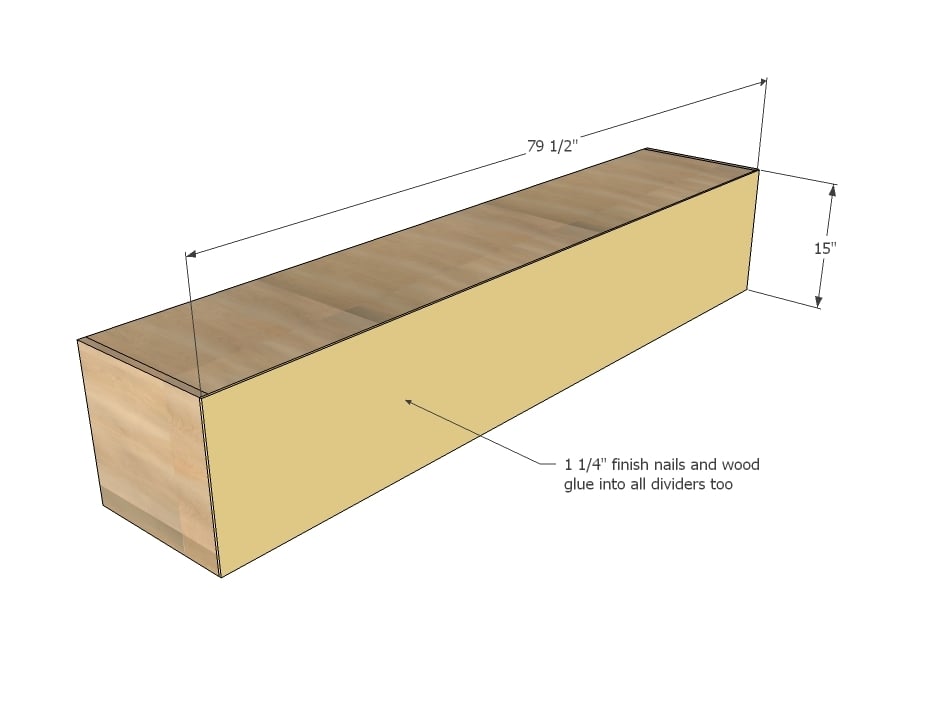
Attach back to the boxes with finish nails and glue. Make sure you nail into all center dividers too. The back will help keep things straight and minimize sagging.
Step 14

Now this is where things get fun! Take a minute and cut some leftover 4x4s or 2x4s 4" long and use them as blocking to hold the boxes up as you screw to the headboard and footboard. Screw from the inside of the boxes into the legs and supports.
Step 15
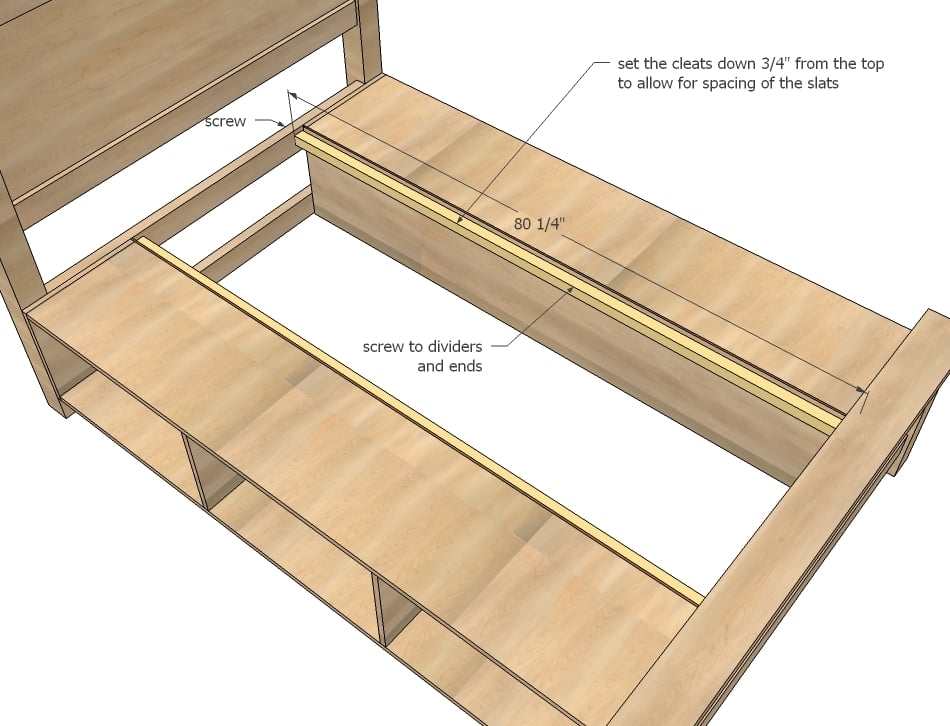
Attach the cleats to the back side of the boxes, leaving 3/4" gap to the top.
Step 16
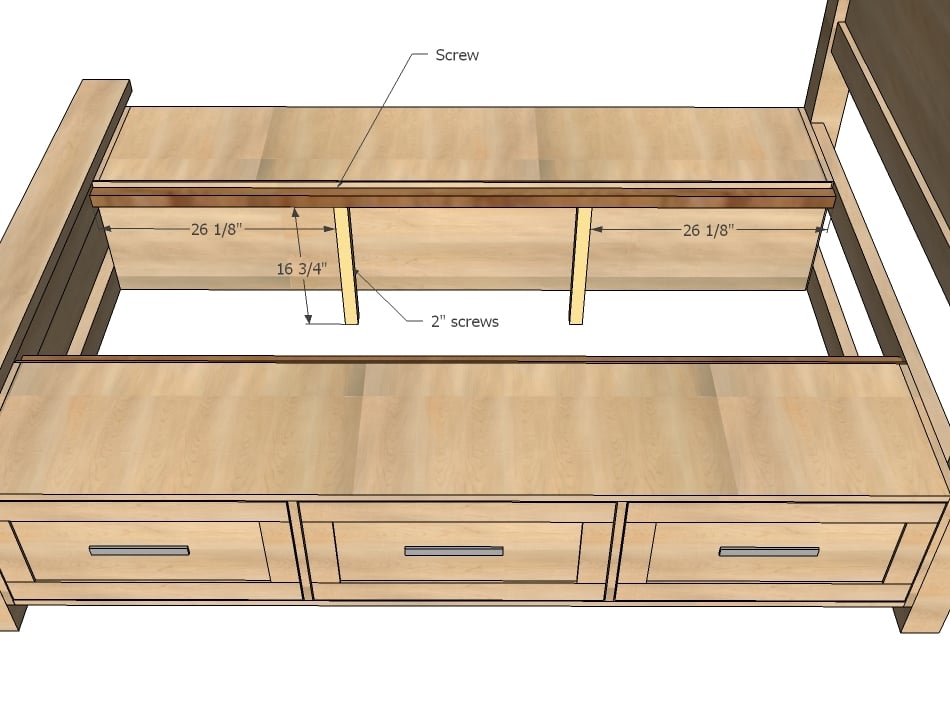
Especially if you move up to a king, you will need to add some support to the center. Some 2x2s "legs" as shown above will never be seen, but add a tremendous amount of support to the bed.
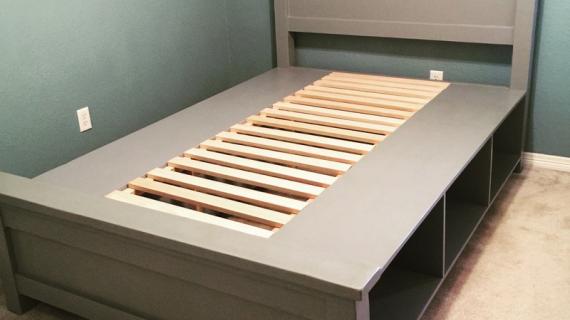
Step 17
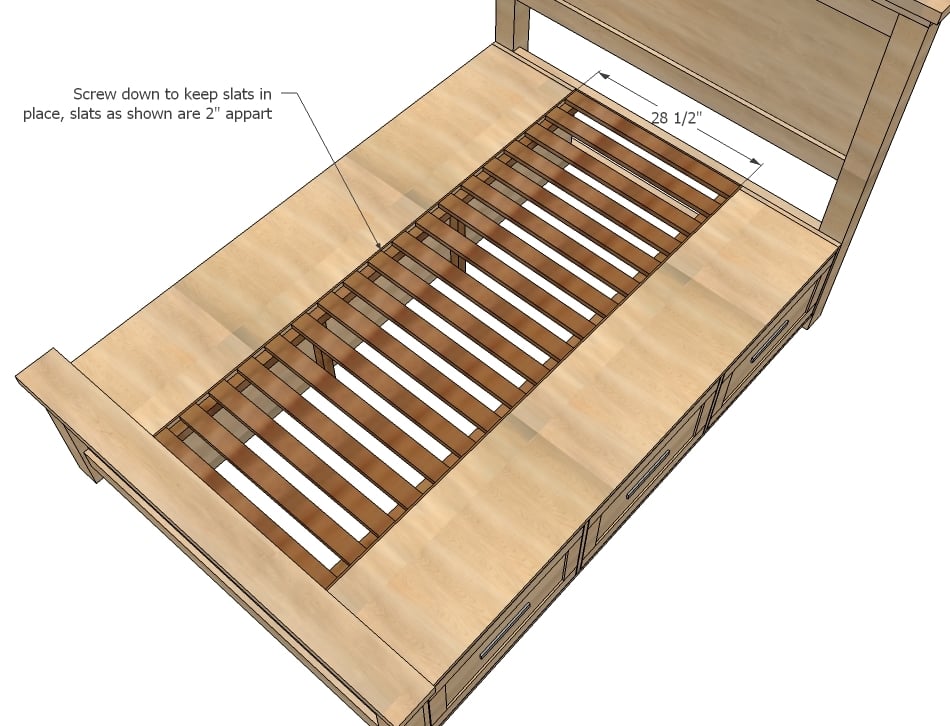
Finally, lay the slats. Per your mattress recommendation, you may need more (or can get away with less) slats.
Step 18
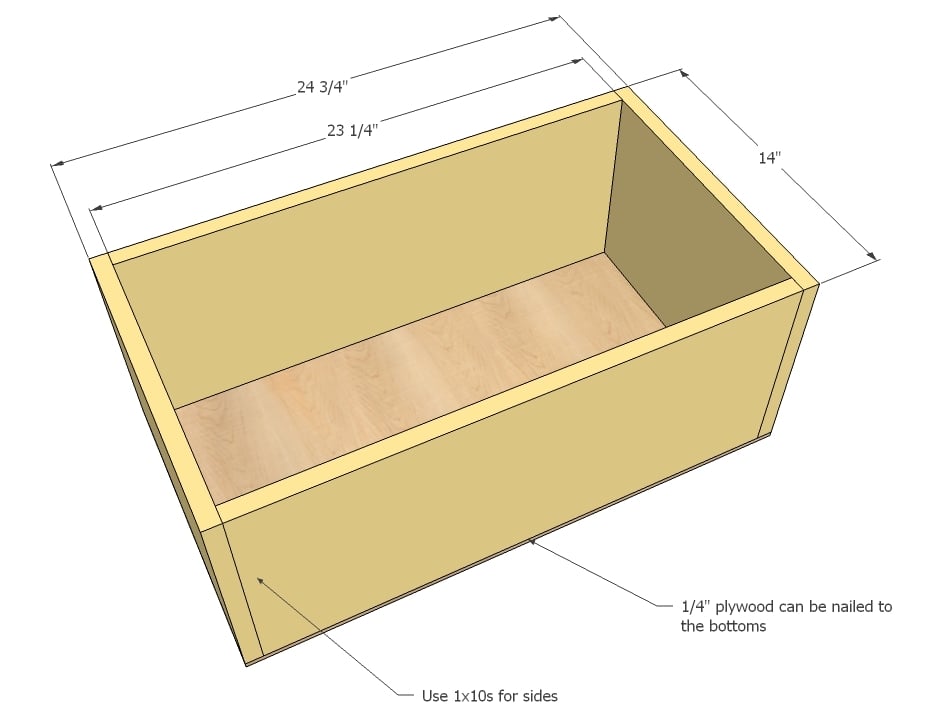
Build six drawers as shown above. Your drawers must be perfectly square to slide properly into the bed. Remember, your drawer should be exactly 1" less than the overall width of the opening, and 1" less deep as well.
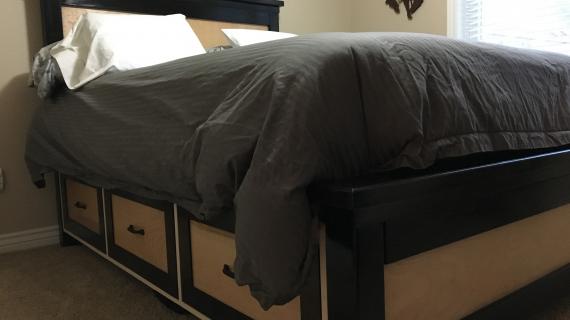
Step 19
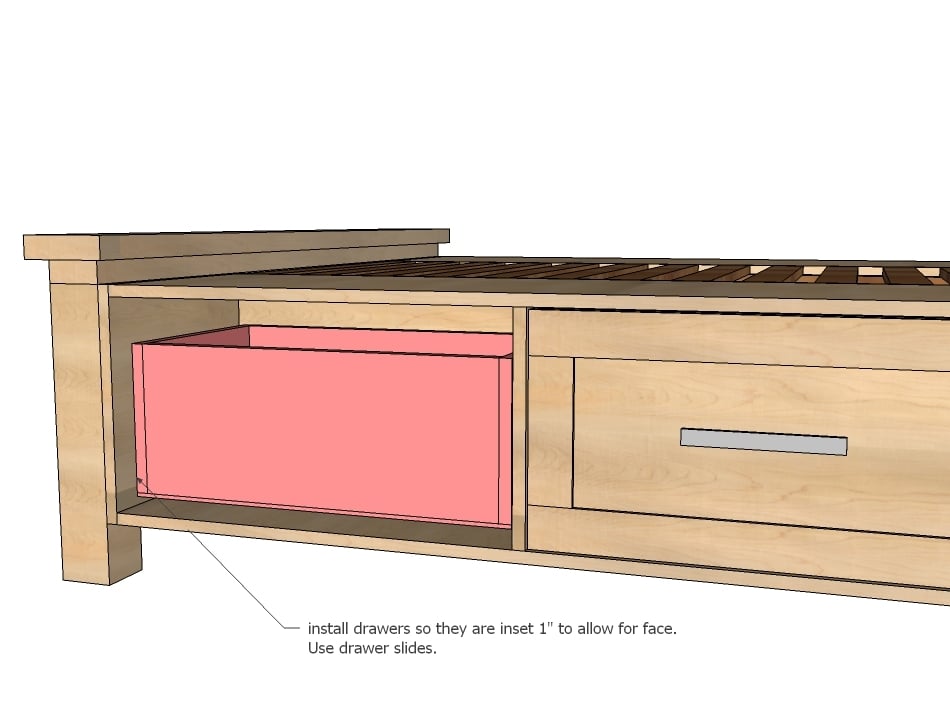
Install drawers into bed as shown in diagram, using the white euro style drawer slides that cup the bottom corners of the drawers. Make sure drawer sits inset 1" from outside of box to allow for drawer face. Adjust drawer slides until you are satisfied with how the drawer opens/closes.
Step 20
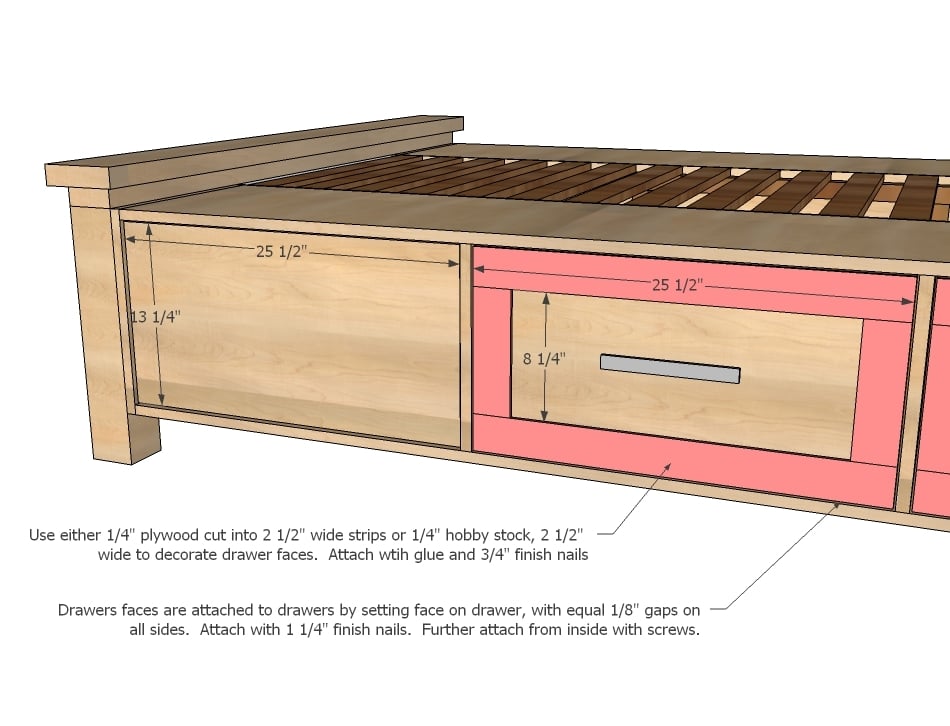
Build the drawer faces by attaching 1/4" hobby stock (or other moulding) to the faces with 3/4" finish nails and glue. Place drawer face on installed drawers, with an 1/8" gap on all sides of drawer face. Attach with 1 1/4" finish nails and wood glue.
It is always recommended to apply a test coat on a hidden area or scrap piece to ensure color evenness and adhesion. Use primer or wood conditioner as needed.

Comments
linkepp98
Fri, 04/03/2015 - 17:36
Love it
Do you have the dimensions to make this for a Twin bed? My husband and I love it and so does our daughter! Thanks
linkepp98
Fri, 04/03/2015 - 17:36
Love it
Do you have the dimensions to make this for a Twin bed? My husband and I love it and so does our daughter! Thanks
In reply to Love it by linkepp98
Ana White
Sat, 04/04/2015 - 10:30
Take a look at this posthttp:
Take a look at this post
http://www.shanty-2-chic.com/2014/04/diy-twin-storage-bed.html
nbuckmas
Sun, 04/12/2015 - 11:56
Headboard/ Foot board
I am exited about starting this project! With the 62" 2x6 that fastens on top of the headboard and foot board, does it fasten flush on one side with 2" overhang on one side? Or does the board get centered with 1" overhang on either side?
Thanks!
In reply to Headboard/ Foot board by nbuckmas
Ana White
Sun, 04/12/2015 - 15:30
You're going to want to
You're going to want to center it.
sunshine247tc85
Sun, 05/24/2015 - 17:35
Twin dimensions?**
Could you please help me and send me this plan with dimensions for a twin?
hkingman
Sun, 07/05/2015 - 17:02
Adapted to twin
http://www.shanty-2-chic.com/2014/04/diy-twin-storage-bed.html
regante
Thu, 06/04/2015 - 07:09
Moving
Could anyone recommend a way to make this bed so that's its easy to disassemble? We are a military family so we move quite often.
In reply to Moving by regante
Ana White
Thu, 06/04/2015 - 18:30
Use screws and no glue to
Use screws and no glue to assemble.
hkingman
Fri, 07/03/2015 - 11:39
Typo in plywood cut diagram?
You seem to have a typo in the plywood cut layouts for sheet #2 and sheet #3. The cut list calls for 8 @ 15-1/2 x 13-1/2, but the cut sheets show four at 15-1/2 x 13-1/2 and four at 15-1/2 x 13-1/4.
ekd001
Fri, 07/03/2015 - 22:02
Typo in Plywood
The 1/4 sheet plywood also is confusing. It shows that the length should be 79 1/2 and should fit to the edges of the boxes. However, the finished length of the boxes is 80 1/4.
BobbyBob
Sun, 10/25/2015 - 14:37
Step 1/2 Cut List Clarification
I am starting to work on this (modfying it as a twin) great design and I have a question about the cut list in step 1 & 2.
It states that there should be three cuts at 13 1/4 but it appears that should be 13 1/2 for the ends/dividers? There are only four storage box ends/dividers in the step 2 cut list and another 13 1/4. Am I not seeing something or should you end up with 8 15.5" x 13.5" cuts in 3/4 ply vs the four in this plan?
The other thought is that they are 13 1/4 to in the boxes and then the 13.5s are left for ends and should be attached to the outside of the boxes, which differ from the plans posted.
Thanks you for the clarification!
BobbyBob
Sun, 10/25/2015 - 14:39
Just saw the other comments,
Just saw the other comments, sorry.
ryan81623
Fri, 10/30/2015 - 08:42
Geat bed, some mistakes
I am in the process of building this bed, I have found a couple mistakes that I would like to point out for the next person.
First is the cut list. The storag boxes call for 8 pieces with dimensions of 15 1/2'' by 13 1/2''.
The cut list has you cut 4 of this dimension and then 4 with dimensions of 15 1/2'' by 13 1/4''. This means you end up with 4 boards the proper size and 4 that are 1/4' short on one side.
Next is the 2x6 on the footboard. The distance from head board to foot is 80 1/4'' perfect to accomidate an 80'' long queen mattress. The overhang of the 2x6 on the foot board on the mattress side needs to be trimmed 1'' from side to side to make the mattress fit properly.
Finally I take issue with the estimated $150-$200 estimate. I used top choice lumber which is certainly more expensive. If I add up just the lumber and supplies minus the 3/4 and 1/4 ply, the drawer slides and the pulls it comes to $209 before tax. Granted I live in an area with a higher cost of living but I think a more realalistic cost estimate is $350-$450.
Thanks for the free plans! Will post photos when I am finished.
In reply to Geat bed, some mistakes by ryan81623
joepap
Sat, 05/21/2016 - 09:49
I wish I had seen your
I wish I had seen your comment yesterday on cut day! My boxes are now smaller for the second set. My solution will be to raise that side of the bed's boxes up 1/4 inch. It's a tiny room and you won't be able to see the difference I believe.
I realize these plans are free, but there is money being made so while these are diy plans, they are made by a semi-pro/pro. When comments like yours point out the small errors, they really should be fixed. Different people rely on different things. I relied on the cut diagrams and not the cut list.... if I was a professional, I would have figured it out sooner...
Anyway, back to bed building, I still love the plans and your site!
kessingers
Sat, 11/14/2015 - 20:44
for those of you who have
for those of you who have made this bed. What was the final cost of production?
thank you for your time
Tom
ibtrker53
Mon, 12/14/2015 - 19:52
farmhous bed
I have a cannon ball headboard and footboard already and am going to try to make these drawers work.
jlinder71
Mon, 01/04/2016 - 16:06
Night stand
Does anyone know of plans fora nightstand that will work for this bed? One that won't block the draw closest to the headboard?
In reply to Night stand by jlinder71
Ana White
Mon, 01/04/2016 - 21:00
You will have to figure the
You will have to figure the mods. Here's an inspiration pic,
https://www.pinterest.com/pin/270216046364478127/
plan http://www.ana-white.com/2010/11/rolling-c-end-table.html
Hope this helps!
harte
Wed, 01/27/2016 - 16:12
Storage Box drawings off a wee bit
Just an observation on your drawings. The drawing of the storage boxes has the side panels in between the top and bottom panels to give the 15" height. Later on those same side panels are shown connected to the sides of the top and bottom panels. Not a huge thing, but someone not paying attention may get confused and mount them incorrectly and thus throw off the dimensions of the entire unit and the internal vertical drawer dividers. Overall though great drawings for all! Thanks!!!!
bbullied
Wed, 01/27/2016 - 20:43
Taped edges?
Are the edges of the plywood boxes taped?
Rwconway
Thu, 03/10/2016 - 06:41
Full Size Farmhouse Bed
I would like to make the drawers on both side go all the way to the middle and just use a sheet of plywood to cover the entire bed. Will the extra weight be okay
gotkids4
Wed, 05/18/2016 - 18:56
Full/ Double Bed Instructions
Do you have instruction on this same bed but in a full size? Would love to make this but in a full/ double size for my sons room
In reply to Full/ Double Bed Instructions by gotkids4
Ana White
Thu, 05/19/2016 - 11:30
Please read through this
Please read through this entire post
http://www.ana-white.com/2016/02/free_plans/farmhouse-storage-bed-drawe…
Winona
Sun, 05/22/2016 - 20:17
Queen size
Looking at the dimension I would like to confirm this is for a Queen size bed? If so I need this in my life. I want to do this for my daughter's room so we can make it more spacious.
Winona
Sun, 05/22/2016 - 20:18
So sorry re read the entire
So sorry re read the entire post again and answered my own questions:) Cheers I can not wait to help stain this
Stephanie_Bell
Mon, 06/13/2016 - 21:07
I need help!!
So, I'd like to start this project, but it doesn't look like I can have a box spring. I have a Tempurpedic bed, so both my matress and box spring are quite large. I think it will look silly using this existing plan. Is there a modification I can use? Do I just need to make the headboard and footboard taller?
Thanks in advance!
kmwilson343
Tue, 07/12/2016 - 12:17
Full Size Bed?
Is this plan for a full size plattorm bed?
Lusica
Fri, 08/26/2016 - 21:31
What an fantastic Idae !!!!!
What an fantastic Idae !!!!! Really great planing. We can use it for may purpose.
Rusty-c
Thu, 10/26/2017 - 21:59
Adjustable split king frames
Has anyone successfully modified this plan to accomodate adjustable bed frames (Split King Specifically). Suggestions appreciated....
teeyoter
Sat, 02/17/2018 - 16:01
Cutsheet issues
Hi Ana,
Thank you so much for the plans, i'm in the process of building this for my daughter right now and she is super excited! I wanted to point out an issue with the cutsheet though. For the drawer boxes it is showing a dimension of 13 1/4" but the cutlist and diagram show 13 1/2". I'm assuming that it should be 13 1/2". Just thought i would mention it. Thanks again for the plans.
Thanks,
Teeyoter
johnsma1966@gm…
Wed, 12/04/2019 - 09:51
Actually, it should be 13 1…
Actually, it should be 13 1/4 for the drawer fronts as listed in the plans. This allows for 1/8 space on both the top and bottom of the front so it fits easily into the drawer opening.
johnsma1966@gm…
Wed, 12/04/2019 - 09:56
Nevermind my comment. I see…
Nevermind my comment. I see what you mean. the drawer boxes need to be 13 1/2, but in a couple of places on the cut sheet, it shows the drawer box supports at 13 1/4. All the supports should be 13 1/2. Thanks. Sorry for the confusion.
marloes phil
Fri, 03/16/2018 - 11:29
stronger middle
hiya could i use 3/4 ply in the middle rather than slats ,or is there a reason i cant .thanks
In reply to stronger middle by marloes phil
Brian Famous
Fri, 03/16/2018 - 14:23
No reason not to.
There's no reason you couldn't use plywood in the middle instead of slats. It'll just be a lot heavier and a little more expensive.
johnsma1966@gm…
Wed, 12/04/2019 - 09:52
I would recommend against…
I would recommend against using plywood instead of slats. The slats allow for air flow. In some climates, without that airflow, it is possible to get mold growing under the mattress.
vstroud
Fri, 02/01/2019 - 14:41
Farmbed Storage for Twin
I'm getting set to start a twin size Farmbed but need the storage. Was wondering if anyone has done a material and punch list for this size. Thank you so very much for all help.
motyloco
Fri, 05/10/2019 - 12:28
The Farm house bed with drawers
Hello, could this bed handle a 300 £ person?
ahc1q16
Mon, 05/20/2019 - 17:43
King Size
This bed is awesome! Would love to have the king size plans
Nikki L
Sat, 07/06/2019 - 09:37
Boards or plywood
Im a little confused. The pictures show boards used for the head board. The plans use plywood.
mattpace23
Thu, 07/18/2019 - 09:29
King plans
Just finished our bed!
Modified the plans to accommodate a king bed.
I increased to 22 inch length drawers and shortened the drawer height b/c my mattress was 14 inches.
Also I only put 2 drawers on each side and made the drawer face near the end table magnetic so it looks like a drawer but is more of a storage space.
Lowered the bed to 3 inches off ground.
Here are plans for this bed modified from Ana's plans.
https://drive.google.com/open?id=12vks-lqunFeEuoPpBRN_4MXEh8GAEouy
Here is a picture of the bed...95% done.
I need to restain the drawer faces...too light. Lacquer it. and add pulls. And i have not added the magnetic third doors yet...you know how it goes...finishing that last 5% is the most difficult!!
https://drive.google.com/open?id=1rtgYOQ2RFZB9XESdrLcgnCOcOakuYJE8
And she was so right...the drawers must be perfectly square...and they must be exactly one inch less than the drawer boxes!!
dreither44
Fri, 11/08/2019 - 17:31
Using this design with knockdown hardware.
Hey all,
I move from place to place around every 2-3 years and so I would like to build this plan is a way where I could take it apart. Has anyone utilized knockdown hardware to build this? Any help is much appreciated!
-Dan
RRoutzahn
Mon, 01/13/2020 - 04:01
adaptions
Im just curious would this bed be structurally sound if the drawers went to the middle of the bed instead of having slats? I want to use the entire space beneath my mattress as drawer space.
extremefs
Thu, 01/16/2020 - 05:14
Furniture
Good article. It was so helpful. Explained in a very good way all thoughts are clear feel good to read.
simonbrobinson
Tue, 04/21/2020 - 16:31
Hi, Is the material for the …
Hi,
Is the material for the 'Optional Drawer Boxes' in the original material list?
hairstylistdevvv
Wed, 04/22/2020 - 13:14
Printer Friendly Plans
I may be seem dense when asking this, but is there a link to a “printer friendly” version? My father in law does a lot of DIY in retirement and I think printable plans may be more convenient for him, LOL!
Thanks so much. I LOVE your website and can’t wait to get my hands dirty as well!
jpad067
Tue, 07/07/2020 - 06:48
King Bed
My father-in-law took these plans and expanded them to a king-size bed, I can potentially help those who are wanting to build a king bed. Look at my brag, Farmhouse King Bed with Drawers, to see some pictures.
Adrian1487jd
Wed, 07/15/2020 - 06:49
plano
Hola saludos desde Costa Rica amo y me encantan sus proyectos,como puedo descargar los planos ?
iupgrade
Sat, 08/08/2020 - 16:46
Questions about strength/solidness of the bed.
This looks like a great platform bed with storage and I really want to build it. However, I am concerned that there does not seem (to me) to be any real support. It spans 6’ from headboard to footboard with just 3/4” plywood laid on its side with 1/4” plywood for a stiffener. That does not seem very strong to me. I may be missing something. Can others confirm the solidity of this design? Does the design of the boxes make them stiff enough to carry the bed across the 6’ span from headboard to footboard?
Thank you.
Don
miner1964
Wed, 12/23/2020 - 19:19
Question on plans
Hi,
I am writing this to you to ask if you still have the plans for the Farmhouse Storage Bed With Hidden Drawer? As I would really like to make this for our spare room when the Grandsons come for a visit plus so I can hide some things from them as well lol. Please let me know if you still have the plans for this bed. If so please email them to [email protected]
Thank you
Ernest