

Do you want a farmhouse table, but don't want to spend thousands of dollars? Have you thought about building your own? Check out this free, step by step plan to build your own with basic tools. From Ana-White.com
The Farmhouse Table Story
Beloved for hundreds of years, the Farmhouse Table was usually made by the family that used it, from wood that was locally harvested, using basic tools. Soft woods were easier to use, but the soft wood dents easily, and the tables showed wear, creating that authentic distressed look.
Today, a true farmhouse table is just that - built by hand by the family that uses it, using soft woods, and finished by hand. The tables are meaningful, with each scratch and scuff having a story, each moment creating memory for the family that uses it.
Start your family's Farmhouse Table Story by building your own table, and gathering around it to share a meal, to fold laundry on and do homework on - to create the foundation of your family's home.
The Farmhouse Table Plans
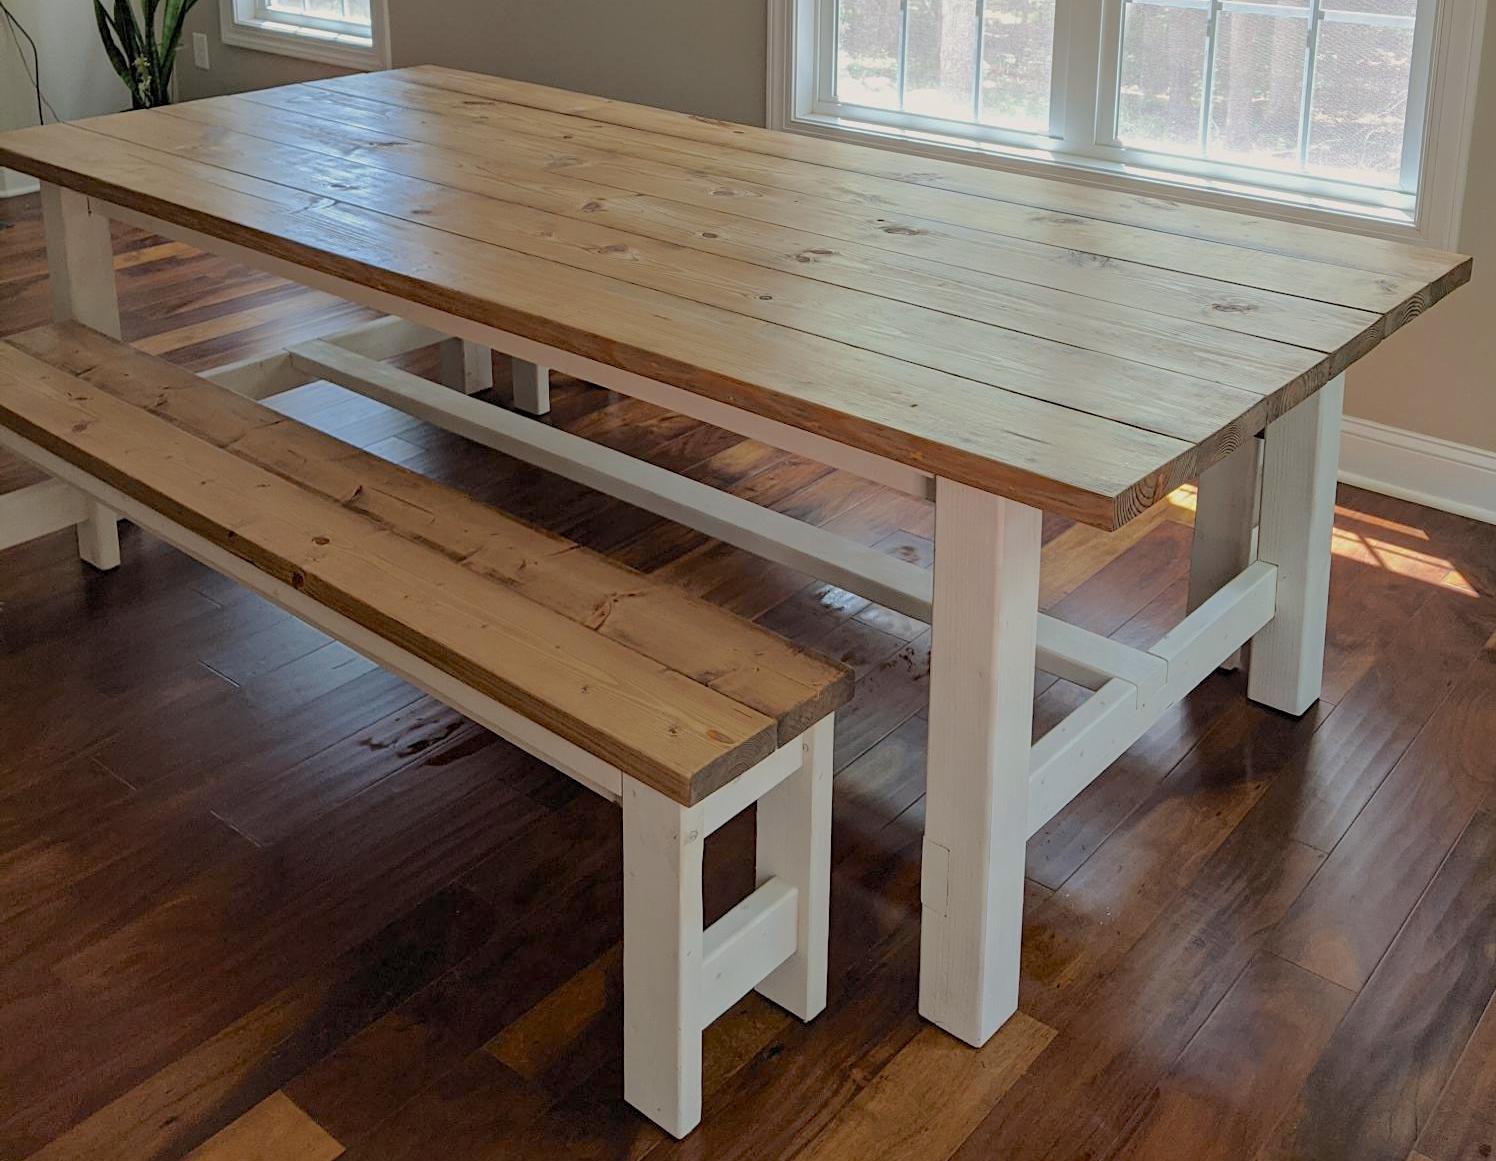
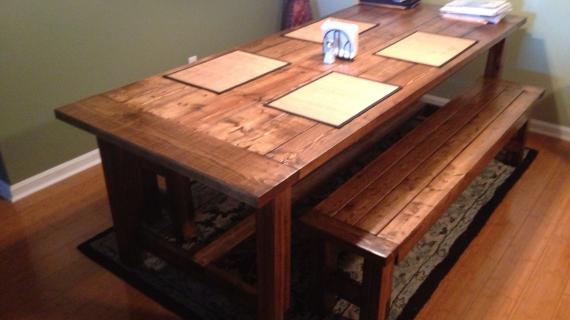
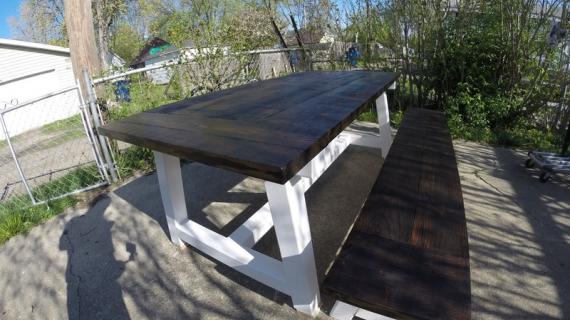
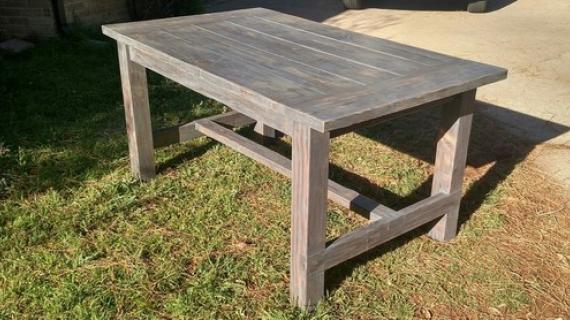
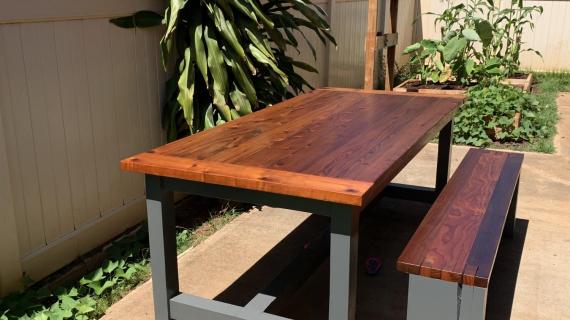
Our Farmhouse Table plans have been built tens of thousands of times and are in homes all over the world. The extremely sturdy, rustic styling is easy to build and authentic to history.
Built out of all off the shelf lumber - builders spend between $50 and $100 making their farmhouse tables.
You just need a saw and a drill to make this farm table.
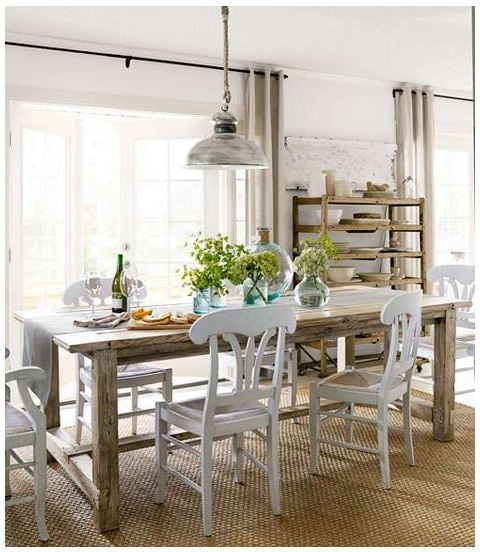
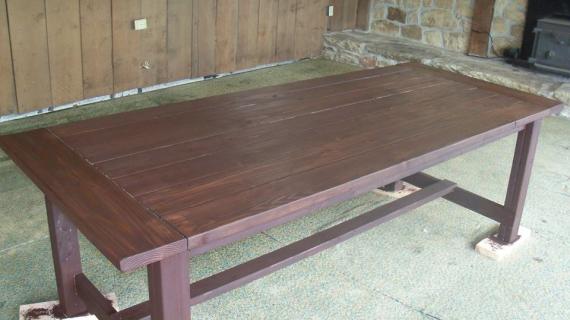
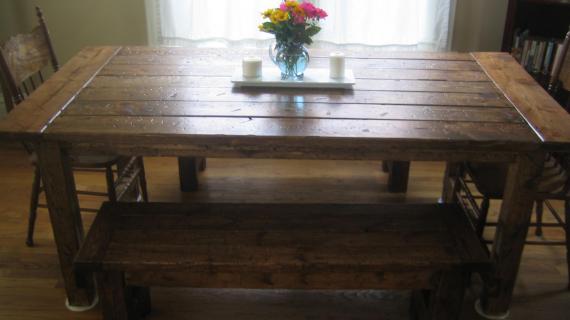
Special thanks to ssshindler for the featured photo.

This table was also featured in Country Living Magazine! Built by Michael and Emily Knotts, photo by Lucas Allen
The plans for this farmhouse table follow. Also check out these other plans:
- Matching NO Pocket Hole Farmhouse Bench
- Farmhouse Table built with Pocket Holes (no screw holes showing)
- $50 Farmhouse Table - The most beginner friendly table you can build
Thank you so much for using our plans. If you build, please share a photo and let us know how your build went in the comments or a brag post.
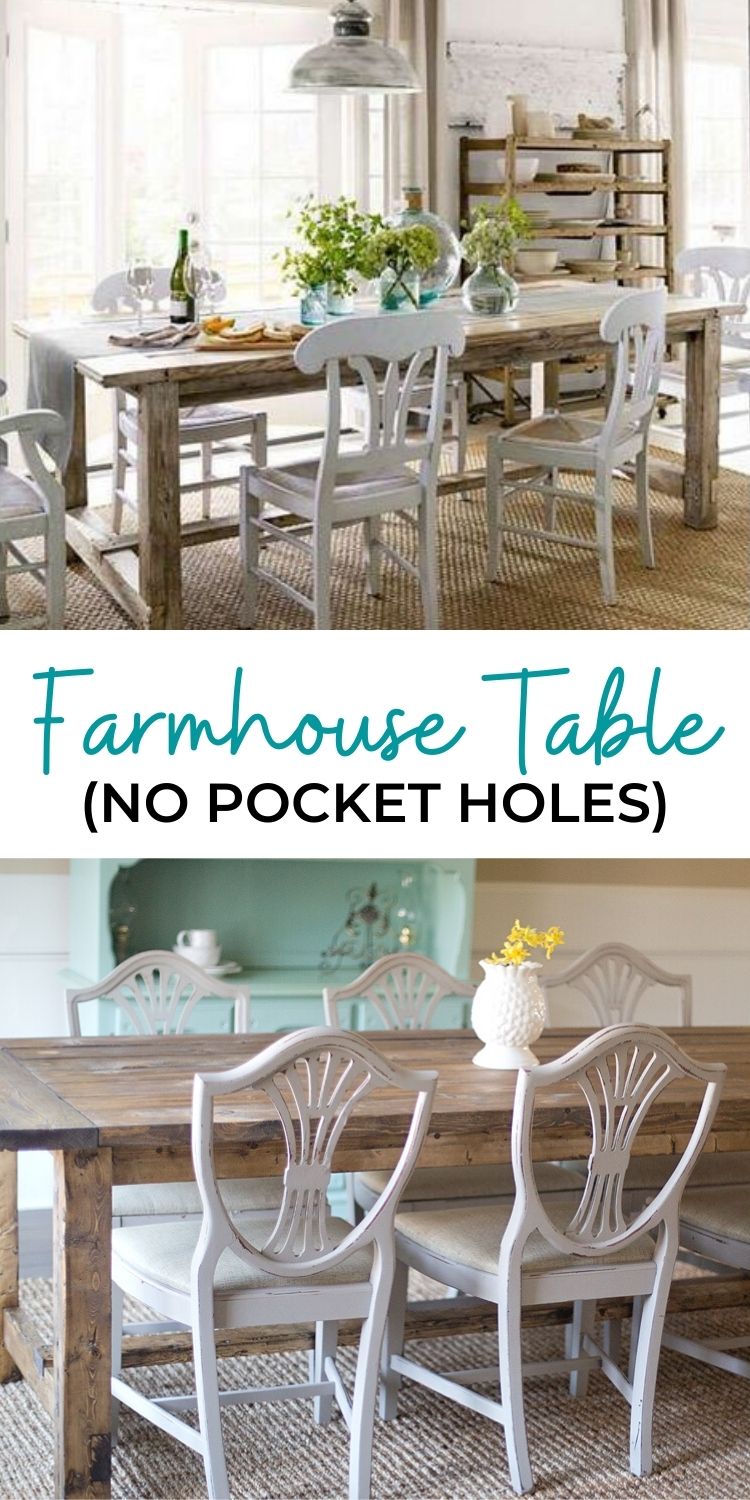
Pin For Later!
Preparation
- 8 – 2x4 8 feet long
- 6 – 2x2s 8 feet long
- 1 - 2×8 8 feet long
- 7 – 2x6s 8 feet long
- 2 3/4″ Self Tapping Wood Screws (About 100) (try spax brand or similar)
- 4″ Self tapping wood Screws (About 20)
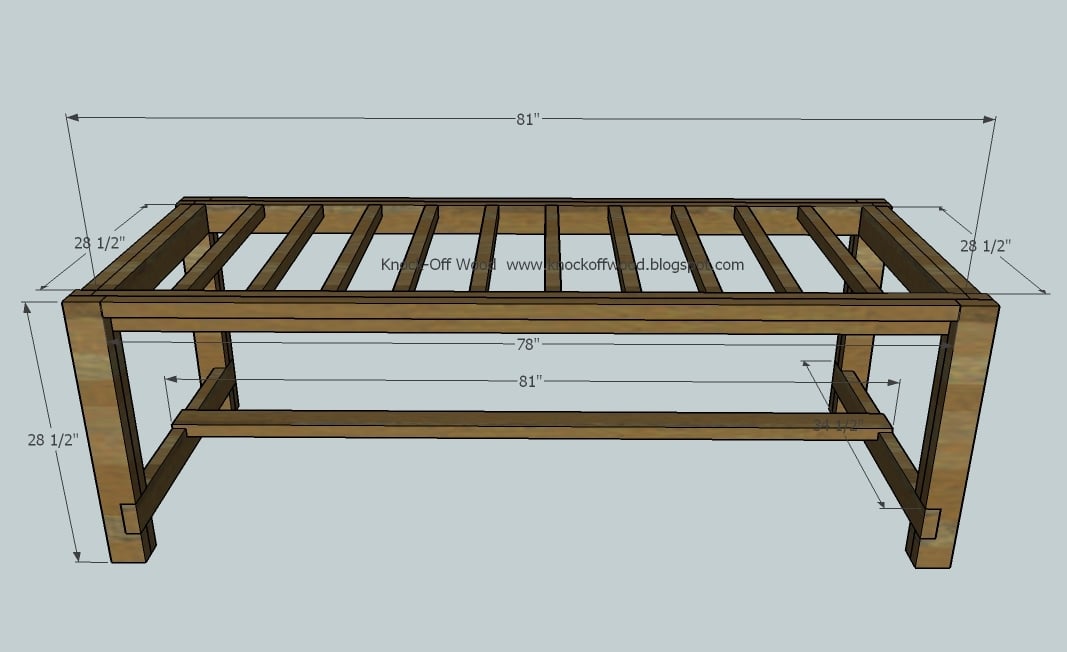
A) 4 - 2×4 @ 28 1/2″ (Outside Legs)
B) 4 – 2×4 @ 28 1/2″ (Inside Legs)
C) 2 -2×4 @ 34 1/2″ (Bottom End Supports for the Stretcher)
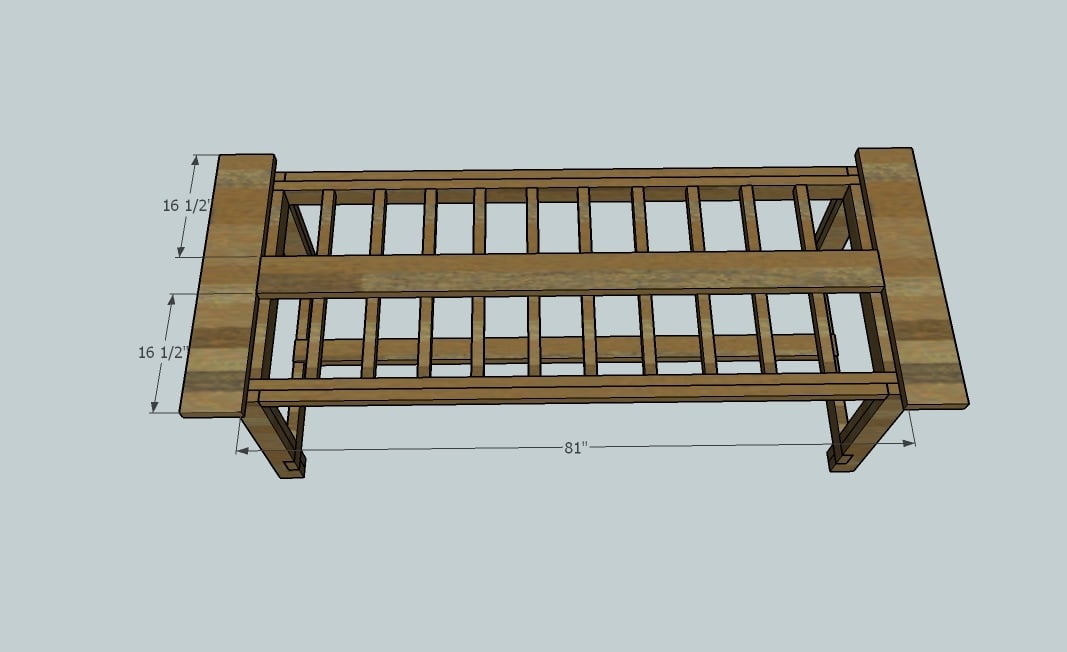
D) 1 – 2×4 @ 81″ (Stretcher)
E) 2 – 2×4 @ 81″ (Side Aprons)
F) 2 – 2×4 @ 28 1/2″ (End Aprons)
G) 2 – 2×2 @ 28 1/2″ (Overhang Supports, Ends)
H) 2 – 2×2 @ 78″ (Overhang Supports, Sides)
I) 10 – 2×2 @ 28 1/2″ (Under Tabletop Supports)
J) 2 – 2×8 @ 38 1/2″ (Breadboard Ends)
K) 7 – 2×6 @ 81″ (Tabletop Pieces)
Start by cutting all your boards. The best way to cut is with a compound miter saw. You can also use a circular saw with a guide - good square cuts are very important.


Always use glue. Use the longest possible screws, and predrill with a countersink bit to hide the screw heads.
Instructions
Step 1
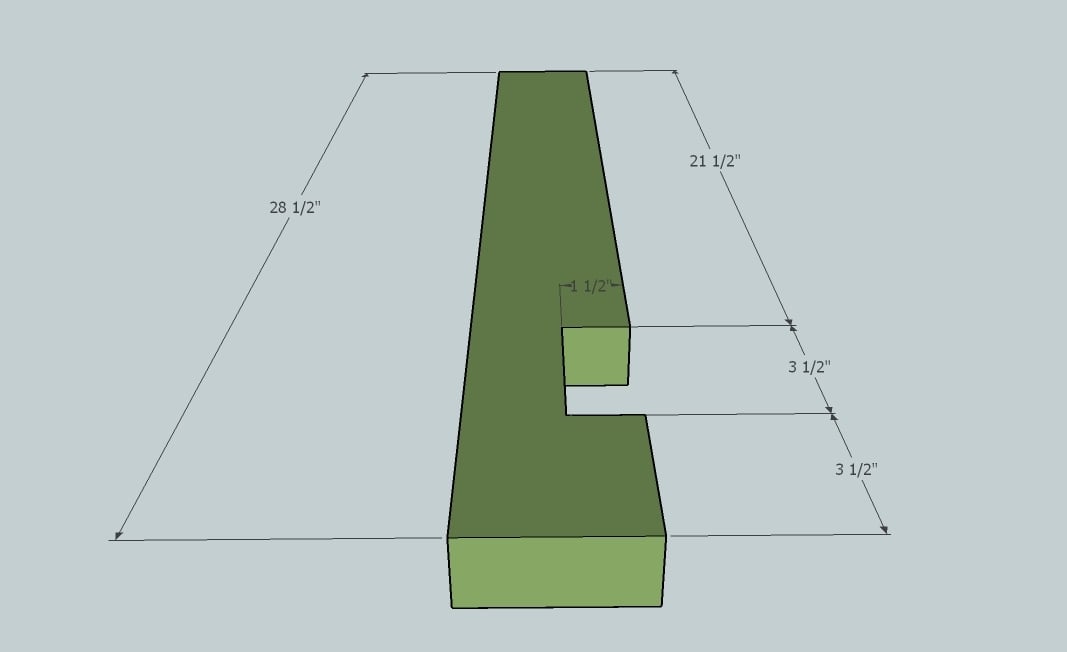
Notch out boards A, the Outside Legs, as shown above. If you do not know how to notch out boards, watch me notch the boards out for my table in my HOW-TO section.
Step 2

Notch out the inside leg as shown above. Make sure you notch both the top and the bottom as shown above. Use the measurements from step 2 to notch the bottom. See the below diagram for a closeup on notching the top.
Step 3
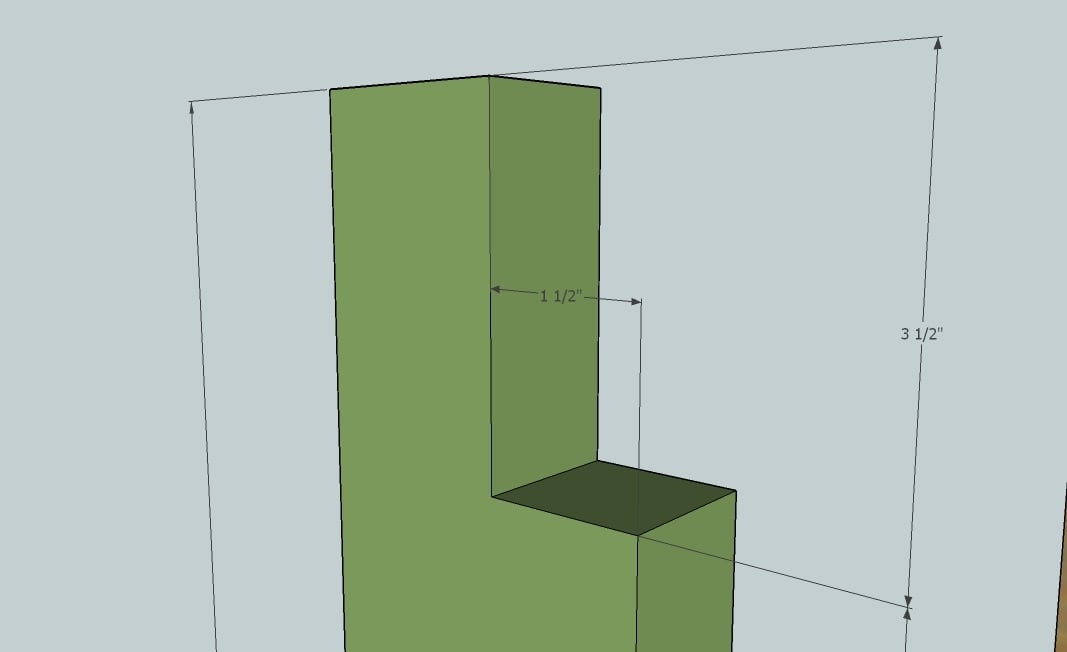
The above diagram show you how to notch out the top of the inside legs.
Step 4
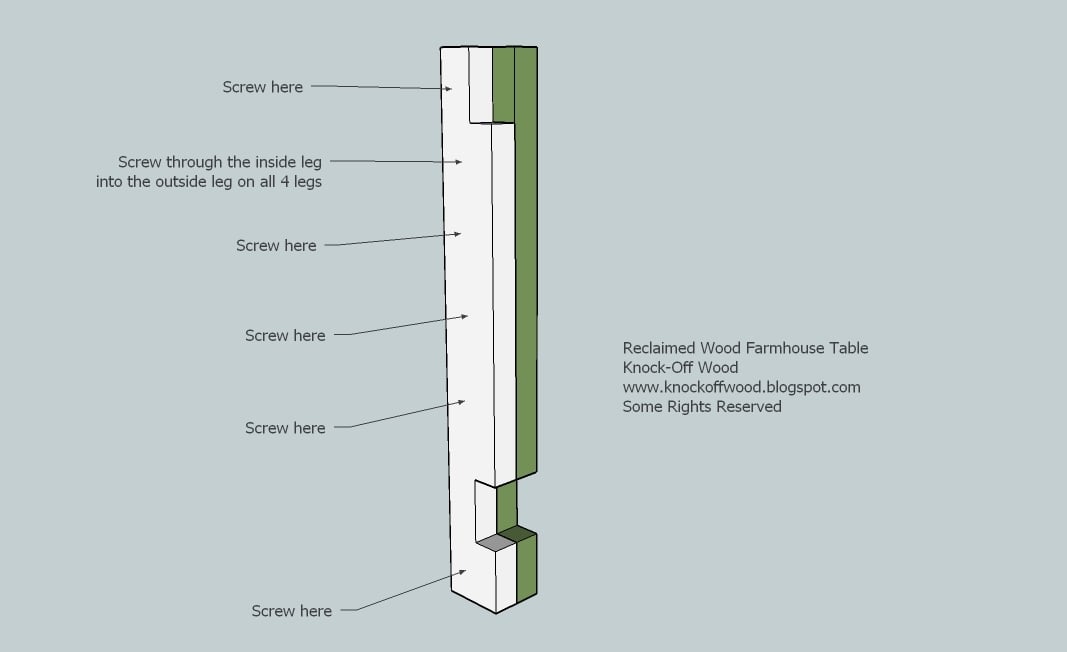
Now screw an inside leg to an outside leg, using glue and 2 3/4″ screws. Be aware of where each leg is placed – it does matter on what sides the inside leg sits. Also, screw through the inside leg into the outside leg to keep your screw holes on the inside.
Step 5
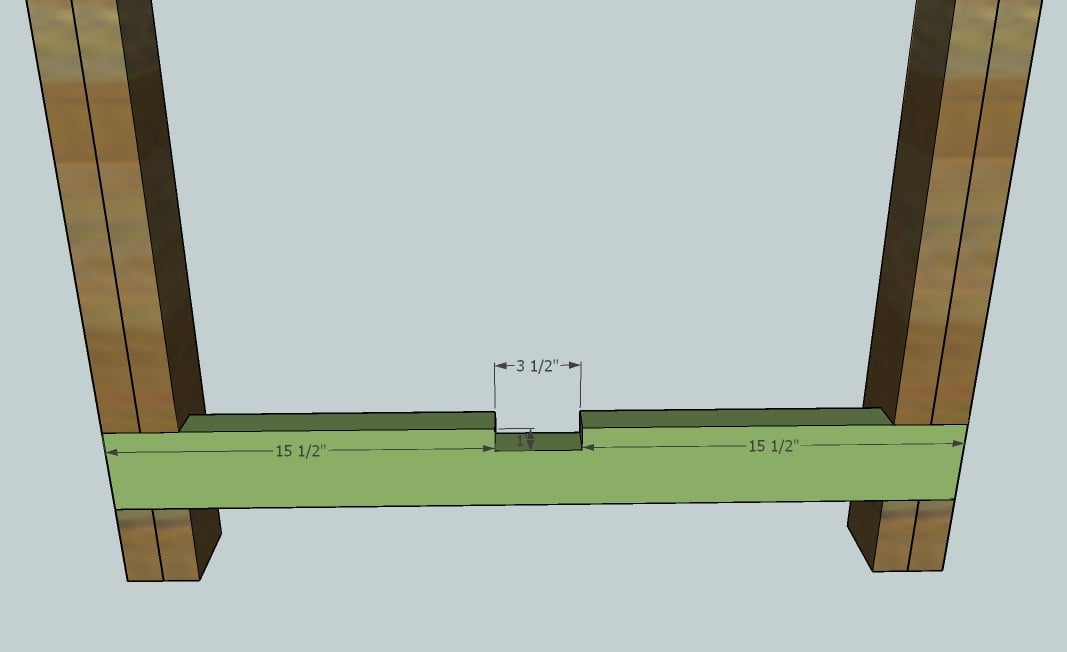
Step 6
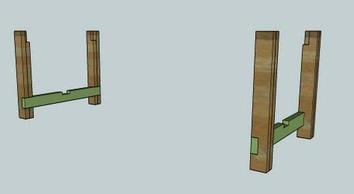
Screw the support, C, into the legs, as shown above. Make sure you use 2 screws on the inside leg and 2 screws on the outside legs per side of the end supports. NOTE: If you would like the support to be on the outside, rotate the legs, keeping the inside legs on the inside, and add 4″ to your stretcher, D. This will reduce your leg room for end chairs, but the notch out will be more visible, like my table and the Restoration Hardware table.
Step 7
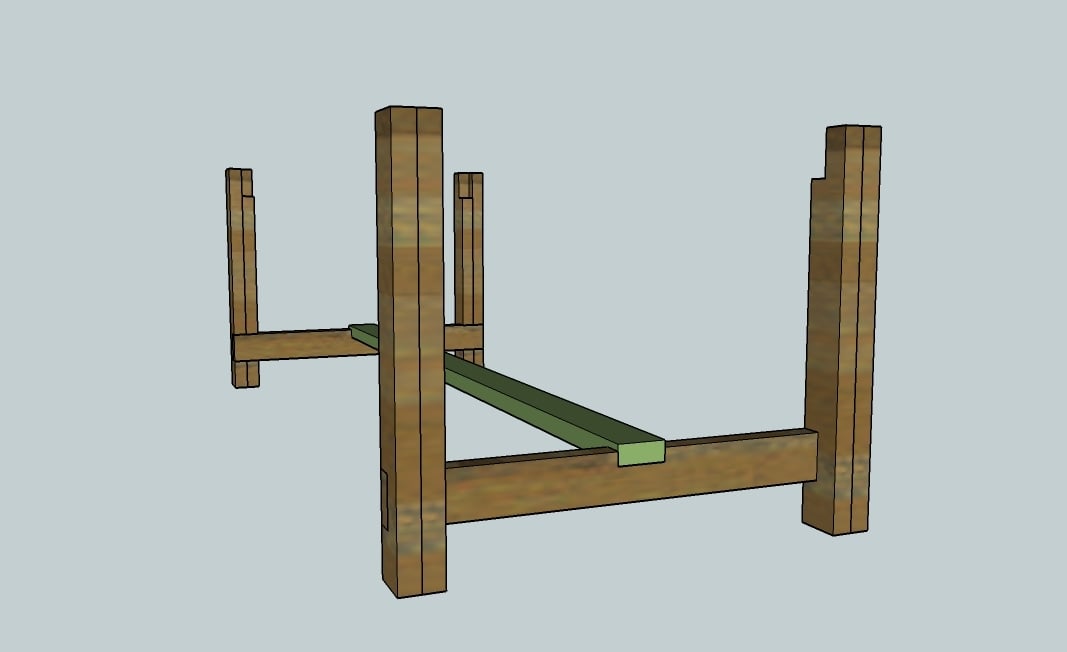
Put your stretcher in place and screw down.
Step 8
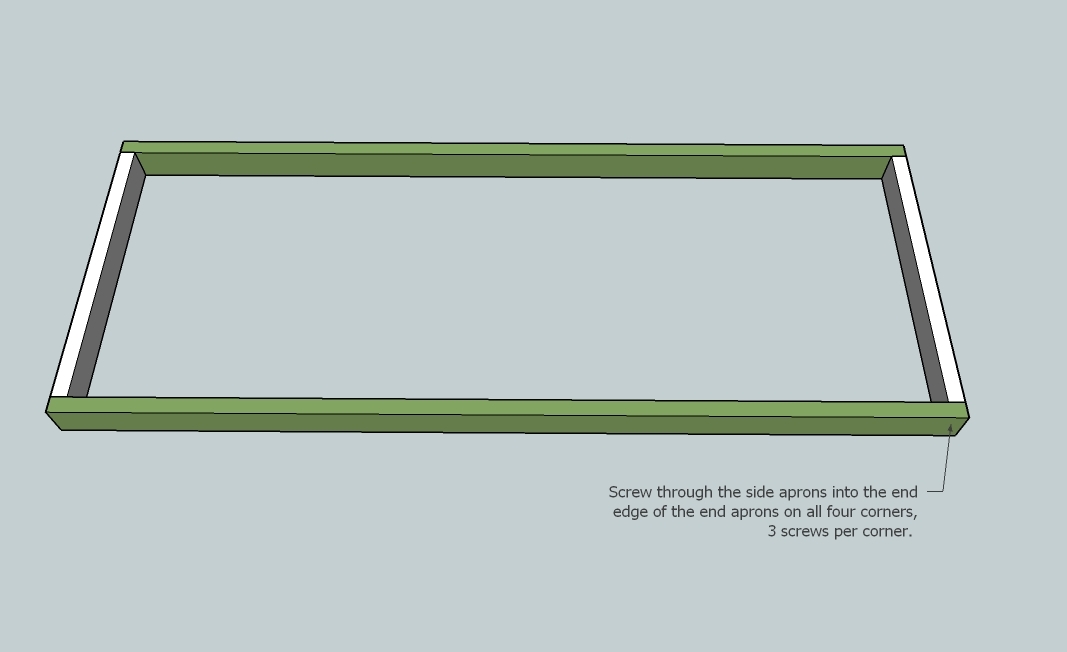
Build your apron on a level surface as shown above, using side apron boards E and end apron boards F.
Step 9
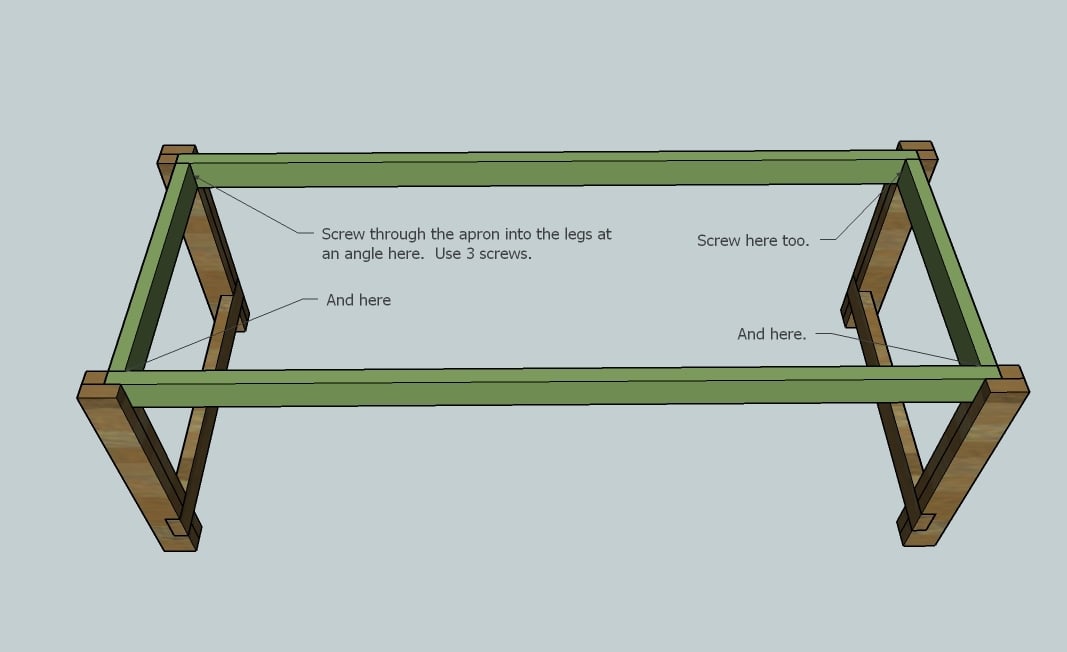
Fit the apron frame into the base of the table as shown above. Use the long screws to screw at an angle through the apron into the legs. Use 3 screws per leg on all legs. Lots of glue here. Now is a good time to check your table for square. Visit the HOW-TO section if you do not know how to check for square.
Step 10
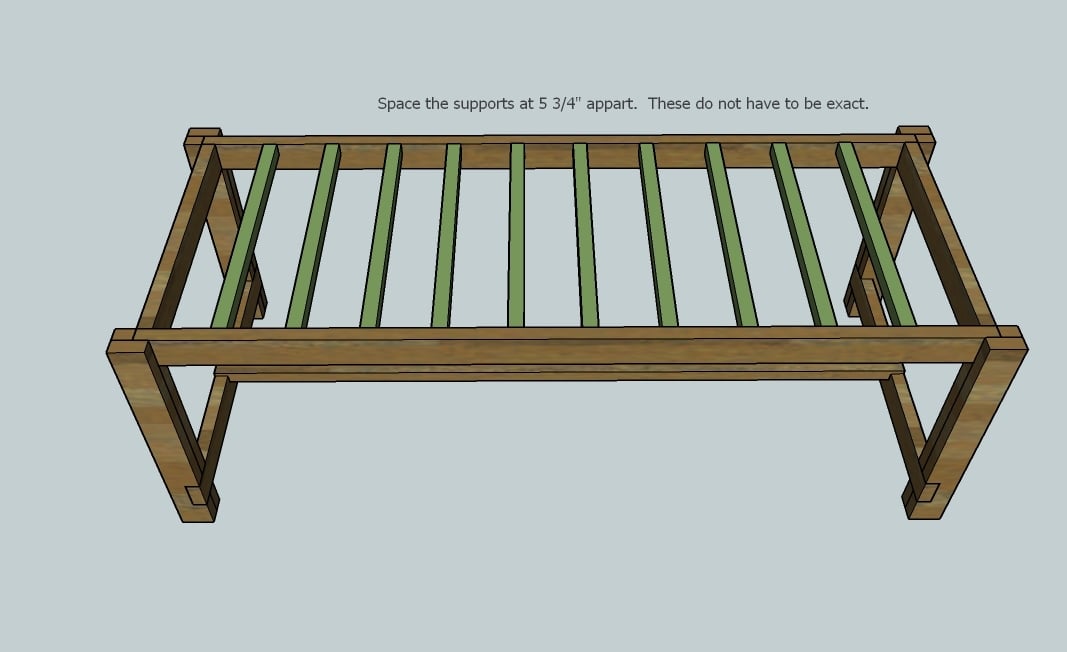
Mark the side apron every 5 3/4″ and place the 2×2 supports, I, as shown above. Remember that a 2×2 is 1 1/2″ wide. This does not have to be exact and the last support will not be exactly 5 3/4″ from the end. Use the 2 3/4″ screws here.
Step 11
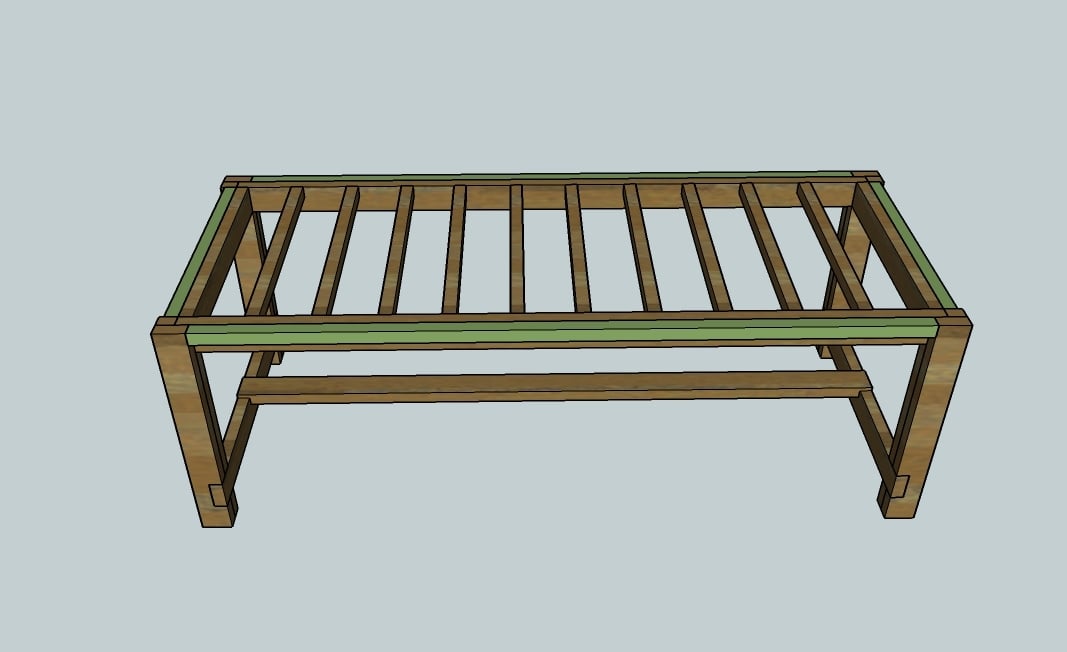
Add the overhang supports, G and H, as shown above. Keep the top edges flush, use the 2 3/4″ screws. Make sure you screw these in good.
Step 12
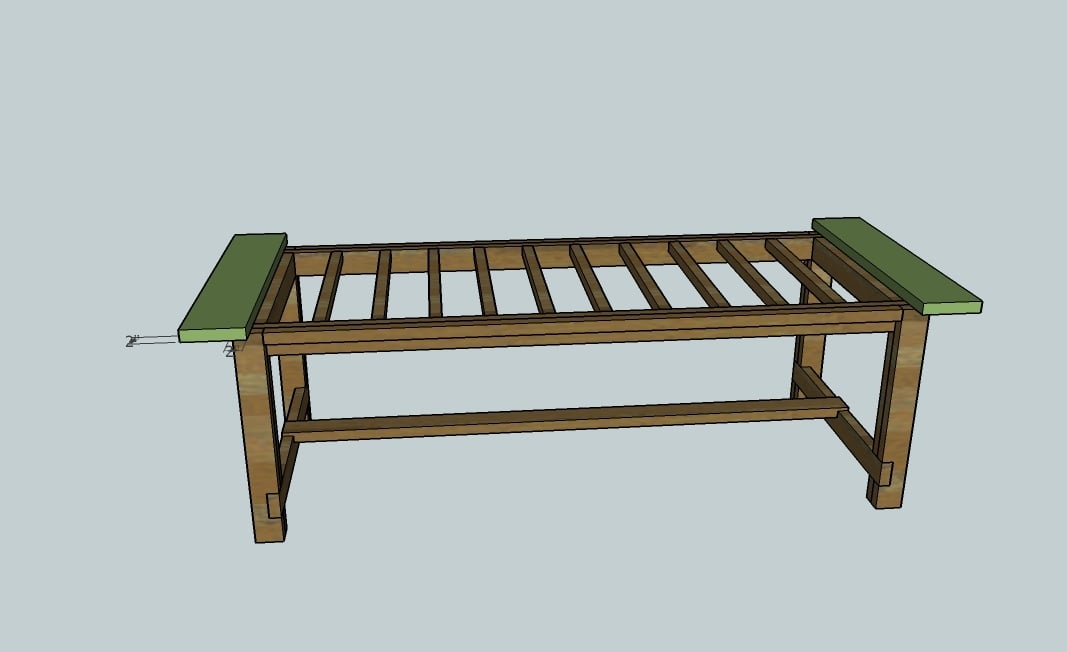
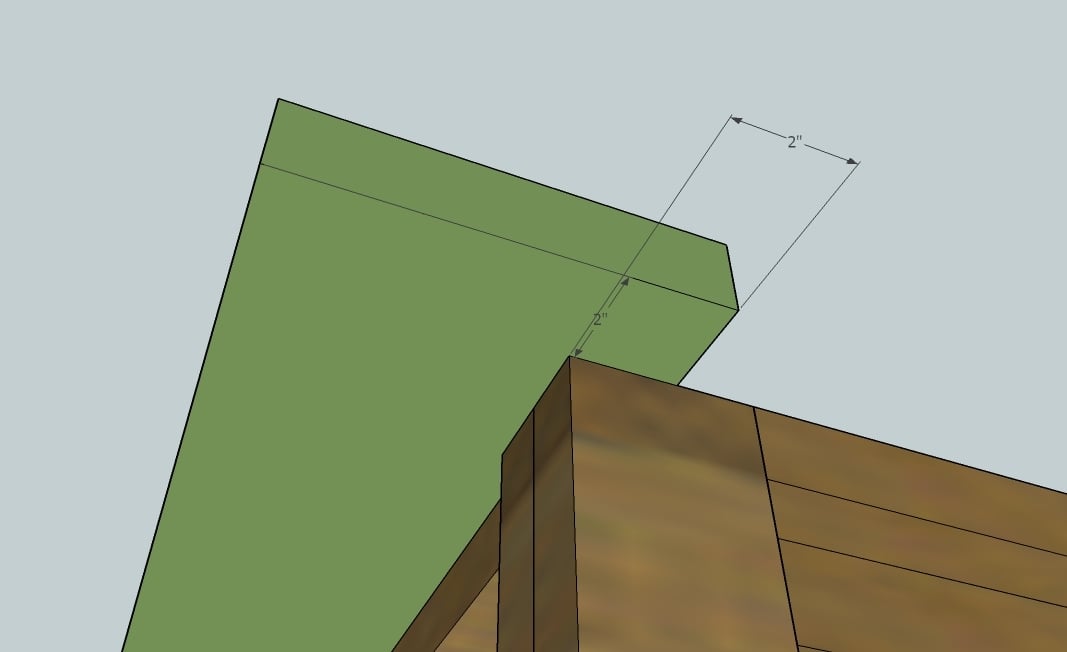
Now the breadboard ends, J. See the below diagram for measurements:
Step 13
Use the long screws to screw the breadboard end into the legs. Then screw from the underside of the overhang support, board G, into the underside of the breadboard end.
Step 14
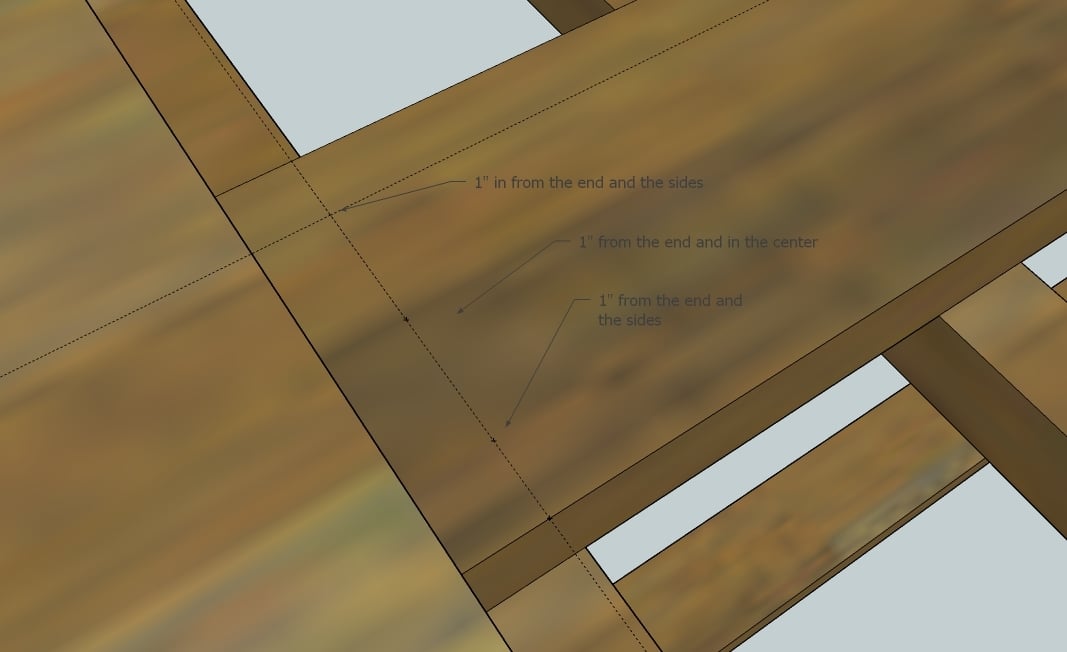
First mark all the ends of the tabletop boards, K, for the screw pattern. The screw pattern I used was 1″ from the end, and 1″ from each side and one in the middle. Predrill the ends on the marked pattern, as shown above.
Step 15
Then begin adding the tabletop pieces K, starting with the center piece. Screw the center board in place on the ends through the top, pre,drilled and marked in step 15. Then from the underside of the table, screw through the tabletop supports, I, into the underside of the tabletop boards, K.
Step 16
Add the next tabletop boards, K, as shown below. As you screw each board down, take special care to line up the edges with the existing boards. You do not want a gap between the boards on the tabletop. Remember to screw through the top on the ends and then screw through the bottom of the under supports to the underside of the tabletop boards.
After all the boards are screwed in place, then use the long screws to screw through the tabletop boards into the breadboard ends, as shown above.
Sand the entire table with 120 grit sandpaper, working in the direction of the wood grain.
Refill holes with wood filler if needed.
Sand table with 180 grit sandpaper.
Stain or paint. If the table feels rough between coats, lightly sand with 180 grit sandpaper.
A final coat of poly on the top can help keep the top easy to finish and wipe cleanable.


Comments
Jay (not verified)
Fri, 02/17/2012 - 16:08
Help!
Does anyone know how deep the notch's should be cut out?
claydowling
Fri, 02/17/2012 - 18:45
Notches
The dadoes for the stretchers on the ends should be cut to the same depth as the thickness of the stretchers. That can be measured with a ruler, but it would be better done with a marking gauge.
Roy Ford (not verified)
Fri, 02/24/2012 - 15:31
Farm Table - - Notching out 2 x 4 legs
Can you provide me with the link for your how to notch out the legs on the farm table?
Also I have a 10" table saw, can I subsitute a 8" dado blade?
Thank you for your help
Roy
Guest (not verified)
Sat, 02/25/2012 - 18:40
Farm House Chairs
I searched through the site looking for some Farm House Chairs that go with the Table and the Bench but couldn't find any. Any chance of making some ? It would be REALLY GREAT if you would be able to do that. Thanks
claydowling
Sun, 02/26/2012 - 08:19
Farmhouse Chairs
There are a few plans for chairs on this site. You won't find plans for chairs like are shown in the photo because those are moderately non-trivial to built.
If you want to try building your own chairs, I can recommend a book called "Chair Making Simplified." My wife gave it to me a fews years back for Christmas. That books really isn't for beginners though, since tool #1 that you'll need is a lathe with at least 36" between centers.
A book with some good advice on building chairs and other furniture with precious few tools is Woodworking With Your Kids by Richard Starr. If Richard Starr has eighth-grade girls building chairs and tables with hand tools, a bit of willingness to learn and you'll be building your own new dining room set.
Guest (not verified)
Mon, 02/27/2012 - 10:07
how to make it a square 54"x54" table?
I would like to know if there are any plans or you have any info on how to make it a 54"x54" square table so I can have 2 chairs on each side to fit 8 people. Thanks!
Guest (not verified)
Sun, 03/04/2012 - 09:18
Plan Dimensions?
I was wondering if there was a version of this plan available where the dimensions shown in the images are visible? I would love to make this table, but I am having a very hard time reading the measurements from the images provided.
Thanks!!
Guest (not verified)
Tue, 03/20/2012 - 07:59
Question on contruction
Would you be able to construct this table without the lower bars on the table, so that the head and foot of the table could have a chair pushed in? I like this plan except for that small detail.
Guest (not verified)
Tue, 03/20/2012 - 18:20
farmhouse table
My daughter's fiance' built this table for me and I love it! I'm going to have a glass top made for it etched with a border design and our family initial in the center. I want to protect the top while still keeping the beauty of the wood visible. Thanks for the great plans!
claydowling
Tue, 03/20/2012 - 19:04
Glass Top
That top sounds beautiful. When you have the top it would be great if you could post pictures. I must confess a weakness for etched glass.
Guest (not verified)
Fri, 03/23/2012 - 17:40
farmhouse table
i love it!!!!!!!!!!!!!!!!!!!!!!!!!!!!!!!!!!!!!!!!!!!!!!!!!!!!!!!!!!!!
tom boyle
Guest (not verified)
Wed, 03/28/2012 - 04:24
Lower Bars
I see a lot of questions regarding the lower bars - asking if they are necessary.... but I don't see any responses. I'm thinking the responses may not be visible to the other guests.... so I'm submitting the same questions again..... I'd like to use the ends of the table.... are the lower bars necessary???
claydowling
Wed, 03/28/2012 - 04:43
End Bars
They aren't strictly necessary, but they are going to provide a lot of stability.
David Corbin (not verified)
Fri, 04/06/2012 - 20:49
Pictures for Step 16-19
I was just wondering where the pictures are for the remaining steps. I am a begining builder and I know how to follow plans very well, but understanding a couple of the last steps has me a little confused. I know I would probably understand if I seen the picture and realize I was being dumb, but without it I am unsure if I would be able to fully finish the table. Thank you in advance for any response and help.
Rockonnell (not verified)
Wed, 11/14/2012 - 12:33
I am looking for these pics
I am looking for these pics too. Just realized they have been missing since April. I am about ready to put the top on and also am trying to figure out what she means when it says to drill into the breadboard ends after all the 2x6s are screwed on. Did you ever figure it out? Hope you had a successful build!
SusanWessel (not verified)
Mon, 05/21/2012 - 12:21
table dimensions
Hello! This will be my first time to try and build something. The table will be way too long for my room at 96 inches. Do you have instructions or measurements for this table but smaller?
thanks
Brian Bicknell (not verified)
Wed, 05/23/2012 - 18:55
Nominal vs. Actual?
Hi!
I love these plans and I'm driving to wine country to purchase some repurposed redwood to build it. The boards that I'm getting are 2x12 (actual dimension) and I was wondering how I should rip them for this project. The easiest thing in my mind is to just rip the 2x12 into sections like 2x2 (6 of them)? Will it matter much, or since most of the measurements are just .5 inches bigger than the nominal counterpart it will all work out? Thanks!
claydowling
Wed, 05/23/2012 - 19:40
Modify plans
I would just modify the plans to accommodate the width of lumber that you have. It's something you should do anyway, because there are variances in width in the material from lumberyards and home centers. Especially home centers.
claydowling
Wed, 05/23/2012 - 19:40
Modify plans
I would just modify the plans to accommodate the width of lumber that you have. It's something you should do anyway, because there are variances in width in the material from lumberyards and home centers. Especially home centers.
Brian Bicknell (not verified)
Thu, 05/24/2012 - 20:49
Nominal vs. Actual?
Hi!
I love these plans and I'm driving to wine country to purchase some repurposed redwood to build it. The boards that I'm getting are 2x12 (actual dimension) and I was wondering how I should rip them for this project. The easiest thing in my mind is to just rip the 2x12 into sections like 2x2 (6 of them)? Will it matter much, or since most of the measurements are just .5 inches bigger than the nominal counterpart it will all work out? Thanks!
stever (not verified)
Fri, 06/15/2012 - 17:47
screwing wide boards may cause cracking
Just a caution that your design calls for 2x6s for the top and you are suggesting to screw each piece down in 3 places while leaving no gap. This is fine for today, but wood moves with the seasons and you will either end up with gaps, cracks, cupping or all three over time.
This is actually the reason why real breadboard ends were made for tabletops. The breadboard normally holds the boards making up the table top via sliding mortises allowing for the movement that is inherent to all woods.
So, just a caution, that this will give you 'the look' but the top may not hold up well over time.
Cee Holmes (not verified)
Mon, 06/18/2012 - 03:23
farmhouse table
Thank you so much for these plans. I love your site!
Costrutorre
Fri, 06/22/2012 - 05:57
Table
Hi Ana,
Love your site and this table! I have two questions.
1) Do you think the reccomened wood on the tabletop will bow overtime if the table is kept indoors?
2) I am considering using oak for the tabletop. Any thoughts or concerns about this? I thought it could look great and last longer.
Thanks!
Seamus
Cynthia (not verified)
Tue, 06/26/2012 - 16:11
First let me just say that
First let me just say that you are amazing!!
Here is a question from someone who is in the dreaming stage. Never built anything in my life and own no tools. You are an inspiration and I am trying to learn about what would be involved before even thinking about the next step.
The instructions for all these projects for the shopping list talk about the width and depth of the lumber needed (eg. 2 x 4). What length are all these pieces that you are talking about? Do they come in standard lengths? It seems like the stores carry them in 8 ft, 10 ft, 12 ft etc. Which length would I need to follow the instructions for this table?
Thanks for the help.
In reply to First let me just say that by Cynthia (not verified)
Lady Goats
Tue, 06/26/2012 - 17:02
More often than not, she'll call for "standard" sizes at 8'
If the plan doesn't need 8', the shopping list will occasionally have the board length listed (they often come in 2' increments, so it would be like... a 1x2 @ 4' or something), but if not, go with the 8'.
Keep dreaming, but don't take too long! It's much better to dive right in! You'll love it!
Travis (not verified)
Fri, 06/29/2012 - 10:20
Step 17?
Hey Ana,
I'm about to build this table this weekend, and I'm confused about step 17. How do I do that? Do I screw the 4" screws from the sides of the table top pieces into the faces of the breadboards touching the table top pieces? It seems like the angle of those screws would look ugly from the outside. I could skip that step and probably be okay, but I'm pretty new at woodworking.
Also, I'm planning to add 20" removable extensions to the ends of the table to seat more people. I'm not sure if the table will be able to support them due to their length.
Thanks!
Travis
Travis (not verified)
Fri, 06/29/2012 - 10:22
Step 17?
Hey Ana,
I'm about to build this table this weekend, and I'm confused about step 17. How do I do that? Do I screw the 4" screws from the sides of the table top pieces into the faces of the breadboards touching the table top pieces? It seems like the angle of those screws would look ugly from the outside. I could skip that step and probably be okay, but I'm pretty new at woodworking.
Also, I'm planning to add 20" removable extensions to the ends of the table to seat more people. I'm not sure if the table will be able to support them due to their length.
Thanks!
Travis
Travis (not verified)
Fri, 06/29/2012 - 10:31
Step 17?
Hey Ana,
I'm about to build this table this weekend, and I'm confused about step 17. How do I do that? Do I screw the 4" screws from the sides of the table top pieces into the faces of the breadboards touching the table top pieces? It seems like the angle of those screws would look ugly from the outside. I could skip that step and probably be okay, but I'm pretty new at woodworking.
Also, I'm planning to add 20" removable extensions to the ends of the table to seat more people. I'm not sure if the table will be able to support them due to their length.
Thanks!
Travis
The Allens
Tue, 07/24/2012 - 15:06
Finish
What was the finish color used in the country living photos? When should you use wood conditioner? If you are going for a more weathered look, is it necessary if you are use pine for the table?
EEE
Mon, 01/20/2014 - 12:15
Finish
I was wondering the same thing...did you ever get an answer?
EEE
Mon, 01/20/2014 - 12:15
Finish
I was wondering the same thing...did you ever get an answer?
Kim Gaynor (not verified)
Sat, 07/28/2012 - 09:36
Question regarding finishing
What “weathered wood” stain did you use?
Rebecca Morris (not verified)
Mon, 07/30/2012 - 20:54
Have a few questions before I start to build!
LOVE your website!! Wish I had found it years ago, but I'm moving this month and need a new dining table--came to you first for a plan! I'm going to start building this weekend, but I have a few questions:
First, is it just me or are there no pics step 16-end? I'm such a visual person, and your diagrams are so helpful to this feeble wannabee carpenter, so I wanted to make sure I'm not missing out.
2) Do you suggest a particular brand of stain? I've dabbled with weathered wood looks before and haven't been absolutely happy yet...
3) What kind of lumber do you suggest? I'm not trying to build something to be passed down as an heirloom, so cheap construction grade is my go-to.
4) I only need to fit 3 chairs/side, and can't really afford the extra space in my dining room. How many inches should I subtract from the length?
Thank you thank you!
Rebecca Morris (not verified)
Mon, 07/30/2012 - 21:07
Are pictures missing in last steps?
Planning on building this weekend, wood is being cut as we speak! I'm wondering though, are there pictures to accomany steps 16-end? Thanks for the beautiful furniture, inspiration, and motivation to do it!
Amber's Mom (not verified)
Wed, 08/22/2012 - 07:43
Question on dimentions.
I have a question on the dimentions and the shopping and cut list... The photo dimentions are different that what it says the dimentions are, so is the supply and cut list for the picture dimentions or the stated dimentions?!
Deborah Monson (not verified)
Thu, 09/13/2012 - 23:17
Wood?
I've been scrolling through all of these posts and I was really trying to find out what kind of wood to use on this table. Help? Thanks!
Kim Whitley-Gaynor (not verified)
Sun, 09/16/2012 - 16:36
I made it!
I modified the table size and made it with my husband. Check out my post on http://livingvintageco.com/2012/09/do-it-yourself/a-desk-made-from-recl….
Jaci Gray (not verified)
Mon, 09/17/2012 - 11:48
so awesome!! :)
I love this table. I am currently building this table and I am loving how it is turning out. I'm almost to the point of staining it!! All i need to do next is make the bench and my dining room will be complete!! Thank you for posting the plans!! :)
ranamae
Wed, 09/19/2012 - 12:38
Missing diagrams?
Are there some diagrams missing from steps 16-19?..I also can't find a "How To" section on the site. I can always look up videos on Youtube, but that's a bit confusing.
dalio1610
Sun, 10/07/2012 - 17:38
Farm House Table
Love this plan,Cant wait to build this!
Celia Cawthon (not verified)
Fri, 10/12/2012 - 05:58
Can't believe the timing!
I was just telling my husband that I need to make the table for our new home because I want it to be long enough to seat 12, look rustically handbuilt with just the right finish to fit my vision for the room!!!! Thank you a 1,000 times over. Just a little history: My father was a cabinet maker by hobby and owned every piece of equipment to make furniture, so I grew up in love with the fragrance of fresh-cut lumber. My major at Oklahoma State was Industrial Arts until the chairman of the department recommended a different major more suitable to a woman. Ugh! I believed him and changed to ... nursing. BORING! So thank you for letting me unleash my inner carpenter once again!
Maggie H. (not verified)
Tue, 10/16/2012 - 09:05
This is amazing! My husband
This is amazing! My husband loves when I give him new crafts so I'm hoping he'll get started on this this weekend. Do you have plans for benches to go with it? Thanks so much! LOVE LOVE LOVE your blog.
tmlcole
Wed, 10/17/2012 - 17:51
FarmHouse Table
Hello, this is a great plan and written with very easy to follow instructions with step by step pictures which are more help than you will ever know. I wondered if it would be possible to write a cut list for a 5 foot long table. I don't have a big enough area for this one. I would really appreciate it! I can only imagine how busy you so I understand if you don't have time! Thanks so much for all your plans and making them affordable. I also love the fact you don't have to have any fancy tools to make them!! Thanks again, Tamela
evan (not verified)
Mon, 11/12/2012 - 09:21
building
I love this table. So cool! However, I am currently building it, and have run into a big issue. It seems impossible to find regular pine boards at the lumber store that aren't warped. I am screwing them to the table, but they're warping the whole table! Is there a solution, other than having a planer?
Heather Staugh (not verified)
Mon, 11/12/2012 - 12:17
Site
Oh my...i just stumbled onto your site by googling diy headboards and this is all stuff i love and have pictured doing in our new house! but had not found any pics to go with what i had pictured in my head and the prices and directions you have are soooo awesome! this is totally my new favorite site and i will be back to it often. gonna go get the book too! thanks soooo much!!!!!!!!!!!!!!!
Rockonnell (not verified)
Wed, 11/14/2012 - 10:16
Steps 16-19
I am completing the base and was hoping the diagrams for steps 16-19 would be updated or fixed on the directions page by the time I got there. Any tips as to where I can find the missing information?
kristi gutierrez (not verified)
Fri, 11/30/2012 - 10:17
Thank you. My husband and I
Thank you. My husband and I used your plans to make us a 9 ft table for our dining space which worked wonderfully for our large family on thanksgiving. We made some changes as our table has a large counter top island piece for the top. I LOVE my new table. I have been doing crafting, homeschooling, and puzzles ALL OVER it.
AndrewKutz (not verified)
Fri, 12/14/2012 - 22:30
Made it into a Coffee Table
To practice the notching I first used a variation of these plans and built a coffee table. Here is a link to a description and the gallery. http://www.reddit.com/r/DIY/comments/14vtrb/built_a_coffee_table/
JLR0331 (not verified)
Mon, 12/17/2012 - 20:30
Step Confusion
Hello,
I have the table built and ready to be finished, I am just a little confused on step number 17 it says screw the table top boards in to the bread board ends as shown above. Are you supposed to pocket hole the tabletop boards in to the breadboard ends? Thanks