Folding Camp Stools

Difficulty
Starter Projects
| Print this plan

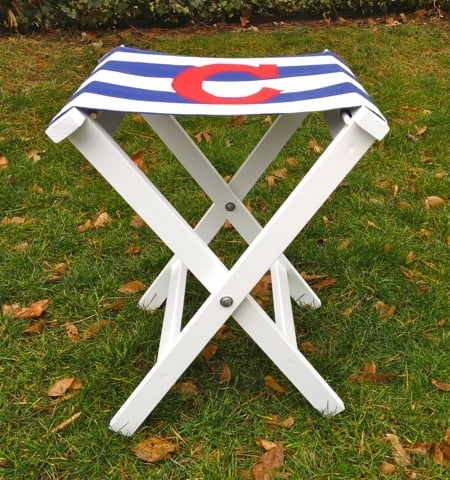
Make your own folding stools from wood boards! Free DIY plans to build folding camp stools.

Thank you for understanding when we decided to take this winter indoors on the Momplex.

We are having a very fluffy winter up here in Alaska.
Wishing we had one more roof built!  
Thank you to those of you thinking of us and our extreme weather up here in Alaska.  We live in Interior Alaska, so are not in need of rescue, but we are grateful not to be fighting a roofless Momplex this very snowy winter!  It got to be a full time job just shoveling the snow to get to the point of working.
I can't believe it's mid January.  Are we really weeks away from spring and sunshine, and snow melting, and maybe, work overalls and a hammer?  I can't wait.  We truly miss working up on the hill!
Today, I have special spring treat to share with you. I know we are still a long way from break up - as we call it in Alaska - but these folding stools are like the first flowers sprouting in spring!  Special thanks to Jaime for sharing her plans with us today!
Like our folding beach chairs, Jaime took a couple of 1x2 boards and made this folding chair.
$5 in lumber and some fabric, and you can have this folding stool!  Wouldn't they make a terrific gift?
Special thanks to Jaime for sharing her stool with us and giving us all an opportunity to build for ourselves.  
And for all of use to enjoy using or gifting!
The plans follow.  Also must read Jaime's post including fabric seat tutorial - yep - the slings are removable and washable/changeable - and step by step photos.
Dimensions
Adult sized dimensions as shown above

Preparation

Shopping List

2 - 1x2 @ 8 feet long
1 - 5/16" dowel, 2 feet long
Fabric for sling (see last step)
Bolts: 2 - 1/4" x 2" long
Nuts: 2 - 1/4"
Washers: 6 - 1/4"
Assemble frames with either 2" screws or 1 1/4" pocket hole screws and glue

Common Materials
Cut List

4 - 1x2 @ 24" (legs)
2 - 1x2 @ 15" (top sides)
2 - 1x2 @ 12.25" (outer stretcher top and bottom supports)
2 - 1x2 @ 10.5" (inner stretcher top and bottom supports)
1 - 5/16" dowel @ 13.5" (outer side fabric insert)
1 - 5/16" dowel @ 11.25" (inner side fabric insert)

Tools
Tape Measure
Speed Square
Pencil
Safety Glasses
Hearing Protection
Drill
Circular Saw
Drill Bit Set
General Instructions

Please read through the entire plan and all comments before beginning this project. It is also advisable to review the Getting Started Section. Take all necessary precautions to build safely and smartly. Work on a clean level surface, free of imperfections or debris. Always use straight boards. Check for square after each step. Always predrill holes before attaching with screws. Use glue with finish nails for a stronger hold. Wipe excess glue off bare wood for stained projects, as dried glue will not take stain. Be safe, have fun, and ask for help if you need it. Good luck!

Instructions

Step 1

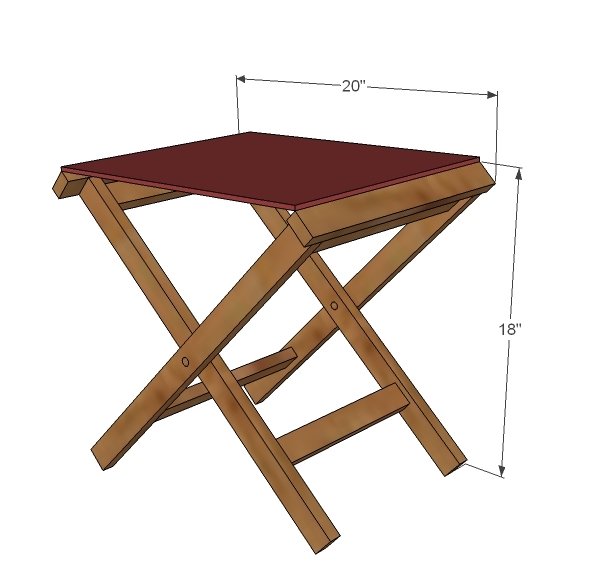
Build the first frame as shown in diagram. You can use 1 1/4" pocket hole screws or 2" countersunk screws. Use glue. Top board overhangs 1/2" on each end.

TIP: It's easier to drill the 1/4" holes before assembling :)

Step 2

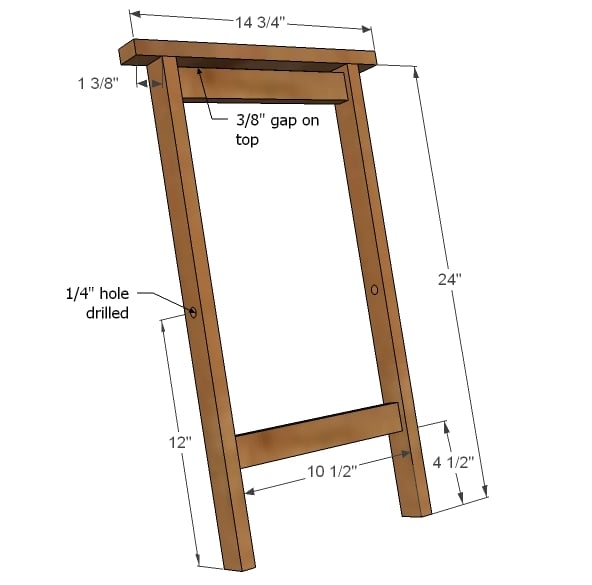
The second frame is exactly the same as the first, just a little wider. Build as shown in diagram.

Step 3

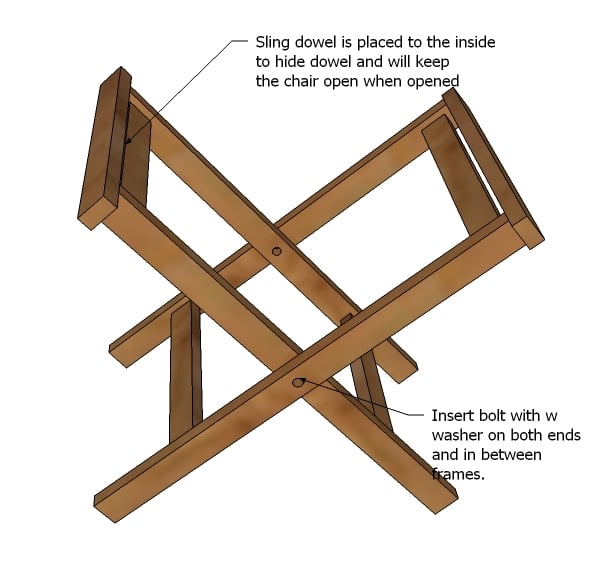
Now assemble the two frames by laying the smaller frame inside the larger and lining up the predrilled 1/4" holes. Insert a bolt, with a washer at the start, between frames, and end with nut through the predrilled holes. This will create a folding frame for you.

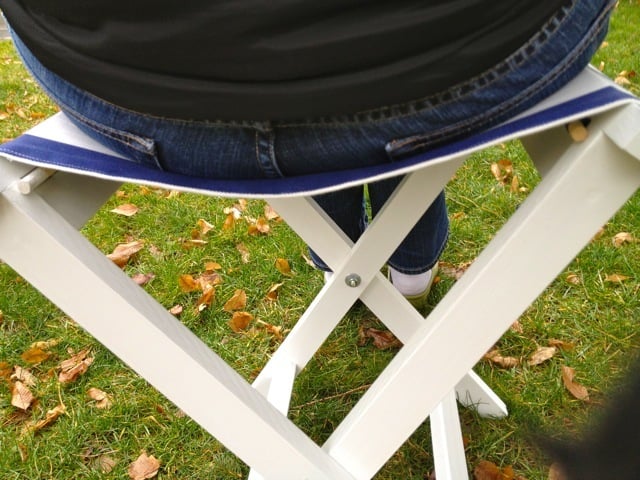
Next, you will need to make the sling, and then install with wood dowels.

Step 4

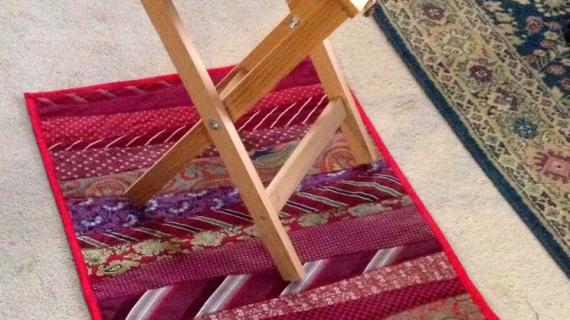
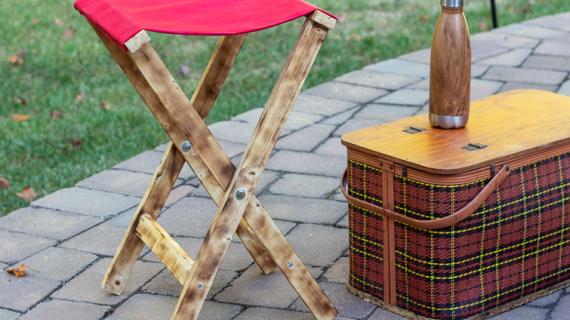
When your sling is inserted properly in the seat, the dowels are hidden underneath. The seat sling also keeps the folding stool open when opened.

Finishing Instructions
Preparation Instructions
Fill all holes with wood filler and let dry. Apply additional coats of wood filler as needed. When wood filler is completely dry, sand the project in the direction of the wood grain with 120 grit sandpaper. Vacuum sanded project to remove sanding residue. Remove all sanding residue on work surfaces as well. Wipe project clean with damp cloth.

It is always recommended to apply a test coat on a hidden area or scrap piece to ensure color evenness and adhesion. Use primer or wood conditioner as needed.
Project Type
Room

Comments

zarizi (not verified)

Mon, 01/16/2012 - 05:53

Wow.. I like the chair. It so simple but my hands is not good enough to build thing like this. Just buy from supermarket.. HUhu

RichardMaretti

Mon, 01/16/2012 - 16:32

This is Babulerman.

Seven-Photogra… (not verified)

Mon, 04/09/2012 - 10:19

This is wonderful! I'm thinking that these would be perfect additional seating in our small living room for those unexpected guests... & even for a little one's birthday party, they would be perfect! Thanks so much!!

Guinn (not verified)

Sat, 07/07/2012 - 14:37

Very nice. I have looked for this site for some time but for some reason couldn't find it! Now I can finish the stool I am currently making, then make three more from your plans. Thank you so much.

Guinn

Guest AW (not verified)

Thu, 10/04/2012 - 19:49

I think two of these stools would work for a wood & canvas canoe rest, either as a interum rest from car top to water-edge, or when doing some touch-up / refinishing work. canvas seat would cradle the canoe, but not damage paint or varnish finish. Comment?

Sehmket

Sun, 11/03/2013 - 15:43

I was working on this stool this weekend... I got the wooden parts completed without a problem, but I'm having some real issues with the seat. I first made it according to measurements, but it seems to be way too big... I tried pinning it smaller, and when I sat on it to figure it out, the pin broke, and I ended up crashing through and breaking the stool :(

Has anyone made this, and have any tips on how the seat goes together?

skyzen

Sat, 11/09/2013 - 15:55

1x2s split when joining them using 1 1/4" pocket screws. I drilled the pocket holes using 3/4 setting. Should i be using 1" screws instead?

Are there any other plans that use 1x2 strips only?

Frequently Asked Questions

Wood Questions

What kind of wood should I use?
Most of our plans use standard construction lumber like pine or fir. It's affordable, easy to work with, and easy to find. It's also rapidly renewing and biodegradable, so a great eco friendly choice!

Can I use hardwoods instead?
Yes—just keep in mind they're heavier, cost more, and can be tougher on tools and harder to join together and finish. I recommend not tackling a hardwood project until after you have built several softwood projects.

What if my boards are warped?
Choose the straightest boards at the store. You can often work around slight warps by cutting them into shorter pieces.

What wood should I use for outdoor furniture?
Use red-toned or pressure-treated 2x lumber for framing, and cedar or cedar fence pickets for the decking. Outdoor furniture should be built like a deck—your local home center can help recommend the right wood for your climate.

Will my wood move or warp after I build?
Potentially, especially in humid climates. Let your wood acclimate indoors before building. Once acclimated and kept in a stable environment, movement should be minimal. Remember, most houses are built using framing lumber - it's all about keeping moisture down indoors.

Cutting Questions

Do I need a miter saw?
A miter saw is great, creating fast, safe, and precise cuts, even for beginners. But most plans can be built with a circular saw and a straight edge. If using a circular saw to cut, take time to practice, and get good at making cuts, before cutting your project boards.

How do I get clean cuts with a circular saw?
Clamp your board, measure twice, cut slow, and use a sharp blade. This takes practice, so spend some time making cuts. I go through becoming proficient at freehand cutting in my course, it is worth taking if you want to master this skill.

Will the store cut my wood?
Yes—most stores will do rough cuts to help you transport your materials home. But from store to store, the quality of cuts could greatly vary.

Joinery Questions

What screws should I use?
We recommend star-head self tapping screws for framing, most common sizes are 2-1/2", 1-3/4". Pre-drill if close to the edge or you find your wood is splitting.

Do I have to use pocket holes?
Pocket holes are the cheapest, easiest and fastest way to do some joints - like edge to edge or a hidden fastener joint. There are other methods, but these can be time consuming and expensive. We recommend using pocket holes as indicated in plans for best results.

How do I keep things square?
Use a speed square and measure diagonals after each step. Always clamp joints before screwing to keep them tight and flush.

Finishing Questions

Stain or paint before or after building?
A quick sand before and a full finish after gives the best results. Pre-finish if you're doing two-tone or detailed finishes.

What type of finish?
Use oil-based or water-based stain. For paint, cabinet-grade latex or enamel works great. High use surfaces on indoor projects should get a coat of polyurethane, I recommend a Helsman or Spar or other flexible poly that won't crack or peel with wood movement. For exterior projects, use a finish suitable for exterior fences.

How to get a smooth finish?
Start with a well sanded project. Sand between coats (220 grit), wipe clean, and apply light coats with a foam brush or roller.

Plan Questions

Can I change the size?
Many people do, and that's the great thing about building your own furniture! But do keep in mind going bigger might mean more supports are required, and often plans are optimized for minimal material waste.

Are these beginner-friendly?
Yes—plans are written with simple tools and clear steps in mind, with every effort to make plans as simple as possible.

Can I sell what I build?
Absolutely! Just don’t resell or repost the plans themselves.

General Questions

What tools do I really need?
A drill, circular saw, tape measure, square, and a few clamps will get you through most projects.

Do I need a workshop?
Nope! A driveway or small patio is plenty to get started, just make sure you have a level place to work. If you find you are building several projects a year, creating a small workbench is a great way to store tools and have a dedicated workspace.

What if I mess up?
Wood filler, sanding, or flipping boards goes a long way. Mistakes are part of the process!

What can I do to make my projects look more professional?
Start with straight boards, make accurate cuts, clamp all joints, and line up everything neatly. Sand thoroughly, use a neutral finish, and apply it in light coats for a clean look.

I've never built anything before. Where should I start?
Start with a few smaller softwood projects to get hands-on experience. Or if you're tackling a big project, buy a little extra lumber and practice your cuts and joints first. If possible, work with someone who has a bit of experience.

Care & Maintenance

How long will my furniture last?
With good joinery and regular care, your DIY furniture can last for decades. I have pieces in my own home that are over 20 years old and still going strong! One of the best parts about DIY furniture is that it’s easy to repaint, refinish, or repair—so your projects can grow and adapt with you.

How should I care for outdoor furniture?
Lightly pressure wash or hose it down once or twice a year. Tighten screws and reapply finish as needed to protect it—just like a deck or fence. A little upkeep goes a long way in extending the life of your furniture.

How about indoor furniture?
Regularly dust or wipe with a damp cloth. If it starts to look worn, a light sanding and touch-up paint or stain can refresh it in no time. DIY pieces are meant to be durable and fixable—so don’t be afraid to give them some love now and then.

Want to Build with Confidence?

Check out my ebook: 12 Skills to Build Your Own Furniture
It walks you through the core skills every builder needs—measuring, cutting, joinery, and finishing—so you can build beautiful furniture that lasts.

Still Have Questions?

Email us anytime at [email protected] and we’ll be happy to help!