


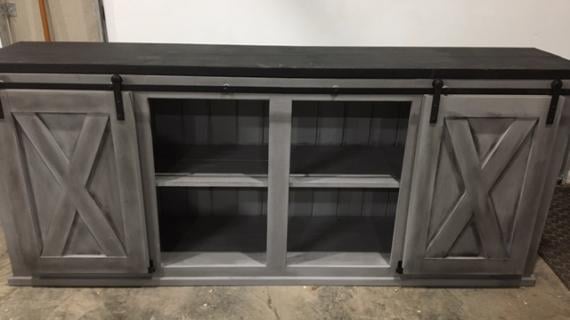
How to build barn door console or buffet - free plans by ANA-WHITE.com
See also: Simplified 8' Barn Door Console Plans
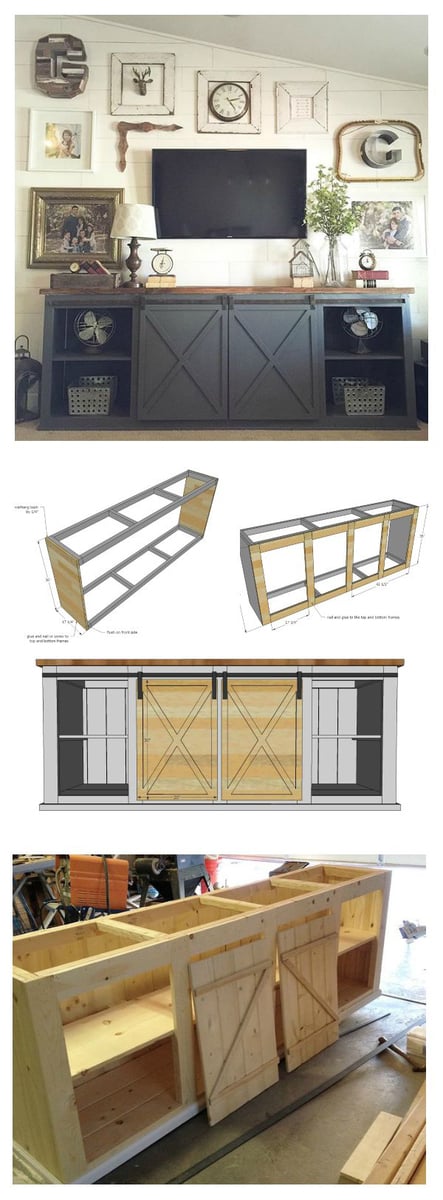
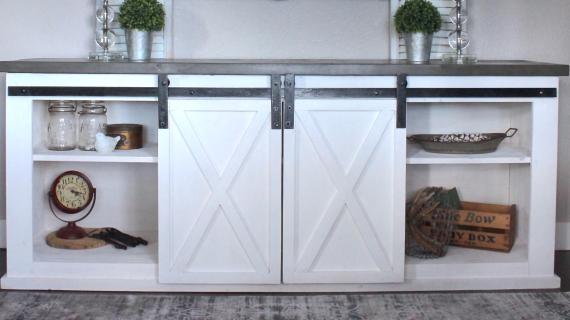
Man oh man do I ever have a treat for you today!
Do you follow Nikki Grandy on Instagram yet?
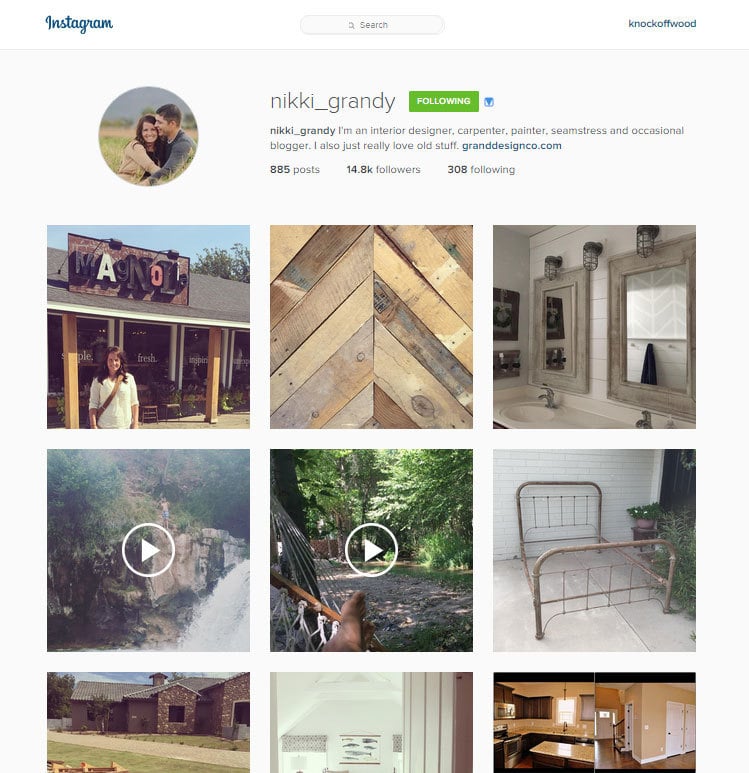
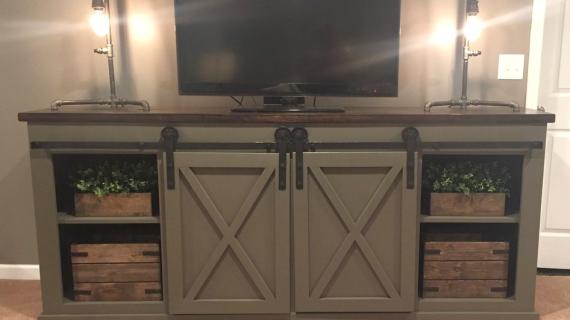
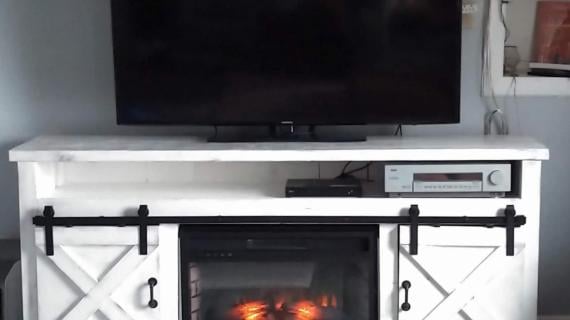
If you do, you know she pretty much has redefined the sliding door console.
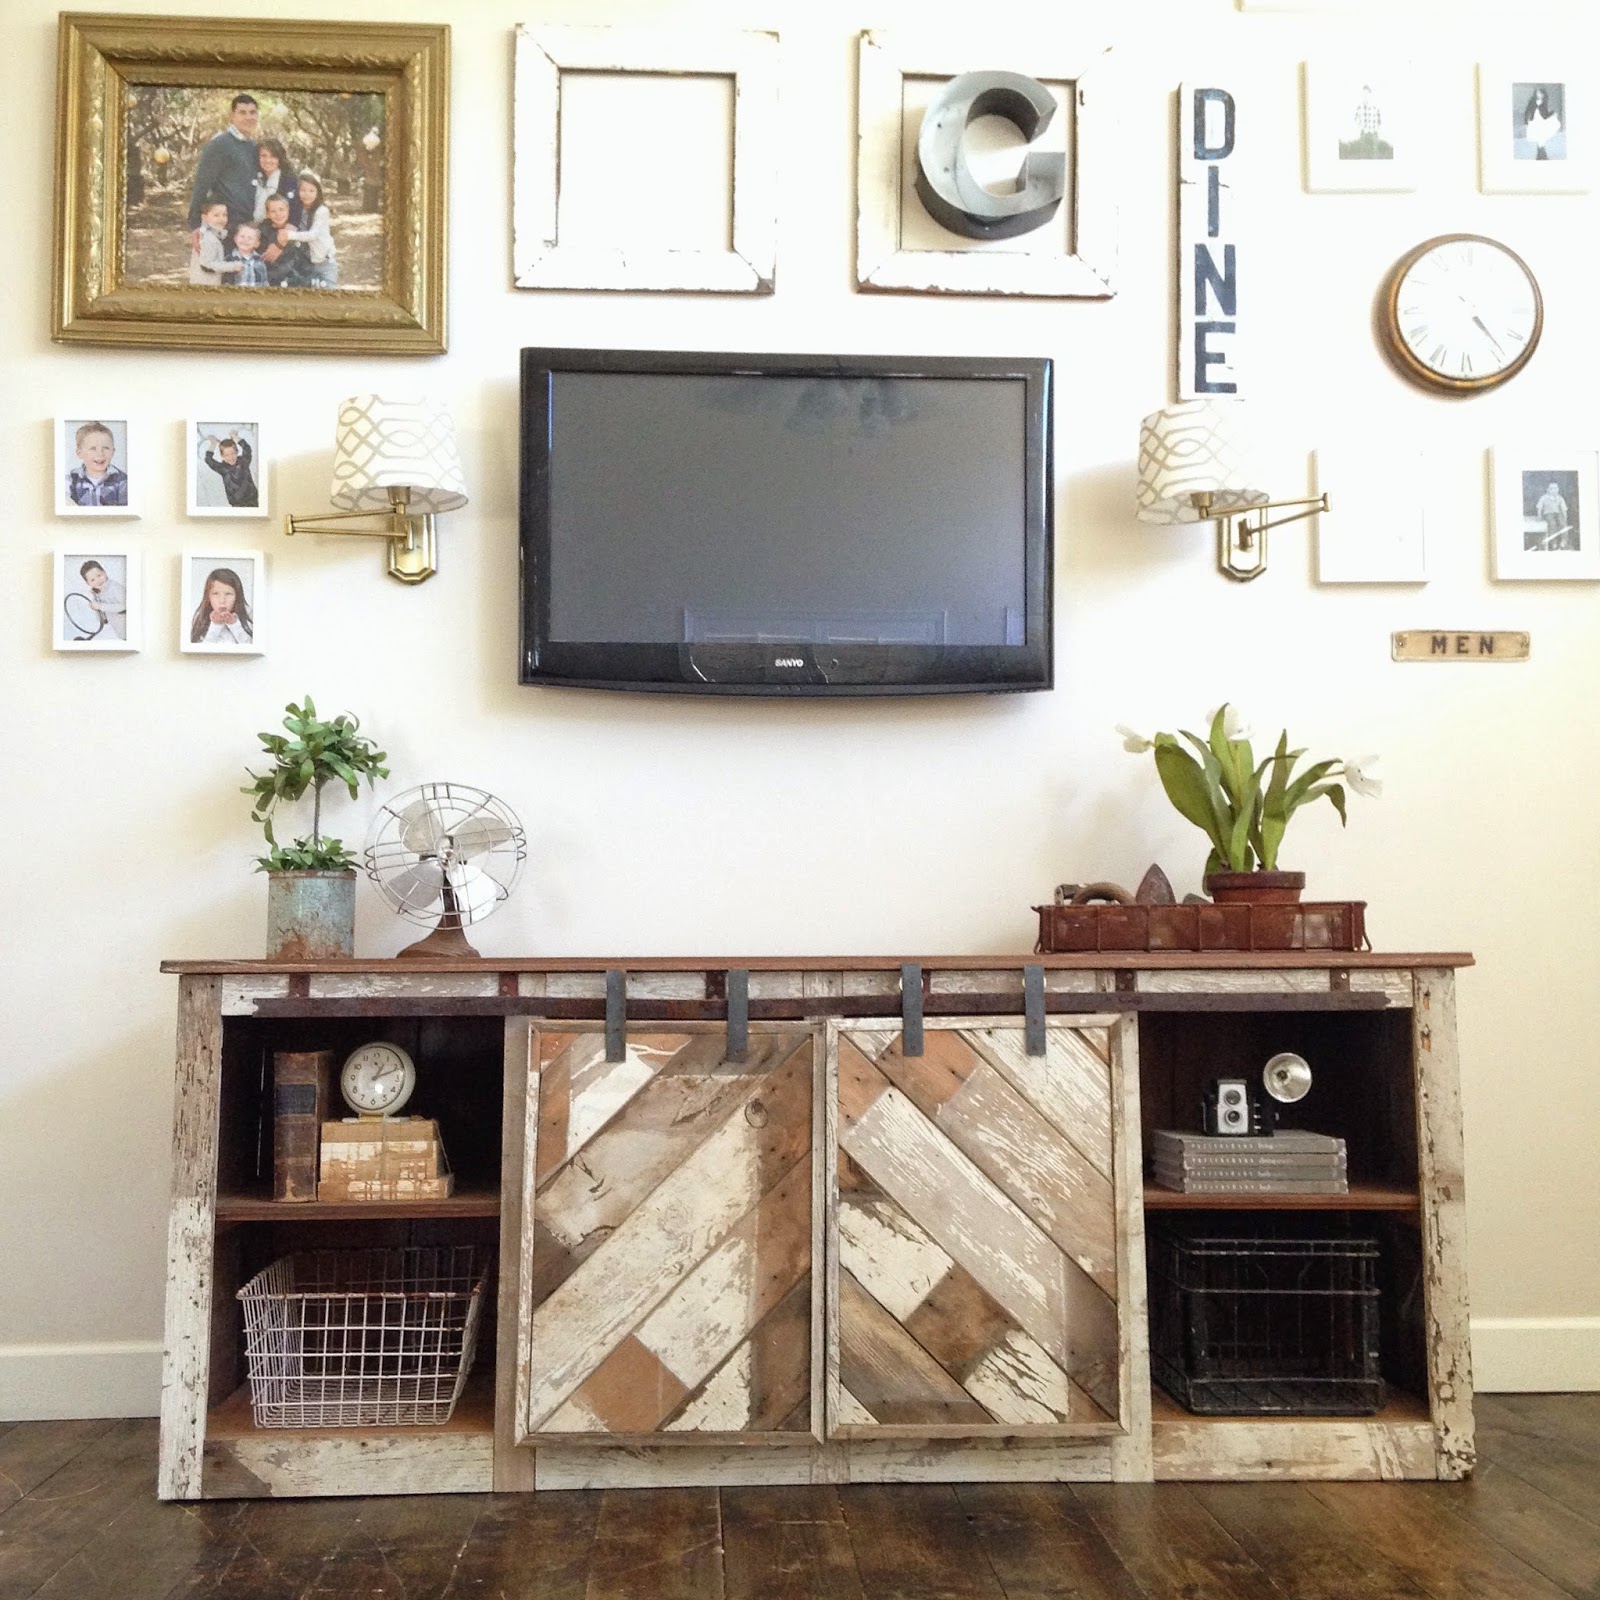
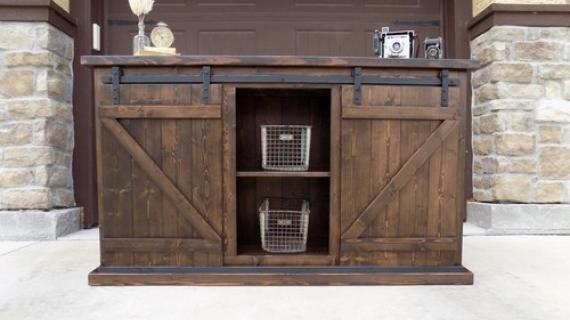
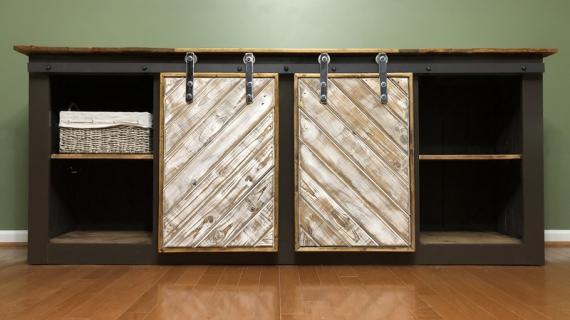
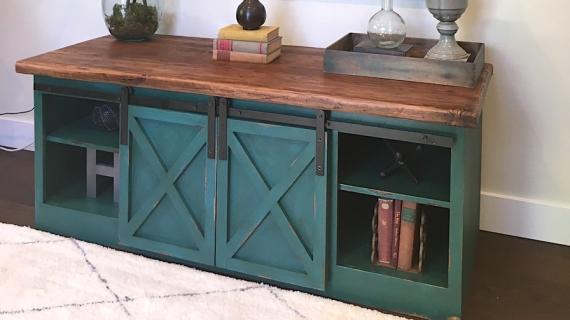
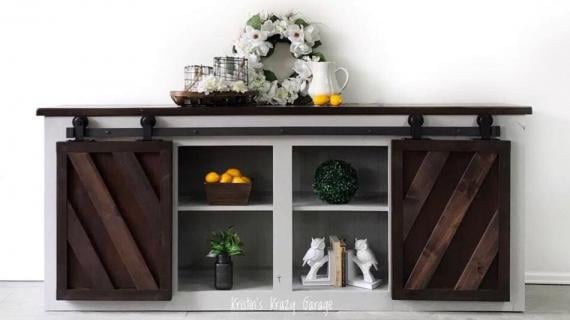
My personal favorite is her reclaimed wood version with herringbone pattern doors.

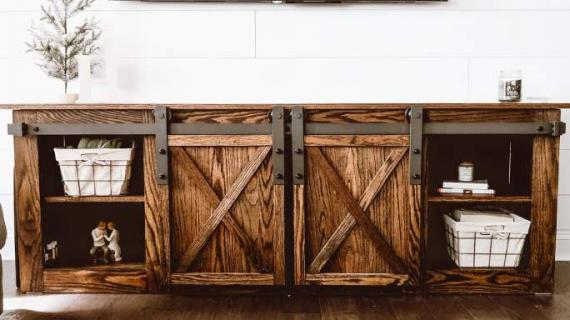
How stunningly gorgeous is this barn door console?
Yep, she's letting me share plans with you!!!
The plans for this amazing barn door console follow, but one thing first - hop over to Instagram and follow nikki_grandy right now!
Have an awesome Wednesday!
Ana
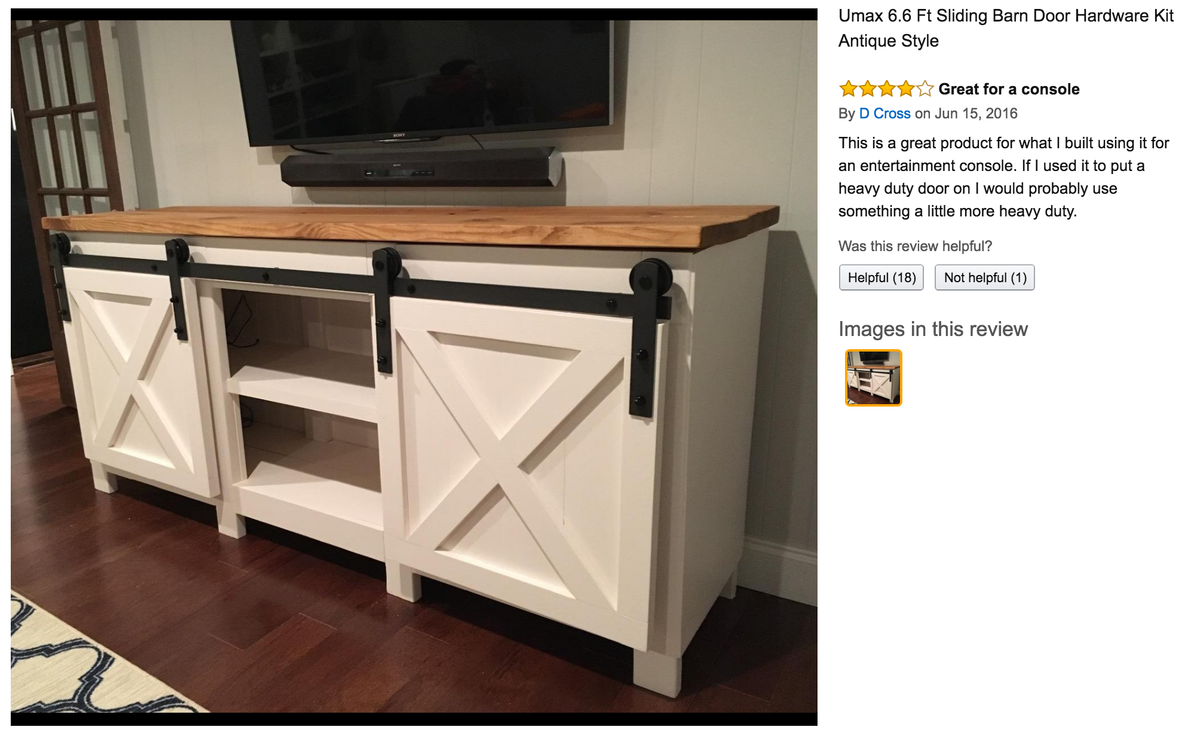
PS - barn door hardware has come down alot in price!

$50 for 8 foot long sliding door hardware from Amazon - and it has five star reviews!
Pin For Later!
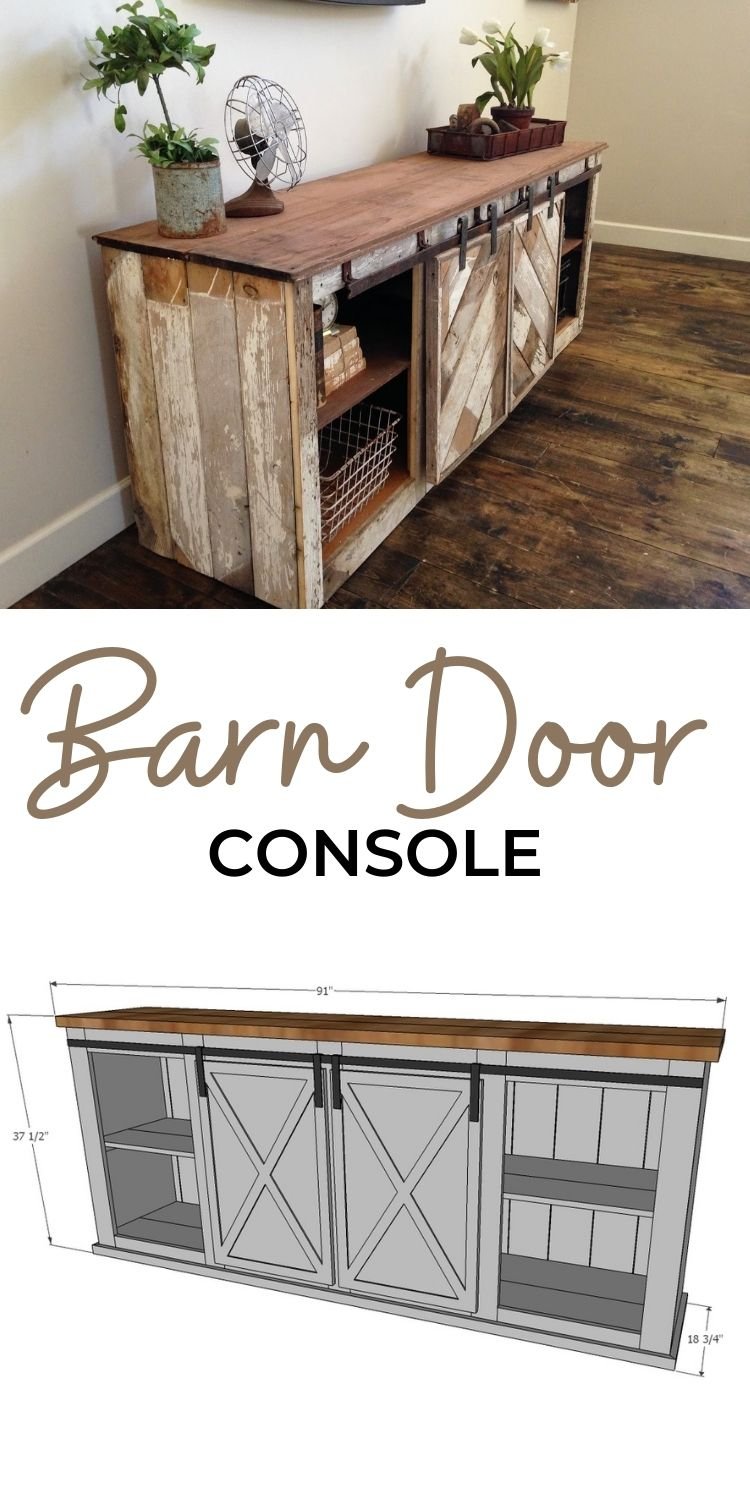
Barn Door Console Plans

Preparation
- 2 - 2x10 @ 8 feet long
- 2 - 1x8 @ 8 feet long
- 2 - 1x10 @ 8 feet long
- 1 sheet of 1/4" thick plywood or hardboard (for back)
- 3 - 1x2 @ 8 feet long
- 4 - 1x4 @ 8 feet long
- 6 - 2x3 @ 8 feet long
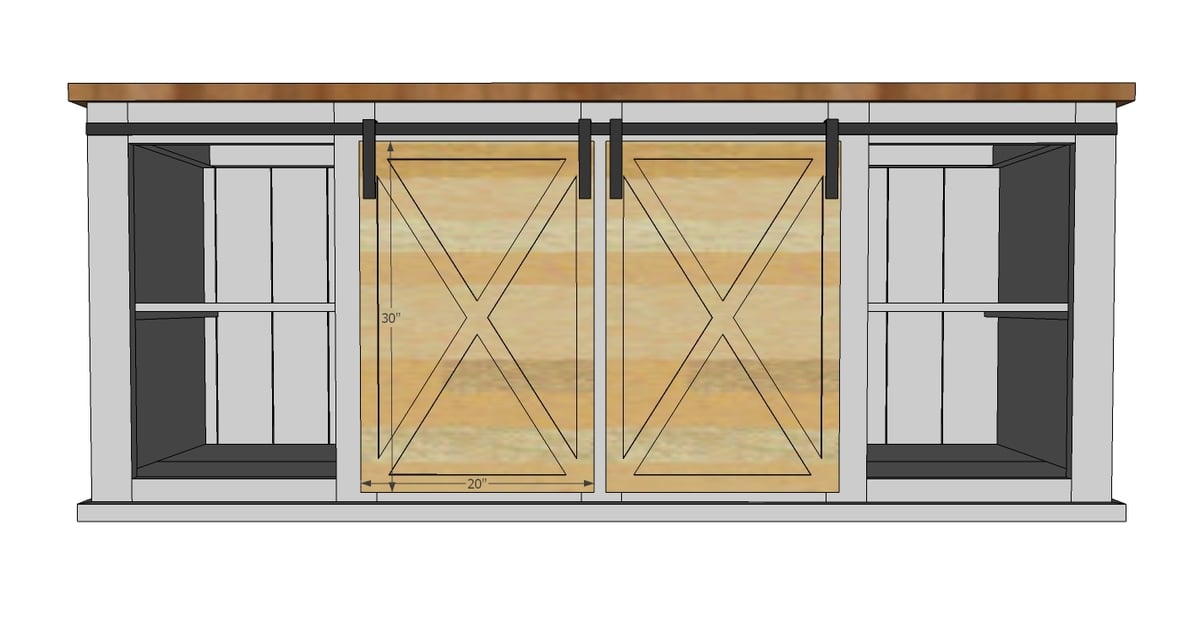
- 2 - project panel pieces 17-1/4" x 36" (may be advertised as 18" wide project panel - measure in store)
- Hardware for sliding doors
Frames
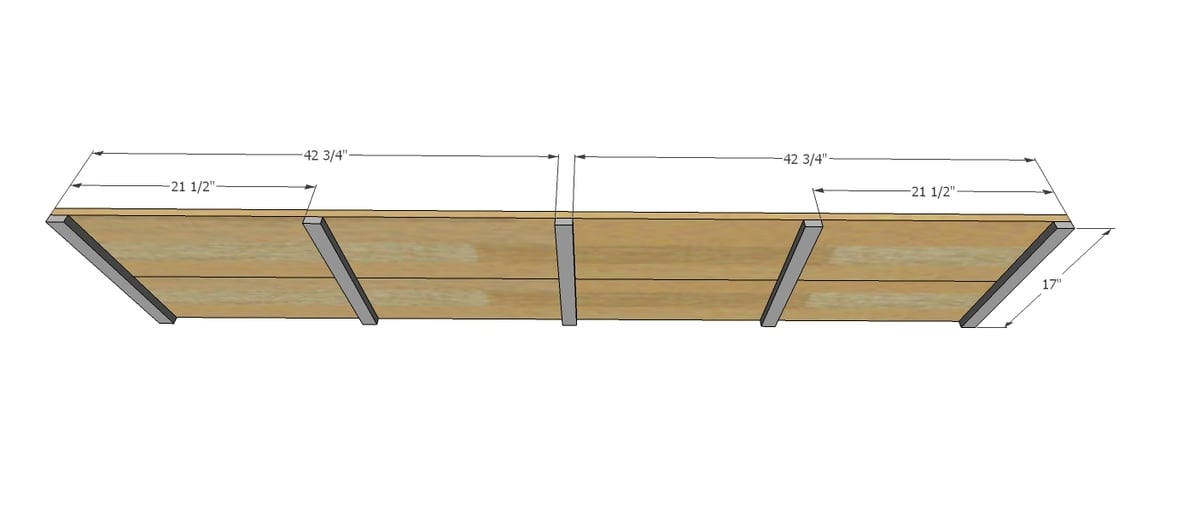
- 4 - 2x3 @ 84"
- 4 - 2x3 @ 17"
- 4 - 2x3 @ 14"
Sides
- 2 - 3/4" thick project panels or plywood 36" x 17-1/4"
Face Frame
- 5 - 1x4 @ 36"
- 8 - 1x4 @ 17-3/4"
Shelves
- 2 - 1x8 @ 87"
- 2 - 1x10 @ 87"
Middle Shelf Supports and Cleats
- 5 - 1x2 @ 14"
- 5 - 1x2 @ 17"
Back
- 1/4" plywood pieces 36" long
Bottom Trim
- 1 - 1x2 @ 90" - both ends cut at 45 degrees, NOT parallel, longest point measurement
- 2 - 1x2 @ 18-3/4" - one end cut at 45 degrees, longest point measurement
Top
- 2 - 2x10 @ 91"
- Doors are cut to fit, overall 20" x 30"


Please read through the entire plan and all comments before beginning this project. It is also advisable to review the Getting Started Section. Take all necessary precautions to build safely and smartly. Work on a clean level surface, free of imperfections or debris. Always use straight boards. Check for square after each step. Always predrill holes before attaching with screws. Use glue with finish nails for a stronger hold. Wipe excess glue off bare wood for stained projects, as dried glue will not take stain. Be safe, have fun, and ask for help if you need it. Good luck!
Instructions
Step 1
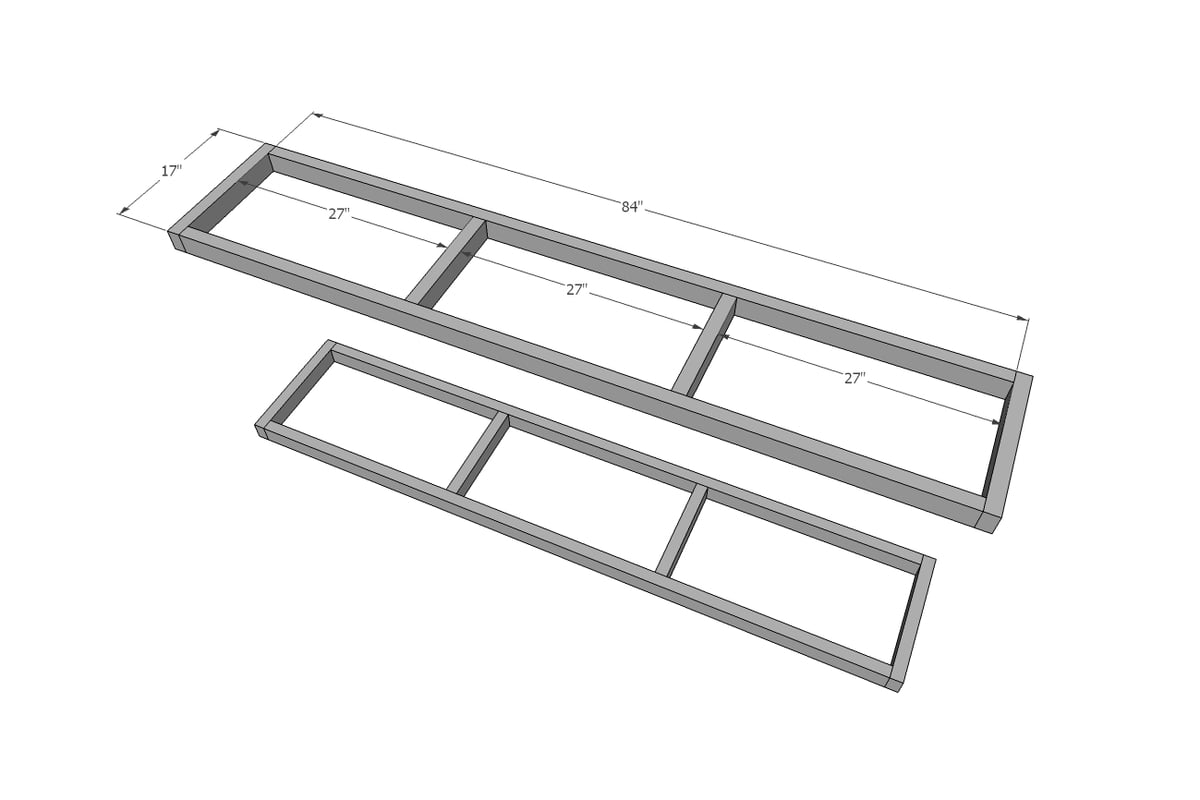
Build two frames out of 2x3s. The frames should be screwed together as this is the main support for the entire piece. Use 2-1/2" or longer screws, or for those of you with a Kreg Jig, use 1-1/2" pocket holes and 2-1/2" pocket hole screws. Don't forget to glue the joints.
Don't be concrened about being perfect here, the entire frame is concealed.
Step 2

For the sides, add the side panels. This plan is designed to work with project panels 17-1/4" wide. You can use any material here, plywood or reclaimed wood too. I recommend screwing these to the frames, but you could also use nails and glue - nails should be at least 1-1/4" long. I love how the back overhangs by 1/4" to conceal the back (will put that on in later steps).
Step 3
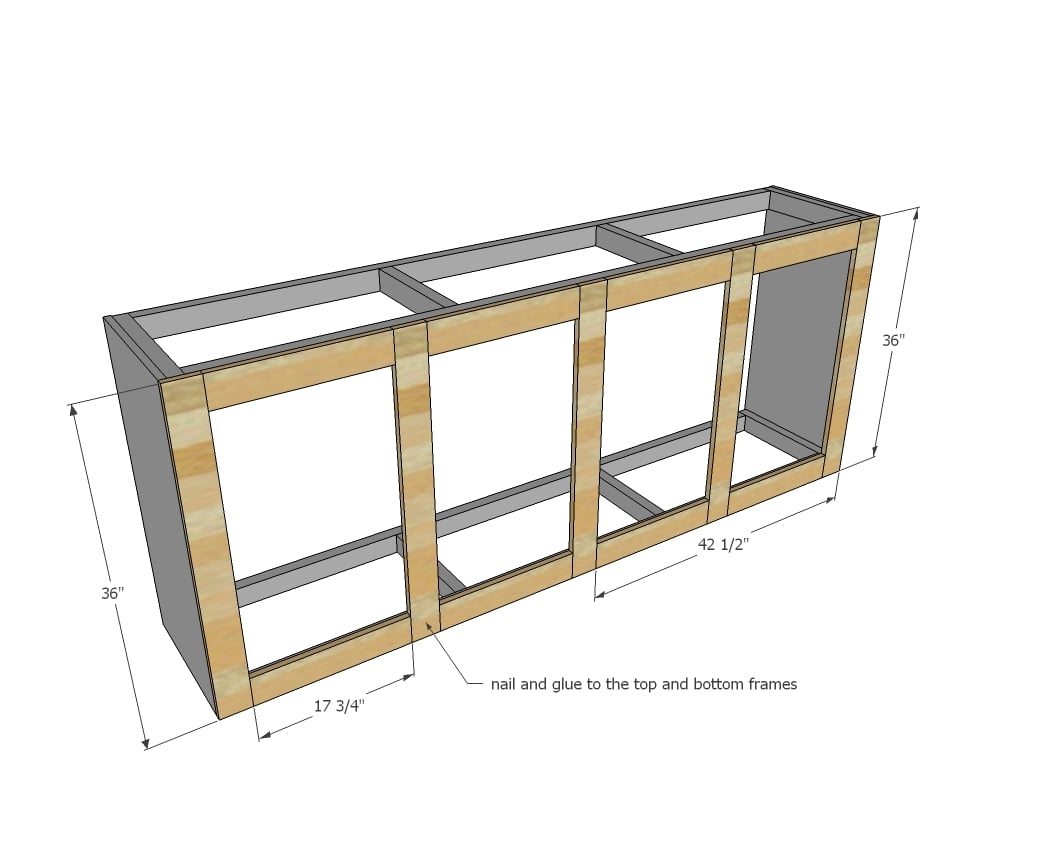
Now the face frame. With the projec ton it's back, lay out all the face frame boards and glue and nail down. Nails should be at least 1-1/4" long. Pocket hole users could also build the face frame seperately and attach.
Step 4
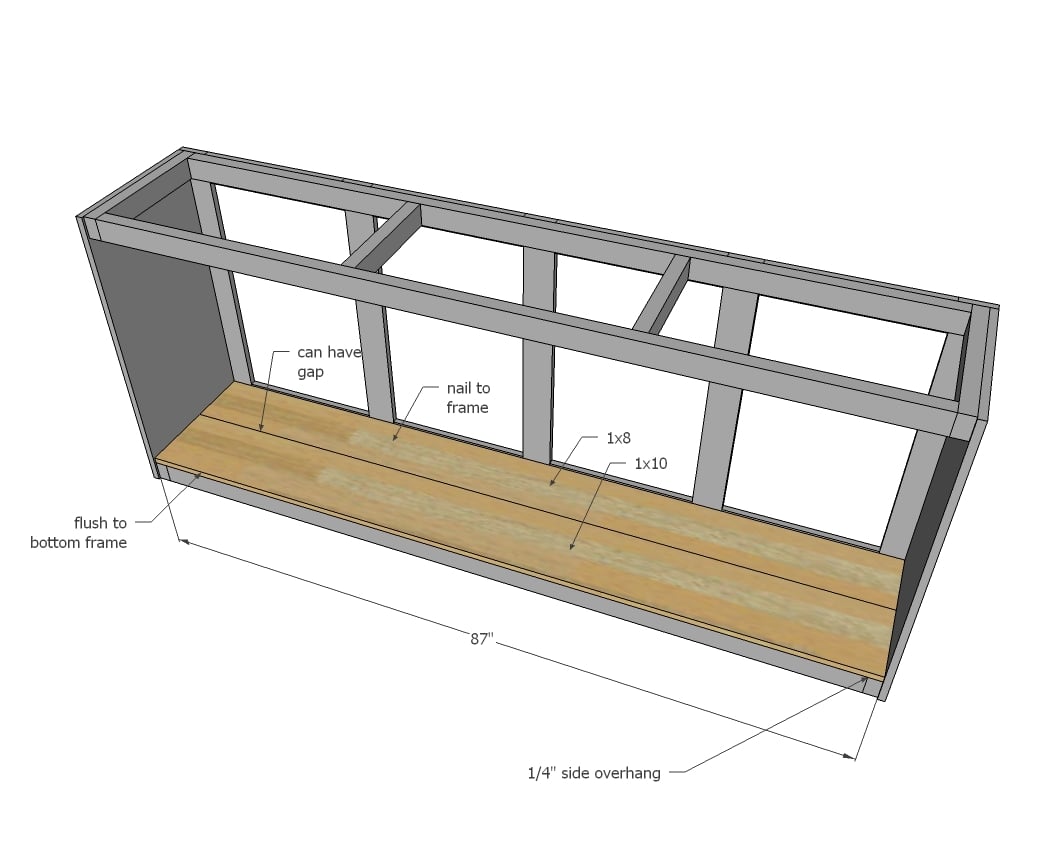
Lay the bottom shelf boards down on the bottom frame. Nail and glue down, with nails longer than 1-1/4". There can be a gap between the boards, but the shelf should not go past the back of the bottom frame (sides overhang by 1/4" to allow for the back).
Step 5

Step 6
Build your bottom shelf by attaching bottom shelf boards to the shelf cleats. Use 1-1/4" long nails and glue to attach. Can have a gap in the middle.
Step 7
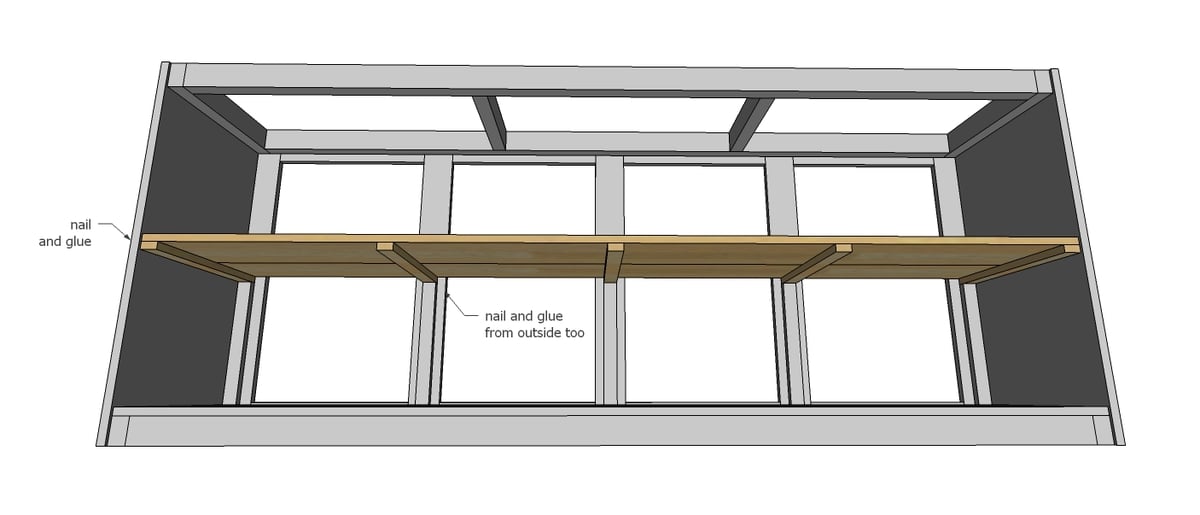
Place shelf inside console and attach from outsides to secure in place.
Step 8
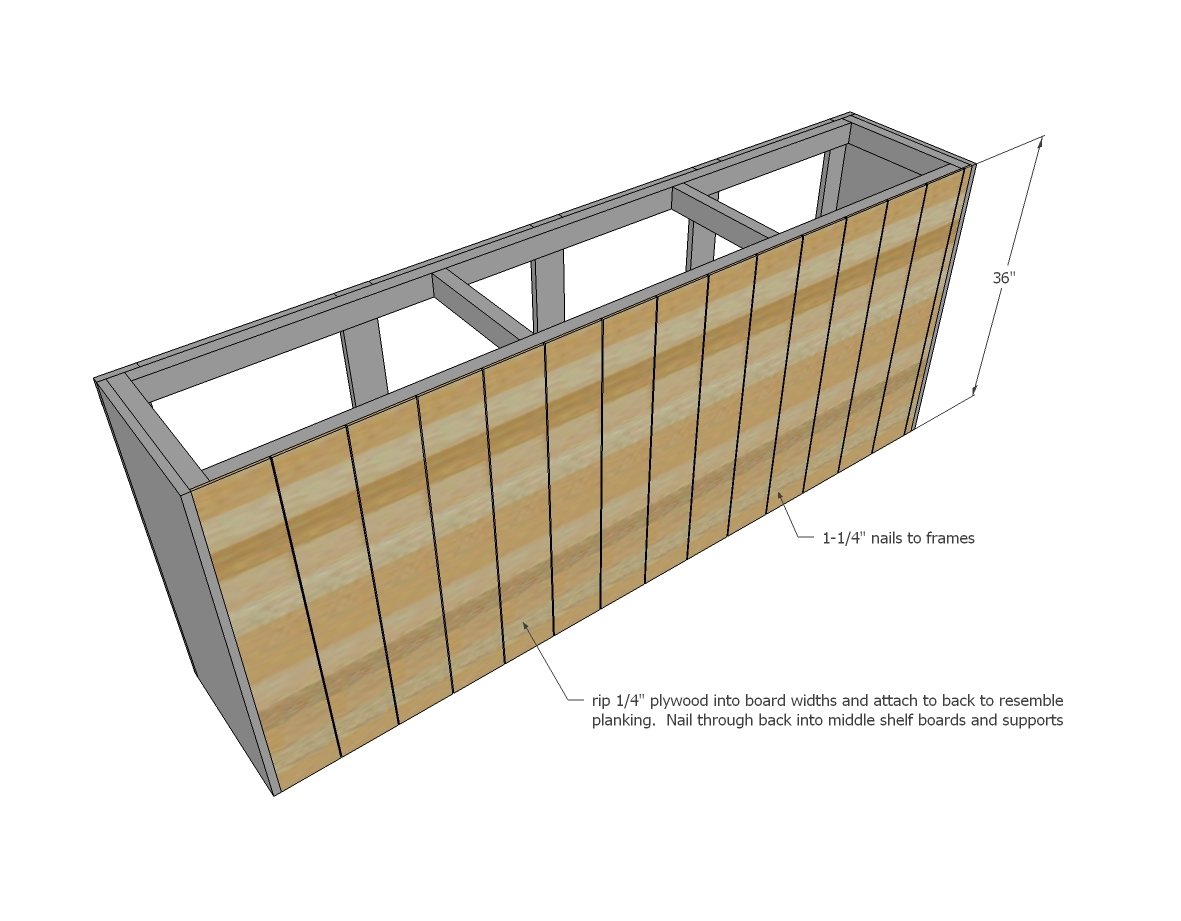
To get the planked look on the back of the console, Nikki ripped 1/4" plywood into strips and then attached the individual strips to the back. You can also use full sheet of 1/4" plywood. You can use shorter nails here but if you don't want to buy a shorter nail (3/4" would be ideal) the 1-1/4" nails would be fine.
Step 9

The bottom is trimmed out in simple 1x2s, mitered around corners. Use 1-1/4" nails and glue to secure.
Step 10
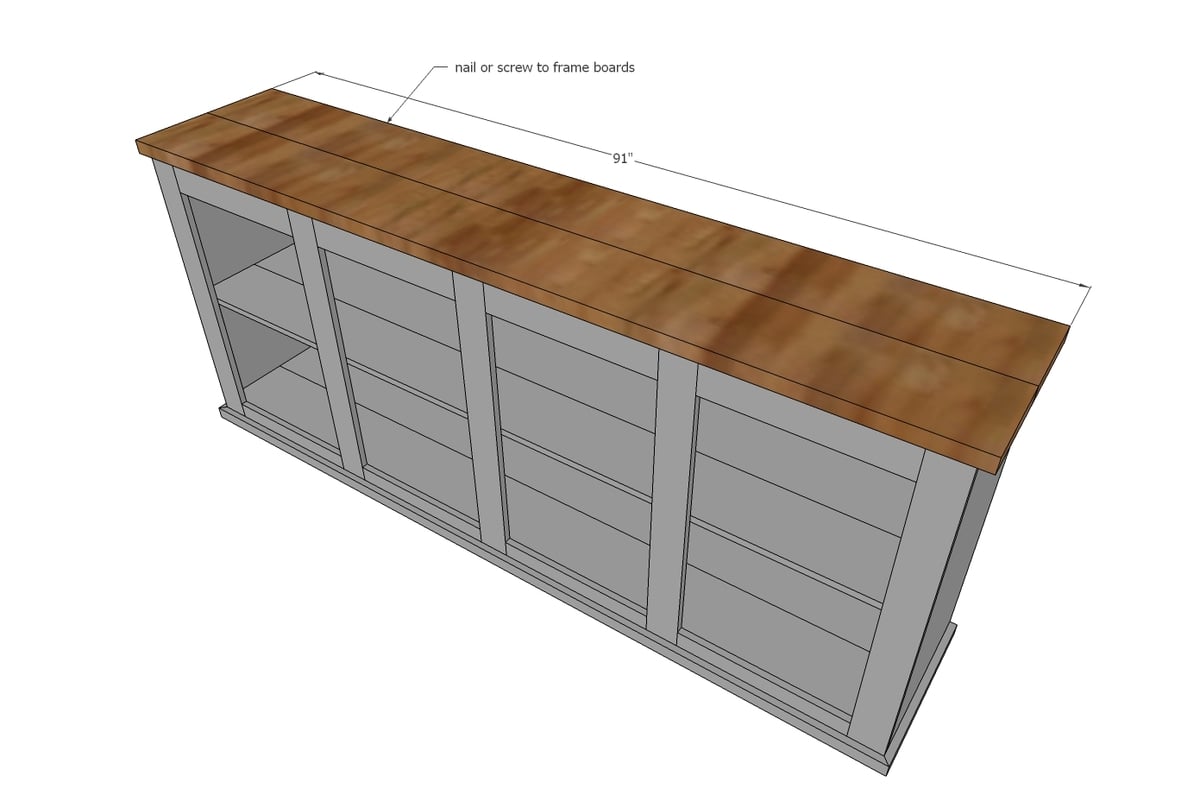
Attach top with the longer screws you used to build the top frames (2-1/2" or longer) so top is flush to back and side overhangs are even. TIP: You may wish to stain the top boards first.
Step 11
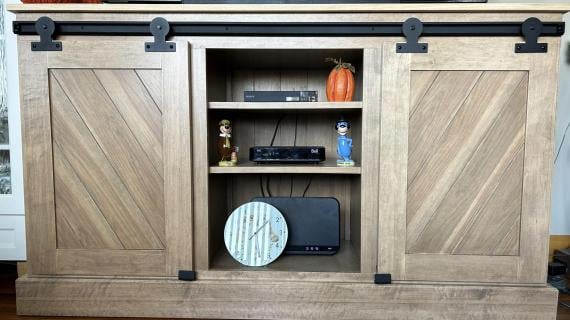
Nikki built the doors shown with 1/2" plywood with smaller strips nailed on top, but you can use a variety of different methods to build the doors (love the reclaimed wood!) Nikki makes her own sliding door hardware too.
Jaime from That's My Letter provides a good tutorial on her sliding door hardware if you want to check that out.
It is always recommended to apply a test coat on a hidden area or scrap piece to ensure color evenness and adhesion. Use primer or wood conditioner as needed.

Comments
Lady Goats
Thu, 08/06/2015 - 12:19
Dream Team
Great plans, great console... totally swooning over here!!
bhoppy
Mon, 08/10/2015 - 08:11
hardware
Jamie from That's My Letter has a tutorial for making the hardware here:
http://thatsmyletter.blogspot.com/2014/10/s-is-for-sliding-door-console…
Jippy
Sat, 08/15/2015 - 21:57
More info needed
I appreciate the plans but the whole point of this post is about sliding doors yet we get no instruction on where to buy hardware or make our own. There is also no tutorial on how to make the X insert on the doors. Without instructions on these two things I think the whole post is almost pointless. It might as well just say here are plans for a regular ole buffet. I believe Nikki Grandy should show us a tutorial on how she made her hardware as it looks significantly different than the one from "Thats my Letter." But big thank you to the person from that blog who so graciously shared the tutorial about their hardware.
bhoppy
Wed, 09/09/2015 - 07:42
you could always buy your own
Here's a kit on Amazon: http://www.amazon.com/TCBunny%C2%AE-Country-Sliding-Hardware-Antique/dp…
Jippy
Sun, 11/08/2015 - 09:12
Thanks bhoppy but that
Thanks bhoppy but that hardware is far too big for this console. I think that's everyone's frustration is you cannot find barn hardware that small, you have to make it.
cjay
Tue, 12/08/2015 - 14:35
Sliding Door Hardware
For the rollers I used patio door wheel. I got them at Home Depot (item # 100179045). Pack of 2 was right at $6. For the rail I used 1 1/4" x 1/8" flat bar. I only made mine 6' so that is what I used. I think is was about $11. For the door hangers and the rail supports I used 1" x 3/16" flat bar. I heated it up with a propane torch then I stuck it in a vise and bent it as much as I could. I then removed it from the vise and stuck a piece of wood in the bend that was the thickness that I needed. I hammered it down until it was snug with the wood. Then just drill and add the roller.
Jippy
Fri, 12/11/2015 - 22:54
Thank you cjay! You're
Thank you cjay! You're awesome. I figured I would just have to put flat bars in a vice and bend them. Glad it worked for you.
imsomark
Sun, 02/14/2016 - 17:50
I bent mine in a vise and it
I bent mine in a vise and it worked great with aluminum. I just used a normal hammer and it didn't really eave any marks. I cut the bar to size with a jigsaw and used a file to remove any sharp edges.
Jippy
Fri, 12/11/2015 - 22:55
Thank you cjay! You're
Thank you cjay! You're awesome. I figured I would just have to put flat bars in a vise and bend them. Glad it worked for you.
In reply to More info needed by Jippy
MichelleL
Mon, 01/30/2017 - 11:32
Doors & Hardware
I make mini barn doors for a different purpose, but can help anyone looking for hardware and/or doors for this project. TADcompany on Etsy is my shop. Message me for any custom orders.
handmadewithash
Tue, 09/01/2015 - 09:34
This is officially on my to
This is officially on my to build list. I just need to figure out where I'm going to put it first!! :) I LOVE that "Count Your Blessings" sign too!
WalkerDesigns
Thu, 09/17/2015 - 19:35
Barn door hardware
I thought the cabinet was very nice but I was disappointed that you didn't include any information about the barn door hardware.
sburgfeld
Fri, 10/16/2015 - 09:50
track
Where did you find the track and 4 hangers? All kits I have found are with 2 hangers, and extras are either non existent or rediculously priced.
Emilynhok
Mon, 10/19/2015 - 21:06
Paint color
I am working on building this now! So excited!
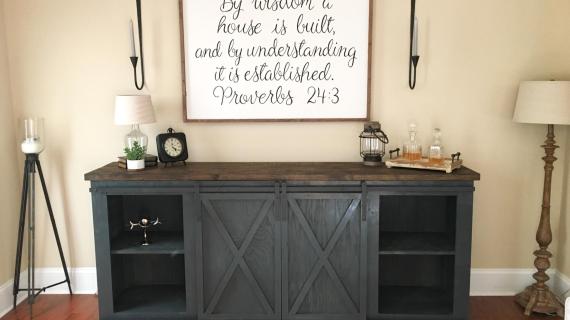
What are the paint colors used for
the large darker console with the dark body and brown top?
Chrisklns
Sat, 12/19/2015 - 06:31
Color
I can't find paint color response
Chrisklns
Sat, 12/19/2015 - 06:31
Color
I can't find paint color response
revampedvintage9
Thu, 10/22/2015 - 09:02
HARDWARE
PLEASE PLEASE let me know where you get the hardware or an easier way to build it. Thanks.
Emilynhok
Thu, 10/22/2015 - 17:17
I'm working on the hardware
I'm working on the hardware and home depot cut my pieces down to size. It saved me the trouble and time . I'm following the instructions from that's my letter from one of thecomments above
Emilynhok
Thu, 10/22/2015 - 19:17
I also found these on Amazon
I also found these on Amazon
http://www.amazon.com/gp/aw/d/B00KC5L10G/ref=mp_s_a_1_2?qid=1445566492&…
I think they might be 2x the size though????
Fantastic Furn…
Fri, 10/23/2015 - 05:29
Another incredible piece of
Another incredible piece of furniture!
tlsellen91
Thu, 11/19/2015 - 07:37
Barn door
How do you make the X's on the front of the barn doors?
hcbryan
Thu, 12/10/2015 - 10:01
Count your Blessings sign
Is there a tutorial on how to make the Count your Blessings sign, or a place to purchase?
In reply to Count your Blessings sign by hcbryan
Ana White
Sat, 12/12/2015 - 13:30
This may help! https://www
This may help! https://www.instagram.com/p/9qzDuUslSx/?taken-by=nikki_grandy
Remerson
Mon, 12/28/2015 - 20:13
4 - 2x3 @ 14" frame cut list
I am confused about the frame cut list where it states 4 - 2x3 @ 14".....why 14"? Shouldn't there be 8 - 2x3 @ 17"??? Hoping to make this in a 5' length as shown in gray. Not sure if she still used 1x4" for the face frames but I'll figure that out later. Wish me luck!!
Ana White Admin
Tue, 12/29/2015 - 16:58
14" cuts
Take a look at the diagram just above step one. See how the two middle 2x3's are inside the frame? Now look at the two at the ends. Do you see the difference?
Remerson
Wed, 12/30/2015 - 17:02
Silly me! Thank you, I see it
Silly me! Thank you, I see it now!
Tishaj56
Fri, 02/19/2021 - 05:11
Thank you so much please help
Ana on the barn doors, can you please tell me the thickness or how you made them please. I did mine but I believe they’re too thick for the hardware.
BlakeBurns20
Tue, 01/05/2016 - 13:32
Hardware???
Has anyone found where we could get the hardware for this plan? I wan't to get the ball rolling on this one. Need help ASAP!!!
Lvc1013
Fri, 01/08/2016 - 18:32
Can't find 2x3s!!!
We are having a really hard time finding 2x3s like this plan calls for. Can anyone provide any info on where to get 2x3 instead of just 2x4s???
In reply to Can't find 2x3s!!! by Lvc1013
[email protected]
Fri, 01/08/2016 - 22:00
2x3s.
i can always get these at Lowes. Sometimes they are in odd places and you may need to ask someone where they are. The first few times I was looking for them I couldn't find them either. Good luck!
skirwin1237@gm…
Sun, 01/10/2016 - 06:01
Painting!
Hi Ana! My husband and I are about to start painting ours. What type of paint do you recommend; chalk, spray paint, stain.. I have gotten mixed advices and I would love some help!
Shannon Starvish
Sun, 01/10/2016 - 17:22
Gave this plan a try, and I loved it!!
This plan was fanatastic! I loved how I was able to make it my own, while using these plans as a fabulous outline! This by far is my favorite thing I have built so far! Thank you for sharing! Check out my post at http://thebombshellgarage.blogspot.com/
Ana White Admin
Tue, 01/12/2016 - 11:26
Nicely Done!
Hi Shannon,
This looks great, thanks for sharing! I checked out your blog and would love to share your herringbone top island linking to your site. Anyway to get nice photos of the piece in the kitchen? If so please email them to [email protected], or add to your site. If you're not interested, no problem. Thanks!
ryanb4614
Fri, 01/15/2016 - 15:39
Where is everyone finding the
Where is everyone finding the squared edges for the 2x10 on the top. Everywhere I looked they are rounded edges so I bought them don't like it.. Ran it through the table saw and to high of a gap in the center...
Jenkuczmarski
Thu, 01/21/2016 - 13:57
measurements and instructions
Do you have the measurements, shopping list, and the instructions for the smaller version of the Grandy Sliding Door Console? Thank you!
bbutts01
Mon, 01/25/2016 - 14:05
door hardware
My husband would like to build this but our local hardware did not have the barn door hardware. Where can we purchase these from? Like the ones on the picture.
Thank you
imsomark
Tue, 02/02/2016 - 15:34
Barn door question
I'm trying to understand what is preventing the barn doors from rolling right off the rails. Can someone explain what I need to do to ensure that doesn't happen?
Goofydad37
Thu, 02/11/2016 - 09:05
Barn Door hardware
Where do you buy your barn door hardware? All the ones I've found are $150 and up.
In reply to Barn Door hardware by Goofydad37
Ana White
Mon, 02/15/2016 - 15:30
Take a look at thishttp:/
Take a look at this
http://thatsmyletter.blogspot.com/2014/10/s-is-for-sliding-door-console…
G@Edwards
Sun, 04/17/2016 - 02:36
Lumber
The plans are great, but what lumber is recommended for this project? And where is the best place to go for it(Home Depot)? If you go to a lumber supplier, how do you know what to get in Board Feet from these plans?
BojackH
Thu, 04/21/2016 - 18:55
either Lowes or Home Depot
either Lowes or Home Depot for the wood will be cheapest. Douglas fir (kiln dried and non pressure treated) for the 2x's and pine 'common board's for 1x's. We used some pallet boards for the backing. If you change the measurements from the template here so Ana's shopping list doesn't apply, you'll need to figure out how many boards you need of each based upon your cut list. I use this site calculator to simplify that so I don't need to rely on my terrible math skills: http://jonathan.overholt.org/projects/cutlist
Norma.A
Tue, 05/17/2016 - 11:43
Cost Of Project
I wanted to know how much was the total cost for this project?
In reply to Cost Of Project by Norma.A
Ana White
Thu, 05/19/2016 - 10:44
Cost
Best guess $150, give or take $50, depends on your location and hardware choice.
leahray09
Thu, 05/19/2016 - 14:35
Cost
Based on Louisiana lumber prices, from start to finish this project costs $151.27 (that includes stain and polyurethane)
kelvinglad
Thu, 05/26/2016 - 18:29
Hello, I estimated the lumber
Hello, I estimated the lumber alone at big box stores (Lowes, Home Depot) costs around $175 plus the cost of hardware. Are you quoting from a lumber store? Where can I find cheaper prices on lumber?
mrubio77545
Fri, 05/27/2016 - 08:00
Tools
I don't own a table saw nor miter saw. Can I use a powered hand saw to cut the wood down to size?
Mitzfive
Sun, 07/03/2016 - 17:50
Spacing
Thank you for the plans! Here's what worked for me. If you are downsizing the console to a tv stand like I did, 60 in x 20 in tall by 18 in deep, I recommend not using the widths of wood suggested in these plans. The widths , especially of the face frame, become too big for me, making the shelf opening too small.
Mitzfive
Sun, 07/03/2016 - 19:01
...continued
Also, consider possibly using different width of aluminum bar and pulley when downsizing. Just an option.
i haven't finished mine yet. I had some challenges.
In fact, if I could start over, I would use the picture but not the cut list or shopping list - because I downsized it changes things.
If you are downsizing or upsizing, Approach this as just a basic cabinet. Determine how tall wide and deep you want it - then start with the face frame. I would make a cardboard frame to practice. This may save you some money on having to try different sizes of wood to get the spacing look you want. The width of your face frame wood can significantly open up or narrow down the shelf opening space. I found my shelf opening space was really small when using the face frame recommended widths in the supplied plans - that is because I downsized.
After messing with this and realizing I am very detail oriented, here's some thoughts that I hope help.
In my experience, the most important place to start is the vertical face frame pieces. If you are going for a very evenly spaced front layout, the vertical face frame slats seem to dictate a lot of the rest. This is going to get tough to explain - but the expensive versions of this console are very nicely spaced in the way the doors sit and so I want mine to be too!
The edges of your doors should sit in the middle of the vertical face frame wood. So, if you use a 1x3 (2.5 inches wide) your hanging door should sit at the 1.25 mark of the vertical face frame slat to its left and right. The bottom trim piece should then allow 1.25 inches of the bottom horizontal face frame to be exposed. the aluminum bar is then mounted 1.25 inches above the bottom edge of the top horizontal face frame. The top edge of the sliding door almost butts up against the aluminum bar and the bottom edge of the door rides right along the bottom trim piece. - not using a bottom tracking aluminum bar in the case. What this does is creates a nice even spacing that I noticed in the very expensive store bought versions. Very nicely proportionate. As this is going to be a tv stand nd a big centerpiece of the home, this spacing is important to me. And because I downsized the original plans, spacing has been the challenge.
I also found doing a cardboard face frame/door layout was helpful but really time consuming.
The width of your top horizontal face frame can be whatever, (though make sure you have room for the pulleys and maybe an additional .25-.5 inch clearance above it for aesthetics) ---as long as the space below where you mount the aluminum bar to the bottom edge of the top horizontal face frame is half the width (half the width = 1.25 in in my case) of whatever width you use for your vertical face frame slats. This will set the stage for nice spacing.
Another thing I learned the hard way is that because the pulley wheels were wider than the short aluminum bar they are mounted on, if you mount the short aluminum bars (with the pulley attached at the top end) flush with the door edge the doors won't close flush together by about a half inch because the pulley wheels butt together.
Lastly, my cabinet which is 60 inches wide, 20 inches high and 19 inches deep- with spacing of door openings based on 1x3 vertical face frame slats (actual 2.5 inch wide )--- I feel the openings for the shelves could be bigger. I am going to try basing my spacing on a 1x2 (1.5 in wide actual) vertical face frame slat. Half of that width is .75 in. So I will expose .75 in of the bottom of face frame ( the rest covered by trim), hang the aluminum bar .75 in above the bottom edge of the top horizontal face frame slat/slats, and the doors will be wide enough that they will cover .75 in of vertical face frame slat on left and right, riding snugly just below the aluminum bar and snugly just above the bottom trim piece. Clear as mud?
With these measurements, I wish I had used 2x2s for the bottom part of the carcass frame. This allows it to sit lower to the floor and allows the bottom shelf ( which rests on the carcass frame) to sit lower. I found it important to have a little wiggle room down there when balancing the trim and face frame to expose the right measurement. Because I used 2x3s for the carcass frame and the bottom shelf sits on this, the shelf opening space is smaller. In the bigger console that may be fine. In my smaller version I would have found it very beneficial to use 2x2s around the bottom. Because if you are crazy enough to understand and implement what I have written, youll appreciate having more wiggle room at the bottom so you don't need an extra wide piece of trim to expose the bottom face frame to your desired measurement. Because if you wanted a more narrow piece of trim at the bottom, more of your bottom face frame would be exposed. Then you would try to lower down the bottom face frame down behind the piece of trim so you expose just the right amount- but now you expose the bottom shelf which is why the 2x2 for the bottom part of the carcass frame would help. Whew.
and this will save you money on redos.
pow. My head just exploded.
Somebody as nuts as myself will benefit from this post.
Please be kind with your responses. I feel my comments were kind and informative though complicated and scattered. I would you respond in a kind and informative way.
tarinoki
Tue, 07/12/2016 - 13:17
Doors swing out
Any suggestions for getting the doors to hang straight? I don't really want to put a track on the bottom.
tinadesigns
Thu, 07/28/2016 - 05:52
pdf link isn't working for me
Can you update the pdf link please? It isn't downloading, just goes to a link that isn't valid.
Thank you! Love all your plans. Getting ready to build a small kitchen with your cabinet ideas!