


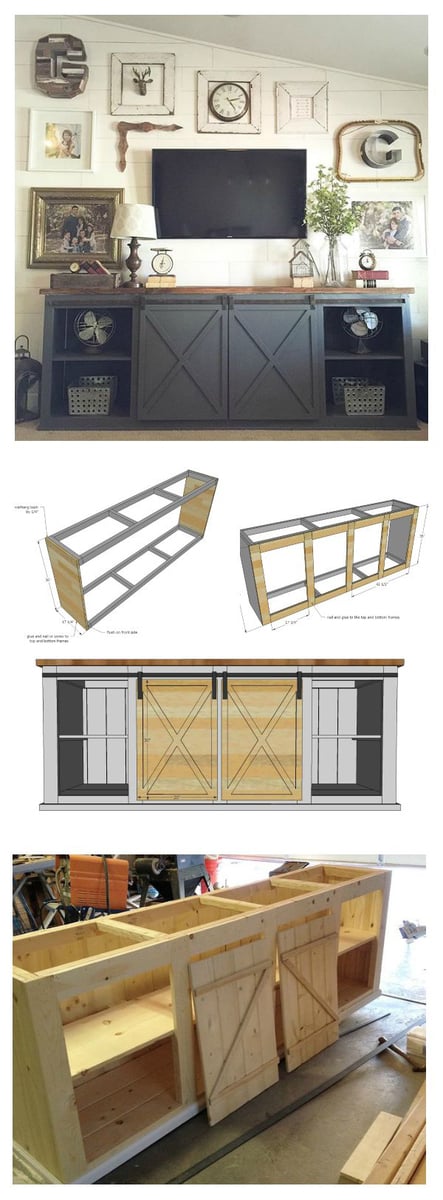
How to build barn door console or buffet - free plans by ANA-WHITE.com
See also: Simplified 8' Barn Door Console Plans
Man oh man do I ever have a treat for you today!
Do you follow Nikki Grandy on Instagram yet?
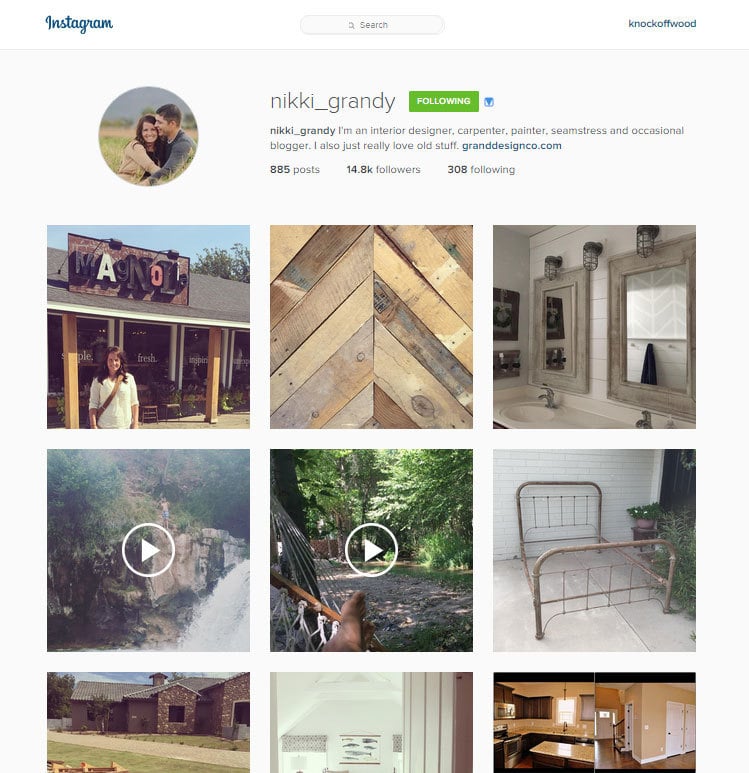
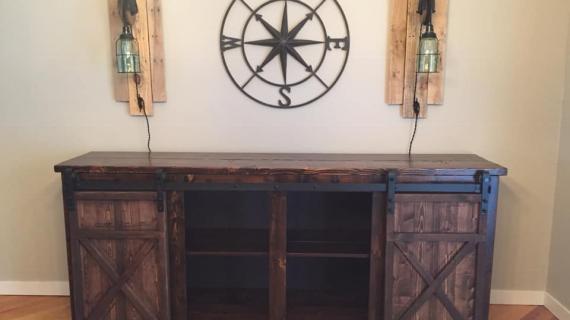
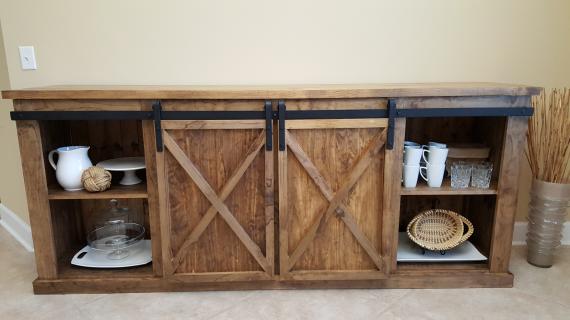
If you do, you know she pretty much has redefined the sliding door console.
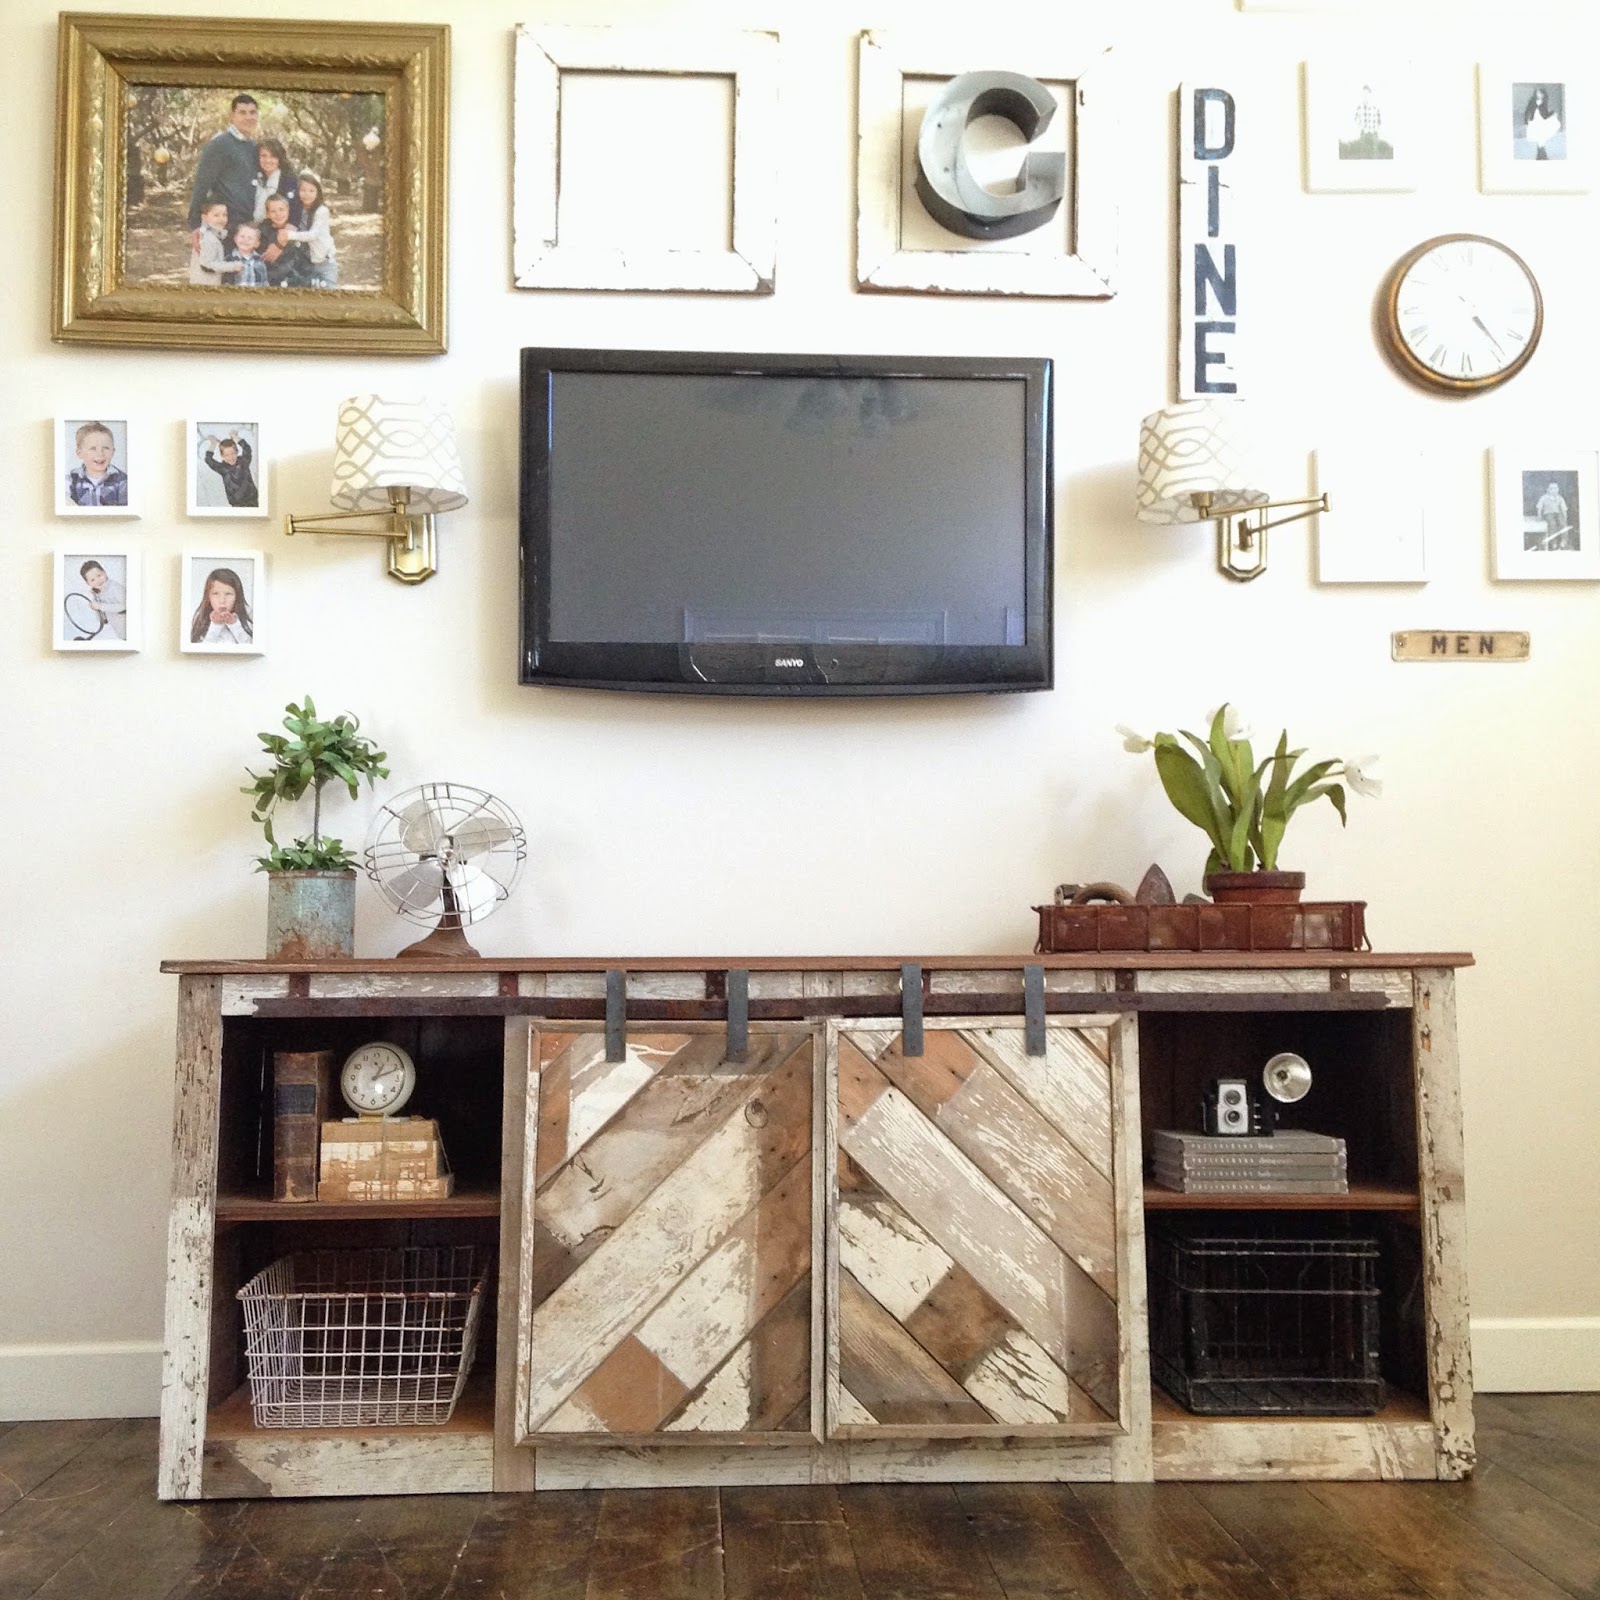
My personal favorite is her reclaimed wood version with herringbone pattern doors.

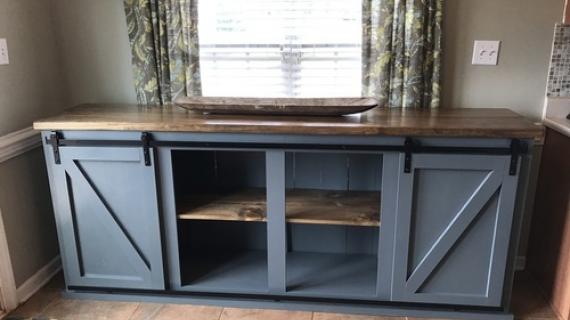
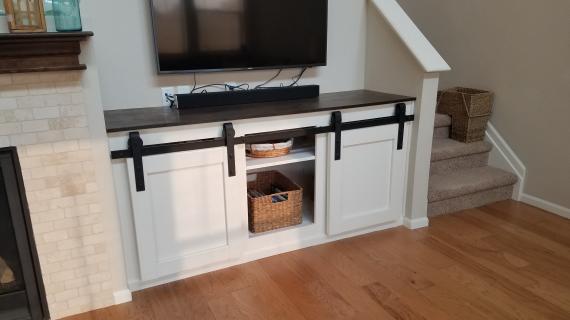
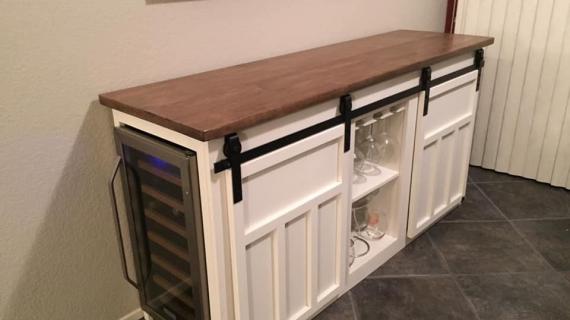
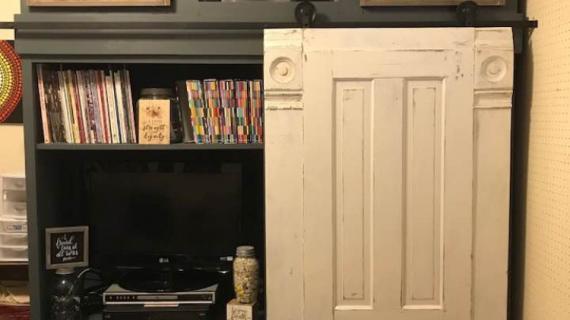
How stunningly gorgeous is this barn door console?
Yep, she's letting me share plans with you!!!
The plans for this amazing barn door console follow, but one thing first - hop over to Instagram and follow nikki_grandy right now!
Have an awesome Wednesday!
Ana
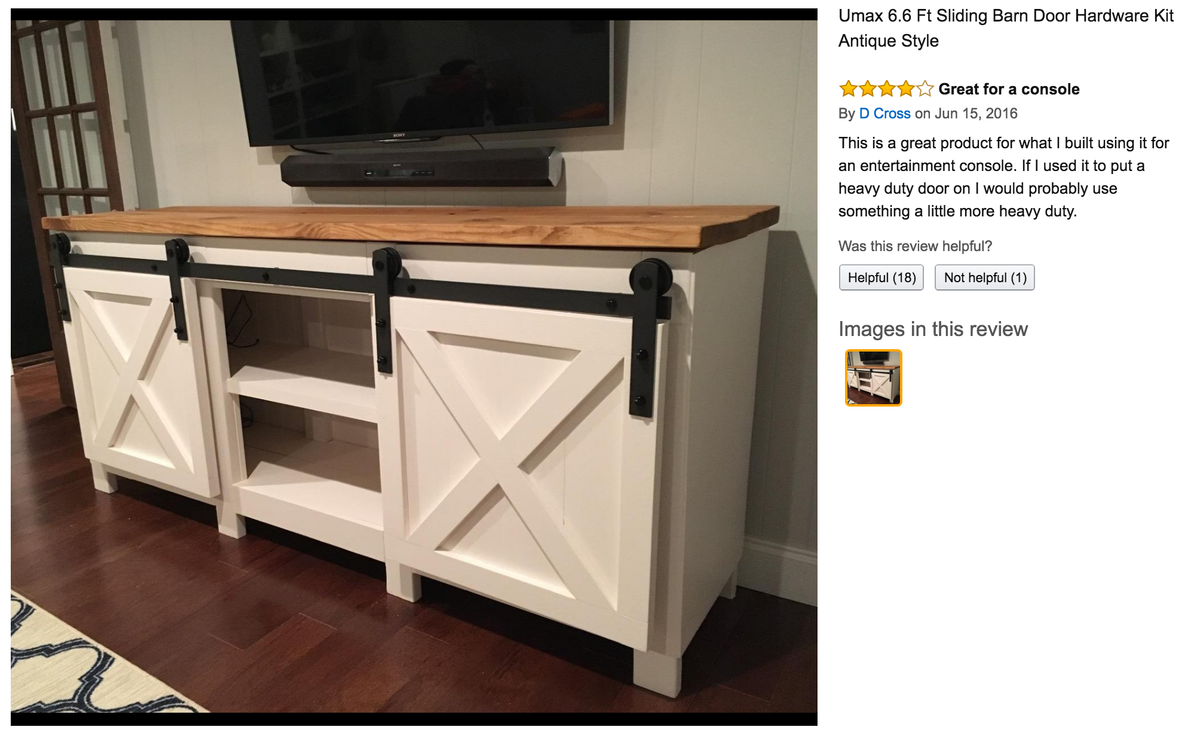
PS - barn door hardware has come down alot in price!

$50 for 8 foot long sliding door hardware from Amazon - and it has five star reviews!
Pin For Later!
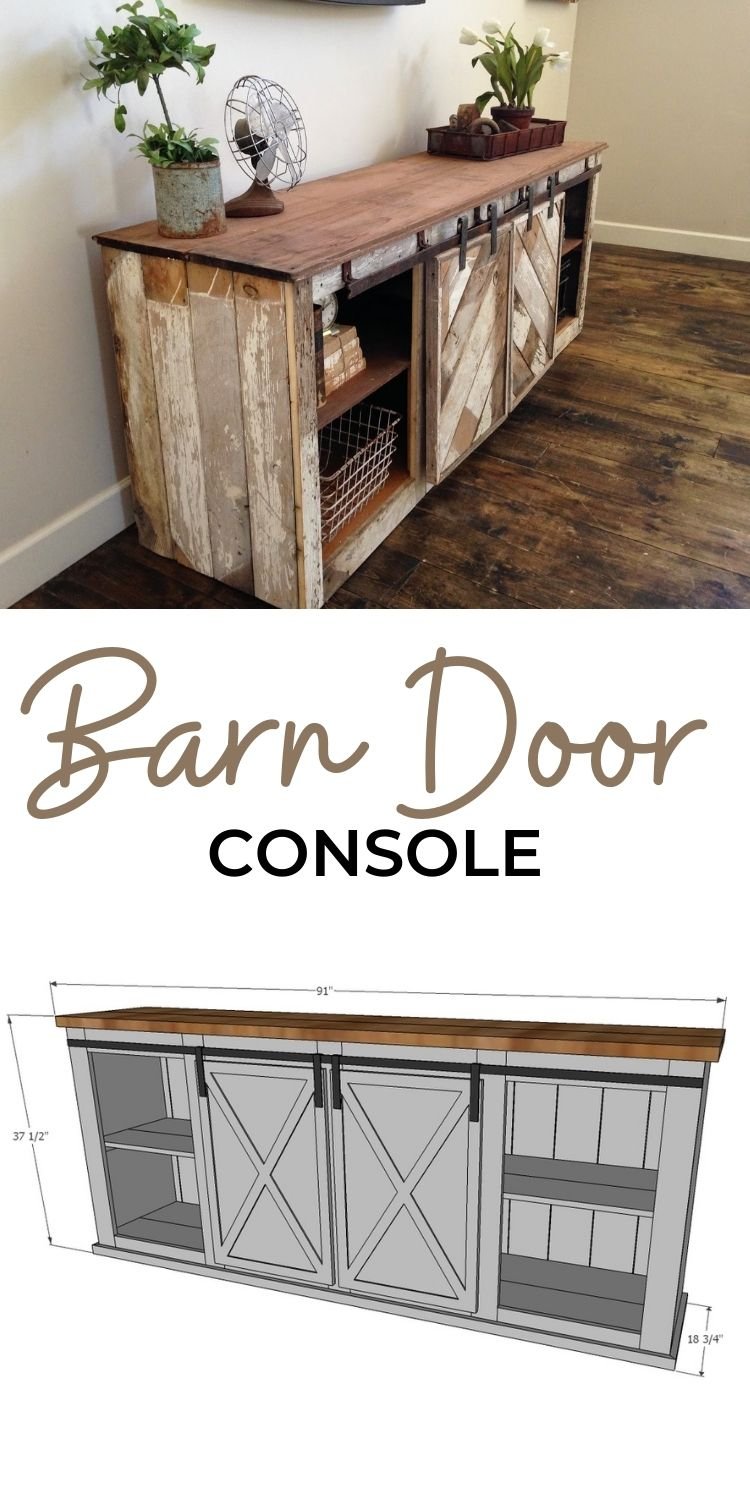
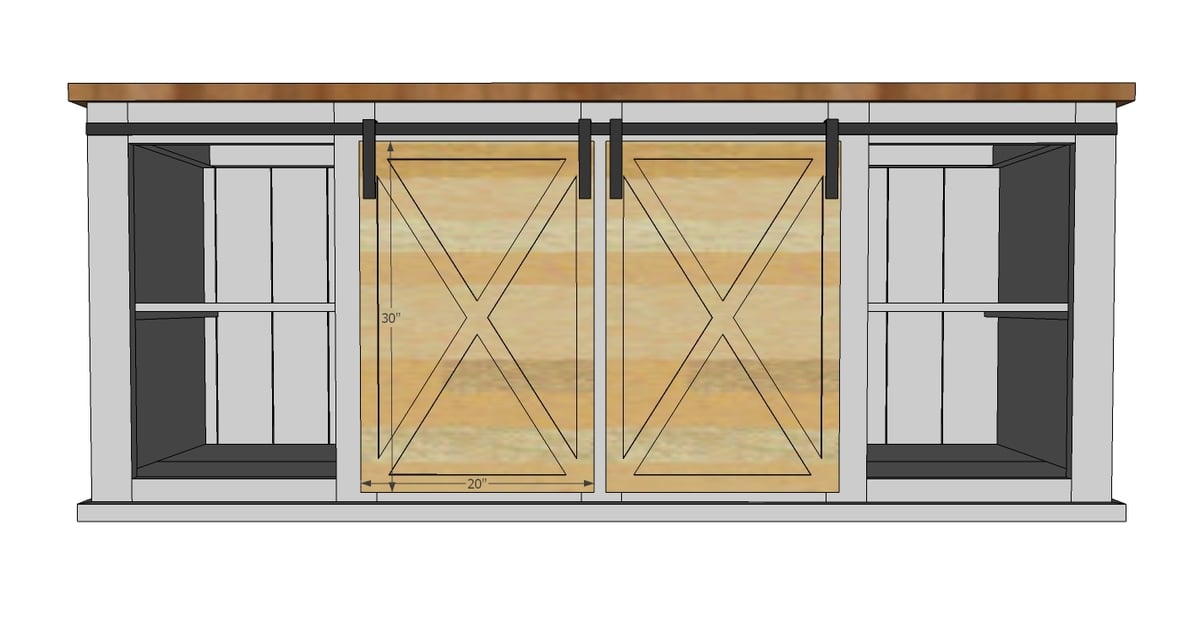
Barn Door Console Plans

Preparation
- 2 - 2x10 @ 8 feet long
- 2 - 1x8 @ 8 feet long
- 2 - 1x10 @ 8 feet long
- 1 sheet of 1/4" thick plywood or hardboard (for back)
- 3 - 1x2 @ 8 feet long
- 4 - 1x4 @ 8 feet long
- 6 - 2x3 @ 8 feet long
- 2 - project panel pieces 17-1/4" x 36" (may be advertised as 18" wide project panel - measure in store)
- Hardware for sliding doors
Frames
- 4 - 2x3 @ 84"
- 4 - 2x3 @ 17"
- 4 - 2x3 @ 14"
Sides
- 2 - 3/4" thick project panels or plywood 36" x 17-1/4"
Face Frame
- 5 - 1x4 @ 36"
- 8 - 1x4 @ 17-3/4"
Shelves
- 2 - 1x8 @ 87"
- 2 - 1x10 @ 87"
Middle Shelf Supports and Cleats
- 5 - 1x2 @ 14"
- 5 - 1x2 @ 17"
Back
- 1/4" plywood pieces 36" long
Bottom Trim
- 1 - 1x2 @ 90" - both ends cut at 45 degrees, NOT parallel, longest point measurement
- 2 - 1x2 @ 18-3/4" - one end cut at 45 degrees, longest point measurement
Top
- 2 - 2x10 @ 91"
- Doors are cut to fit, overall 20" x 30"


Please read through the entire plan and all comments before beginning this project. It is also advisable to review the Getting Started Section. Take all necessary precautions to build safely and smartly. Work on a clean level surface, free of imperfections or debris. Always use straight boards. Check for square after each step. Always predrill holes before attaching with screws. Use glue with finish nails for a stronger hold. Wipe excess glue off bare wood for stained projects, as dried glue will not take stain. Be safe, have fun, and ask for help if you need it. Good luck!
Instructions
Step 1
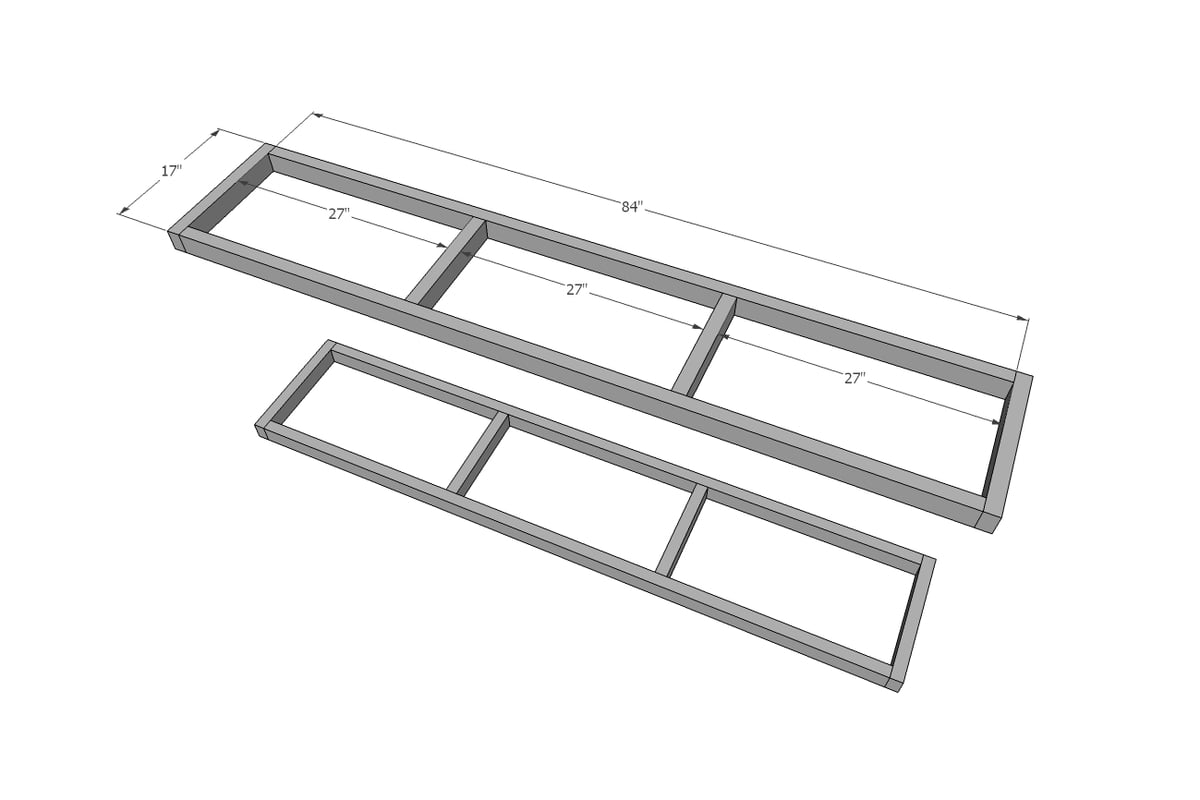
Build two frames out of 2x3s. The frames should be screwed together as this is the main support for the entire piece. Use 2-1/2" or longer screws, or for those of you with a Kreg Jig, use 1-1/2" pocket holes and 2-1/2" pocket hole screws. Don't forget to glue the joints.
Don't be concrened about being perfect here, the entire frame is concealed.
Step 2

For the sides, add the side panels. This plan is designed to work with project panels 17-1/4" wide. You can use any material here, plywood or reclaimed wood too. I recommend screwing these to the frames, but you could also use nails and glue - nails should be at least 1-1/4" long. I love how the back overhangs by 1/4" to conceal the back (will put that on in later steps).
Step 3
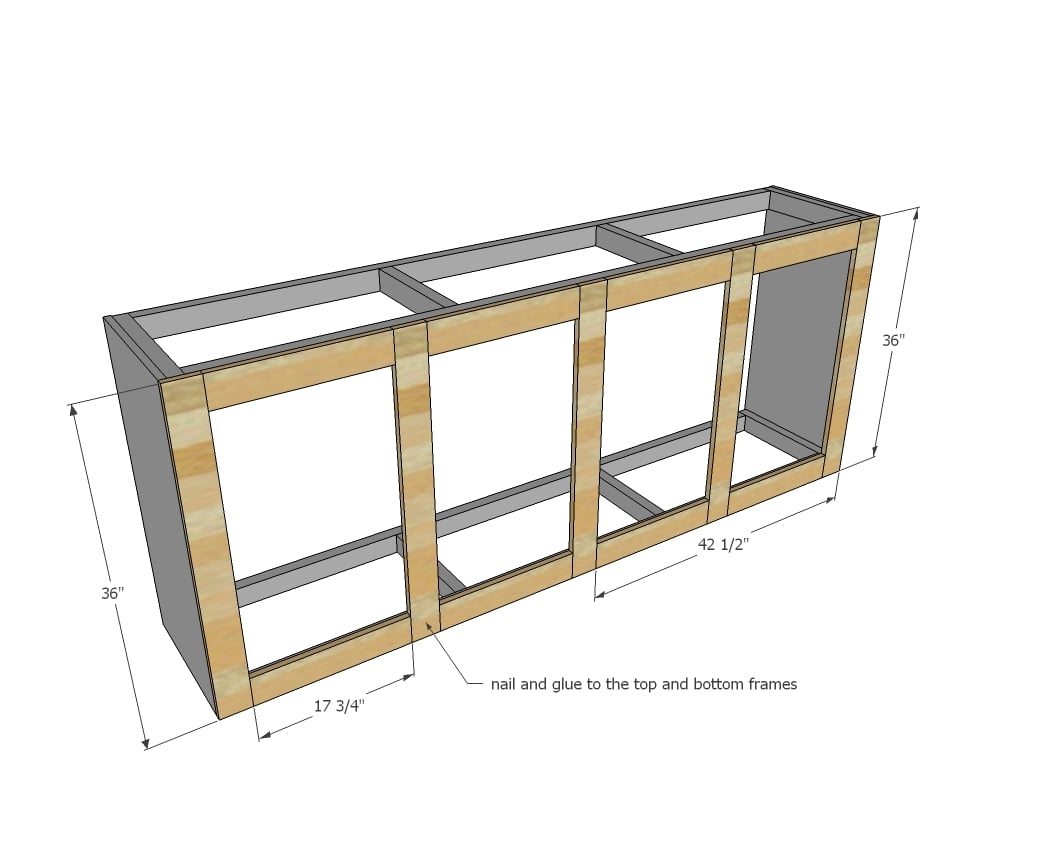
Now the face frame. With the projec ton it's back, lay out all the face frame boards and glue and nail down. Nails should be at least 1-1/4" long. Pocket hole users could also build the face frame seperately and attach.
Step 4
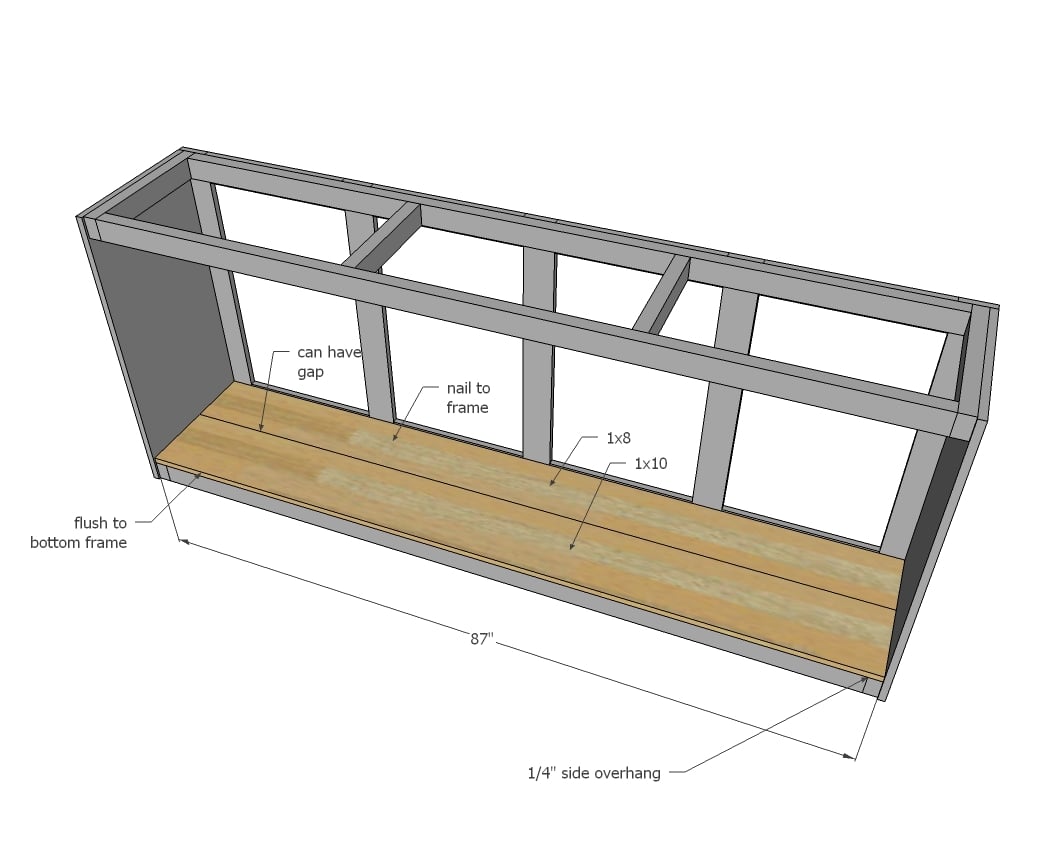
Lay the bottom shelf boards down on the bottom frame. Nail and glue down, with nails longer than 1-1/4". There can be a gap between the boards, but the shelf should not go past the back of the bottom frame (sides overhang by 1/4" to allow for the back).
Step 5

Step 6
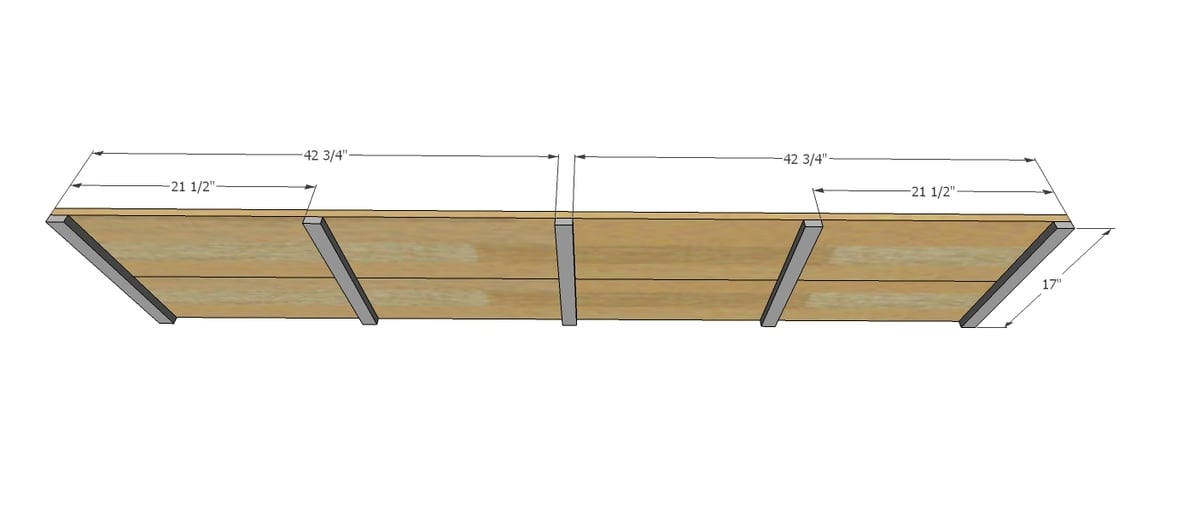
Build your bottom shelf by attaching bottom shelf boards to the shelf cleats. Use 1-1/4" long nails and glue to attach. Can have a gap in the middle.
Step 7
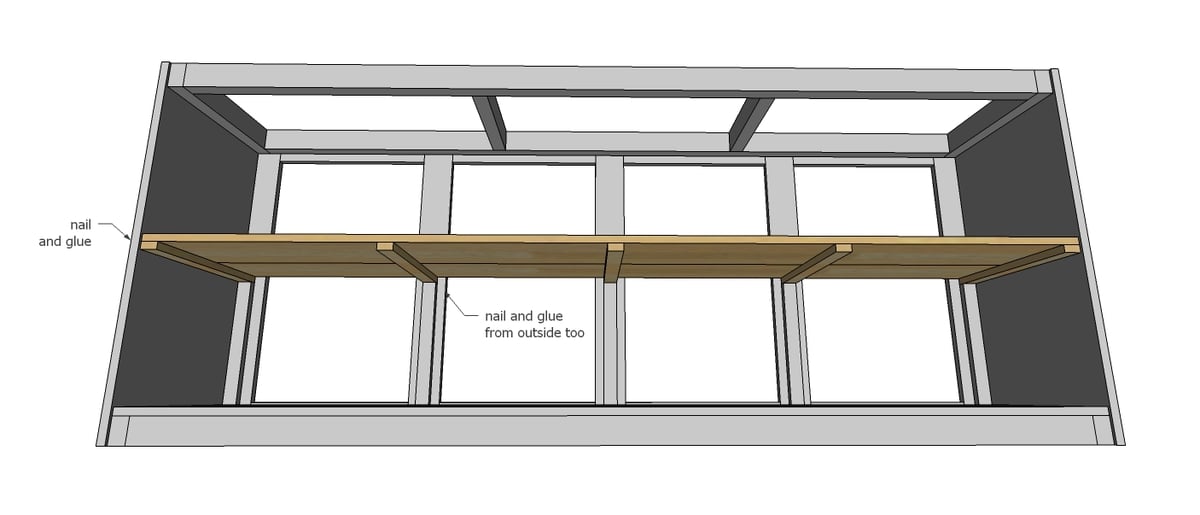
Place shelf inside console and attach from outsides to secure in place.
Step 8
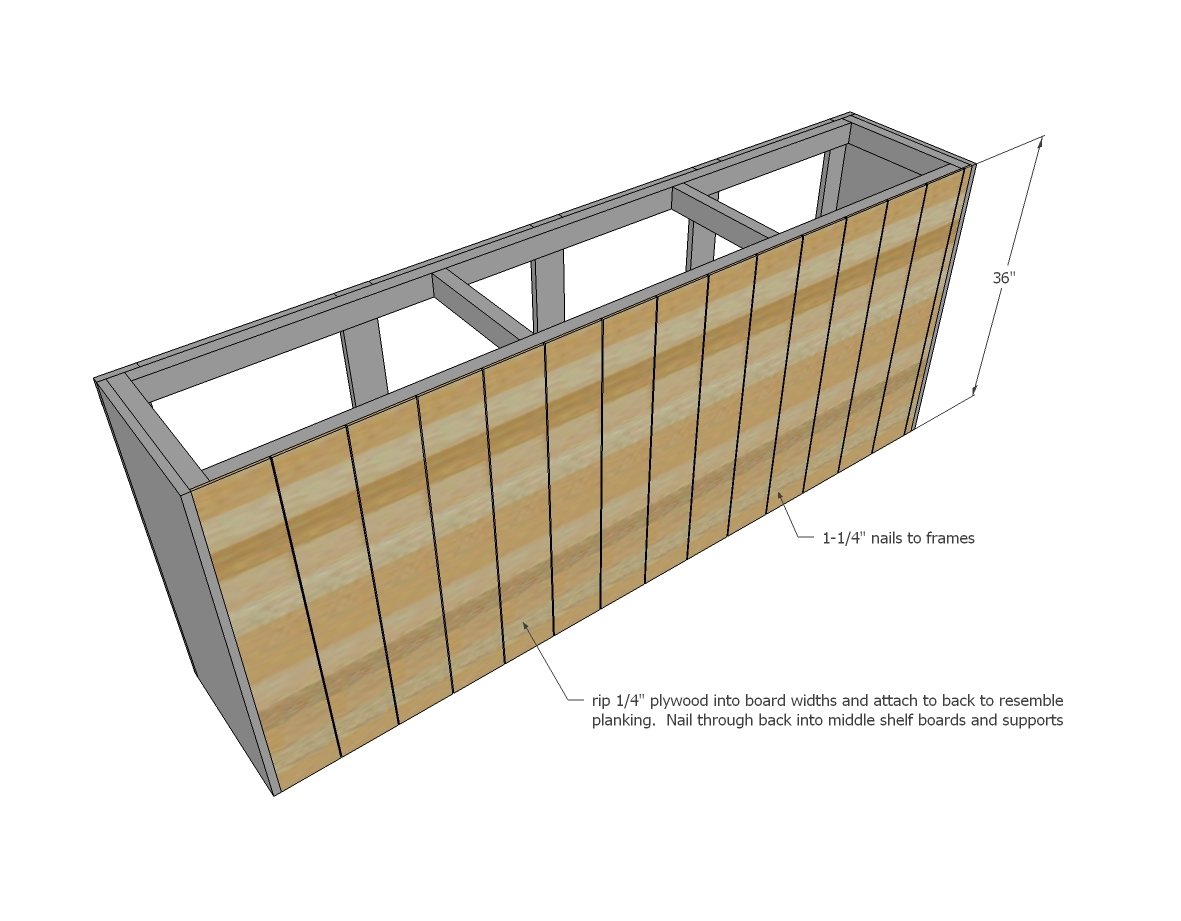
To get the planked look on the back of the console, Nikki ripped 1/4" plywood into strips and then attached the individual strips to the back. You can also use full sheet of 1/4" plywood. You can use shorter nails here but if you don't want to buy a shorter nail (3/4" would be ideal) the 1-1/4" nails would be fine.
Step 9

The bottom is trimmed out in simple 1x2s, mitered around corners. Use 1-1/4" nails and glue to secure.
Step 10
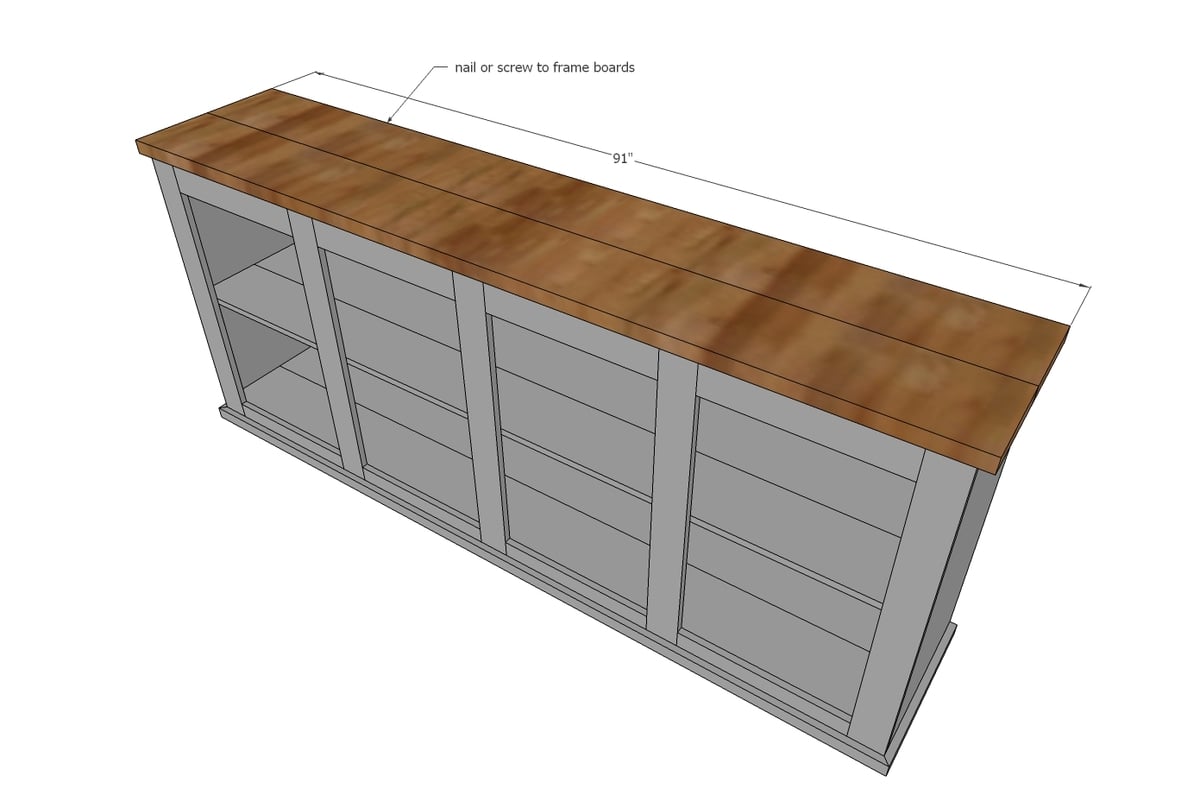
Attach top with the longer screws you used to build the top frames (2-1/2" or longer) so top is flush to back and side overhangs are even. TIP: You may wish to stain the top boards first.
Step 11
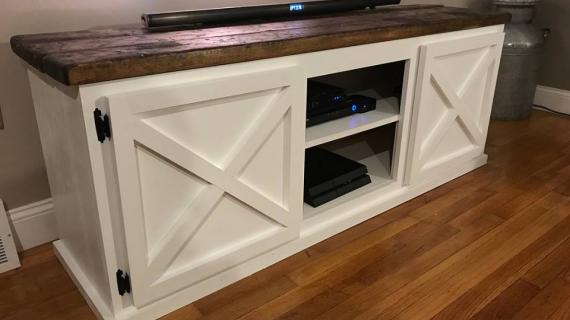
Nikki built the doors shown with 1/2" plywood with smaller strips nailed on top, but you can use a variety of different methods to build the doors (love the reclaimed wood!) Nikki makes her own sliding door hardware too.
Jaime from That's My Letter provides a good tutorial on her sliding door hardware if you want to check that out.
It is always recommended to apply a test coat on a hidden area or scrap piece to ensure color evenness and adhesion. Use primer or wood conditioner as needed.

Comments
mdmoyles
Tue, 08/30/2016 - 12:55
Decorative Moulding Recos Needed
We have a massive wall in our living room - 20x20 - that was begging for built ins. We loved the look of the grandy console so decided to build 3 as the base and then will add book shelves. Side by side it looks unfinished and I wanted to add decorative moulding so you dont see the 2x4's. Problem is it is hard to ifnd 8 inch flat moulding. Recos? Thanks!
Mac7342
Wed, 08/31/2016 - 13:22
Plans
Ana,
I have been trying to get into contact with you via email. I need some help.
rwglink
Mon, 10/03/2016 - 02:04
very good
very good
rwglink
Mon, 10/03/2016 - 02:04
very good
very good
[email protected]
Fri, 10/14/2016 - 12:51
tv stand
tv stand
Jpants29
Fri, 10/21/2016 - 16:51
Painting
This might be a stupid question, but is it easier to paint/stain before assembling? If not, how do you paint the inside shelves once everything is assembled?
Greda05
Wed, 11/23/2016 - 22:58
I agree that we need more information on some things...
I agree with Jippy that it'd be nice to see how the doors with the X design were made and more ideas on how to do the rails. I don't have a propane torch or any fancy tools, but I feel like the project gets complicated with the rails, yet the sliding doors are the best part.
bvann
Mon, 12/12/2016 - 06:08
Wood choice
Just learning how to get into woodworking, and these plans are easy, thank you! I am curious about suggestions on the best wood to use? Or is it an issue of preference? thanks for any help!
govolsbm
Sat, 01/14/2017 - 10:18
2x3?
Just curious, I've seen several plans that call for 2x3 stock. Not sure where you are getting 2x3 wood without ripping a 2x6 or 2x4.
Is there an alternative?
bradyrupp
Sat, 02/18/2017 - 19:14
Plans for the smaller version
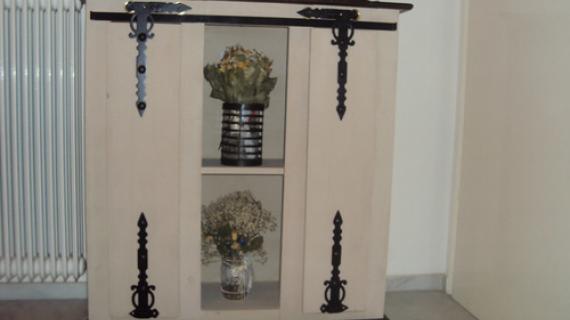
Hello, I think that these plans are awesome but I was wondering if there were plans for the smaller one that is right above the shopping list? It has three holes instead of 4 and it looks not as tall and not as wide. I also noticed that the sliding barn door hardware kit that was used was only 6.6 feet wide and so the consol had to be not as wide. Can anyone help?
Dstone
Wed, 02/22/2017 - 08:11
The hardware for the Grandy Sliding Door Console???
So I clicked the link and ordered the sliding door hardware for the Grandy Sliding Door Console and the hardware (wheels and brackets are huge. Way too big for the project we have built. They don't look that big on most everyone's pictures. Did I order the wrong ones? The wheels are 2.75", the J bracket is 12" long. I need 5" + of clearance above door opening and I used 1x4s which as you know are only 3.75". I orded the 6.5' Basic J kit by Umax. ???? Help.
Avdw91
Mon, 02/27/2017 - 03:54
Shortening to 5 or 6 feet in length
Has anyone shortened the length to 5 or 6 feet instead of 8? And if so, how did you change the dimensions?
this will be my very first build
MRZSALDANA
Sun, 12/17/2017 - 16:56
5 foot console
Does anyone have the cut list to turn this into a 5 foot console? Thanks!
cjmalone1
Sat, 02/03/2018 - 09:32
Has there been an answer to
Has there been an answer to this? Im wondering the same thing before I attempt to figure it out myself.
Katiemhayes
Mon, 12/18/2017 - 14:29
If you wanted to make this as
If you wanted to make this as a 3 panel instead of 4 what would the new measurements for it be? Thanks!
cbeach34
Tue, 12/19/2017 - 08:42
great first project
I made this as my first wood project and it was fun and easy. added a rich feel to my livingroom for very little money.
Thanks
Terry P
Fri, 12/29/2017 - 05:25
Console hints and tips
I'm building this now and found some difficulties along the way so I wanted to offer a few tips and suggestions.
1. The width of the upper faceframe is not wide enougth for most of the barndoor hardware out there. The plans call for a 1x4 which is actually .75 x 3.5 inches. The 3.5 inches does not allow enough room to fit the rails and wheels between the bottom of the countertop to the top of the doors . It will work if you make the hardware yourself, using smaller rails and wheels, but a lot of people (like myself) would prefer to just buy it. I would suggest making the upper rail at least a 4.25 inches wide. I build mine according to the plans, using a 1x4. I had to add another 3/4" by adding a 1x4 (flat down) around the top, giving the upper faceframe a total of 4.25 inches.
2. Hardware. I searched and searched for smaller barn door hardware and eventully order this from Amazon. https://www.amazon.com/gp/product/B07542QY67/ref=oh_aui_detailpage_o00_… It was $90 but it looks like it should fit perfectly.
3. The back is unsupported on the left and right edge where it meets the sides. I would suggest either making the sides 17 inches and then let the back go all the way across from edge to edge, covering the back edge of the sides, or build to the plans then add trim pieces inside the cabinet, where the back meets the sides.
MichelleL
Tue, 01/02/2018 - 16:49
Mini Barn Door Hardware
I have posted here before about this. But I wanted to post again in case anyone is looking for hardware. I make and sell mini barn doors for decorative dog door covers. The hardware I make is proportionate to what is needed to complete this console.
If anyone would like to check it out, you can find me on at Etsy.com/shop/TADcompany
You can use promo code DIYCONSOLE at check out.
Dietz777
Fri, 01/19/2018 - 12:54
MINI BARN DOOR HARDWARE - TADcompany
TADcompany, I am on your website, which of the three products fits this project?
DudeMade
Fri, 01/19/2018 - 13:49
Woodworking
When I look back at the old woodwork furnitures we have, I am carried by the simplicity and inspiration the marker must have had in his head and wonder if he had any woodwok plans to follow. Somehow I ask myself if I could make anything appreciated by another person, but thanks to guys like you than continue to inspire us, even novies have a chance. The woodwork plans I got for my project were very helpful. You can check them out here https://tinyurl.com/y75sacsd
cjmalone1
Sat, 02/03/2018 - 09:30
Cost
Hi-
What is the average cost to buid this?
MattMart82
Tue, 03/06/2018 - 14:17
Shorter in length?
How can I go about making it only 70 inches in length, rather than 91 inches?
In reply to Shorter in length? by MattMart82
Brian Famous
Tue, 03/06/2018 - 18:00
Making it shorter
If you want to reduce the width by 21 inches, almost a quarter of it's width, you first have to decide if you are going to reduce it down to 3 bays instead of 4, or make all of them 5.25" skinnier, etc... Where is that 21" coming off from?
I'd be happy to draw up a similar design for you if you want to provide your thoughts.
MattMart82
Wed, 03/07/2018 - 07:57
Thank you!
My wife does not want a console that large... three bays would be great.... are their plans on here for the three bay stand?
In reply to Thank you! by MattMart82
Brian Famous
Wed, 03/07/2018 - 18:51
I don't know if there are
I don't know if there are plans already on the site for one at 37.5 x 18.75 x 70 (which is what it would be just 21" shorter). Give me a day or two and I can draw one up for you with 3 bays (one sliding door). Feel free to reach out to me via my profile info if you have any thoughts about other changes
MattMart82
Wed, 03/07/2018 - 20:45
That's Awesome
Thank you
Molzhon3
Mon, 07/08/2019 - 20:57
About how much is this piece…
About how much is this piece to build?
shaunetheridge
Tue, 07/23/2019 - 12:36
Cost me around $250 bucks…
Cost me around $250 bucks all in.
shaunetheridge
Tue, 07/23/2019 - 12:35
Weight limit
Will this hold/support the weight of a very large TV? 105-110 lbs.?
lulu_agogo
Tue, 07/23/2019 - 18:44
I'd like to know what size…
I'd like to know what size shelves you end up with. I'd love nothing more than to hide all my old vinyl albums behind the barn doors. I'm guessing by the overall height and depth that's a possibility but can you actually give me the "go ahead" before I start planning to make this? I'm totally in love...
deanwhite71
Tue, 08/27/2019 - 06:03
Modifications
Would you happen to have modified plans and cut list for the one in the picture that only has 3 sections instead of 4 and with the wider doors and the feet please? I'm a beginner and don't trust myself to try and figure that out on my own.
Robdre05
Thu, 12/12/2019 - 17:41
Barn Door Console
Great project. Finished mine and created my own barn door hardware doing a little research and they came out perfect. I wish I could upload my project but unsure how to at this very moment.
Ina Ilyaev
Wed, 12/18/2019 - 07:28
Question about software
Hi Ana!
What computer program do you use to build plans?
Thank you for this site and videos!
aem4v2000
Wed, 02/05/2020 - 11:58
Is anyone else having…
Is anyone else having trouble finding the right size project panels? I’ve been to Home Depot and Lowe’s and I can only find 16inch wide. Not 18 inch that the plans call for.
kaotic3
Tue, 02/11/2020 - 14:34
I used 2) 3/4 x 2 x 4 BCX…
I used 2) 3/4 x 2 x 4 BCX Sanded Plywood (24" x 48")
hmcdaniel87
Wed, 04/01/2020 - 19:14
Shorter version?
The space I am hoping to fill with this piece is just a bit to small for these full dimensions. Is there a link anywhere for instructions for a scaled-down version? (Only in length!) I’m hoping to make it about 6- 6 1/2 ft long)
This will only be my 2nd project (farmhouse king bed was my first- turned out AMAZING!!) so I’m a little afraid to deviate from the plan on my own! :)
McBeast2012
Wed, 04/22/2020 - 21:51
Attaching top to frame?
Hi there. I'm going to start building this console this weekend and wanted to inquire about the best way to attach the top to the frame. Pocket holes? Brad nails? Any advice is greatly appreciated. Thanks so much!
jdrucker
Wed, 05/20/2020 - 09:24
great plain.
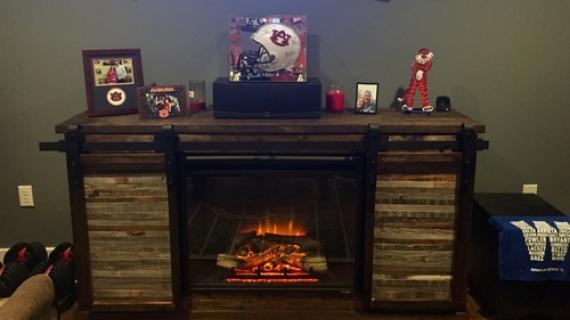
Made this but added a fire place in the middle. It was great and it heats the living room.
rone
Wed, 05/20/2020 - 14:22
what kind of wood for the…
what kind of wood for the face frames? Poplar?
emarg
Sat, 08/08/2020 - 09:54
I am having difficulty…
I am having difficulty finding hardware to fit the small area (3.5") above the door but under the table top. I do not have the tools to create my own from the blog post. Any info on where to find a smaller set?
jmart58
Sun, 08/30/2020 - 08:40
I love this console!
I really like this plan. I finished my version of this console yesterday. Looks really great!
aaroncap
Sun, 10/25/2020 - 10:41
Quick and easy plans - 1-2 day build.
My second Ana White build and the thorough plans and drawings made this as easy as the first! The design of the “box” is quick and easy but not the type of design for flawless, heirloom type table. I think this design is best when paired with a more rustic, antique type face, sides, back, etc... this is because the side panels aren’t fully secured, can warp and leave some gaps from the back and frame. Anyway, I’m being picky because these are fast and easy plans that produced a far better product than imagined. I shorten the length to a total of 61 inches to fit a standard 60 inch barn hardware. Here are some pics!
Suhrbier
Tue, 11/17/2020 - 18:08
do you see an issue with…
do you see an issue with making the frame in 1x3 or 1x4 poplar instead of 2x3's?
AnaWake
Fri, 01/15/2021 - 07:04
Nailing back panels
I'm new to building furniture and my question is - in Step 8, how do i nail the panels to the shelf if i cannot see the shelf? That does not seems easy to do, and presents high risk of error or even injury. What am i missing?
In reply to Nailing back panels by AnaWake
Jason Sokoloski
Fri, 01/07/2022 - 10:41
AnaWake, If I understand…
AnaWake,
If I understand what you are asking, you don't nail the panels to the shelf. The only nailing is to attach back 1/4" Plywood to the 2 doors. The doors themselves attach directly to the barn door track. I hope I answered your question right!
Jason Sokoloski
Fri, 01/07/2022 - 10:35
Material option that's already 15 1/4" wide- instead of Plywood
I'm excited to build this one! Another great plan from Ana!
I've found another option for the 3/4" Plywood which would allow you to use boards that are actually 15 1/4 wide, which is exactly what Ana has as dimensions in the plan. It called Whitewood and its laminated panels of solid wood. I have them at my Home Depot and they come in 8' lengths for $26, (in Canadian) so cheaper for my American friends. I've made an entertainment console entirely with this material and it is strong and straight. The other bonus is that you won't need to deal with the exposed layers of the plywood.
I'll post my project when I'm done.