


A loft bed that works with an entire system of plans to get your teen more space and storage in their room. Step by step plans from Ana-White.com
This plan works with our Loft Bed tall bookcase plan and our Loft Bed desk and small bookcase plans.
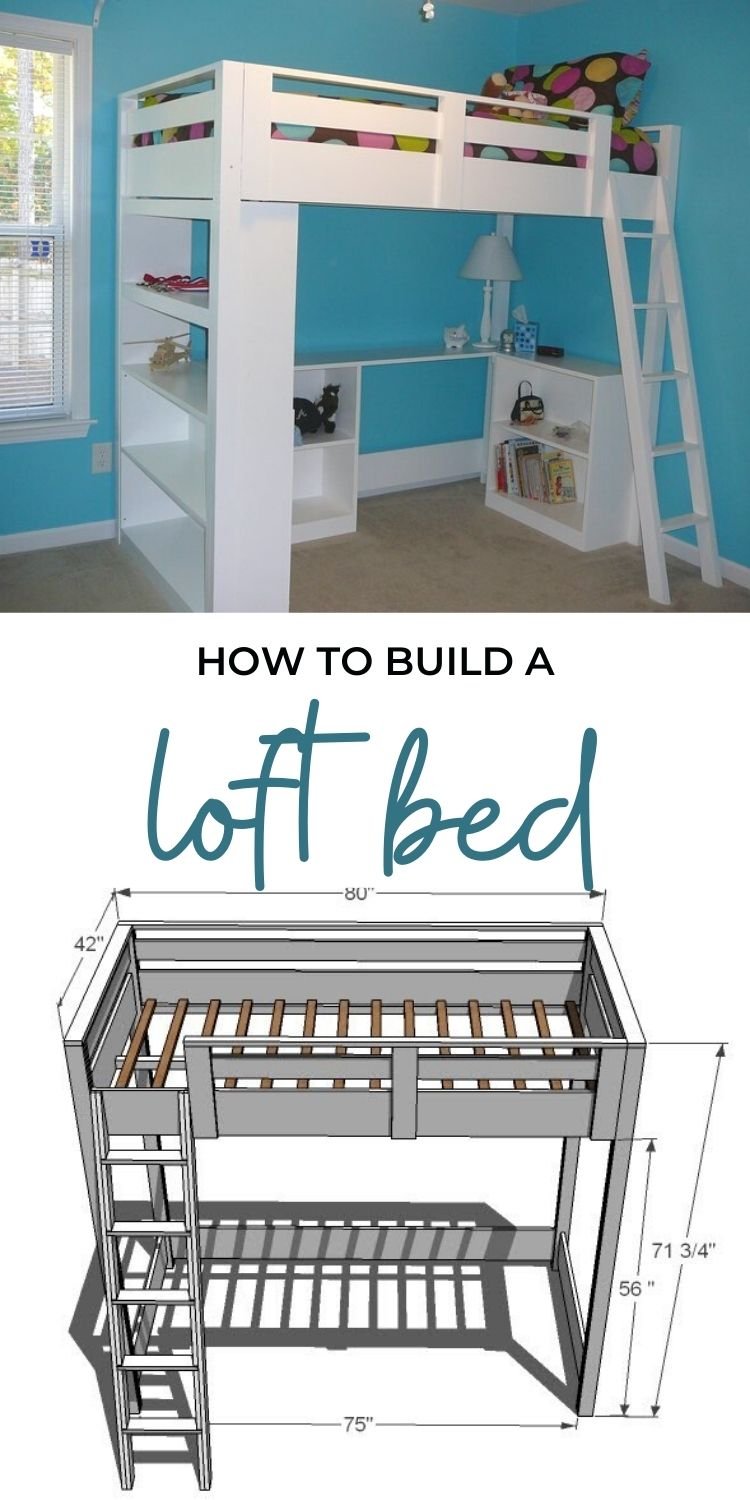
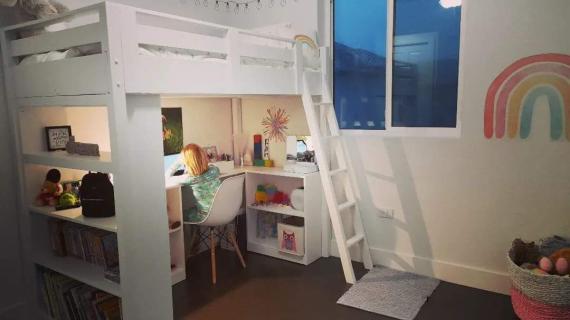
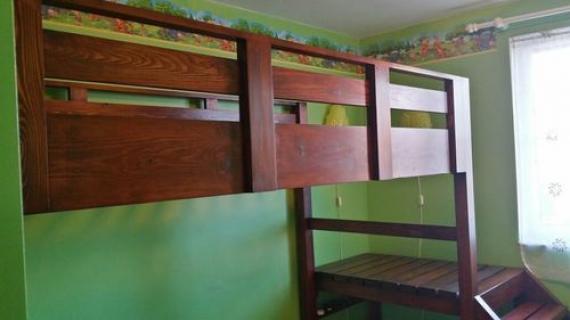
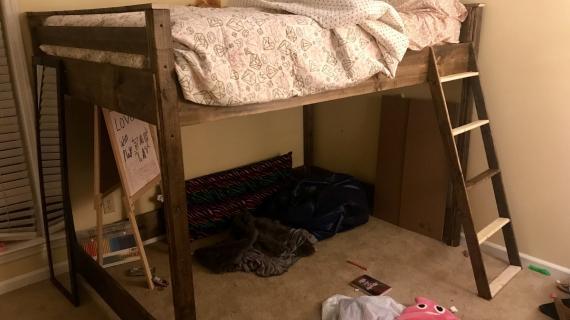
 Special thanks to Anne for sharing her photos from this plan.
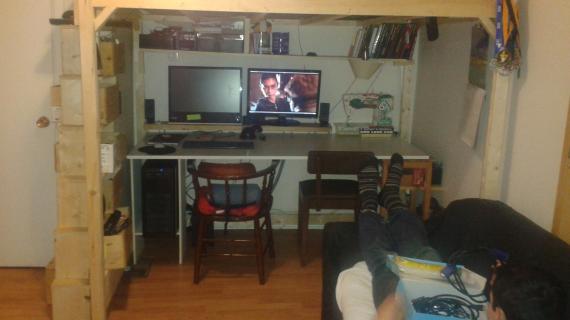
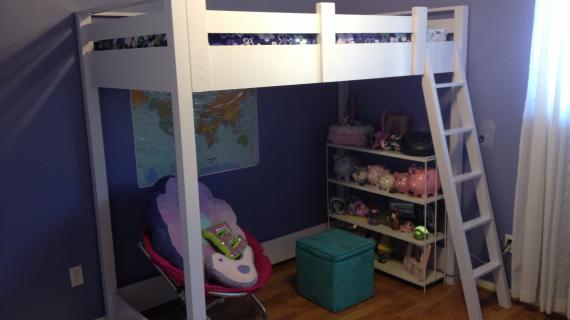
This plan is just for the loft bed. You can customize the storage underneath by adding a tall bookcase and a desk system. (plans linked)
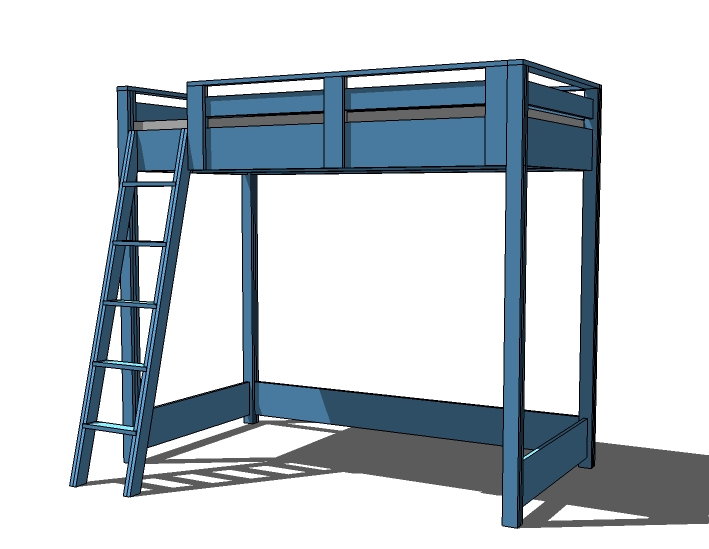
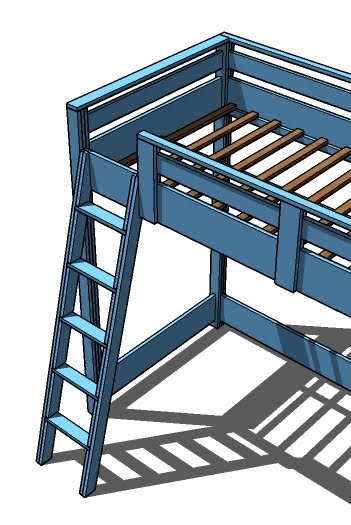
This plan uses a built in slat system as shown. You can use any type of 3/4" material - check your mattress recommendations for slat spacing. I usually will burn up scrap wood here.
Pin For Later!
Preparation
- 15 – 1×3 Boards, 8′ Long
- 3 – 1×8 Boards, 10′ Long (cut one long and one short cut from each)
- 1 – 1×8 48″ Long (cut 1 short cut from this one)
- 3 – 1×4 Boards, 8′ Long
- 1 – 2×2 Board, 8′ Long
- 11 – 1×2 Boards (Less if you have a bunkie board or box spring), 8′ Long
- 1 1/4″ self tapping screws (can also use brad nails and glue)
- 2″ self tapping screws
- Wood Glue
- Finishing Supplies (Wood Filler, Sand Paper, Paint, Brushes, etc)
Cut List for Loft Bed
- 8 – 1×3 @ 71″ (Inner Legs and Outer Legs)
- 4 – 1×8 @ 37 1/2″ (Large Planks, Ends)
- 2 – 1×4 @ 37 1/2″ (Top Planks)
- 3 – 1×8 @ 80″ (Front and Back Rails)
- 1 – 1×4 @ 80″ (Top Back Rail)
- 2 – 1×3 @ 46 1/2″ (Back Filler Piece, Long)
- 6 – 1×3 @ 2″ (Back Filler Piece, Short)
- 2 – 1×3 @ 56″ (Front Filler Pieces, Long)
- 2 – 1×3 @ 7 1/2″ (Front Filler Pieces, Short)
- 1 – 1×2 @ 80″ (Back, Top Piece)
- 2 – 1×3 @ 40 1/2″ (End, Top Pieces)
- 2 – 1×2 @ 75″ (Cleats)
- 1 – 2×2 @ 76 3/4″ (Center Support)
- 14 – 1×2 @ 39″ (Slats)
Cut List for Guard Rail
- 1 – 1×4 @ 61” (Rail)
- 1 – 1×2 @ 61” (Top)
- 3 – 1×4 @ 15” (Uprights)
- 6 – 1×4 @ 2” (Filler Pieces)
Ladder Cut List
- 2 – 1×3 @ 65 3/4″ Overall (Bottom end cut at 15 degrees off square, top at 75 degrees off square)
- 10 – 1×3 @ 10 3/8″ (Spacers, ends cut parallel at 15 degrees off square)
- 5 – 1×3 @ 12 1/2″ (Treads)
- 2 – 1×3 @ 10″ (Top Spacer, cut to match top sides)
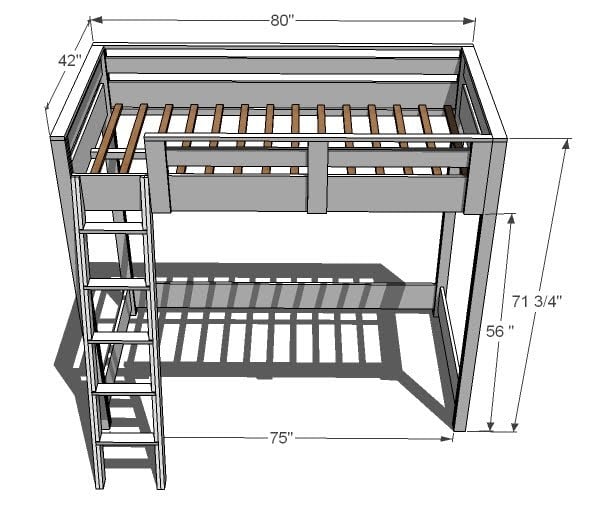
Converting to Full Size This bed can easily be converted to full size. You will simply need to add 15″ to all boards that run parallel to the ends. This includes the planks, end top pieces and the slats. Shopping list will need to be adjusted as well.


On a large project such as this one, it is crucial that you build straight and square. To do this begin by working on a clean level surface. Select boards that are straight and free of cracks or other imperfections. Check for square after each step. Predrill and countersink all of your screw holes to avoid splitting the wood and to hide your screw heads. Use glue unless otherwise directed. Of course, you should be safe and have fun! Remember, you can click images for larger views.
Instructions
Step 1

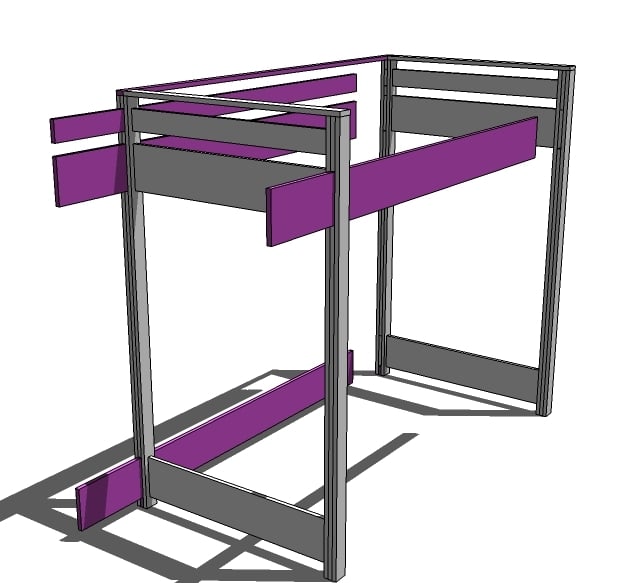
UPDATE: If you have narrow door opening (or are building the bed in a full size) you may need to assemble the bed in the room or not use glue so that the bed can be assembled and disassembled. The boards shown above in pink are not to be glued to the bed, and will be inserted in the slots on assembly. You will then on assembly use screws to fasten the rails to the bed ends.
Step 2

Ends Begin building the ends by screwing with 2″ screws and glue the planks to the inside legs. Center the planks on the inside legs, leaving 7/8″ on either side of the planks. Use the measurements above to guide you. Glue these pieces.
Step 3
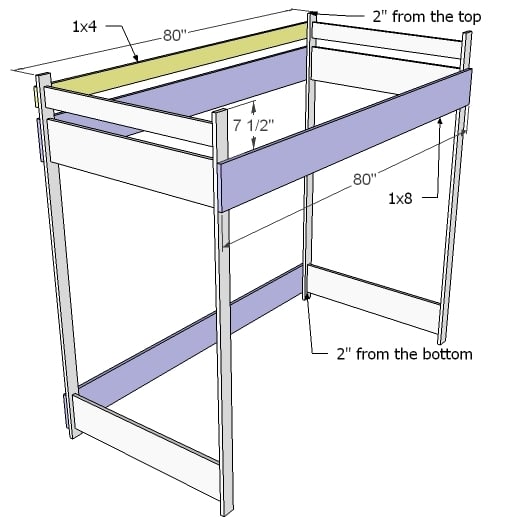
Front and Back Rails Instead of fastening the front and back rails, mark their positions on the ends, as shown above. You can use one or two screws to fasten each board in place temporarily.
Step 4
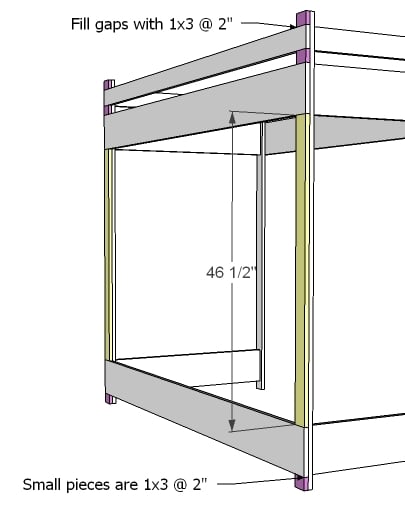
Back Filler Pieces Measure and cut your filler pieces to fit the back as shown above. You can save yourself quite a bit of time by gluing and clamping these pieces in place. When you fasten the outer leg on, it will secure these pieces with screws. If your nailer is handy, a few 1 1/4″ nails would hold everything in place. You can use glue in this step. The filler pieces will hold your rail boards (the one’s you did not glue down in step 2) in place for now.
Step 5
Step 6
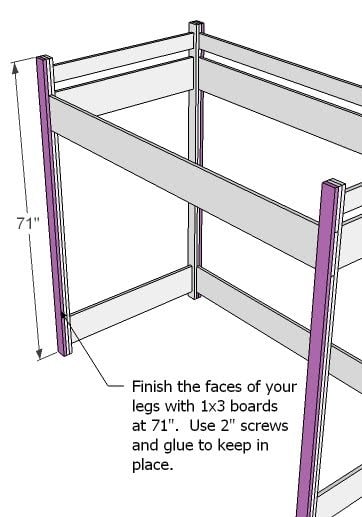
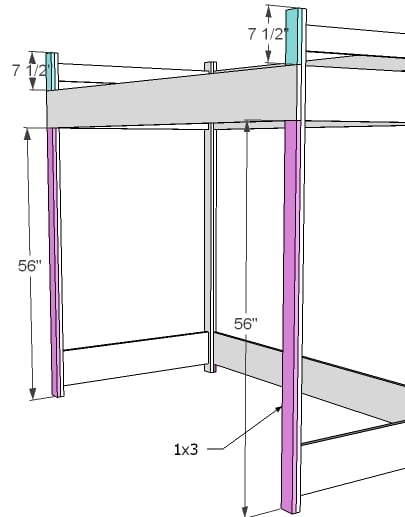
Outer Legs Pieces First unscrew the rail boards that you loosely screwed in step 2, and remove. Then, using 2″ screws and glue, predrill and countersink your screws as you fasten the outer leg boards to the inner leg boards. If you are staining or leaving natural, I highly recommend using a measured bolt pattern or screwing from the inside of the legs on this step.
Step 7
DO NOT FASTEN in the gaps left for the rail boards. Test fit your rail boards to make sure they fit in the opening. The diagram above shows how the rail boards should be removable.
Step 8
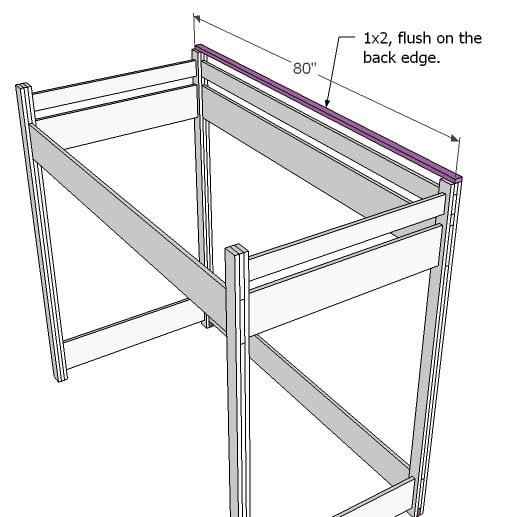
Back, Top Using 2″ screws, fasten the back top piece to the tops of the legs. The back top piece will be flush with the outside of the legs, but not the inside. Do not use glue. This board will be removed to move the bed through a doorway.
Step 9
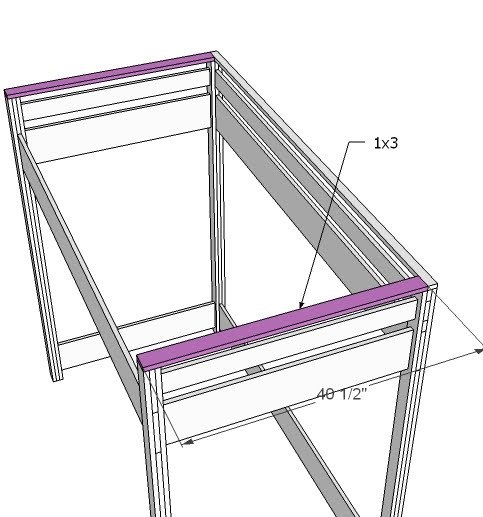
Top, Ends Using 2″ screws and glue, fasten the top end piece to the top of the ends, as shown above.
Step 10
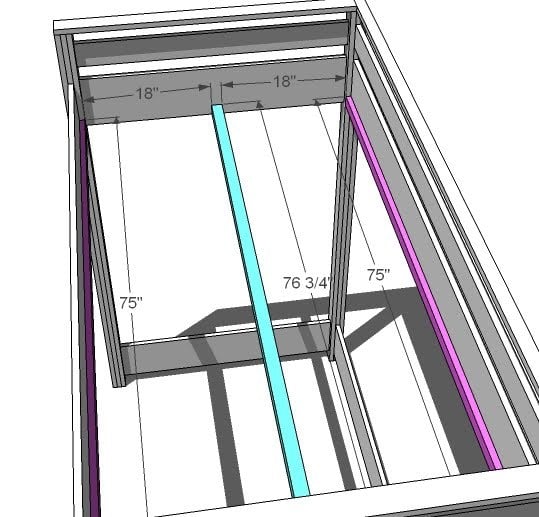
Cleats On assembly, fasten your side cleats to the side rails, flush with the bottom edge. Use 1 1/4″ screws. Then fasten your center cleat to the end planks, flush with the bottom of the 1×8 plank, using 2″ screws and NO glue. Center the support on the plank.
Step 11
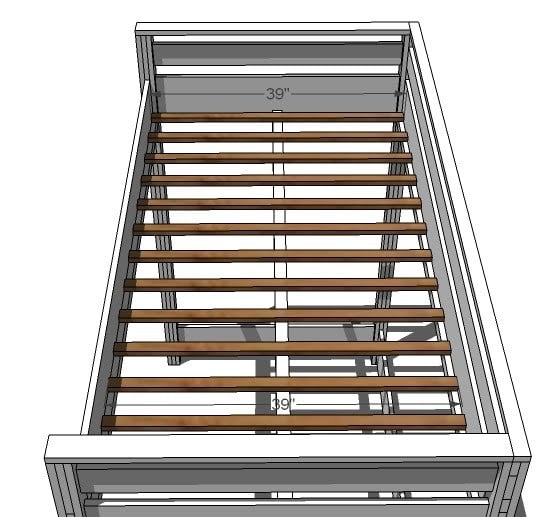
Slats Position your slats with approximately 4″ gap between the slats. TIP: Cut 2 1×2 scraps at 4″ and uses as a spacer between the slats as you are assembling. Screw the slats down with 1 1/4″ screws. For extra support, you can also screw a couple of the center slats from the outsides of the 1×8 rails using 2″ screws.
Step 12
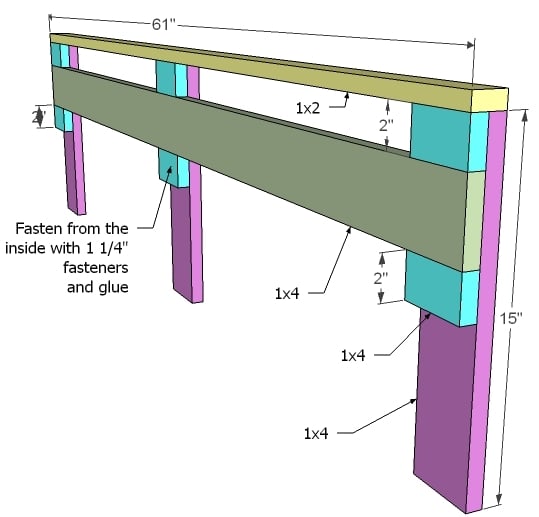
Guardrail Use 1 1/4″ fasteners (nails would work just fine) to build your guardrail. Fasten from the inside to hide holes. Then add the 1×2 top, keeping all outside edges flush.
Step 13

Guardrail Attachment Attach the guardrail to the bed as shown above. From the inside, use 1 1/4″ screws. Don’t use glue so you can remove it.
Step 14
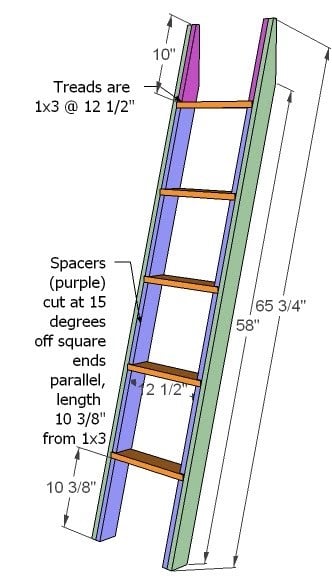
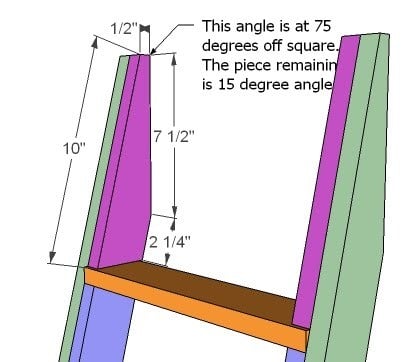
Ladder So cutting the top of the sides is going to be a little tricky. Think of it this way, you are leaving a 15 degree angle on the top of the board, then trimming off the top 2 1/4″ to remove the sharp pointy end. The best way to do this is FIRST cut your top angle at 75 degrees off square (leaving 15 degees on the board). You will need to use a jigsaw or circular saw. Then snip off the top 2 1/4″ at a right angle (90 degrees) from the back of the top (where the leg rests against the bed. THEN measure down the leg 65 3/4″ and cut your 15 degree angle on the bottom of the leg. Then use the top as a pattern when cutting the top filler pieces. Construct your ladder as shown above, using 1 1/4″ screws when joining the filler pieces to the leg sides, and 2″ screws to join the treads to the leg sides. Don’t forget your glue. See an exploded view below.
Step 15
Step 16
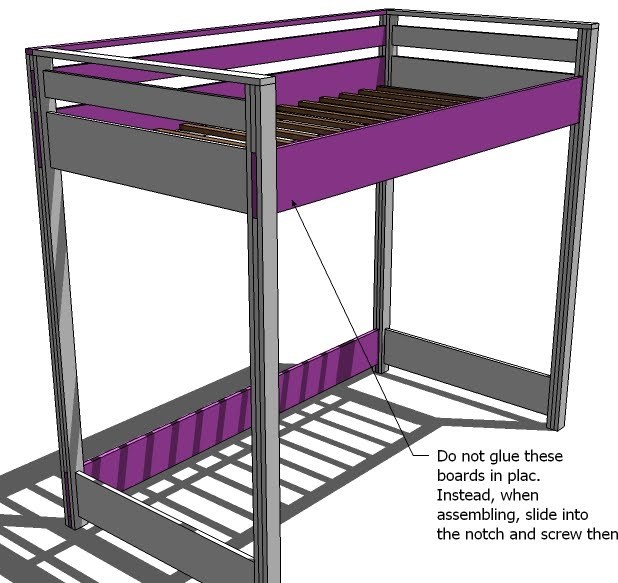
Assembly The boards shown in pink above are removable and are not glued down. You should be able to slide the boards out of the notches to disassemble the bed and move. Slide the boards back into the notches to assemble and use 2″ screws to screw from the outside of the leg into the rail boards. Also screw the back top to the top as show above. In this method, you should be able to easily assemble and disassemble the bed without destroying the finish.

Comments
In reply to Bookcase by mthomson
JoanneS
Sun, 01/12/2014 - 13:47
Bookcase plan for loft bed
I think this is the one you'll want for the tall side:
http://ana-white.com/2010/06/plans/what-goes-under-loft-bed-how-about-b…
And the small one (with desk) is here:
http://ana-white.com/2010/06/loft-bed-small-bookcase-and-desk
Happy building! :)
Joanne
mthomson
Mon, 01/13/2014 - 18:56
Price
Can you give me a ball park figure on how much the materials ran you?
Thanks
Dad Of Four
Mon, 03/31/2014 - 17:39
Round The Corners!
I built this for my 7 year old, and she LOVES it (she'll probably love it even more when I have the time to paint it for her!) One tip though, sand the corners round, at least around the ladder. That's actually on the list of things to do tomorrow since in the 2 days the bed has been up she's already been in tears half a dozen times from scraping the corner of the guard rail as she climbs in.
This is my first Ana White project and I was really happy with the way the provided plans turned into a finished project that worked! Of course, now I'm seeing all these other cool projects on here that I just HAVE to do lol
Philangel
Mon, 07/07/2014 - 16:22
What are the dimensions to make this bed a full size bed?
I like this bed, but I would like to make it a full size bed.
Philangel
Mon, 07/07/2014 - 16:22
What are the dimensions to make this bed a full size bed?
I like this bed, but I would like to make it a full size bed.
mosouza
Fri, 08/14/2015 - 21:34
Desk under the loft
Hi my daughter fell in love with the desk style under the loft. Can I also get the desk design plans? Thank you. You are extremely talented.
In reply to Desk under the loft by mosouza
Ana White
Sat, 08/15/2015 - 09:30
Please take a look herehttp:/
Please take a look here
http://ana-white.com/2010/06/loft-bed-small-bookcase-and-desk
DLDavis2
Mon, 09/21/2015 - 10:36
Mattress Question
So I see on the plans where you can make adjustments for a full size mattress. My question is do you need a box spring? This plan looks to have just he mattress on the bed.
In reply to Mattress Question by DLDavis2
ndelanuez
Mon, 08/15/2016 - 08:00
No boxspring needed.
Just built mine, No boxspring needed, works great and very comfy.
Fantastic Furn…
Thu, 10/22/2015 - 02:13
I'm impressed!!
I'm impressed!!
Beautiful bunk bed assembly plan and project! You manual is extremely detailed! As a professional furniture assembler I rarely see such level of quality! Now I do not feel that pro to be honest :D
Once again, amazing work here!
Jkvadas
Sat, 12/26/2015 - 20:00
Weight Limit
What is the weight limit for this bed? How do you determine weight limits?
nikkijohn23
Wed, 01/06/2016 - 09:50
Missing Step 15?
I noticed that there isnt a Step 15 and just want to be clear that maybe this was just a typo when numbering them?
I love all your work and this is our first project :) Thanks!
stcavanaugh
Mon, 01/11/2016 - 14:32
Very sturdy
I built this bed last weekend. It is exceptionally sturdy. Don't be scared by the use of 1x3s for the legs - you are tripling up on the boards, with cross pieces running through to create supports. Keep everything square and you'll end up with a rock solid bed.
Colleen20191
Thu, 02/11/2016 - 19:12
looking for plans for tall shelf
I want to make this bed with all the parts. I clicked the link for the tall shelf portion and it went to a page that said it was no longer there. Can anyone help me find the plans for the shelf?? Thank you!
In reply to looking for plans for tall shelf by Colleen20191
Ana White
Fri, 02/12/2016 - 13:30
http://www.ana-white.com/2010
http://www.ana-white.com/2010/06/plans/what-goes-under-loft-bed-how-abo…
Colleen20191
Tue, 02/23/2016 - 11:56
Thank you!
Thank you for the bookcase plans!
PPeachee
Fri, 07/08/2016 - 19:08
Awesome plans
My husband made this bed for our daughter and I absolutely love it. It's the perfect addition to her new big girl room. http://audreylynnpeachee.blogspot.com/2016/07/audreys-big-girl-room.htm…
ndelanuez
Mon, 08/15/2016 - 07:57
Desk & bookshelf for Loft bed
Are there any plans for the Desk & Bookshelf that are seen under the Loft bed? I could not find them. If so, please add the link. Thank you so much.
In reply to Desk & bookshelf for Loft bed by ndelanuez
Ana White
Mon, 08/15/2016 - 19:00
http://www.ana-white.com/2010
http://www.ana-white.com/2010/06/plans/what-goes-under-loft-bed-how-abo…
ChristopherHull1
Fri, 08/26/2016 - 00:06
Full size
I recently made this loft bed for my daughter and she loves it. I adjusted to make it a full size though. My wife worries quite a bit and is asking what can I do to make it less wobbly?
darkpiro
Wed, 09/28/2016 - 08:40
Updated list
Does anyone have the updated list for the Double Mattress conversion? I'm having trouble with the math
Papu5477
Mon, 01/01/2018 - 18:43
Bookshelf Desk Plans
Can someone point me in the direction of the plans for the bookshelf and desk plans that will work under this bed? Thanks for the help.
In reply to Bookshelf Desk Plans by Papu5477
Ana White
Tue, 01/02/2018 - 15:00
http://www.ana-white.com/2010
http://www.ana-white.com/2010/06/plans/what-goes-under-loft-bed-how-abo…
2boysmomma
Wed, 07/10/2019 - 14:58
Loft bed mattress
Fantastic! My boys are so excited to help make this loft bed. What is the maximum mattress thickness and weight? Thanks!
cree124
Mon, 07/22/2019 - 15:58
Hi, I am new to the site and…
Hi,
I am new to the site and love your diy projects. Can you tell me what my miter would be set to for the latter - 75 degrees off square. Not familiar with this term. Thanks!
stevemaxwellrn
Thu, 04/16/2020 - 05:49
Step 2 Question
I'm relatively new to woodworking and have a question about step 2. How did you support the middle boards while gluing them & then screwing them into the post boards?
BradyM
Tue, 05/19/2020 - 11:19
Great plans! Higher clearance?
I am considering making the full size version of for my 11 year old. We both really like it, but I have a question about clearance. 56" is pretty shy on height for a boy his age (and growing). Many of the full loft beds I am seeing allow from 64" - 68" below. His room has a 10' ceiling, so bunk clearance isn't as much of a consideration.
Would just making this taller by simply increasing the length of the vertical measurements be a bad idea regarding stability? I would think that I would at the very minimum need to add a cross brace on the back, but wanted to get your thoughts.
branden381
Tue, 05/26/2020 - 14:52
L-Shape Challenge - I need (2) of these in 10x10
Can you edit the dimensions to fit (2) of these in an L-shape inside a 10x10 room? I need some suggestions.. I understand a twin bed is only 38"x74" - I'd need thinner wood or I could eliminate one side and attach the second one directly to the other? Suggestions would greatly be appreciated
MGoodman
Fri, 07/03/2020 - 11:32
Love this bed! But would…
Love this bed! But would mention that the end planks in step 2 aren't needed if building the bookcase and desk to go with this.
mel30
Sun, 08/09/2020 - 20:26
Loft bed
How much weight is this bed ok for?
jewel_37_09@ya…
Mon, 01/18/2021 - 07:46
PDF for Loft Bed Not Working.
Hi Ana, can’t wait to build this for my granddaughter. Problem is the PDF link is broken. Any chance you can fix? Thanks so much, not much signal for iPad in the workshop so need to print! ☺️
alishap09
Tue, 03/09/2021 - 18:44
I am getting ready to…
I am getting ready to assemble a loft bed using these plans, I’m wondering what the best way to secure the end frame pieces for accurate screwing. I’m concerned about shifting to be off centered or not square as I am trying to screw them together since I am assembling myself. Any tips or suggestions for a type of clamp or how you were successful at getting them exactly where they needed to be?
pholland
Mon, 01/23/2023 - 09:50
Thanks! And...what size mattress?
Ana,
Thank you for posting your design and plans for this loft bed. I just finished cutting all the lumber for a full-size version and am reducing the height by 2" to better accommodate our 8' ceiling and a comfortable mattress. Speaking of mattresses. What brand/size mattress did you use in your photo? I'd prefer an 8" high mattress (this is for my pre-teen daughter) but it seems as though the better mattresses come in 10"+ heights.