Modern Wood Floor Lamp from a 1x2

Difficulty
Starter Projects
| Print this plan

DIY Modern Wood Floor Lamp from a 1x2 - super easy DIY Project! From ana-white.com

Hi everyone!  

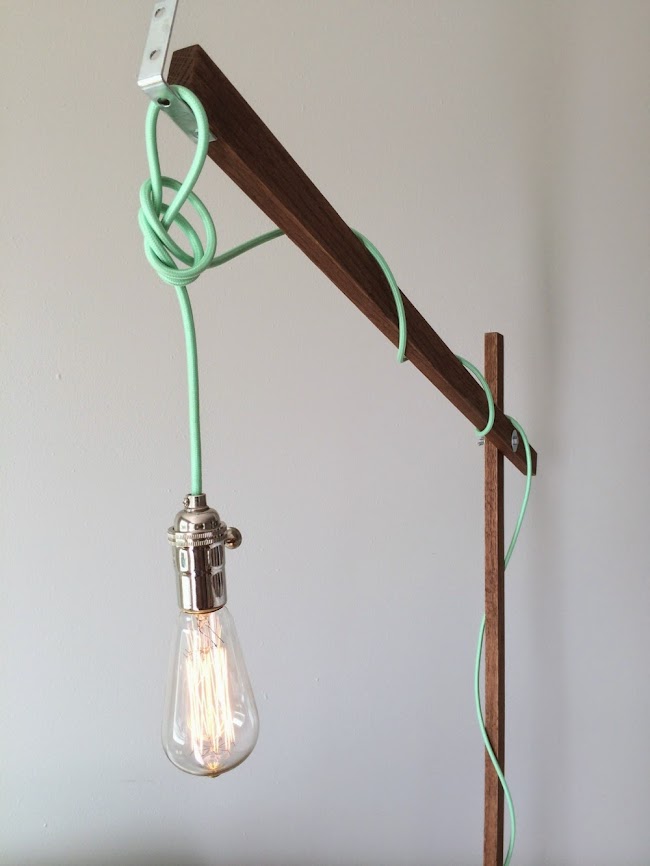
Behold the power of the 1x2!

All 25 Watts, Edison style.

Toliy's been wanting to make a floor lamp, so I challenged him to come up with a design using a single 1x2 board for the majority of the project.

He also used a scrap piece of 2x8 board (about 1 foot long), some L brackets and bolts with washers and nuts.

We also ended up ordering a new corded light bulb from Etsy 

Because I may or may not have gotten greedy and claimed this project for my own living room ... 

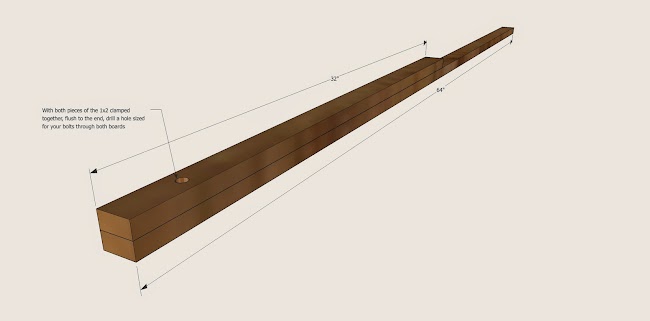
The 1x2 is cut into two pieces, at about the 1/3 point (ends up being about a 32" piece and a 64" piece but exact length is not required).

The two pieces are clamped together and a hole sized for the bolts is drilled through both 1x2 pieces, a few inches from the ends of the 1x2s.

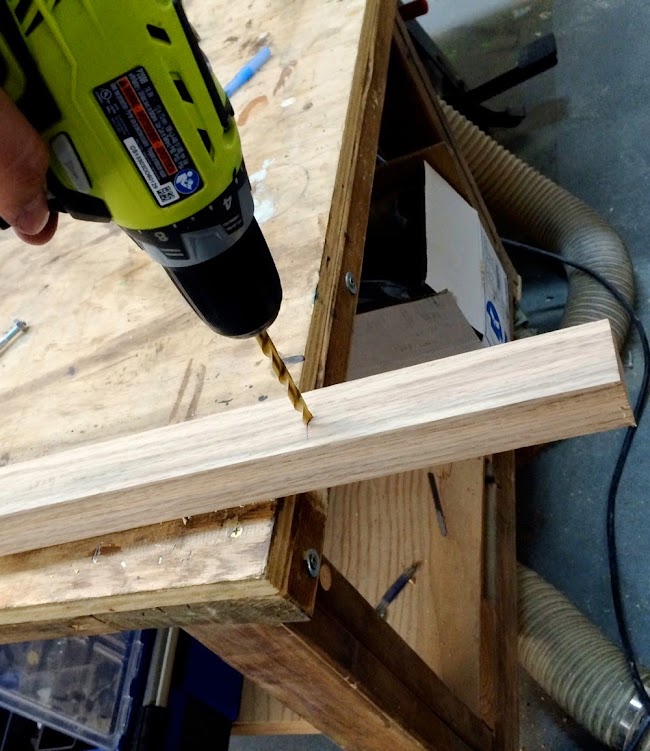
By drilling both at the same time, the overhang on the end of the light is the same.

Then the two 1x2s will get bolted together with a bolt, through the whole that was just drilled, but first,

All the wood pieces are stained -

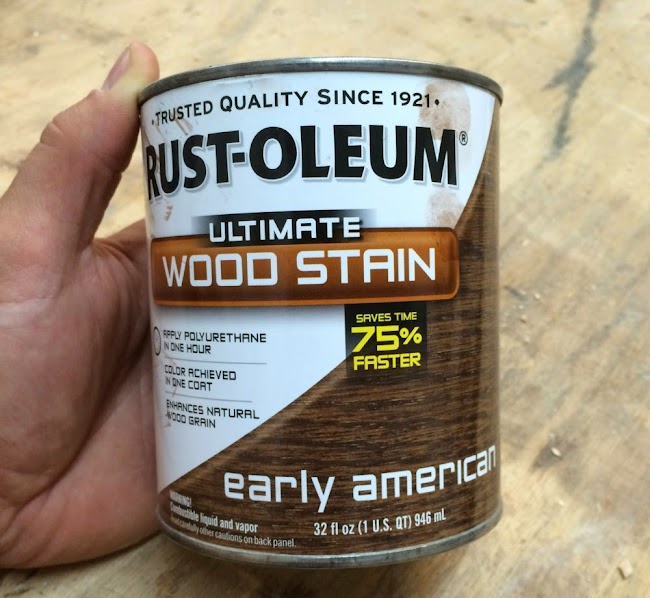
We used RustOleum Early American, one coat applied with a foam brush.

Now back to that bolt.  

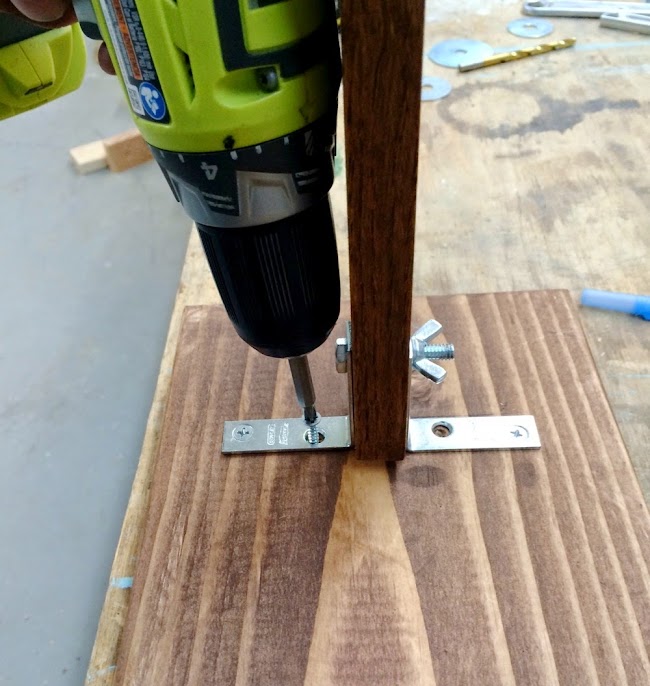
On the opposite end of the longer 1x2, the L brackets are used to attach the longer 1x2 to the 2x8 scrap piece.  The bigger your base piece (we used the 2x8) the more solid the lamp will be.  We liked the smaller base, and decided to stack books (see photos below) to add weight which increases stability.

L brackets to base,

Bolt holding the two 1x2s together in the middle,

Remaining L bracket at tip of shorter 1x2 (the L brackets came in a packet of 4, so we decided to use on up on the end to hold the light cord in place, but a simple hole drilled through the 1x2 would have done the trick as well),

Light bulb on the end of the cord ...

The wood stand part can be easily adjusted at both the base and the middle bolt,

So the lamp can shine from the floor to the ceiling and anywhere in between.

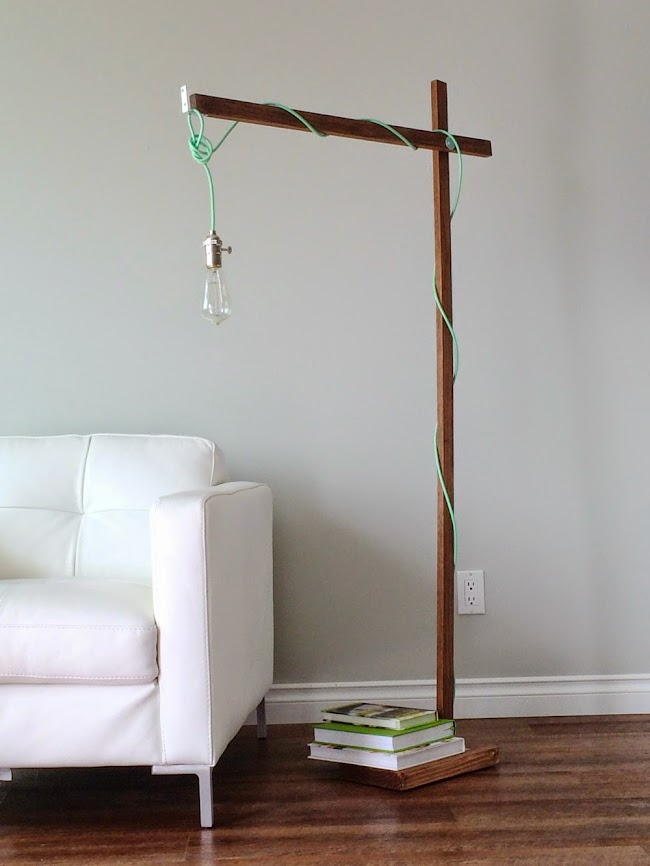
Whether you wrap the cord, go brass, or bright pink, stack the books, or add a wire cage, we hope you love this little DIY Modern Wood Lamp project as much as we do!

Enjoy, and share how you modify this simple plan if you build please!

XO Ana + Family

General Instructions

Please read through the entire plan and all comments before beginning this project. It is also advisable to review the Getting Started Section. Take all necessary precautions to build safely and smartly. Work on a clean level surface, free of imperfections or debris. Always use straight boards. Check for square after each step. Always predrill holes before attaching with screws. Use glue with finish nails for a stronger hold. Wipe excess glue off bare wood for stained projects, as dried glue will not take stain. Be safe, have fun, and ask for help if you need it. Good luck!

Finishing Instructions
Preparation Instructions
Fill all holes with wood filler and let dry. Apply additional coats of wood filler as needed. When wood filler is completely dry, sand the project in the direction of the wood grain with 120 grit sandpaper. Vacuum sanded project to remove sanding residue. Remove all sanding residue on work surfaces as well. Wipe project clean with damp cloth. 

It is always recommended to apply a test coat on a hidden area or scrap piece to ensure color evenness and adhesion. Use primer or wood conditioner as needed.

Comments

backpacker2004

Sun, 08/31/2014 - 08:44

I few years back I built a 2x2 lamp and I love it. As I didn't know about beautiful cords/lightbulbs available on Etsy I went for an ugly, yet energy efficient LED bulb, then hid it with a shade. The exposed bulb sure has beauty but if you want to direct light and hide an ugly bulb, the shade is helpful. I went for one of the cords at Ikea that has the shade mount built into the bulb fixture. I hid the ugly cord by routing a slot along both 2x2s. I may add washers to mine, or a lock washer to the movable joint as mine tends to slip down every few weeks under its own weight. One can also send a bolt through the bottom of the of the base into the end of the 2x2 for a hidden fastener look, but it takes patience/luck.

tracysmith

Wed, 09/03/2014 - 15:31

Ikea also has cord kits for much less, although, you don't get those fun colors - black or white. Can't beat the price though - $5. Plug in style, no switch on the cord or the socket.

Frequently Asked Questions

Wood Questions

What kind of wood should I use?
Most of our plans use standard construction lumber like pine or fir. It's affordable, easy to work with, and easy to find. It's also rapidly renewing and biodegradable, so a great eco friendly choice!

Can I use hardwoods instead?
Yes—just keep in mind they're heavier, cost more, and can be tougher on tools and harder to join together and finish. I recommend not tackling a hardwood project until after you have built several softwood projects.

What if my boards are warped?
Choose the straightest boards at the store. You can often work around slight warps by cutting them into shorter pieces.

What wood should I use for outdoor furniture?
Use red-toned or pressure-treated 2x lumber for framing, and cedar or cedar fence pickets for the decking. Outdoor furniture should be built like a deck—your local home center can help recommend the right wood for your climate.

Will my wood move or warp after I build?
Potentially, especially in humid climates. Let your wood acclimate indoors before building. Once acclimated and kept in a stable environment, movement should be minimal. Remember, most houses are built using framing lumber - it's all about keeping moisture down indoors.

Cutting Questions

Do I need a miter saw?
A miter saw is great, creating fast, safe, and precise cuts, even for beginners. But most plans can be built with a circular saw and a straight edge. If using a circular saw to cut, take time to practice, and get good at making cuts, before cutting your project boards.

How do I get clean cuts with a circular saw?
Clamp your board, measure twice, cut slow, and use a sharp blade. This takes practice, so spend some time making cuts. I go through becoming proficient at freehand cutting in my course, it is worth taking if you want to master this skill.

Will the store cut my wood?
Yes—most stores will do rough cuts to help you transport your materials home. But from store to store, the quality of cuts could greatly vary.

Joinery Questions

What screws should I use?
We recommend star-head self tapping screws for framing, most common sizes are 2-1/2", 1-3/4". Pre-drill if close to the edge or you find your wood is splitting.

Do I have to use pocket holes?
Pocket holes are the cheapest, easiest and fastest way to do some joints - like edge to edge or a hidden fastener joint. There are other methods, but these can be time consuming and expensive. We recommend using pocket holes as indicated in plans for best results.

How do I keep things square?
Use a speed square and measure diagonals after each step. Always clamp joints before screwing to keep them tight and flush.

Finishing Questions

Stain or paint before or after building?
A quick sand before and a full finish after gives the best results. Pre-finish if you're doing two-tone or detailed finishes.

What type of finish?
Use oil-based or water-based stain. For paint, cabinet-grade latex or enamel works great. High use surfaces on indoor projects should get a coat of polyurethane, I recommend a Helsman or Spar or other flexible poly that won't crack or peel with wood movement. For exterior projects, use a finish suitable for exterior fences.

How to get a smooth finish?
Start with a well sanded project. Sand between coats (220 grit), wipe clean, and apply light coats with a foam brush or roller.

Plan Questions

Can I change the size?
Many people do, and that's the great thing about building your own furniture! But do keep in mind going bigger might mean more supports are required, and often plans are optimized for minimal material waste.

Are these beginner-friendly?
Yes—plans are written with simple tools and clear steps in mind, with every effort to make plans as simple as possible.

Can I sell what I build?
Absolutely! Just don’t resell or repost the plans themselves.

General Questions

What tools do I really need?
A drill, circular saw, tape measure, square, and a few clamps will get you through most projects.

Do I need a workshop?
Nope! A driveway or small patio is plenty to get started, just make sure you have a level place to work. If you find you are building several projects a year, creating a small workbench is a great way to store tools and have a dedicated workspace.

What if I mess up?
Wood filler, sanding, or flipping boards goes a long way. Mistakes are part of the process!

What can I do to make my projects look more professional?
Start with straight boards, make accurate cuts, clamp all joints, and line up everything neatly. Sand thoroughly, use a neutral finish, and apply it in light coats for a clean look.

I've never built anything before. Where should I start?
Start with a few smaller softwood projects to get hands-on experience. Or if you're tackling a big project, buy a little extra lumber and practice your cuts and joints first. If possible, work with someone who has a bit of experience.

Care & Maintenance

How long will my furniture last?
With good joinery and regular care, your DIY furniture can last for decades. I have pieces in my own home that are over 20 years old and still going strong! One of the best parts about DIY furniture is that it’s easy to repaint, refinish, or repair—so your projects can grow and adapt with you.

How should I care for outdoor furniture?
Lightly pressure wash or hose it down once or twice a year. Tighten screws and reapply finish as needed to protect it—just like a deck or fence. A little upkeep goes a long way in extending the life of your furniture.

How about indoor furniture?
Regularly dust or wipe with a damp cloth. If it starts to look worn, a light sanding and touch-up paint or stain can refresh it in no time. DIY pieces are meant to be durable and fixable—so don’t be afraid to give them some love now and then.

Want to Build with Confidence?

Check out my ebook: 12 Skills to Build Your Own Furniture
It walks you through the core skills every builder needs—measuring, cutting, joinery, and finishing—so you can build beautiful furniture that lasts.

Still Have Questions?

Email us anytime at [email protected] and we’ll be happy to help!