
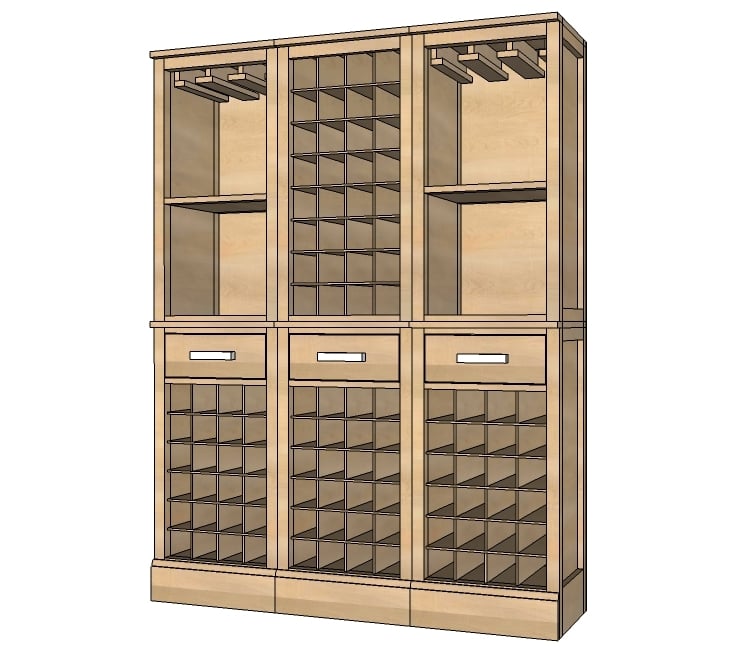

How to build wine grid hutch inspired by Pottery Barn Modular Build Your Own Bar.
My sister moved away from Alaska a few years ago, and she keeps saying she wants to come back up in August. Because she wants to go blueberry picking.
We are quite blessed up here in Alaska, with patches of blueberries for all, to pick to your hearts content - or at least your hearts health.
Each winter, I say this is the winter that I will take the gallons and gallons of blueberries I've picked and make wine. Has anyone every made blueberry wine? Lord knows, I've quit holding my breath when I use a saw, but I'm still afraid to try my hand at wine making. I feel like the process is done blindfolded.
And I must say, building a wine hutch is less intimidating than actually making the wine to fill it up for me. But wouldn't that be quite the conversation piece, a wall of wine storage, filled with wine you picked and made yourself?

Wine Wedding Shower
special thanks to the kind folks over at PureBond for allowing us to use their wood grains in this project plan.
Preparation
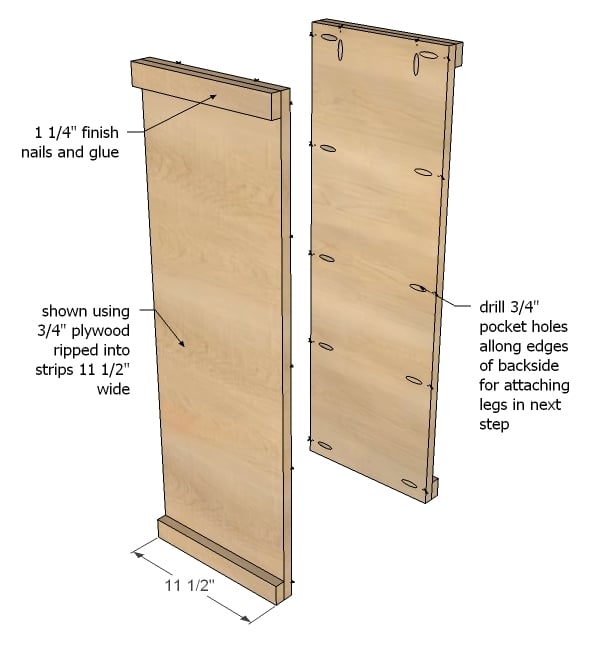
Approximately 1/2 sheet of 3/4" plywood ripped intro strips 11 1/2" wide, referred to as 1x12 boards. Since you will most likely be building the base, you may be able to share plywood with the base.
1 - sheet 1/4" plywood
2 - 2x2 @ 8 feet long
1 - 1x3 @ 2 feet long
1 - 1x2 @ 8 feet long
2 - 1x12 @ 34" (sides)
4 - 1x2 @ 11 1/2" (trim)
4 - 2x2 @ 34" (legs)
1 - 1x12 @ 14 3/4" (shelf)
3 - 1x2 @ 14 3/4" (shelf trim and top support)
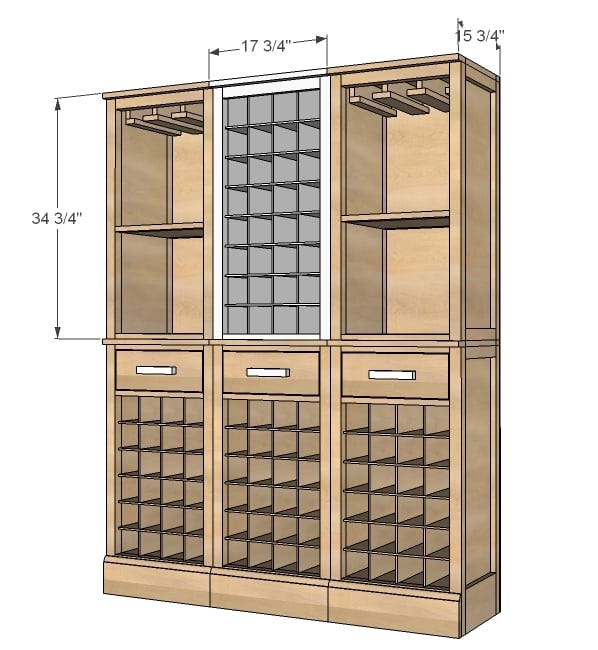
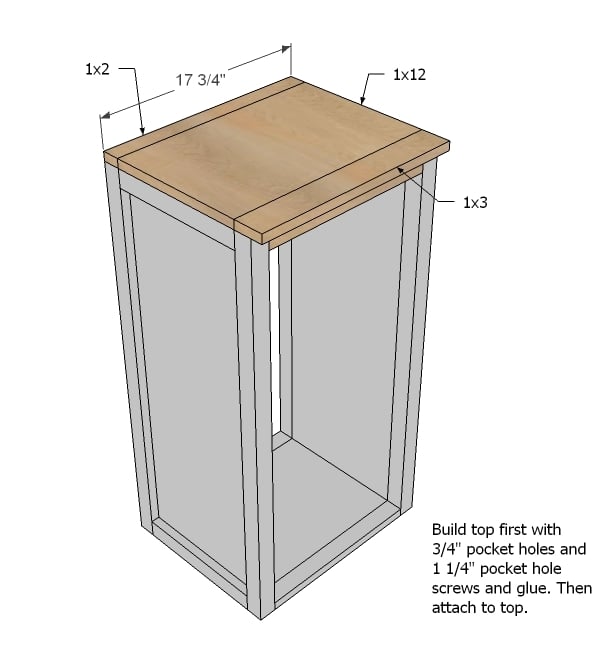
1 - 1x12 @ 17 3/4" (top)
1 - 1x2 @ 17 3/4" (top trim)
1 - 1x3 @ 17 3/4" (top front trim)
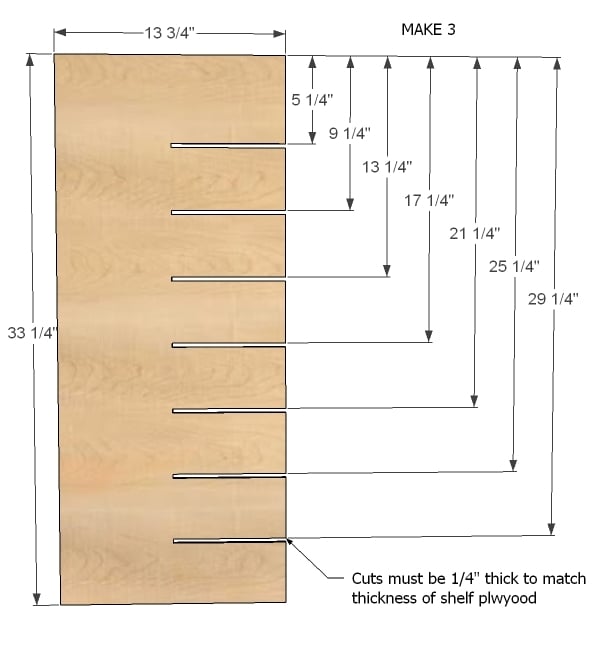
3 - 1/4" plywood @ 13 3/4" x 33 1/4"
7 - 1/4" plywood @ 13 3/4" x 14 3/4"
1 - 1/4" plywood @ 17 3/4" x 34 3/4"


Please read through the entire plan and all comments before beginning this project. It is also advisable to review the Getting Started Section. Take all necessary precautions to build safely and smartly. Work on a clean level surface, free of imperfections or debris. Always use straight boards. Check for square after each step. Always predrill holes before attaching with screws. Use glue with finish nails for a stronger hold. Wipe excess glue off bare wood for stained projects, as dried glue will not take stain. Be safe, have fun, and ask for help if you need it. Good luck!
Instructions
Step 1
This project is shown in PureBond Formaldehyde Free Hardwood Plywood. Gina's base is also built with PureBond. You can use 1x12s, but it will change the measurements slightly depending on your 1x12 widths. Make sure you measure the width of your 1x12s and adjust accordingly. This plan assumes you have ripped 3/4" plywood into strips 11 1/2" wide.
Drill 3/4" pocket holes along side and top edges for attaching top and legs in later steps of side 1x12s.
Then on the outsides, nail on 1x2 trim at top and bottom with 1 1/4" finish nails and glue, outside edges are flush.
Step 2
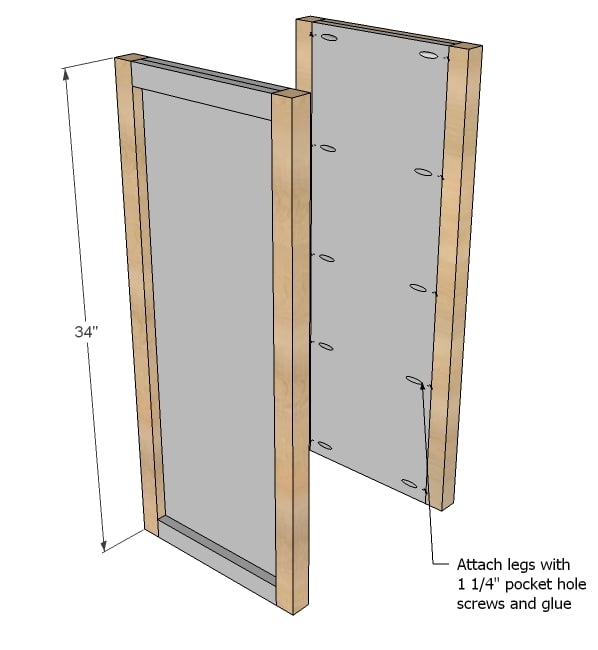
Now attach legs to the sides with 1 1/4" pocket hole screws and wood glue.
Step 3
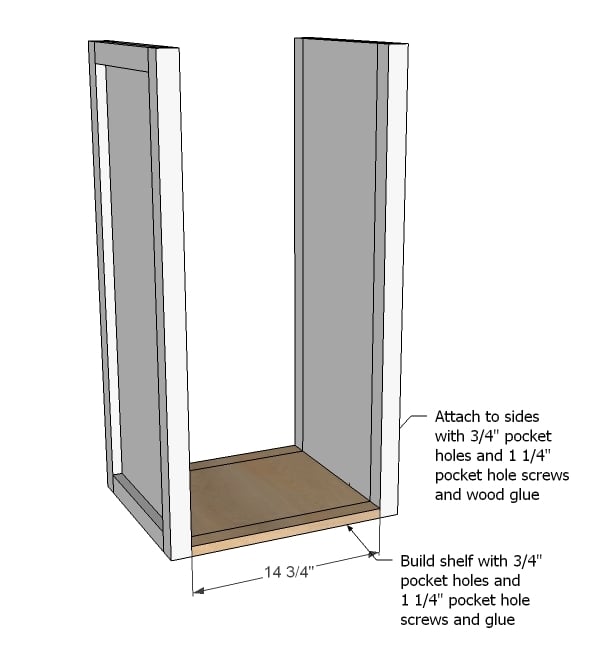
Next, build your bottom shelf with 3/4" pocket holes and attach to sides in the same manner, flush to the bottom.
Step 4
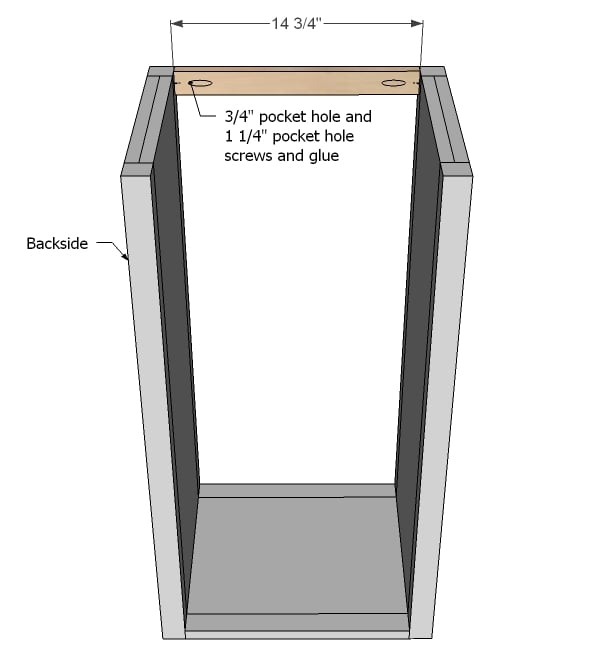
For the header, attach flush to front as shown in diagram.
Step 5
Step 6
I really liked what Gina did here

Step 7
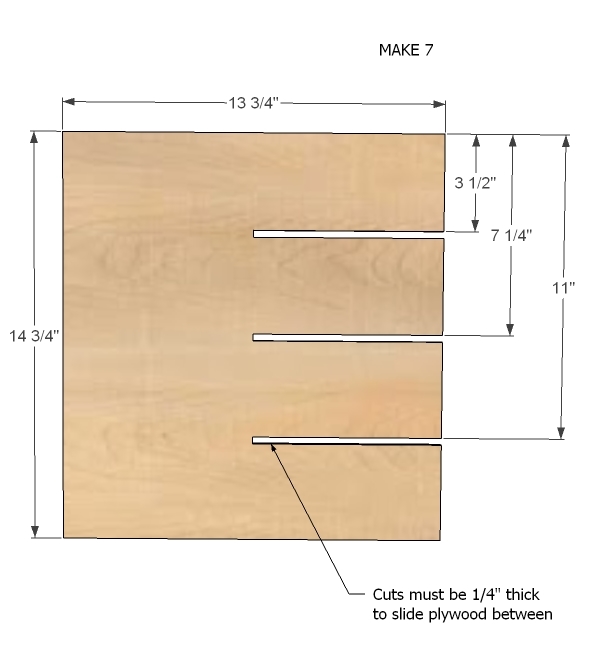
And seven short dividers.
Step 8
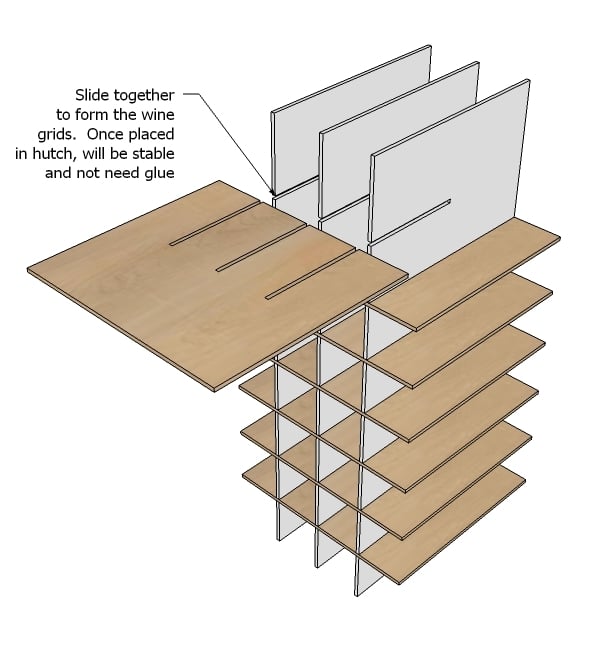
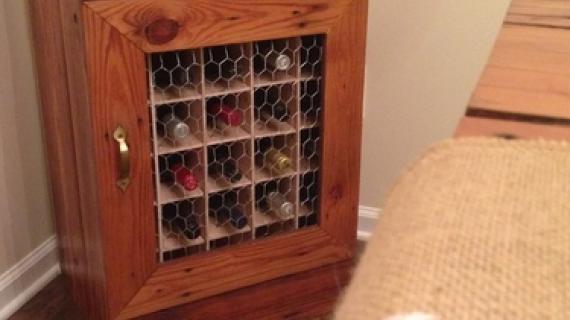
Slide together to form your wine grids.
Step 9
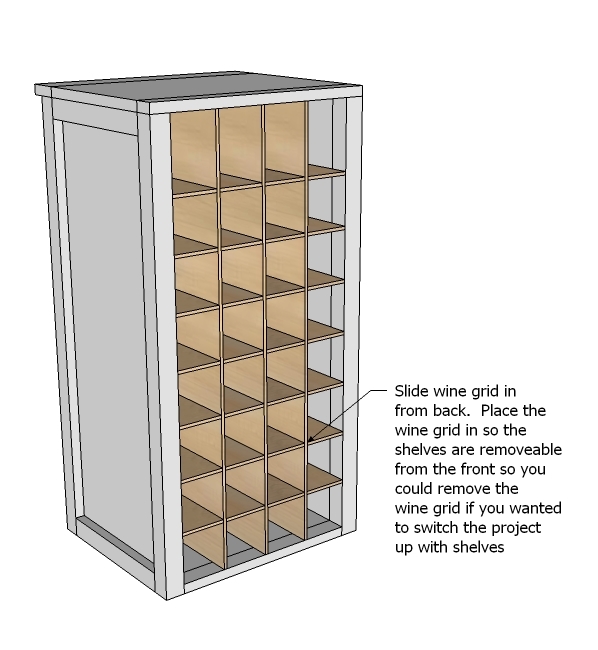
Then insert in hutch. To make it easy to remove later on, make the small shelf pieces removeable from the front. Then you can pull the shelves out, collapse the tall dividers and pull out through the front.
Step 10
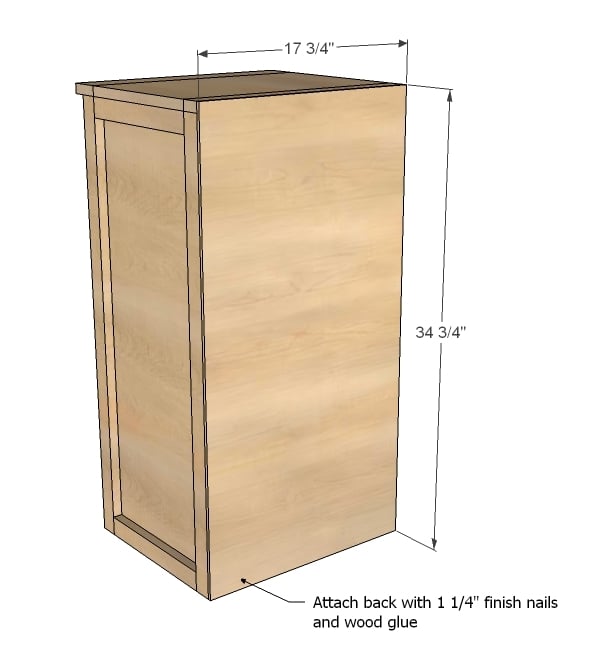
Then finally, nail the back on with glue.
You must secure the hutch to the base to avoid tipping hazards and also a stud in the wall behind the hutch.
It is always recommended to apply a test coat on a hidden area or scrap piece to ensure color evenness and adhesion. Use primer or wood conditioner as needed.

Comments
piefairy
Fri, 02/17/2012 - 18:34
not as hard as it seems
if wine-making is like hard-cider-making -- and it is, it's exactly the same process with different fruit -- then it's SUPER easy. you need a little bit of infrastructure -- the right vessels to ferment things in, appropriate food-safe sterilization techniques, etc -- but once you put your juice in your carboy (glass fermenting jug), you forget about it for a few months until it's turned into something delicious. =)
my husband's been making hard cider for several years now, and a couple of weeks ago we just bottled the 2011 batches. we're at something like 120 wine bottles full. while our current home doesn't have the space for dedicated wine-or-cider-storage furniture (all the bottles live in cases that can be stacked in the back closet), i know that when we *do* have a house and space, the booze production will definitely increase, and i will probably come back to this plan then. =)
thanks!
claydowling
Fri, 02/17/2012 - 18:56
Wine and Woodworking
Making wine is a lot like woodworking. It requires some knowledge, but you can get somebody to show you how it's done and you'll be off to the races.
Pam the Goatherd
Sat, 02/18/2012 - 08:38
I make about 10 gallons each
I make about 10 gallons each of dandelion, strawberry, and raspberry wine every year. It's easy. I use 5 gallon water jugs from the local water cooler supplier for my carboys. The gas-lock that goes on top to let the fermentation gases release while keeping the fruit flies out can be purchased at any wine shop or on-line. The recipe I have is simple, using regular baking yeast and sugar to get things going. The only thing preventing me from making blueberry wine is that we only have two small blueberry bushes in our garden so far. We will be adding more this spring. Once they get producing at full tilt I'll be making wine with them too. So, I say GO FOR IT and make some wine. You'll be hooked once you taste the wonderfulness of it!
Lynda0529
Sat, 02/18/2012 - 08:41
General
Just found your site and I am so excited ! I am 48 and I want to be you when I grow up ! Let's work on getting you on TV ! Thanks for sharing your knowledge !!
New member and excited....Lynda
Guest (not verified)
Mon, 02/20/2012 - 17:12
Blueberries
The essence of blueberries is actually quite fragile and will likely be stripped out of wine made from them as the carbon dioxide is generated, but you _might_ make it work. Here's how - yeasts will generally ferment to a certain concentration of of ethanol. If you used some sort of fruit (even blueberries) and then added fresh blueberries to the mixture as the yeast approach their point of stopping, you may find this works. In beer they do with with hops and call it "dry hopping".
Also, I'd suggest that you soak the berries in water at about 125 degrees F before creating juice as they tend to have lots of natural molds and other nasties.
Best of luck!
P. Mumphrey (not verified)
Sat, 01/05/2013 - 16:54
New DIYer
Ana,
I am so thankful I have found you site!!! It is by far the BEST DIY site available.
My husband and I are at the point where we are exhausted with spending so much money on low quality furniture. You see, my husband is in the military, and every 2 to 3 years, we relocate. Each time we relocate another piece of furniture is destroyed, and we are never reimbursed for the full amount we paid for the piece- it is always a percentage of the cost from the moving companies. To make matters worse, we end up with very little furniture in our new home until we can save up the money over several months to purchase new pieces. I will tell you, it is difficult working each day to see your hard-earned money going to waist. And here is where your site comes into the equation!!!!
I built my first coffee table about 2 week ago, and not only was my husband and I impressed with my new found woodworking skills, but we were able to build the VERY sturdy Tryde coffee table for for about $28!!! I will be building 2 more pieces (a console table and the modular wine bar), with the help of my very handy spouse, of course, within the next month.
So, thank you for this very insightful site, and I hope to see more of what you have to offer!!!
Also, great job on the momplex!!! My spouse and I have always talked about building our own home one day in the FAR future, and your endeavors were very motivating.
Thanks,
P. Mumphrey
drengr
Fri, 05/03/2013 - 15:11
I feel your pain.
I sooooooo identfy with what you are saying about miving with the military! I never minded the pay scale that some complain about, but when they depreciated my husband's 55gal fish tank by 60% because it was "used" (really exactly what was deteriorating in that glass structure with a steel band?) that really got my goat. Moving 18 times in 14 years kept us poor...along with the black-listed mover we got coming back from Germany.
I agree that Ana's blog is a lifesaver (and a sanity saver!)
Brad999
Thu, 03/24/2016 - 14:27
bases with no drawers
Hey looking to make this wondering if anybody has worked out the dimensions to make the bases but without the drawers? Would still like to keep the height for extra wine storage though.
dalecrump75
Sat, 06/29/2019 - 09:53
Do you have dimensions for…
Do you have dimensions for the bottom sections with the drawers?