Outdoor Bar Table

diy counter height farm table
Difficulty
Intermediate
| Print this plan

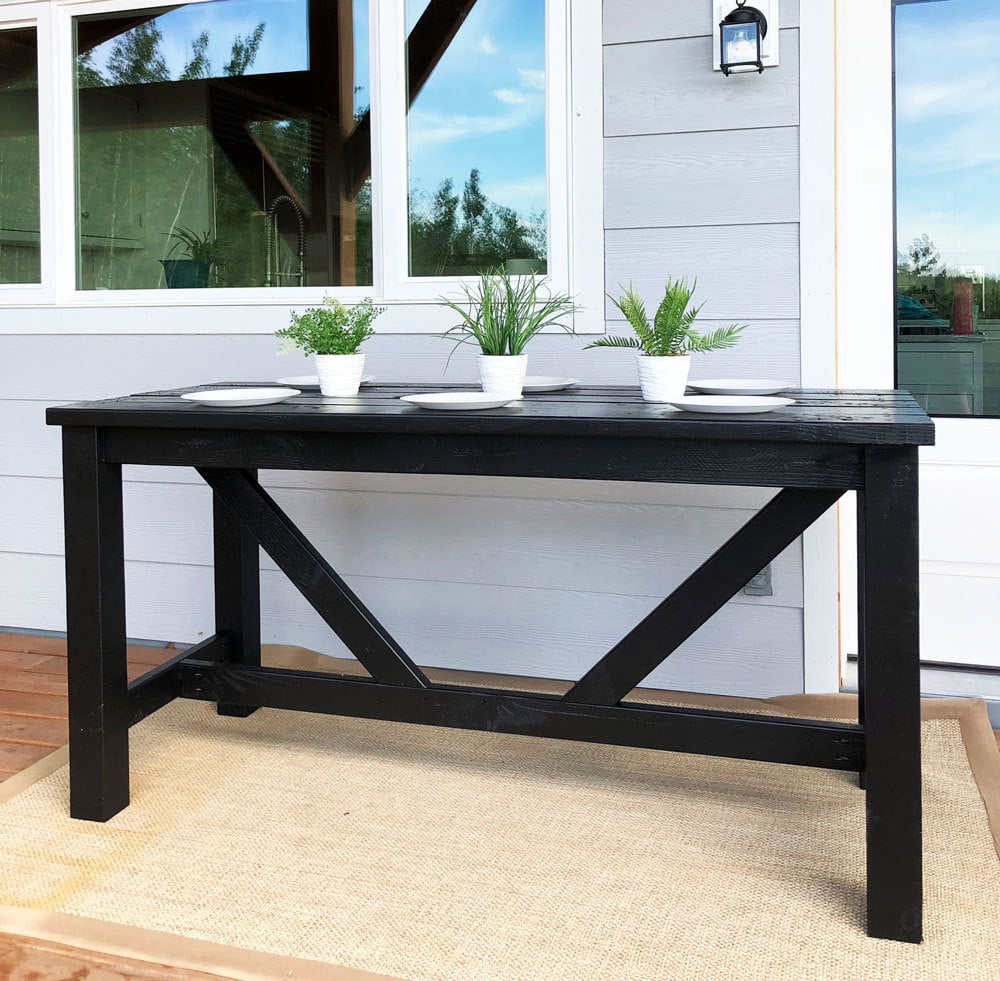
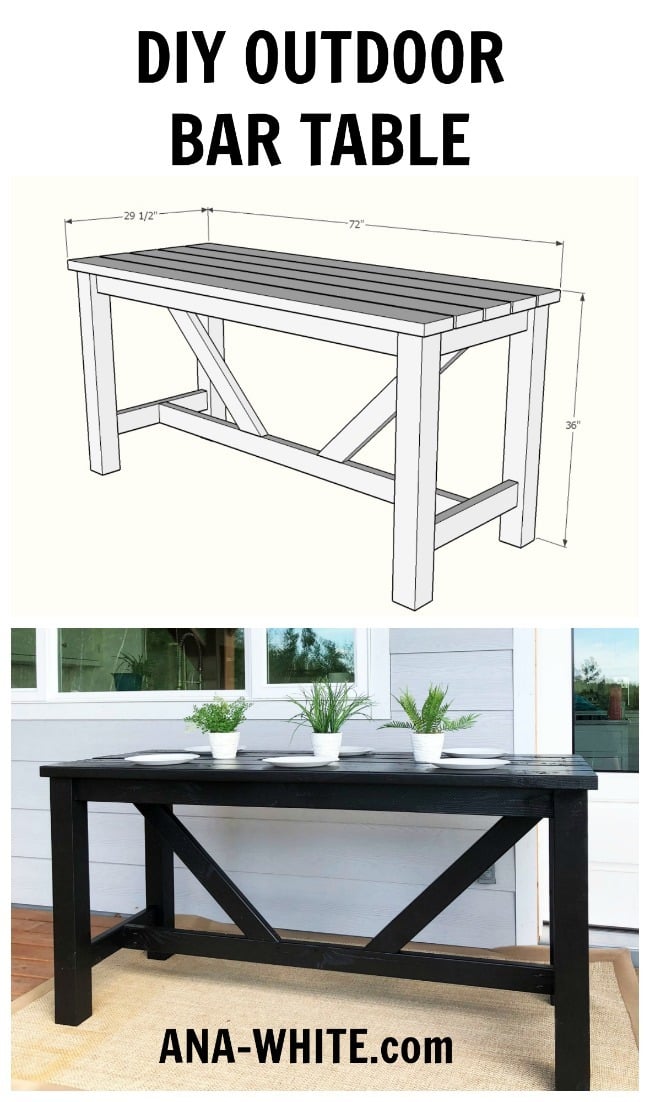
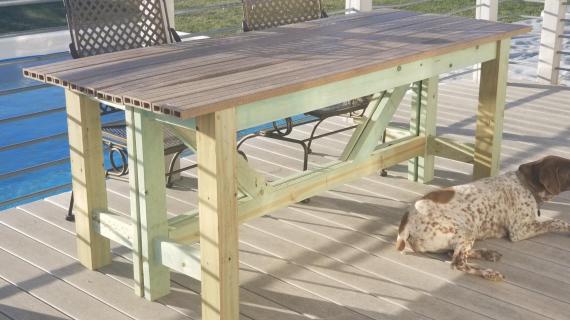
DIY Outdoor Bar Table - free plans by ANA-WHITE.com

If you are short on space but big on entertaining, try a bar or counter-height table to seat more in less space.  

We have a small deck and need to seat at least five for dinner every night.  But I didn't want a table so large it consumed our entire deck.  So I decided on a bar or counter height table for our outdoor dining space.

But I wanted something heavy and substantial, that wouldn't blow away (or over) in the wind.  And something that didn't cost a zillion bucks. 

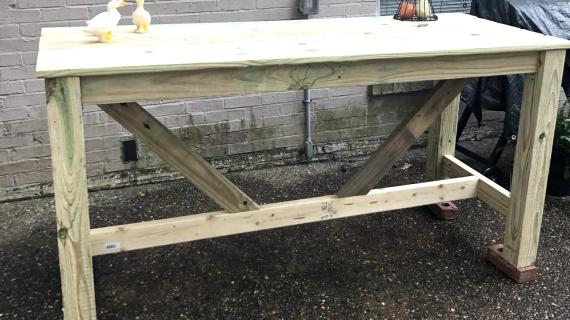
For about $60 in off the shelf lumber, I DIYed this -

It is sturdy.  It is heavy.  It will hold up to kids.

And it's pretty!  

Annnnnd ... it was pretty easy to build!

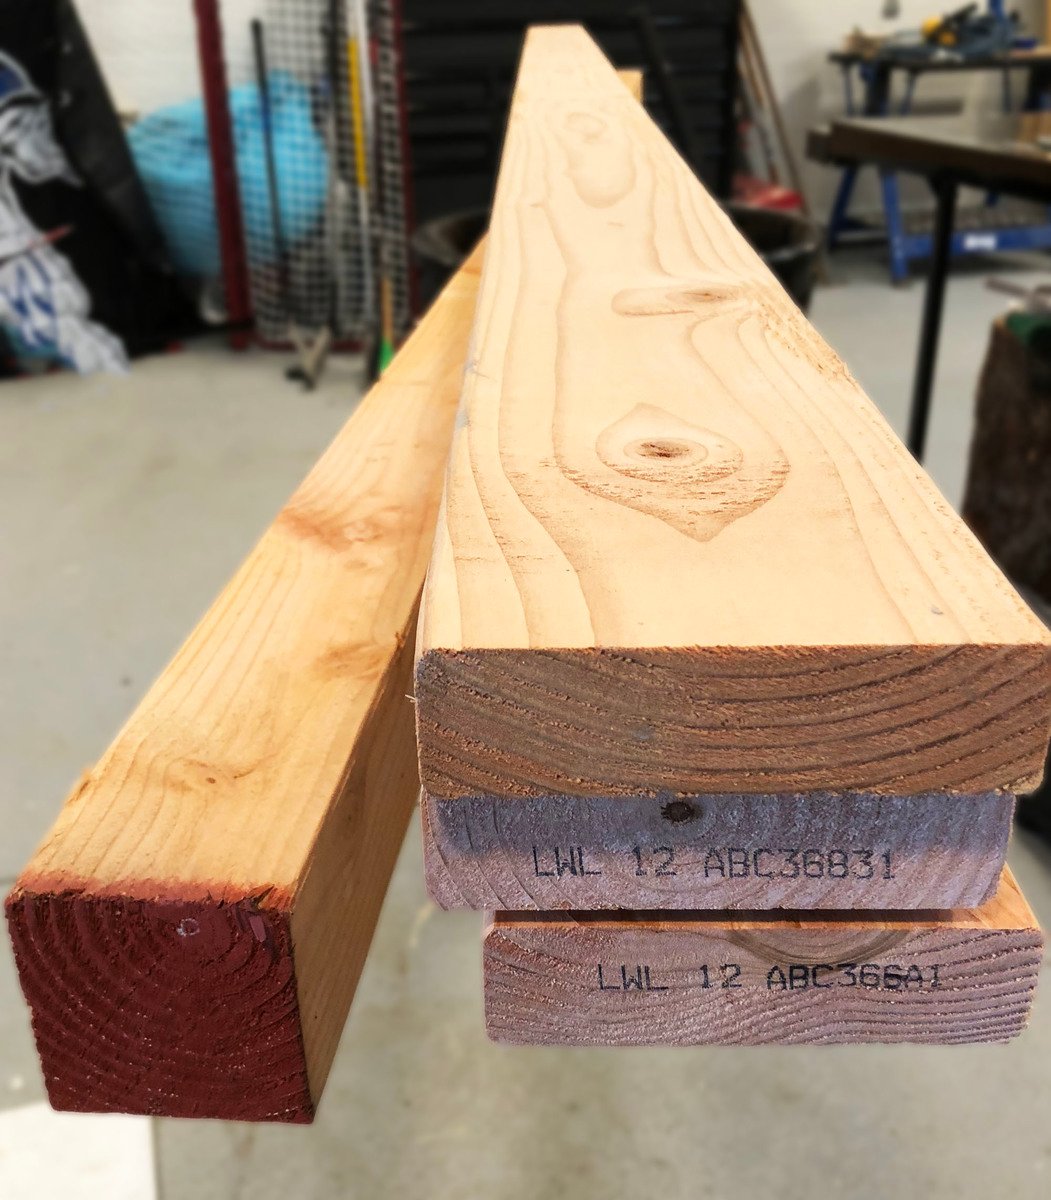
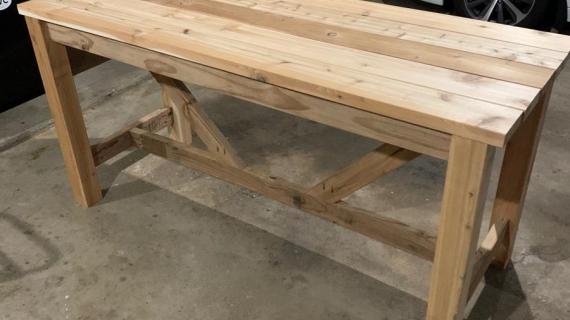
I used off the shelf 2x lumber.  It's douglas fir, so will hold up to elements better than pine or whitewood, but if you live in an especially humid climate, opt for cedar or whatever people use in your area for outdoor fencing, pergolas, and picnic tables.  

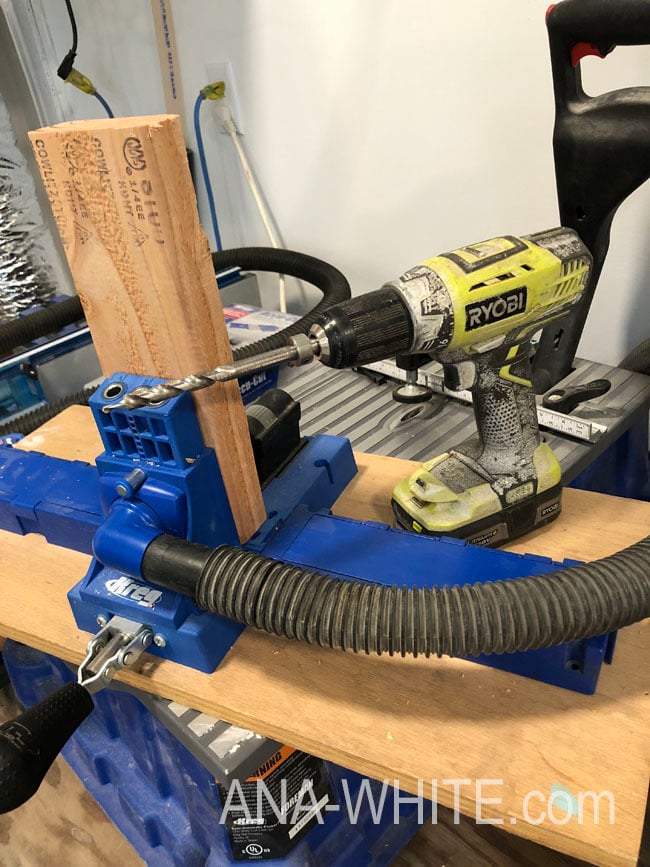
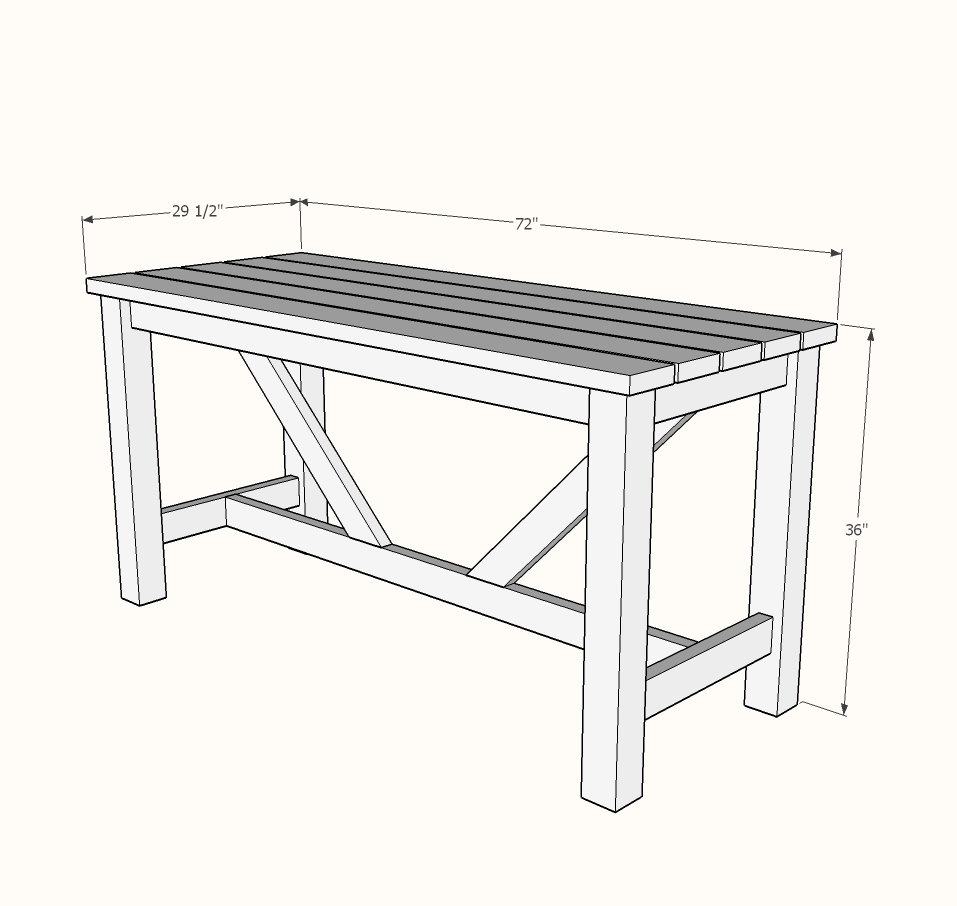
I used a Kreg Jig for all the base joinery.  It is a miracle tool, and you will need it for this project to attach to the 4x4 legs.  It will pay for itself in this one project, and your entire neighborhood will suddenly be your best friends, once they hear you have a Kreg Jig.  Good thing you are making a two-family sized patio table.

The Kreg Jig allows me to attach the 2x4 aprons to the 4x4 legs, hiding the screws on the inside.  

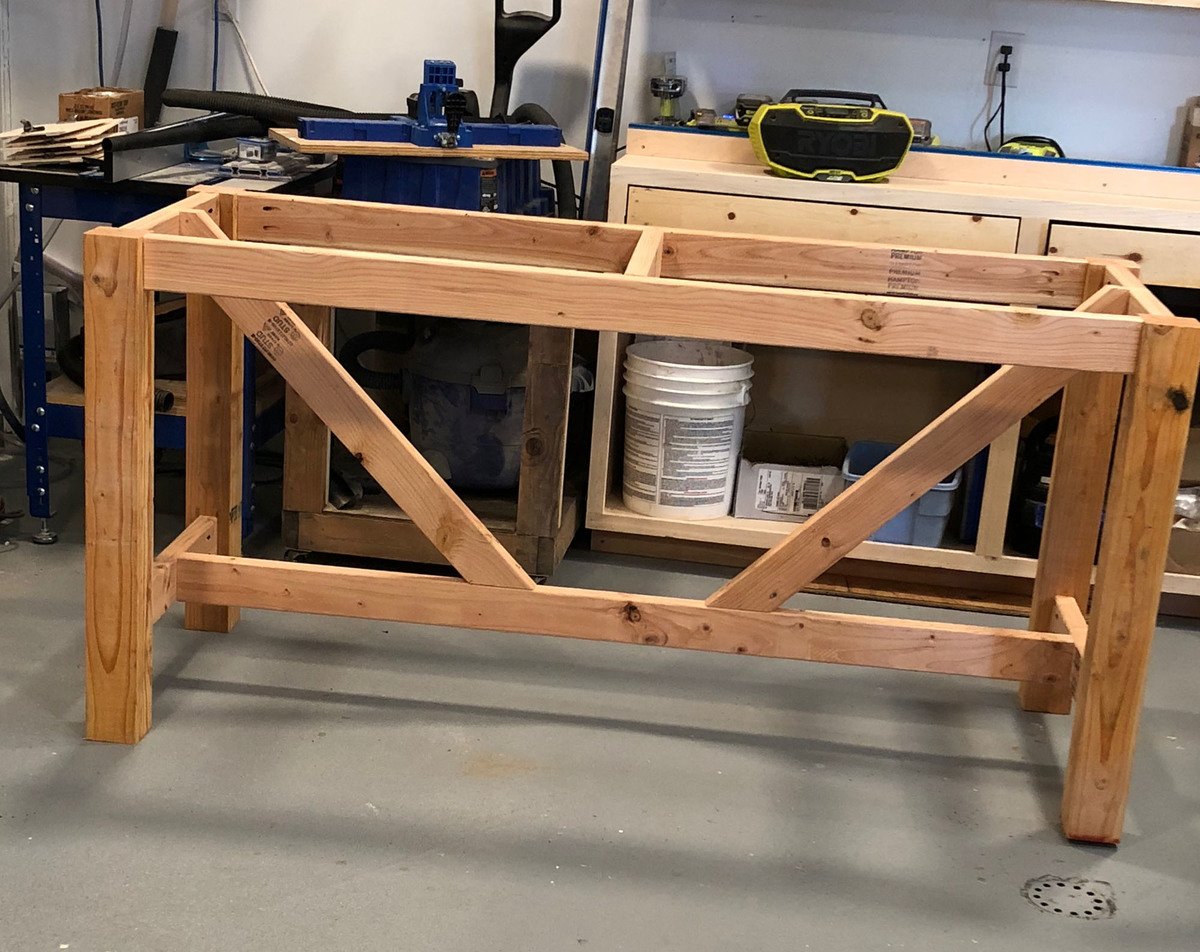
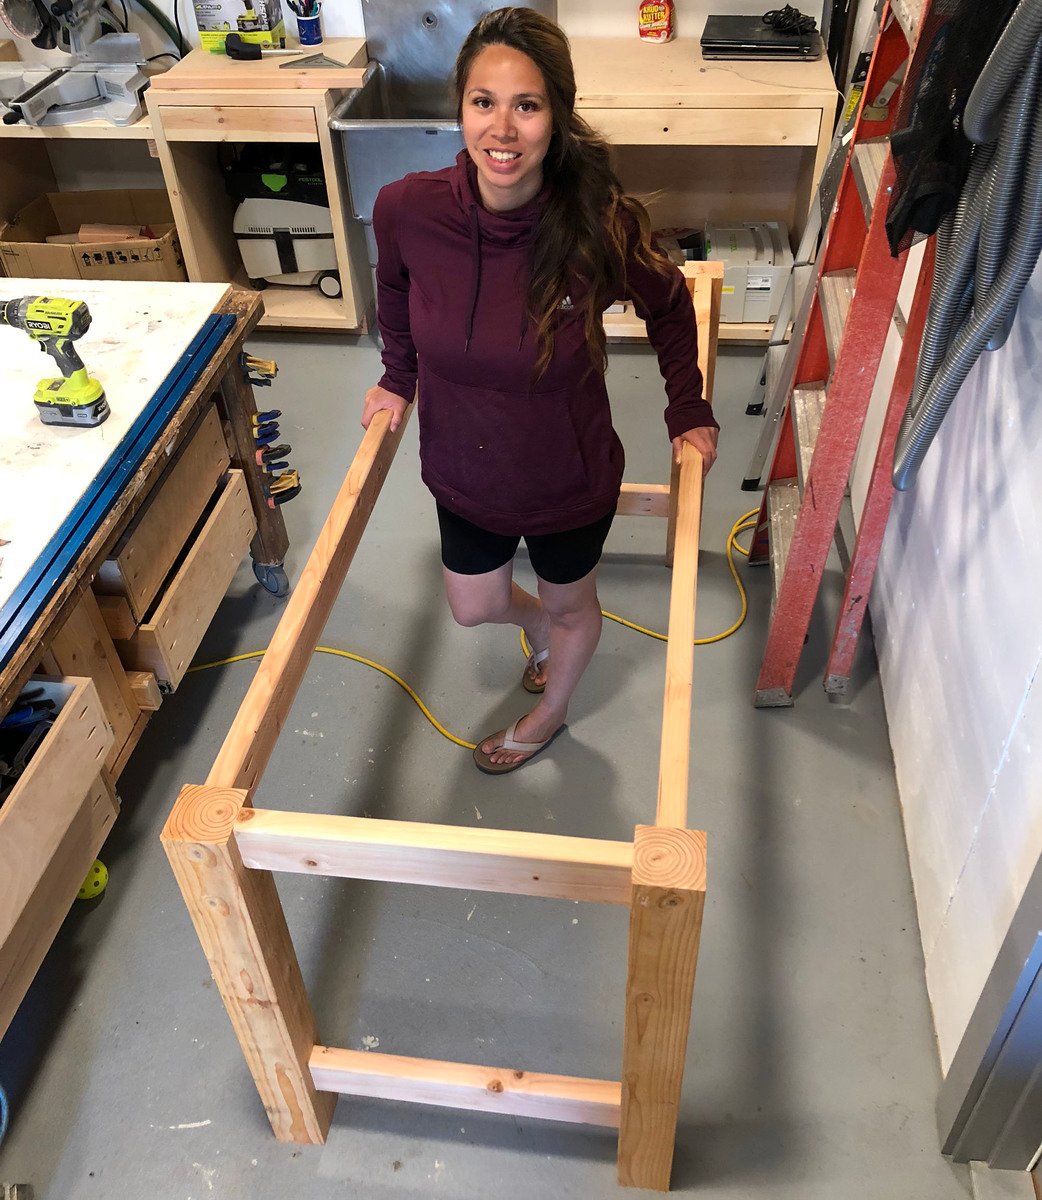
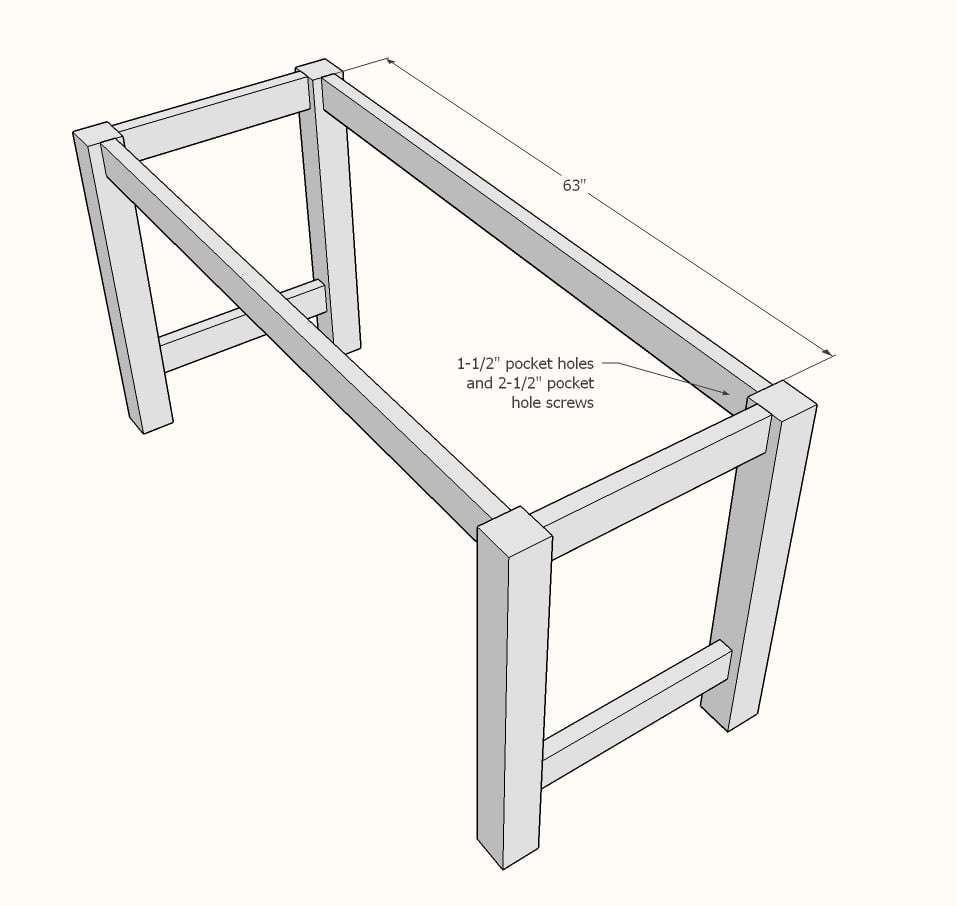
From there, we attached the cross bracking.  It's just 45 degree angles, cut on our compound miter saw.  

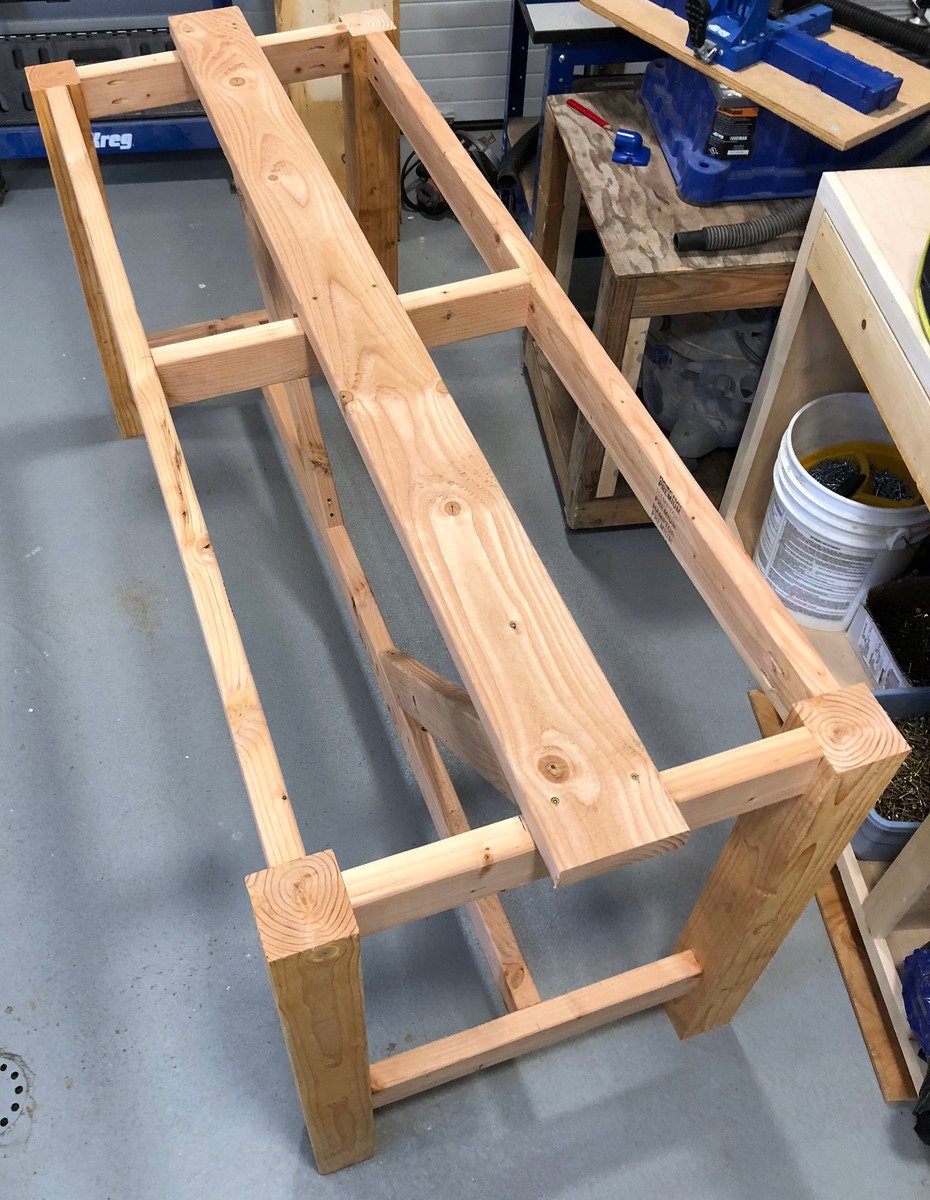
For the top, we started with the center board, attached it perfectly, and then worked outward.  Here we used 3" self tapping deck screws.

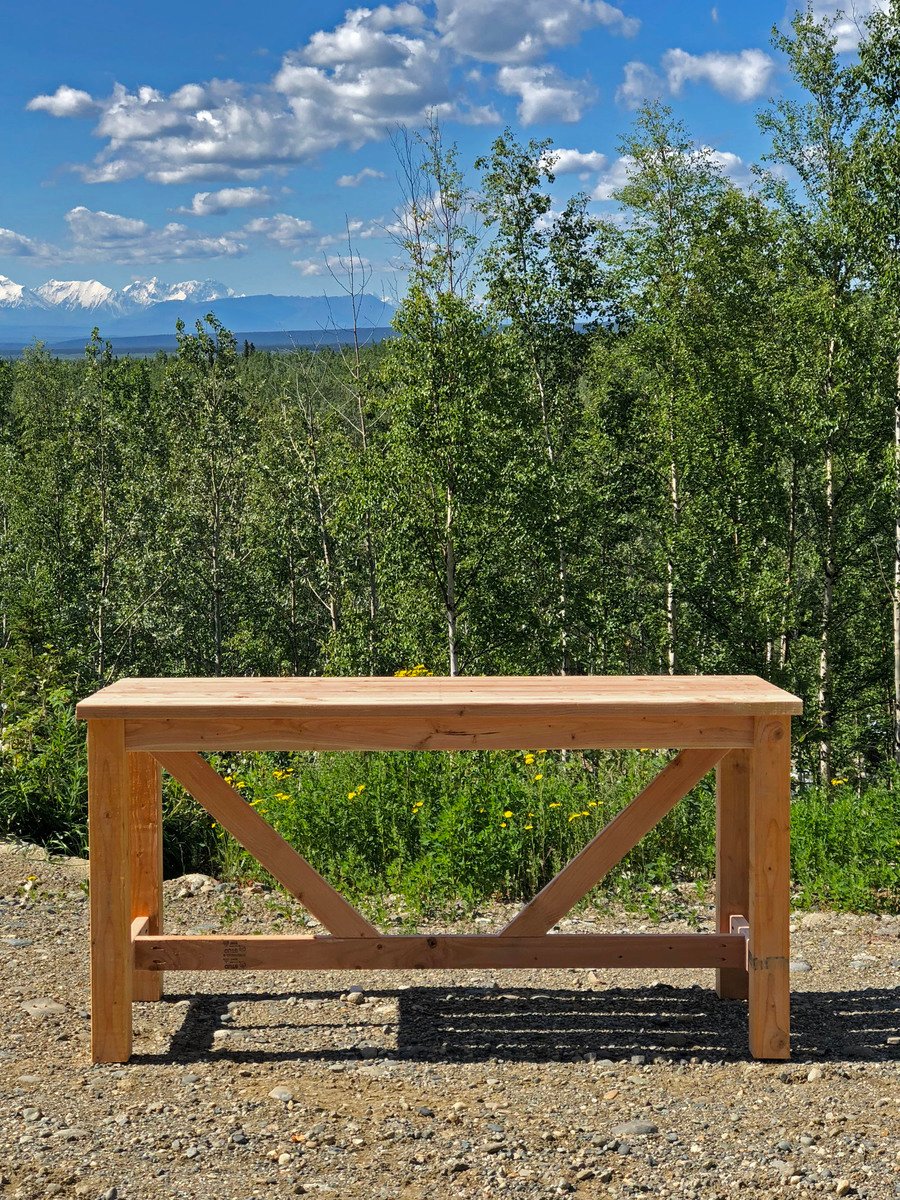
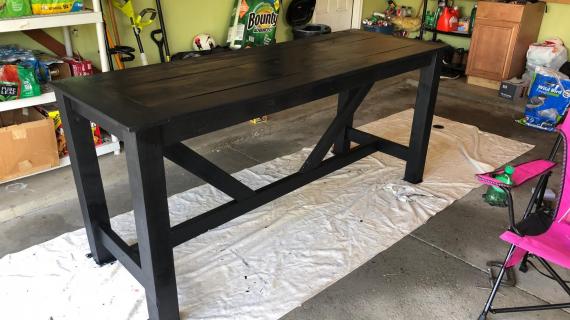
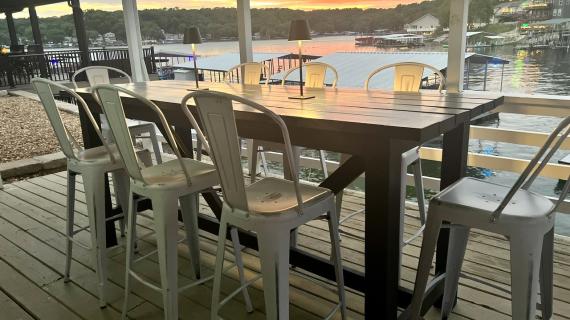
After a light sanding, we are ready for paint!

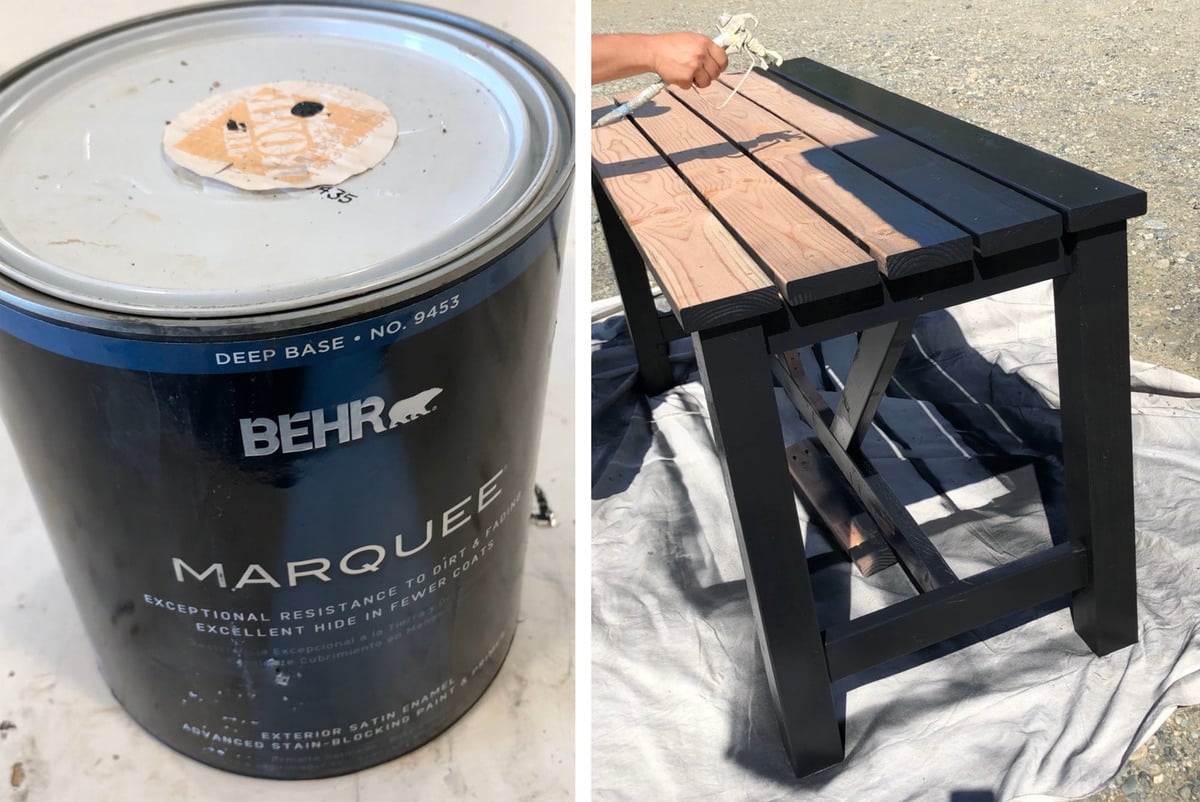
Our go-to paint is BEHR MARQUEE® - it's true one coat coverage and goes on smooth and easy.  It is a little more expensive, but I find you use less and don't have to buy primer.  Pay now or pay later right?

The color is Limousine Leather MQ5-05 by BEHR MARQUEE®.  So dramatic!

The free plans follow - do share if you build, I love seeing your projects too!

XO Ana

Dimensions
diy outdoor bar table plans
Dimensions shown above. Suitable for 6-8 bar stools

Preparation

Shopping List

2 - 4x4 @6 feet long

5 - 2x6 @ 6 feet long

4 - 2x4 @ 8 feet long

Common Materials
2 1/2 inch screws
Cut List

4 - 4x4 @ 34-1/2" - Legs

4 - 2x4 @ 20-1/2" - End Aprons

2 - 2x4 @ 63" - Side Aprons

Cut center support and stretcher to fit from 2x4s

2 - 2x4 @ 30-3/8" - both ends cut at 45 degrees, short point to short point measurement, ends are NOT parallel

5 - 2x6 @ 72"

Tools
Tape Measure
Speed Square
Pencil
Safety Glasses
Hearing Protection
Kreg Jig
Drill
Miter Saw
Power Sander

Instructions

Step 1

Drill two 1-1/2" pocket holes on each end of the apron boards.  Attach to the 4x4s, centered on the 4x4 posts (about 1" on each side of the 2x4).  Use 2-1/2" pocket hole screws.  Build two.

Step 2

Repeat for the longer side aprons.

Step 3

Measure and cut the bottom stretcher and center support.  Attach with either pocket holes or 3" deck screws.

Step 4

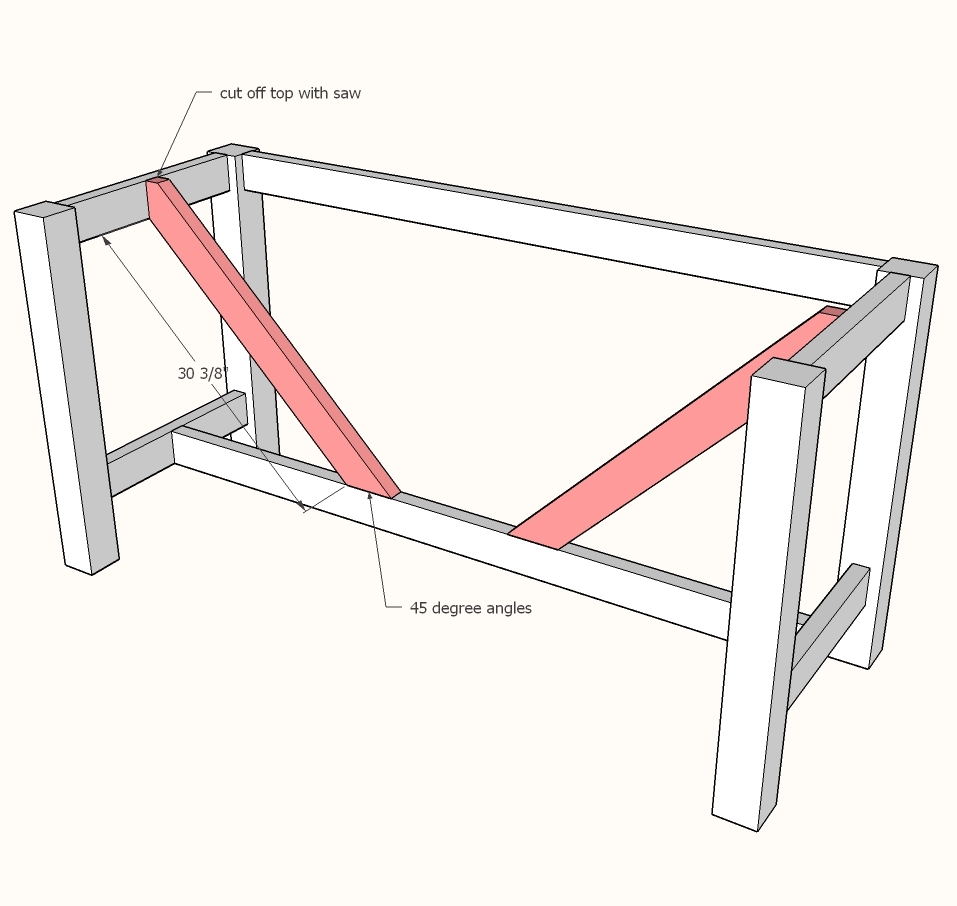
Place the cross supports inside the table.  Mark top that overhangs and cut off with saw.  Drill pocket holes and attach.

Step 5

Comments

cocoloco182

Tue, 06/09/2020 - 07:50

Great looking piece. Q: I want to make it higher/taller. Is this possible and if so, what measurements would you recommend? Just longer legs? Would it compromise the structure if I extend the legs top be 38" - 40"?

sofiac3

Mon, 09/14/2020 - 11:04

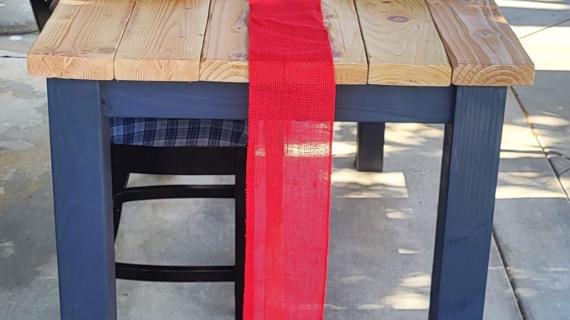
I love this table. I changed the dimensions. I made it counter height and little shorted. The plans were easy to follow. I am new diy-er. I built the plant stand first to get my feet wet and then went all in. I also accidentally bought larger wood for the top so the table is heavy. I have gotten lots of compliments.

smgrant

Sat, 03/26/2022 - 15:22

Hi Celia,
Yes! I had to adjust the length also. It simply means calculating your total length and then cutting the side aprons to a shorter length so that when you add the 3 1/2 " from the 4x4 leg, and the overhang, you come to the 60" you want.

smgrant

Sat, 03/26/2022 - 15:19

Hello Ana, First I have to say I absolutely love your site! I've made your Mudroom and your Farmhouse coffee table, and thanks to your easy to follow, detailed plans and diagrams both turned out absolutely beautifully! I get so many compliments on them and I am actually stunned that I was able to build these projects! Now I am building your outside Pub Table, and I have a question. I wanted to make a counter height table since it takes up less room and I have a small kitchen. The legs are 34 1/2" but the side apron is 4"" (3 1/2"" really) but that means that the distance between the stool height, if I buy them at 24"" only leaves approximately 7 inches. When buying stools, I have read I need to leave between 9 -13" between the chair seat and the table. Does this mean the TOP of the table or are they referring to leg space...seat to bottom of side apron. If you could clarify this for me I would greatly appreciate it. Thank yo Ana

Frequently Asked Questions

Wood Questions

What kind of wood should I use?
Most of our plans use standard construction lumber like pine or fir. It's affordable, easy to work with, and easy to find. It's also rapidly renewing and biodegradable, so a great eco friendly choice!

Can I use hardwoods instead?
Yes—just keep in mind they're heavier, cost more, and can be tougher on tools and harder to join together and finish. I recommend not tackling a hardwood project until after you have built several softwood projects.

What if my boards are warped?
Choose the straightest boards at the store. You can often work around slight warps by cutting them into shorter pieces.

What wood should I use for outdoor furniture?
Use red-toned or pressure-treated 2x lumber for framing, and cedar or cedar fence pickets for the decking. Outdoor furniture should be built like a deck—your local home center can help recommend the right wood for your climate.

Will my wood move or warp after I build?
Potentially, especially in humid climates. Let your wood acclimate indoors before building. Once acclimated and kept in a stable environment, movement should be minimal. Remember, most houses are built using framing lumber - it's all about keeping moisture down indoors.

Cutting Questions

Do I need a miter saw?
A miter saw is great, creating fast, safe, and precise cuts, even for beginners. But most plans can be built with a circular saw and a straight edge. If using a circular saw to cut, take time to practice, and get good at making cuts, before cutting your project boards.

How do I get clean cuts with a circular saw?
Clamp your board, measure twice, cut slow, and use a sharp blade. This takes practice, so spend some time making cuts. I go through becoming proficient at freehand cutting in my course, it is worth taking if you want to master this skill.

Will the store cut my wood?
Yes—most stores will do rough cuts to help you transport your materials home. But from store to store, the quality of cuts could greatly vary.

Joinery Questions

What screws should I use?
We recommend star-head self tapping screws for framing, most common sizes are 2-1/2", 1-3/4". Pre-drill if close to the edge or you find your wood is splitting.

Do I have to use pocket holes?
Pocket holes are the cheapest, easiest and fastest way to do some joints - like edge to edge or a hidden fastener joint. There are other methods, but these can be time consuming and expensive. We recommend using pocket holes as indicated in plans for best results.

How do I keep things square?
Use a speed square and measure diagonals after each step. Always clamp joints before screwing to keep them tight and flush.

Finishing Questions

Stain or paint before or after building?
A quick sand before and a full finish after gives the best results. Pre-finish if you're doing two-tone or detailed finishes.

What type of finish?
Use oil-based or water-based stain. For paint, cabinet-grade latex or enamel works great. High use surfaces on indoor projects should get a coat of polyurethane, I recommend a Helsman or Spar or other flexible poly that won't crack or peel with wood movement. For exterior projects, use a finish suitable for exterior fences.

How to get a smooth finish?
Start with a well sanded project. Sand between coats (220 grit), wipe clean, and apply light coats with a foam brush or roller.

Plan Questions

Can I change the size?
Many people do, and that's the great thing about building your own furniture! But do keep in mind going bigger might mean more supports are required, and often plans are optimized for minimal material waste.

Are these beginner-friendly?
Yes—plans are written with simple tools and clear steps in mind, with every effort to make plans as simple as possible.

Can I sell what I build?
Absolutely! Just don’t resell or repost the plans themselves.

General Questions

What tools do I really need?
A drill, circular saw, tape measure, square, and a few clamps will get you through most projects.

Do I need a workshop?
Nope! A driveway or small patio is plenty to get started, just make sure you have a level place to work. If you find you are building several projects a year, creating a small workbench is a great way to store tools and have a dedicated workspace.

What if I mess up?
Wood filler, sanding, or flipping boards goes a long way. Mistakes are part of the process!

What can I do to make my projects look more professional?
Start with straight boards, make accurate cuts, clamp all joints, and line up everything neatly. Sand thoroughly, use a neutral finish, and apply it in light coats for a clean look.

I've never built anything before. Where should I start?
Start with a few smaller softwood projects to get hands-on experience. Or if you're tackling a big project, buy a little extra lumber and practice your cuts and joints first. If possible, work with someone who has a bit of experience.

Care & Maintenance

How long will my furniture last?
With good joinery and regular care, your DIY furniture can last for decades. I have pieces in my own home that are over 20 years old and still going strong! One of the best parts about DIY furniture is that it’s easy to repaint, refinish, or repair—so your projects can grow and adapt with you.

How should I care for outdoor furniture?
Lightly pressure wash or hose it down once or twice a year. Tighten screws and reapply finish as needed to protect it—just like a deck or fence. A little upkeep goes a long way in extending the life of your furniture.

How about indoor furniture?
Regularly dust or wipe with a damp cloth. If it starts to look worn, a light sanding and touch-up paint or stain can refresh it in no time. DIY pieces are meant to be durable and fixable—so don’t be afraid to give them some love now and then.

Want to Build with Confidence?

Check out my ebook: 12 Skills to Build Your Own Furniture
It walks you through the core skills every builder needs—measuring, cutting, joinery, and finishing—so you can build beautiful furniture that lasts.

Still Have Questions?

Email us anytime at [email protected] and we’ll be happy to help!