
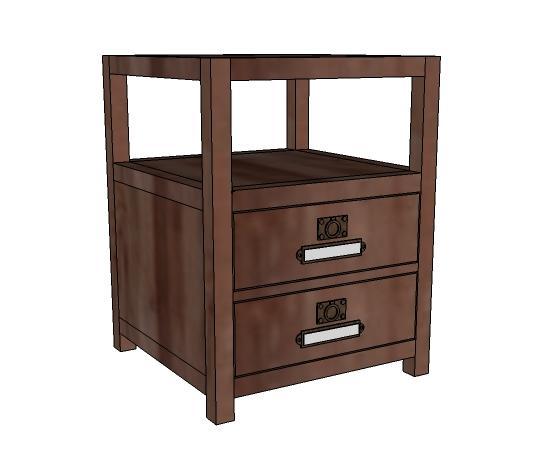

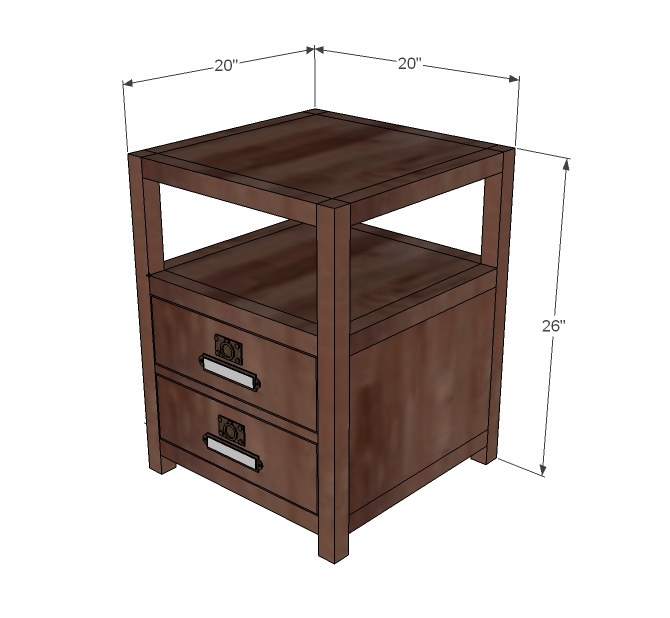
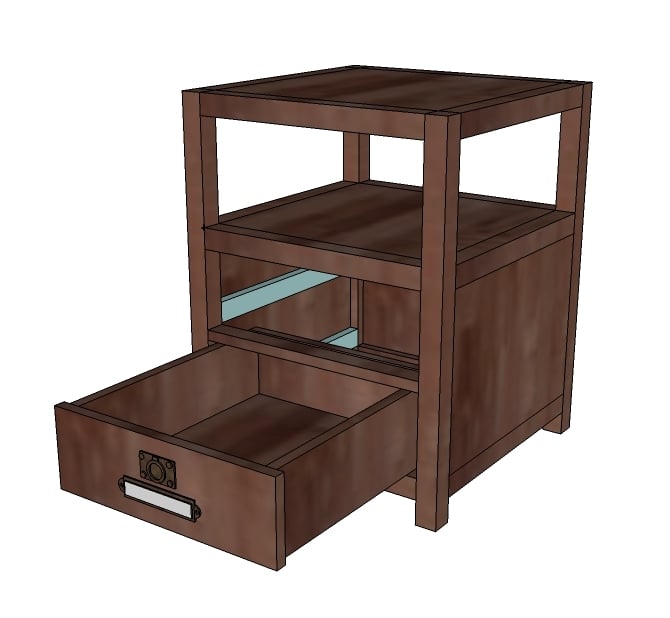
End tables featuring two drawers and a large open top shelf. Open base design. Square styling.
Preparation
1/2 – sheet of 3/4″ hardwood plywood (or MDF for paint grade) measuring 48″ x 48″ or larger
4 – 2×2 @ 8 feet long
2 – 1×6 @ 8 feet long
1 – 1×2 @ 8 feet long
Hardware
2 1/2″ screws, 1 1/4″ screws, or 2 5/8″ trim screws
wood glue, wood filler and finishing supplies
2 sets of 16″ Drawer Slides
2 – 3/4″ plywood or MDF @ 17″ x 17″ (Shelf and Top)
3 – 3/4″ plywood or MDF @ 17″ x 12 1/4″ (Sides)
2 – 3/4″ plywood or MDF @ 17″ x 14 1/2″ (Drawer Bottoms – note different than dimensions shown in plan)
4 – 2×2 @ 26″ (Legs)
12 – 2×2 @ 17″
5 – 1×2 @ 17″ (Drawer Slide Spacers and Drawer Trim)
4 – 1×6 @ 17″ (Drawer Sides)
2 – 1×6 @ 16″ (Drawer Backs – note different than shown in plans)
2 – 1×6 @ 16 3/4″ (Drawer Fronts)


Instructions
Step 1

Cut Plywood
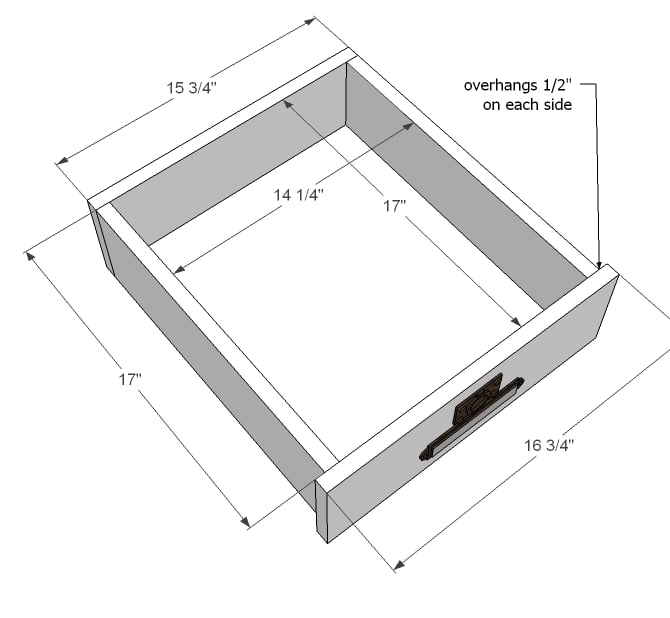
I was just at The Home Depot the other day, and spotted these gorgeous 4×4 posts (been lusting after Crate and Barrel’s Big Sur Table for the longest time). An associate gladly cut the 4×4 to size for me, and the cuts were just perfect and only took a minute. So if your local store has a good staff, perhaps bring this cutting diagram in. Always remember that the saw blade takes up approximately 1/4″ and you cannot just mark out all the cuts and go – your pieces will not be accurately cut. My advice is to cut two strips that are 17″ wide, and then cut the strips into the 17″, 12 1/4″ and 14 1/4″ pieces. And then from the scrap cut your final back piece.
Step 2
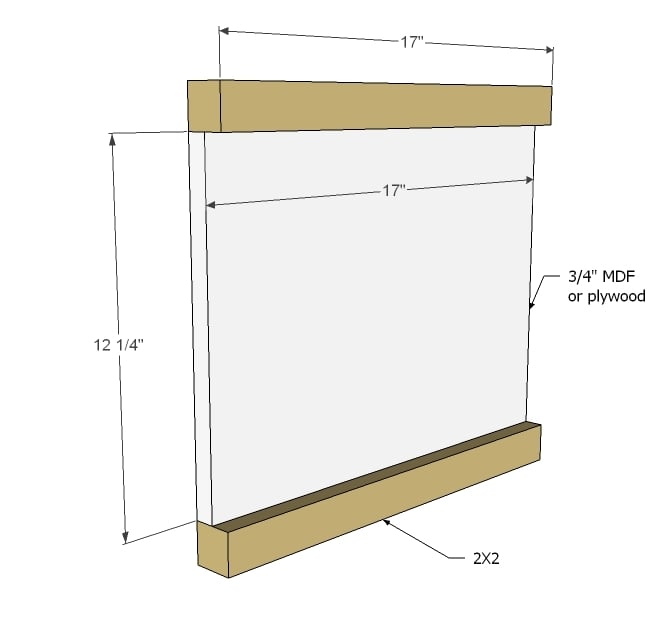
Sides
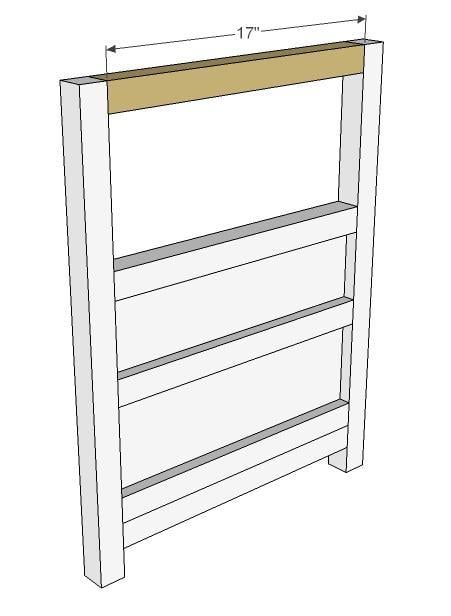
Start building the sides by attaching 2x2s to the top and bottom. You will need to build 2 of these – well, actually, go ahead and build three of these.
Step 3
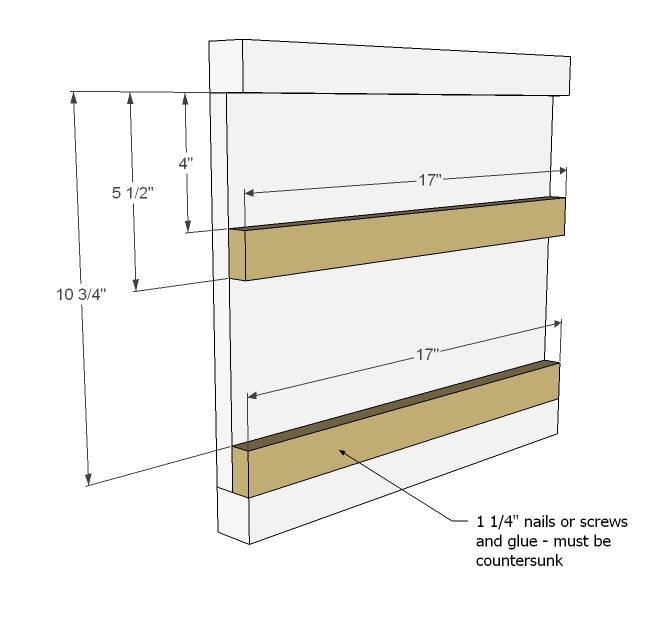
Side Drawer Slides
Okay, now only build two of these from the three that you build in step 2. Make sure that there are no screws sticking out here these are the drawer slide spacers.
Step 4

Legs
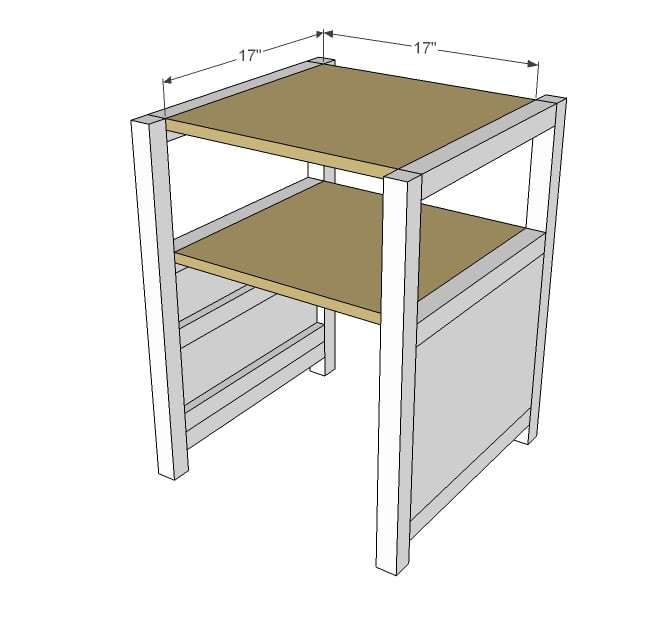
From the two pieces with the drawer slides, add legs as shown above.
Step 5
Step 6
Shelf/Top
Add the top and shelf as shown above.
Step 7
Back and Shelf Trim
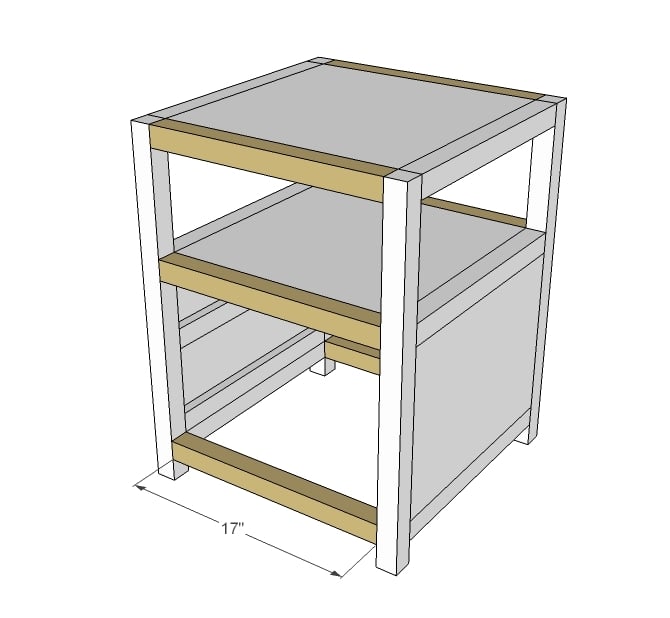
Okay, here’s where you add that third piece you built in step 2 – to the back. Also trim out the shelves and the bottom with 2x2s as shown above.
Step 8
Drawer Trim
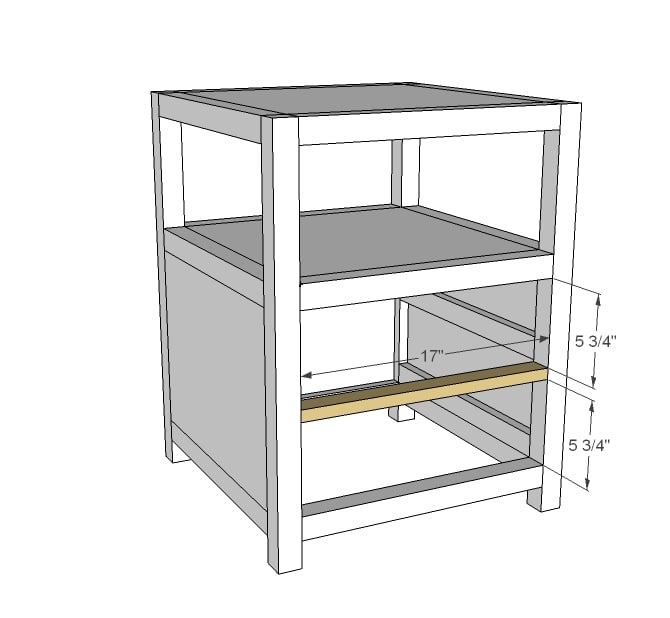
A little piece of trim for between the drawers . . .
Step 9
Drawers
You will need to build two drawers. It’s basically 1x6s surrounding the bottom plywood. You should always build your drawers to fit the opening in the end table, not to shown dimensions. Check the clearance on your drawer slides (normally 1/2") and adjust the door measurements to fit your endtable.
Step 10
Drawer Slides
The blue boards in the diagram above are for attaching the drawer slides to the drawers. This drawer is designed for a standard slide requiring 1/2″ clearance on each side of the drawer. Adjust so that there is an even fit around the drawers and the drawers slide smoot

Comments
Jennifer (not verified)
Thu, 02/03/2011 - 03:30
OMG!!!! I love that
OMG!!!! I love that collection!! thank you Ana for posting this!! can't wait to make it!! I will post pictures soon.... love it! But was wondering will you be posting the matching coffee table?? Thanks again Ana!! I love love love our website!!
Jennifer (not verified)
Thu, 02/03/2011 - 03:32
* I meant your website..
* I meant your website..
Tracy Smith (not verified)
Thu, 02/03/2011 - 04:23
I love this! Looks like a
I love this! Looks like a great next project and I'm ready to replace my flatpack Wal-mart cheapies that I currently have. I do have one question. Where would a person wanting to build these, find the hardware that you used? Thanks so much for posting these (and all the other plans you post)! ;-)
Bethany (not verified)
Thu, 02/03/2011 - 04:33
This is unbelievable - too
This is unbelievable - too good to be true. I told you I wanted Rhys and BAM, I have Rhys!! I started modeling it last week but ran into some trouble on the media center part so I am just ... I can't even think of a word right now I'm so excited! THANK YOU! AWESOME! P.S. The hardware is the cherry on top, a must, imo.
Gwenevere (not verified)
Thu, 02/03/2011 - 04:36
I'm likin' this. I think this
I'm likin' this. I think this may end p being a nightstand.
Melissa (not verified)
Thu, 02/03/2011 - 04:46
I was just thinking about how
I was just thinking about how to make something like this so I can store my laptop somewhere other than on the floor by my chair in the living room...THANKS!!!
Kristen (not verified)
Thu, 02/03/2011 - 05:29
I know that Lee Valley
I know that Lee Valley carries a lot of pulls, some quite similar to these. www.leevalley.com You can look through their catalogue online (the Sept '10 Hardware catalogue should have what you're looking for, although may take a bit of time to wade through). If you're near a Lee Valley store, they should have them. Good luck!
Sarah R. (not verified)
Thu, 02/03/2011 - 05:39
Ana-this is gorgeous! It just
Ana-this is gorgeous! It just might have to be my new night stand.
Also, I clicked over to the Big Sur. Stunning. Now I am seriously incapable of deciding which dining room table I want.
manygoats (not verified)
Thu, 02/03/2011 - 06:13
PLEASE add the rest of the
PLEASE add the rest of the collection! I've been trying to figure out the large media console since I saw it!
manygoats (not verified)
Thu, 02/03/2011 - 07:12
and of course we'd all be
and of course we'd all be willing to help try it out... not every plan CAN be right, but we're a community, so we'd help work out the kinks!
Christina (not verified)
Thu, 02/03/2011 - 07:12
LOVE THIS!!! When you put up
LOVE THIS!!! When you put up the plans for the lego table I loved it but wanted it with the rhys style (just flip the drawers to be ontop and the shelf on the bottom) Thank you for making these plans ... please add more!!!
Heather H (not verified)
Thu, 02/03/2011 - 07:19
I love it! I'm in need of
I love it! I'm in need of some side tables (and maybe a coffee table) now that we've moved into a bigger place. And I love this one!
AmyLynn (not verified)
Thu, 02/03/2011 - 08:40
This is looking promising for
This is looking promising for our first Kreg project! We got the master system for Christmas and haven't had a chance to use it yet. Totally jazzed about this one! You're my hero!
Lavina D. (not verified)
Thu, 02/03/2011 - 12:04
I found a nice selection of
I found a nice selection of hardware at www.vandykes.com. They have a large selection of both label holders and ring pulls. rejuvenation.com and houseofantiquehardware.com are also good sources. I'm totally building this one too!
Allison (not verified)
Thu, 02/03/2011 - 12:09
This is an excellent plan! I
This is an excellent plan! I am thrilled that you are planning on AND making so many end table plans. I need a whole house worth of end tables for living room and bedrooms. Thank you a billion times for your plans!!!!
Julie (not verified)
Thu, 02/03/2011 - 13:29
I have the Rhys entertainment
I have the Rhys entertainment console and coffee table but I couldn't justify spending that much for end tables. This project is perfect for completing my living room. Thank you so much for your plans!
Sarah (not verified)
Thu, 02/03/2011 - 14:00
So glad you posted this! I
So glad you posted this! I have the Rhys coffee table on my list of builds and I think this will help guide me along the way. Thanks!!!
Tracy Smith (not verified)
Thu, 02/03/2011 - 14:45
Thank you Lavina for the
Thank you Lavina for the websites to go to! My husband and I are building a console table for a friend of mine and she wanted some pretty interesting pulls for her doors and looked all over the web for some that looked just like it. I didn't want to have to spend hours looking for these pieces when we build this end table. Thanks again for the time saver!!!!
Aaron Baker (not verified)
Mon, 02/07/2011 - 17:11
"I just cannot in good faith
"I just cannot in good faith design a plan without being able to confidently stand behind my designs, and say, this is doable, and I know it is because I did it. And after the Cabin Collection, I do feel confident in publishing this collection of plans – special thanks to one of our readers for enlightening me on this."
Yeah, you should have built a prototype, Ana. BE WARNED, PEOPLE: these plans have an error. The drawer dimensions are WRONG!
If you plan to build these, you need to make your drawers 1/4" wider.
The plans called for a 15 3/4" drawer width. Once you add a 1/2" (standard) drawer slide on each side, that's a width of 16 3/4". However, the distance between the (blue highlighted in plans) drawer slide attachment points is 17". If you build these per the plans, your drawer slides won't work. One side will slide on the drawer slide, and the other side will be 1/4" off the slide.
I built a very nice set of these nightstands in hardwood, and had to compromise the end result by adding a 1/8" spacer shim on each side of the drawers in order for them to slide properly.
So, yeah, Ana, next time why don't you try building something before you just post up plans.
For anyone wanting to build these, only two dimensions need to be changed: the drawer backs need to be cut to 16" instead of 15 3/4", and the drawer bottoms need to be cut to 14 1/2" instead of 14 1/4". That will take up the 1/4" of slack that Ana inexplicably put in the plans, and your drawers will slide perfectly. No point in spending $150 on wood to recreate an $800 pair of nightstands and having to adds nasty-looking shims at the last minute! Avoid the frustration I'm having!
Aaron
Ana White (not verified)
Mon, 02/07/2011 - 17:36
Dear Aaron, I am so sorry for
Dear Aaron, I am so sorry for your trouble. I have fixed the error. This error resulted in building a very similar piece (the cabin collection) that did not use a drawer slide, thus would need an extra 1/8" gap. I take full responsibility for the error, and I am glad that you found the solution, shims on the drawers slides. Thank you for taking your time to let us all know. Ana
TheDabblingCrafter (not verified)
Wed, 02/09/2011 - 18:09
Thank you so much for the
Thank you so much for the plans Ana! I was just thinking I need a new end table (mine is currently a tv tray) and I wanted one with a drawer for all my computer cords since both my husband and I use our laptops in the living room. I think I may even have the materials for it....perhaps a weekend project.
I'm thinking I may somehow modify it to turn one of the drawers into a charging station for our phones and such.
elei (not verified)
Mon, 02/14/2011 - 22:49
Ana! Thank you for this!
Ana! Thank you for this! It's pretty amazing that though you had a tiny error on this one, you have taken your time to post for FREE, countless other steps for beautiful furniture. I'm so glad that you are willing to post even though you don't have a chance to build everything. I'm sure we'd have a lot less plans up here if that were the case. It's a shame that people can have such a rude tone after all that you've done right. Thank you for all your time and effort. Obviously, you have helped SO MANY PEOPLE for FREE!!!
tallmich (not verified)
Tue, 02/15/2011 - 18:20
I can't wait to make this!
I can't wait to make this! Two of these will be the PERFECT night stands. I appreciate you Ana!
Jackie Callahan (not verified)
Mon, 08/29/2011 - 09:00
Confusion about drawer sizes
Hi, Ana. I hope you or someone else can reply to this. I read through all the posts for this project and saw the post about the error in the sizes of the drawer pieces. And I also saw that the sizes had been corrected in the plan. I took the cut list and the diagram to my wood place and they ended up cutting it according to the diagram and not the cut list - so they cut it at 14 1/4 not 14 1/2 inches. I wasn't knowledgable enough in the moment to be able to tell them which was correct. I came home and re-read the posts and think that now i have wood in the wrong size. But I also notice that no one else who built the night stand seemed to have an issue. So my question is...now that I have pieces that are 14 1/4 and not 14 1/2, do I have a problem and need to go buy more wood? Or can I buy larger drawer slides or something to address the problem and avoid having to use shims to address the gap?
Medickep
Tue, 06/18/2013 - 06:41
How can it cost..,,,
I was getting ready to build two of these and heard someone mention approx. 80$. I went to price out wood at my local orange box and was getting close to 90-100 dollars for one!
I'm not sure if it was a typo or if I need help in froogle shopping!
Thanks for any useful tips!!
In reply to How can it cost..,,, by Medickep
Jake
Tue, 06/18/2013 - 08:10
Cost of Materials is Variable
You could easily build this for about $80 considering the shopping list. The expense will be in the kind of hardwood plywood you purchase. If you plan to paint then go with the cabinet grade with one smooth side and you will save tons of money and still have a really nice result. Even though they are more expensive go with the project 2x2s rather than what you find in the standard wood piles or fencing. Much nicer and much stronger. The real effort should be in preparation before painting or staining and in the painting or staining process. That will easily add another $25 to the process which is never brought up in the building plans.
Medickep
Tue, 06/18/2013 - 14:25
Thanks for your thoughts!
Well, I was able to save some money when I found 3/4" plywood in the scrap area for a total 3.03$
I did buy the nicer cedar 2x2's as they felt stronger to me. I think I'll check our local construction recycle store as the orange box want 19 dollars for one 2x6x8 in hemlock.
I'm sure I can build one for 80, but not two!
solanakv
Thu, 10/17/2013 - 14:49
Cut List VS Cut Diagram for Plywood
I have recently caught the building bug :-) I am in the process of building this table as a nightstand. When cutting my plywood I looked at the plywood cut diagram and not the cut list. I realized after reading an older post that the plans had been updated because there was an error in the width of the drawer bottoms (listed at 14 1/4" in diagram). As a result I cut the drawer bottoms to 14 1/4" rather than the corrected version which is showing in the cut list at 14 1/2". Is there anyway that I can still use the 14 1/4" drawer bottoms or should I get more plywood and re-cut? Suggestions? Thank you.
Medickep
Thu, 10/17/2013 - 15:19
This is why....
This is why I'm not a big fan of pre cutting everything ahead of time! Not a good idea with tiling or wood working!
If it were me I would stick with what you have and get some 1/8th plywood and stick it behind the hardware for the drawers!
Unless you're a professional, speed is irrelevant!!
armymom64
Fri, 02/28/2020 - 08:08
shelf and top support?
I guess I missed something, but is there a ledge or something that supports both the shelf and table top? I put one in but wondered if I did something wrong.