
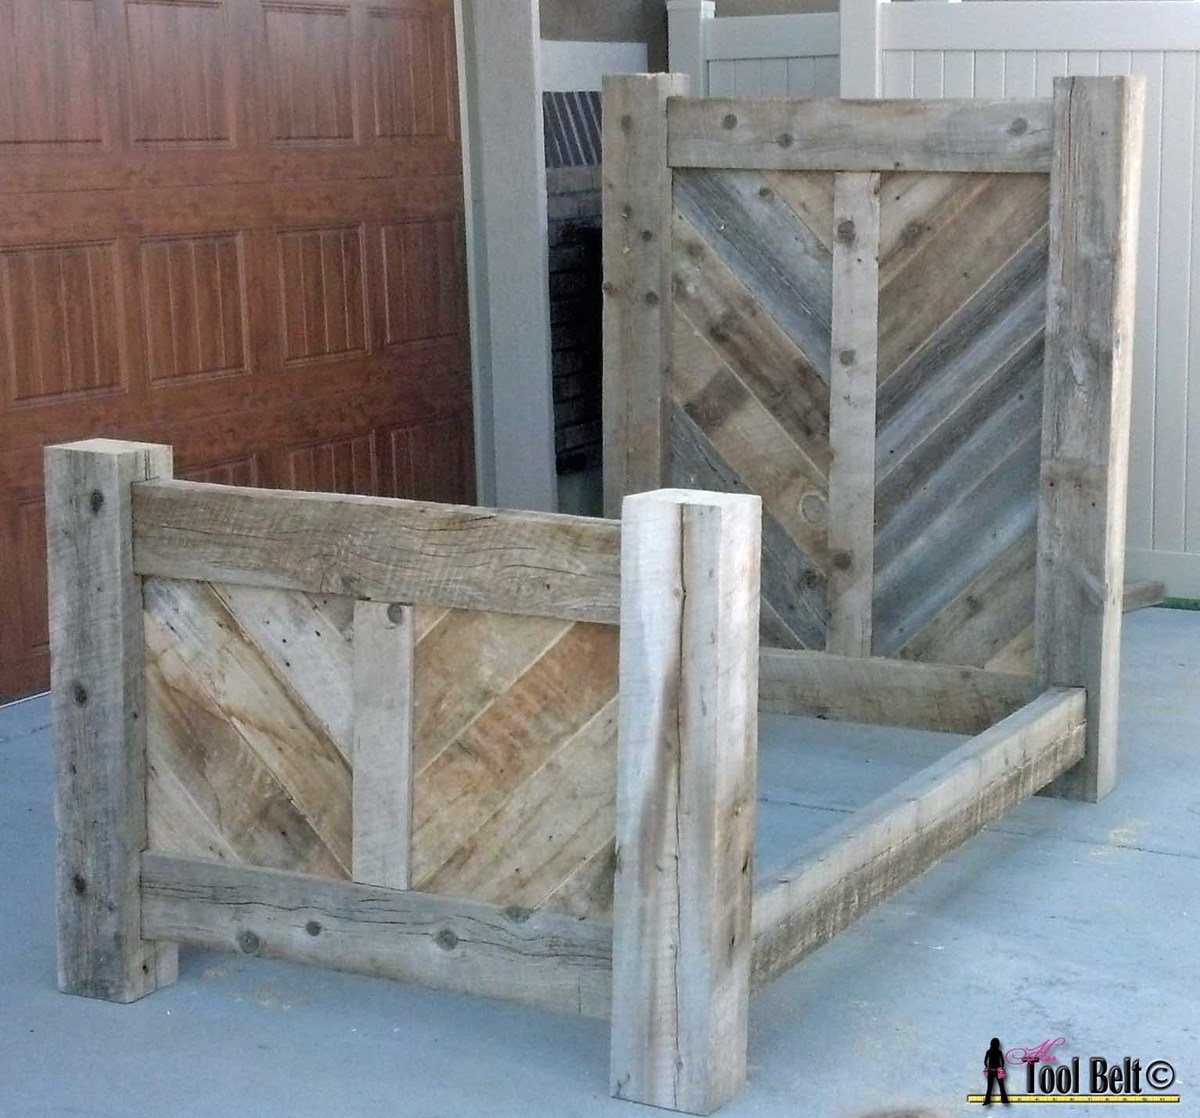

Late last summer my Dad called me up and told me that the old unstable hay barn had to come down. I talked him into letting me salvage as much barn wood as I could. I thought it would be fun to make a rustic bed for my son with the old barn wood. I think it turned out fabulous, the barn wood character is great. All of the wood I used making this bed is rough cut lumber, so a 2" x 4" rough cut lumber measures 2" x 4", unlike a 2x4 stud which measures 1.5" x 3.5". I'll post an updated plan on my site with lumber dimensions from the hardware store.
Preparation
Barnwood
6" x 6" posts
3" x 6" board
2" x 4" board
1" x 6" board
2 -- 60" x 6" x 6" barnwood tall post
2 -- 36" x 6" x 6" barnwood short post
1 -- 44" x 4" x 2" barnwood tall divider
1 -- 20" x 4" x 2" barnwood short divider
4 -- 37" x 6" x 2" barnwood rails
2 -- 77 1/2" x 6" x 2" barnwood bed rails
2 -- 75 1/2" x 1 1/2" x 1 1/2" pine/barnwood bed rail support
as needed -- cut to fit 6" x 1" barnwood diagonal
Make sure to remove all nails and debris from the reclaimed lumber.


Please read through the entire plan and all comments before beginning this project. It is also advisable to review the Getting Started Section. Take all necessary precautions to build safely and smartly. Work on a clean level surface, free of imperfections or debris. Always use straight boards. Check for square after each step. Always predrill holes before attaching with screws. Use glue with finish nails for a stronger hold. Wipe excess glue off bare wood for stained projects, as dried glue will not take stain. Be safe, have fun, and ask for help if you need it. Good luck!
Instructions
Step 1
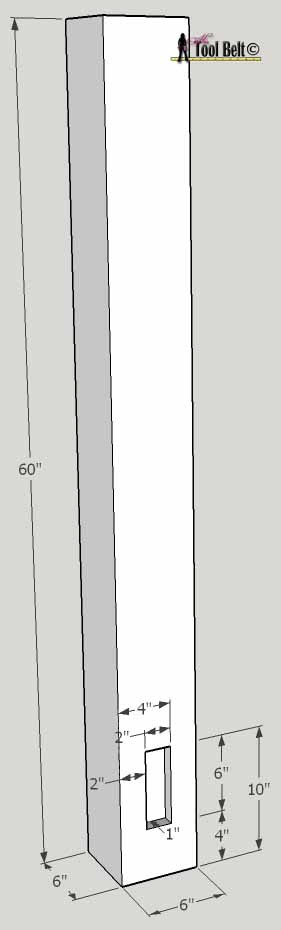
Cut 2 posts that are 6″ x 6″ x 60″. Pick the best side that you’d like showing in the front. On the front side route out a pocket for the bed rail 1″ deep, 3″ wide and 6″ tall according to the diagram.
Step 2

Next route out similar pockets on one side for the head board rails to fit into the post according to the diagram. I don’t think the pockets are 100% necessary if it will be too difficult to accomplish. Kreg jig pocket holes/screws could probably hold the rails in place. If you do the no pocket route, adjust your rails accordingly. But I suggest doing the long dado down the side for the diagonal panel boards to fit in.
Using a table saw and dado blade, or router make a dado groove down the side of the post as shown in the diagram. Repeat for the other tall post, but remember to do the mirror image of the first post.
Step 3
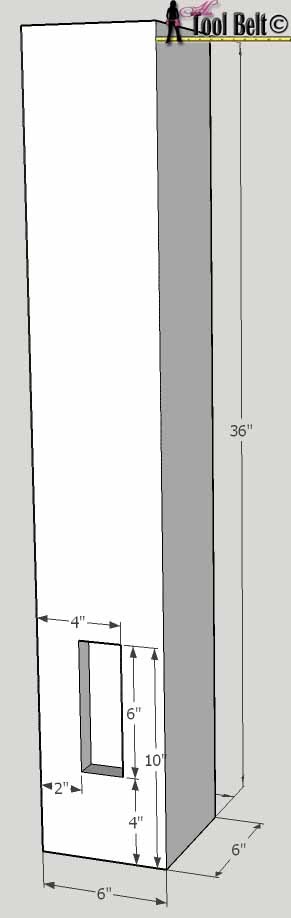
Cut 2 posts that are 6″ x 6″ x 36″. Pick the best side that you’d like showing in the front. On the back side route out a pocket for the bed rail 1″ deep, 2″ wide and 6″ tall according to the diagram.
Step 4
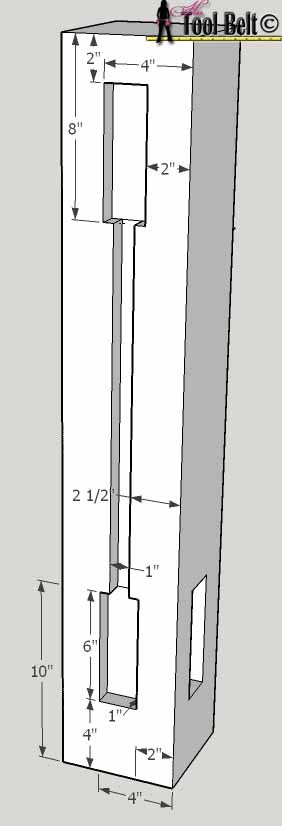
Next route out similar pockets on one side for the foot board rails to fit into the post according to the diagram.
Using a table saw and dado blade, or router make a dado groove down the side of the post as shown in the diagram. Repeat for the
other tall post, but remember to do the mirror image of the first post.
Step 5

Step 6

Cut a 2″ x 4″ x 20″ and a 2″ x 4″ x 44″ board. Cut a 1″ x 1″ dado along both long ends. Now we need to cut tongues that will fit into the rail dado’s that we just cut.
Step 7
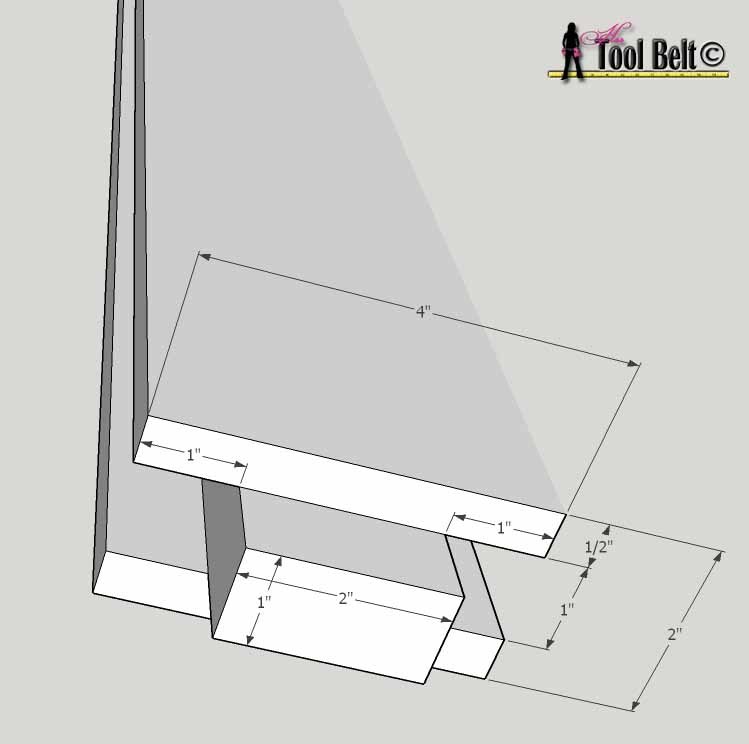
On each end make cuts to match the diagram. The tongue should fit snuggly into the rail groove, trim as necessary. These are the head/foot board center dividers.
Step 8
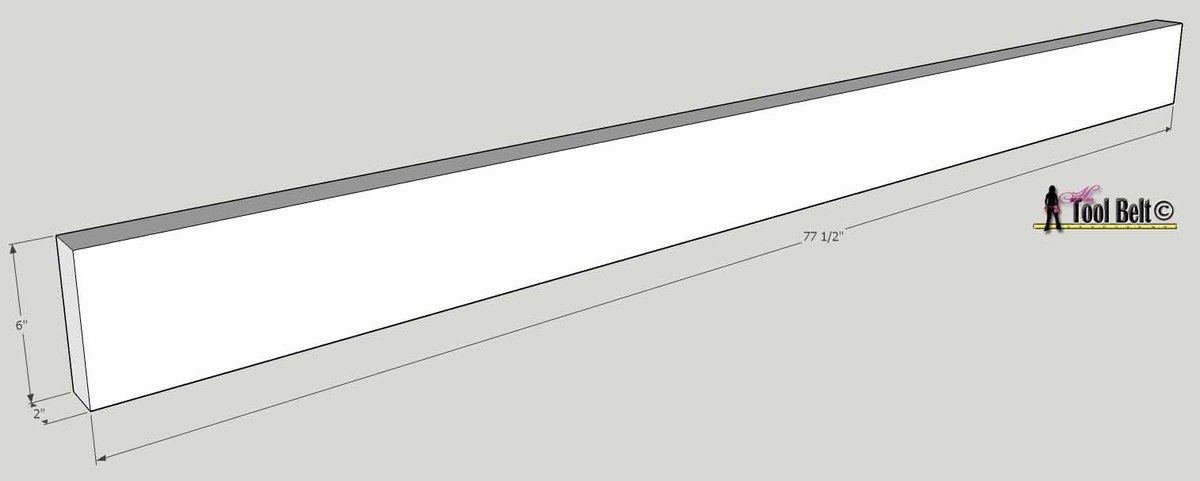
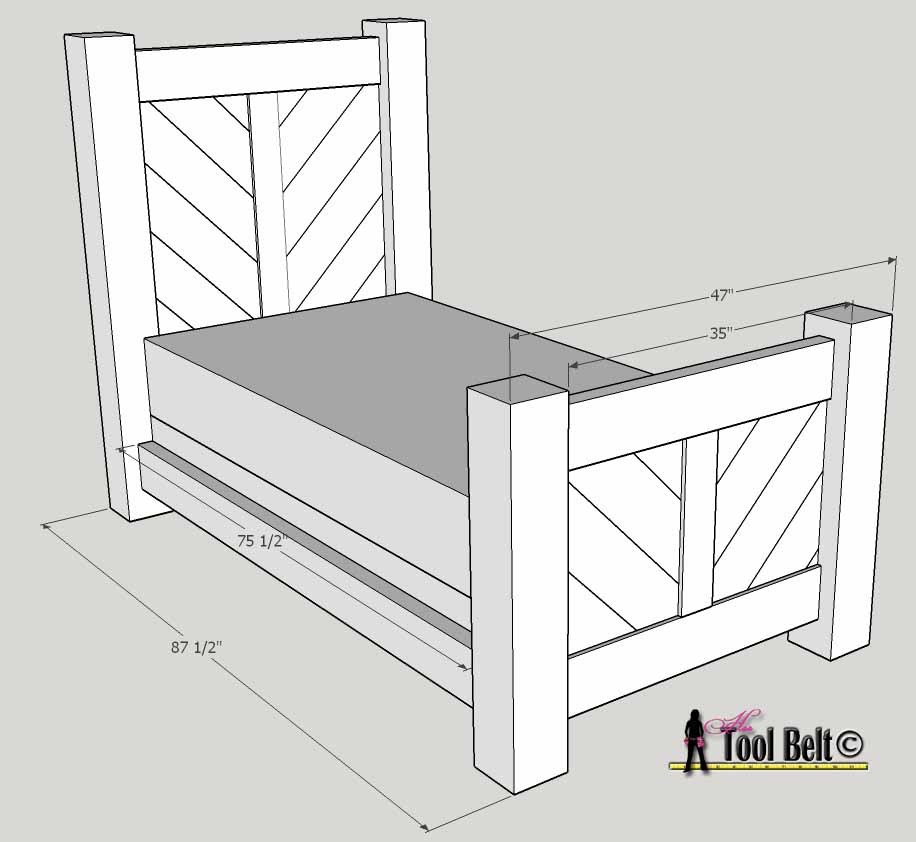
Cut 2 bed rails that are 2″ x 6″ x 77 1/2″. Cut 2 bed rail supports that are 1 1/2″ x 1 1/2″ x 75 1/2″.
Step 9

Partially assemble the head and foot boards by putting the bottom rails in the corresponding post holes. Place the corresponding divider in the center. (The 6" board width is a suggestion, use any width that you prefer.) Start the diagonal panels with a 45 deg triangle on each lower outside corner. Then measure the length of the diagonal side of the triangle and that is the length of the shorter side of your next diagonal piece. Continue to cut the ends at 45 deg. Once the boards get past the inside corners, the boards will repeat the same length with 45 deg ends, until you reach the top. When doing the top boards, I left them a little long to dry fit, then took a straight edge and marked where they needed to be cut at the top. Trim pieces as necessary to fit together. Disassemble all of the pieces.
Step 10
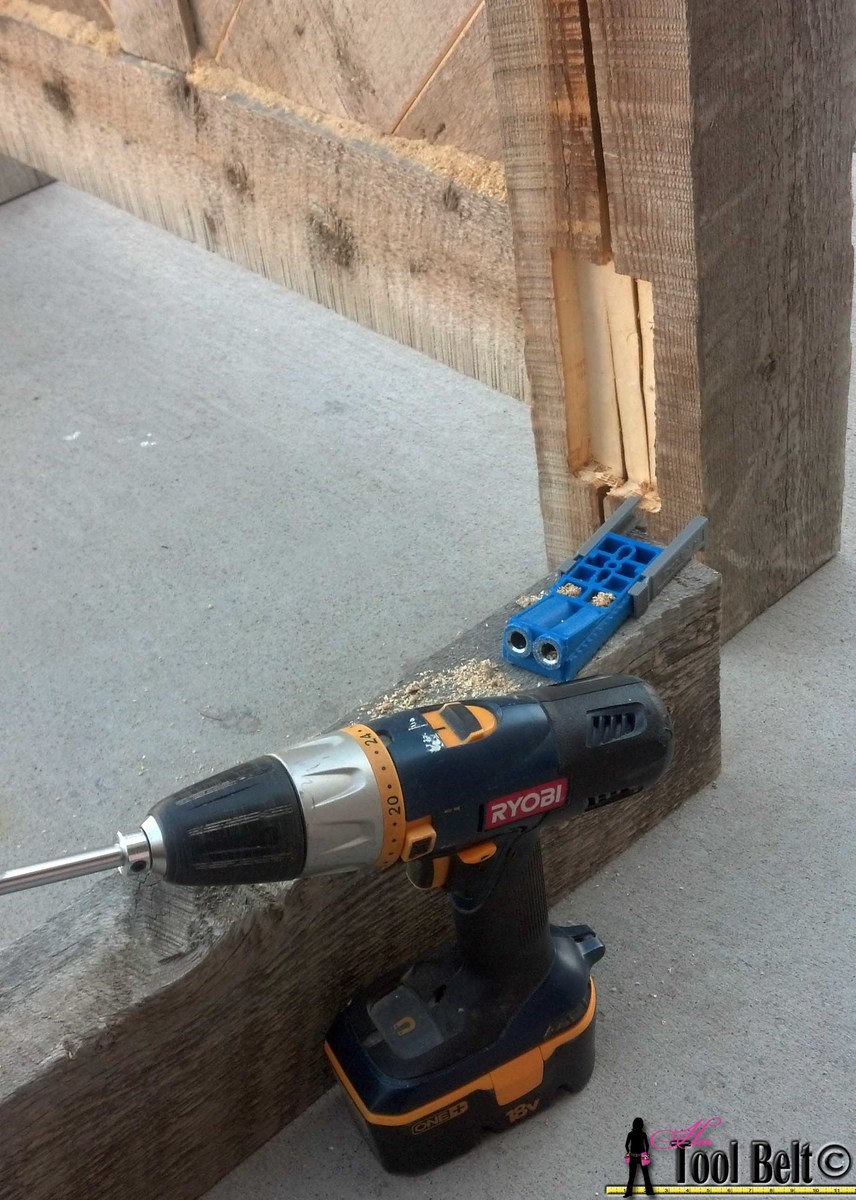
Add some Kreg jig pocket holes to hold the bed together. Add at least 2 pocket holes to the bottom of each headboard/footboard rails. Add 3 pocket holes to the inside face of the bed rail ends, and 2 to each bed rail bottom.
To assemble the headboard and foot board, I found it easiest to lay one post on it’s side. Put in the top and bottom rail, screw into place. Stack the diagonal panels in order starting on one side, install center divider, stack other side diagonal panels, then the other post. Screw the rails into the post. Repeat for the other head/foot board. Tip the head/foot boards over.
Step 11

Install the bed rails into the post holes and screw into place. Screw the rail supports to the inside face of the bed rails near the bottom. This is for the box spring to sit on.

Comments
spiceylg
Wed, 05/07/2014 - 18:44
Wow
This is amazing! Love it!