
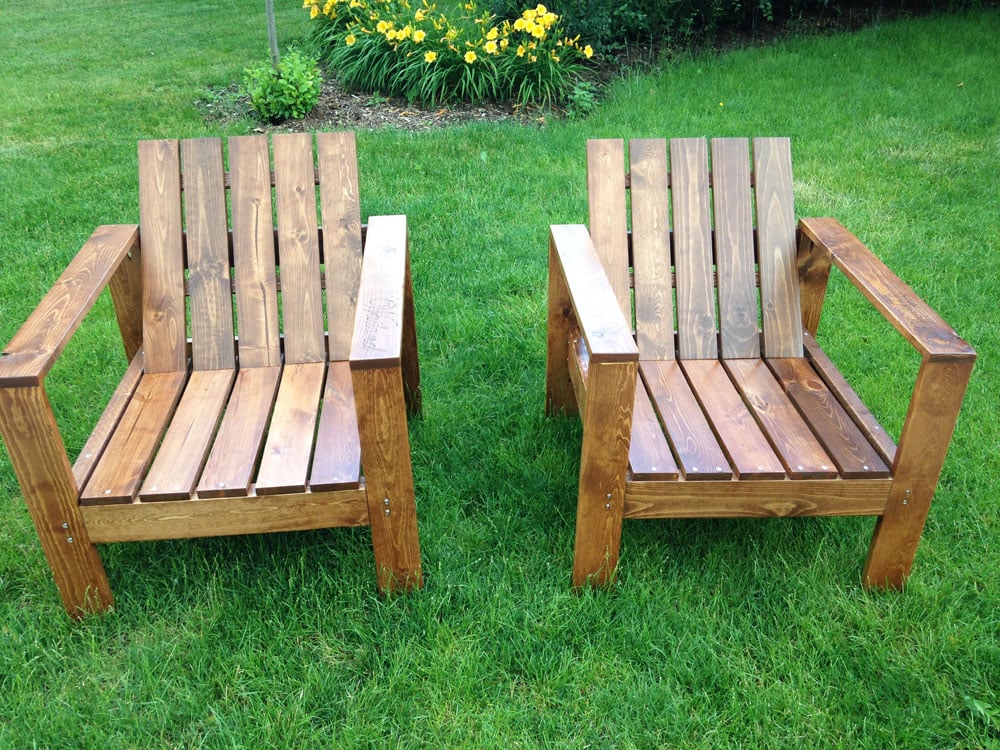

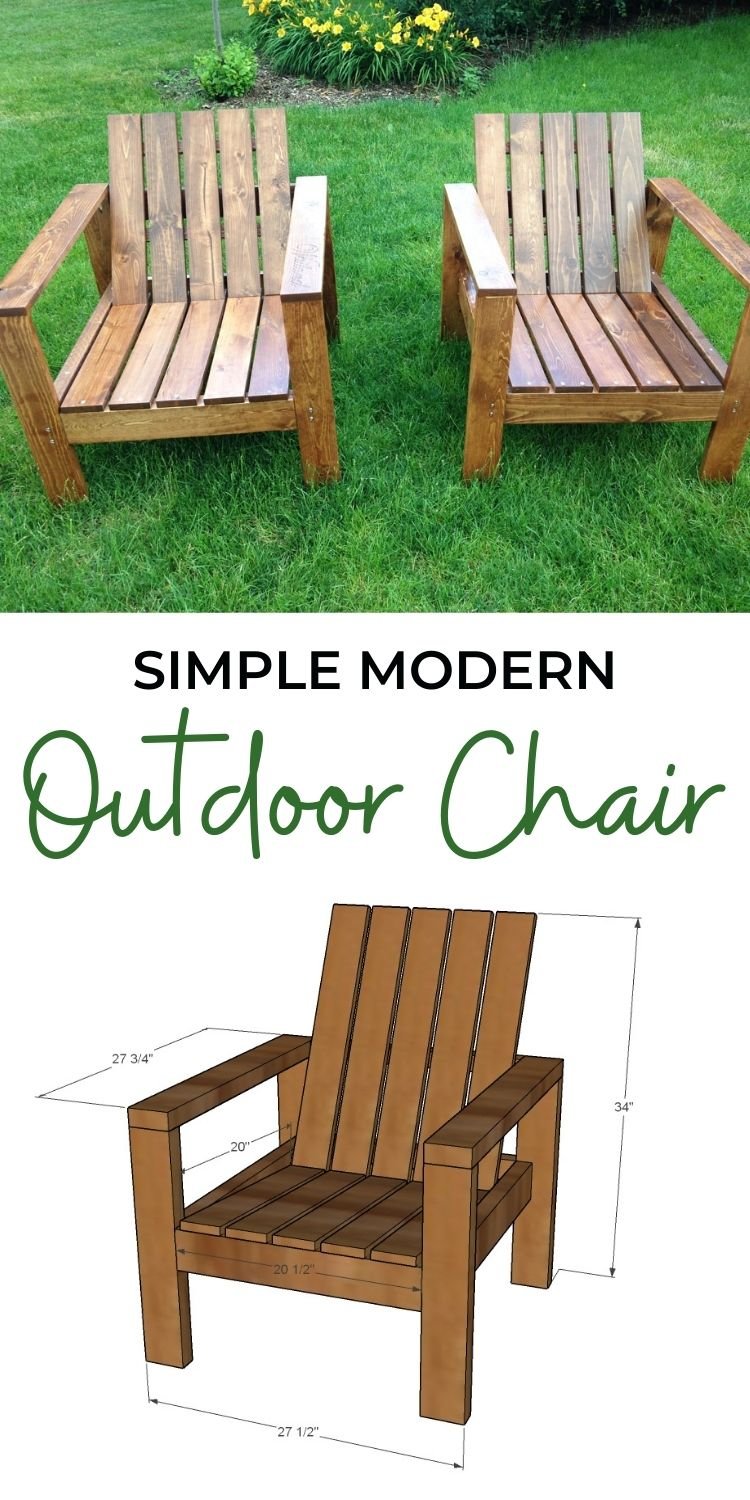
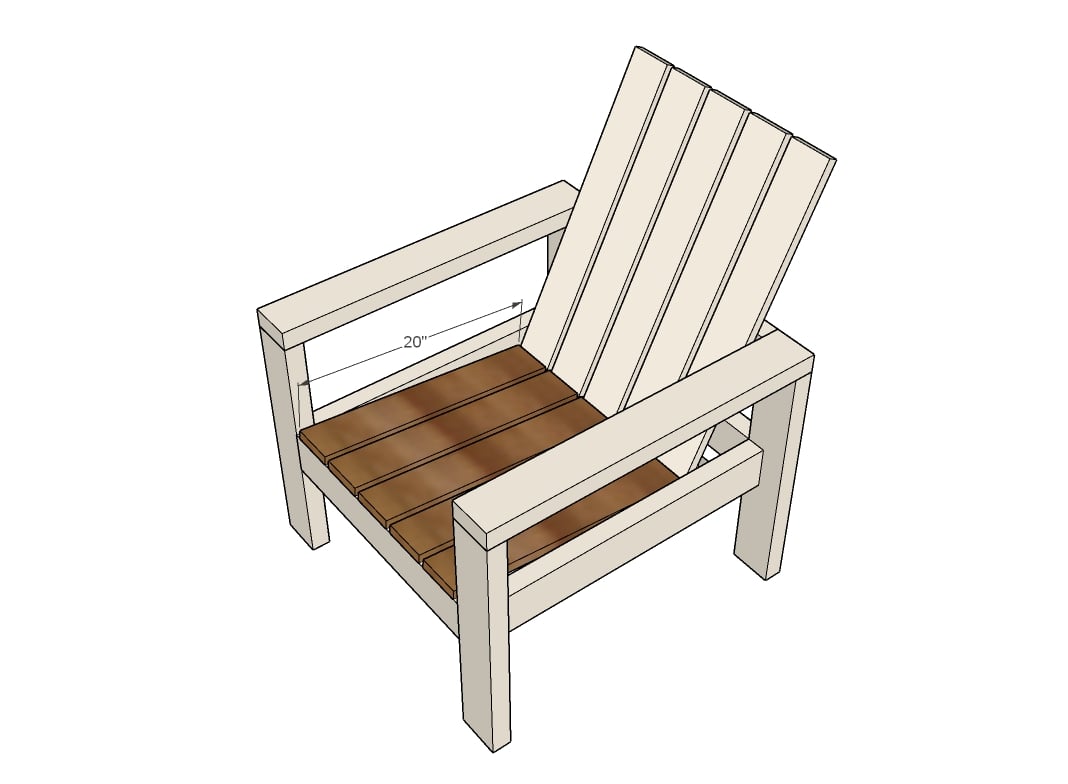
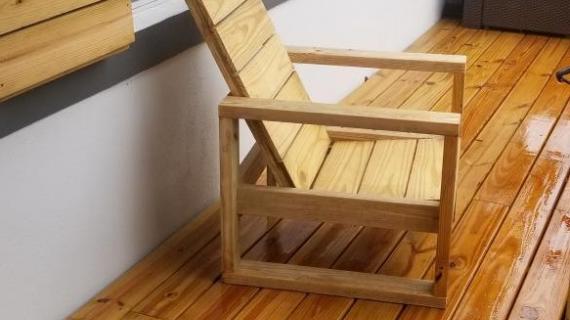
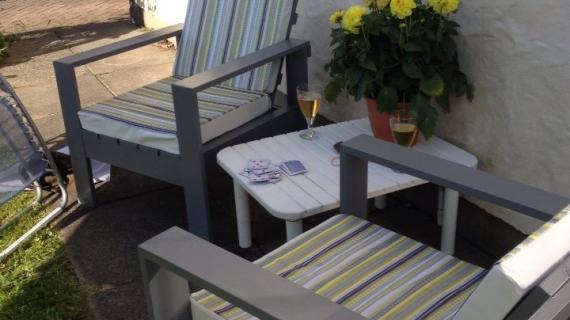
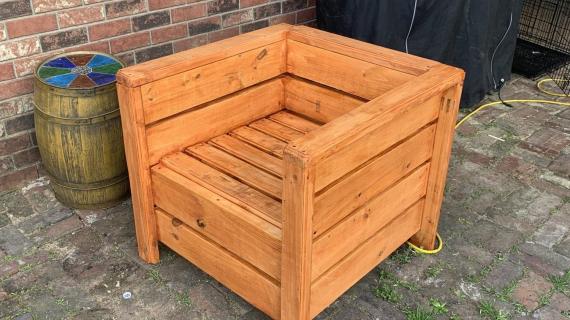
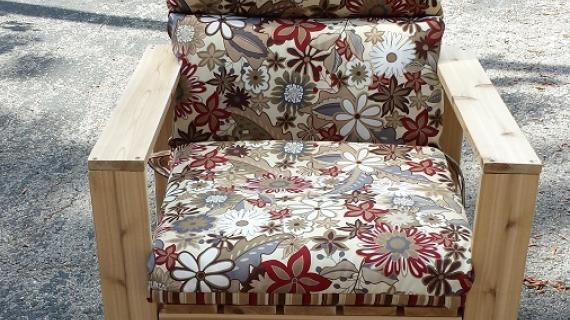
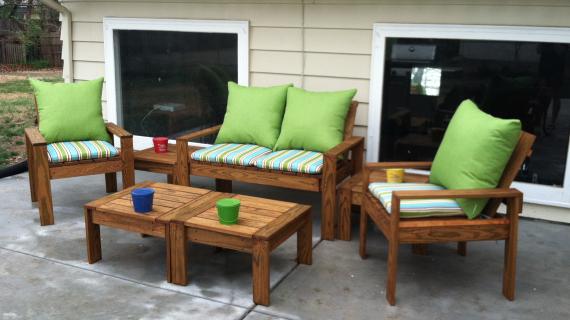
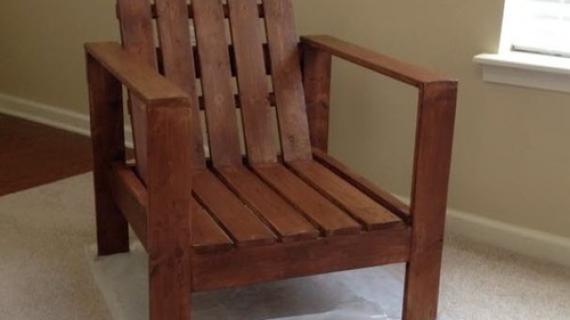
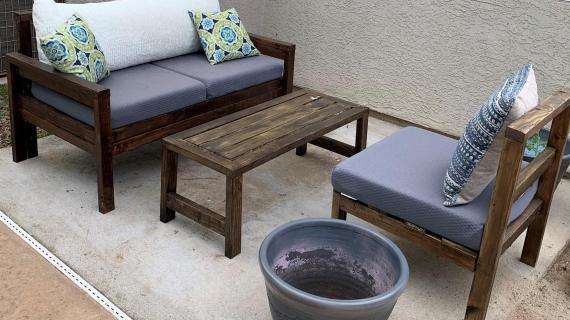
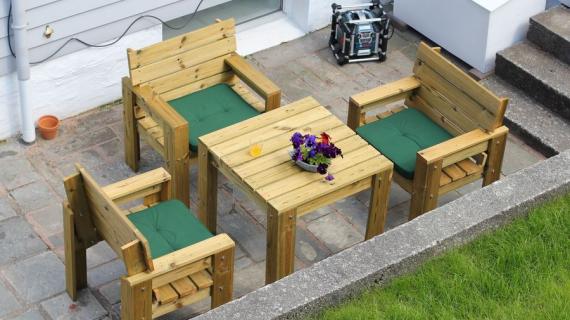
Stylish modern wood outdoor chairs in a compact footprint! Reclined seat and back for comfort, wide armrests. Fits a standard size chair pad. These chairs are smaller in size, more of the size of a dining chair, not oversized like a living room chair.
Pin For Later!
Preparation
- 2 - 2x4 @ 10 feet long
- 2 - 1x4 @ 10 feet long
- 36 - 2-1/2" pocket hole screws for exterior use (can be used as the "longer screws" in this plan)
- 40 - self tapping (star bit) exterior screws, length at least 1-1/2" long (used for attaching the back and seat slats to the frame, referred to as shorter screws in plans)
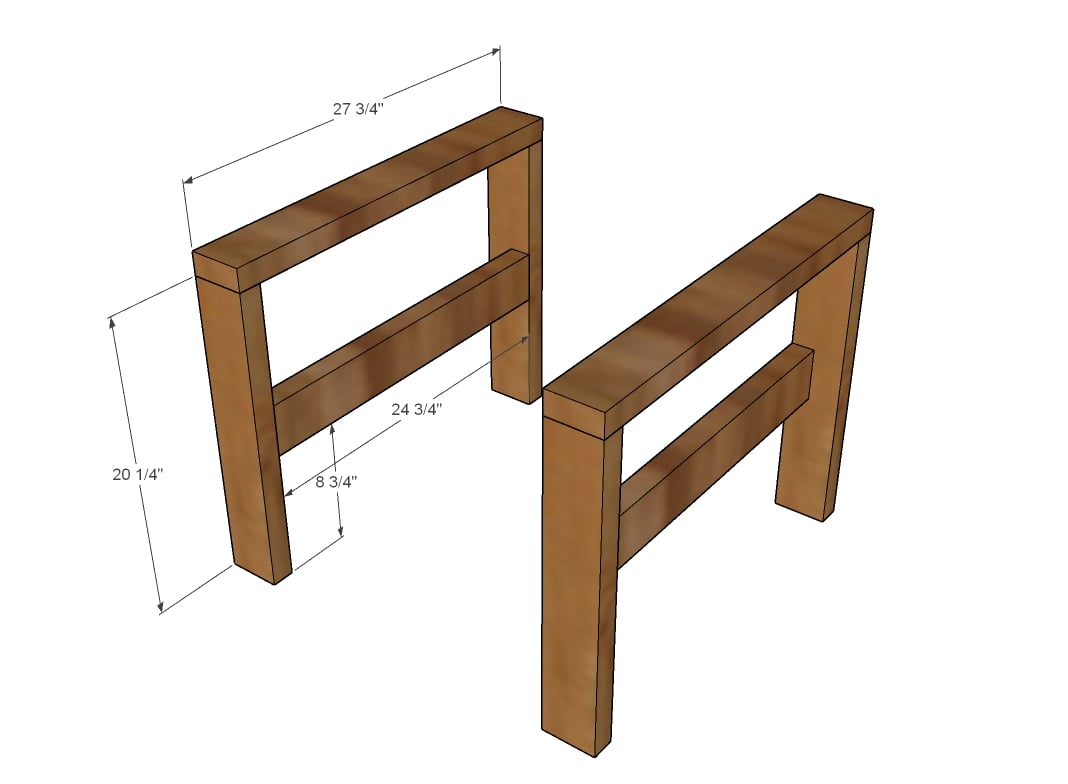
- 4 - 2x4 @ 20-1/2" (for use with a dining table, cut at 24") - legs
- 2 - 2x4 @ 27-3/4" - arm rests
- 2 - 2x4 @ 24-3/4" - side supports
- 2 - 2x4 @ 20-1/2" - front/back aprons
- 3 - 2x2 @ 20-1/2" - seat supports
- 5 - 1x4 @ 25-1/2" - back slats
- 5 - 1x4 @ 20" - seat slats
Cut the longest boards first to make sure you get all your cuts out of the boards called for in the shopping list


Instructions
Step 1
Build the arms using the longer screws (or Kreg Jig on the 1-1/2" setting with 2-1/2" exterior pocket hole screws). The two legs are built identical.
Step 2

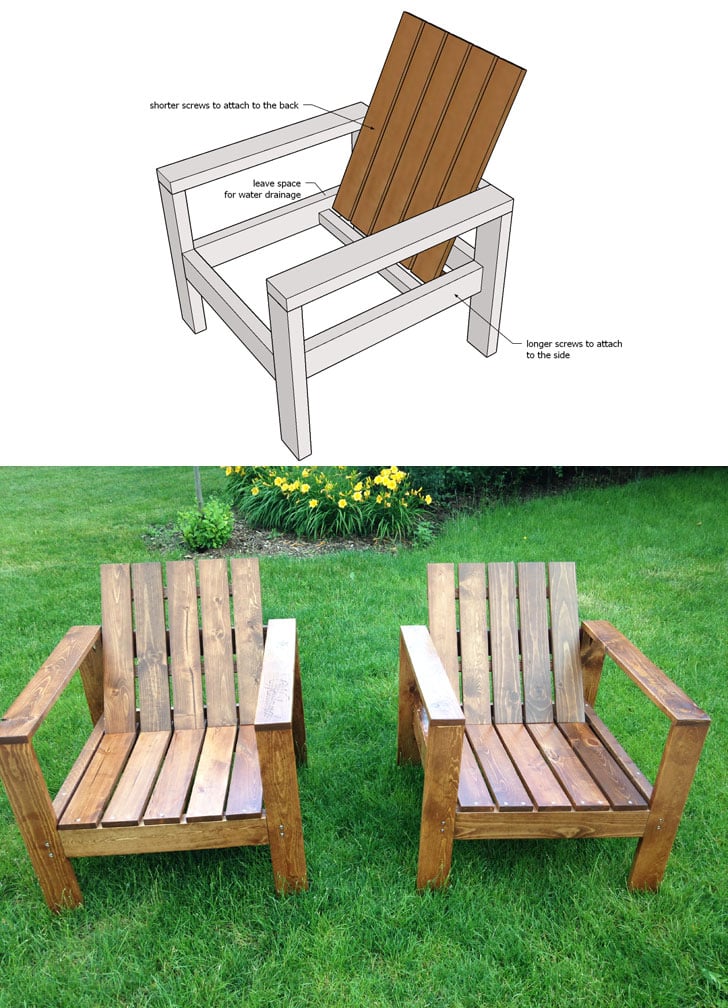
Drill two 1-1/2" pocket holes on each end of all the boards in this step, and attach with 2-1/2" exterior pocket hole screws.
Step 3
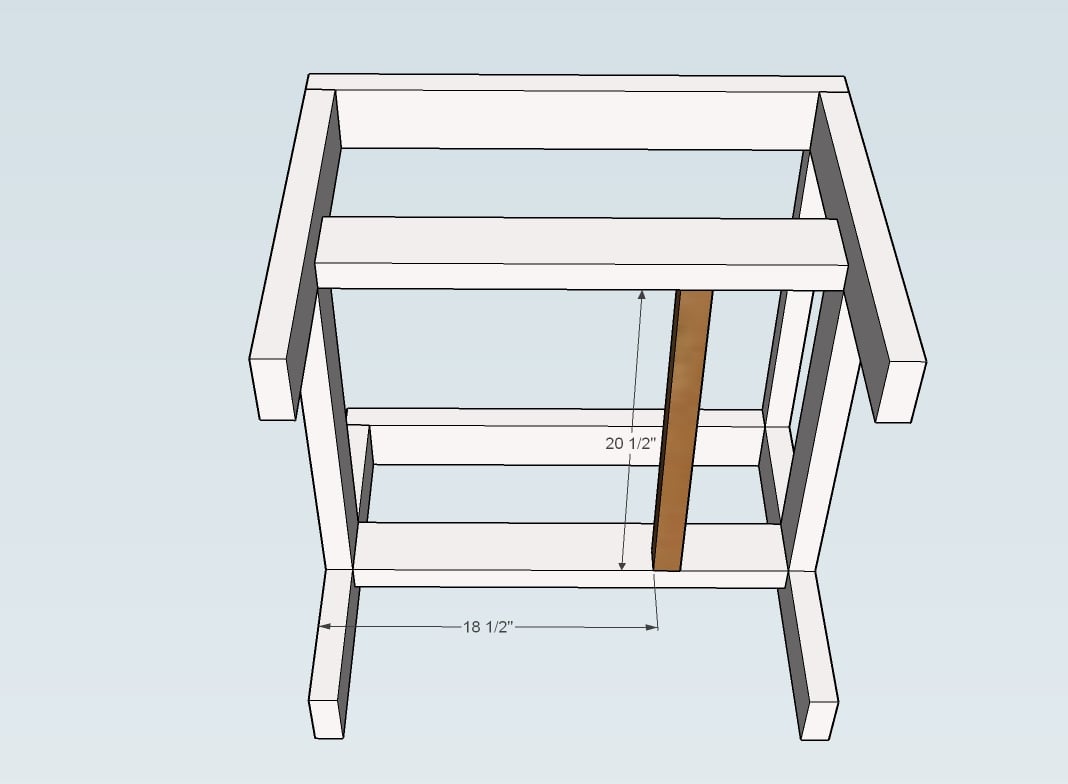
Attach the 2x2 seat cleat with pocket hole screws inside the chair frame, place screws on bottom or sides (NOT top to prevent water pooling inside the pocket hole)
Step 4
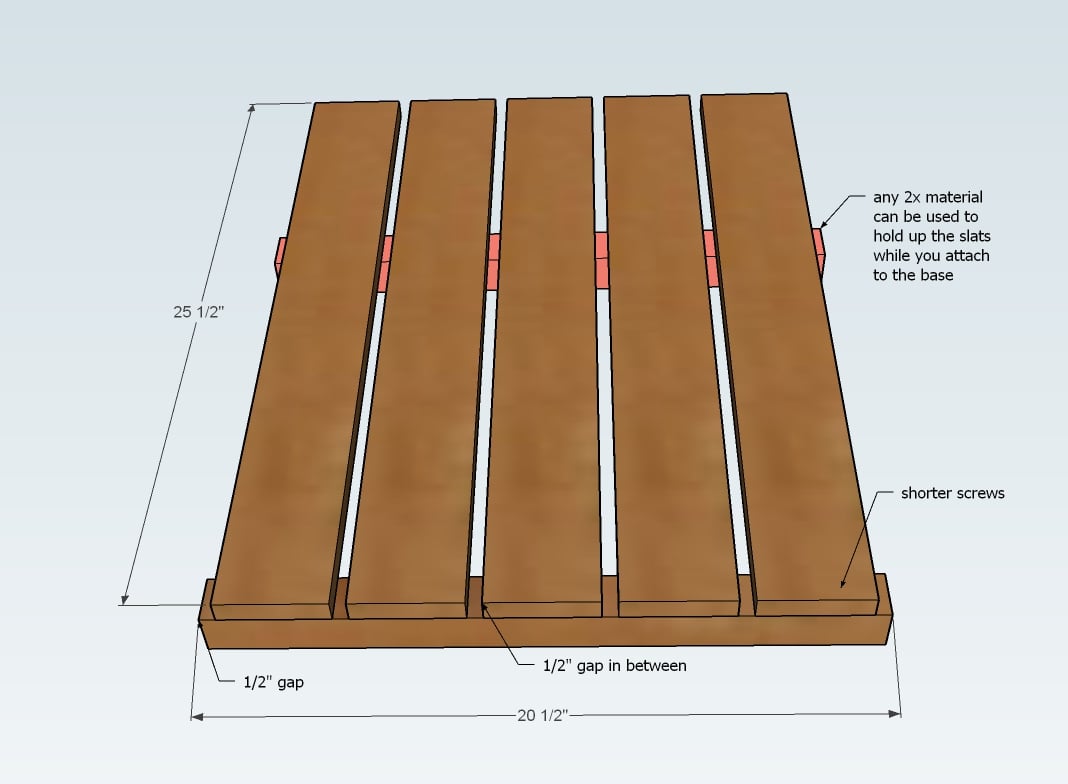
Lay out the chair back and attach to the chair back base with the shorter screws.
Step 5
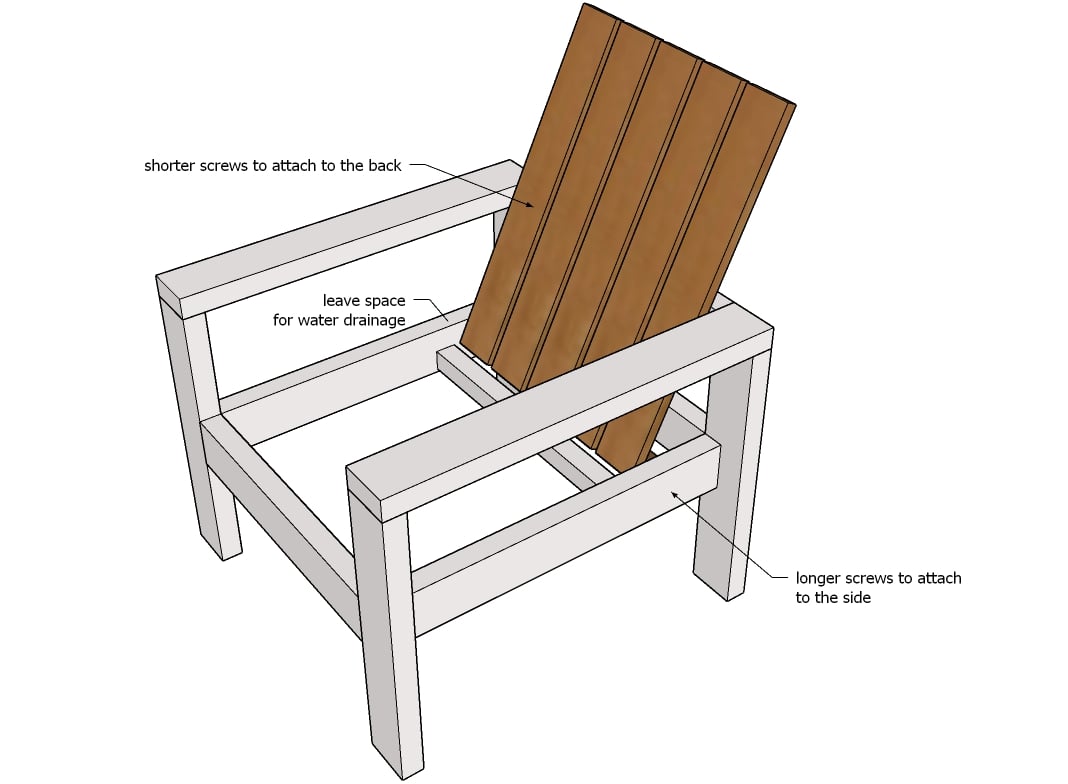
Set the chair back inside the chair, leaving a small gap for water drainage from the seat base 2x2. Attach with the longer screws to the arms.
Step 6
Lay the seat slats inside the chair and attach with the shorter screws, two screws per joint, with 1/2" spacing in between.

Comments
senovia (not verified)
Sun, 05/02/2010 - 20:56
This is a fabulous chair! I
This is a fabulous chair! I just recently found your site and can't wait to make so many things! I would love to see it in a loveseat size!
jdeuce
Tue, 01/06/2015 - 09:10
help with the plan
does anybody know what the "1 1" is on the line after 1 – 2×2, 8′ Length or scrap 24″ long on the material list?
In reply to help with the plan by jdeuce
matencio
Fri, 03/03/2017 - 21:40
Those are wood screws
One and a quarter-inch screws. 1 1/4" screws. Get a box.
Betsy (not verified)
Sun, 05/02/2010 - 21:01
This is so perfect! The
This is so perfect! The style, the size (love that it uses standard cushions)... Thank you, thank you, thank you!! Looking forward to the couch and loveseat sizes, as well.
Erin (not verified)
Sun, 05/02/2010 - 21:36
One loveseat and two
One loveseat and two chairs...yes please!! I told myself I was going to build things in the order that I find them and I am on item #1 of a 10 item list, but these just may have to cut in line :-)
James (not verified)
Mon, 05/03/2010 - 00:57
What fantastic chairs! I had
What fantastic chairs! I had been planning to modify the Simple Stackable Chair into a bench, but this will be a lot easier. It will also fit beautifully with the Hamptons Outdoor Coffee Table I'm planning to build. Can't wait to see the loveseat and bench plans.
Árný Hekla (not verified)
Mon, 05/03/2010 - 01:00
Hi there :)Just wanted to let
Hi there :)
Just wanted to let you know that I blogged about your wonderful site :)
www.systraseidur.blogspot.com
Laura PARING DOWN (not verified)
Mon, 05/03/2010 - 01:08
I could totally see this in a
I could totally see this in a rich stain outside on my patio.
Love it!
Laura
Devon! (not verified)
Mon, 05/03/2010 - 02:27
how awesome! thank you for
how awesome! thank you for posting! would love the love seatsize too!
Leslie (not verified)
Mon, 05/03/2010 - 02:39
You know what, Ana? The best
You know what, Ana? The best part of this whole plan is the fact that you really, REALLY consider US when you create. I mean, we can all actually go to Target and buy a cushion that FITS! Holy crap! That is HUGE, and you know that!
I'm just about packed up and will be heading up to RI for the big move tomorrow. My sister and I have great plans for your plans and we can't wait to get started.
Many thanks!
Tracy (not verified)
Mon, 05/03/2010 - 02:39
You are a mind reader Ana! I
You are a mind reader Ana! I was looking at the Sunday ads yesterday and I saw some outdoor furniture, and I seriously thought to myself... I wonder if the outdoor furniture on knock-off wood is sized right for cushions? Thanks for everything you do. I have not started a project yet, but hope to soon. Love your site!
Hannajoy (not verified)
Mon, 05/03/2010 - 03:03
I LOVE this chair! I'm so
I LOVE this chair! I'm so excited about the loveseat size... my patio is going to look JAZZED thanks to you!!
Shanna (not verified)
Mon, 05/03/2010 - 03:21
I love this chair and can't
I love this chair and can't wait for the loveseat plans too!! I have been wanting new patio furniture, but they are so expensive, especially those made of wood. I was introduced to your site by my husband because I've always wanted to make my own furniture and now have a list started of all the pieces I want to make. Thank you!!!
3Janes (not verified)
Mon, 05/03/2010 - 03:26
Looks Great!! Can't wait to
Looks Great!! Can't wait to see the loveseat plans! Hope you do those next! And THANK YOU for thinking about the cushions!! That will make life MUCH easier. I would hate to make the chair to save $ only to find out later that you woud have to spend more $$ to buy cushions. What were those designers thinking?? Ana, you ROCK!!
Mary (not verified)
Mon, 05/03/2010 - 03:29
love the chair! Can't wait
love the chair! Can't wait to see the loveseat- would LOVE to see an ottoman to go with the set as well!
Chantelle - Th… (not verified)
Mon, 05/03/2010 - 03:40
Absolutely would love the
Absolutely would love the couch and loveseat!! And an ottoman, as stated earlier! Simply fantastic!!
Beth (not verified)
Mon, 05/03/2010 - 03:52
The first things I thought
The first things I thought when I saw this was: "I wonder if I can hack this to loveseat size?" I've wanted an outdoor loveseat for a while now, but it's never made it into the budget...
Laura Fox (not verified)
Mon, 05/03/2010 - 03:56
I love your site. We move
I love your site. We move into our new home in about a month and I am SO excited to start building things. This will more than likely be my first project as well as some beds for my girls. Can't wait.
Thank you for all the hard work you put into this and for giving them away free!! LOVE IT - I check your site at least 3x a day.
Patricia (not verified)
Mon, 05/03/2010 - 04:07
Yes! Please do a loveseat! I
Yes! Please do a loveseat! I have been eying patio furniture for my new covered patio, but haven't found anything as lovely as this. Maybe I should get out my saw and hammer!
Tara M (not verified)
Mon, 05/03/2010 - 04:09
I love that you know your
I love that you know your readers so well to realize that we would want to buy a standard size cushion. Can't wait to see the complete plans for all the outdoor things so I can plan my 'room.' We also need Rayan to do a guest post on finishing our outdoor items. Thanks so much.
Angelfacebaby (not verified)
Mon, 05/03/2010 - 04:25
Perfect! I'm gonna get right
Perfect! I'm gonna get right to work on two of these! I would LOVE a loveseat to match. Thanks so much for thinking about cushions! Any plans for a coffee table? I might give it a shot! You are AWESOME!
Amber (not verified)
Mon, 05/03/2010 - 04:37
I'm hoping for the couch and
I'm hoping for the couch and loveseat plans too. When you posed the stack-able chairs, table and benches I was hoping for these chairs too. My husband didn't like the stack-able chairs. So I thought we could get these and 2 benches it would make for a multi-use seating. I love the coordinating pieces, it makes it more easy to create an outdoor living area that is broken up into dinning and lounging. We built a huge deck last fall and I've been waiting all winter to be able to outfit
me35 (not verified)
Mon, 05/03/2010 - 04:47
I WANT THE LOVESEAT ! I WANT
I WANT THE LOVESEAT ! I WANT THE LOVESEAT !!! Okay, I realise that I'm shouting this and not only that, but I'm not clear what a loveseat is... Is that the kind where you have 2 seats joined with a table between them ?? I have been loving for that without a silly pricetag for a couple of years now (even better if they are angled towards each other...)
I am going to end this post with what I should have started with (eh??) Ana, you are a GENIUS. The plans and the work you put into this site are AMAZING. I wish I had a big enough house to fit all of the designs that I like into (and that I'd found you before the last ikea trip...!) Thank you !!
Susie (not verified)
Mon, 05/03/2010 - 05:37
Thank you Ana! What a
Thank you Ana! What a beautiful chair! I can't wait to get started! I would definitely be interested in a loveseat plan as well. This lounge set would go so well with the outdoor table and stackable chairs that are at the top of my build list!
Thanks so much for being the inspiration behind my desire to build my own furniture! You truly are amazing!
Cristy (not verified)
Mon, 05/03/2010 - 05:47
This is exactly what I have
This is exactly what I have been waiting for! Would love plans for a loveseat! You are the best, I love your site. I am so glad it uses standard cushions. Thank you!
Heather (not verified)
Mon, 05/03/2010 - 05:58
This is darling. I love it.
This is darling. I love it. Would love the loveseat size. Would love to omit the legs and use it as a porch swing. Wonder if this could be done?
Aftan (not verified)
Mon, 05/03/2010 - 06:08
Wahooooo!!!! Love your
Wahooooo!!!! Love your site!!! Can't wait to get building:)
Jen Morris (not verified)
Mon, 05/03/2010 - 06:25
Love it! Beautiful! Looking
Love it! Beautiful! Looking forward the loveseat and couch size!
Jessica (not verified)
Mon, 05/03/2010 - 06:45
Ana, you are amazing! You are
Ana, you are amazing! You are so inspiring. These chairs are perfect, can't wait to build! I'm also looking forward to the love seat & couch versions, what an awesome set it would be!
Adrian (not verified)
Mon, 05/03/2010 - 07:04
What a great design! Please
What a great design! Please please post the loveseat and sofa plans soon!
sharon (not verified)
Mon, 05/03/2010 - 07:07
Love it! I have been looking
Love it! I have been looking for a simple chair plan. Would love the couch and loveseat too. Thank you!
Rob & Cami (not verified)
Mon, 05/03/2010 - 08:15
I love it! I would love to
I love it! I would love to see plans for a loveseat also!
*MICHELLE CAUDLE* (not verified)
Mon, 05/03/2010 - 09:12
Thanks for continuing to hack
Thanks for continuing to hack more outdoor furtniture...I look forward to seeing the larger couch-sizes, too! On Saturday my hubby and I built the Modern Bookcase...I will make sure to post a pic in the Flickr group when I get it all painted!
Yolanda (not verified)
Mon, 05/03/2010 - 09:42
We live in a condo and only
We live in a condo and only have a patio as our outdoor space. For the 8 years I have lived here I have wanted to have furniture outside that we could use to expand our living space. But it’s always been way out of my budget. These plans show the possibility that exists in just a little time and energy. I hope to be sitting in this chair (and snuggling on an outdoor love seat!) real soon.
Deb (not verified)
Mon, 05/03/2010 - 10:59
I love this chair! and the
I love this chair! and the idea to tile the top of a table, SO EXCITED. I can't wait to start these projects to finish making our new back porch beautiful!
Thank you SOO incredibly much!
Rachel (not verified)
Mon, 05/03/2010 - 15:20
I'm trying to open the plans
I'm trying to open the plans as a .pdf file (through the PRINT/PDF link at very end of the post), but none of the diagrams show up when I do that. The text comes through fine, but I don't think I can use the plans without the diagrams as I am far from a professional and I need the visual aids. Has anyone else had this problem? How did you fix it? Thanks! :)
MaryJanes and … (not verified)
Mon, 05/03/2010 - 16:34
This one's going in my to do.
This one's going in my to do. Question for you, I love that you put everything in price categories, but when it's new like this I don't see the price or what category it belongs to. Is it possible to list the aprox. price with the materials list like you do with the kid's picnic table (even if you don't break it down by board like you did there). I saw the table and built it that weekend because it specifically said $15 and I said I can do $15! If I know something is affordable I make it a lot faster. I have no clue what these chairs would cost to build.
BTW- built your pallet shelves today! They are hung and awaiting a photo shoot. Will send pics.
The Trees (not verified)
Mon, 05/03/2010 - 17:18
I love this chair and would
I love this chair and would love to build it in a loveseat and couch size also. And thanks for taking the time to fit the standard cushion.
It's beautiful!
Heather - Hope… (not verified)
Mon, 05/03/2010 - 21:18
MaryJanes - For an estimate,
MaryJanes - For an estimate, the lumber for this project is $24 in Kentucky. (Not sure how much prices vary by location)
I've been wanting 2 chairs to go by my grape arbor, and I think these may be the ones! Now I just need a little table to hold the wine glasses...
Kariner (not verified)
Tue, 05/04/2010 - 02:47
I can't WAIT for the loveseat
I can't WAIT for the loveseat version! I've been scouring the web for a suitable outdoor bench to put under the pergola I made, and the pickings are slim. Pretty please? :)
nillabeans6 (not verified)
Tue, 05/04/2010 - 12:23
Yeah!!! I won't have a naked
Yeah!!! I won't have a naked country porch anymore, especially when the loveseat/ couch goes up!!!! Thank you a million times, Ana :O)
Kate (not verified)
Tue, 05/04/2010 - 13:25
I cannot wait to make this.
I cannot wait to make this. I'm currently away from home finishing a fellowship. When I get back in a few more weeks I'll have such a backlog of things to try!
danahollis (not verified)
Wed, 05/05/2010 - 03:19
I love this chair. I told my
I love this chair. I told my husband I wanted to build some Adirondack chairs and he grimaced & grumbled - guess he's not a fan of that style. LOL. But this one I know he'll like.
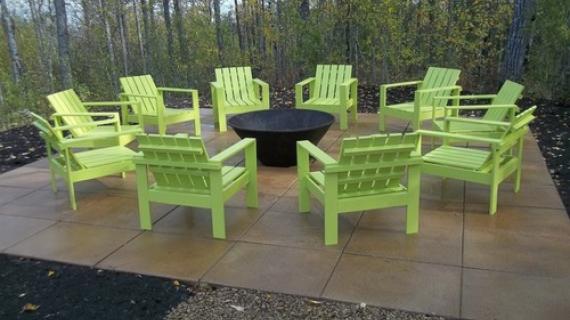
I think they'll be great to have around our fire pit.
Can't wait for the sofa and loveseat plans! :)
Thanks for all the sharing you do. I still think you need your own HGTV show. THAT would be AWESOME! :)
Jill (not verified)
Wed, 05/05/2010 - 04:25
I've found a usable
I've found a usable Adirondack chair plan - love that style - but I've put off using it for two years as it's not an easy project. Guess what? I'm scrapping that idea and am going to build your chair instead! Read through the plans and can tell it's going to be simple! Thank Ana. Know what would look good with two chairs on my deck? A love seat! Thanks for all you do for us readers!
Heather - Hope… (not verified)
Fri, 05/07/2010 - 16:57
Tackling this one tomorrow,
Tackling this one tomorrow, and I'm already thinking I need a small table to go with. I'd like to build 2 chairs and have a place to set the wine glasses between us. :)
Cristy (not verified)
Fri, 05/07/2010 - 19:08
I just saw a similar chair on
I just saw a similar chair on ikea.com and the chairs were $69 each! Thanks for helping me get the chairs I want, for a price I can afford.
Sweet Peaches (not verified)
Tue, 05/11/2010 - 03:30
I want to make this
I want to make this collection as my first projects, but have no idea where to start on picking my wood? Does anyone have any suggestions? Thanks!
Alana (not verified)
Tue, 05/11/2010 - 06:59
I love this chair! I want to
I love this chair! I want to build it this weekend, but in looking at the supplies, I want to make sure to get everything i need... what is the 4th item supposed to be?
6- 1x4 8' Length
2- 1x2, 8' Length
1 - 2x2, 8' Length or scrap 24" long
1 1
2" Screws
thanks!
Ana White (not verified)
Tue, 05/11/2010 - 08:12
looks like the cut list is
looks like the cut list is covered and there is no fourth item, just a typo. I will update.
Another note, one reader built this chair and thought that the chair back recline was too steep. I followed the dimensions for the West Elm Chair, and I think the idea is to have a loungy chair, but if you find your chair back is reclined more than you would like, simply place your 1x2 back suppport to the insides of the chair back legs instead on the back side.
Rachel (not verified)
Tue, 05/11/2010 - 14:16
i think the "typo" was you
i think the "typo" was you started to write out 1 1/4'' screws... because those are needed :)