

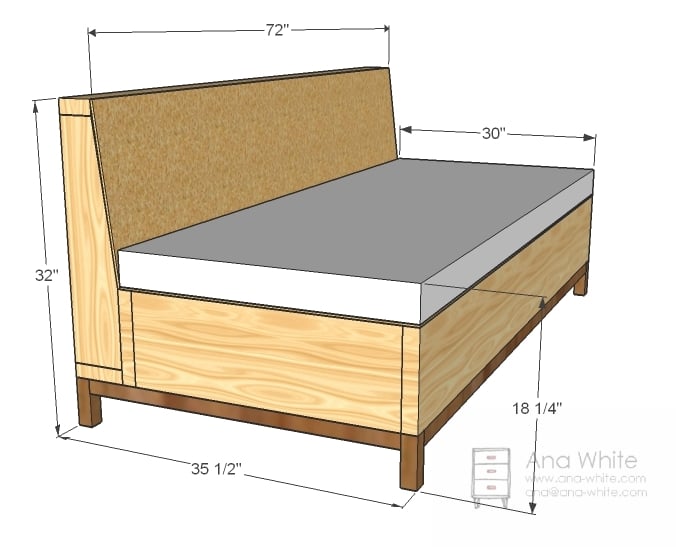
A sofa that you can build with a fold out seat perfect for storing extra pillows and blankets. Based off a sleeping pad foam cushion, so seating surface doubles as a guest bed.

If you would have asked me even a few months ago about building your own sofa, I would have said, it's not worth it. Considering the high cost of foam (upwards of $50 a yard) and the cost of fabric (at least $10 a yard for an upholstery weight) I just couldn't see the economics of building your own sofa.
But then I walked past a pile of foam camping pads at a store we have in Alaska called Fred Meyer (owned by Kroger and is kind of a superstore) that were 30" wide, 72" long, and 3 1/2" deep. And the foam came in soft, medium and firm weights . . . for just $20! Instantly, the wheels were turning in my head.
Then when my sister Esther mentioned that she didn't have a sofa, and she couldn't find one that was inexpensive, square, and with storage, I was drawing up plans within minutes. My sister Lydia (we've reupholstered quite a few sofa's together, but never actually built one from scratch) was visiting, and she was just as excited as me. So we got to work.
And you all know how much I love using paint drop cloths for fabric. So with some 2x4s, 2x6s, some 2x10s, some 1/4" plywood and alot of worn out pillows and stuffed animals, my sister Lydia and I built a couch in less than 24 hours for about $120.

And by the time we were done, both Lydia and I were making plans to build our own sofas. Also pictured reclaimed wood carts.

And I just might . . .

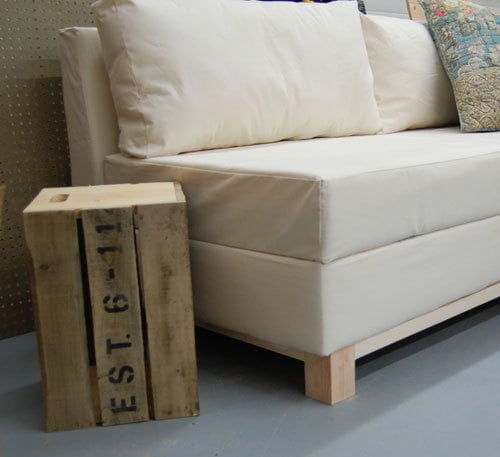
Nice clean square design that is so popular right now. Notice the 2x4 feet. Please don't notice my messy garage, I was afraid to bring this one inside . . . my sister might not every get her sofa back! Also, the deep cushions are perfect for sleeping on.
It is after all made from a standard camping pad. And did anyone notice the little hinges on the front seams?

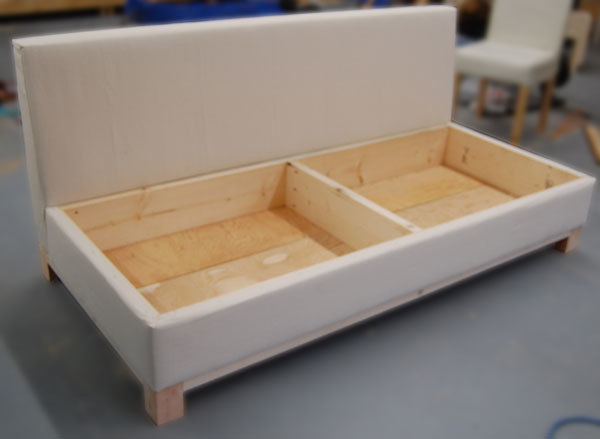
Big enough to sleep on and with built in storage for the bedding too! This is my favorite part of this sofa. You could build it for your office and use it as a reading sofa, then when guests are over, flip open the seat and get your bedding out. Not shown here, but I did add straps to keep the seat from hinging all the way open and also straps that tuck in the seam behind the seat for easily pulling the seat up. Just used an old dog leash.

Ready to build your own? You can do this.
Preparation
1 – 30″ x 72″ x 3 1/2″ Foam Camping Pad or Cushion
1 – 9×12 Paint Drop Cloth
6 yards upholstery batting
2 20 oz bags of pillow stuffing
2 1/2 yards of burlap
staples
3″ screws or 2″ pocket hole screws
1 1/4″ screws
wood glue
spray adhesive
2 – 2×4
2 – 2×6
2 – 2×2
4×4 (You only need about 2 feet for the sofa legs)
1 – 12′ AND 1-8′ 2×10
2 – sheets of 1/4″ plywood
1 – 2×4 @ 72″
1 – 2×6 @ 72″
4 – 2×6 @ 24″ (Tapered as shown in step 1)
3 – 2×4 @ 22″
1 – 1/4″ Plywood @ 17 5/8″ x 72″
2 – 1/4″ Plywood @ 72″ x 30″ (Top and Bottom of Seat)
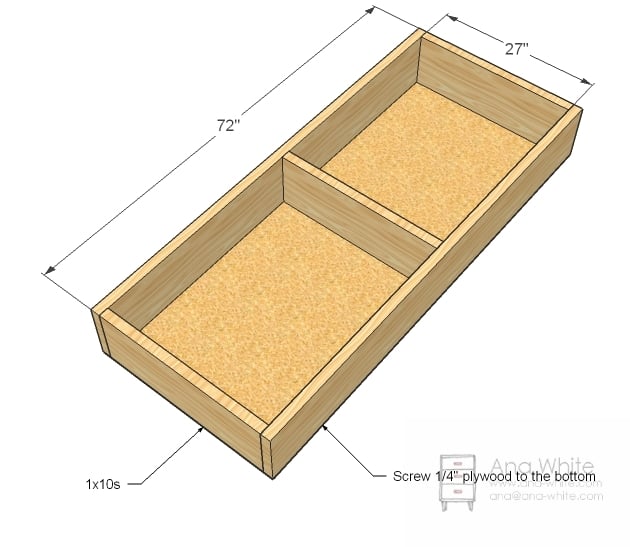
2 – 2×10 @ 72″
3 – 2×10 @ 27″
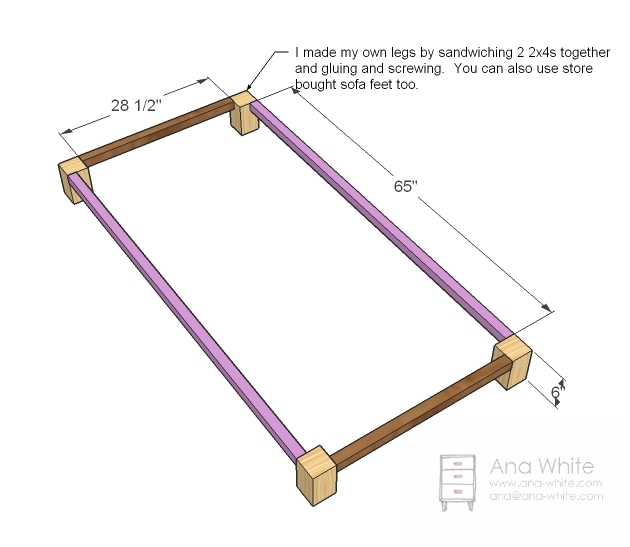
2 – 2×2 @ 65″
2 – 2×2 @ 28 1/2″
4 – 4×4 @ 5″ (Sofa Feet)


Instructions
Step 1
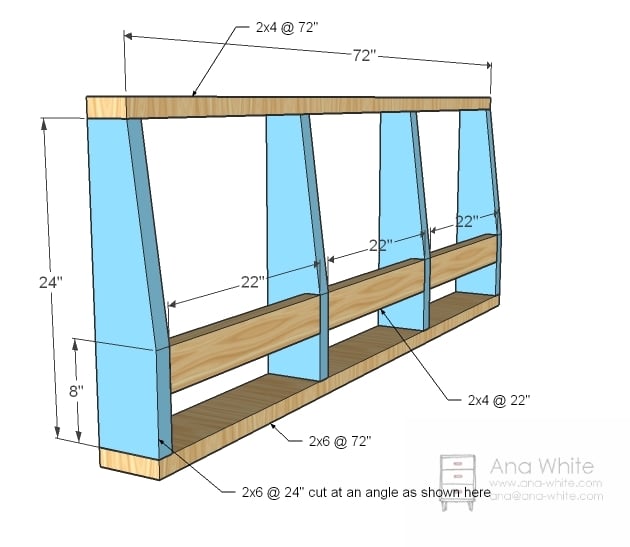
Back
Screw the back together with 3″ screws or 2″ pocket hole screws as shown above. Use glue and adjust for square.
Step 2
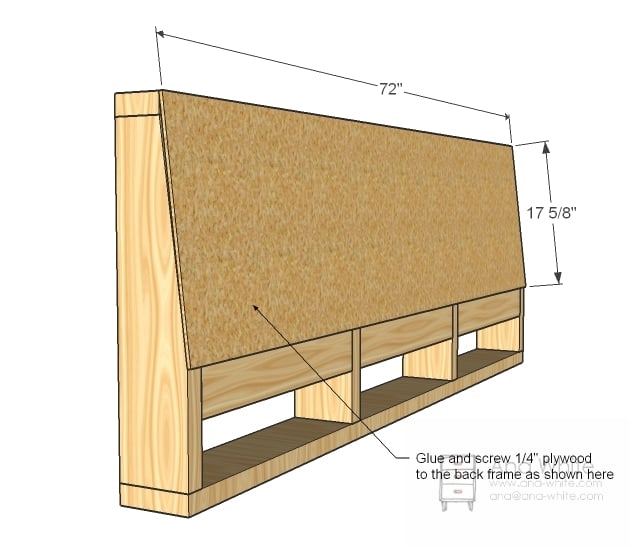
Back
Now attach the 1/4″ plywood to the back with 1 1/4″ screws and glue as shown above.
Step 3
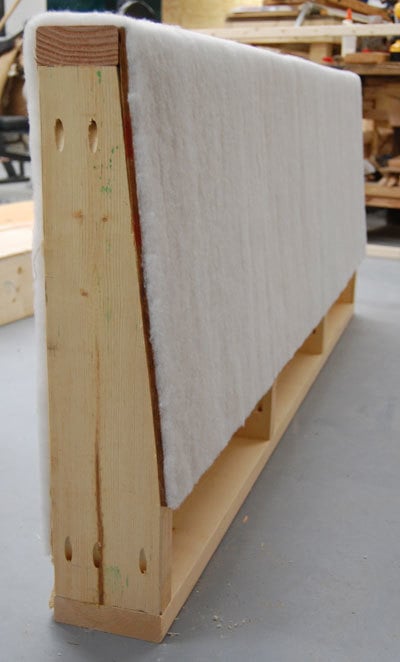
Back Batting
Now wrap the back that is not covered in plywood with the burlap and staple in place on the bottom edge. The burlap should be tight. Then use spray adhesive to glue the batting to the back as shown above. Read the direction on the can of the spray adhesive for the best adhesion.
Step 4
Side Batting
Now glue pieces to the ends with the spray adhesive and then trim to fit as shown above. Set the back aside.
Step 5
Step 6
Slipcover
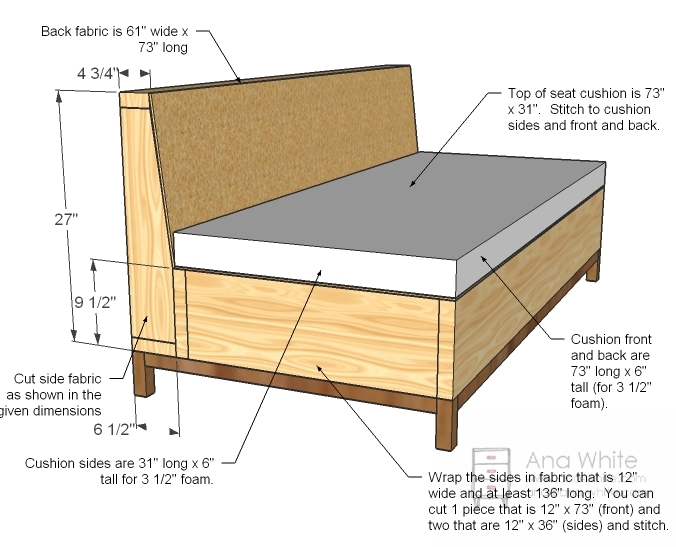
Use the spray adhesive to attach the foam pad to the remaining piece of plywood. Then use the spray adhesive to attach batting to the foam on the top, front and sides. Cut a piece of fabric 73″ long x 31″ wide. Cut two pieces 31″ long x 6″ wide, and two at 73″ long and 6″ wide. Sew together to create a box cushion (see this post for details on sewing). Place the cushion slipcover over top of the foam and staple the slip cover raw edges to the underside of the plywood, hiding edges. This is shown below.
Step 7

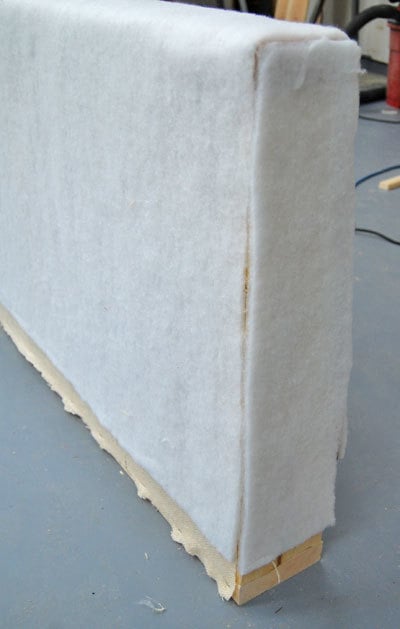
That one should be easy. Now cut strips of fabric as shown in the diagram above (step 6) and sew together and staple in place around the sides and front of the sofa. Should be easy to do. Turn edges under to hide raw seams.
Now the back was the most difficult part – certainly not impossible, but I thought was the most difficult part of sewing. To make this part easier, you could simply not put a taper in the back side of the sofa, and all your cuts are square. Anyway, cut out the side and back pieces and stitch together, and fit over the back. Turn under and staple to the underside of the legs. Reference the diagram in step 6 for exact measurements.
Step 8
Base
Build the base as shown above. Don’t worry about the 2x2s not being strong enough – their is no support required here (it’s all in the 2x10s). The 2×2 aprons are to keep the fabric tucked under and to give you something to screw your feet too. Paint or stain your base. If you choose to use 2x4s for the legs, remember, this does change the dimensions of the legs, and adjust the 2×2 cuts accordingly.
Step 9
Assembly
Assembly will be easy. Start by screwing the storage box to the back, through the 2×10 back boards into the supports in the back of the sofa. Use the 3″ screws. Then flip over and screw the base to the sofa underside with 3″ screws. Flip it back over and attach the cushion with hinges. Support the hinges with a strap to keep the cushion from collapsing all the way forward.
Step 10
Pillows
The pillows I sewed for this sofa are square box cushions measuring 36″ wide x 4″ deep x 18″ tall. Cut four pieces of fabric 37″ wide x 19″, four pieces 19″ x 5″ and four pieces 37″ x 5″. Stitch with right sides together, creating a box, but leaving an opening to insert foam. Stuff with loose stuffing. Hand stitch open seam closed.

Comments
SaiorMoon95
Sun, 11/13/2011 - 19:45
This is great!
I just finished my first one! I will be starting 2 with adjustments for our family in a few weeks. My kids thought it was so cool that Mom made a sofa for them for their play room. It only took me about 20 hours. My power tool batteries kept needing charged. I bought almost every piece new and it only cost 200 for everything! ( The fabric was leftover from when walmart had a $1 yard table) The living room ones will have a higher back and arms, but close to the same. Thank you for such an awesome sight. My mom and I searched your sight for hours while she was visiting planning out future projects.
Austin Hoenig (not verified)
Sat, 11/26/2011 - 17:21
This is AMAZING! Around how
This is AMAZING! Around how much would it take to invest in building one?
dabsabre
Thu, 02/09/2012 - 09:37
foam pad
I'm not having much luck finding the foam camping pad that the plan uses.. anyone find a cheap retail source?
lilred6266 (not verified)
Sat, 06/09/2012 - 20:38
Foam pad
I just called my local Fred Meyer and they have the 30x72x3 pads for $19.99
Bri (not verified)
Sun, 02/12/2012 - 12:52
Weight
How much does this sofa weigh?
Bunnie1978
Tue, 02/14/2012 - 14:07
I couldn't find one either
Try foambymail.com for the foam...
shyrozi
Tue, 02/21/2012 - 01:29
wowwwwwwwwwwwww
wow wow wow wow....very beautiful
Guest (not verified)
Wed, 03/14/2012 - 08:34
storage sofa
I love the idea , and as an addition you could use the back to make more storage for books
Guest (not verified)
Sat, 04/07/2012 - 21:09
fbric
how many yards of fabric would i need to do this
Nicole pitts (not verified)
Tue, 04/24/2012 - 09:21
sectional
think this could be modified into a sectional? I was thinking of just adding an arm to one side that could maybe be removed if I wanted to use as two pieces?
In reply to sectional by Nicole pitts (not verified)
Maria1981
Wed, 08/28/2013 - 21:59
Great Idea!!!
Hi Nicole, I definitely do think it could be done... I'm planning on making one myself, so if mine is a success I will definitely let you l
know. Keep me up to date if you get yours done first ^_^
Gibson Goff (not verified)
Sun, 04/29/2012 - 10:57
You just saved me a bunch of money
We had the same need not long ago for a small, armless sofa. We moved into a small, small (394 sq. ft.) downtown loft area, and after putting in our desks and bookcases we had all of 45" for a loveseat/sofa. And being sandwiched between an aquarium built-in and a bookcase, we didn't want arms.
The design is almost exactly like yours, with one major exception - instead of skinning it with sheet plywood, we recycled old pallets, and planked the surfaces. Rustic yes, but functional. Built a small ottoman to go with it.
We've been using old sofa cushions, and have been thinking of covering it in foam and burlap (and, the same color as what you've used!). But burlap is spendy! And, other upholstery fabric is even worst.
Now you say use a paint drop cloth - canvas! THANK YOU! You just solved our dilemma, and saved us a bunch of money! Woo-hoo!
momof4@home (not verified)
Mon, 04/30/2012 - 07:26
I really like this storage
I really like this storage sofa, however I am in need of a convert-a-bed or something of the sort. I love this one http://www.seventhavenue.com/Furniture/Sofas-and-Futons/Lounger-Sofa-Be…
and this one
http://www.seventhavenue.com/Furniture/Sofas-and-Futons/Madrid-Convert-…
However I have no clue as far as the hinges go. Could someone offer me some advise on the best hinges to use for these two plans? Thanks in advance!
Andy Hawkins (not verified)
Mon, 04/30/2012 - 19:52
A great base
This is near perfect for my needs, Will be tweaking the plans to turn it into a chaise and the start building it. Thanks for a great starting point.
ramooonas (not verified)
Fri, 05/04/2012 - 12:42
Made SolidWorks model, you
Made SolidWorks model, you can see it here http://grabcad.com/library/storage-sofa, if you like, can do 2D drawing with cut list table.
mahdi (not verified)
Thu, 11/15/2012 - 14:42
thanks
hi. thank you about your web page. i love you. good lock.
mahdi (not verified)
Thu, 11/15/2012 - 14:42
thanks
hi. thank you about your web page. i love you. good lock.
Laura Daniels
Wed, 11/21/2012 - 10:11
Storage Ottoman
Yesterday my poor husband came home to find me cutting up our second couch to turn it into a sleeping ottoman. As always he just shook his head in bewilderment, said "I'm not even going to ask why because I'm sure I'll love it and grabbed his tools! I think I'll adjust some of your always fabulous plans and finish mine as a storage ottoman instead. Thanks for the continual inspiration!
TaLLaHead (not verified)
Sat, 01/05/2013 - 13:04
Couch Building!
I love your plans and I plan to build my own! Although, it is hard for me to find this foam! I live in California, The OC, and I cant find any local stores that carry camping foam pads or any foam pad period with those dimensions. I can order online but I wanted to pick up from store! Anyhow I will post in the brag post once I finish. :) Thanks so much for this and Happy Building :)
Chandra
Sun, 07/14/2013 - 13:19
Beginner
Hi Anna,
I really want to made it in the near time but I am beginner on woodworking. So far i have made 2 projects. They are a book self and a hanging planter. Do you think a beginner could make it?
Chandra
Sun, 07/14/2013 - 13:20
Beginner
Hi Anna,
I really want to made it in the near time but I am beginner on woodworking. So far i have made 2 projects. They are a book self and a hanging planter. Do you think a beginner could make it?
Legz26
Sun, 07/21/2013 - 22:11
I love, love, love this
I love, love, love this couch. I decided to make one for myself. I built mine with storage but I used a twin size mattress as my cushion. I am going to work on a "love seat" option using a crib mattress next.
Maria1981
Wed, 08/28/2013 - 21:44
My First Project!!!
I just love this idea!!! I plan on making one ASAP!!! I saw someones idea in the comments to make one as an L and it could be used as a sectional... I can't wait to get started!!! I wish Lowe's was open 24hrs cuz I can hardly contain myself!!! ^_^
freefromburdens
Thu, 10/17/2013 - 06:47
I don't comment too often but
I don't comment too often but today I really wanted to comment because I was on another site that posted this couch and read a negative comment about Ana's site and building. I know she's aware of those who speak against what she does, but after reading that comment I thought about how much this site helps me. I remember when I 1st came on this site and how excited I was. Not only are the plans free, they are good. There are so many websites that only offer plans for money. I pray she continues to offer this because it helps a house wife like me to build things I can't afford to buy. I used to be envious of people because of what they have and because they spent a lot of money for it. But not anymore. Now I look at things and say, "I can do that". I've downloaded so many plans I plan on building in the future. I'm so excited about the things I have planned. I have to state, when I 1st saw this sofa I was intimidated and thought I couldn't build it. But after doing several projects already, here I am, months later ready to build. I just did my bedroom closet, a farmhouse kitchen table, a mission sofa, etc. My future projects are a coffee table, double pedestal dining table, a mantle, etc. These are things I didn't think I could do or have in my home. But with help from God, I am doing it. Thank God for using Ana to encourage women like me. Keep it up...
rfpeterlin
Mon, 12/30/2013 - 08:06
Conceal-a-cabinet
What a wonderful idea! My wife will get a cut down sofa for the bed room, and I will get an extra gun cabinet! Just gotta notch the interior 2 x 10 to provide support for the center span and to receive the stock of the weapon! Style with a large dose of Utility
Saidauto
Thu, 05/28/2015 - 08:39
Goood ana
Goood ana
Brandym7
Fri, 06/03/2016 - 15:47
Sofa Couch /w storage - a Nightmare
So I downloaded the instructions beings as I already had lumber and a memory foam mattress to use, plus lots of nails and screws, etc. I even read through the directions without realizing until it was too late the page telling you how to attach the back to the bottom was not there!!! So, my first attempt to attach the back and it fell off, of course because of inadequate support. So then, I added some spacers to the back section so I could actually screw/bolt the bottom to it. I did not make it as a storage couch/sofa. And I put arms on it. My son use to work for a furniture restoration place so could give me hints on how to ... Finally it was done and it's a beauty. Everyone loves it - sadly - no thanks to the instruction manual or whatever you want to call it. Now I'm a little leary about trying any more of these Ana White thingees. There's no way to add a photo here without knowing how to put in my computers url so I'll leave it as is.
In reply to Sofa Couch /w storage - a Nightmare by Brandym7
GrammaSuannie
Sat, 06/04/2016 - 08:58
Directions ARE Posted....
The missing directions for attaching the back to the body of the sofa are actually explained in one of the final steps online. It's all there, you will just need to re-read the instructions in the post.
munchie
Sun, 02/19/2017 - 02:42
Step 6 - Slipcover
Can you please post the link for the sewing instructions listed in Step 6 (Slipcover)? There is a link mentioned, but no link exists. Thank you!
milkbuckets
Sat, 03/18/2017 - 16:34
weight of storage sofa?
I want to make the storage sofa, but am hesitant because of how heavy it will be using 2x10's for the storage box. Most of your other seating furniture uses 1x's or 2x4's. Are the 2x10's necessary for strength, or do you think 1x10's would work? Thanks for all the wonderful plans you have on your website.
moonprysm
Thu, 04/06/2017 - 11:00
Buy list - board sizes?
Since it doesn't specify board length (2 – 2×4
2 – 2×6
2 – 2×2) do I assume those are 8ft boards?
Building Nana
Tue, 03/13/2018 - 08:15
sofa storage
I love your design. Question in step 1 what is the angle cut? Do to cut the angle to measure your top connecting board?