
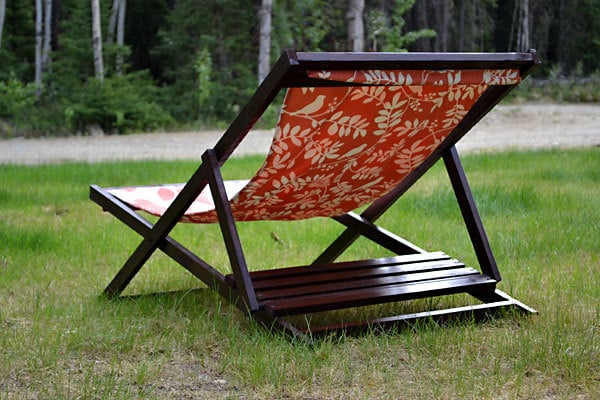

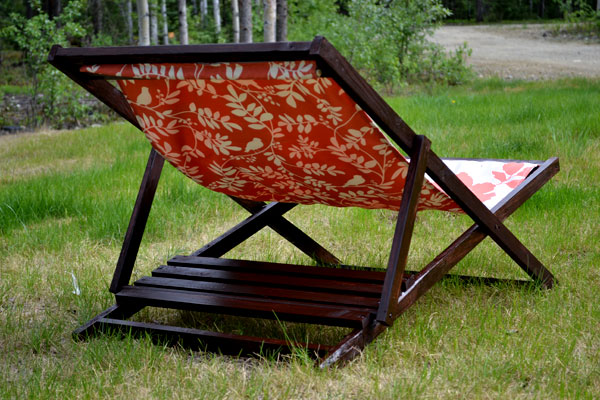
Folding adult sized wood sling chair, also known as wood beach chairs or deck chairs. Folds flat for storage, opens up for easy relaxation! Adjusts to three positions for customized reclining. Features removable slings.
I know this chair has been a long time coming . . . it's also been a long time in the making. When you first started requesting a sling chair (also known as wood beach chairs or folding deck chairs) I knew it was definitely a project I wanted to tackle. I just didn't know it would take me four prototypes to finally be able to put this seal on it . . .


Preparation
1 - 6' 1/2" Diameter Wood Dowel
1 1/2 Yards Outdoor Fabric, 54" wide
Sewing Notions and Thread
1 - 1x3 @ 48" long
4 - 1x2 @ 8 feet long
4 - 1/4" diameter bolts, 2" long with matching nuts
12 - washers to fit bolts
Backrest Frame
2 - 1x2 @ 48"
1 - 1x2 @ 24"
1 - 1x2 @ 25 1/2"
1 - 1x3 @ 24"
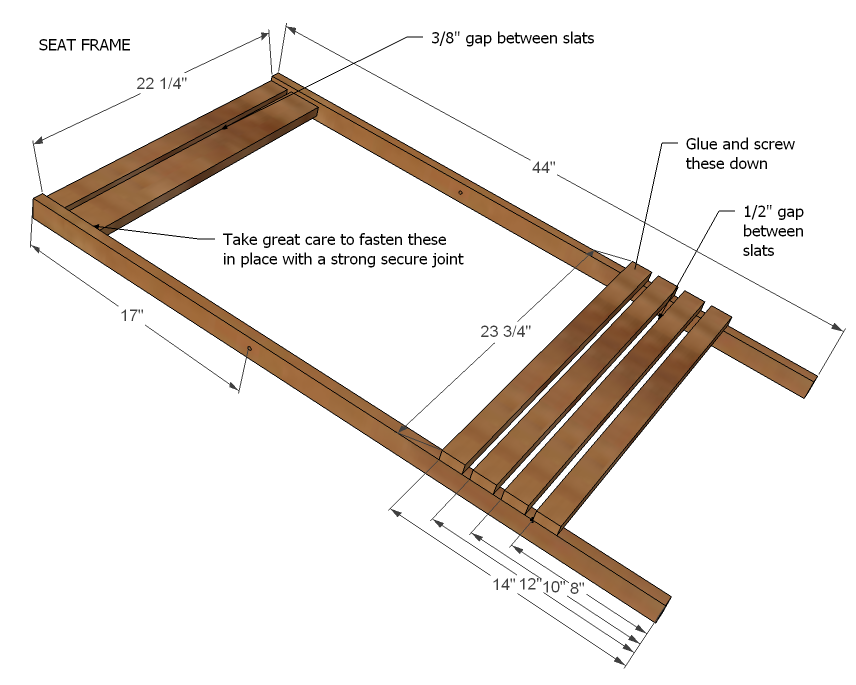
Seat Frame
2 - 1x2 @ 44"
4 - 1x2 @ 23 3/4"
1 - 1x2 @ 22 1/4"
1 - 1x3 @ 22 1/4"
Prop-Up Support
2 - 1x2 @ 15"
1 - 1/2" Diameter Wood Dowel @ 25 1/2"
Fabric Slings
2 - Outdoor Fabric Squares @ 54" x 22 3/4"
2 - 1/2" Diameter Wood Dowel @ 22"


Please read through the entire plan and all comments before beginning this project. It is also advisable to review the Getting Started Section. Take all necessary precautions to build safely and smartly. Work on a clean level surface, free of imperfections or debris. Always use straight boards. Check for square after each step. Always predrill holes before attaching with screws. Use glue with finish nails for a stronger hold. Wipe excess glue off bare wood for stained projects, as dried glue will not take stain. Be safe, have fun, and ask for help if you need it. Good luck!
Instructions
Step 1
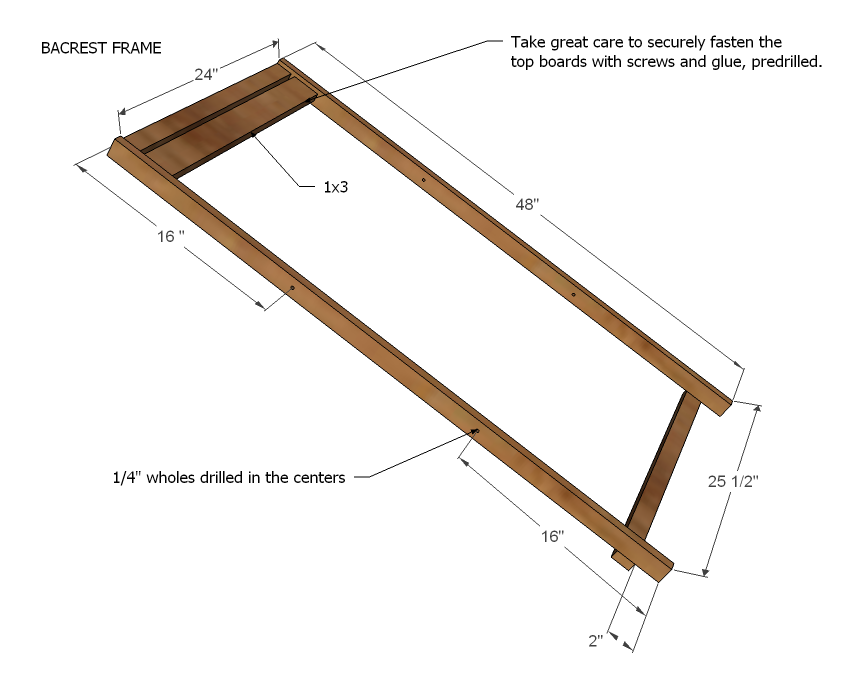
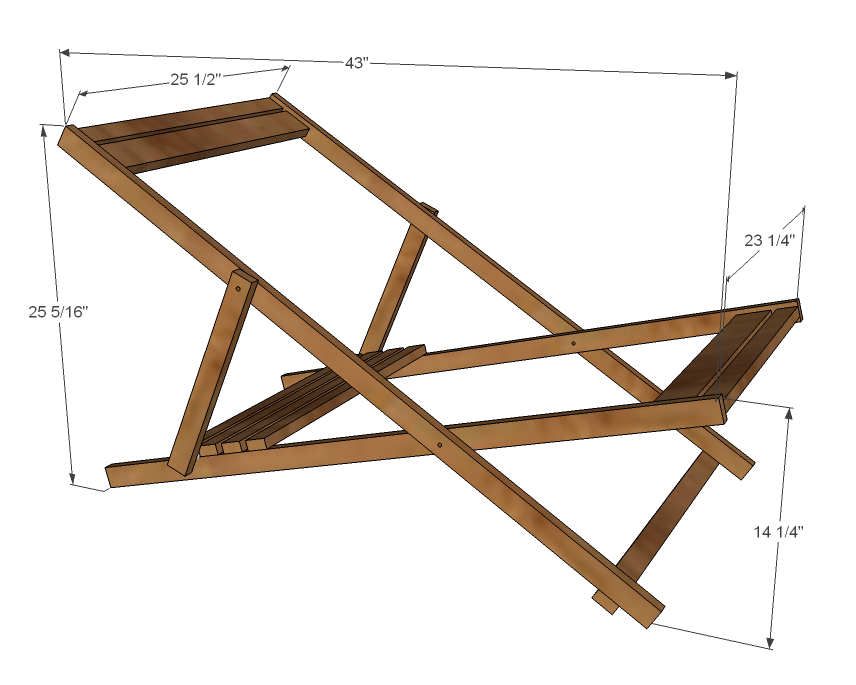
Build the back frame very carefully as shown above. The main weight bearing joints are going to be where the fabric slings pull on the headers - so take great care to use glue, carefully predrill holes, avoid splitting your wood, and attach in place. There is a 3/8" gap between the header boards. Drill the holes as shown above for the bolts.
Step 2
Build the smaller sling as shown above, taking great care again to create strong joints for the headers.
Step 3
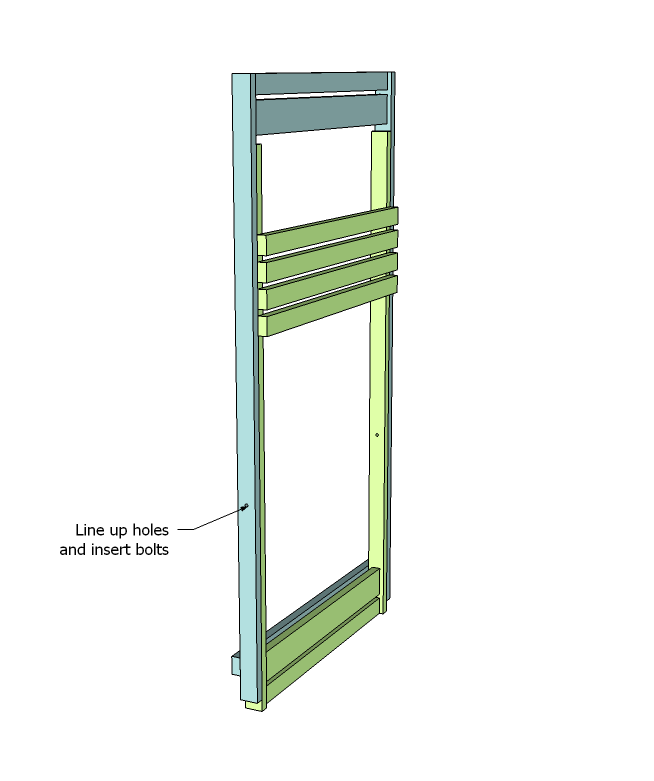
Once both frames are complete, line the frames up as shown above, and insert bolts, with washers on both sides of bolt, and one washer between the two wood frames to protect the finish on your wood frames. The chair should now swing open, but there will be nothing to keep the chair from staying open. See next step . . .
Step 4
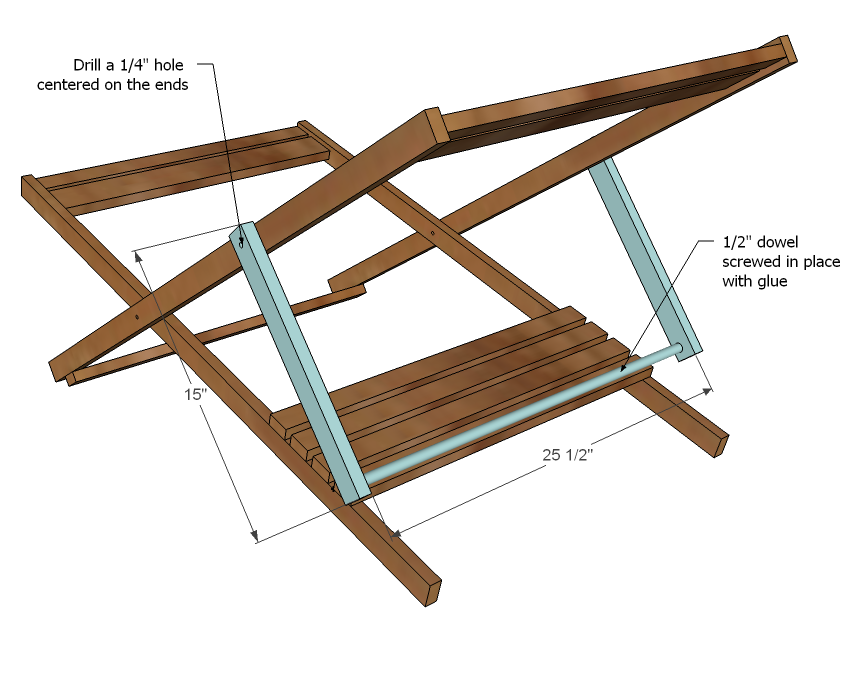
Build the propup support as shown above. Attach with bolts and washers to the backrest frame, in the remaining predrilled bolt hole. Rest between seatframe slats. You will be able to move the prop up to adjust the angle of the chair.
Time to make that sling.
Step 5
Step 6
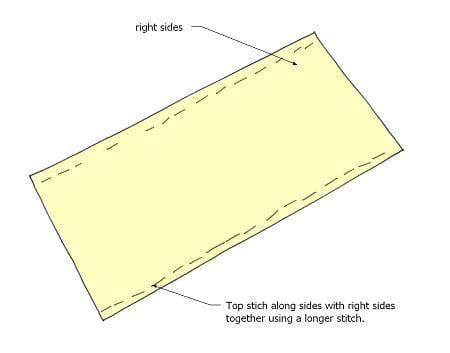
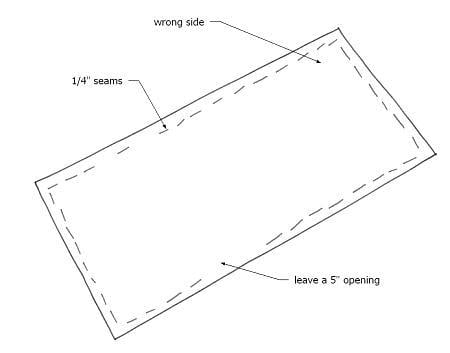
Using a larger stitch length, topstitch edges along both (long) sides only. A decorative stitch is optional. Finish edges by tucking thread into project.
Step 7
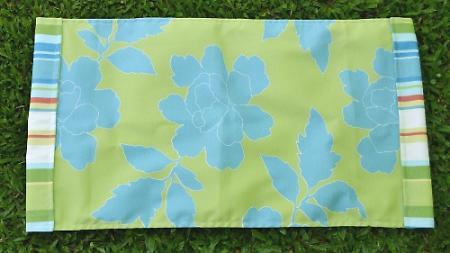
Fold bottom and top over 1 1/2” to create “sleeves.”
Topstitch using same seam allowance as on the sides.
Finish edges by tucking thread into project.
Step 8
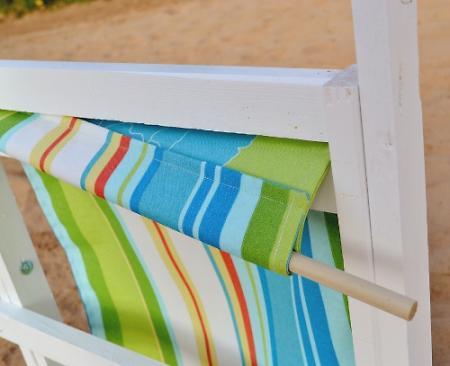
By threading the slings through the chair headers, then threading the dowels in the "sleeves" you create a sling that is held in place sturdily, but is easy to remove to wash or change the look up.
It is always recommended to apply a test coat on a hidden area or scrap piece to ensure color evenness and adhesion. Use primer or wood conditioner as needed.

Comments
exuma_momma
Fri, 06/03/2011 - 12:54
Will be doing these!
I love these chairs! We do kayaking and sailing camping expeditions in the Bahamas and the traditional, but cheap, camping chairs are so expensive and rust so fast, plus they are so ugly compared to these! I'll be working this summer on getting a stock of these chairs ready so our guests will have true 'luxury' camping in the islands :) THANKS ANA!!!!
ripon heating repair (not verified)
Wed, 01/16/2013 - 05:09
Wood Folding Sling Chair, Deck Chair or Beach Chair - Adult
However, both the sensory perceptions prove to be soothing and that is why this gadget has become very popular.
Turn off your unit at the emergency switch or the breaker.
As an HVAC technician, you will work on and install compressors, pumps, fans,
thermostats, switches, pipes and motors in commercial and residential buildings.
Guesting (not verified)
Fri, 06/03/2011 - 13:16
assuming you wanted to make
assuming you wanted to make this for someone heavier - what would you suggest to make it stronger?
Also, you might put a hair pin cotter pin (spring type cotter pin) to make sure the dowels don't fall out during transport.
In reply to assuming you wanted to make by Guesting (not verified)
Ana White
Fri, 06/03/2011 - 13:58
Stronger
To make these chairs stronger - use hardwood for the frames, use 2x2s and 2x3s for the headers, use larger bolts. For an even stronger chair, you would use wider width boards for the frame, but at a certain point - the weight is going to be too much for the sling itself.
smasumur
Fri, 06/03/2011 - 15:28
Perfect chairs!
And I was worried that I may have to figure out how to scale the kid's sized chair to fit an adult. Thank you Ana for doing it AND running it through the Ram test.
I'm thinking the only addition that would make it better is a small pillow with a pocket along the top for a dowel so it can be fit in the like the sling covers. Leaves you free to use either side of the sling cover with your pillow.
Guess it's back to blue (was there once already today) to get supplies.
ddietz12
Fri, 06/03/2011 - 17:11
Awesome job. Was worth the
Awesome job. Was worth the wait. I'll volunteer for your adult lounging in it as soon as we get one done
ferbit
Fri, 06/03/2011 - 17:23
YES!!!
SO excited about these! Yay!!!!!
Stephanie (not verified)
Fri, 06/03/2011 - 17:25
Fabric
When I made the kids chairs I got fabric for $2 a yard in the clearence section at Joann's. If I would have known this pattern would be up so soon I'd have bought enough for these chairs as well so they are a matching set! But their clearence is the best place to look...
deanna_g
Fri, 06/03/2011 - 19:10
Question about how much fabric....
So, if I wanted to do a "double sided" sling like you have shown in your picture....do I need 1.5 yards of EACH fabric or 1.5 yards total?
deanna_g
Fri, 06/03/2011 - 19:10
Question about how much fabric....
So, if I wanted to do a "double sided" sling like you have shown in your picture....do I need 1.5 yards of EACH fabric or 1.5 yards total?
In reply to Question about how much fabric.... by deanna_g
Ana White
Fri, 06/03/2011 - 19:24
For 54" wide fabric, you
For 54" wide fabric, you would need 1 1/2" total yards. What I did was make two chairs, and then bought two different fabrics, each 1 1/2" yards for the contrasting slings. Hope that makes sense?
deanna_g
Sat, 06/04/2011 - 04:47
Yes! That makes complete
Yes! That makes complete sense. Thank you! I'm going to build a couple of these for my best friend's birthday. She's been wanting some chairs for her front porch and I think she'd love these!
angela r j (not verified)
Fri, 06/03/2011 - 19:35
Fabric Dimensions
The fabric dimensions are the same for this adult chair as they are in your plans for the child-sized chair. Shouldn't the fabric be longer and wider to accommodate for the larger chair?
In reply to Fabric Dimensions by angela r j (not verified)
Ana White
Fri, 06/03/2011 - 19:50
Fixed it!
Hi Angela, thanks for catching this. Yes, the dimensions for the adult sling differ and should be 54" x 22 3/4".
Ana White
Sat, 06/04/2011 - 13:58
One More Note
You may also consider using a 3/4" Dowel for the base dowel instead of 1/2" for a stronger chair. Mine's actually 5/8" diameter, and I have no issues, but 1/2" might be not enough for a heavier load. If you do go the larger dowel size, be sure to space stops 3/4" wide instead of 1/2".
momof8
Sat, 06/04/2011 - 17:01
Cheap Fabric
fabricguru.com has fabric for as low as $4.95 per yard, and shipping is 4.99 for your entire order!
Debbie Christianson (not verified)
Mon, 06/06/2011 - 04:59
Gifts
I have been thinking what to give my son's preschool team, as he's heading to kindergarten and has been with them for 3 years. I think I may make these as gifts for them. That would be 6 chairs -- oh gosh. Better get started!
deanna_g
Tue, 06/07/2011 - 04:25
Don't worry! You can get them
Don't worry! You can get them done quickly. Building the frame for this chair only took my about an hour, including cuts! They'll make great gifts!
Guest (not verified)
Wed, 06/08/2011 - 06:44
This chair brings back childhood memories
We had a lot of fun with this chair when we were kids. We used to remove the dowel from the sling's base sleeve and watch someone sit and fall. Many times got into trouble when it was an adult that fell.
I remember our's had armrests too.
I'll make one and show that trick to my kids.
-V
Hawaiianatheart (not verified)
Wed, 06/08/2011 - 07:29
Sizing ?
Love this chair and would like to make them for an older couple but they'd need them to be a more standard chair height. Can this be done? What changes should be made? Thanks!!!
Marianne (not verified)
Sat, 06/11/2011 - 13:14
Has anyone used Polyester
Has anyone used Polyester Outdoor Fabric? What does it feel like? Is it similar to Outdoor Canvas? It's much, much cheaper.
http://www.fabricguru.com/cart/index.php?target=products&product_id=403…
deanna_g
Sun, 06/12/2011 - 19:06
Question about sewing the canvas...
Ana, I know Grace's Grandma sewed the slings for you, but do you know if she used a regular household sewing machine or did she use an industrial machine? If she used a household machine, what type of needle should be used? I'm worried about my machine being able to get through the layers of canvas. :-/
momof8
Sun, 06/12/2011 - 20:36
Can I use Drapery Fabric?
Ana,
I'm wondering if I can use drapery fabric, I live in Arizona, so anything you leave outside dries within a few min, and since there isn't any padding or anything between the two it would probably dry (if and when it ever rains here) pretty quickly.
In reply to Can I use Drapery Fabric? by momof8
Lady Goats
Tue, 06/14/2011 - 22:34
Drapery Fabric in AZ
If you have it, use it. I'm in Chandler, and was thinking about using drapery fabric. I couldn't imagine why it would matter... at ALL.
In reply to Can I use Drapery Fabric? by momof8
Lis West
Sat, 04/21/2012 - 06:24
Fabric Does Matter
The type of fabric you use DOES matter. I am in the NC...with the nice, hot, frying sun. I do a lot of sewing and have been sewing for more than 30 years. Outdoor fabric AND outdoor fabric thread will hold up much better than drapery fabric. Outdoor fabric is made to withstand the drying effects of the sun as well as all the other outdoor elements. Thread makes a difference too. The regular thread will break down in a season from the sun. I use Sunbrella fabric and thread. Have you ever bought any Better Homes and Garden outdoor swings with a cloth cover? My husband bought one several years ago and the cover literally disintegrated and frayed within the year. I made a new cover from Sunbrella fabric and thread (I live near Highpoint, NC where fabric is super cheap) and no problems years later. I used an universal needle 110/18 (upholstery needle) on my regular sewing machine and did ok. My friend has an industrial sewing machine and she had absolutely no problems. Also, after you have finished your cloth portion of the project, spray it down with an outdoor fabric protector. I hope this answered a few of the cloth questions.
ferbit
Tue, 06/14/2011 - 16:29
Starting two of these tonight!
Just bought enough wood and hardware for two of these. A few quick questions. How come you didn't use pocket holes? I thought they were supposed to be stronger, right?
What kind of wood did YOU use, Ana - especially since you said $25 in lumber? I bought pine knowing I would seal it really well, so I'm not worried about rot or anything. My biggest concern is strength, but it should be fine. Neither my husband or I are near 200 lbs. Hopefully pine is good enough!
I'm letting my girls help me with this whole project as a homemade Father's Day gift for hubby! They are so excited to get started tonight!!! :-)
deanna_g
Wed, 06/15/2011 - 19:41
HELP!
I finished my chair for my friend tonight. It LOOKS amazing! My worry.....the dowel rod on the prop-up support is bending like MAD! And it looks as though it's starting to split where it's connected to the 1x2. )-: Her birthday is tomorrow and I'd really like to get this fixed before I give it to her. Is there anything I can do at this point other than replace the dowel?
In reply to HELP! by deanna_g
ferbit
Tue, 06/21/2011 - 15:15
Mine too...
Mine is doing that too, but not too bad so I'm keeping it as is for now. I think I picked out a warped dowel unfortunately.
Options I'm considering are a 1/2" metal dowel (sold at HD). I was thinking if I had it cut longer, it could fit INTO each of the 1x2 (sort of countersunk, if that makes sense), rather than screwing in from the outside. Or possibly long enough to go all the way through and then cap it somehow on each end??? Just some thoughts! :) Hope that helps! Can't wait to see a photo!
ferbit
Tue, 06/21/2011 - 22:36
Found better bolts for the beach/sling chairs!
I found House-Mates Connecting Bolts & Connecting Cap Nuts at Home Depot today and I love them!!! They come in 4-packs for about $4.75 per pack (choice of bronze or brass plated), so you'll spend just under $10 for a 4-pack of bolts and a 4-pack of cap nuts. I did keep a washer in between the 1x2's to keep the wood from rubbing. PERFECT fit! If you used 1x2's (some people used 2x2's for extra strength), make sure to get the size I linked to on Home Depot's website for a perfect fit. I just updated my Brag Post with a new photo (last one at the bottom) showing the chair with the new connecting bolts.
The bolts fit through the 1/4" holes Ana's plans instruct you to drill, but the caps need a larger hole. I drilled 3/8" holes into all OUTER 1x2 where the connector caps needed to be and kept the inside 1x2 holes at 1/4" per Ana's instructions. Hope that makes sense!
1/4"-20 x 40mm bolts

1/4"-20 x 12mm cap nuts

Guest (not verified)
Wed, 08/03/2011 - 14:07
almost finished
I made a few adjustments to this plan because I didn't trust merely gluing the dowels. I drilled a hole through the pop-up support and pushed the dowel through that. I then glued the dowel into place and capped it off with a screw and a washer (so that it wouldn't slide out) We'll see how it goes after I attach the fabric.
Orange "price matched" dowels from Michaels for me. Michaels sells $1 dowels, and Orange is around $2.45. Since Michaels only has "hardwood" dowels, and Orange has Oak, I got them for $1.45. (Michaels dowels are far too weak for this project)
Kalli (not verified)
Fri, 08/05/2011 - 07:41
Taught Fabric
I bought 54" home decorator fabric and sewed them according to directions, but the fabric is taught. It doesn't sag like the chairs in the pictures. Has anyone else had this problem?
Sherry (not verified)
Fri, 09/23/2011 - 21:03
Tall
Want to make one of these for my husband for Christmas. He is 6"4'...will he fit in this chair comfortably??
Aia (not verified)
Fri, 06/08/2012 - 06:35
can anyone tell me how high
can anyone tell me how high the front of this sits off the ground? My husband has a bad back and does not like chairs that make him feel like his behind is hovering inches from the ground. I am actually looking to modify this into a double-wide/loveseat. Has anyone modified their chairs into a more upright position vs lounger?
raj_k (not verified)
Tue, 07/24/2012 - 09:26
Question on fixing top boards
I am new to this so I apologize if its a silly question. The above picture in Step 1 refers to "fasten the top boards with screw and glue, predirlled"
Do I predrill holes to on the side frame wood( 48") so I can have the screw from the side connecting the top board? Is that 2 inch screws are for?
Phil O'Connell…
Wed, 07/10/2013 - 18:33
This looks like a great
This looks like a great chair, and as per usual, easy to follow plans, too!
Next chance we have to build more things, this is on the list for sure! Just have to finish building a fence first!
Cheers from New Brunswick in Canada!
ladams1221
Tue, 08/20/2013 - 14:54
Stain color/# of coats
Hi, Ana. I happen to have two of these wonderful chairs from the 1930-40's, and they are so comfy to sit in. I wanted to know what color of Minwax Gel stain you used, and how many coats you applied to get that color? Thanks - for ALL your wonderful plans. Much success on the book - it's terrific!
dannyJohansson
Sat, 08/31/2013 - 08:12
one difference
I beefed these chairs up a bit by using 5/4 stock and 5/8 inch dowels. They held 300 lbs no problem. As one person previously pointed out, a simple way to strengthen the arm / back support is by drilling through the arm support and cutting the dowels long to go all the way through and then gluing the dowels in place. No screwing necessary. These turned out awesome, really comfortable, and super pretty to boot.
jdallasw
Thu, 05/22/2014 - 06:00
Foot rest?
Hi Anna!
I cannot wait to try these out! What are the chances of getting plans for a folding sling foot rest?
klnhr62
Fri, 05/30/2014 - 11:11
sling chairs!
I love these! Is the supply list for 2 chairs? I need to make at least 4, maybe 6(LOL)
treydutton
Tue, 11/04/2014 - 09:45
ripstop nylon
Would ripstop nylon be an acceptable fabric to use on this chair. I know it will have a little bit of stretch to it, but could you cut it a little shorter to account for the stretch? I really have no idea about fabric and sewing so any direction would be appreciated.
Thanks
invaderk2
Sun, 06/07/2015 - 06:22
Directions should be changed for safety
The half inch support dowel snapped as soon as I sat down when I was finished and the chair collapsed and I hurt my shoulder. The directions should really be changed to at least 5/8 if not 3/4 dowel and it should also instruct the dowel to go the whole way through the 1x2 so it's flush with the outside. The way it is now I don't think it's safe.
Sharvish
Thu, 09/24/2015 - 01:19
Simplicity is awesome
Thanks a lot dude ^.^ It helped me for my mini project.
Love this design.
Simplicity is Awesome <3
Chickenchew
Sun, 04/18/2021 - 19:44
Anyone see an issue using…
Anyone see an issue using dowels and glue for the header and footer cross pieces instead of screws?