
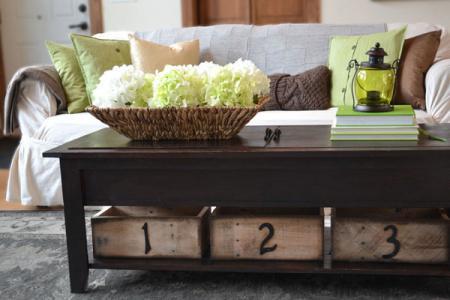

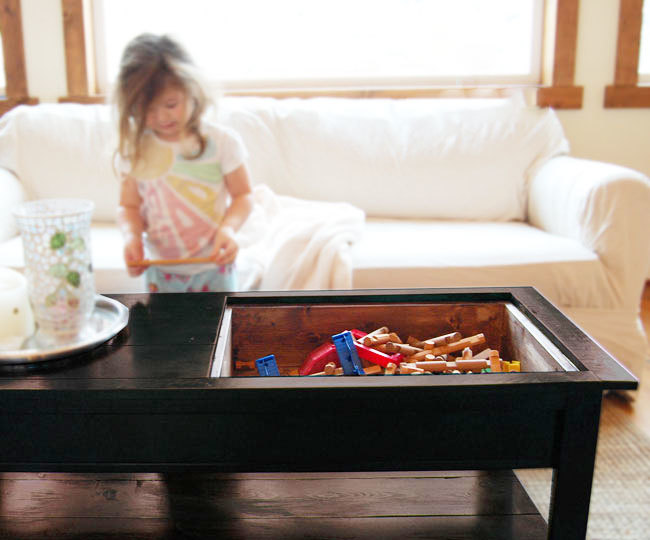
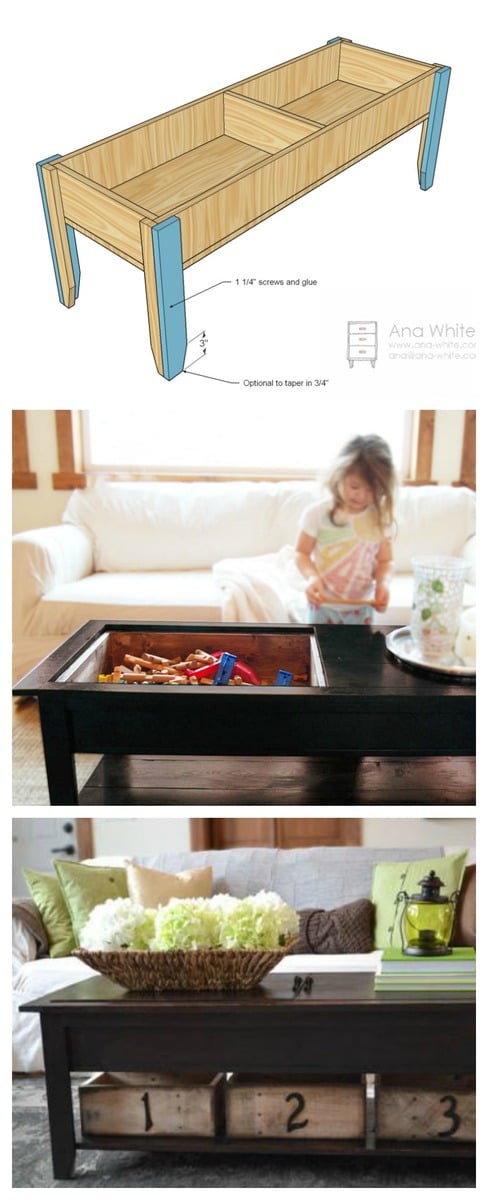
This beautiful coffee table has a secret! The top panels remove, with lots of storage inside. We love it as a play table (legos anyone?) or a workcenter for your laptop, or just a place to store board games, extra blankets, or magazines.
This coffee table is easy to build - you'll just need a few tools and some off the shelf lumber. Step by step plans with diagrams by Ana-White.com
Preparation
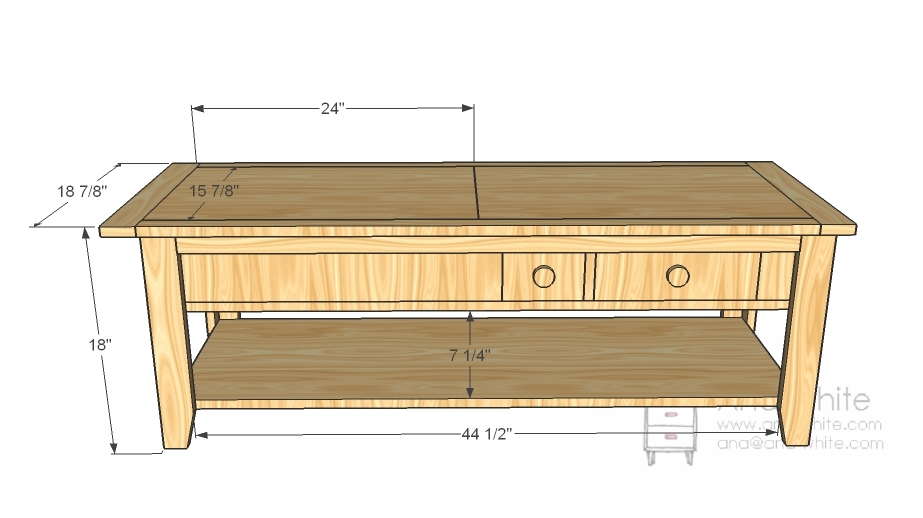
1/2 Sheet of 3/4″ MDF or Hardwood Plywood cut into strips 15 7/8″ wide x 48″ long
2 – 1×3
3 – 1×2
1 – 1×6 – 12 foot long
2″ screws (self tapping wood screws)
1 1/4″ screws (self tapping wood screws)
wood glue and filler and finishing supplies
2 – 1×6 @ 48″
3 – 1×6 @ 14-3/8″
2 – 3/4″ MDF or Plywood @ 15-7/8″ x 48″
2 – 3/4″ MDF or Plywood @ 15-7/8″ x 24″ (top inserts)
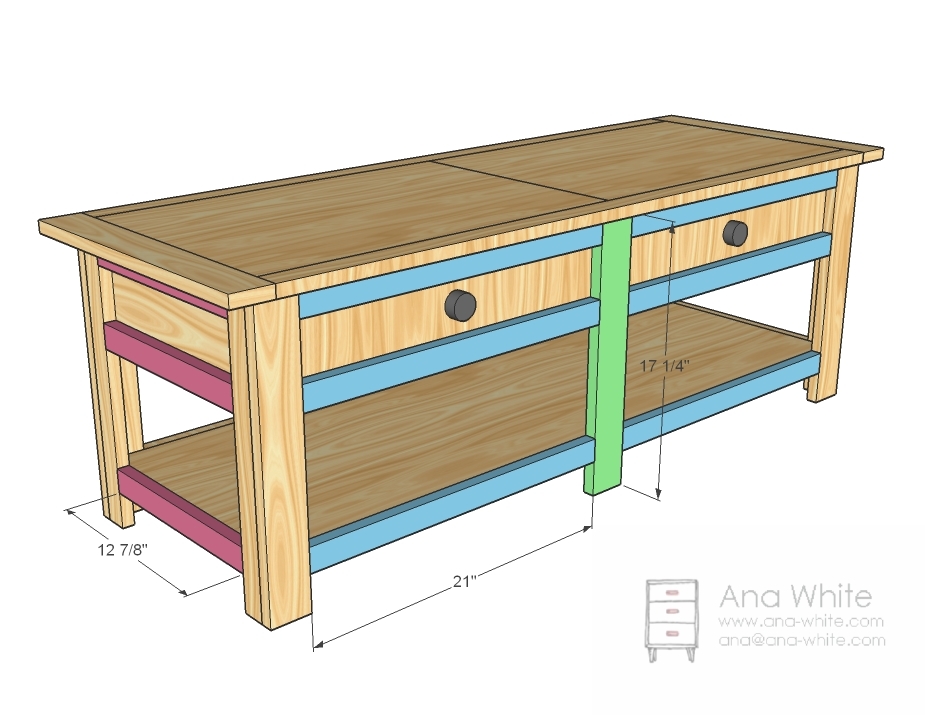
4 – 1×2 @ 17-1/4″
4 – 1×3 @ 17-1/4″
2 – 1×2 @ 44-1/2″
2 – 1×2 @ 12-7/8″
2 – 1×2 @ 48″
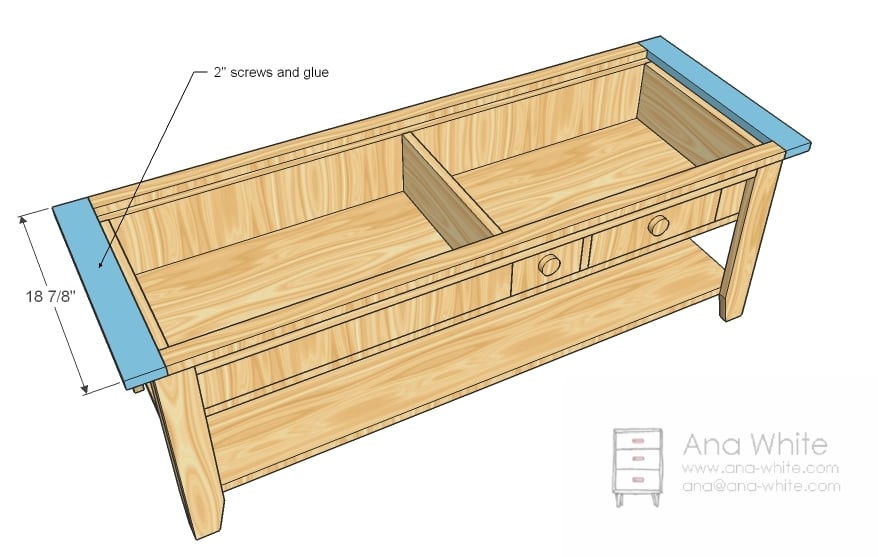
2 – 1×3 @ 18-7/8


Instructions
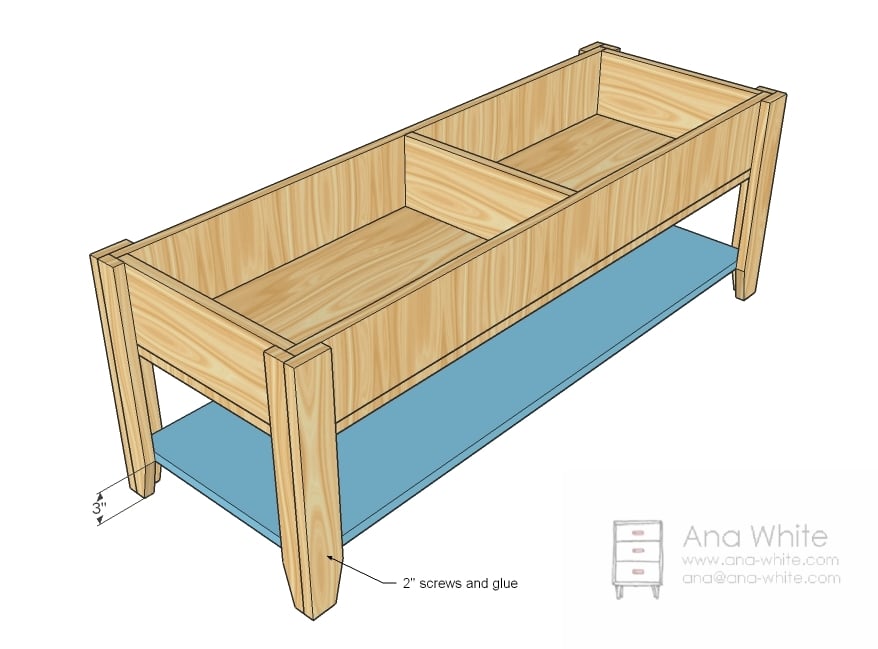
Step 1
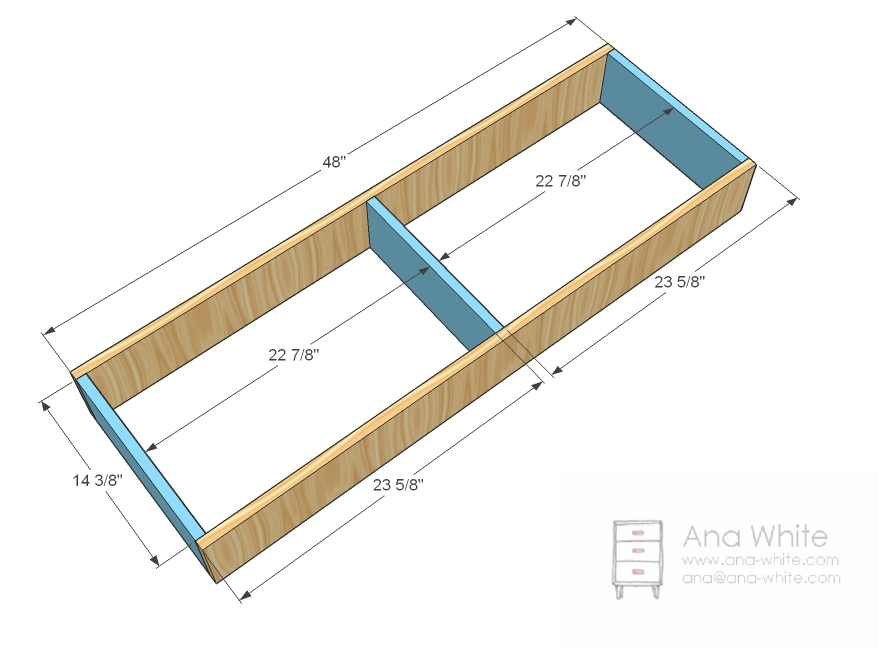
Build the Box for the wooden train table - Mark the sides of the box and predrill holes. Attach the ends and center to the box as shown above. Use 2″ screws and glue or 1 1/4″ pocket hole screws and glue.
Step 2
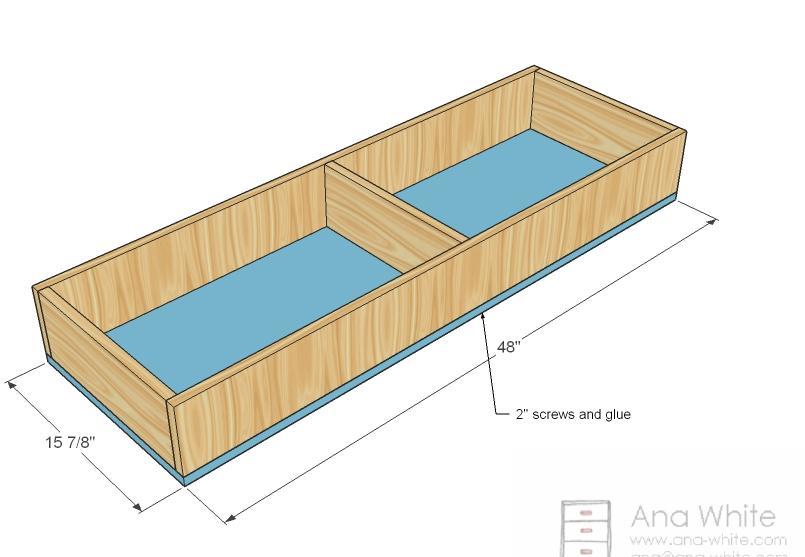
Bottom of Box - Now just screw the bottom of the wooden train table compartment to the sides and dividers as shown above.
Step 3
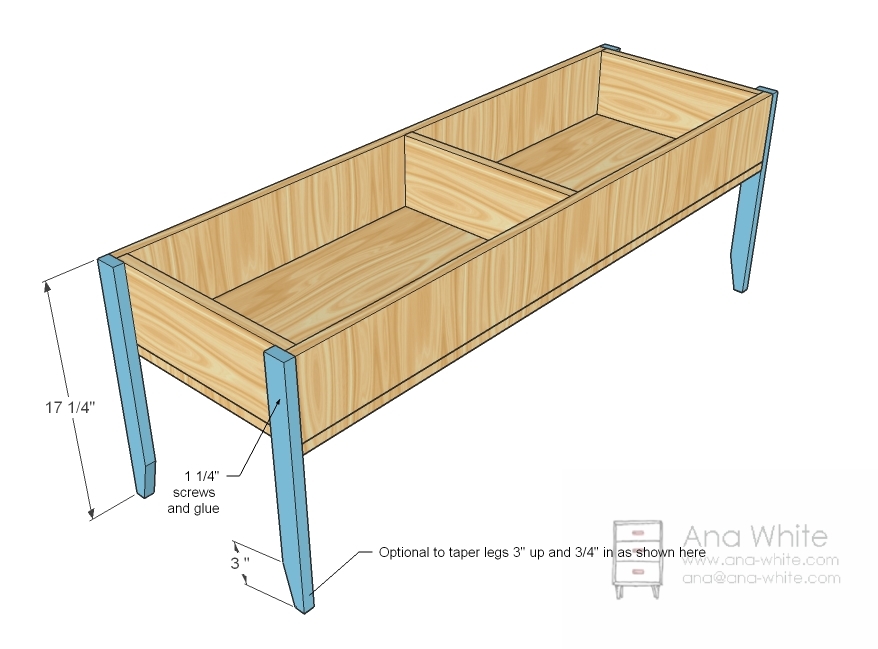
End Legs - Now just screw the end legs on with 1-1/4" screws. I turned the whole thing upside down to do this and screwed the legs from inside to hide. Also, I tapered the legs with a circular saw, but that’s purely decorative.
Step 4
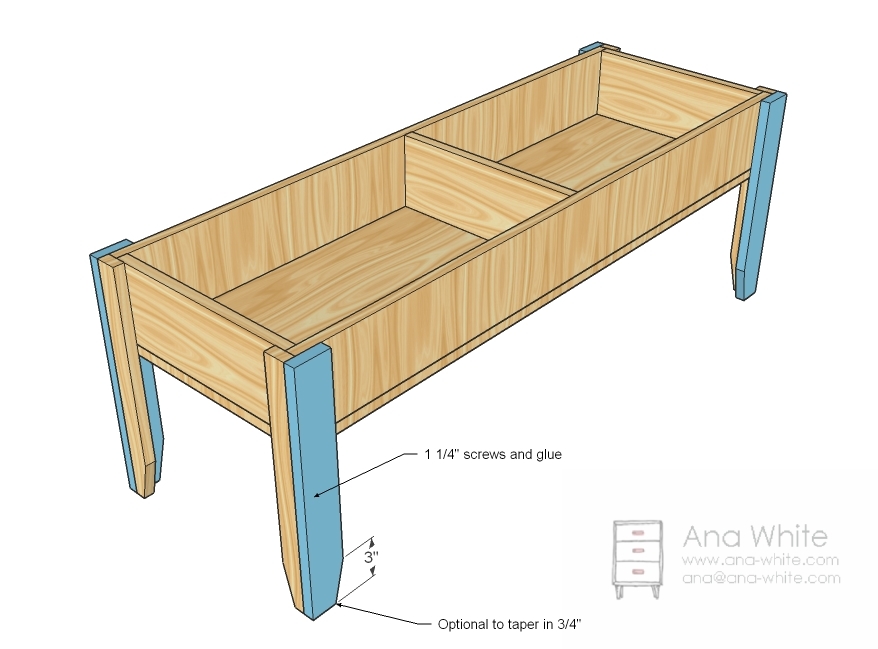
Front and Back Legs Now screw the front and back legs to the box and the side legs with 1 1/4″ screws and glue. I tapered these too as shown above. You could also use nails and glue to hide any holes. Nail holes are much easier to hide than screw holes.
Step 5
Step 6
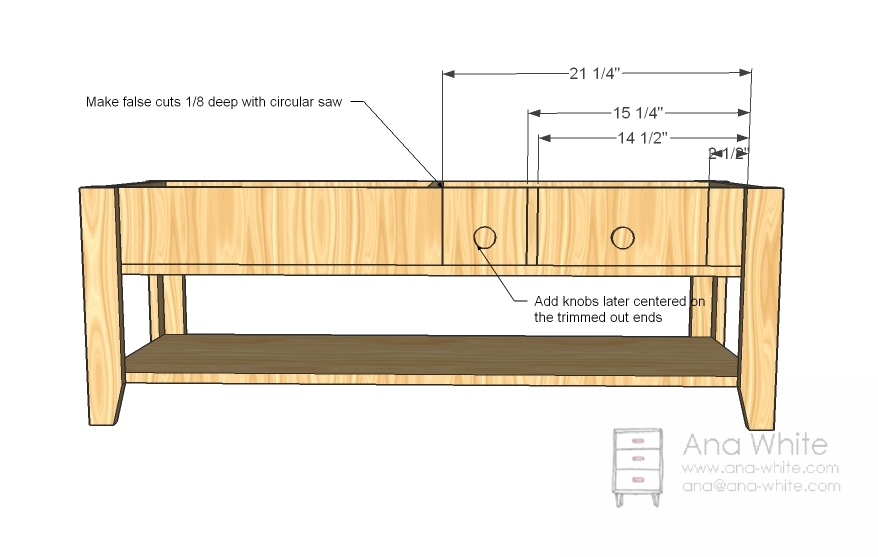
Optional False Drawers To make the coffee table look like it has drawers, just set your circular saw blade to 1/8″ and make cuts as shown above. Hold off on the knobs until you are done with the table. Make the cuts on both sides, on opposite sides.
Step 7
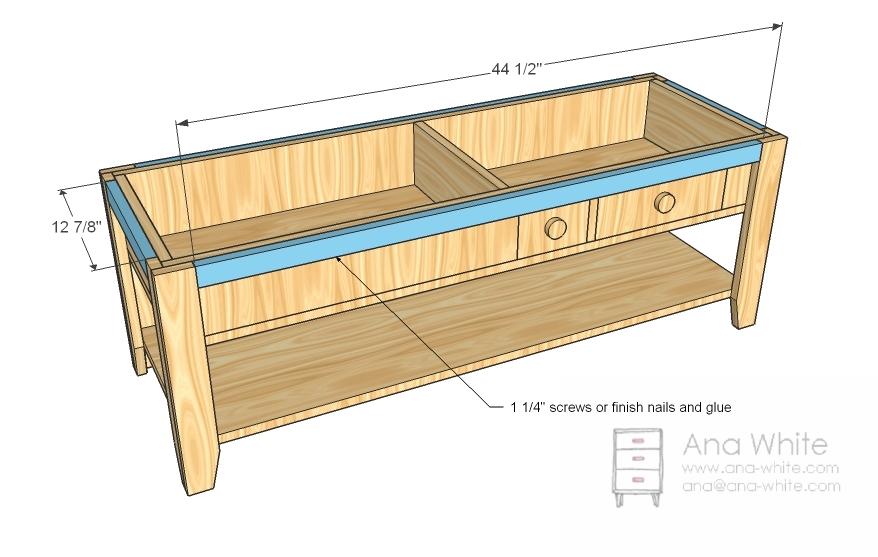
Top Supports Now just screw these on flush to the top with 1 1/4″ screws and glue
Step 8
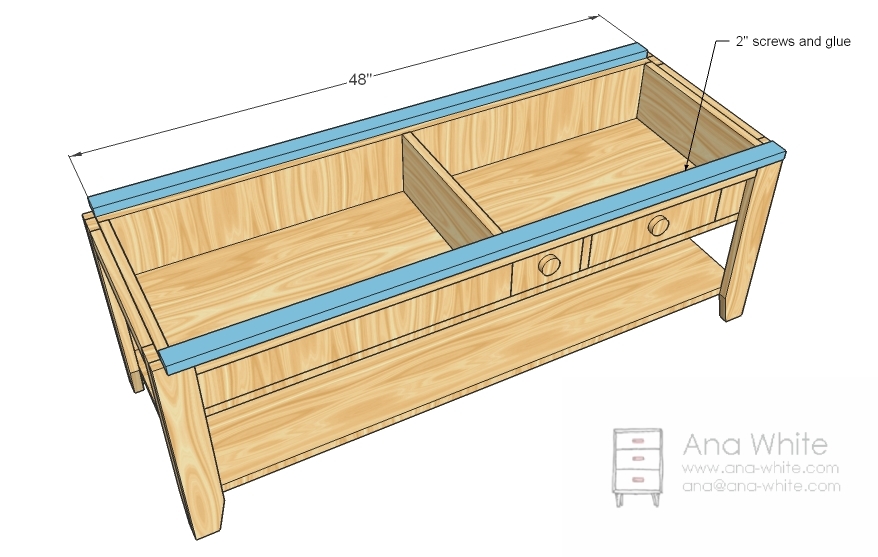
Top Sides Now simply screw the top sides to the top as shown above.
Step 9
Top Ends Now simply screw the top ends on as shown above. If you have a Kreg Jig™, you can also screw the end to the sides for added support.
Step 10
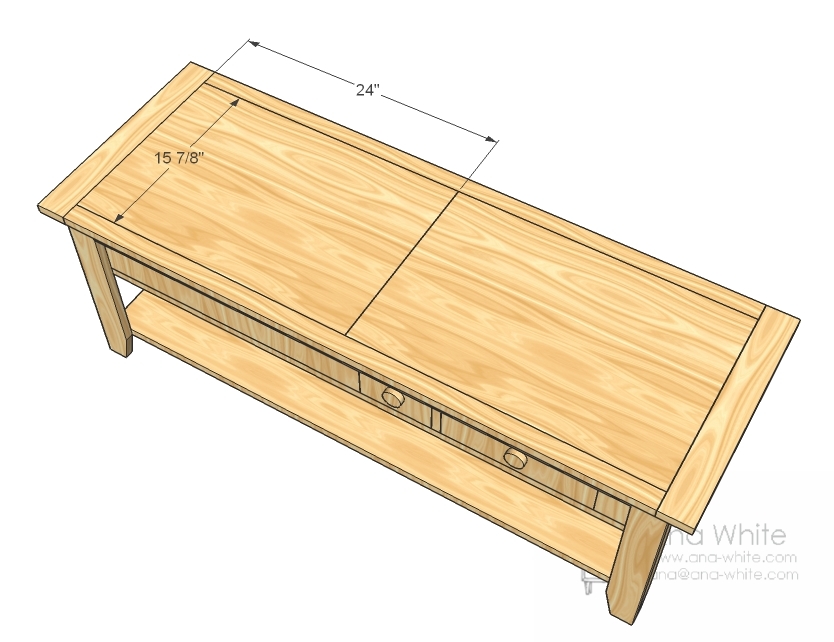
Tops Check the fit of the top inserts and sand as needed to insure that the inserts fit properly. If needed, drill a hole in the inserts to use as a handle to pull inserts up with.
Step 11
And here are those mods for the other version. Don’t taper the legs and just add a middle legs, and trim out the bottom of the box and shelves. It’s really simple.
Step 12
I won’t say much more than I’ve been at this one for three days with a hair dryer . . . but the color is dark walnut. I used Elmer’s wood filler and it took the stain quite well. Thanks for reading! I hope you take a second to let me know if you like this design, so I can continue to post more plans that are similar. Mom to mom, this is a must make.

Comments
Breanna (not verified)
Thu, 12/09/2010 - 09:40
Forget using this for just
Forget using this for just legos, I can't think of a better place to stash all the remote controls, magazines and game console controllers then in those compartments. Our house is void of legos (for now) but extra storage anywhere that is super accessible and easy to hide is perfect! I may never have to try corralling Wii-motes and xbox controllers again!
kimber (not verified)
Thu, 12/09/2010 - 10:46
This is awesome! Love it.
This is awesome! Love it. You are fabulous. Thanks so much for sharing!
Ana White (not verified)
Thu, 12/09/2010 - 11:02
Definitely plank the top with
Definitely plank the top with pocket holes - it's what I did, or double layer over 1x2s run the opposite direction as the planks, every 12" or so would do the trick and add very little weight. Just make sure that the 1x2s end 3/4" from the edges of the inserts, and you won't be able to use the insert bottom as say a lego mat.
Ana White (not verified)
Thu, 12/09/2010 - 11:06
Someone else mentioned pop up
Someone else mentioned pop up magnetic clasps - so you would just give the insert a little push and the top would pop up. I simply left a little space so I can pull mine up with on the edges.
MarketGirl76 (not verified)
Thu, 12/09/2010 - 12:18
Awesome project. A living
Awesome project. A living room junk drawer! I am speechless. My list is growing. Thank you so much!
Michele G (not verified)
Thu, 12/09/2010 - 12:30
Ana -- When you planked
Ana --
When you planked your 1 x 6's for the shelves and top, at what interval did you space your pocket holes? 6 inches or so apart? Do you need to stagger them from board to board to make it strong enough? I've never used a pocket hole jig but am planning on getting one soon and don't want to screw this up.
Also, to make the wood look more "planked" did you sand down the edges to be joined before putting them together?
Thanks for any feedback.
--Michele
P.S. I found your blog way back when you only had 3 plans on it and It's been amazing watching it grow and develop into something truly spectacular. Makes me wish I didn't have to go off to my lawyer job every day so that I could stay home and build stuff! Keep up the great work!
ShannonG (not verified)
Thu, 12/09/2010 - 17:57
I want one! This is really
I want one! This is really awesome, and looks great. You suppose I could talk my father-in-law into building it for me? (As I have No Tools!)
Cheryl in Canada (not verified)
Fri, 12/10/2010 - 05:08
I'm not a mom (yet) so at
I'm not a mom (yet) so at first I thought I didn't need this table. But the more I look at this, the more I want to build it! It would be a perfect place to stash throws or even DVDs that I would want hidden away. Thanks for everything you do, Ana!
Elle (not verified)
Fri, 12/10/2010 - 08:15
Love this project and am
Love this project and am really tempted to try to make it even though I don't have children, nor have I ever tried constructing my own furniture. What can I say? You make it look simple/easy enough that even a klutz like myself might be able to manage. Although I'd really like to see this design with functional draws instead of removable play tops, do you think I'd be able to modify the plans to accommodate this feature? Sorry if that's a silly question, but remember I am newer than a novice at this type of thing.
Thanks for sharing, you really are an inspiration for DIY wannabes like myself.
christy (not verified)
Fri, 12/10/2010 - 08:39
I love this idea. If we had a
I love this idea. If we had a living room big enough I would do this. My kids love legos and with 6 kids we have LOTS of legos (just not lots of room). We have built so much from your website. Ledge shelves, hanging daybed (modified to be the hanging bunkbeds we saw featured here), the outdoor sectional, and the pallet picnic table. We have several more book marked to build as well. My 14yo son has built most of it on his own. My husband broke down and bought a dewalt chop saw and is looking at a table saw. We have saved so much money on this furniture and it gives me son a sense of pride and accomplishment when someone comments on his building. He has made some of the doll furniture for his sisters for christmas.
Thanks so much!!
Autumn (not verified)
Fri, 12/10/2010 - 10:39
I LOVE this! I am forwarding
I LOVE this! I am forwarding this to all of my friends. Maybe one of them will build it for me!
Love your site too!
RBarry (not verified)
Fri, 12/10/2010 - 10:43
Oh. My. Goodness. I have been
Oh. My. Goodness. I have been looking for a coffee table with storage, this is perfect. It would be perfect for storing our board games, or for the usual hiding of junk when people stop by. ;P Love it! Thank you.
Ariel (not verified)
Fri, 12/10/2010 - 12:04
Ana, In your pictures it
Ana,
In your pictures it looks like you joined 1x6s to make the bottom shelf instead of using MDF or plywood. Is this correct? Did you use your kreg jig?
Thanks! Ariel
Ashlee (not verified)
Fri, 12/10/2010 - 20:06
where can you get a large
where can you get a large lego mat?! Thanks for the info!!
Sarah K (not verified)
Tue, 12/14/2010 - 08:44
You are smart on so many
You are smart on so many levels, Ana. My daughter is 16, and I'm waiting:)
I'm also waiting (read as 'busily building') to finish my house so that I can start making furniture!
Lisa (not verified)
Wed, 12/15/2010 - 18:13
This table is fabulous! We
This table is fabulous! We don't need a coffee table, but I read another comment about using this to store diapers, etc. That is a great idea, but my kids would get into it if it were at coffee table height. Would it be possible to make the legs longer, more like a sofa table height that I can keep up against the wall in my family room? I'm not a big fan of the pack&play/diaper changer taking up half my room, but a pretty table tucked neatly out of the way that could hold all my supplies...THAT I could go for. I guess I'm just wondering if any other modifications would be needed for support if the table were taller? And by the way, THANK YOU so much for this site! My husband and I (who've never built ANYTHING before) are currently building the play kitchen for our kids (girl, 4 & boy, 2) for Christmas, and we never would have imagined being able to do it without this site and your expertise! (We are also already talking about a dining table and queen bed for our next projects!) :)
Yetunde (not verified)
Thu, 12/16/2010 - 09:21
I'm soooo excited! I just
I'm soooo excited! I just built the Train table depth version of this! This is my first Ana White project, but definitely not my last. I submitted my photos already, but here's my blog post on it: http://afromartha.com/?p=896
Ana, you rock!
Babychaser (not verified)
Fri, 12/17/2010 - 11:01
L.O.V.E. the "hide stuff"
L.O.V.E. the "hide stuff" furniture idea! We live in a small space and are always looking for ways to make things fit! Thanks!
Joscie, rhymes… (not verified)
Mon, 12/20/2010 - 08:49
oh my gosh, i loooove this!
oh my gosh, i loooove this! I am wondering how to you remove the top to get to the bin? Is it easy to remove? I totally want to make this!
Ana White (not verified)
Mon, 12/20/2010 - 09:05
Joscie, just drill a hole in
Joscie, just drill a hole in the center, and it's easy! The panels are rather light.
Kimie (not verified)
Tue, 12/21/2010 - 05:42
Did you finish the edges of
Did you finish the edges of the plywood in any fancy way or just stain them?
Melissa (not verified)
Thu, 12/23/2010 - 06:25
WHat a great idea! I love it
WHat a great idea! I love it and want to try building it myself. Are there any plans in the making for matching side tables with storage?
Ana White (not verified)
Thu, 12/23/2010 - 07:08
Thanks Autumn!
Thanks Autumn!
Ana White (not verified)
Thu, 12/23/2010 - 07:09
Ariel, that is correct. I
Ariel, that is correct. I used 1x6s joined with a pocket hole jig, 3 1x6s wide. If you built your 1x6 shelves first, then you could measure their width and build the table around them. Should be easy to make the mods. Good luck! Ana
Liz (not verified)
Mon, 12/27/2010 - 05:07
I made this for my sister for
I made this for my sister for Christmas (she has 2 year old twins and a 3 month old!). She LOVED it! The only change I made was to make a "skirt" under the lower shelf with extra 1x3s. It helps support the shelf (for when the twins try to climb under there) and will prevent toys from getting lost under the table. Thanks for the great plans!
Michelle (not verified)
Mon, 12/27/2010 - 15:27
This is a great plan, one we
This is a great plan, one we are building right now. I do, however, have a question about the top and how to get into the top storage. Did you put a hole in the top to lift the tabletop up or use a different idea? I'd like to hear the solution.
Thanks!
Cate (not verified)
Mon, 12/27/2010 - 15:44
This might be the project
This might be the project that solves my lego problem! Thank you so much! Is the bottom shelf necessary for stability or strength? I think I might like an even simpler version, without the shelf. Of course, if I have a shelf, I have a place to store the floor cushions I want to make to go with the lego table....
Rachel (not verified)
Tue, 12/28/2010 - 12:01
I LOVE this. I think I might
I LOVE this. I think I might actually have all of the wood in my garage to make this. WOOHOO!!! I am thinking I should have asked my hubby to get me my own power tools for Christmas. :)
Thank you for your amazing plans. I have shared your site with many friends and family members.
You are AWESOME!!!!
kimberly (not verified)
Wed, 12/29/2010 - 22:05
LOVE it!!! hubby was just
LOVE it!!! hubby was just laid off, I think I just found a project for us to do together as he looks for new work
Jala (not verified)
Sun, 01/02/2011 - 19:30
Well, I was considering
Well, I was considering buying a 'train table' but this is so much better and exactly what I'm looking for! My list just keeps growing! Kitchen Helper Tower, Mom's table, Farmhouse bed, oh my list goes on and on... Thank you for all you do!
Jess (not verified)
Thu, 01/06/2011 - 07:29
I don't know when my comment
I don't know when my comment will be seen, but I would love to see something like this that is more shallow so that you could scrapbook while sitting on the floor. You could hide the stuff while the kids are up and about and the get it out at nap time. I love this idea!!
Tracey (not verified)
Sun, 01/09/2011 - 11:08
Brilliant! Legos have taken
Brilliant! Legos have taken over my living room with all of my 6 year old sons creations and colorful bins. I'm not much of a DIYer but this I might have to give a try.
Elisa | blissfulE (not verified)
Sun, 01/09/2011 - 18:00
Wow! I just stopped by your
Wow! I just stopped by your site for the first time (linked from Simple Mom) and WOW! Your instructions are clear and your drawings are super-clear and professional. Keep up the phenomenal work!!!
Where did you buy the sheet of Lego bumps to flip over for Lego play-table mode?
Ana White (not verified)
Sun, 01/09/2011 - 18:17
Elisa, welcome! Thank you!
Elisa, welcome! Thank you! You can buy the lego mats at Walmart for sure, we don't have a Target, but I would guess they would be sold there too.
Elisha (not verified)
Mon, 01/10/2011 - 04:51
I love this! We're in need
I love this!
We're in need of a coffee table, and I recently asked my construction-worker brother to help me learn my way around some power tools, so I found this at the perfect time. And it's beautiful!
Thanks for sharing this with us!
MarlaAndWilliam (not verified)
Wed, 01/19/2011 - 05:49
Hi Ana - We are planning to
Hi Ana - We are planning to do this as our next project for our living room, but we've also been dying for an appropriate ottoman.... so I've decided that instead of having the panels flip over for lego mats, etc (we don't have kids!) I'm going to make upholstered cushions on them! So it'll be a coffee table that converts into an ottoman!! What do you think about my idea!?
Julie (not verified)
Sat, 01/29/2011 - 13:31
OMGosh!!!! Hubby and I are
OMGosh!!!! Hubby and I are going to make this as part of the silent auction Lego theme "basket" for our eldest daughters class for the Spring Fundraiser!! Can't wait to get started - and yes, we're going to build it twice and keep one for us!!! HA!!!
hlg232 (not verified)
Sun, 01/30/2011 - 05:03
I love this coffee table.
I love this coffee table. I've been looking at lift-top coffee tables. Could you convert this to be a lift top? It moves the top over the sofa so that it works like a TV tray/work table over the sofa. Where could you find the hardware?
Lisa (not verified)
Wed, 02/02/2011 - 07:01
WOW!!!!!! All I can say is
WOW!!!!!! All I can say is WOW!!!! Wow to everything on this site!!! I love this table and as unhandy as my husband and I are, our handyman is not. He is dirt cheap and with the help of your plans, I am going to be hiring him a lot!!!!! Farmhouse table and benches, beds, entertainments centers, you name it!!! The thing I love best is how you lay it out simply and that I can buy the materials that meet my criteria for safety in my home. Most might consider me a little crazy :) but I am trying to rid my home of all of the "fake wood" for the chemical emissions. This is the perfect scenario for us! Ssshhh, I really shouldn't say this because I really don't want you too, but you could easily charge for these plans. They are BRILLIANT!!!!
Sarah Z. (not verified)
Sat, 02/05/2011 - 15:56
Thanks so much for this great
Thanks so much for this great table! I can't wait to show my husband so that we can get started and I can stop stepping on Legos!!!
Andrea (not verified)
Sat, 02/12/2011 - 17:19
You are so awesome! I went to
You are so awesome! I went to my first moms club function and someone raved about your site, and emailed the link out today. I have no idea how to make this stuff, but it is PERFECT for my dad to make my 2 kids. This is only the first post I have looked at, and I cannot wait to look at more. He is going to be SO busy!!!!
Julie (not verified)
Thu, 02/17/2011 - 18:07
do the drawers pull out?
do the drawers pull out? sorry, im just startin on this.
klmullen (not verified)
Mon, 02/21/2011 - 03:38
Anna, After looking at the
Anna,
After looking at the plans and the pictures I am trying to figure out if you have a slight reveal for the bottom of the box. If there is a reveal how did you negotiate the legs? Did you use a dado blade to notch them or is it all an optical illusion?
Kari (not verified)
Tue, 02/22/2011 - 22:55
I think I love you. I just
I think I love you. I just found this site, and I am in LOVE! Especially with this coffee table.
Christina (not verified)
Mon, 03/07/2011 - 05:12
I love it!! I just told my
I love it!! I just told my hubby to clear his weekend, he is going to be busy!
QueenMahin
Sun, 03/20/2011 - 20:09
I made it!
I finished mine this weekend. Thanks Ana. Putting my brag blog post together now.
Theresa
Fri, 03/25/2011 - 09:13
This would make a great gift
Going on my to do list. Thank you Ana
momofwar (not verified)
Thu, 04/21/2011 - 05:24
Love Love LOVE This!
I adore this plan! I, too, am waiting, waiting, waiting...but in the meantime this really fits the bill for a functional coffee table that doubles as a Lego table. I have one question regarding the bottom shelf. In the pictures it looks like it's made of pine boards. I can see parallel lines running the length of the board. Is that a finishing technique, and if so could you please tell me how you did that? Thanks for all you do!
Dragonflybay (not verified)
Sat, 07/23/2011 - 18:21
Table
Do you have to put the shelf on the bottom or can you leave it out? We always sit at the table on the floor with our feet under the table.
Guest (not verified)
Mon, 10/17/2011 - 19:29
great idea
I can't believe that I have not seen this idea before. I can't think of a way to say what a great idea this is. It is going on my list of "I wish I had time to do" because we don't have a coffee table yet and I have been wishing we had room for a train/lego/building table.