Community Brag Posts

Outdoor Sectional

Submitted by Anonymous (not verified) on Fri, 04/28/2023 - 05:24

This was my seventh outdoor couch but my first sectional. My very first couches were all inspired by Ana White's plans and I have gotten so much better with my skills that I building other things as well. Thanks Ana for all your inspiration!

Comments

Essential Adirondack chair

Submitted by str1523 on Mon, 05/25/2020 - 10:23

Like this chair! Changed the 3 1x10's on the back to 4 1x8's ripped down to 6 ¹⁵/¹⁶

Estimated Cost
40
Estimated Time Investment
An Hour or Two (0-2 Hours)

Comments

Love our new greenhouse!

With the help of friends and family, we managed to build this greenhouse rather easily. We had to start with the foundation since the spot we chose was not an even grade. We did this by filling sono tubes with cement and leveling each off so the greenhouse would have a solid place to sit. We then built out a frame around the outside of the cement tubes with some reclaimed 6x6's. After that, we filled the space with 5 tons of river rock and then got to work! After the foundation was ready putting the rest of the house together was a piece of cake. The frame was so easy to put together. We had a few minor kinks to work out here and there, I won't say this house came out 100% perfectly, BUT I am so happy with the end results. We chose to paint it a deep green color as a final touch. So far we just moved a few potted plants from our deck to the greenhouse for the winter. It has been working very well to keep the plants cozy during the colder days we've had. Eventually, I plan to build a potting station, shelving, and most likely a garden bed for winter harvests.

Built from Plan(s)
Estimated Cost
$2000
Estimated Time Investment
Weekend Project (10-20 Hours)
Recommended Skill Level
Intermediate

Comments

Ana White Admin

Mon, 11/09/2020 - 09:52

The foundation looks great the greenhouse looks amazing! I'm sure fun was had building it too:) Thanks for sharing.

Seasonal And Holiday

Master Bath Barn Door

Submitted by Anonymous (not verified) on Fri, 03/17/2017 - 16:34

Created this door with pine wood tongue and groove lumber and pine wood planks. Purchase barn door hardware / track from Jet.com and door handles from Hobby Lobby. 


This replaced my Master bath door and I think came out pretty good. Thank you for the ideas!!!  Jeff M.   Brownstown, Mi

Estimated Cost
Wood 55.00
Handles 2 for 8.00
Stain ( left overs)
Barn door track 54.00

Total $117.00 and 10 % Military discount at lowes
Estimated Time Investment
Weekend Project (10-20 Hours)
Finish Used
Minwax. Mix of Kona and Driftwood Grey
Recommended Skill Level
Intermediate

Shoe Dresser

Submitted by Anonymous (not verified) on Sat, 04/01/2017 - 08:26

We used the shoe dresser instructions with some modifications to make it longer

Built from Plan(s)
Finish Used
Stain, polyerthane, chalk paint and wax
Recommended Skill Level
Advanced

Chicken Coop

Submitted by Elloh on Tue, 08/11/2020 - 11:05

This was my biggest build yet and these plans along with being able to see a few brag posts with modicifactions made this project less intimidating. I extended the coop in order to add a walk in door. The drop down doors on both sides will give plenty of access and help with cleaning. I've added door latches to all the doors since putting it in place. My dad provided the cedar so that greatly reduced my costs. This project took about six days to complete. The fun part was getting it out of my carport : ) This was built for my daughter's chickens and she is thrilled with it. So am I! Thanks for the plans Ana!

Estimated Cost
Hardware, screws, hardware cloth and plywood - around $150

Roller Vertical Pantry

Submitted by MikeW on Mon, 05/06/2019 - 08:49

Made my wife happy!

Estimated Time Investment
Day Project (6-9 Hours)
Finish Used
Paint
Recommended Skill Level
Intermediate

Comments

Workbench

Submitted by Ulrike on Sun, 06/21/2020 - 09:37

Built 2 of the workbenches for our garage. The plans made assembly very easy and quick. We had Home Depot cut the plywood to size.

Estimated Time Investment
Afternoon Project (3-6 Hours)

Comments

Modern Dorm Mini Refrigerator Microwave Cabinet

Submitted by rachelcb on Sat, 07/31/2021 - 12:35

I changed plan to make deeper. I also modified the bottom trim and top. I put a ball bearing soft door drawer guide on modern door so it can slide back and forth. I feel we need more modern plans on here but with a bit of creativity and using plans you can make anything. I have never built anything before. I love General Finishes Milk Paint in Snow White and I brushed rolled it on (sanded between 3 coats). It’s basically self leveling and leaves a nice matte finish. Used door glide in picture bought from homedepot in the 24 inch and that’s how wide door was and it was 36” tall. Door glide I only used one on top of the door not on bottom as well. Door piece of fiberboard with just strips glued on and quarters spacing them correct.

Estimated Cost
$200
Estimated Time Investment
Weekend Project (10-20 Hours)
Finish Used
Dorm mini refrigerator microwave cabinet
Recommended Skill Level
Starter Project

Comments

Homemade Home Office with Peninsula Desk

Thank you Ana for so many amazing plans and shelf help that helped me get this monster built! Now my husband has a nice office where he can work from home. I was so impressed with how easy it was to make the plans in shelf help and how quickly it all arrived. (I can’t link the drawer slide trick plans, but they were key and I based the middle table off of the foldable farmhouse idea)

Comments

Sturdy Workbench Sink

Submitted by Anonymous (not verified) on Mon, 05/01/2023 - 09:57

Used sturdy workbench plans with 2x6 cedar top for outdoor sink. Turned out much better than I expected!!

Built from Plan(s)

Comments

2x4 Outdoor Sectional Sofa

Submitted by lknolan2 on Sat, 04/18/2020 - 20:19

Great Plan! Loved how easy it was to build and how little the cost was.

Estimated Cost
$200
Estimated Time Investment
Afternoon Project (3-6 Hours)
Finish Used
Outdoor deck stain by Valspar in Canyon Brown
Recommended Skill Level
Beginner

Comments

jwood4

Sun, 08/01/2021 - 18:40

Looks amazing! What method did you use (pocket holes, dowels, deck screws, etc) to join the visible portions like the arms?

Seasonal And Holiday

Sandbox with built-in seats in our playhouse

Submitted by Anonymous (not verified) on Thu, 09/10/2020 - 10:55

The base of our playhouse felt like the perfect spot to use the sandbox plan with built-in seats. The bench seats actually fold flat to create a lid for the sandbox when it’s not in use. I followed Ana’s plans exactly and used the list of materials she provided. The only modification I made was eliminating the back supports. It was not necessary for me to add the back supports since we have the playhouse posts to support the back of the bench.

Built from Plan(s)
Estimated Cost
$60
Estimated Time Investment
Afternoon Project (3-6 Hours)
Finish Used
Stain
Recommended Skill Level
Beginner
Seasonal And Holiday

2x4 DIY Pantry

Submitted by Michael K on Thu, 08/15/2019 - 11:50

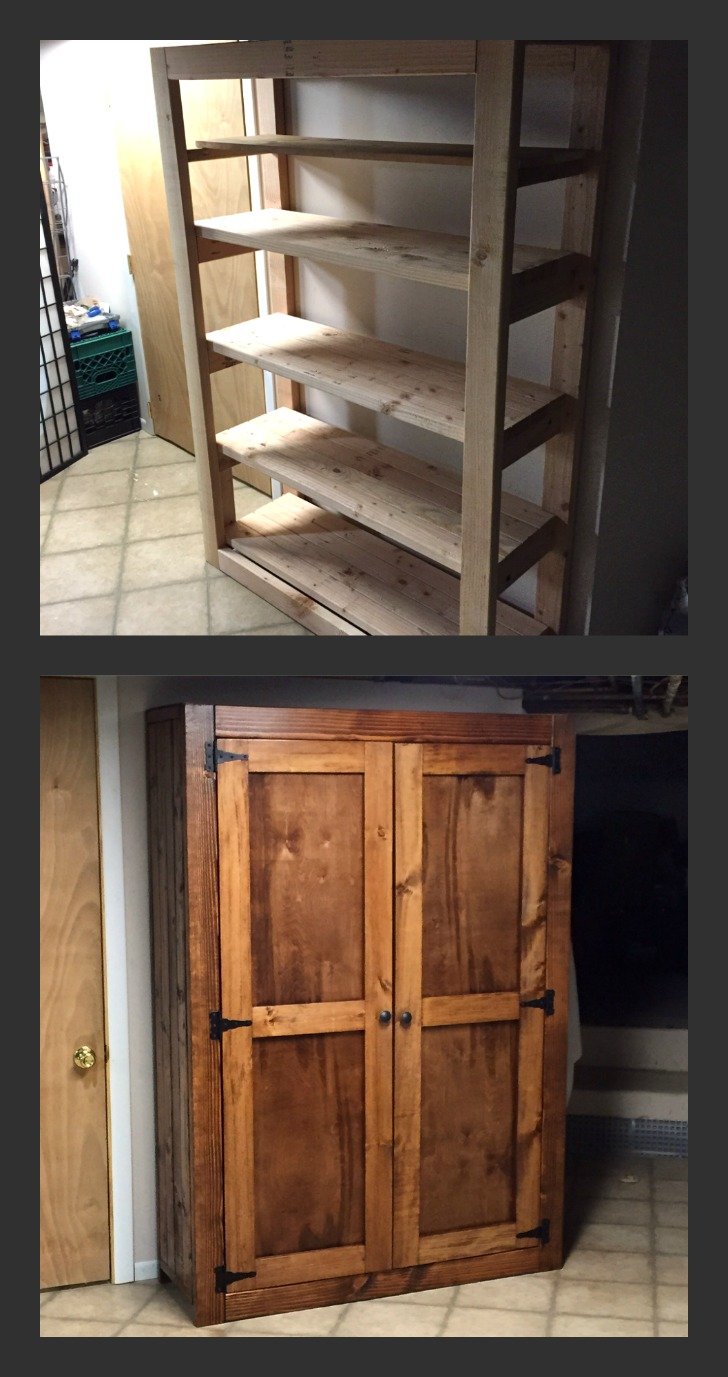
Anything is possible when you put your mind to it. This is my 4th DIY furniture project. First time working on cabinet/doors. Installing them straight was the biggest challenge. The side of the pantry is actually four 2x4's. I measured the frame so tightly that I had to use a hammer to bang in the fourth 2x4 on each wall, also adding a distressed look in the process. The pantry is very large, 48in wide and about 17 inches deep. Our kitchen lacks storage space and we could use a little more space for food and also pots, pans etc. The staircase to our basement is off our kitchen, so I placed the pantry right at the bottom of the staircase for easy access. I am thrilled with how this came out considering the time and effort it took. Very gratifying. Build on!

diy pantry made from 2x4s

Estimated Cost
$180-$200
Estimated Time Investment
Week Long Project (20 Hours or More)
Finish Used
Miniwax English Chestnut
Miniwax Semi Gloss Poly
Recommended Skill Level
Intermediate

Comments

Michael K

Thu, 03/05/2015 - 07:51

Thanks, to the both of you! Possibly the most fun part of this project was buying a Ryobi Airstrike Brad Nailer. That thing is fun to use! Used it for the back of the doors, back of the pantry and also for the door stops.

denverdave66

Sat, 07/23/2016 - 18:21

I am thinking about building one but I am not sure if my skill level is up to this yet. I am going to attempt to build the Kentwood Bookshelf and see how that goes. I am remodeling my office and want real wood shelves instead of that pressed wood junk. Great job on your build.  I love this website!

langgin26

Sat, 01/13/2018 - 18:09

Hey Michael I really love the pantry and would love to make this exact one but there is not enough info on the sizes and what all you used for all the wood. If you have  time I would greatly appreciate it if you could give us some more info thank you 

Steve Phil

Fri, 12/25/2020 - 10:42

Haha. Nice. But ya did not pound it in ... You persuaded it in as old timber framers would say using an old mallet called a Commander. 😉

Modern Farm table

My first real project, can't wait to do another one.

Built from Plan(s)
Estimated Cost
70.00
Estimated Time Investment
Day Project (6-9 Hours)
Finish Used
White wash/weather oak grey stain
Recommended Skill Level
Starter Project

Comments

leejinhaeng

Tue, 06/02/2015 - 12:38

Great job!!
I was wondering how did you do the finish on the Pine to come out like that?

cris_stroud@ya…

Thu, 06/04/2015 - 03:15

Thanks! Sorry for the late reply. Didn't get a notice.
1. 3 coats of white wash
2. 3 coats of weathered oak grey stain
3. 2 coats of polyurethane matte finish.

RobA

Thu, 06/02/2016 - 11:00

I know this is an old post. But just wondering about your finish as well. So when u say white wash what did you use?

Beautiful by the way!

modern outdoor lounge chair

Just finished this beauty, entirely made with 2x4, plans were modify to match our outdoor sofa and coffee table. I think our best looking project so far ;) Thank you for inspiring me to build !!!

Estimated Time Investment
Week Long Project (20 Hours or More)
Recommended Skill Level
Beginner

Comments

Seasonal And Holiday

Modified Garage Shelf (w/ Workbench)

Submitted by Anonymous (not verified) on Thu, 06/08/2017 - 11:15

Great plans allow for versatility and easy customization. Put the whole thing together in a day w/ one other person. My set up is 16' long - 5' on the side shelves and 6' for the workbench. Added a pegboard and fluorescent light under the top middle shelves. I'm also designing a slim drawer to go under the workbencheck area. Thanks a bunch!

Estimated Cost
~$150 including pegboard.
Estimated Time Investment
Afternoon Project (3-6 Hours)
Finish Used
Will stain dark in the future
Recommended Skill Level
Starter Project

Comments

Kid's Playhouse and Slide

Submitted by docfin02 on Mon, 03/28/2011 - 18:56

I LOVE these plans. This was my first project, and although it was a big one to start with, the plans were easy to follow. If I can do it, anyone can. I added the rock wall. My kids and I love it. Total cost for me (including all lumber, nails, paint, slide, etc.) is about $850.

Estimated Cost
$850
Estimated Time Investment
Week Long Project (20 Hours or More)
Finish Used
1 coat primer, 2 coats paint
Recommended Skill Level
Intermediate
Seasonal And Holiday

6' Square Sandbox

I've been wanting to buy or make a sandbox for my son for a couple of years now. Since seeing this on Ana White I knew I had to make it. My son is 4 yo and I didn't think the 4' square sandbox would be big enough for him, so I made it bigger. Ours is 6' square.

Materials:
4@1x8x6'
12@1x6x6'
2x4 - used leftovers from another project
8 hinges
4 handles
decking screws

Cut lengths:
2@1x8 cut to 71.5 (long sides of the box)
2@1x8 cut to 70.5 (short sides of the box)
did not cut the 1x6 boards (top planks) - actually designed the other boards to fit their length to prevent cutting (saving time) (note that original plan uses 1x4 planks - I used 1x6s so I could use the same number of planks but cover a larger area)
4@2x4 cut to 11.5 (arm rests)
4@2x4 cut to 18.5 (back supports)

followed instructions for assembly otherwise. At my husbands suggestion we put the handles on the sides and can easily open from either side - prevents having to lean over to the middle to open (back saver)

I finished the project in 4 hours including clean up and a couple of small breaks. This is my first Ana White project. It was a lot of fun to build and I hope my son will enjoy it for years to come!

Built from Plan(s)
Estimated Cost
$190
Estimated Time Investment
Day Project (6-9 Hours)
Finish Used
Sand and stain with sealer included
Recommended Skill Level
Beginner

Comments

Mrs. Chellebelle

Sat, 09/01/2012 - 20:59

Wow, this is just what I need! I've been wanting to make a sandbox for under the playhouse but the other plan was too small. This would be great for the little guys. Thanks!