Community Brag Posts

Chicken Run with Turkey House

Submitted by vendo on Wed, 10/13/2021 - 10:03

My daughter helped me build this enclosure. We used Ana's chicken run plan, but just made it taller so we could walk in easily. We added an overhang to store food and pellets under, for the supports we used Ana's easy shelves angle support plan, and finally we used the playhouse base plan for the base of turkeys house. All plans used are linked below. We ran the chicken wire out under the structure and still need to bring in some large rocks or pavers, but so far no issues with predators. Turkey was getting too big to fit in the smaller coop, so we decided to have fun with his house and used cedar fence pickets and some treated 2x4's, built a box and jig sawed the shape of a turkey. As you can see in the first photo the ladder for turkey wasn't big enough, all the other chickens were in his house, lol. So I beefed up the ladder and he happily can put himself up at night now:) Overall a super successful project, I wasn't sure what to do with the top and just at that point, the neighbor walked over and offered the metal, talk about a huge win and the perfect solution! We attached the run to the previous smaller structure and now they have so much more room and are laying like crazy:) Finally, I think this would make a great dog kennel as well...

Simple 2x4 Bench

Submitted by jennibee on Sun, 09/14/2014 - 17:03

I made this in an afternoon. Loved this project. It is made with 2x4's using a Kregs Jig and mitre saw (plus additional tools like a drill and square).  This was my frist time using the Kregs Jig and I am sold!!

The free plans were taken from another website. They are very detailed and there is even a video (I recommend it as he gives a great tip for making sure the back stays equal/level to each other before putting the back on). Even though you can build this by yourself, I did have help for the heavier sides once they were assembled.  I plan to build the additional side table soon and finish them both with sanding and staining when the weather seems less iffy for rain.

If you are looking for a good beginner project that doesn't take forever or have complicated steps, this is your project.

Built from Plan(s)
Estimated Cost
Around $50
Estimated Time Investment
Afternoon Project (3-6 Hours)
Recommended Skill Level
Beginner

Farmhouse Bed with Storage and Bookshelf footboard

Submitted by rbgreene04 on Sat, 05/21/2016 - 15:50

I altered the plans just a bit so that I could make use of the drawer closest to the headboard, while using bedside tables as well (not the ugly ones in the pictures, but some that only exist in my mind as of now). With the plan as is, I didn't think that first drawer would be able to open if you have a nightstand. So I left about a 17" gap that can be used as an open shelf for storage, and still had room for 3 drawers. I also wanted to include a bookshelf as the footboard to make it multifunctional. We have a ton of books and no place to store them (fear not, a large bookshelf/media center is coming soon!) I also altered the top of the headboard just a bit to give it more texture and visual appeal (hopefully, but beauty is in the eye of the beholder so I've been told). Lastly, I did not put the 1/4" plywood backing on the drawer carcasses. They were pretty sturdy as is, and only got more sturdy as they were attached to the headboard and footboard; I'm not worried about racking at all. Leaving the back off also allows me to pull the drawers out and access some hidden storage in between the two drawer carcasses. 

I wanted a simple finish, so I rubbed it with dark walnut Danish oil. Super simple finish and I think it'll hold up as the bed is not like a desk that needs poly or something. 

Estimated Cost
Cost? Great question! I build things, but don't keep track of receipts. Whoops! It's a major flaw of mine, and I'm working on it. I'd estimate just shy of $300.
Estimated Time Investment
Week Long Project (20 Hours or More)
Finish Used
I sanded to 120 and then lathered on Dark walnut Danish oil. I let it soak into the wood, and boy was the wood thirsty. Then reapplied after about 30 minutes and wiped off the excess, which there wasn't much excess--did I mention the wood was thirsty?
Recommended Skill Level
Intermediate

Comments

ciara5545

Sun, 08/28/2016 - 19:50

This bed turned out amazing.  I love the modifications and agree the first drawer will be more usable.

Lydia Baby Bed

A photographer friend of mine requested I build her this after she saw them selling on Etsy for $115. They make super sweet props for newborn shoots, as well as a really cute doll bed for those popular 18" dolls. I free-handed the side details, and cut them out with my new Dremel Trio. It's an awesome tool! I used scrap MDF and plywood for everything but the 2x2 legs and finials, which I snagged for about 60 cents each at Lowe's. I played around with my finishing to give it a rustic look, since the cheap MDF I had on hand is super ripply and can't be sanded smooth.

I used the Farmhouse Doll Bed as a jumping off point for the dimensions. I put it together with my Kreg Jig, but I wouldn't recommend it, since those holes are really hard to fill, and you can see the indentations on the back of the headboard and footboard. Though it's sturdy enough to hold my 55 pound boxer, so I'm pretty sure all those newborns will be safe and sound on it! I really love how it turned out, and can't wait to get my own newborn photographed in this bed come August!

Estimated Cost
$20
Estimated Time Investment
Afternoon Project (3-6 Hours)
Finish Used
Two coats of Behr Harvest Brown, Valspar weathered crackle medium, one coat flat white paint. Sanded to reveal brown on edges, and sealed with two coats of spray varnish.
Recommended Skill Level
Beginner

Modern Rustic Outdoor Sofa Inspired by RH Merida

Submitted by susanshamp on Sun, 04/01/2018 - 14:19

I was in love with the RH Merida set because of its clean lines and modern style. Also, the plan seemed simple enough that I could re-create it without a pattern. The only thing that I did not like about it is the lack of arms. I really like to have a place to put my arm or my beverage :) - so I added arms to the design.

Estimated Cost
$150
Estimated Time Investment
Day Project (6-9 Hours)
Finish Used
Natural
Recommended Skill Level
Intermediate

Comments

bogle

Wed, 05/20/2020 - 10:45

This is Awesome. I'm halfway in the middle as i thought I could complete without plans. Do you have any plans could share. Please....

Twin Farmhouse Bed with Trundle

Took the farmhouse plan and added a Trundle.   Was initially going to build two farmhouse beds for my two girls, but thought adding the Trundle would free up some much needed floor space.  The girls love it!

Estimated Cost
$150
Estimated Time Investment
Day Project (6-9 Hours)
Finish Used
Latex paint
Recommended Skill Level
Intermediate

Simple Square Cedar Outdoor Dining Table

Submitted by Finns-Dad on Mon, 03/12/2012 - 17:58

I've been planning on building a patio table for this coming spring and summer, but didn't know where to begin. I found Ana's wonderful site and now I don't know where to stop! So many great ideas.
After seeing ewood's great table I decided to make one similar. I made my square table based on Ana's and ewood's basic designs. Thank you both. I also made a bench based on Ana's design.

Built from Plan(s)
Estimated Cost
300--475
Estimated Time Investment
Weekend Project (10-20 Hours)
Finish Used
Semigloss Spar Urethane
Recommended Skill Level
Beginner

Comments

7CsShepherds (not verified)

Thu, 03/29/2012 - 07:37

I have a family of 7 (soon to be 8, I hope), and was trying to figure out how to fit us all on the rectangular table. This is the solution! I can simply make 4 benches to go with it! Thanks for the idea and the picture!

Guest (not verified)

Mon, 04/09/2012 - 07:24

Love this table and your modifications to ewood's table. I was wondering what size are the legs on your table - I can't tell if they are 4x4s...which is sort of what I'd like to have on mine. And they are under mounted, which I love because I want to make ours with the ability to remove the legs for reduced storage space in the winter. If you could would you mind putting a few close up photos of how the outside corner came out and the underside of the corners. It would be much appreciated.

K_W (not verified)

Mon, 04/09/2012 - 07:27

Love this table and your modifications to ewood's table. I was wondering what size are the legs on your table - I can't tell if they are 4x4s...which is sort of what I'd like to have on mine. And they are under mounted, which I love because I want to make ours with the ability to remove the legs for reduced storage space in the winter. If you could would you mind putting a few close up photos of how the outside corner came out and the underside of the corners. It would be much appreciated.

In reply to by K_W (not verified)

Finns-Dad

Sat, 04/14/2012 - 13:35

Hi - sorry it took a little while to get back to you. Yes the legs are 4x4's. I used knotted cedar 4x4's for the legs and made them 29" tall. I wanted to be able to disassemble the table and put it away for winter, so I attached the legs using carriage bolts, 2 per side (4 total per leg). I drilled holes using a pilot bit, then used a spatter bit to make the larger holes for the carriage bolt.

I didn't bother to counter sink them, but if I made another I think I would try that to make a more polished look. The legs are sturdy, the table doesn't wobble at all, but I am sure that someone with more furniture building experience might have a different/better idea.

I've added a couple more photos showing the corners, outside and underneath. I've also added my very basic plans that I used to make the table, one of these days I will study Ana's post of how to use sketch-up, until then this is what I worked with.

Joni

Wed, 06/06/2012 - 09:26

Can you tell me what size (width) boards you used on the frame pieces of the table, and what size on the inner boards? From your diagrams, it looks like the frame is made of 1x4s, but the inner pieces look smaller. Thank you !!!

Your table is absolutely beautiful. It looks like a very high-end piece of furniture. One of my favorite things is how the carriage bolts are installed -- I wouldn't change a thing on them!

In reply to by Joni

Finns-Dad

Tue, 07/30/2013 - 16:36

Sorry it took so long to reply - I didn't see your post. So far the table is holding up well.

You're right, the top is made from 1x4's, including the inlaid slats. To support the top, I cut 1x4's down to 1x3's so they remain hidden by the side 1x4's of the frame.

Aussie Paul (not verified)

Tue, 10/16/2012 - 18:02

Love the table - looks absolutely fantastic! I have been looking for a decent square outdoor table for ages and this one certainly fits the bill.

Can you please add a photo of the underside of the table and advise how you fastened inner boards on table top. Thanks.

In reply to by Aussie Paul (not verified)

Finns-Dad

Tue, 07/30/2013 - 16:40

I added a new photo of the bottom. Hopefully this will help show how I attached the top. I have a number of additional photo's I can send to you if you like - this site limits the number of photos I can add.

Everything is attached from the bottom to hide the screws. I used a kreg jig and it helped so much - i really recommend it.

Belmo

Wed, 08/14/2013 - 12:35

I love the look of this table, man - I think I'm gonna steal some ideas from this.

I have a question about your top, though. The slats look to be 1x4s, which I can understand, but the edges seem to be a bigger size.

Did you use 1x6 boards for the edges? 1x8s? Something else?

Thanks for your help.

Finns-Dad

Mon, 09/02/2013 - 11:03

Thank you - please take any ideas from it that you can. That is what I love that about Ana's site. You can take these great ideas and make them fit your own style...

You're right - the table top is made of 1x4's and 1x6's. When i put the top together I made the frame first. Then I added the exterior 1x6's. Next I added the center 1x6. Lastly I cut each 1x4 to size and added them.

livingston.140

Sat, 05/17/2014 - 07:15

This is an amazing table, it is beautiful! I am somewhat new to wood working and was wondering if there was a material list? I plan on creating this in AutoCAD first, so I have a visual to work off of. Also what did you use for spacing in between the boards or what was the allowance of space.

Thanks again, your work is beautiful!

leitaf

Wed, 04/22/2020 - 20:37

In looking at the plans and the underside of the table, there are some measurements missing that make it a little hard to decipher. It would be good to know the lumber sizes e.g. 1x4x8 etc. the underneath side seems to have some additional boards that don’t seem to be in the drawing. I was just wondering if it might be possible to get some additional details?

@njhorseplayer

Sun, 05/24/2020 - 08:05

This is a beautiful table and I'm going to try and replicate in a rectangular version. Primary question I have is what length screws you used to affix the framing pieces underneath to the top side so that the wood doesn't split and that the screws don't pop thru the top. Any help you can provide would be appreciated, if even you still look at this page. Thanks in advance!

Custom Modern Chicken Coop

Submitted by Anonymous (not verified) on Wed, 08/30/2023 - 08:49

I made this coop twice as wide like Ana suggested since I have 4 chickens and wanted to make sure there was some extra wiggle room in case “chicken math” got the best of us. I made a nesting box to mount on the outside. I also used plywood for the sides like Ana did in the video. I installed a Run Chicken automatic door that opens at sunrise and closes at sunset. I added some hasps and clasps to make sure all my doors would close tightly. I put hardware cloth across the top before installing the roof panels. I stapled and buried hardware cloth around the perimeter for predator protection. I also spray painted the hardware cloth flat black so that it would be easier for us to see inside the coop. I stained the rest of the wood with Varathane Semi-Transparent stain, color “Carbon Gray.” I also added some roosts and cedar shingle siding for some extra protection during our New England winters at to match our house. Working 2-4 hours a day, off and on, with a bum shoulder and weak hands, this took me about a week! Thanks for the great plan, Ana!

Comments

Seasonal And Holiday

Shoe Dresser

Submitted by Anonymous (not verified) on Sat, 04/01/2017 - 08:26

We used the shoe dresser instructions with some modifications to make it longer

Built from Plan(s)
Finish Used
Stain, polyerthane, chalk paint and wax
Recommended Skill Level
Advanced

Outdoor Sectional

I scaled back the length of the sofa by a few inches and I made the sectional only one seat to fit my space on the deck. This was my first woodworking project that I did by myself. I got the cushions for more than 1/2 off at Ikea so the whole project cost about $150 ($80 for the cushions). It took me about a week to complete but the total time was less than 10 hours to build and stain. I'm pretty happy with how it turned out.

Estimated Cost
$150
Estimated Time Investment
Weekend Project (10-20 Hours)
Finish Used
Pittsburgh Paints Stain & Sealant in One for Decks, Fences, & Siding in Walnut. I brushed on the exterior stain just like a paint. I did the top part of the sofa first, then flipped it over and stained the bottom. Read instructions on the label.
Recommended Skill Level
Beginner

Comments

Queen Murphy Bed

Submitted by Jenga on Sun, 12/06/2015 - 12:59

Not too bad of a project but had to a good bit of guess work so I could changed the plans for a queen size bed and flip in on its side.

Estimated Cost
$200 if you already have the bed
Estimated Time Investment
Week Long Project (20 Hours or More)
Finish Used
White Paint and laminate flooring left over from the floor.
Recommended Skill Level
Beginner

Comments

Arilie

Sun, 05/29/2016 - 18:50

Good evening!

I am new at wood working, and would be very interrested in knowing the different measurements you changed to get from a twin to queen murphy bed. If it is posted on this page, I tried but couldn't find it. Thank you for your help. Have a good day.

Marie-Julie

Reclaimed Fence = Free Benches

These are made from the 4x4 posts, 2x4 rails, and slats from an old wooden fence that weren't good enough to re-use when we repaired the fence.

It's close to the Simple outdoor bench, but I simplified the plan even more to take advantage of the pile of free lumber. Or maybe it's the Simple Outdoor Dining Table ... but a lot shorter.

CAUTION: Be careful to remove ALL nails, screws and bolts from the lumber you are reusing. If you can't get the metal out, mark that area and figure out a cut that won't hit it.

TIPS FOR RECLAIMED LUMBER:
* Trim the ends of the lumber square before you measure.
* Don't try to salvage split or rotted wood. Trim it off and see what you can do with the good bits.
* Plan your cuts so you have the least waste.

TOOLS:
10" Miter saw
Wood glue
Nail gun, with 2 1/2 and 1 1/4 inch 16gauge nails for gun (You could use deck screws if you have them)
Surform Pocket plane (wood rasp from Stanley tools)

CUT LIST:
For one bench, 21x36

NOTE: To cut a 4x4 cleanly with the 10" miter saw, put a thin shim behind each side of the 4x4

4 4x4 post scraps, 18 inches long (legs)
2 2x4 18 inches long (sides)
2 2x4 36 inches long (front and back rail)
10 fence slat pieces, 21 inches long (cut to fit the top after it is assembled)

ASSEMBLY:
See the picture of the underside of the bench:
1 - Square up the legs with the end pieces, glue and nail.
2 - Square the sides with the legs, so the legs are inside the 2x4 apron, glue and nail.
3 - Align the 2 end slats with the edges of the bench and nail through them into the 2x4 apron
4 - Space the rest of the slats on the top, leaving 1/8 inch or so etween the boards for drainage. Nail them to the 2x4 apron.

FINISH: Use the wood rasp to round the cut ends of the slats and 2x4s. Rasp with the grain to avoid raising splinters. Lightly rasp the tops of the slats to smooth any really rough spots.

A table or maybe a buffet is planned, with the same construction method, but a bit taller. Tables are 26-29 inches, most buffets are 36". It depends on what will make best use of the remaining bits.

Estimated Cost
$0
Estimated Time Investment
Afternoon Project (3-6 Hours)
Finish Used
none
Recommended Skill Level
Beginner

Barn Door Console with Drawers

Submitted by Anonymous (not verified) on Mon, 05/06/2024 - 13:27

Being a newby to woodworking, I wasn't sure if I could tackle this build. I saw pictures on your website and decided to give it a try. However, my wife wanted drawers so I made the doors a little shorter in order to add the 4 drawers but keep the height at 36". Thanks for your inspiration. I'm getting more comfortable everyday.
 

Louis Villarrubia


Roll Out Grill Station

Submitted by Anonymous (not verified) on Fri, 05/31/2024 - 16:41

I used Ana White’s plan for Grill Nesting Table for my inspiration. The dimensions were altered to accommodate my electric smoker and small Weber grill. I also revised the design so that my pile of recycled wood could be used. I made the “open” side to the back.

Billie Corbin

Seasonal And Holiday

Shed Chicken Coop and Run

Submitted by mikesofka on Tue, 05/12/2020 - 09:27

I had such a fun time on this shed coop/run build! My wife and I have 5 children and it was fun involving them in building everything about this coop and run. They have a wonderful sense of accomplishment in looking at what they helped build.

A few notes, while this what a fairly straightforward build, there are a lot of little intricacies to be aware of. Such as:

• Make sure your chicken coop is about a foot off the ground. It's best to do that so critters such as rats and snakes don't make their home under the shed and potentially eat their way through the floor.

• It is highly advisable to dig a trench about a foot to a foot and a half deep around the coop and the run and attach chicken cage fencing from the bottom of the coop/run into the trench, and then taper the cage fencing outward. This will prohibit critters such as raccoons from trying to dig under the coop.

• When you attach the poultry netting to the outside of the chicken run, staple one side really well, then move to the other side and pull the netting fairly hard to make the netting as tight as possible. (Also, be careful when putting the netting across the top of the run to not fall off the ladder as I did and dangle there until one of your kids comes to help you! Ha! :D )

Thank you, Ana, for posting these plans! We are so excited to get our little chickies out into their new home as soon as their feathers come in!

Estimated Cost
$800
Estimated Time Investment
Week Long Project (20 Hours or More)
Recommended Skill Level
Intermediate

2x10 Step Stools

Submitted by msyoung22 on Tue, 08/16/2016 - 07:26

My kids needed a step stool and I had some scrap wood (2x10) left over from a previous project

Estimated Cost
20 dollars
Estimated Time Investment
Weekend Project (10-20 Hours)
Finish Used
Minwax (weathered oak stain)
Minwax polycrylic protective finish
Recommended Skill Level
Starter Project

Comments

kristyzed

Wed, 08/17/2016 - 20:40

These are great.  Can you share dimensions and if there are any angle cuts on the legs?

msyoung22

Thu, 08/18/2016 - 20:12

Thank you! The dimensions are the same as the Ana White "Simple 1x10 Single Step Stool" except I used 2x10's instead of 1x10's like the plans called for. I also used some scrap pallet wood to make a design on the top of the stool. 

- Stool height: 7 1/2" for legs, 1 1/2" for top, and 1/2" for scrap pallet wood; which gives a total height of 9"

- Stool width: 9 1/4" x 16"

- 5 degree angle cuts were made on the legs

Farmhouse Storage Bed With Hidden Drawer

Submitted by Beekeeper on Wed, 12/10/2014 - 17:35

Ana, thanks for these plans! They inspired me to make my first bed build. I also want to thank all of you that added brag posts! They gave me ideas for some of the modifications that I made. I did this build by mixing your Queen Farmhouse and Queen Farmhouse Storage bed plans. I also added a number of modifications to suit my own preferences. The drawer boxes I changed by building a faceplate (I didn't want the plywood ends exposed), and by increasing in depth to maximize some additional storage. Since I increased the drawer sizes, I went with the euro roller bearing slides. I increased the foot-board height to be slightly higher than the mattress. I also designed the footboard to have a removable inner section with hidden latches on the inside. I did this because I wanted to make use of the "dead space" between the drawer boxes. I then used this space to house a hidden drawer, that is approx six feet deep (I couldn't help myself-I love hidden drawers wink
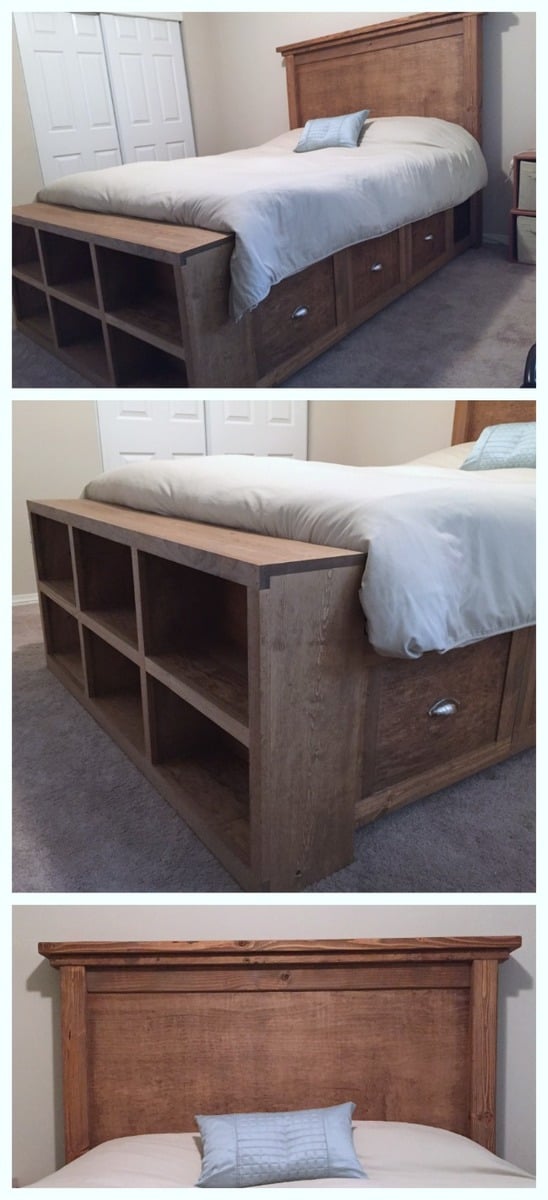
). Because I added the hidden drawer, I changed the opptional center support to 4X4 blockes that were pocket screwed under the center of the boxes. I ended up using birch plywood and fir for this build. For my first bed build I'm fairly happy with how it came out. Thanks again!

Estimated Cost
I didn't keep exact track of the cost of this bed, but I think it was about $800.
Estimated Time Investment
Week Long Project (20 Hours or More)
Finish Used
I haven't got there yet, but I am planning on putting a mahogany stain and then a polyurethane. All
Recommended Skill Level
Intermediate

Comments

spiceylg

Thu, 12/11/2014 - 07:41

This is your first build and you did all of those awesome modifications?! Really impressive and it looks perfect! Congrats and welcome to the community!

In reply to by spiceylg

Beekeeper

Sun, 12/14/2014 - 06:03

Thanks for the compliments! It was a fun learning experience. Making all the modifications definitely slowed down the build, but also made it more rewarding!

beckbg

Fri, 12/12/2014 - 13:18

I just started my bed (mostly out of Baltic Birch) and am wondering where you were able to find such nice 4x4s. Your bed is gorgeous! No luck here. I bought redwood, but really wanted fir for the sharper edges. It's my first project, too. I also bought same drawer slides, but the soft close. Didn't want the slam. I figure building it will be the easy part compared to procuring nice 4x4s! Hope you can help!

In reply to by beckbg

Beekeeper

Sun, 12/14/2014 - 06:01

Thanks! The 4x4s I found at a place called Better Living Building Supply. They had a pretty nice assortment of fir, including the 4x4s, so that is why I chose it for the build. Finding the 4x4s slowed down my start on the build. Our local Lowes only had them in treated pine.

athingvall

Sat, 09/05/2015 - 20:47

Thank you for the pictures, the bed turned out Awesome.  I was wondering about the latching system for the foot of the bed.  Do you think a piano hinge on the lower would work too?  Also on the center drawer did you use rollers or is it just friction?  Can't wait to start the build.

Thanks

Codding58

Mon, 02/15/2016 - 14:11

This is excellent!!!   I really like this, so much in fact that the wife is going to have to get used to it too. lol   But really, GREAT work!    Any chance you could post a pic and or comment about how you attached that removeable end?    i think this is the best part!    Cheers!

Kmaynard19

Tue, 12/10/2019 - 08:42

Beekeeper,  Awesome build!!!  Have you posted your altered plans anywhere?  I'm very interested in your build, I was wondering about some aspects of it and how you approached it.  Plans would clear it up instead of bothering you with all my questions.

NinjaPinky

Sat, 06/20/2020 - 09:06

I, like many others, have been wondering if you'd share your plans for this modification. It just looks so great!

tammis50401

Mon, 11/16/2020 - 15:42

Bed turned out awesome. I was wondering if you have the plans for the bed with a list of supplies it took to make this bed. I so want this bed it's just what we are needing

Great job

Footbridge

Submitted by sooz122 on Tue, 04/26/2011 - 18:36

I wanted to make a footbridge for my mom so she wouldn't get muddy when she crosses a small drainage ditch when goes walking on the trails behind her house. I didn't have a plan and this was my first build and I loved it! I just wanted to give everyone an idea of something to build. Can't wait to build more.

Estimated Cost
45
Estimated Time Investment
Afternoon Project (3-6 Hours)
Finish Used
Dark Minwax Walnut with a couple coats of poly.
Recommended Skill Level
Beginner

Best Chairs Ever!

Submitted by Anonymous (not verified) on Tue, 06/09/2020 - 18:16

I made these modern Adirondack chairs for our business in Anchorage. GREAT and easy to build design by Ana - we upgraded the arms to tapered 2x6 and they're awesome!

2x4 modern Adirondack Chair (modified)

Submitted by Anonymous (not verified) on Thu, 07/02/2020 - 17:45

I was so excited to find the plans for these awesome chairs, I’ve built 7 this season already—the modification happened as an accident, but I loved the result !

Estimated Cost
$30
Estimated Time Investment
An Hour or Two (0-2 Hours)
Finish Used
MinWax Aged Oak and Black paint
Recommended Skill Level
Intermediate

Comments

Seasonal And Holiday
Back