Community Brag Posts

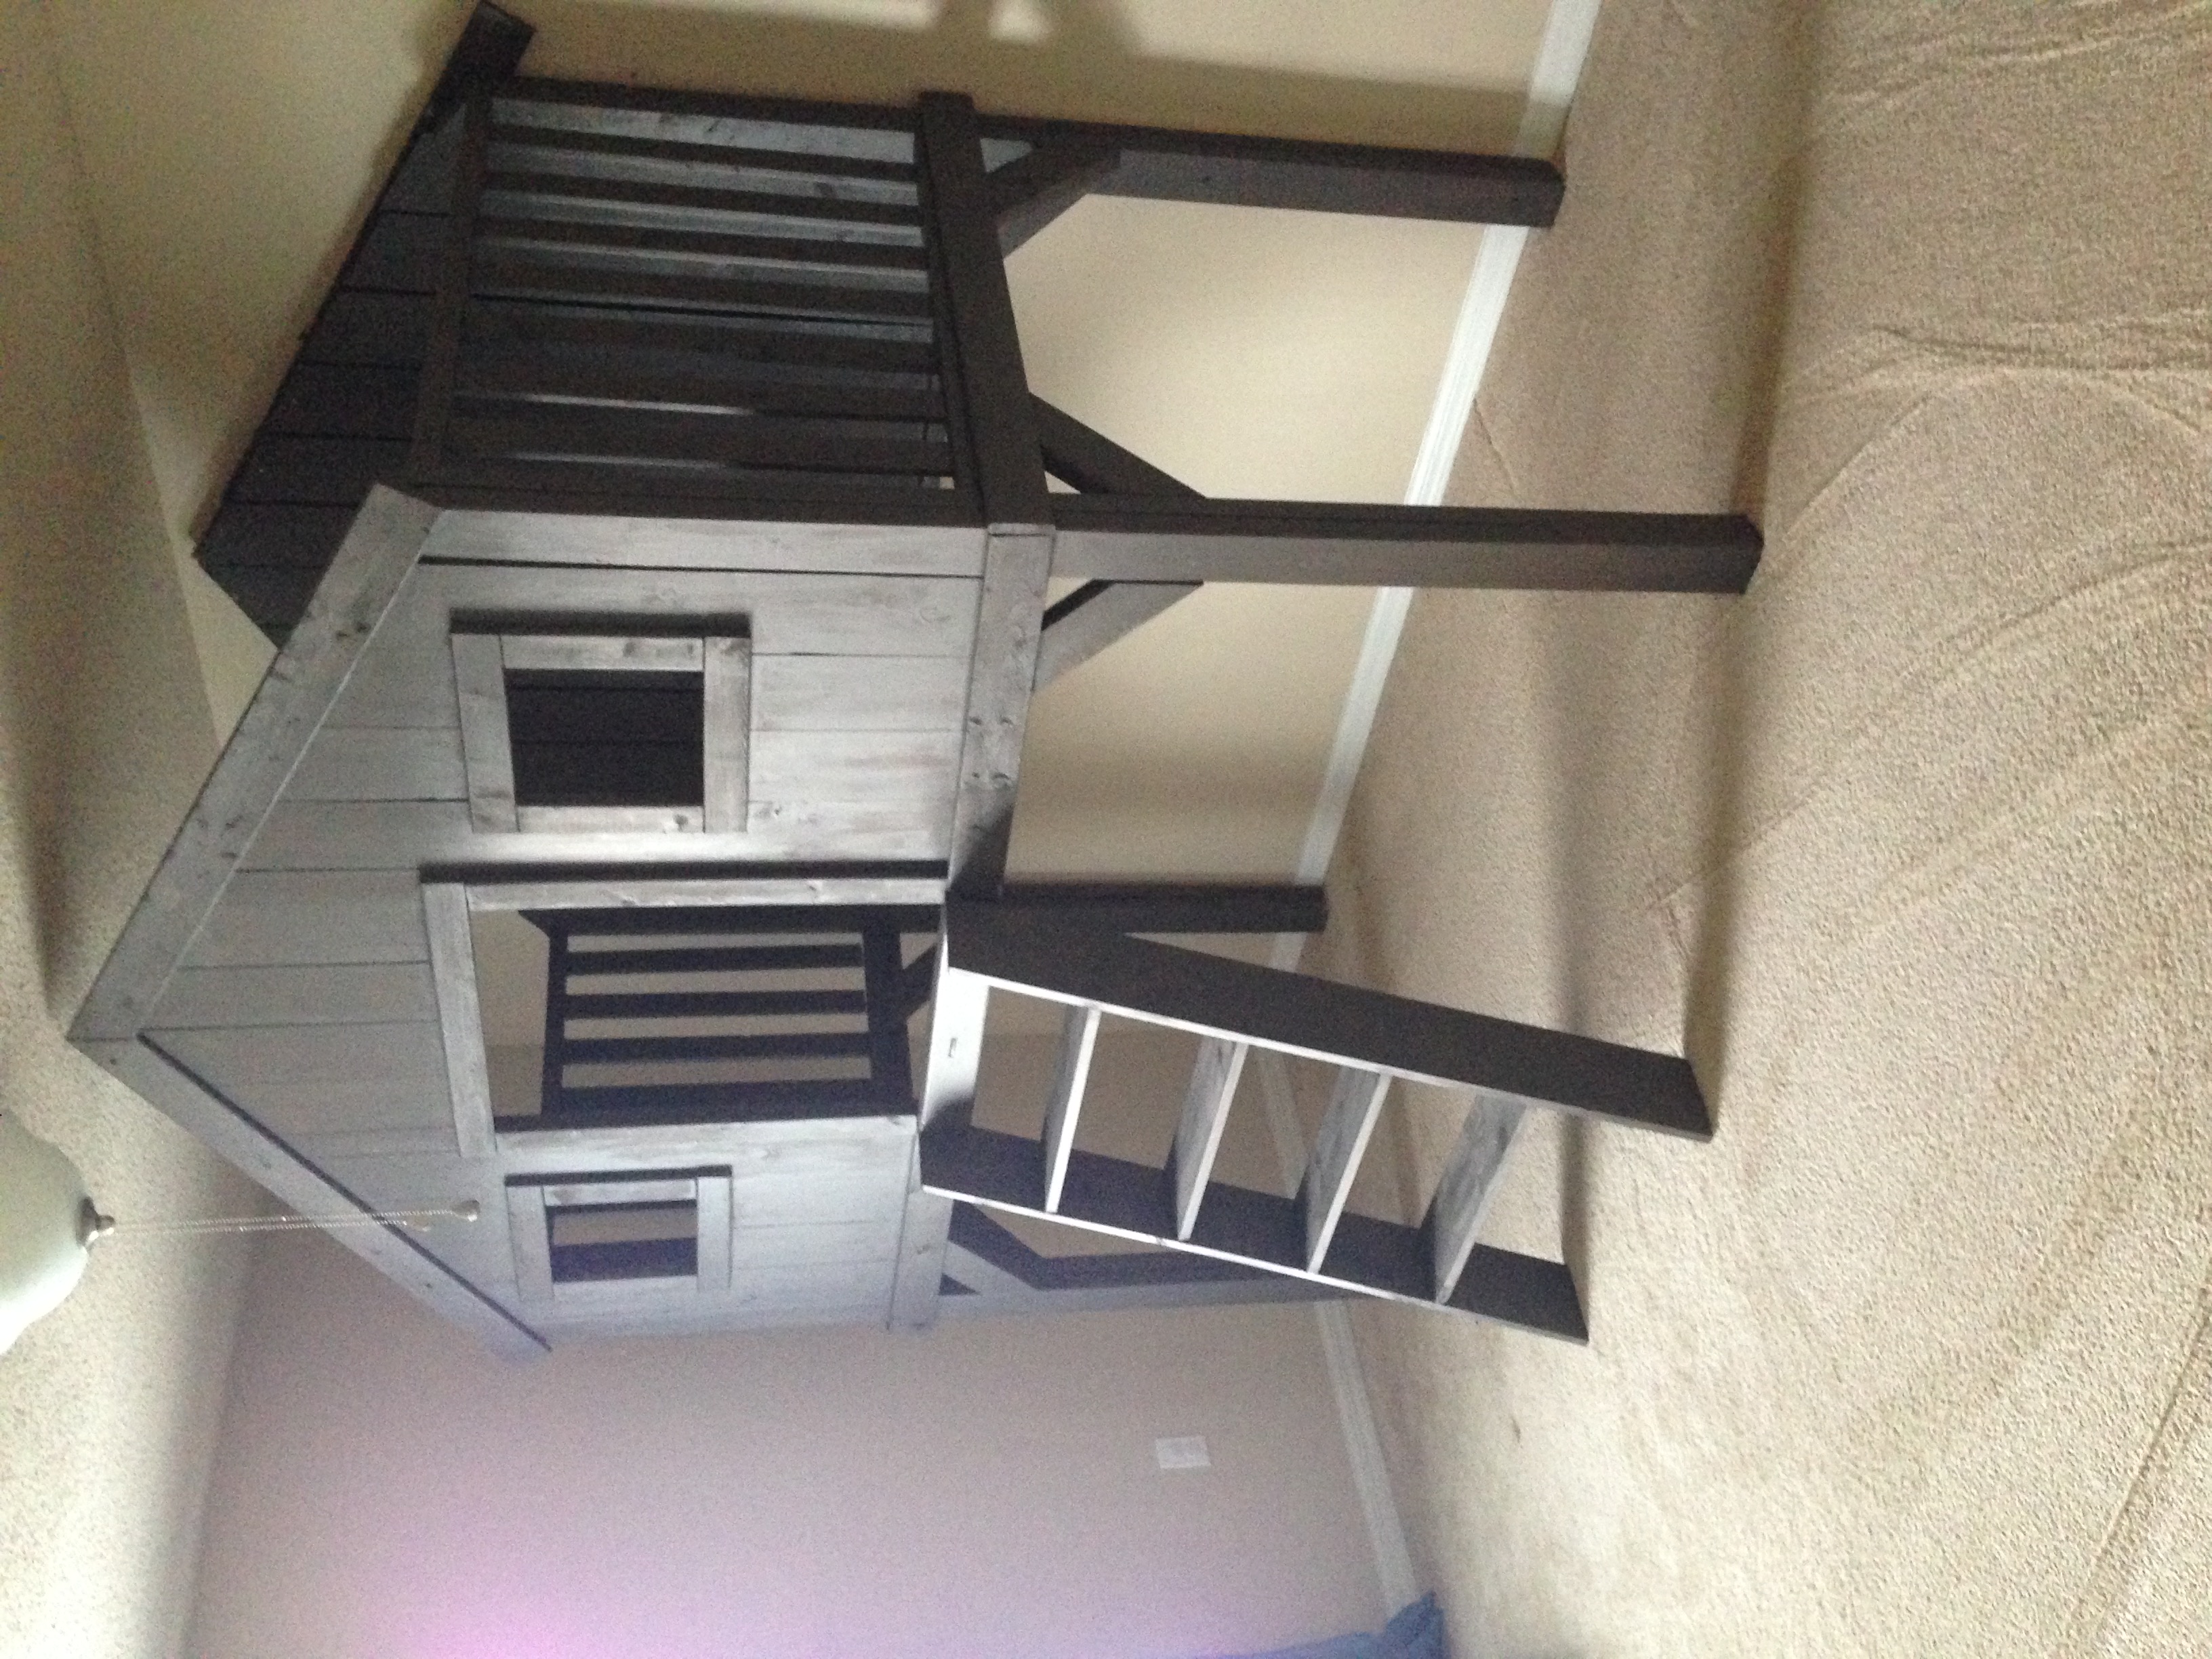
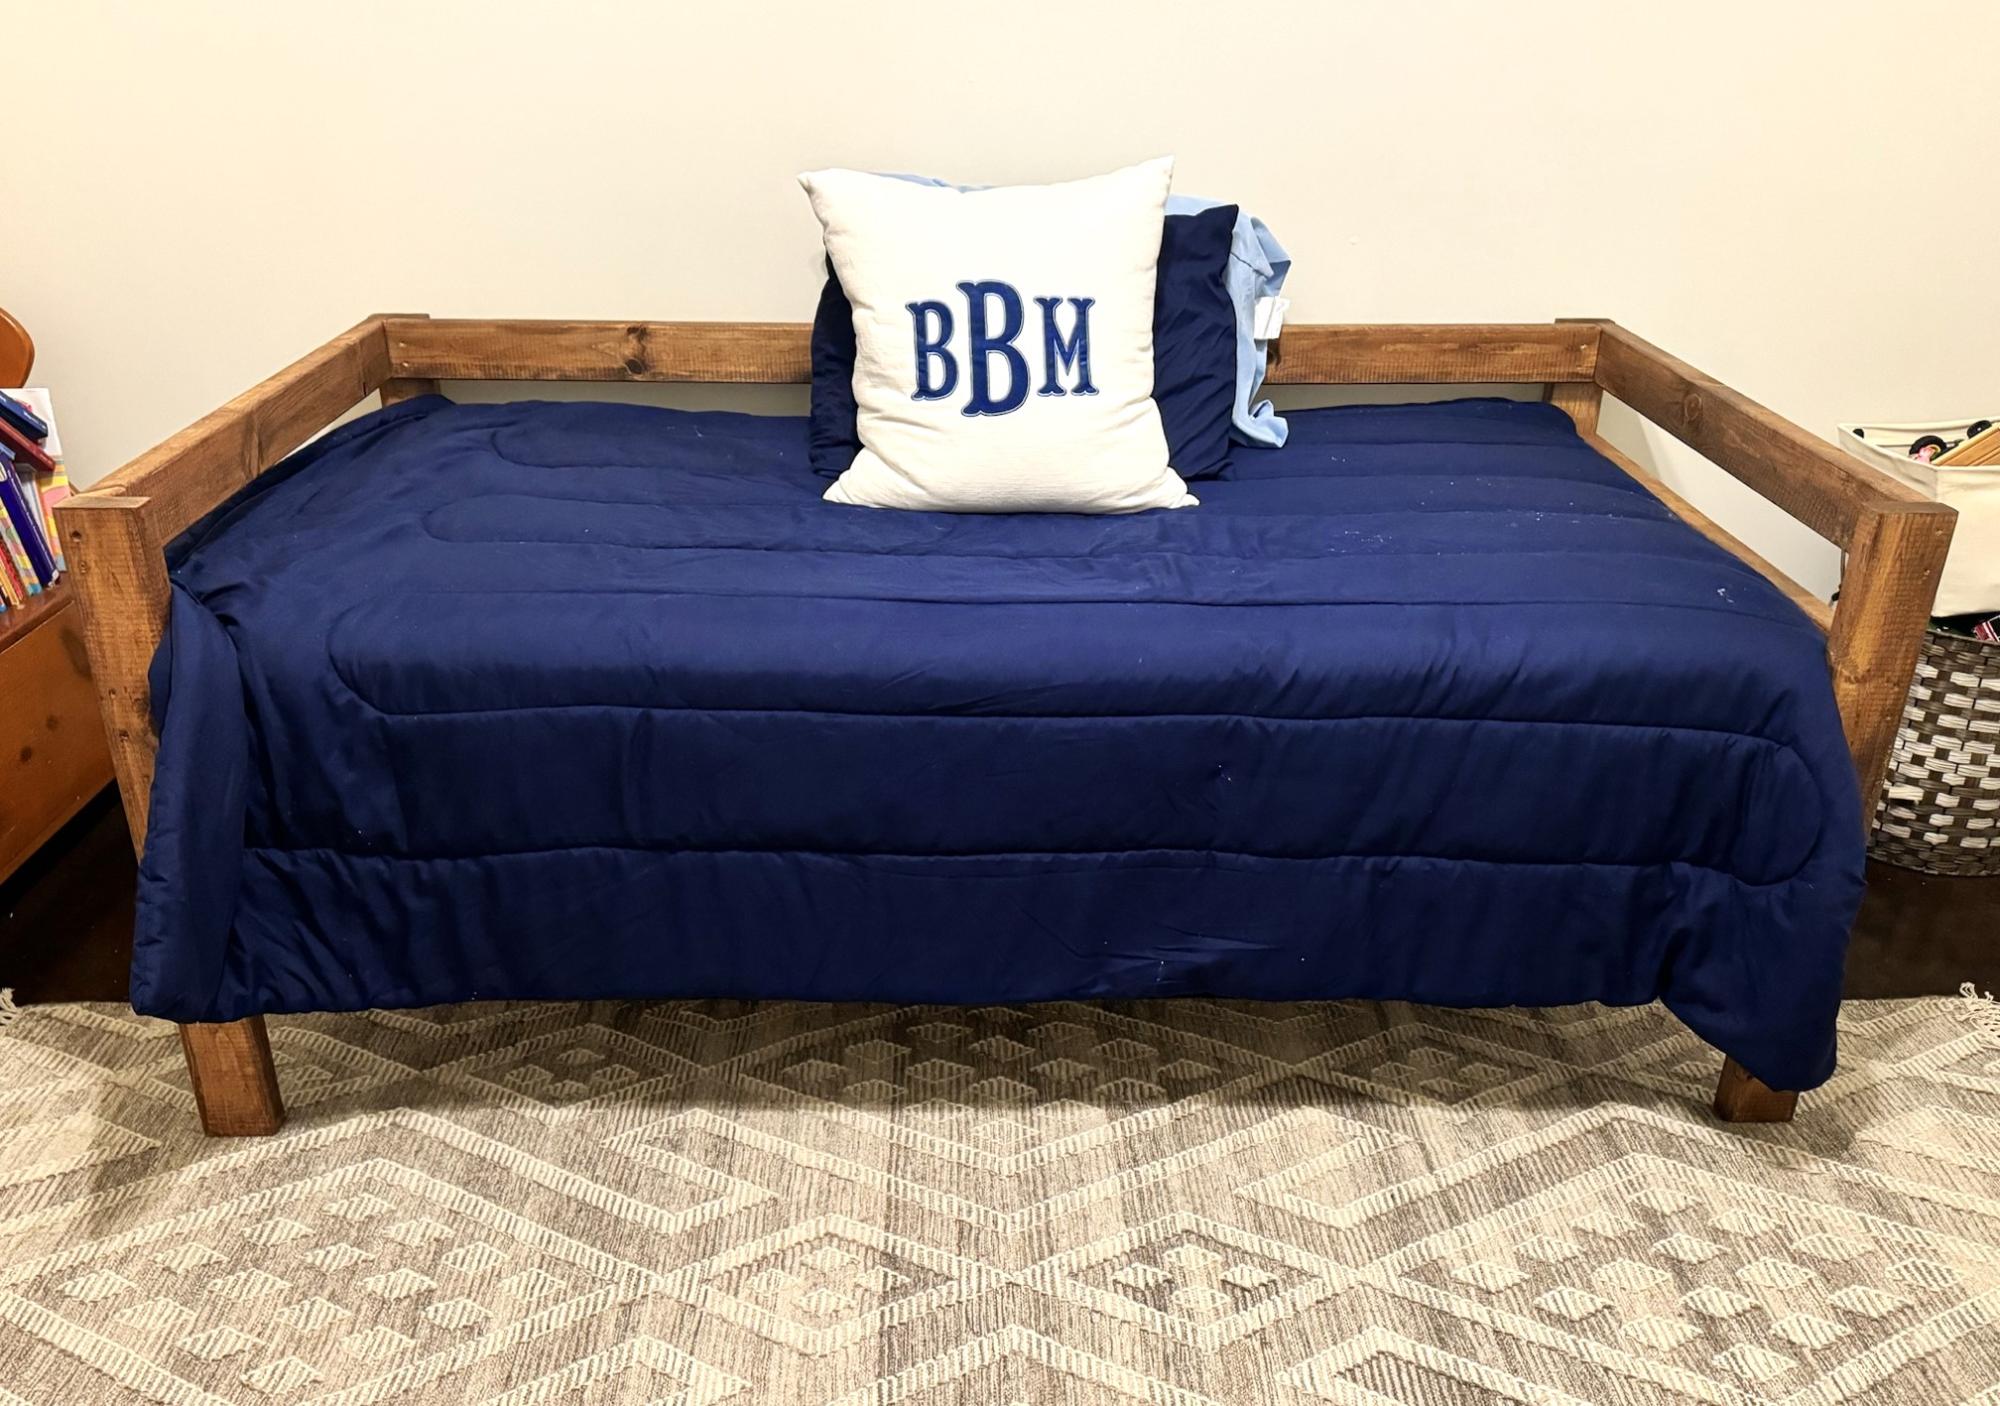
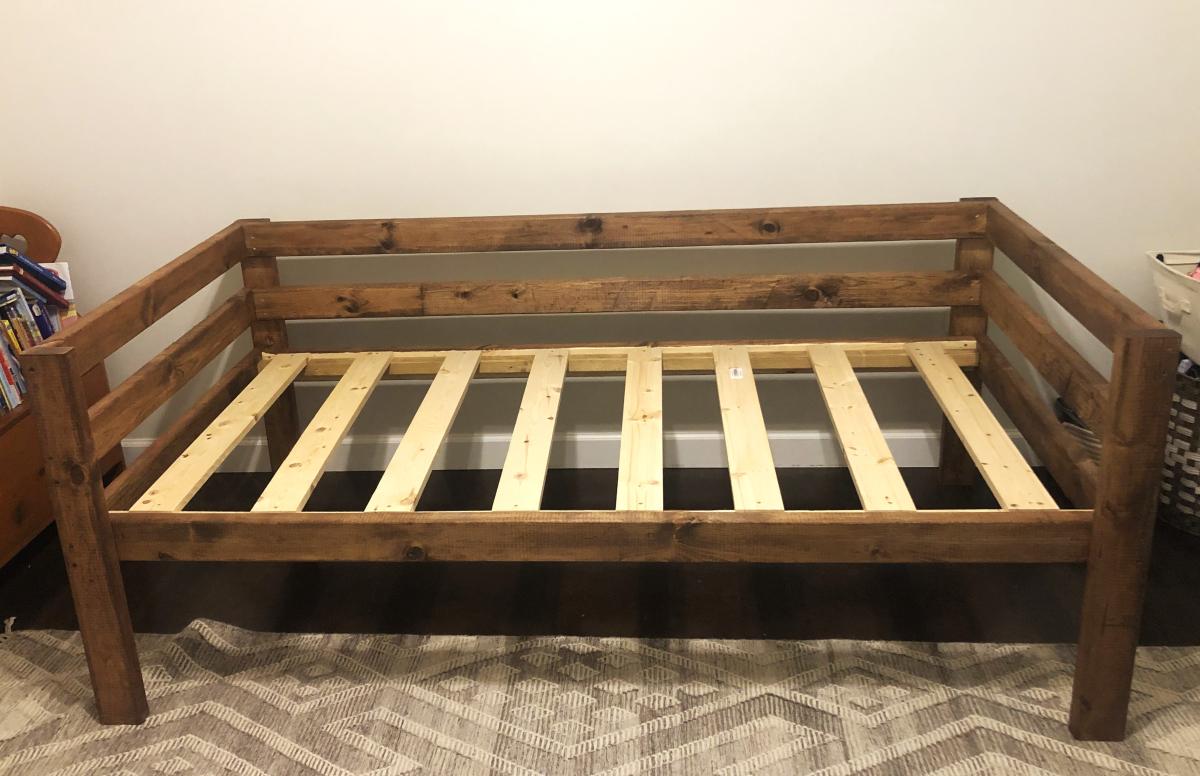
Treehouse for a sweet little boy!

Submitted by hyounger11 on Sun, 08/30/2015 - 06:05

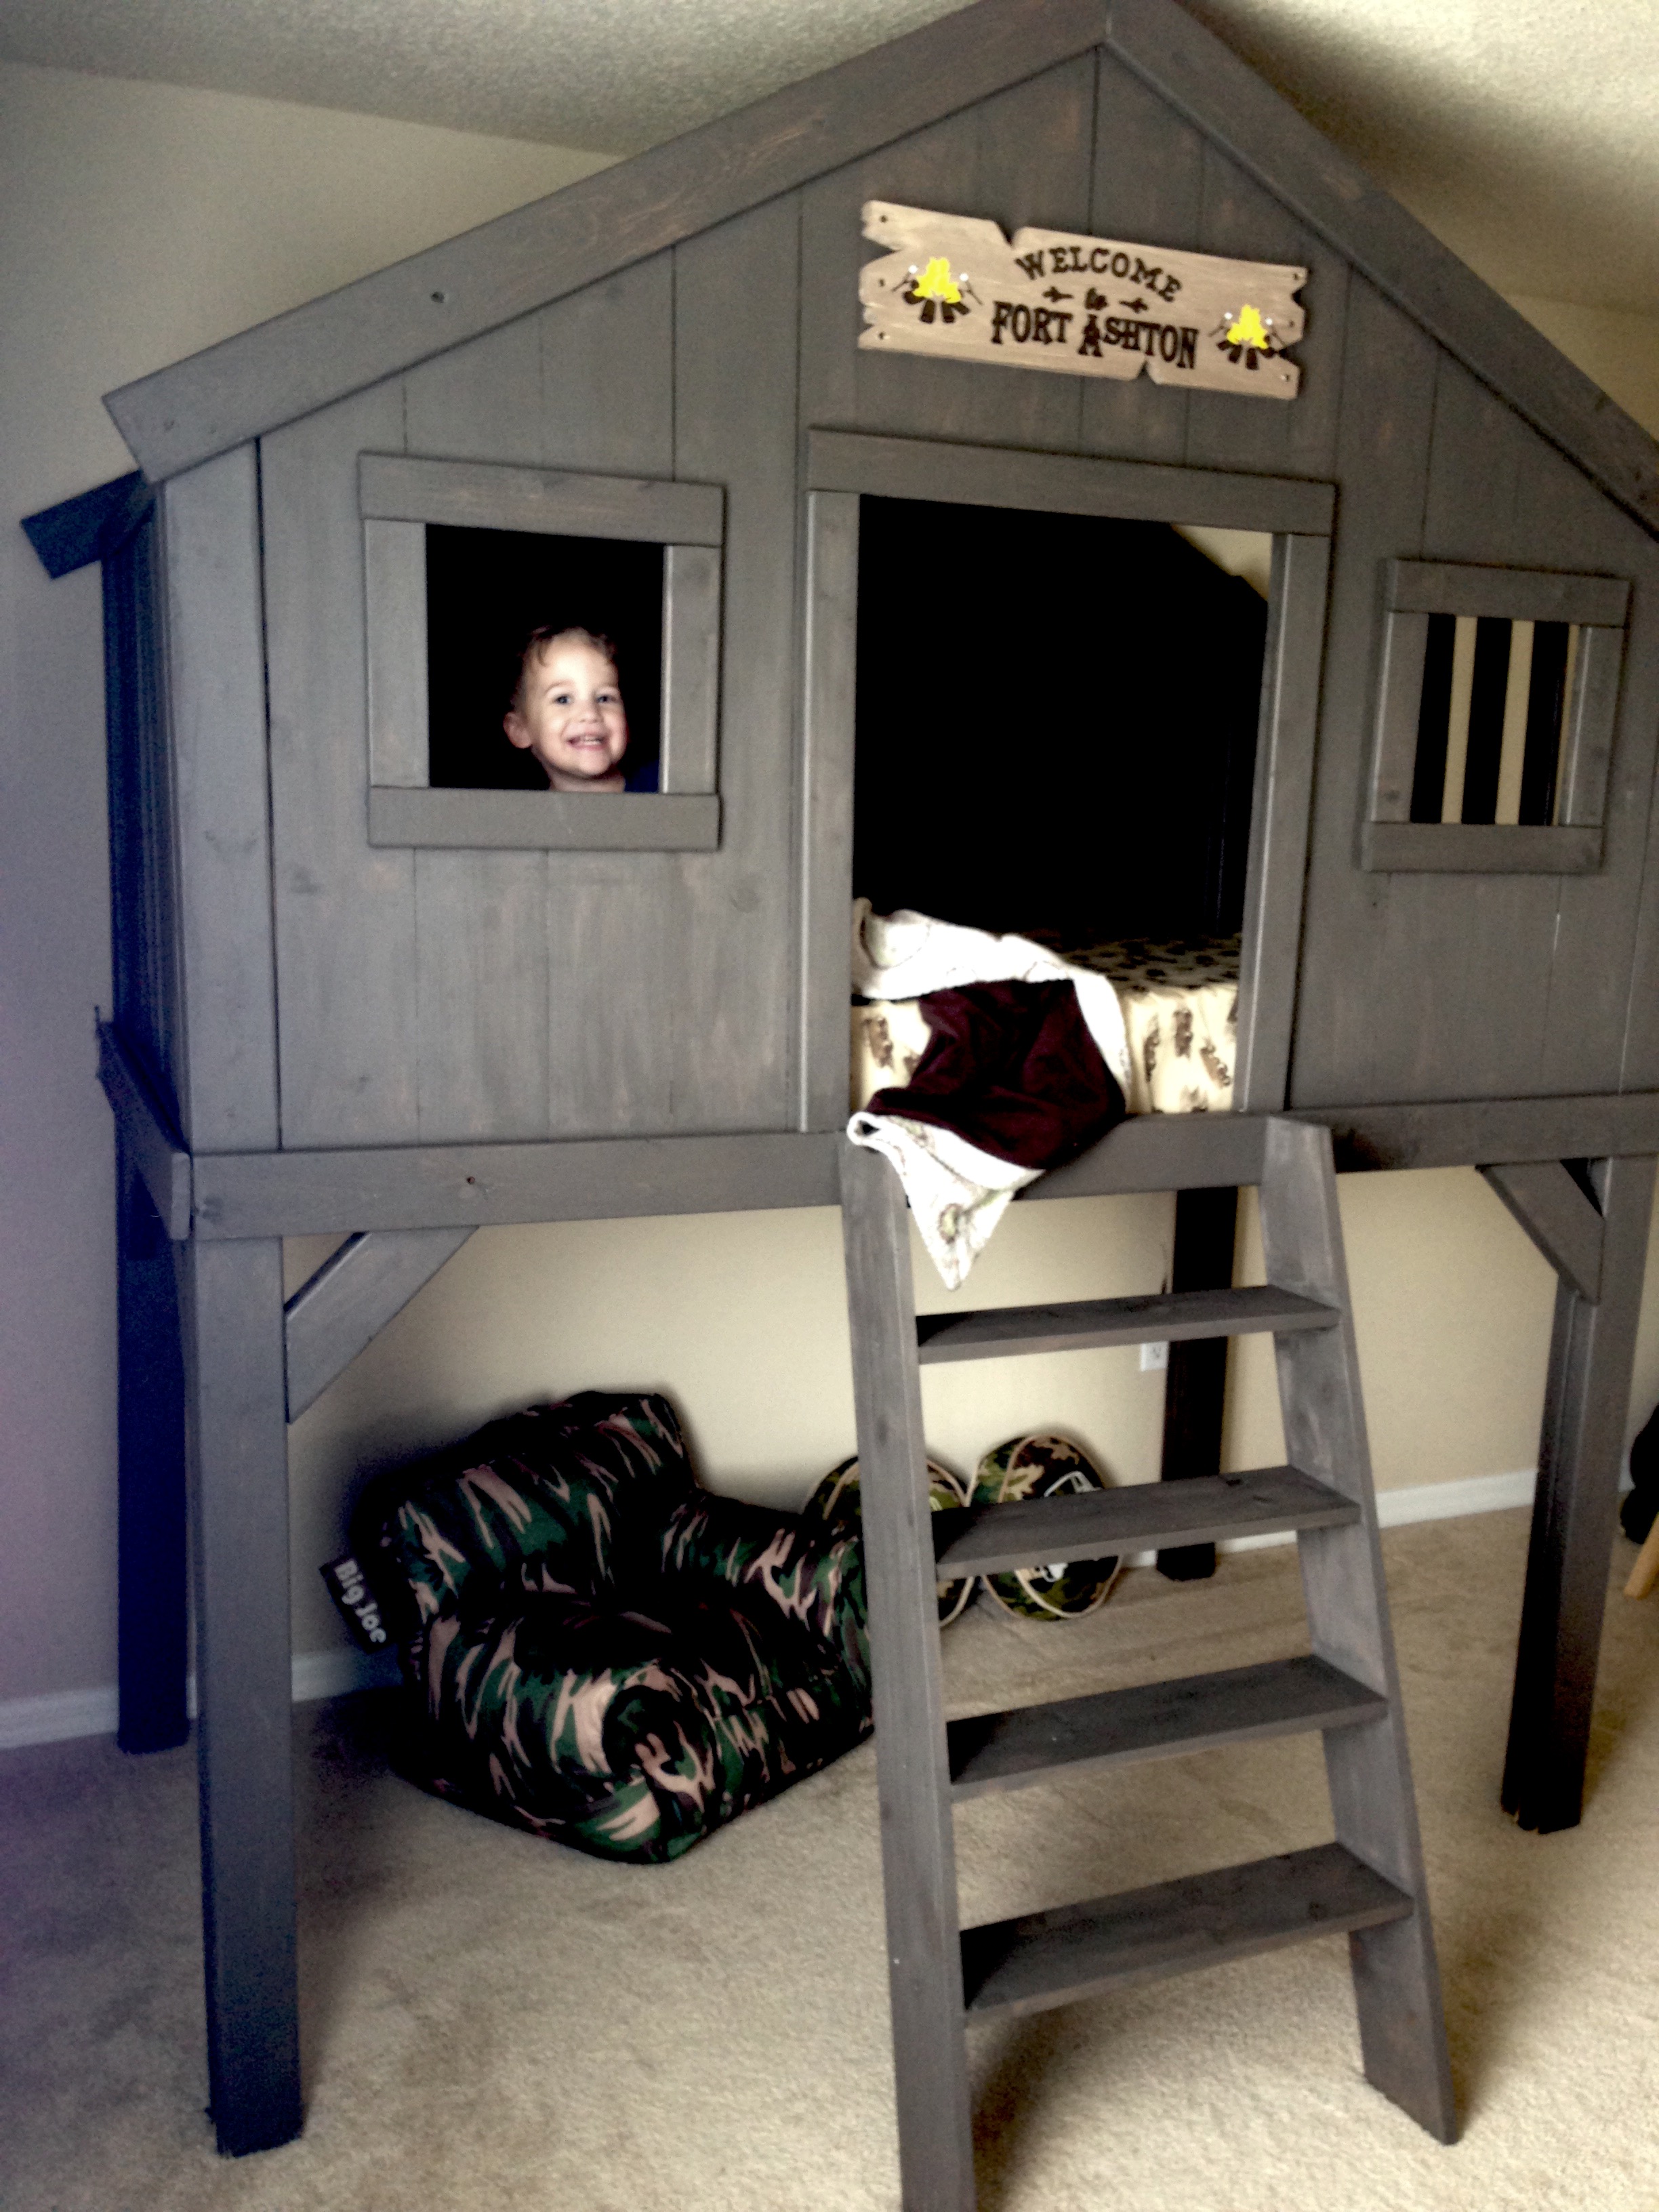
If you are wondering if you can do this, I just learned to use a saw a week ago! So... YES, you can! =)

Took me all weekend to do the cutting and building. Was able to do everything alone except final assembly. I just didn't have enough hands.

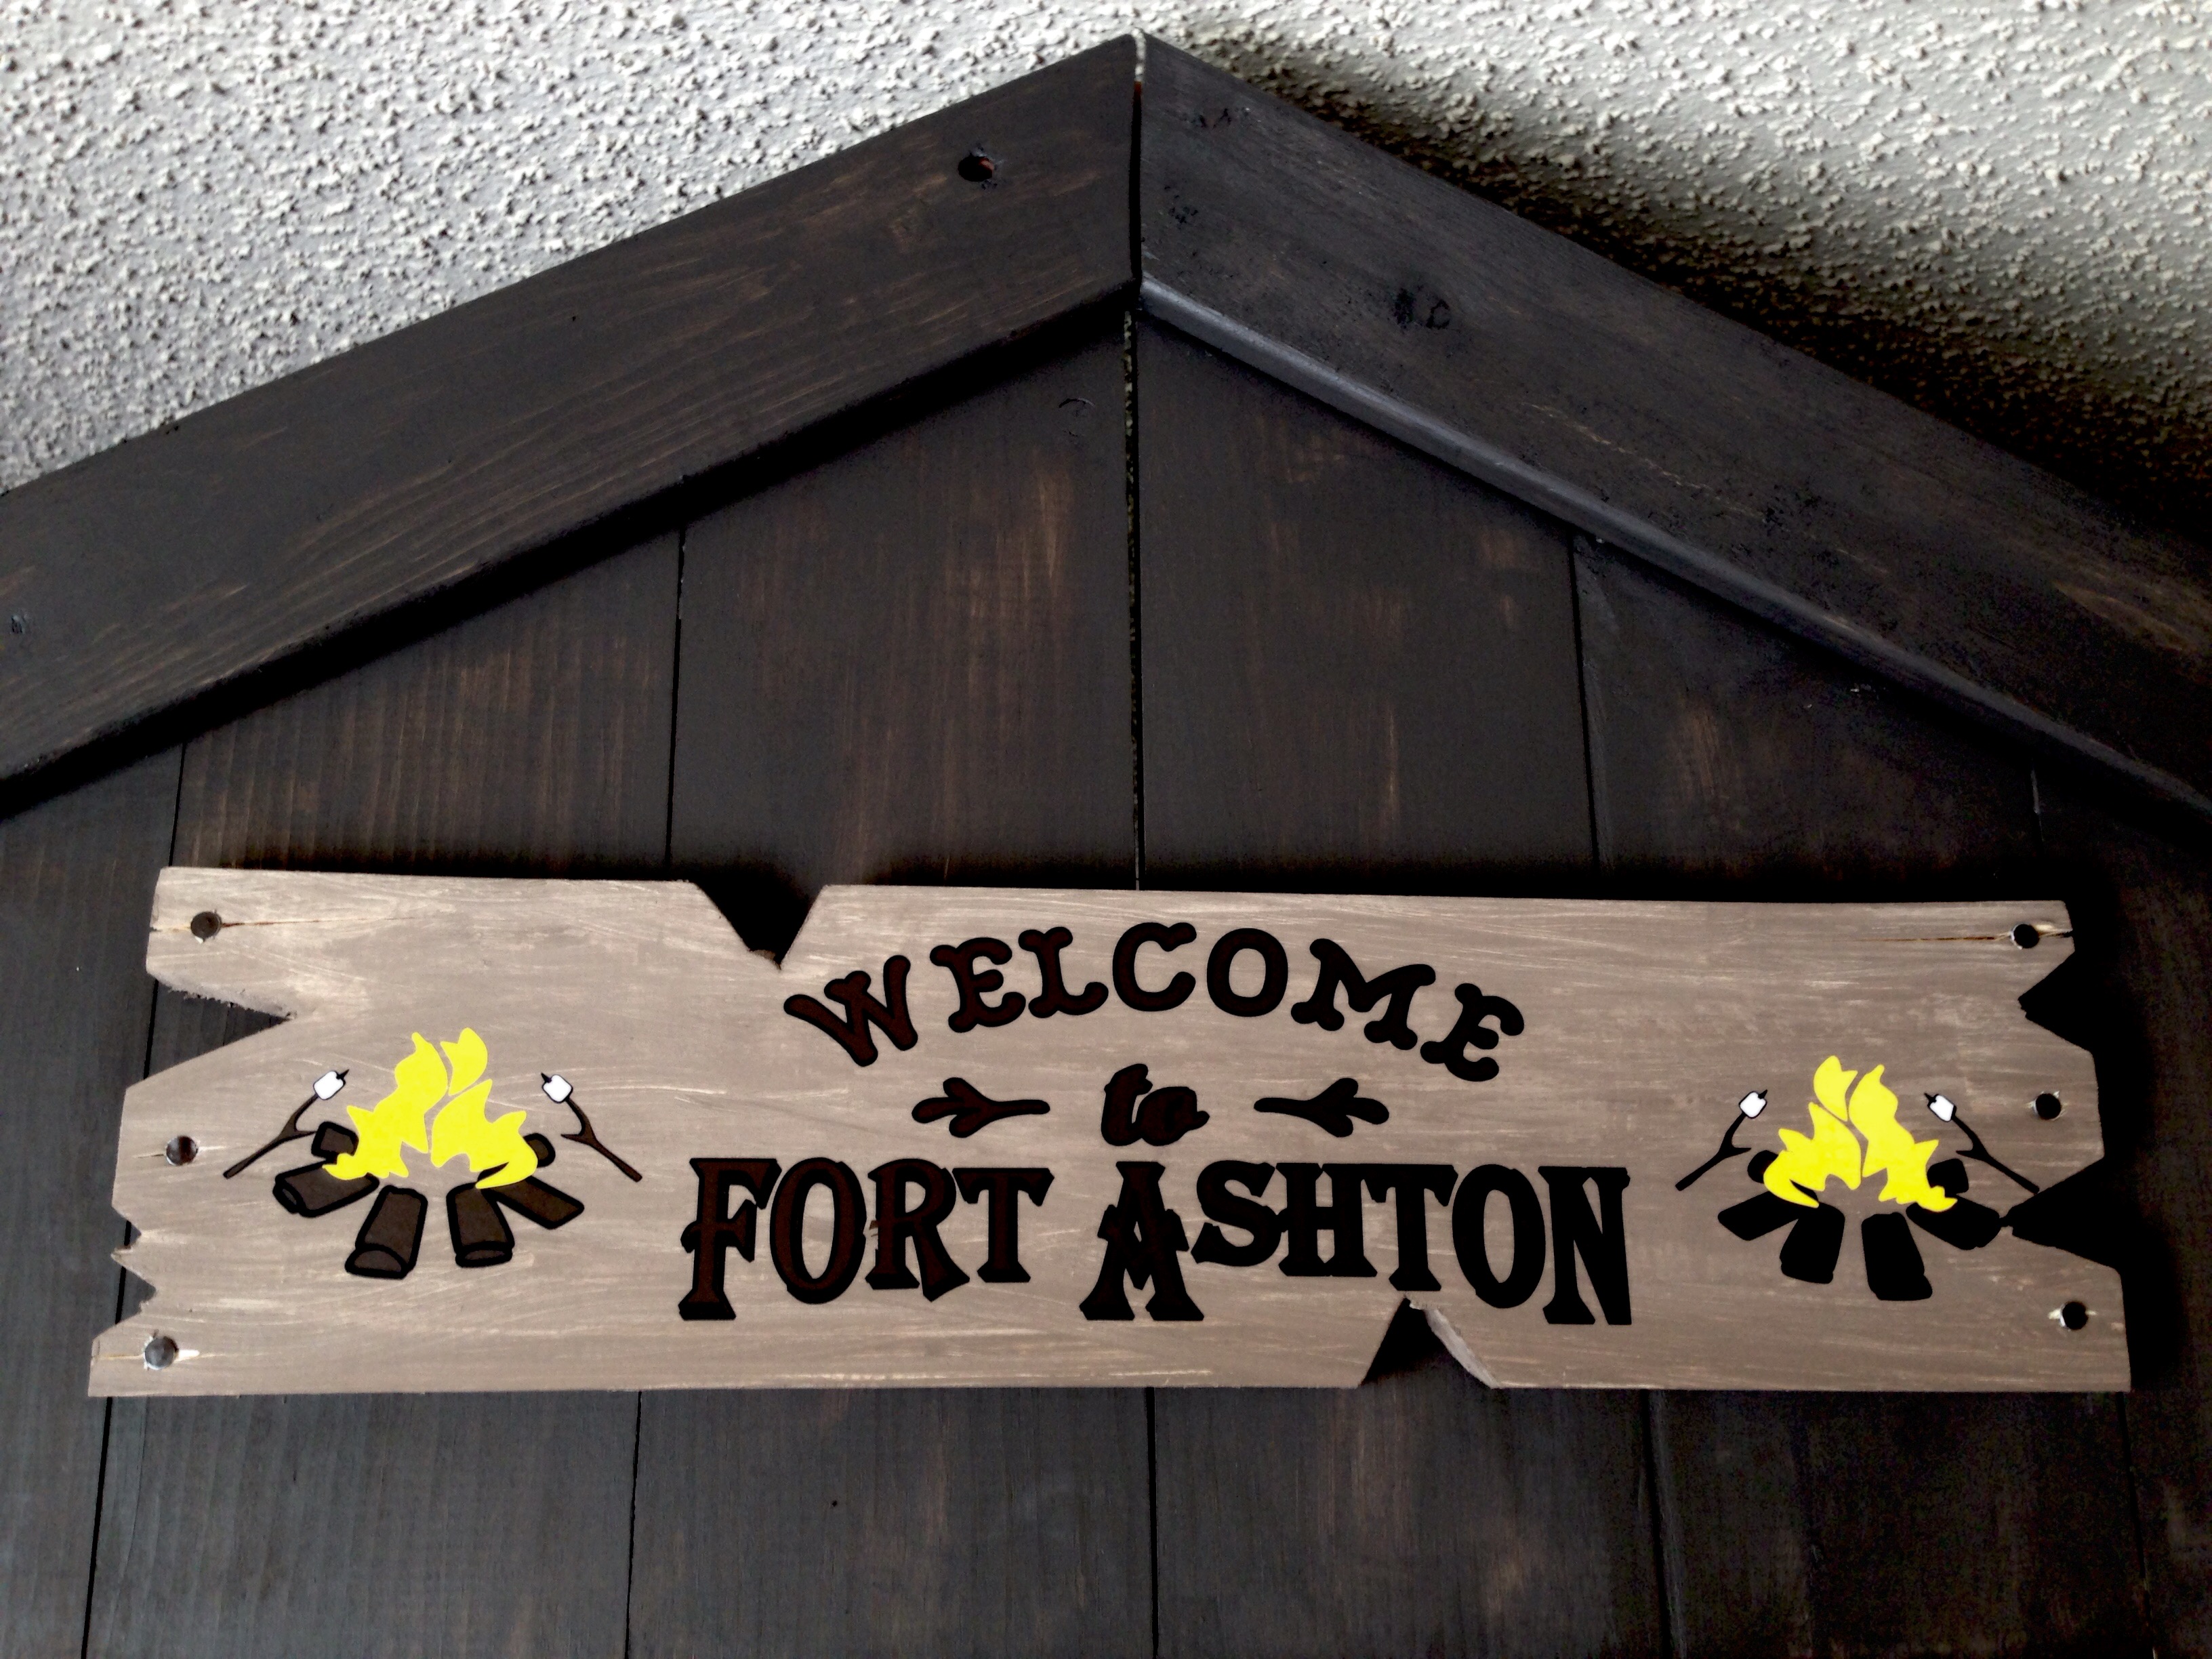
Feel free to ask any questions. Also, take a look at my site for custom signs!! =)

www.heathersvinylcreations.com
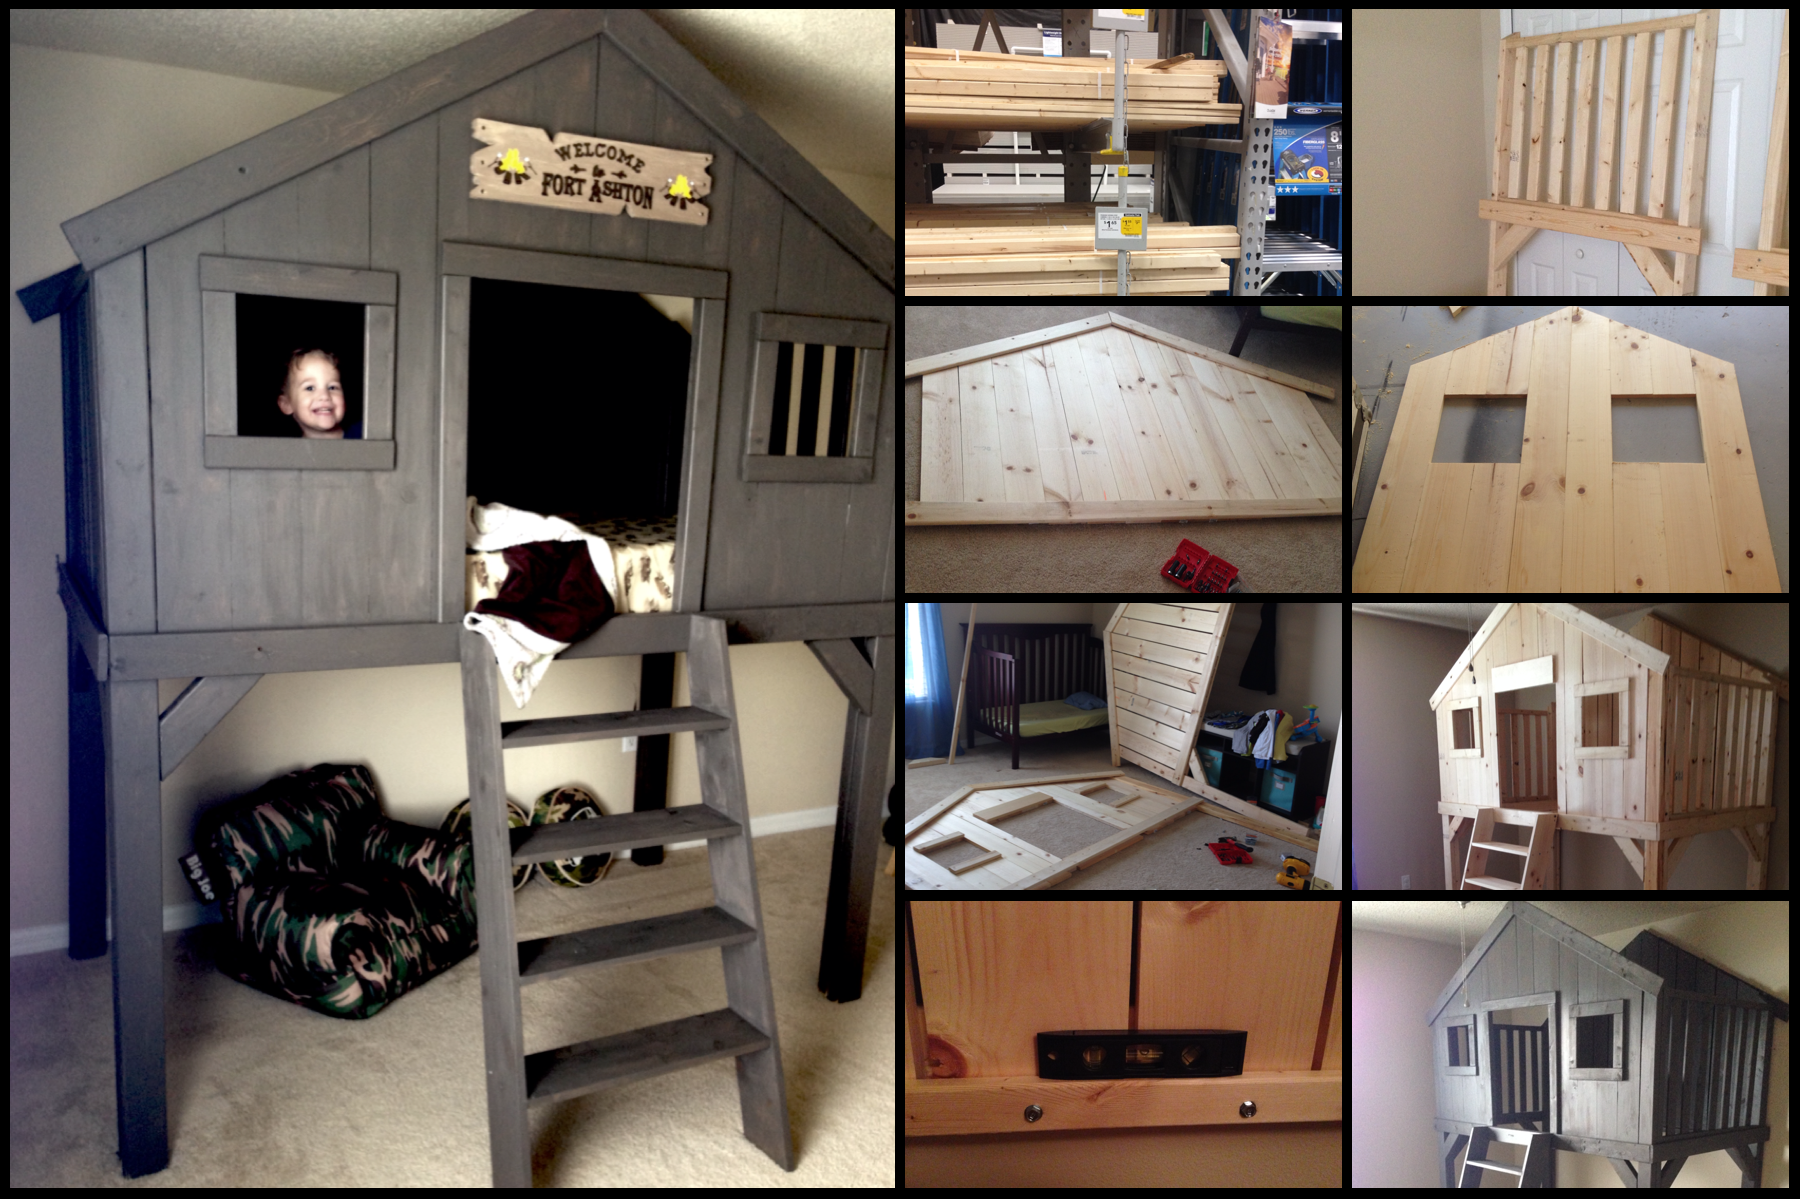
 

Built from Plan(s)
Estimated Cost
$300.00
Estimated Time Investment
Weekend Project (10-20 Hours)
Recommended Skill Level
Intermediate

Comments

Folding Workbench

Submitted by MrsCordz on Fri, 10/11/2019 - 07:47

We chose this project because we have a small garage and space is at a premium.  The dimensions of this build fit well in our limited space and allowed us to organize items such as paint, stain, screws and nails into one central location. I chose 2x4's on the sides to give it a more stable feel. Our garage and parking lot are all sloped and with the 2x4's this prevented the twisting. It feels solid and the wheels are smooth. We picked everything up at Home Depot. The screws that came with the hinges are to long and my husband used the Dremel to grind them down. You could just buy shorter screws.  This is one of my firsts builds and I've definitely learned a lot of lessons along the way. Measure, measure, then measure again before you cut a piece and use a level surface to make level pieces. Overall, everyone in my family played a part in helping me build this piece and so I love it and will cherish this piece and the memories always. Thanks Ana for all your fun videos, sharing your life with your family, and providing resources like this plan to us for free. I'm thankful for my son who bought me a compound miter saw for Mother's Day and other family for buying me a Ryobi circular saw. I'm truly blessed and loved. Thanks

Built from Plan(s)
Estimated Cost
120
Estimated Time Investment
Weekend Project (10-20 Hours)
Finish Used
I'm leaving it in the raw due to the nature of the piece. I may put a clear coat on it later.
Recommended Skill Level
Beginner

Comments

Best Chairs Ever!

Submitted by Anonymous (not verified) on Tue, 06/09/2020 - 18:16

I made these modern Adirondack chairs for our business in Anchorage. GREAT and easy to build design by Ana - we upgraded the arms to tapered 2x6 and they're awesome!

Narrow Console Table

We did it! Our first every project!

Submitted by parwald on Sun, 05/03/2015 - 10:58

We are in desperate need of toy storage in our playroom. We are planning to build several more of these bulk bins.

Built from Plan(s)
Estimated Time Investment
Day Project (6-9 Hours)
Recommended Skill Level
Beginner

Comments

kcasabella

Sat, 04/09/2016 - 21:03

They turned out beautiful! What type of wood did you use, if you remember, and did you paint before assembling?

parwald

Sun, 11/20/2016 - 10:39

It was just standard pine. We painted afterwards with grey paint leftover from a kitchen project.

Full length sliding mirror cabinet

Submitted by mltdblack on Tue, 10/16/2018 - 19:25

I built this for my daughter after building a ladder shelf for my kids bathroom. It took more time to install and adjust the drawer slides and paint the project.  

Estimated Cost
$65.00 - I used a slightly larger mirror.
Estimated Time Investment
Day Project (6-9 Hours)
Finish Used
Exterior - Valspar Black Flat Latex
Interior - Valspar Filtered Shade Flat Latex
Top Coat - Minwax Gloss Spray Polyurethane
Recommended Skill Level
Beginner

Comments

akagracegallag…

Sat, 09/07/2019 - 03:32

Hi mltdblack

Really nice finish on the cabinet.  

It looks like there’s molding on top of your mirror.  

Did you buy a mirror with a frame or buy molding and put it on over the mirror?  

What molding did you use an how did you secure it?  

What size mirror did you use?  Thanks

mltdblack

Fri, 01/07/2022 - 14:14

I am so sorry. This is the first I am seeing your question. The mirror came with a frame and I carefully nailed thru the frame to attach with my 18 gauge nailer. I bought the mirror at Lowe’s and I believe it was 15.5” x 50”. Also, I used full extension soft close drawer slides.

Cedar Boxes made with Pallet Wood

Submitted by flashfire on Fri, 09/15/2017 - 22:19

Thanks for the plans, I was able to make this for a friend's birthday. I made it from pallet wood and it was so easy, I did a mitred top though because I wanted it to look neat and trim. .

Built from Plan(s)
Estimated Cost
Nil
I used pallet wood
Wood glue & screws I already had
Estimated Time Investment
Week Long Project (20 Hours or More)
Finish Used
Linseed oil
Recommended Skill Level
Beginner
Seasonal And Holiday

L-shape Modern plywood desk

I constructed this desk all from birch plywood. It features a pull out keyboard tray, modern drawer finger pulls, and full extension drawer slides. The plywood was finished with a hand-rubbed danish oil for a natural wood appearance.

Estimated Cost
$150.00
Estimated Time Investment
Afternoon Project (3-6 Hours)
Finish Used
danish oil
Recommended Skill Level
Starter Project

Fireplace with recessed TV mount

Submitted by medicscott on Thu, 02/16/2023 - 07:46

This is a very custom fireplace that I built for my wife as a 40th wedding anniversary gift. It is built around a Samsung 55” Frame TV and a Vivo motorized mount. The motorized mount allows the TV to be lowered to a better viewing height than the standard above mantle position which is usually too high for comfortable viewing.

In order to maintain the flush mount effect with the TV in art mode, I recessed the mount into the fireplace. That required building a “back” frame for the TV mount then the outer frame for the surround. I covered the outer frame with ½” OSB then ship lap. The mantle and hearth is made from Poplar with walnut stain and Polyurethane satin top coat. The hearth opens for storage.

This was sourced from several different plan sets with a lot of customization and input from the Technical Support Staff at Vizo-US.

Comments

Ana White

Thu, 02/16/2023 - 09:46

Happy Anniversary!
This is a beautiful, well thought out project.
I was hoping someone would do the recessed mount, and you nailed it! It's so much better with the tv flush like yours.
Also love the motorized mount.
Thank you very much for sharing photos.
Ana

Outdoor hangout using 2x4 and fence boards

Submitted by sylvialh on Sun, 06/16/2019 - 18:13

Bought enough lumber for one sofa but ended up using old fence boards for the  decking so had enough lumber to make the sectional and a shortened coffee table. 

Great way to save some cash even if u have to buy the fence posts. 

Added a reinforcing piece to the one armed sofa between the legs using a kreg jig to stabilize the legs a bit more. 

Waiting on my foam from Amazon to finish off this project!

Used inspiration from the beer/wine cooler patio table and made the middle of the table removable to add a buck underneath later. 

Note the 5 year old patio set, also an ana white project from back in the day!

Super quick build!

I did find that the measurements for customizing it for your cushion size seemed about 1.5 inches too big for all the depth pieces so I sized down but I haven't received my foam yet so maybe I'm wrong but Smth to think about. I didn't want my cushions to slide around so I took that into consideration when building. 

Estimated Cost
60$ CAD for the high density foam for each sofa (3x24x72) plus throw cushions for the back.

11 2x4x10 - cost varies depending on cedar or PT
Fence boards were reused

Outdoor Fabric to cover the foam
Estimated Time Investment
Afternoon Project (3-6 Hours)
Finish Used
None yet
Recommended Skill Level
Beginner

My new and amazing outdoor bench

Submitted by ישראל on Sat, 11/16/2013 - 21:57

Thank you for the easy and fun bench plan.
It was really easy to install.
Even my 2 little daughters had fun (-:

Estimated Time Investment
Afternoon Project (3-6 Hours)
Finish Used
Bondex walnut
Recommended Skill Level
Starter Project

Comments

Chachamation

Thu, 10/02/2014 - 07:21

This is absolutely amazing!

This "ישראל" person is super talented comes to the final touches!!  From now on, I will start following your work...

DIY Pantry Shelves

Submitted by Anonymous (not verified) on Sat, 11/04/2023 - 14:49

Built in 5ft x 5ft pantry using pine panels as they were available in the widths we needed. Inspired by your pantry build video, thank you.

Rob Worsnop

Built from Plan(s)

Octagon Picnic Table

Submitted by Anonymous (not verified) on Thu, 06/09/2016 - 04:59

Was a good project that I built for my son's new home.

I found a few errors in the instructions such as:

A) 2 - 2x4 @ 30 1/2 should be 30 1/4

B) 8 - 2x6 @ 32 15/16 both ends at 30 degrees off square, parallel to each other) should be cut at 34 15/16 blank sizes then cut the angles to acheive the finish size of 32 15/16

C) 8 - 2x6 @ 36 3/4 (both ends at 90 degrees off square, parrallel to each other) should be (both ends at 22 1/2 degrees off square, NOT parrrallel to each other)

Built from Plan(s)
Estimated Cost
$120
Estimated Time Investment
Week Long Project (20 Hours or More)
Finish Used
Dark Walnut Stain, Urethane Top Coat
Recommended Skill Level
Intermediate

Pallet outdoor sectional!

Submitted by Anonymous (not verified) on Fri, 08/19/2016 - 17:49

I made the sectional from pallet wood

Needed extra wood for legs to be stable. I made these under the house, and unfortunately had to take apart to get out! luckily  i used screws.

I made to measure after getting the outdoor cushions first.

Taught me heaps

Estimated Cost
Cost of cushions $60nzd and paint $25nzd
Estimated Time Investment
Week Long Project (20 Hours or More)
Finish Used
paint
Recommended Skill Level
Beginner

Cedar Planters made from Reclaimed Fence Pickets

I built Ana's under $20 cedar planters for free. Or, almost free! I had to buy some more wood glue, but I had some of the wood on hand and took some from a friend's pile of old fence wood. It took me about five hours to build both planters from start to finish. See the blog link below for more info.


Pin For Later!

Cedar Planters made from Reclaimed Fence Pickets

Built from Plan(s)
Estimated Cost
Free
Estimated Time Investment
Afternoon Project (3-6 Hours)
Finish Used
Oxidized the new cedar 2x4s with steel wool/vinegar (http://thefriendlyhome.blogspot.com/2012/07/how-to-oxidize-wood.html). Other than that, no finish.
Recommended Skill Level
Beginner

Comments

Seasonal And Holiday

My Mom's King Fancy Farmhouse Bed

Submitted by thehallway on Fri, 10/26/2012 - 08:28

I built this bed for my parent's guest room at my sister's house. It is very similar to a bed mom had been wanting. They wanted a king size so I had to do some modifications to the original plan - primarily adding 16" to all width measurements. I also used 10 - 1x8s for the headboard panels. That made the panels slightly too wide, so I had to rip a little bit off the 2 end panels.

The hardest part of the project was getting it in her house! The legs made it about 1/4" too wide to fit it thru the door. We were about to remove the legs (which would have been a disaster since they were glued, screwed and painted on) when we finally figured out the right angle to squeeze it in. I had to touch up the paint in a few spots once we got it in position, but that was much better than having to remove legs and put them back on. We still need to get plywood for the mattress to sit on and I'm going to add a middle leg for extra support since it's a king. I will probably eventually build nightstands to go with it. Overall, I'm pretty happy with how it turned out since this is my largest and "fanciest" project so far.

Estimated Cost
~$250
Estimated Time Investment
Weekend Project (10-20 Hours)
Finish Used
Valspar Satin Latex Enamel in White
Recommended Skill Level
Intermediate

Comments

bran2511

Tue, 04/09/2013 - 12:41

I really love this bed, however, being military we move quite often. Is there a way that you would recommend I could alter it so that it can be broken down a little to make it easier for moving? Thank you much :D

bran2511

Tue, 04/09/2013 - 12:41

I really love this bed, however, being military we move quite often. Is there a way that you would recommend I could alter it so that it can be broken down a little to make it easier for moving? Thank you much :D

jlouki01

Sat, 08/24/2013 - 18:31

I just posted a brag post with this bed in black. I will see if I can upload a photo of how I built this bed for very easy break down. I looked at all the brackets etc.. with this being built out of pine I was not 100% confident in the Rockler / Wood craft brackets. I used a forstner bit and a 4.5" bolt with some washers.

Back