


Build the truss beam farmhouse table! Free step by step plans from Ana-White.com
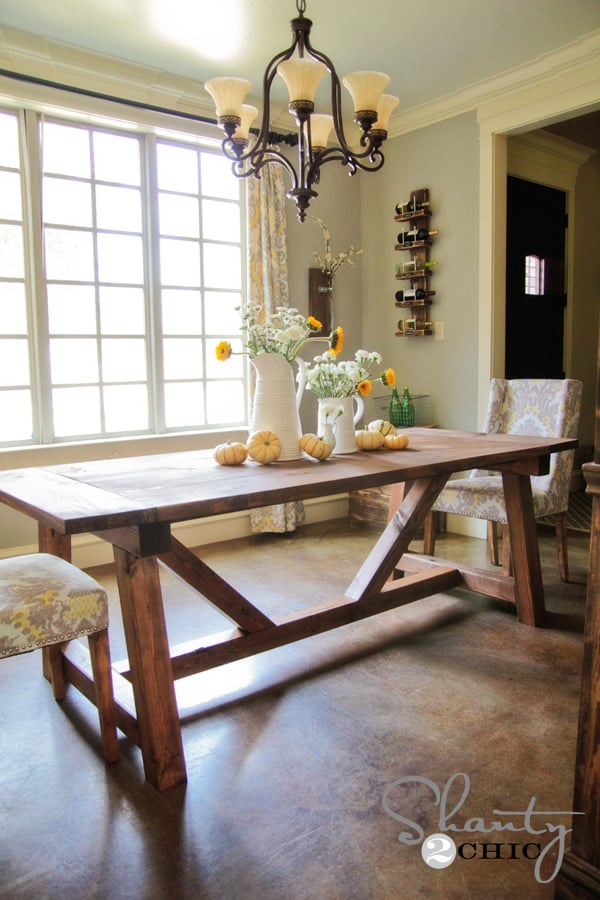
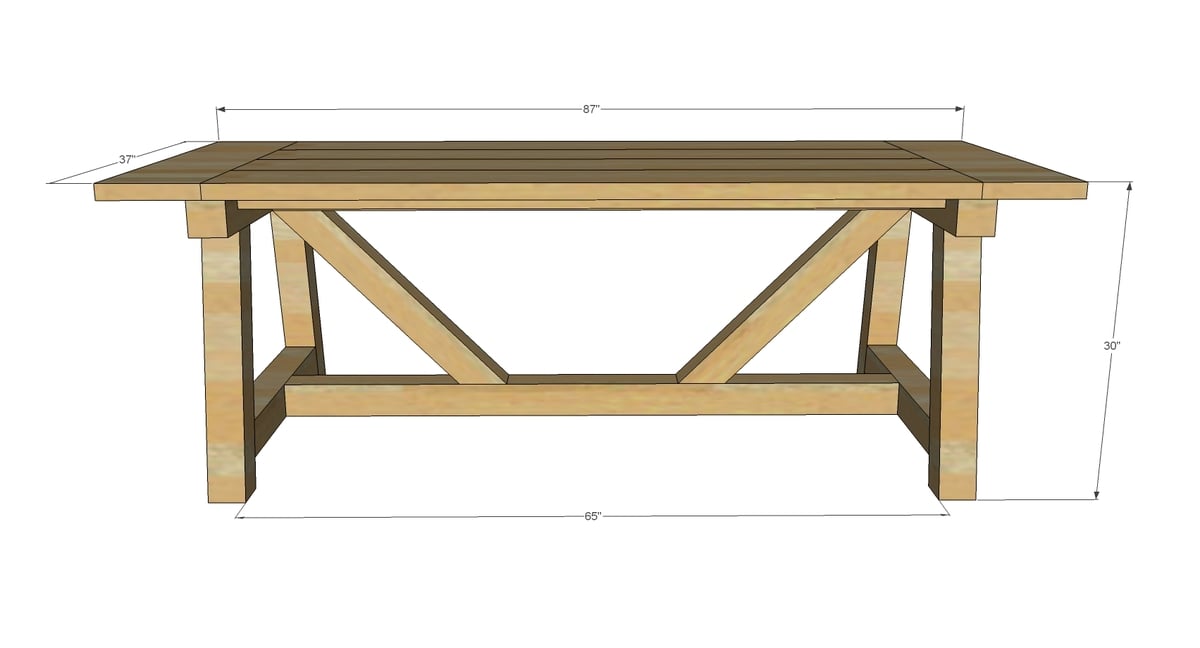
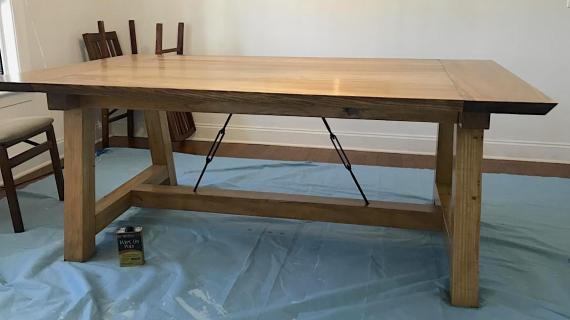
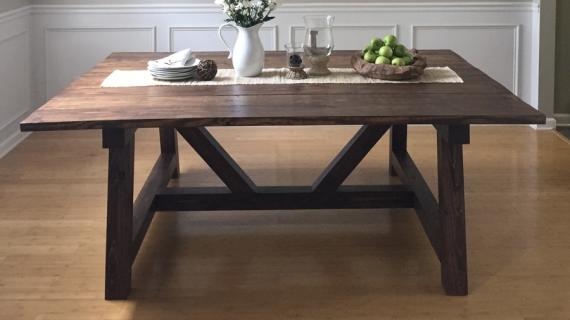
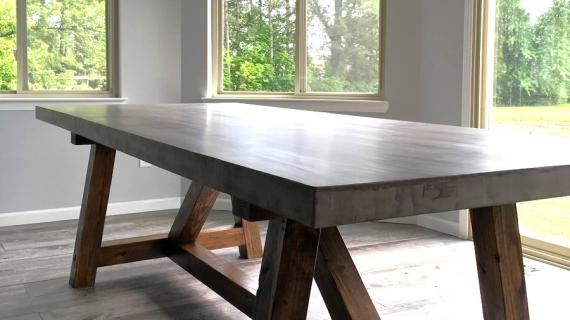
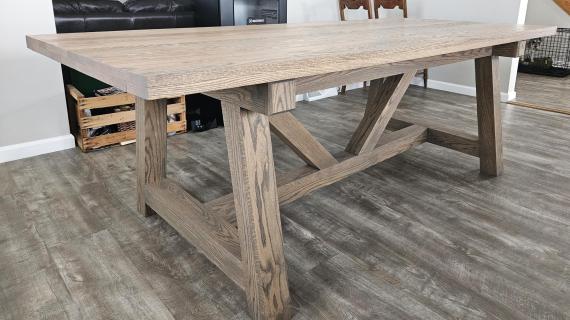
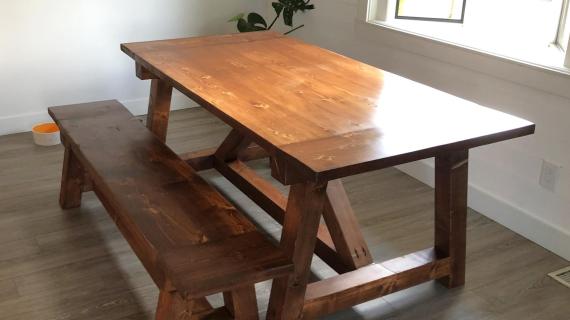
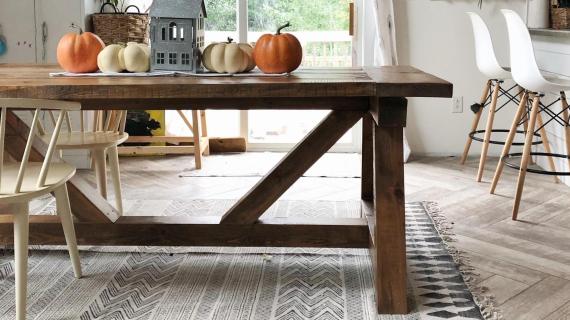
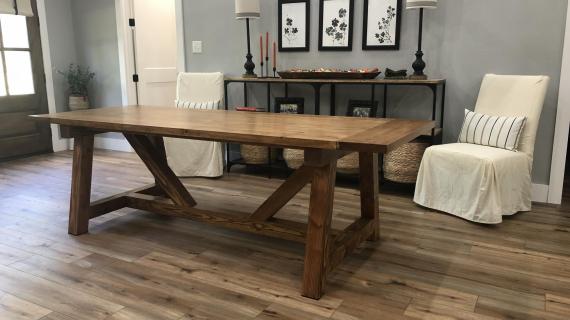
This beautiful solid wood table is sturdy and substantial. Built using off the shelf lumber, we love the truss beam detailing and angled legs. It's a beautiful table that will add that rustic look to your dining room.
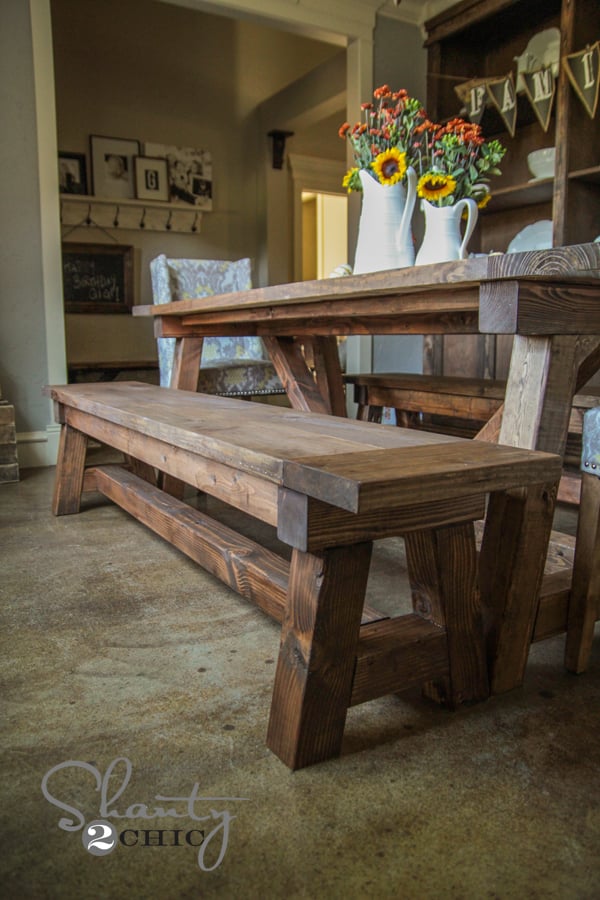
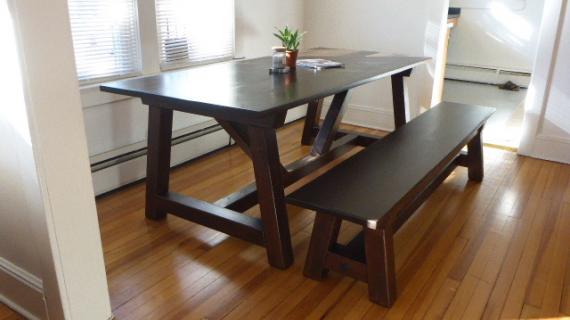
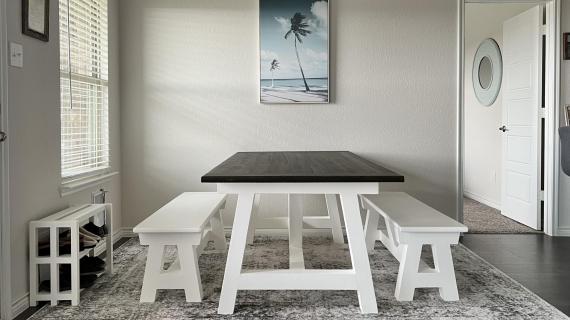
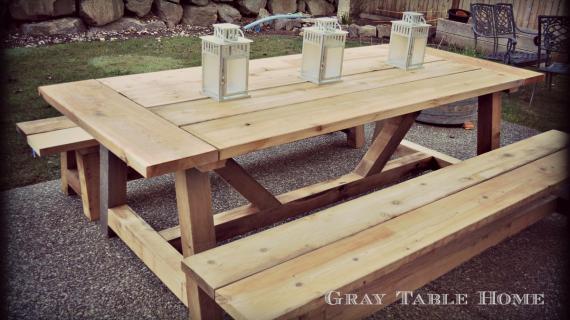
We also have available the matching Truss beam bench plans
My friend Whitney from Shanty2Chic loved our Providence Table, but wanted a bigger version for indoor use, built using real 4x4 beams.
Here's from Whitney:
"Oh how I LOVE a great DIY dining table. Restoration Hardware wants $3000 for theirs, and I built mine for around $100 in wood. This table is big and beautiful, and I can't wait to serve my entire family at it!"
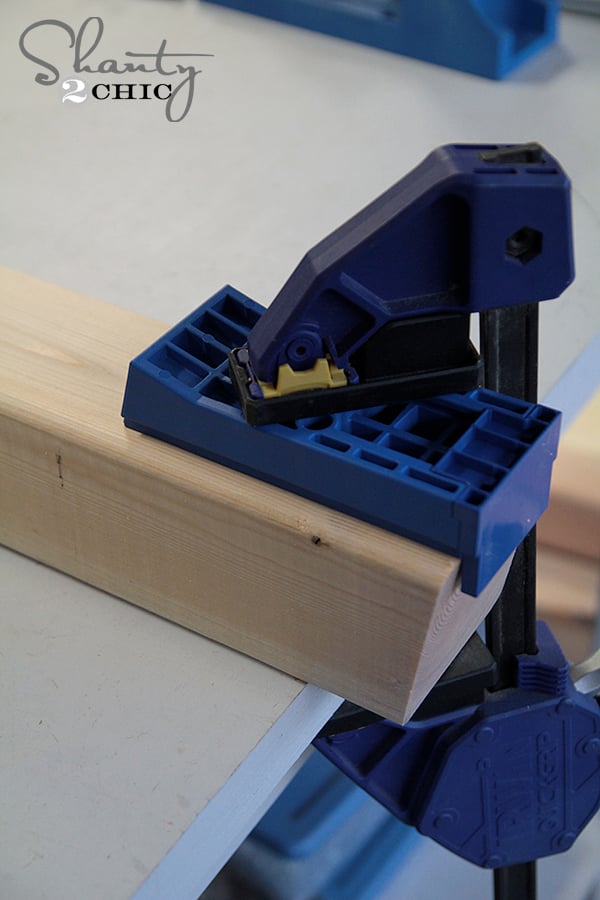
There's a ton of different ways this table could have been put together, but Whitney choose to use a Kreg Jig HD. Because the 4x4 is so big, it won't fit in the jig, so Whitney's solution was to use a clamp.
Whitney has provided lots more details on how she built this table and lots more pictures right here - please take a second to stop over and check it out!
And of course, the plans follow!
Enjoy!
XO Ana
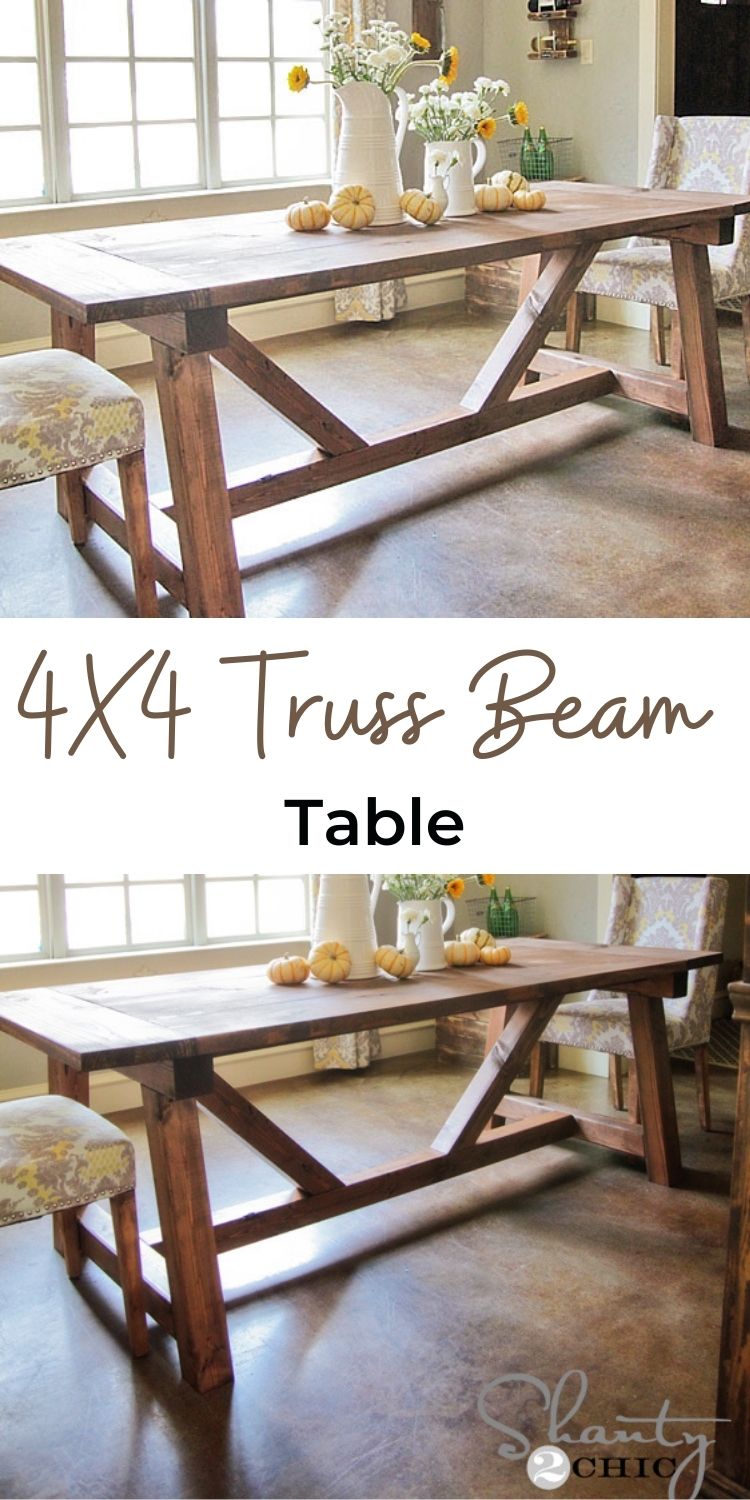
Pin For Later!
Preparation
5 - 4x4 @ 8 feet long
2 - 2x4 @ 8 feet long or stud length
2 - 2x10 @ 12 feet long (tabletop boards - can be cut in half at store for easier transport)
1 - 2x10 @ 8 feet long (cut breadboards out of this board - can also use a 2x8 or 2x12)
Whitney used 2 1/2" Kreg HD Screws and a Kreg HD to build this table
You'll also need 2 1/2" pocket hole screws to put the tabletop together and to attach the tabletop to the aprons
2 - 4x4 @ 35"
4 - 4x4 @ 25 3/8" (both ends cut at 10 degrees off square, long point to short point, ends ARE parallel)
2 - 4x4 @ 28 1/4" (both ends cut at 10 degrees off square, long point to long point, ends are NOT parallel)
2 - 4x4 @ 65"
2 - 4x4 @ 26 1/8" (both ends cut at 45 degrees off square, long point to long point, ends ARE parallel)
2 - 2x4 @ 65"
4 - 2x10 @ 68 1/2" (tabletop boards)
2 - 2x10 @ approx 37" (cut breadboard ends to fit)


Please read through the entire plan and all comments before beginning this project. It is also advisable to review the Getting Started Section. Take all necessary precautions to build safely and smartly. Work on a clean level surface, free of imperfections or debris. Always use straight boards. Check for square after each step. Always predrill holes before attaching with screws. Use glue with finish nails for a stronger hold. Wipe excess glue off bare wood for stained projects, as dried glue will not take stain. Be safe, have fun, and ask for help if you need it. Good luck!
Instructions
Step 1

Build two of the leg sets out of the 4x4s. Once you get one built, built the other on top of it so they match perfectly.
Step 2

Attach the two legs together with the center beams.
Step 3
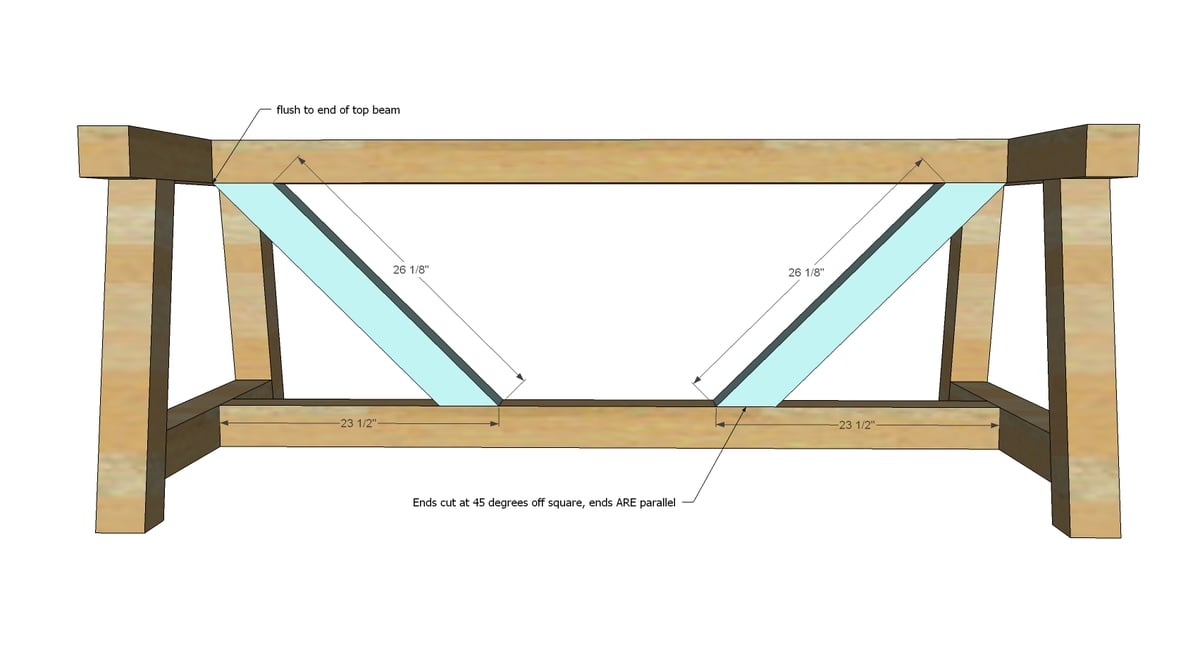
Position the cross supports inside the table and attach to the top and bottom beams.
Step 4

Add the 2x4 aprons underneath for added support.
NOTE: We kept these flat to keep the look the Shanty girls were after, but to make this table stronger (especially if you were modifying the table to be longer) I recommend attaching the 2x4s vertically instead of flat. If you go this route, make sure you predrill 1 1/2" pocket holes facing upward in the aprons to attach the tabletop in the next step.
Step 5

It is always recommended to apply a test coat on a hidden area or scrap piece to ensure color evenness and adhesion. Use primer or wood conditioner as needed.


Comments
momofour09
Mon, 09/23/2013 - 16:16
My husband will die!
I already have a partially finished table in the garage. But with what we need to buy to finish it I feel like making this one would make more sense. If I can convince him this will be on my "to do within this century" list. Whitney never ceases to amaze me and these look so much easier (not that the others are complicated) than some of the other tables. I have 4 kids so we need a sturdy table, no question.
dee708
Sat, 10/26/2013 - 19:16
Truss Beam Table - change width
I LOVE the Truss Beam Table! It's exactly what I've been looking for. However, I would love to build it wider than 37". I was thinking of using 3-10" boards and 2-8" boards for the top, plus 10" breadboards on the ends with more support underneath. I was planning to add 2 more 2x4s underneath for support of the wider width. Do you think this is doable? I've never built anything of this size before and I'm nervous to change the plan without more direction. I'd love any advice you could give... Thanks so much for sharing this!
wingnut2000
Wed, 04/07/2021 - 12:21
I built a table for my…
I built a table for my dining room similar to this one with one of Ana's plans and I am building another for my sister like this one. On mine and I plan to do on hers as well, I took and notched out the 4x4 out 1.5"x3.5" for the 2x4's to run past the 4x4 leg support and provide support for the bread board. Stop about 3 or 4" from the end of the table and I also cut the end of the 2x4 at a 45 to dress it up if someone looked under the table lol
Cindyclev
Fri, 07/18/2014 - 13:31
Paint color
Can you please tell me the color and brand of paint used in this dining room pic? It's beautiful! I am going to make this table too :)
3girlslater
Wed, 12/03/2014 - 18:07
expansion and contraction?
We are looking to build this table soon. Has anyone had problems with the top expanding and contracting? We live in the Midwest and it tends to be dry here in then winter and humid in the summers. Thanks for any help.
In reply to expansion and contraction? by 3girlslater
Newb
Fri, 09/04/2020 - 12:11
Yes. I used the typical wood…
Yes. I used the typical wood bought from the big box store and I had about 1/2 in contraction on each side.
bcole11
Tue, 01/06/2015 - 07:11
Other ways to join the table top
I see that the Kreg Jig, in this example was used to join the table top. Would it not be easier and/or better to use a biscuit joiner to join the table top 2x4s?
jhancock42
Tue, 01/06/2015 - 09:56
biscuit joiner
Yes, it is. Biscuits are great for alignment. Just make sure the edge jointing and glue up is done well. But just for the top. The biscuits would not work well strength wise for the butt joints used in this table.
Kreefreaza
Sat, 10/31/2015 - 17:28
Kreg K4?
How could I use a K4 kreg jig to join the 4x4s? Thank you!?
mikehorn05
Mon, 11/23/2015 - 16:05
what type of wood did you use?
what type of wood did you use?
In reply to what type of wood did you use? by mikehorn05
Ana White
Tue, 11/24/2015 - 12:00
Pine or Douglas Fir would
Pine or Douglas Fir would work here.
charchav
Mon, 12/07/2015 - 14:46
Treated or Untreated Wood
What type of wood did you use? Treated wood or untreated?
Ana White Admin
Tue, 12/08/2015 - 10:10
Wood
Take a look at the build post here for all of the details, be sure to read through the comments too! http://www.shanty-2-chic.com/2013/09/diy-dining-table.html
Megs204
Mon, 02/22/2016 - 11:50
I love the idea of building a
I love the idea of building a table so that it will be exactly the size I want. I'm hoping to seat 10 people around it, so the interweb tells me it will need to be 120" long. Obviously the top will be longer as well as the center beams and aprons. How about the cross supports? Leave as is? Change the angle to make them longer?
lwinstone
Thu, 04/21/2016 - 11:56
How many Does this fit
How many chairs can sit at this current size of table? I would also like to fit 10 at the table, and was wondering how to change the plans to fit that accordingly. I am going to make this in a wood shop class.
gaddyzt
Thu, 06/23/2016 - 08:05
Wood Cost
Where do you get your wood from for all of that material to only cost $150? Everything I find is way more expensive than that.
jeremysavoy
Wed, 09/07/2016 - 05:39
Joint / Plane
Just curious if jointing/planing the table top boards so that it's completely flat and also so that there are no gaps between the boards (I have 4 kids 7 years old and under, lots of crumbs) would distract from the otherwise rustic / primitive appeal of this peice. Obviously you could still distress the top and round off the edges of the comleted top. I suppose one could joint/plane the entire project as well. Obviously this increases time and costs as you're likely not buying standard dimensional lumber, but that aside - thoughts?
bryan1
Sun, 09/25/2016 - 06:45
Table and bench? Check!!
TimLucky
Mon, 12/28/2020 - 17:35
Color?
Beautiful!! What color of stain did you go with?
Canisty
Mon, 10/10/2016 - 18:31
Perfect
I was looking for a plan just like this. Thanks!!
billy78
Sat, 10/15/2016 - 23:34
Love it!
I totally love this rustic table. Will make a great addition to our dining room! Thank you for the plans!
piper41955
Thu, 11/03/2016 - 22:51
Breadboard ends
The breadboard ends are supposed to be more than an asthetic detail - in practice they should allow the table top to expand/contract/move without cracking. This is normally done using more complex joinery, gluing and screwing the ends most likely defeats this entirely since the entire top would be held rigid.
Jakins13
Thu, 11/10/2016 - 06:39
Truss
Truss
somartin
Wed, 12/28/2016 - 00:43
How many screws?
Hi guys, could anyone please tell me how many screws you used for this table?
Romptimus Prime
Tue, 01/10/2017 - 16:36
Depends...
I just built this table, and it depends on how you do your screws. I used the Kreg jig to make a pattern on the table top that gives it a bit of dress up. I tend to over-engineer things, so with my table top alone, I'd say I used about 60 screws. I didn't bother with the 2 x 4s under the table, and I also left off the 45 degree pieces off the center truss... It is more than sturdy enough without all that.
Romptimus Prime
Tue, 01/10/2017 - 16:46
If you go here, you can see
If you go here, you can see the pattern I put in to the top with the Kreg jig:
http://www.ana-white.com/2017/01/DIY_furniture/truss-table
adklima
Tue, 01/10/2017 - 06:24
Breadboard Support and Extensions
I love this table and plan on starting it this weekend. If I want to get some extra support for the breadboards what would you suggest? Also, is there plenty of room to put chairs on the ends or should the breadboards be extended?
Thank you in advance for any replys.
Romptimus Prime
Tue, 01/10/2017 - 16:40
I used all 2 x 10s and there
I used all 2 x 10s and there was no need to extend the breadboards. I'm a big guy (6'3") and with the way the trusses are designed, my knees fit with no problem without extending them. I ran two screws top and bottom into the breadboards from each of the lengthwise 2 x 10s, and as long as no one tried to push themselves up using the table, they are rock solid. I had debated reinforcing them with bolts from underneath, but with the way I lined up the 4x4s underneath, I had enough support. I also used true 4 x 4 (eastern white pine), not 4 x 4s from the box store that actually measure 3.5 x 3.5".
Best advice I can give anyone doing this table: Spend the extra money and go to a real lumber yard and get nice wood. It will save you time, effort and money in the long run when you're not stuck fixing warps, twists, cracks, etc.
staci424
Wed, 02/22/2017 - 20:59
Kreg jig position and collar depth setting
Awesome plans! These plans just specify to "build" the leg sets but I've seen a lot of videos where people use 6 inch torque screws to attach the legs, and the kreg jig like the Shanty girls did. I would love to know the measurement of how far to position the jig from the end of the work piece as well as what setting to use for the depth collar for the 4 inch material? No matter where I look I can't seem to find either of these settings for 4 inch material. Should I also use 2 1/2 inch pocket hole screws for the 4 inch material as well? Would help me out a ton! Thanks a bunch =)
rafusea
Mon, 12/11/2017 - 00:18
A small change but totally in LOVE
A friend of ours helped us with this table and after reading so many comments about the breadboard ends and the possible lack of strength we decided to frame the table top in. I was upset at first because I really loved the look of the breadboards but we wanted to make sure that this table lasted through our big family dinners and our little girl who is going to be putting this table through the ringer once she gets older. So happy with the results. We LOVE this table and the plans were great. We adjusted the size a bit to fit our benches.
The only small issue we are having is the smell from the polyurethane coats on the table itself. Not sure if we used the wrong product or not but oh boy the smell is strong. We brought the table in our house yesterday but we are taking it out today because the smell is so strong and we don’t want our 1 year old to be exposed to the strong odour. Did anyone else have this issue? If so, what did you do about the smell, if there is anything you can do? If you didn’t have this isises, What product did you use to seal the table?
Thanks again for sharing such beautiful plans with us!! Can’t wait to tackle more projects...hopefully next time on our own!
TimLucky
Mon, 12/28/2020 - 17:40
Would love to see your final…
Would love to see your final result with the frame end.
Kristinbroughton
Wed, 12/27/2017 - 06:57
The benches
Do you have the measurements for the benches?!
Ngus
Fri, 01/12/2018 - 14:04
Wear over time
Has anyone had any issues with this table cracking over time? A video I watched with a woodworker stated that the breadboards on the ends don’t allow the wood in the middle of the table to expand thus leading to the wood cracking over time. I dont want to spend all the time making this if it is going to break. Thanks for any guidance!
Ravin1keys
Wed, 01/24/2018 - 05:33
How to shorten the length
My space isn't big enough for the actual length in the plans. How do I go about altering the plans for a shorter table ?
New to building furniture. Any help on this will be greatly appreciated. :)
AndyAlva
Tue, 02/20/2018 - 12:47
Pocket Holes Didn't Feel Like Enough
This plan is incredible. I love the simplicity of the build both in the aesthetic and the actual process. My only beef, though, was the lack of direction with pocket holes. I ended up adding four extra PHs per 4x4 when I noticed the beams slightly bending away from each other when under weight. Something to potentially note, S2C. Otherwise, everything was easy and inexpensive! Keep killing it, gals!
aderosa
Tue, 03/27/2018 - 07:44
What type of wood is ideal and practical?
This table is my next project and I'd like to get started soon. I am debating on the wood. My husband wants me to find some good wood, like at a specialty lumber shop. But I was planning on using pine from Lowe's for a few reasons: it's convenient for me to get, if I screw up a cut it's not too expensive to get a new piece, it saves money to use pine, and if I sand it well enough it can look very nice. Thoughts on type of wood for this table....
Thanks!
In reply to What type of wood is ideal and practical? by aderosa
Brian Famous
Tue, 03/27/2018 - 20:13
My outdoor table is cedar
My outdoor version of this table, which I built about 4.5 years ago, is made from cedar.
http://famousartisan.com/outdoor-farmhouse-dining-table/
It cost me about $400, but was well worth it.
I wouldn't recommend cedar for indoor use though. I'd also, personally, skip on pine. It will dent, scratch, and just generally not wear well over time. I think you might be able to get away with it for the base (particularly if you're open to painting it), but would use a better hardwood for the top.
Though, if it's your first table build, doing a pine top first may be a good idea. You can always replace it in a few years and wouldn't have that much money invested in it.
Medickep
Fri, 03/30/2018 - 13:16
Wood for table
I made a similar table and used kiln dried Doug Fir.
bclute
Fri, 05/18/2018 - 13:15
Wood Type
I am not a professional builder at all, but I will say I have done a couple projects with the pine from HD or Lowes. We had a farmhouse table custom built and I am pretty sure the guy just bought his wood from big box as well. The table was sturdy and looked great, but after a couple months the wood started to shrink and/or dry up. Spots that were covered when he stained, now show and are unstained. Not sure if better wood will fix these issues.
erniegeneva
Mon, 10/14/2019 - 18:22
Thank you for the plans to…
Thank you for the plans to this table. I used a mix of Kreg, biscuit, and mortise and tenon joinery to assemble the parts. Also used a router, jointer and planer to mill the boards prior to assembly. I've made the table in cedar, douglas fir, pine, and now oak.
rico
Mon, 10/28/2019 - 09:34
Truss is backwards. FYI I…
Truss is backwards. FYI
I am a concrete furniture fabricator and made this base for a customer for a concrete dining table. This design probably suffices for a wooden top but if you are making something heavier reverse the 45 degree supports. The weight from the center of the table needs to be carried down to the legs, not the center of the bottom 4x4 stringer. Aesthetically the plans might look nicer reversed but as a former general contractor I couldn't bring myself to build a backwards truss even if my top wasn't 400 pounds. That said, as designed here the two 45's do provide the the second function of sheer bracing (think rocking from end to end) so you want them installed securely.
rico
Mon, 10/28/2019 - 09:38
*meant stretcher (cord) not…
*meant stretcher (cord) not stringer
EllieSteele
Wed, 12/11/2019 - 09:30
it looks very nice!
it looks very nice!
pollettm
Tue, 02/11/2020 - 06:59
Pocket holes
Hello,
I was just wondering if I don't have a HD Jig, can I add pocket holes on both side of the beam?
I just have the R3 jig right now.
Thanks in advance.
airtrucker
Sun, 08/09/2020 - 20:43
I didn’t have a good night…
I didn’t have a good night for it either. I drilled 5/8s hole through different places and then screwed into the different beams. Then to cover it up I glued a 5/8s dowel in the hole. I did sets of 2 and three. Dowels will be visible though but I like the look a lot.
debaril82
Fri, 03/06/2020 - 03:26
Resize!
I love this table! However, my space is smaller. Can someone help me to make it a 6ft table instead of the size it is now?
mattgold
Sat, 06/27/2020 - 09:10
I would also love to build a…
I would also love to build a 6 foot version of this table. Are there plans available for this?
jmueller@grani…
Mon, 05/11/2020 - 11:51
Updating Plans for a 10' x 4' table
Hi i love this table and would like to make mine 10' long by 4' wide. Can anyone help on updating the wood dimensions/cut list or provide me with insight as to how best to do this? Thanks for any help. love this site!
Jthoose45
Mon, 05/11/2020 - 19:26
4x4 Truss table with matching bench planes
Want to make this table, but cannot find the planes for the bench to go with it.
Homemakingit
Sun, 06/14/2020 - 09:59
Expandable table
Is there anyway to make this table a small lengh but also expandable? Has anyone tried it?