Community Brag Posts
Modified Laundry Basket Dresser
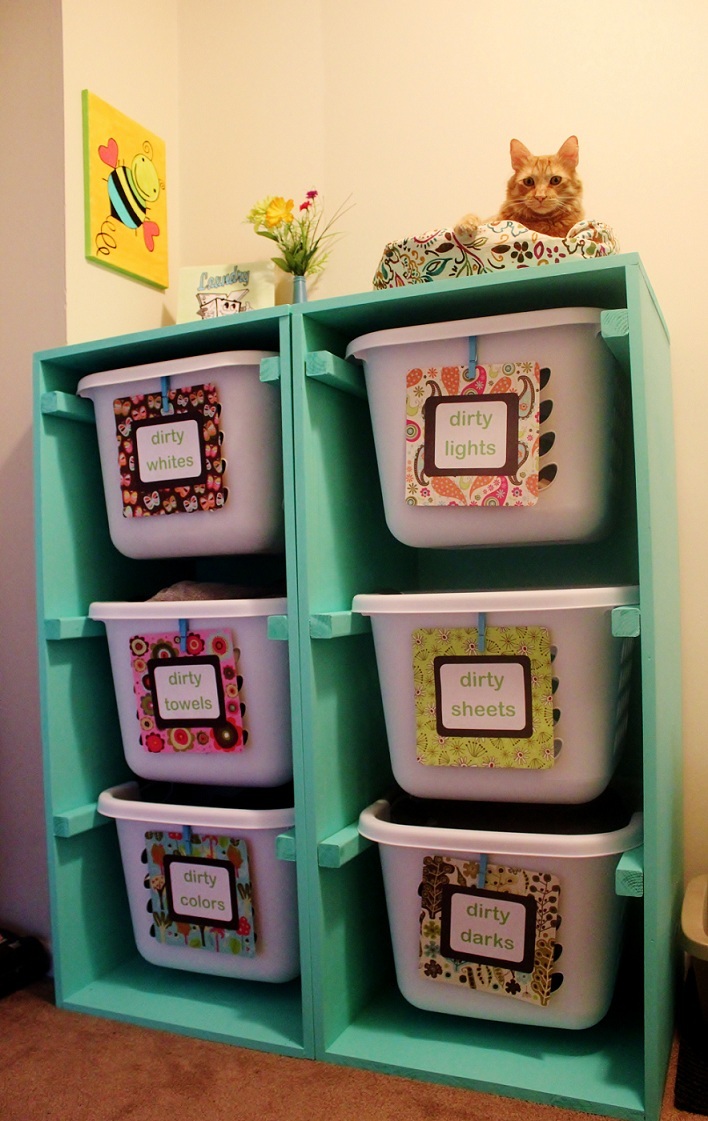
Both dressers were completed in one (long) day by my boyfriend and his father. Modifications were made to make it fit square Sterilite 1.5 Bu./ 53 L laundry baskets (serial/bar code # 073149121789).
I'm not sure what size pieces they purchased, however this is the cut list (for one dresser, 3 laundry baskets):
2 - 48" x 20" (sides) - could possibly be shorter, we had a little bit of extra space
1 - 20" x 20" (bottom)
1 - 21.5" x 20" (top)
1 - 48.5" x 21.5" (back)
6 - (2" x 2")'s cut into 20" pieces (or the metal angle option in the original design)
They did not distance the spaces perfectly for the (2" x 2")'s, but every 14-16 inches should be about right.
I'm sorry these instructions are void of a lot of information, but I hope they can help.
I think this project can take a shorter amount of time if no mistakes are made. They had to run to Lowe's 2 times in the middle of the project because they forgot to purchase a second size of screws and then they cut the back too thin.
Good luck, and have fun! It is a fabulous project and oh so very useful.
Built from Plan(s)
Estimated Cost
$50 - $100
Estimated Time Investment
Day Project (6-9 Hours)
Finish Used
Lowe's Creative Ideas for Color, "Dive In" CI 249
Recommended Skill Level
Beginner
Comments
Mon, 05/28/2012 - 09:53
Wonderful idea!
This is a brilliant solution, particularly since most sorters don't have enough compartments to separate the whites, sheets and towels from each other. But we really don't want to wash them together, do we?
Love how cozy your kitty looks up there, too.
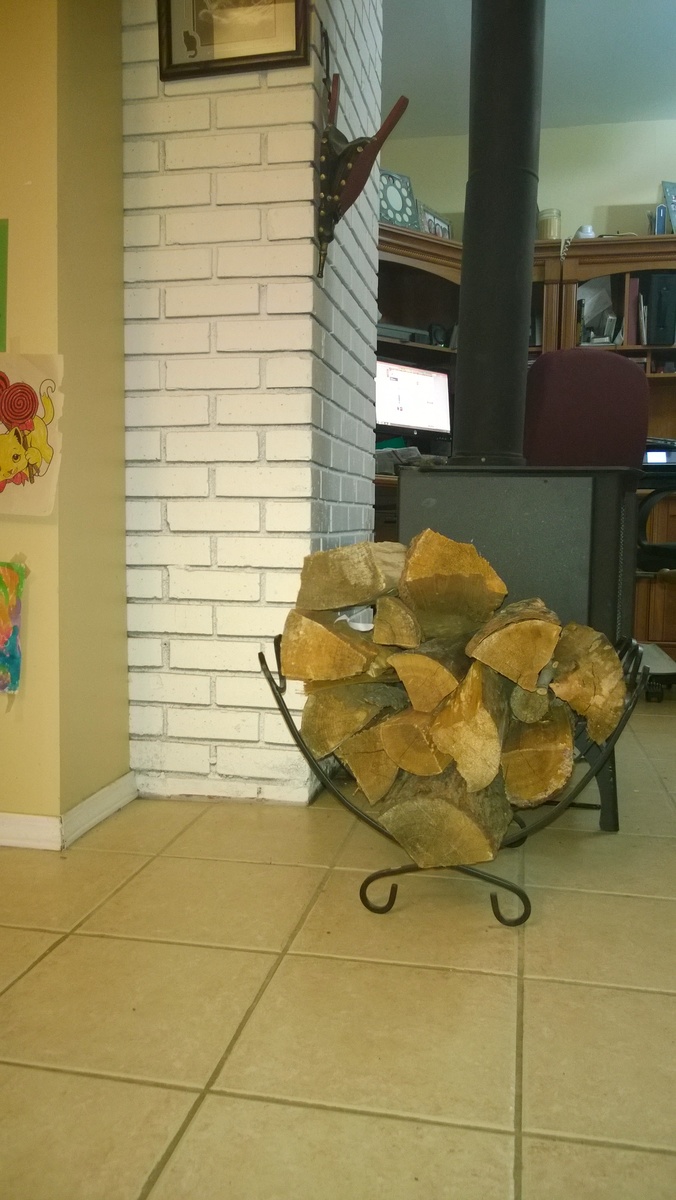
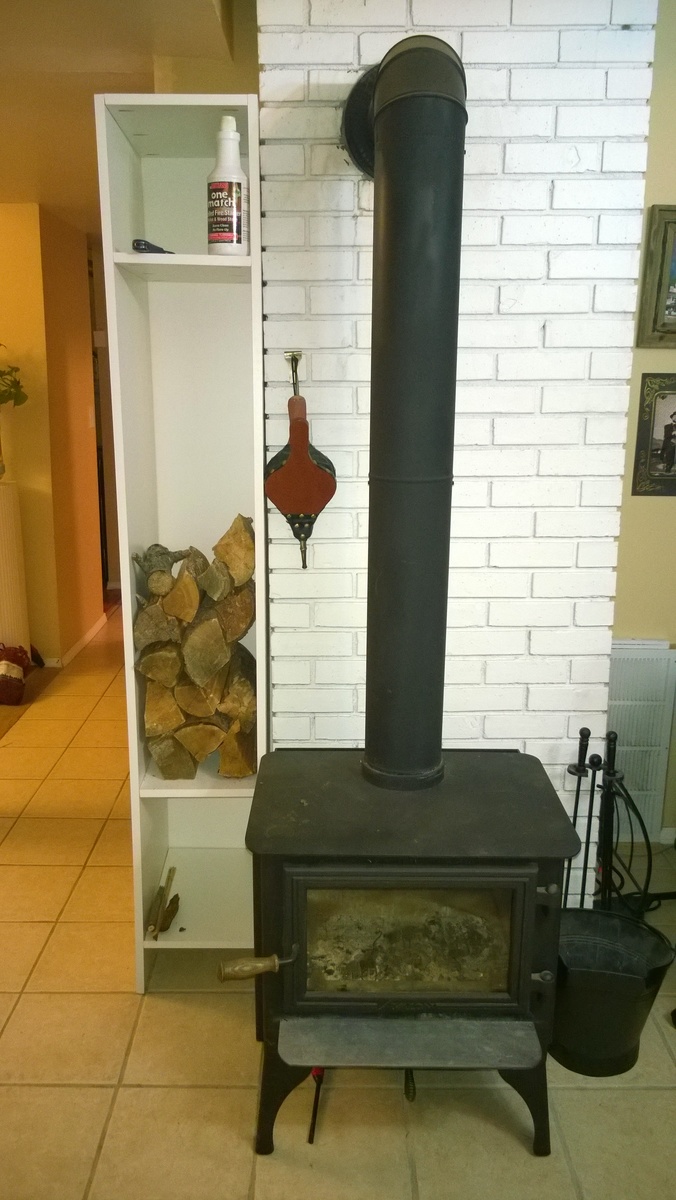
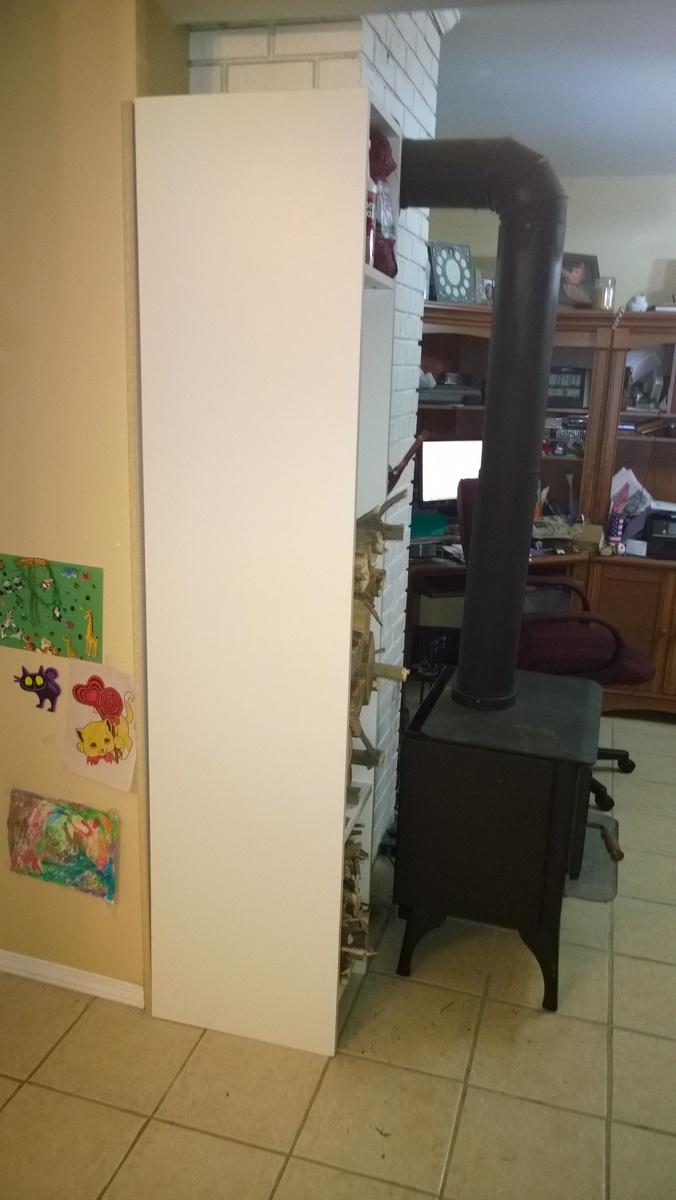
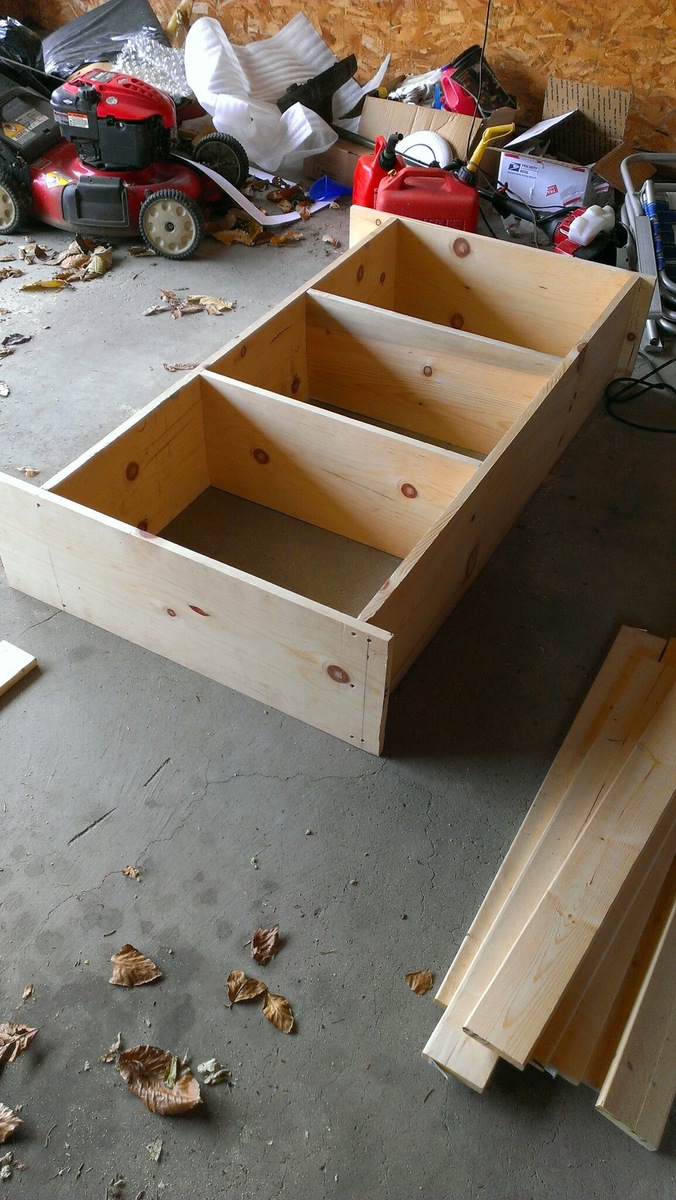
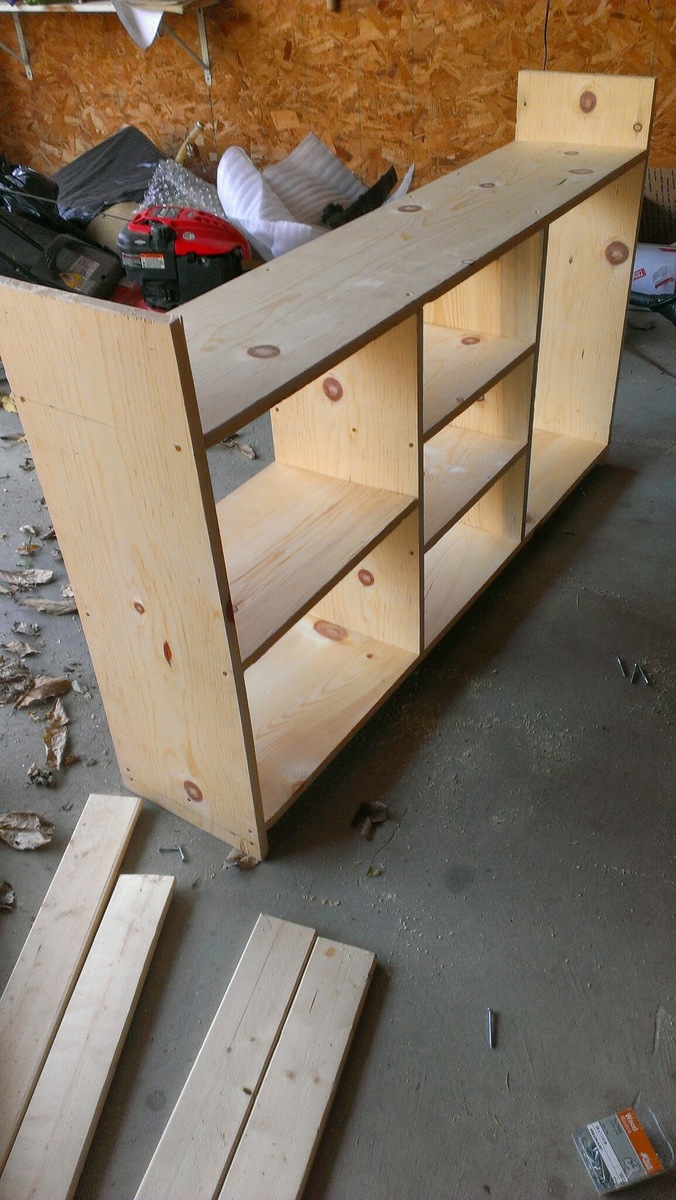
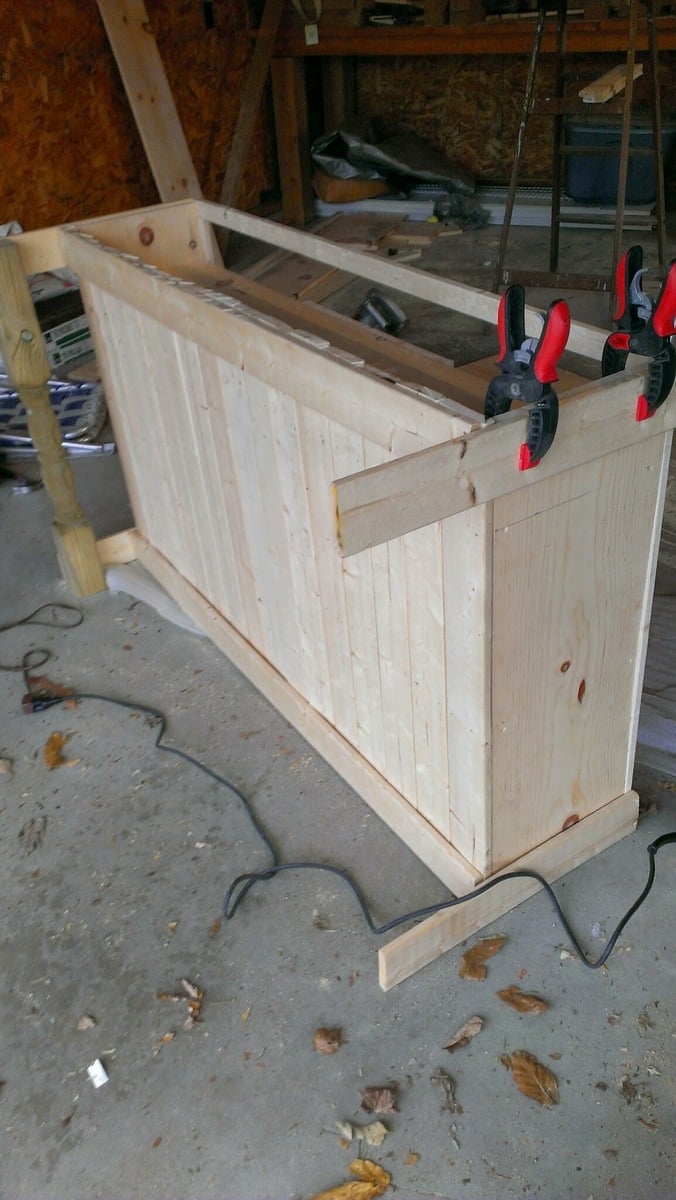
Firewood holder
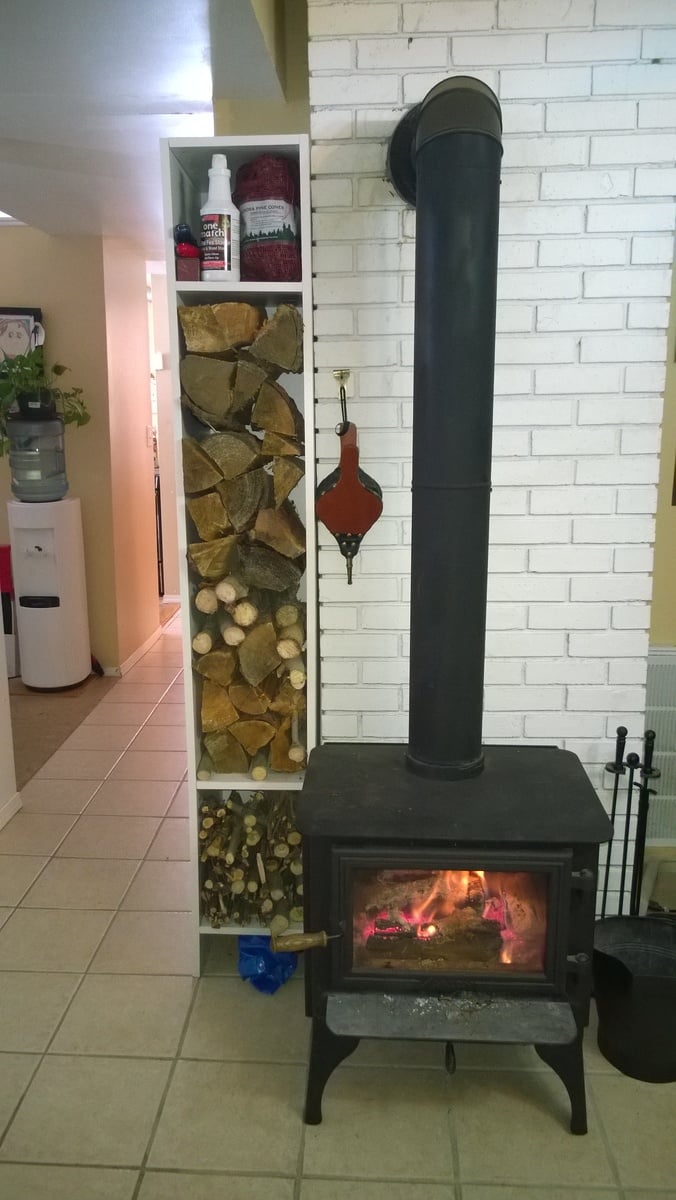
I needed a better way to store my fire wood. The rack that we had only held enough wood for to load the fire place and add 2 or 3 as needed before the wood was gone. I wanted something that I could hold more wood.
I was looking online at different racks and came across something that looked like a bookcase with no shelves filled with wood. I then looked at where I had my wood and saw that I had a nook to put something like that in. The photo of the shelves with only a little wood is all the wood that was in the metal holder. I had a lot of space left.
After looking at various store for bookcases and shelving, hoping in vain that I could find something cheep that would fit the size I needed, I came to see what plans I could use from Ana's site. I looked at the cube tower and the locker cabinet and finally used the pdf from the locker cab resized to fit my needs.
My wife remembered seeing something about banding on here,( http://ana-white.com/2013/11/momplex/finishing-plywood-edges-edge-bandi… ) So we found some white to match the wood. I think the banding turned out good.
I did have a hard time getting the drill in to the pocket holes for the second side of shelf. I started to look on line and found 3" bits at Lowes and HD, but it was 10:30 at night. After looking some more I found a great post on Kreg's site for using a ratchet with a 1/4" socket to hold the bit. http://kregjig.ning.com/photo/ratchetasrtangledriver-1?context=user
My wife also said I should add one more shelf for keeping the wood stable. I told her that I would be fine. Now that I have filled it up all the way I think another shelf would be good to keep the wood rotated. Have one stack of room temp wood, and one of just from outside trying to warm up. So she was right that I should put in another shelf. ;)
I think it has opened the space by the fire place and should help my daughter not to stub her toes like she did with the rack.
The wood was $30 and HD cut if for no charge. It only took one sheet. The banding was around $5 and I had to buy some more Kreg screws.
The Size is 12 1/2"W 18"D and 79" high.
The blue bag under the shelving is an Ikea bag. It is just the right size and strength to carry the wood in.
Mike
Built from Plan(s)
Estimated Cost
$45
Estimated Time Investment
Day Project (6-9 Hours)
Finish Used
White MDF with White banding
Recommended Skill Level
Starter Project
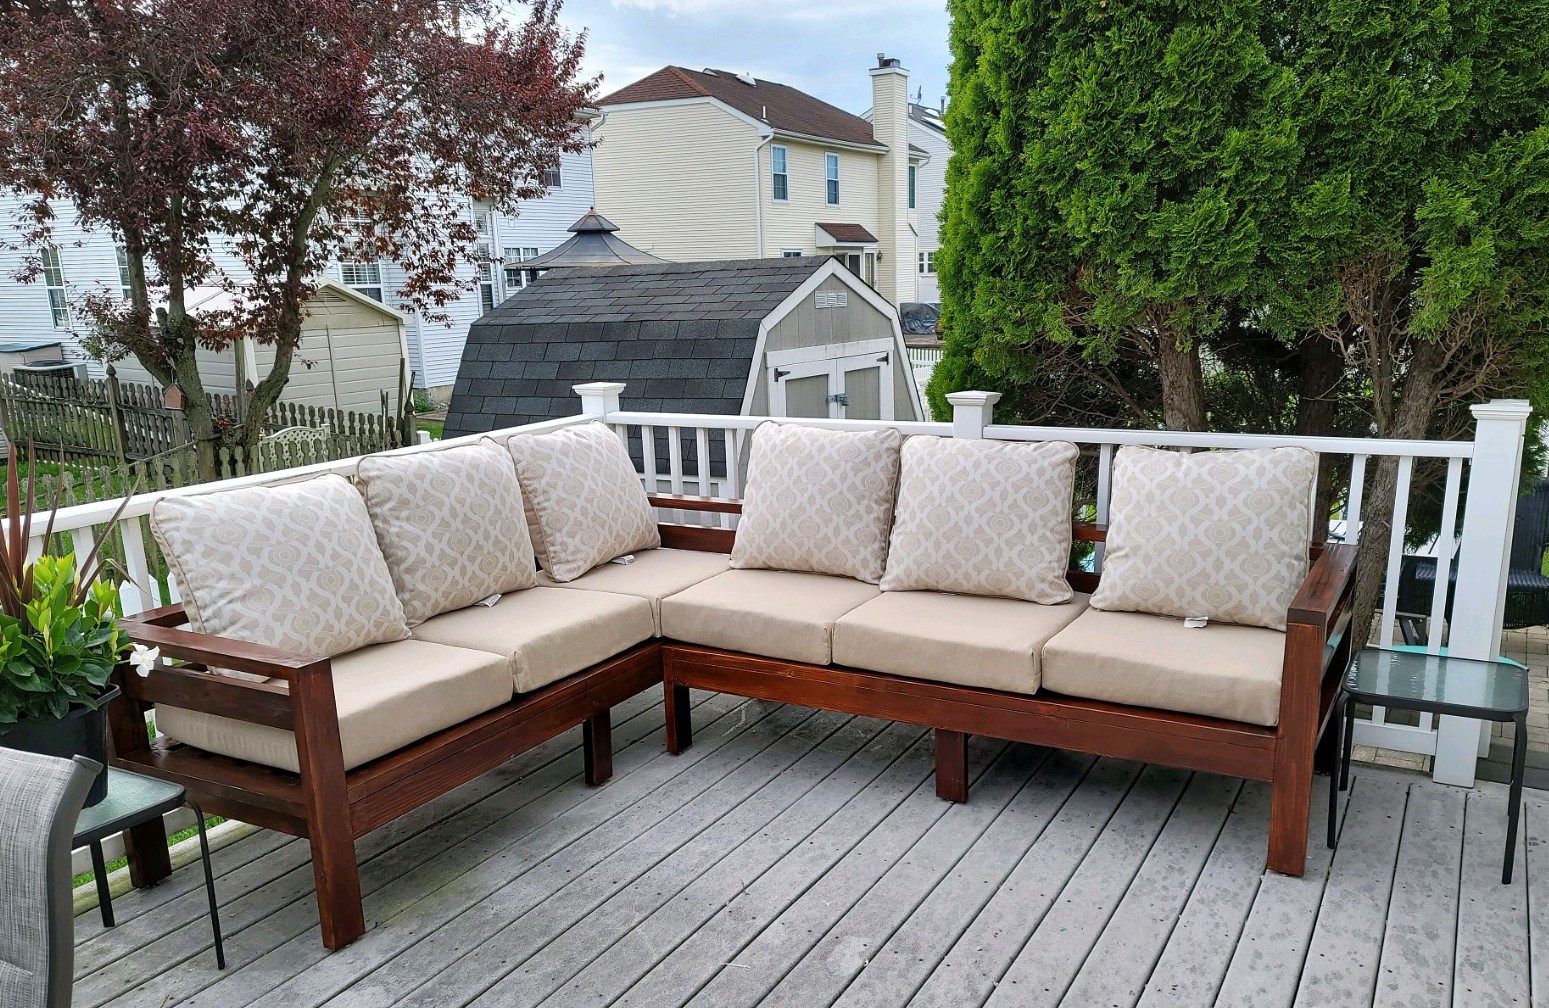
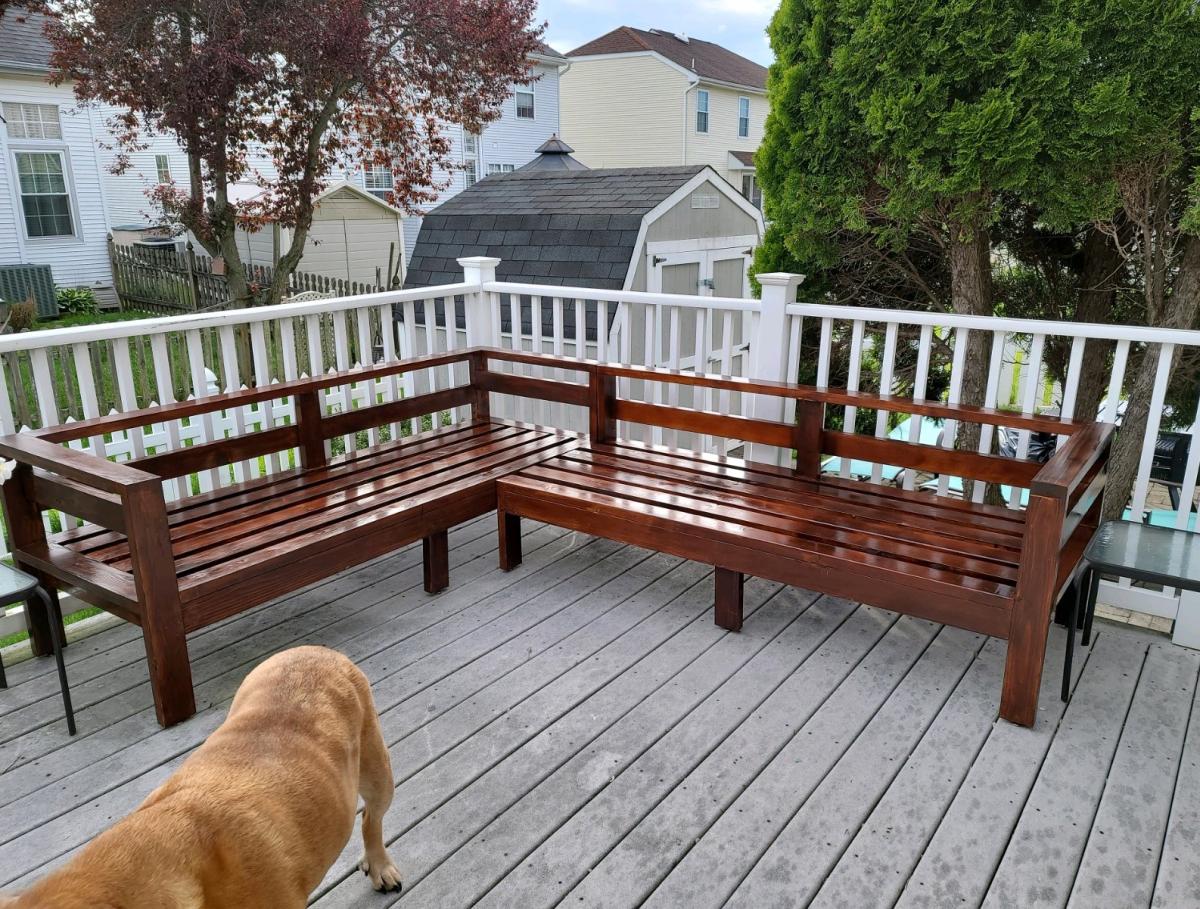
Woven back bench
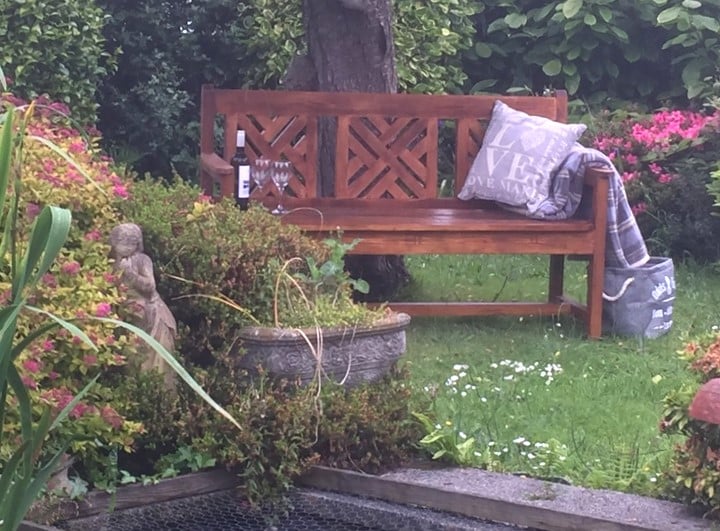
Built for my parents 50th anniversary
Built from Plan(s)
Estimated Cost
£60
Estimated Time Investment
Week Long Project (20 Hours or More)
Finish Used
Cupronel outdoor furniture stain (teak)
Recommended Skill Level
Intermediate
Farmhouse nightstands
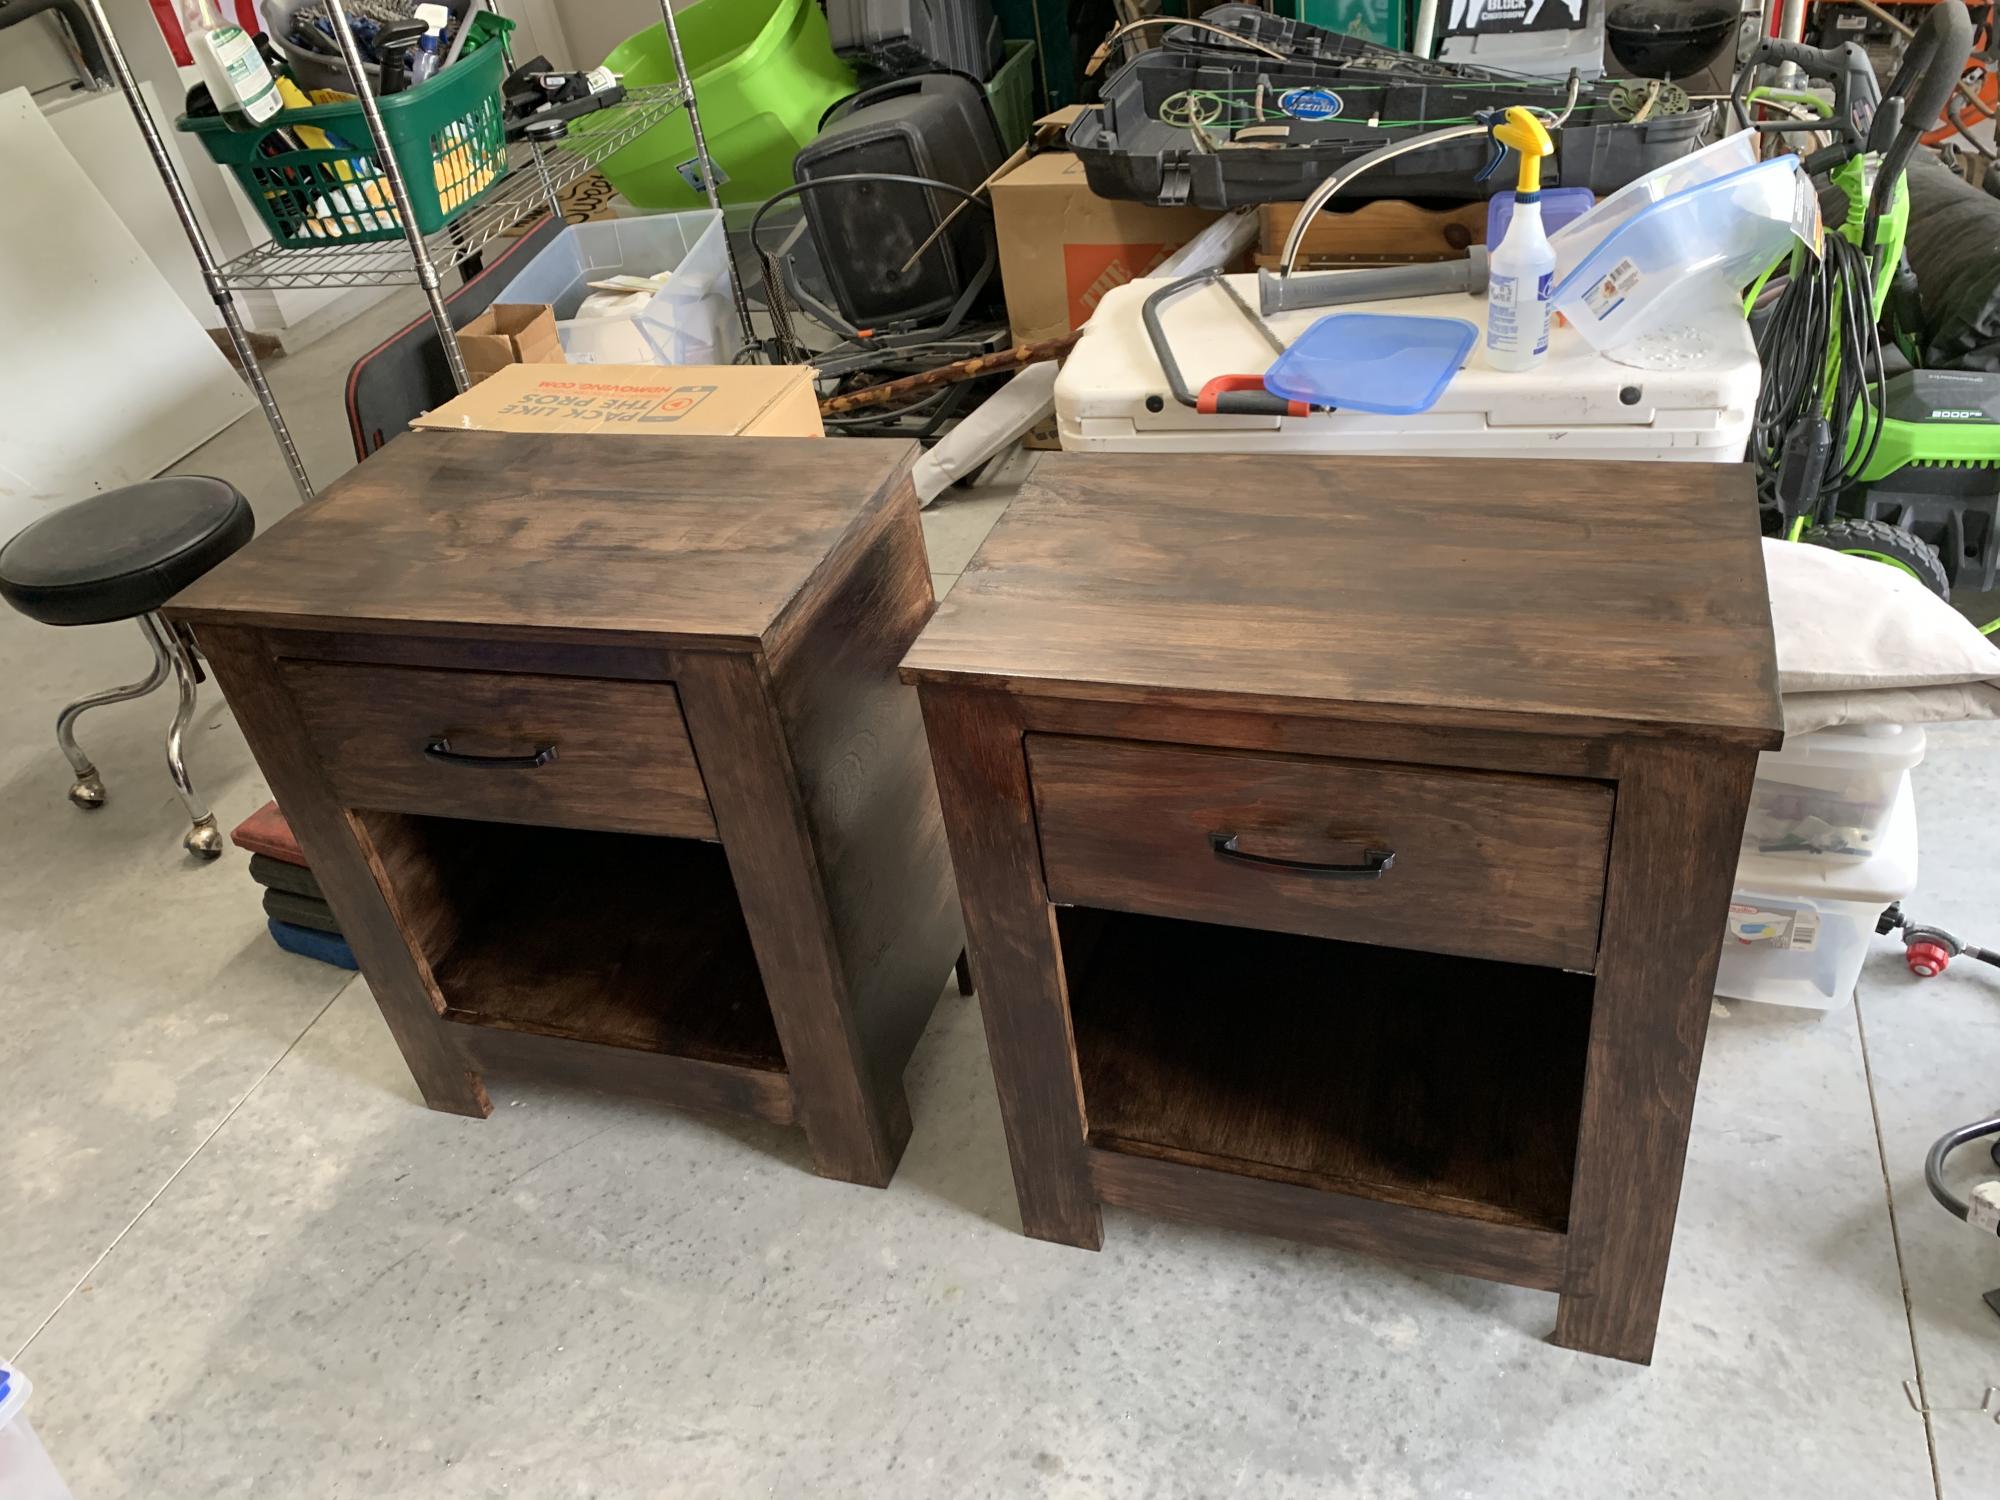
Very nice bed side tables. Very impressed.
Built from Plan(s)
Estimated Cost
$150.00
Estimated Time Investment
Day Project (6-9 Hours)
Finish Used
Varathane poly/stain in one Kona color
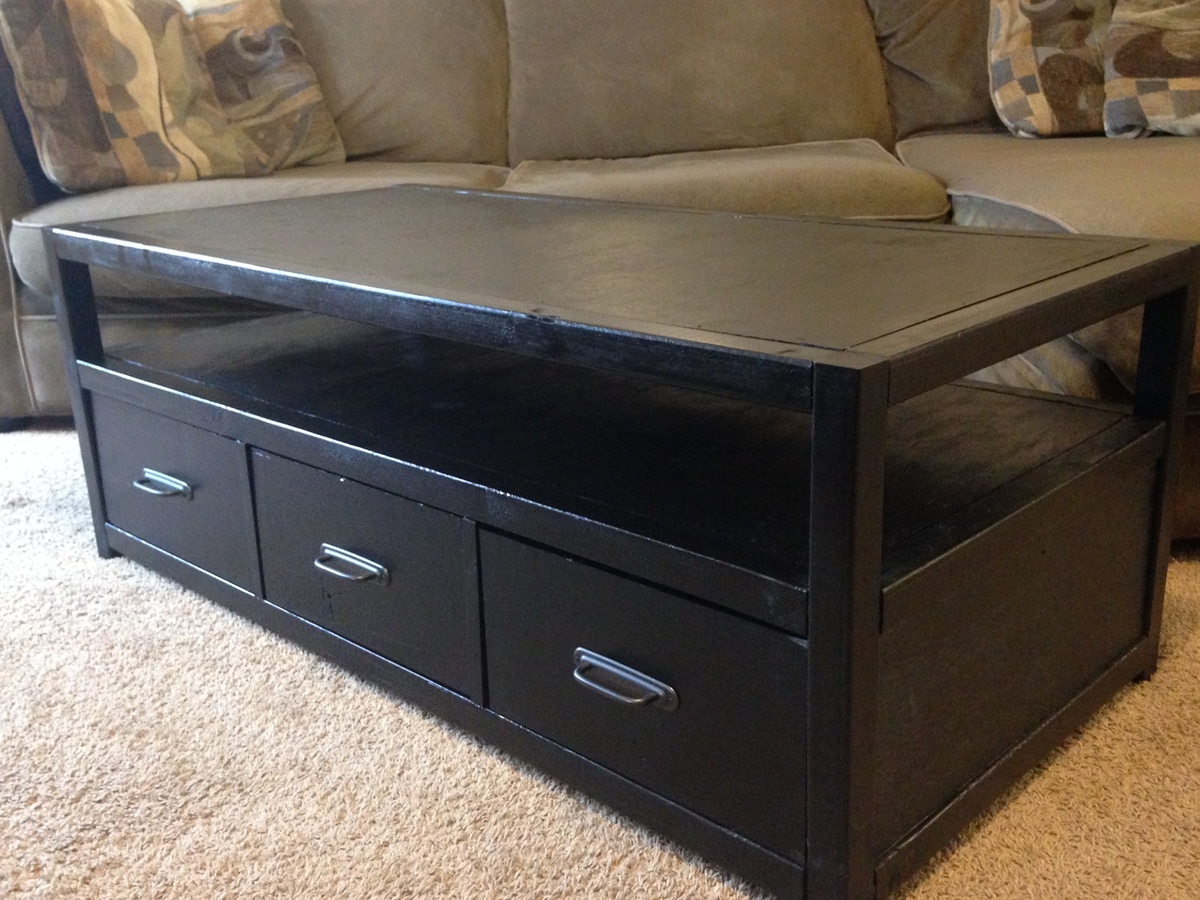
Coffee Table with Drawers
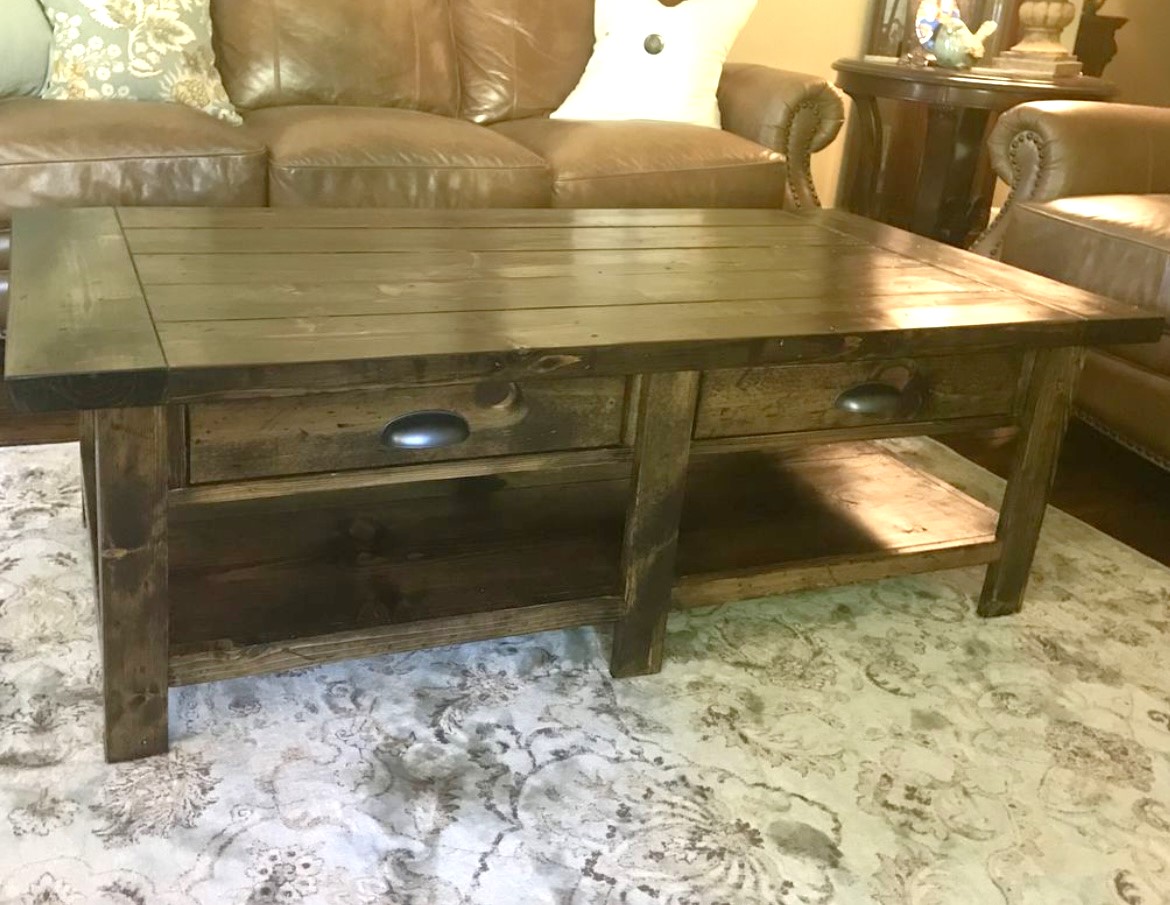
This was inspired by a Potter Barn table that looked similar. It was one of my first projects. I couldn’t afford the 2000 plus from there so built it. Sanded very fine and used Dark Walnut stain. Sealed four times with polyurethane sanding between each. Rubbed last coat of polyurethane on with cloth and used 0000 steel wool to give it a very soft and smooth finish.
Lynn
Built from Plan(s)
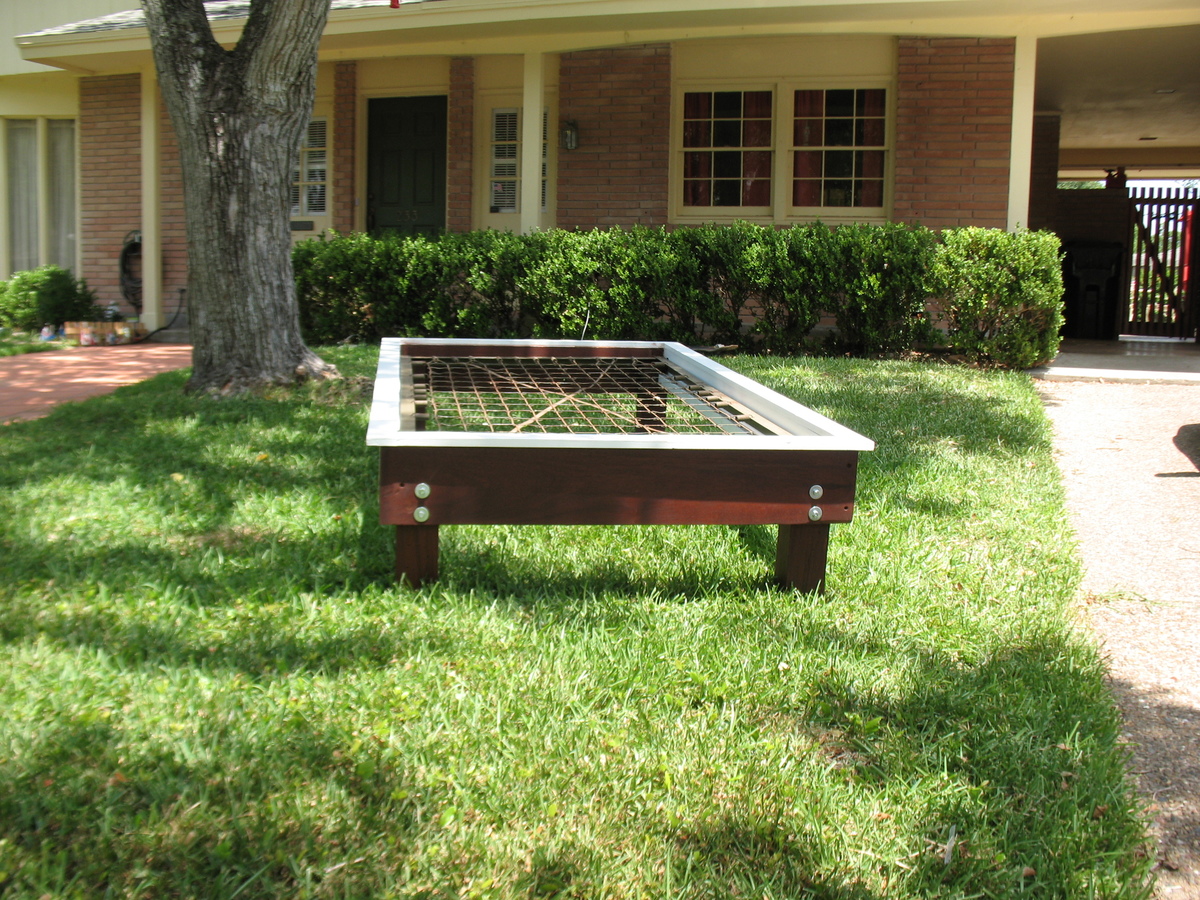
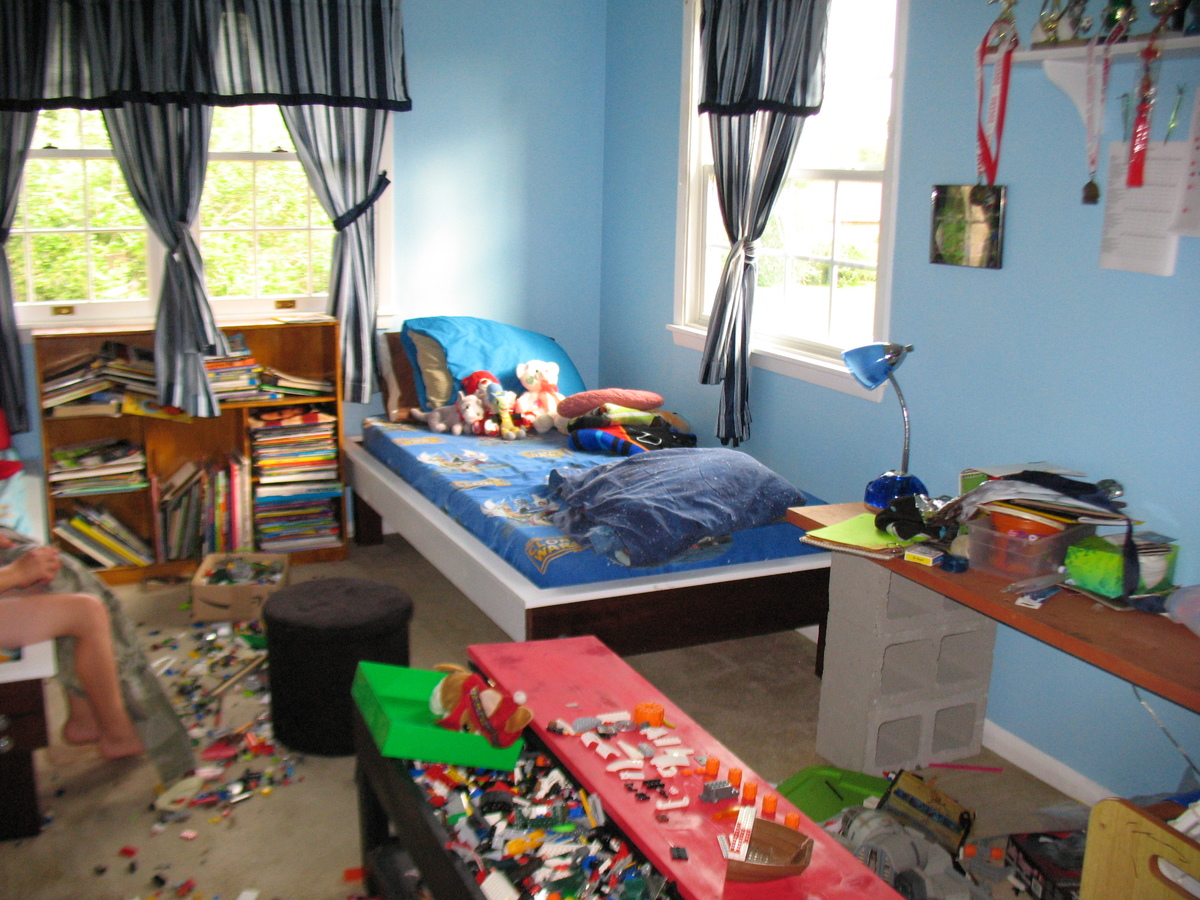
Modified Hailey Platform Bed
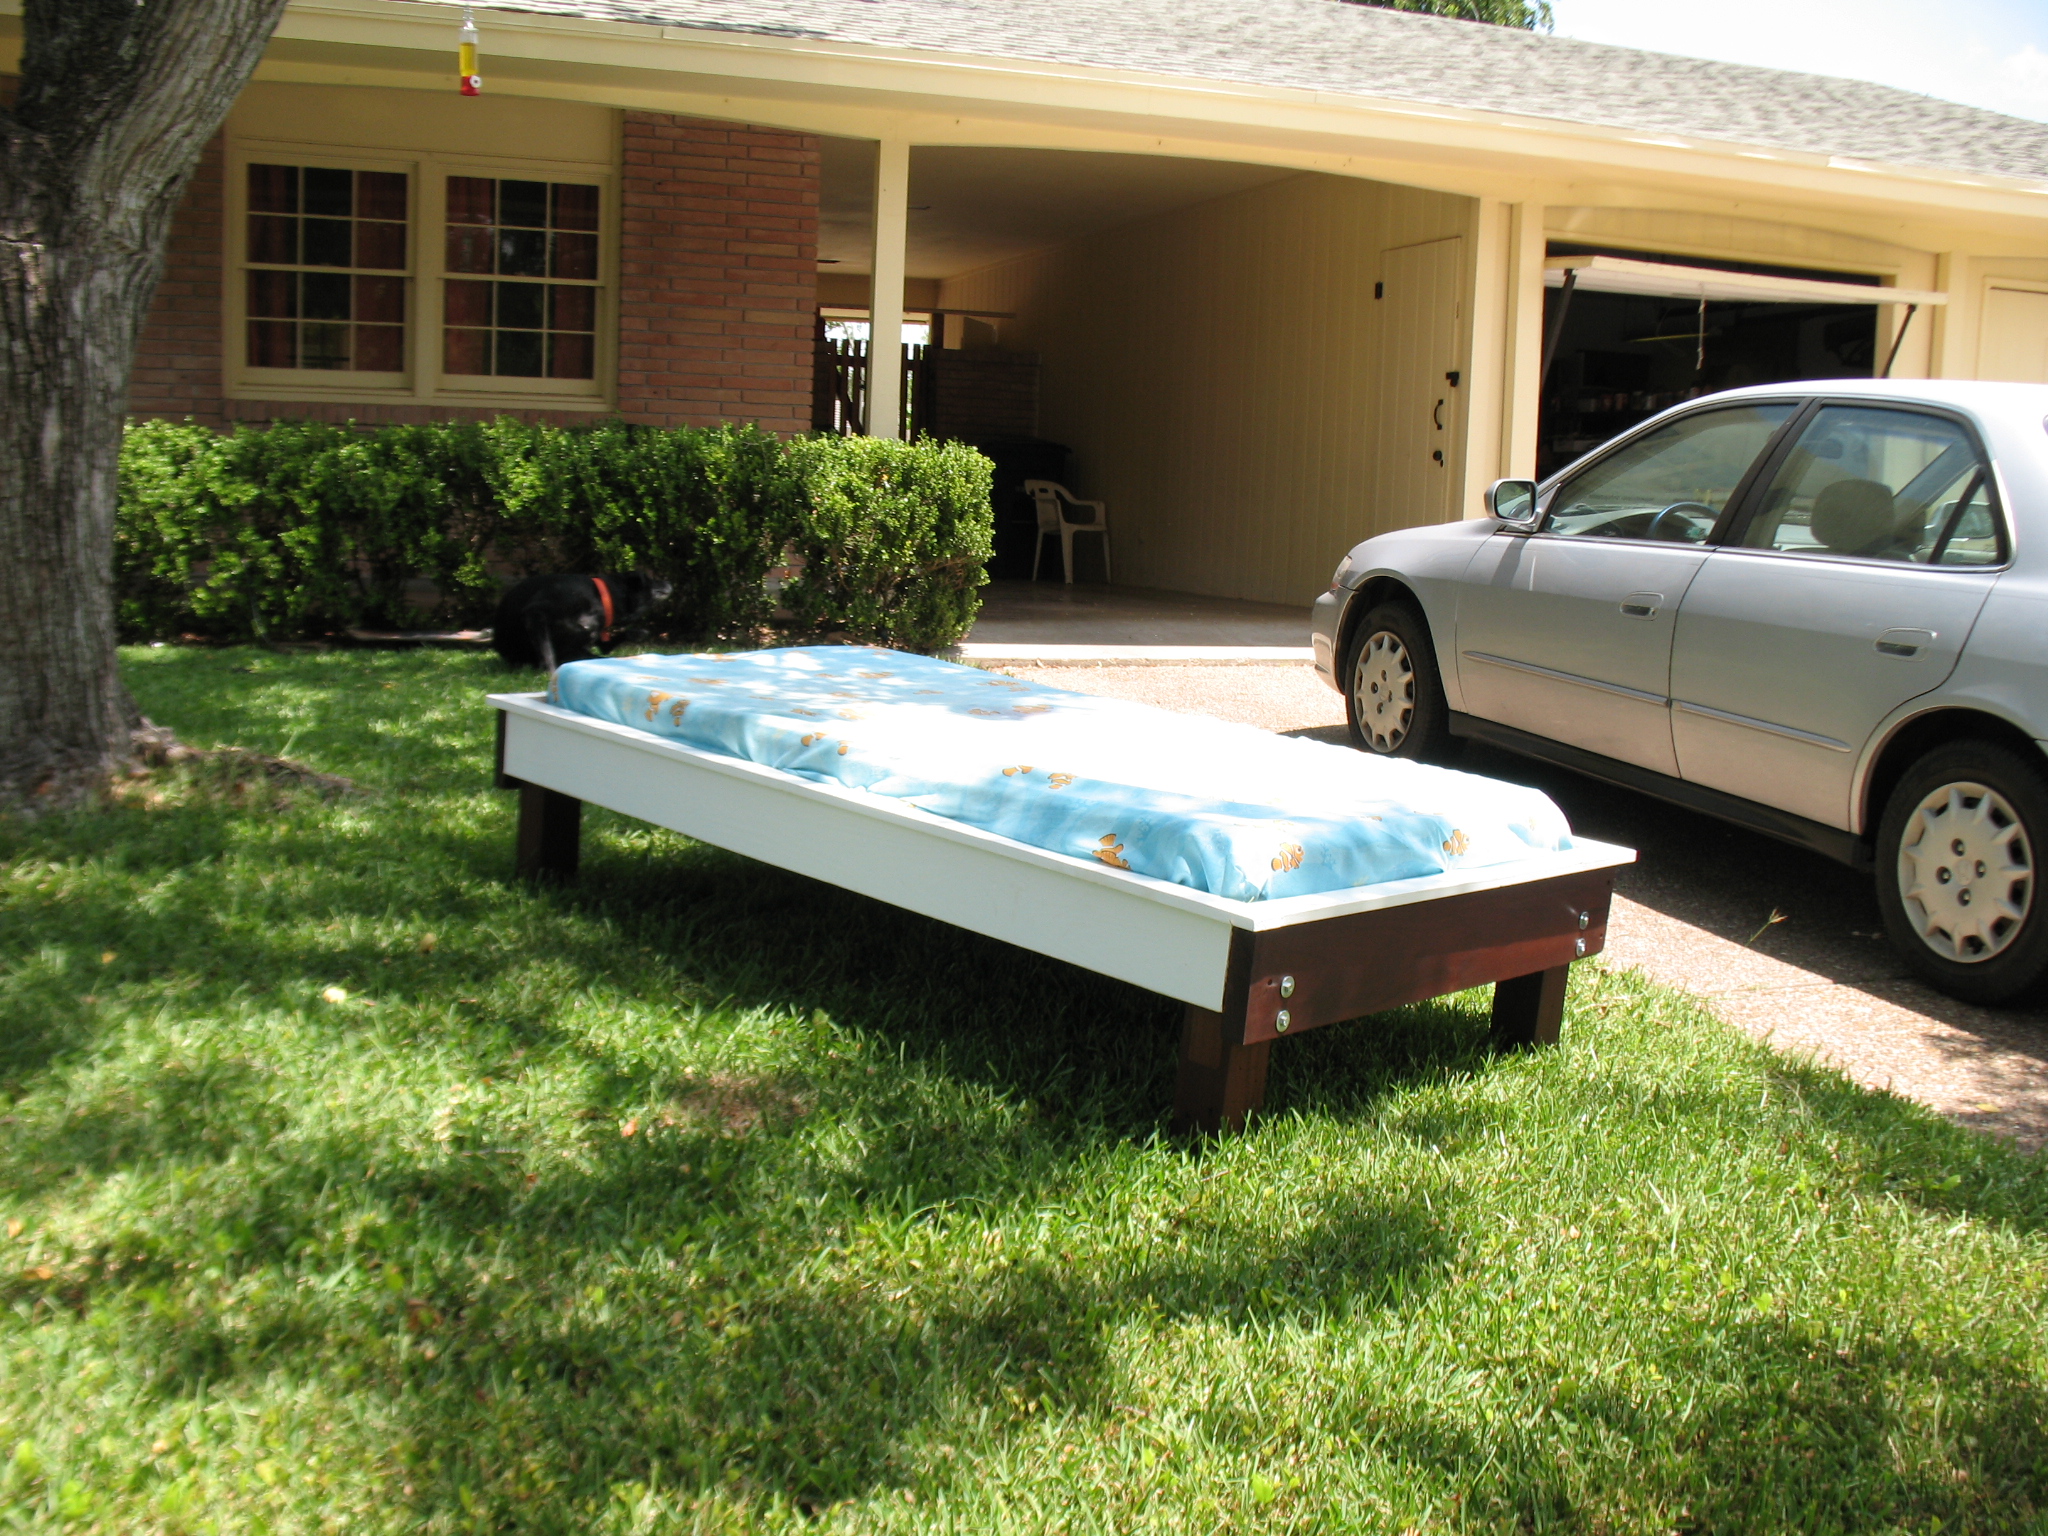
I took the Hailey Platform Bed plan and cut to a twin bed size. I used some old wood I found in the garage for the head and foot boards and the legs. Notice the legs are 4x4s. The grandkids had some old bed springs under their mattresses so I incorporated the spring into the build. That required that I lower the cleat a couple of inches and it meant I had a very complicated leg geometry in order to get it deep enough to support the bed. I built the frame with Kreg Jig pocket joints and they made the work very easy with such large and heavy timbers. Notice I attached the legs to the frame with 5/16" lag screws which allows easy removal of the legs if you need to make it easier to move. Came out very good but I think I will build the second bed without the springs and go for the slat method as shown in the plans.The result is beautiful. My neighbor commented that it looked very Pottery Barnish!
The second bed I finished yesterday is made with slats. A very smart move. The legs are so much easier to attach to the frame. Both beds are beautiful and sturdy. One grandkid told me that when the hurricane comes he is going to get under his bed because it is so strong. He may be right but I will be in Laredo or San Antonio.
Built from Plan(s)
Estimated Cost
$70 for two beds and I also got free wood from the garage.
Estimated Time Investment
Weekend Project (10-20 Hours)
Finish Used
Red Oak stain on the legs and head and foot boards. The rest was primed then given two coats of a good satin paint called Benjamin Moore Impervo. It is expensive but I used it on repainting the kitchen cabinets and it was worth the cost. Best advice is good primer, sand with 150 grit, then two coats of final paint but light sanding with 320 grit between coats.
Recommended Skill Level
Beginner
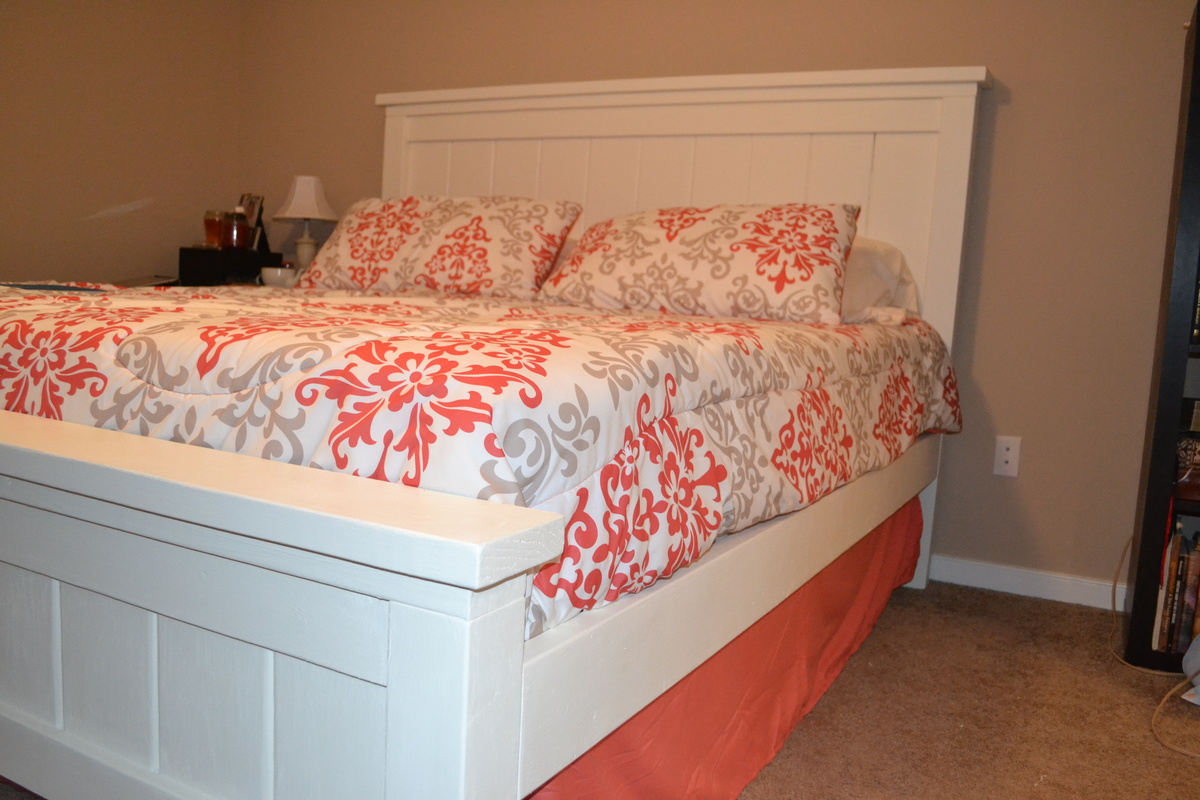
Farmhouse King Bed
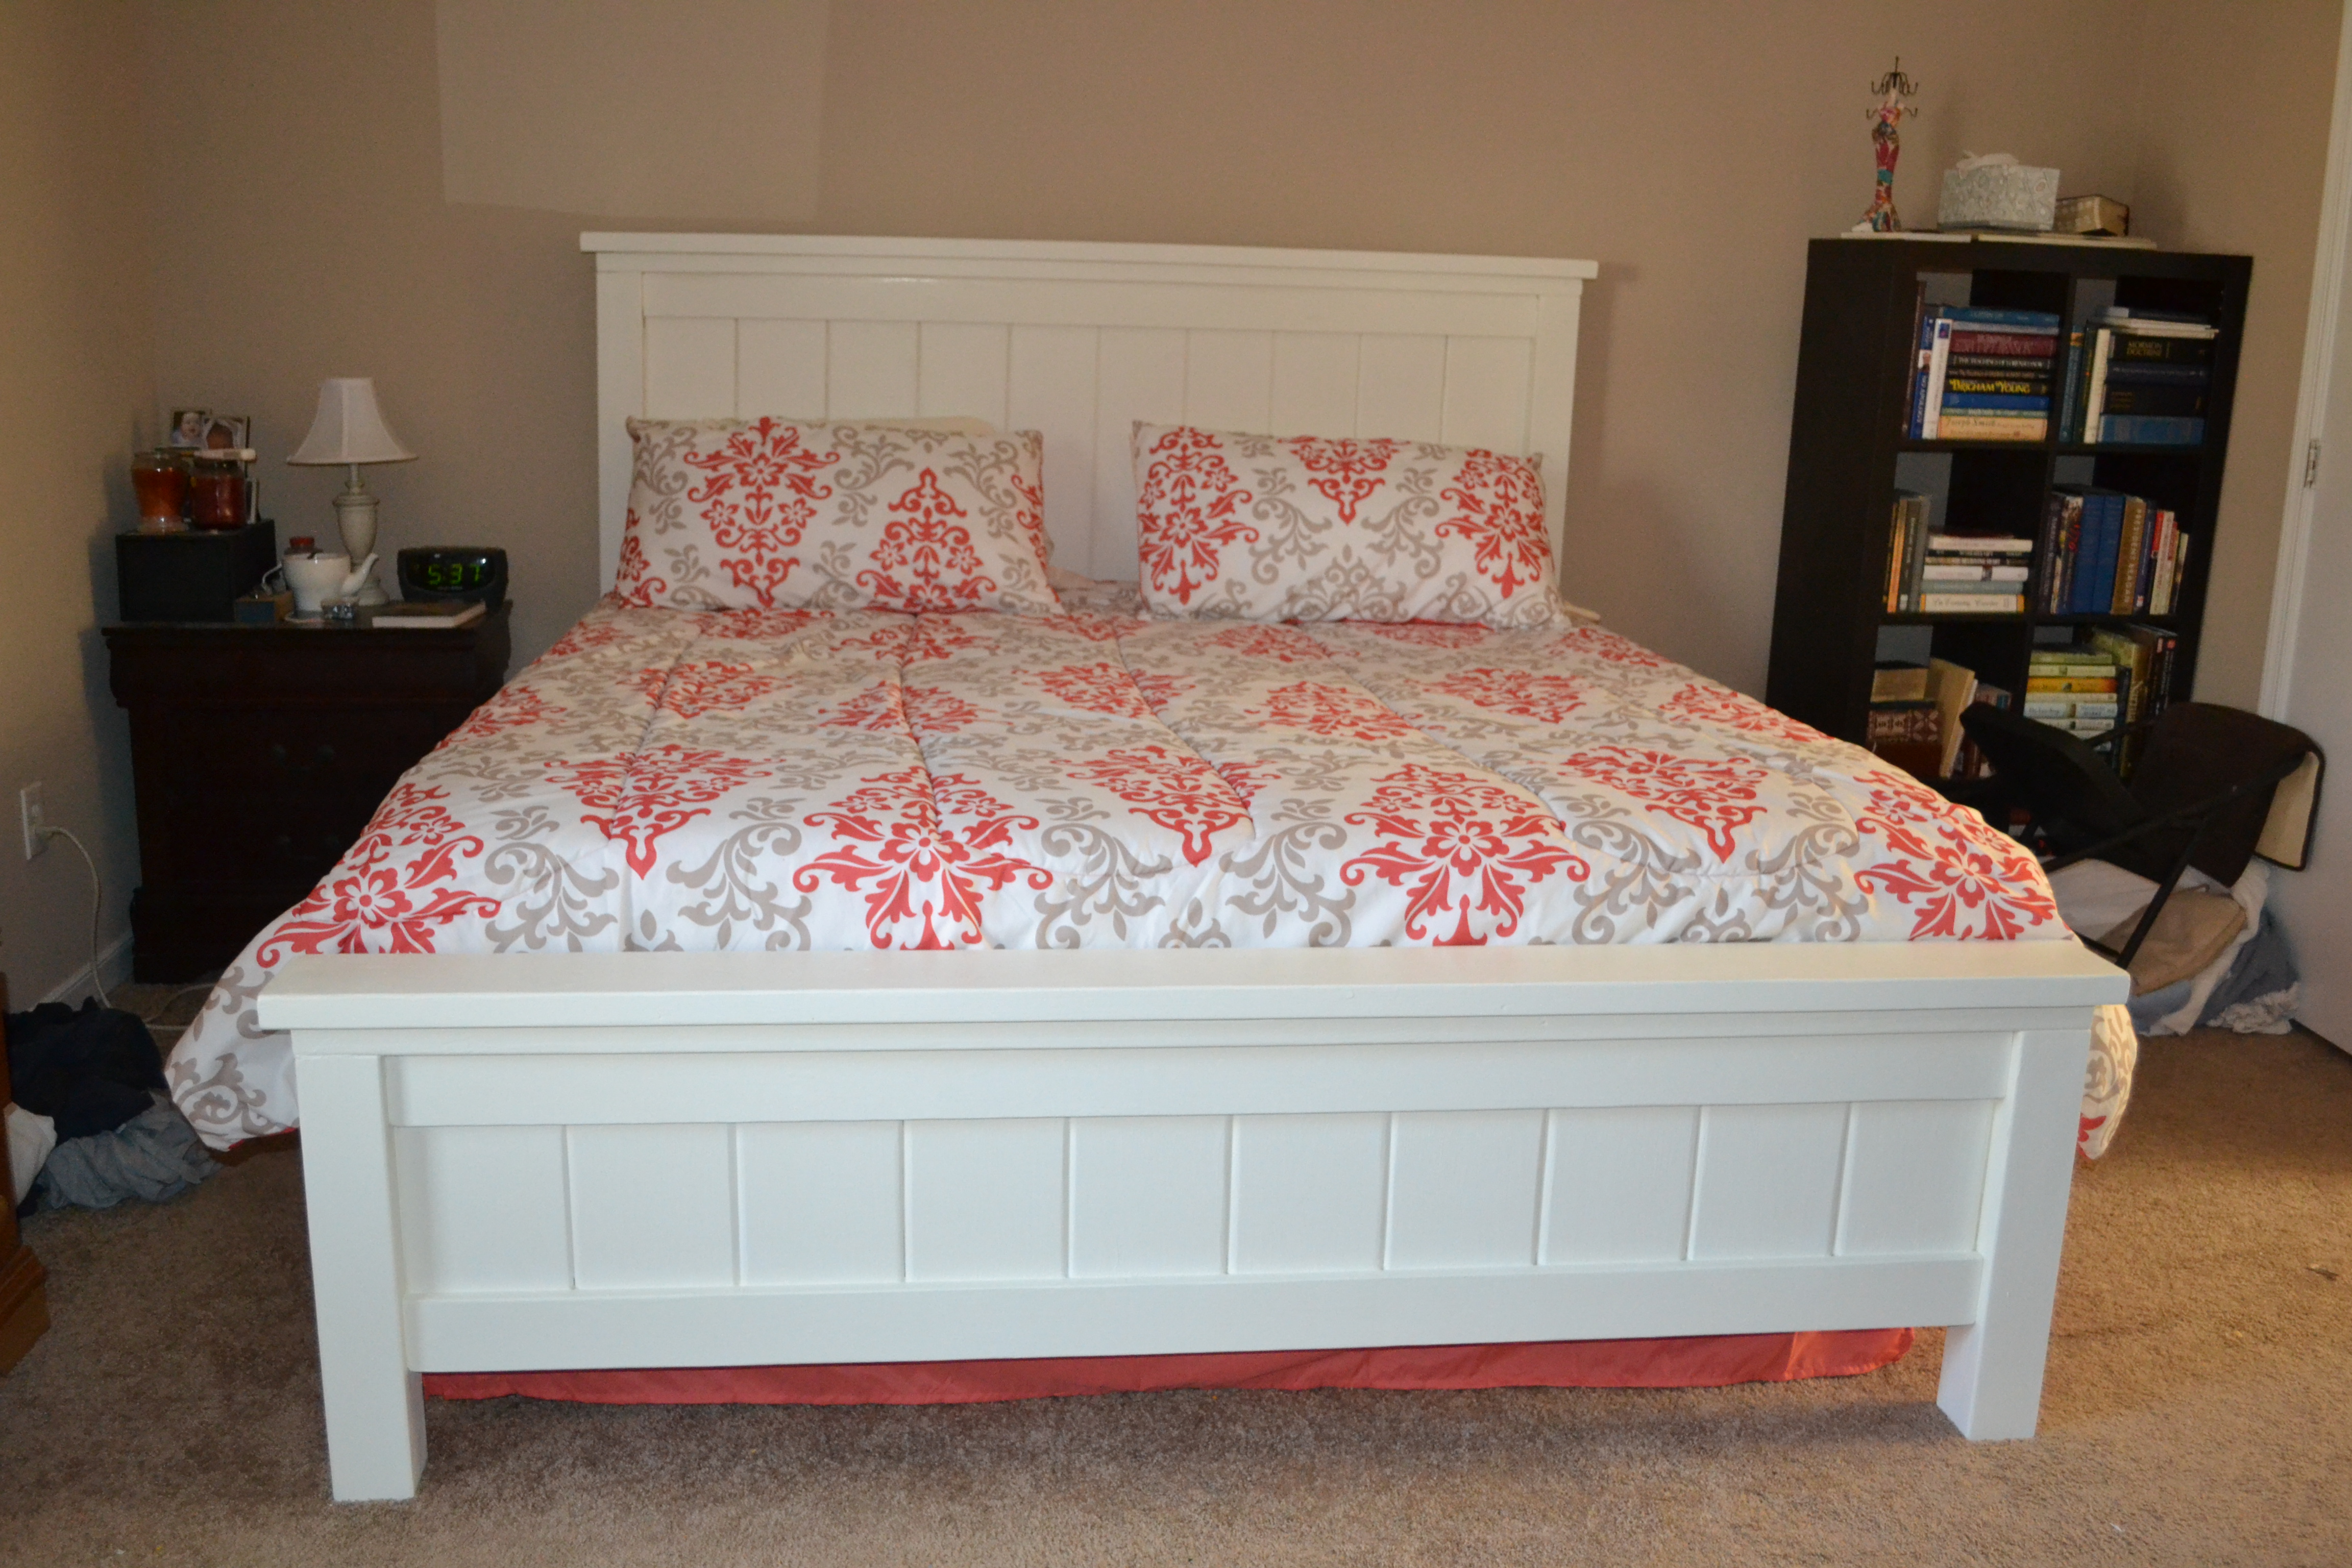
This is my first project and I've spent a couple of months preparing for it. My wife loved the plans for this bed and I loved the challenge. I reviewed the plans for both the king and queen size beds and read through all of the comments before starting. The comments were especially helpful, so thanks to everyone for contributing. I took my time with project hoping to minimize beginner mistakes. We recently upgraded to a king sized mattress and already had a bed frame (we highly recommend this one)

So I adjusted the plans for making just the headboard and footboard along with the runners. I omitted the 1x3 boards to account for orienting our king bed so that it is 76" wide and 80" long. Initially, I made the mistake of thinking that 1x6 boards would be adequate for runners. But that wouldn't withstand the constant onslaught of our kids climbing into our bed, so I switched to 2x6 boards and it's much sturdier. I cut the runners 3" longer than the bed frame to allow for room for the bedding and to account for the 1" overlap from the 2x6 cap on the footboard. L brackets were perfect for attaching them to the headboard and footboard. Now that this is under my belt I'm looking forward to my next project.
Built from Plan(s)
Estimated Cost
300
Estimated Time Investment
Week Long Project (20 Hours or More)
Finish Used
primer, Valspar paint - Honey Milk
Recommended Skill Level
Beginner
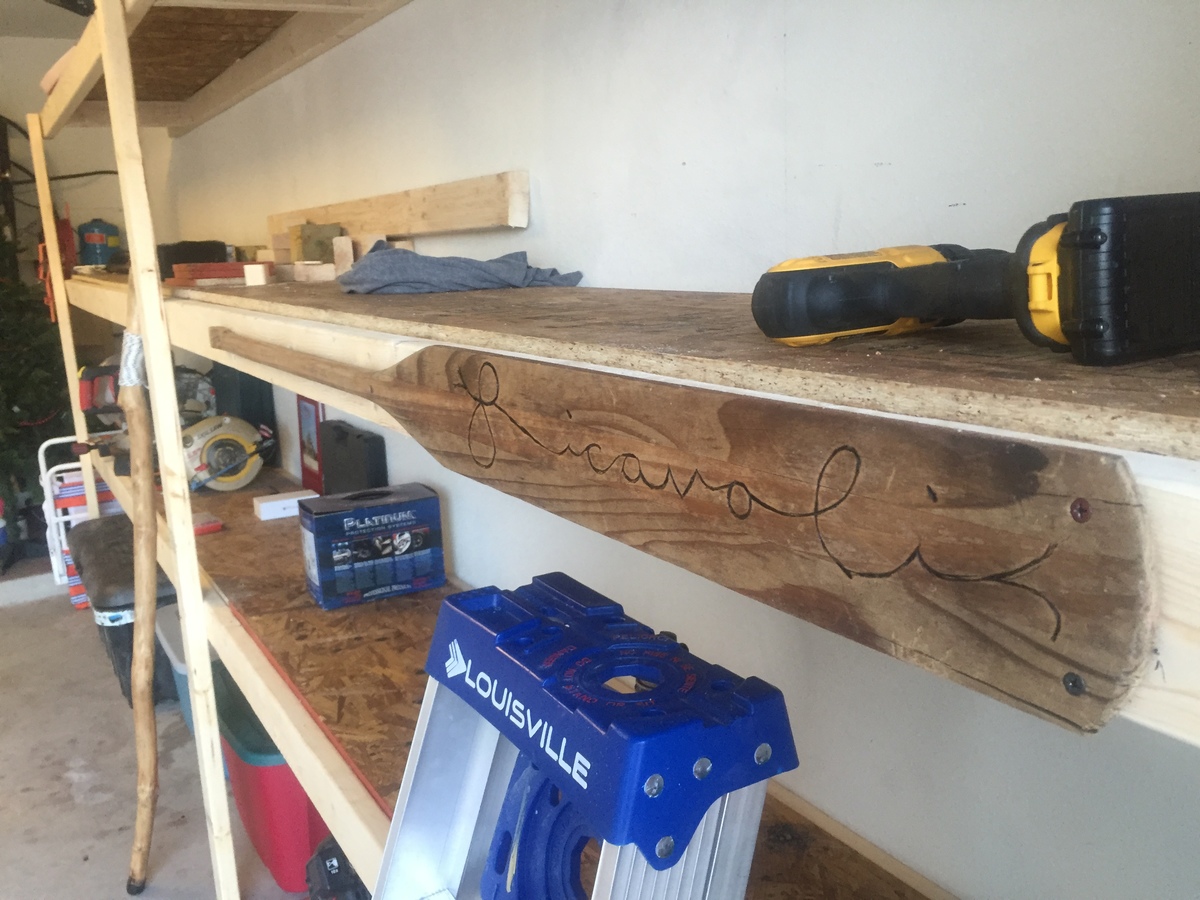
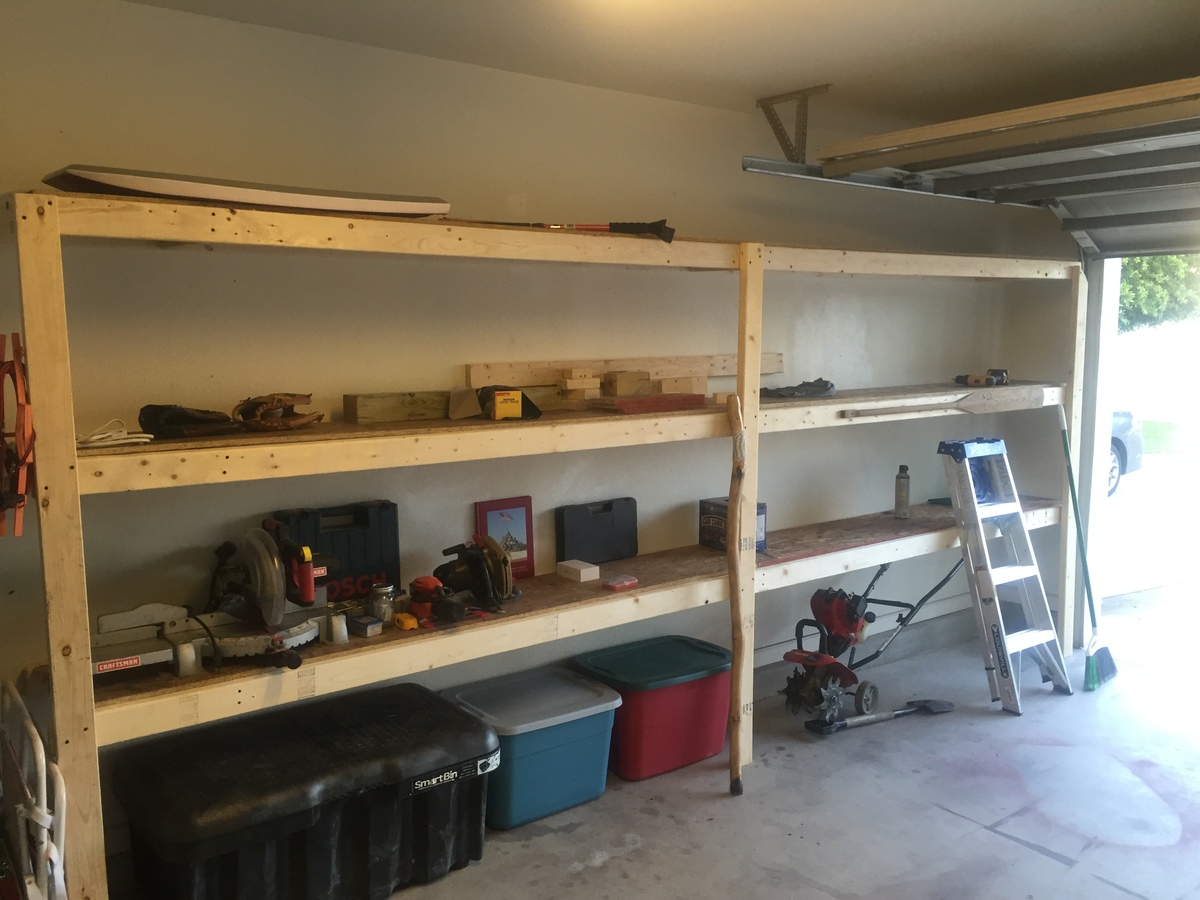
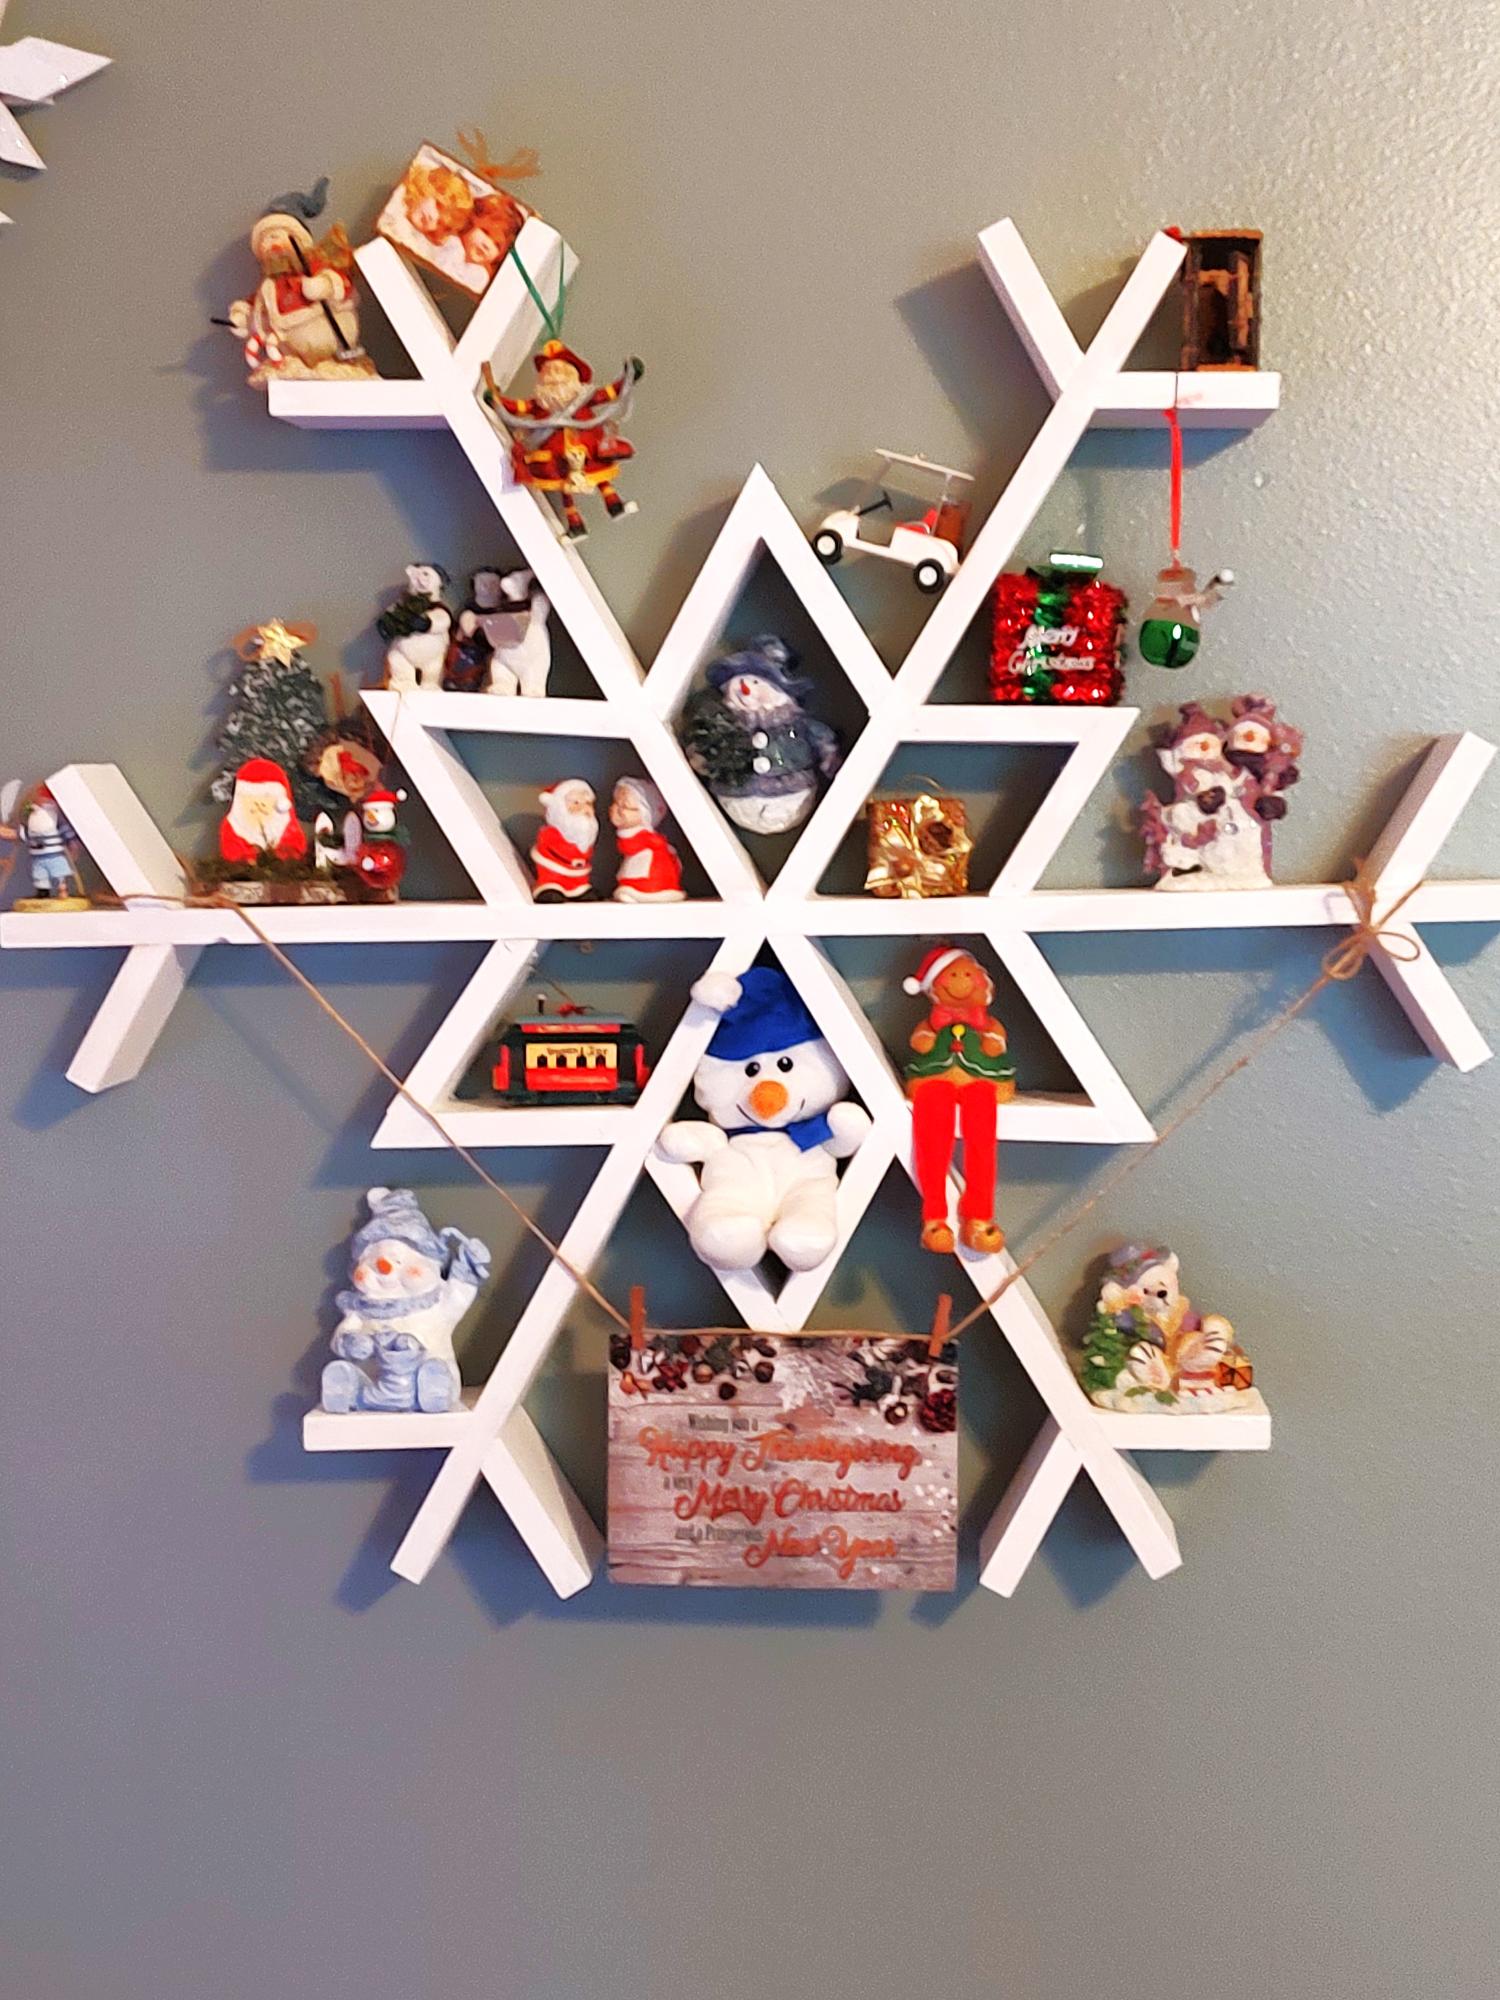
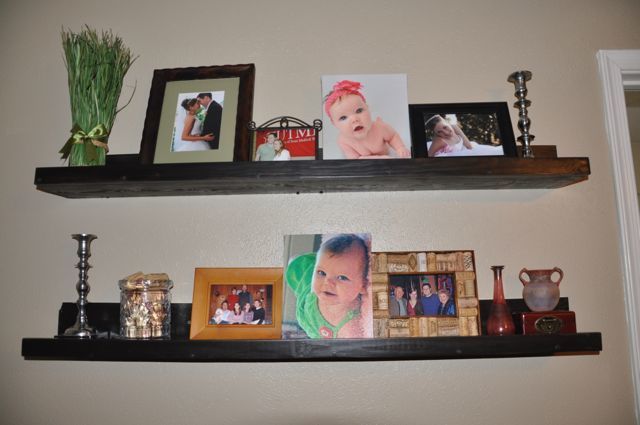
I Love These Shelves
Wanted to make something for the house and seen these plans and though I would give it a shot. didn't think I would love them as much as I do! My wife loves them even more I think. Also added my own little touch with an old paddle that I burned our last name into. I think it makes a nice little touch.
Estimated Cost
$100
Estimated Time Investment
Day Project (6-9 Hours)
Finish Used
Natural
Recommended Skill Level
Beginner
My first project
My first project very simple plan to follow extremely proud of it
Built from Plan(s)
Estimated Cost
$65
Finish Used
Walnut
Recommended Skill Level
Beginner
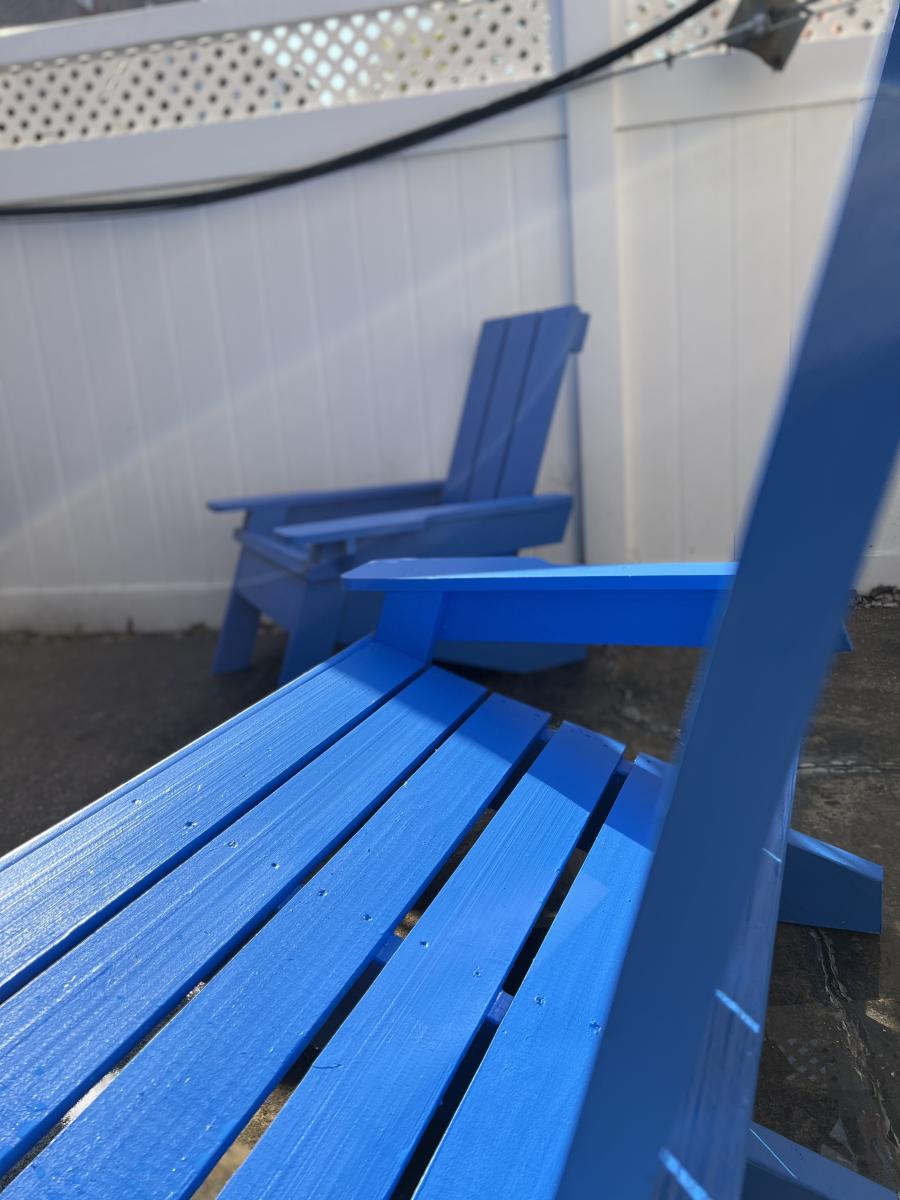
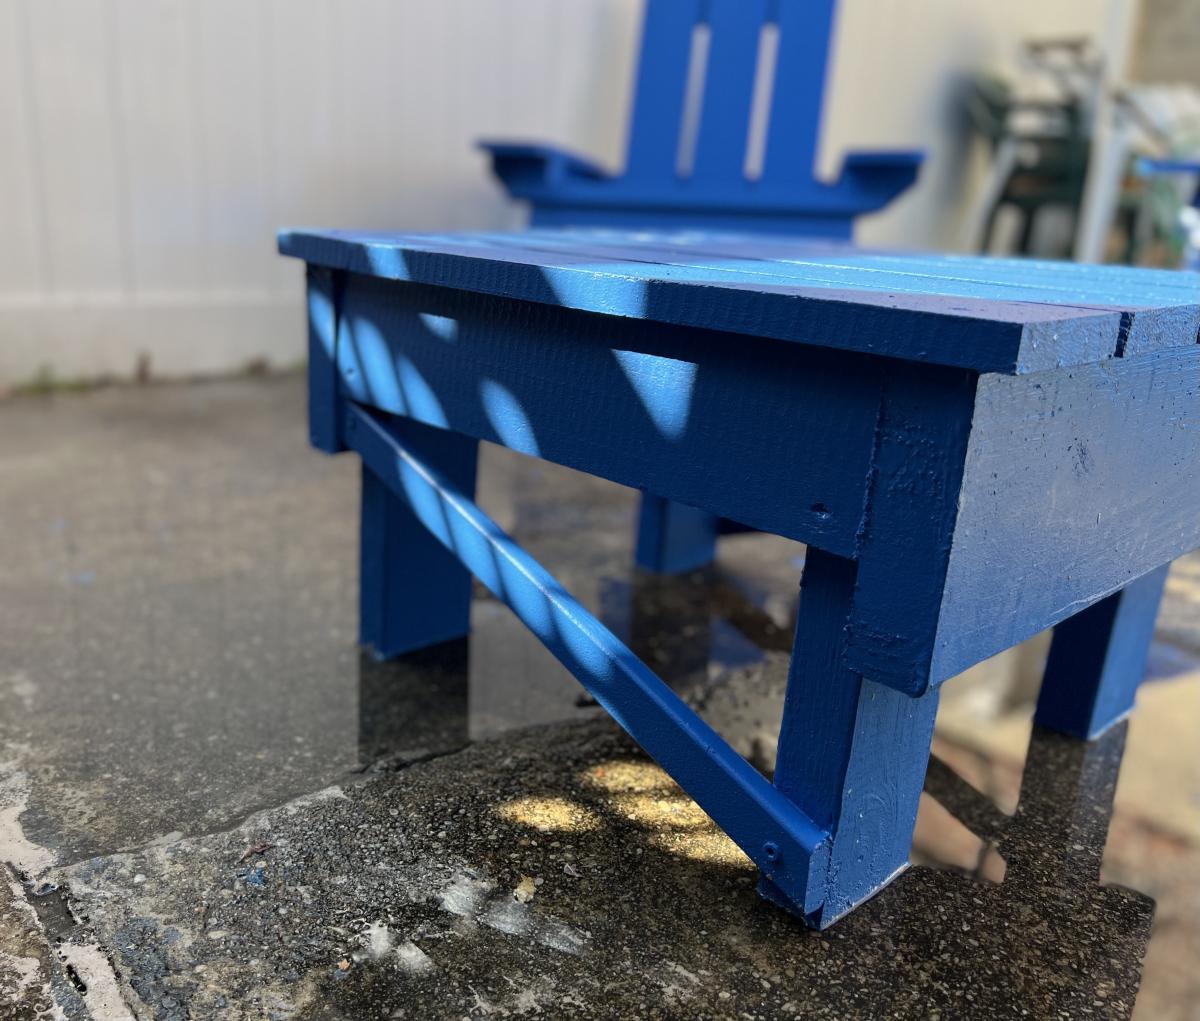
Blue Adirondack Chairs
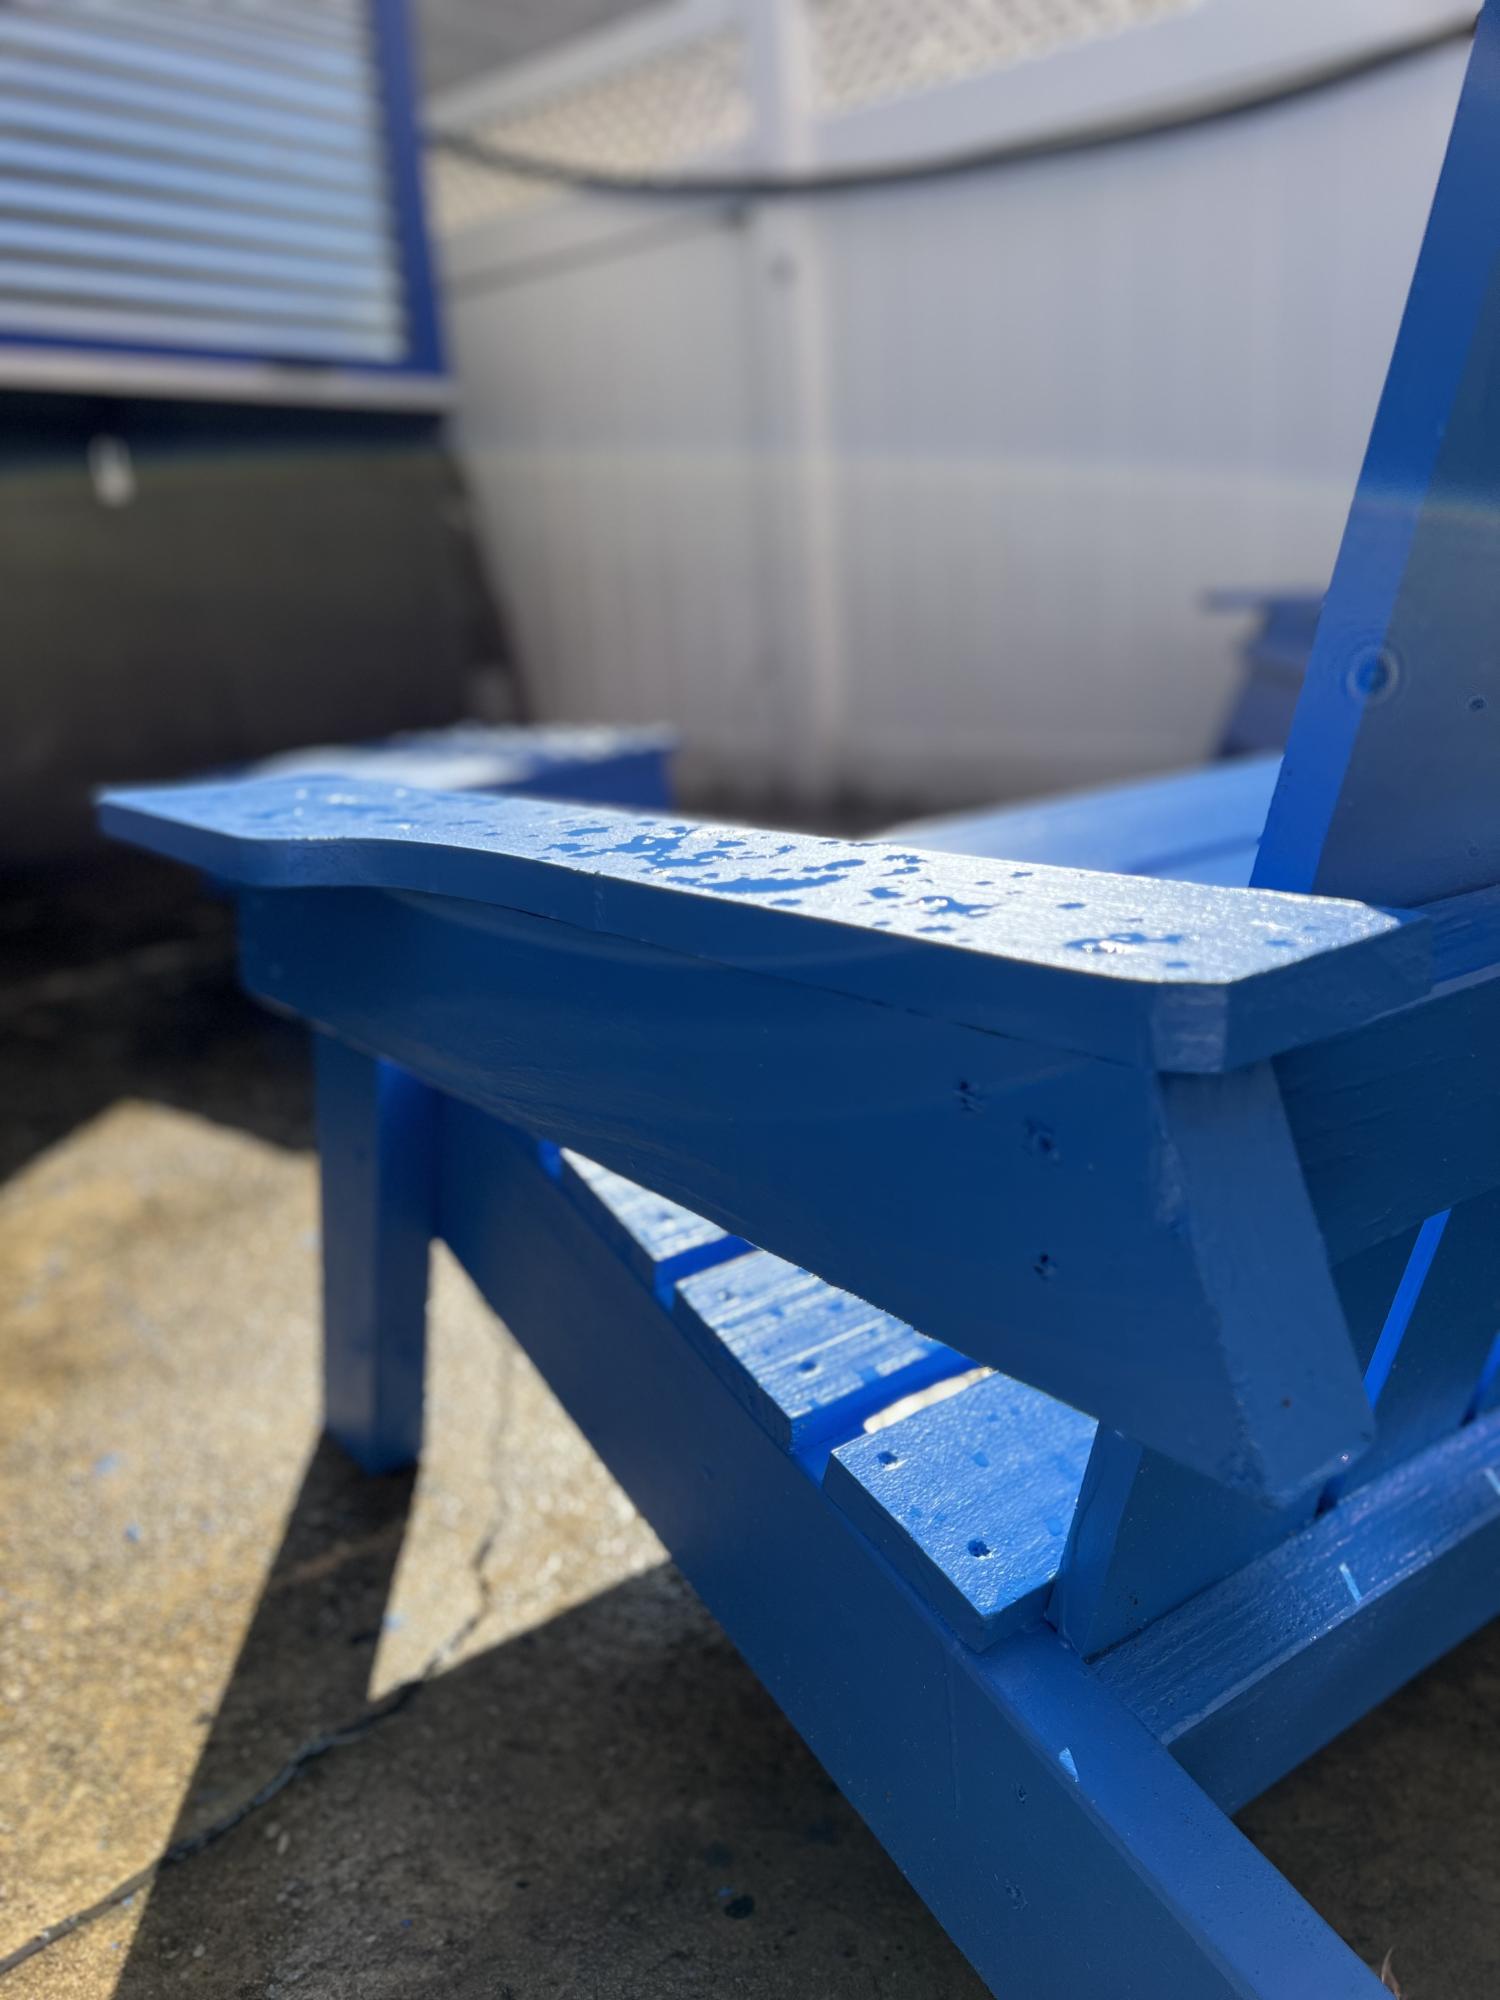
Very inspired by this design. As well as the solid and bold colors, these are very functional. Thanks for the inspiration!
MR DALLIS
Built from Plan(s)
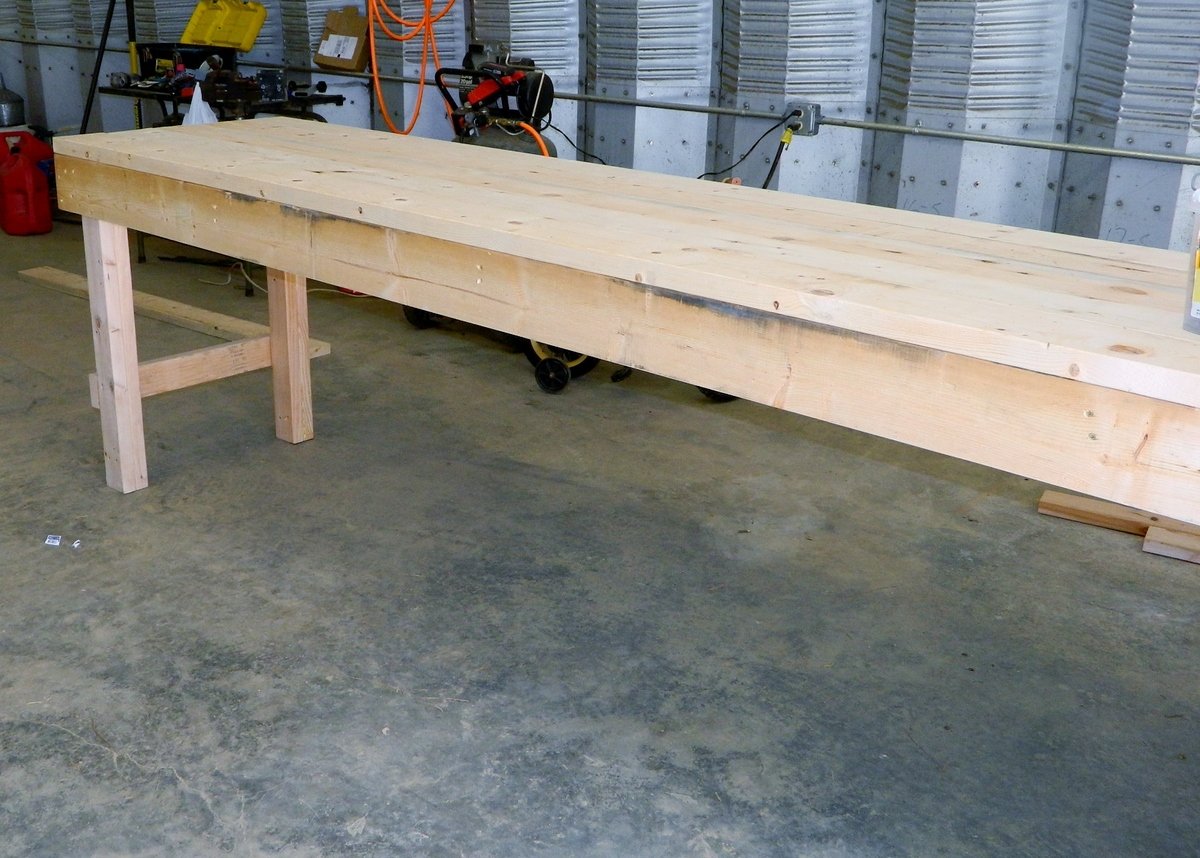
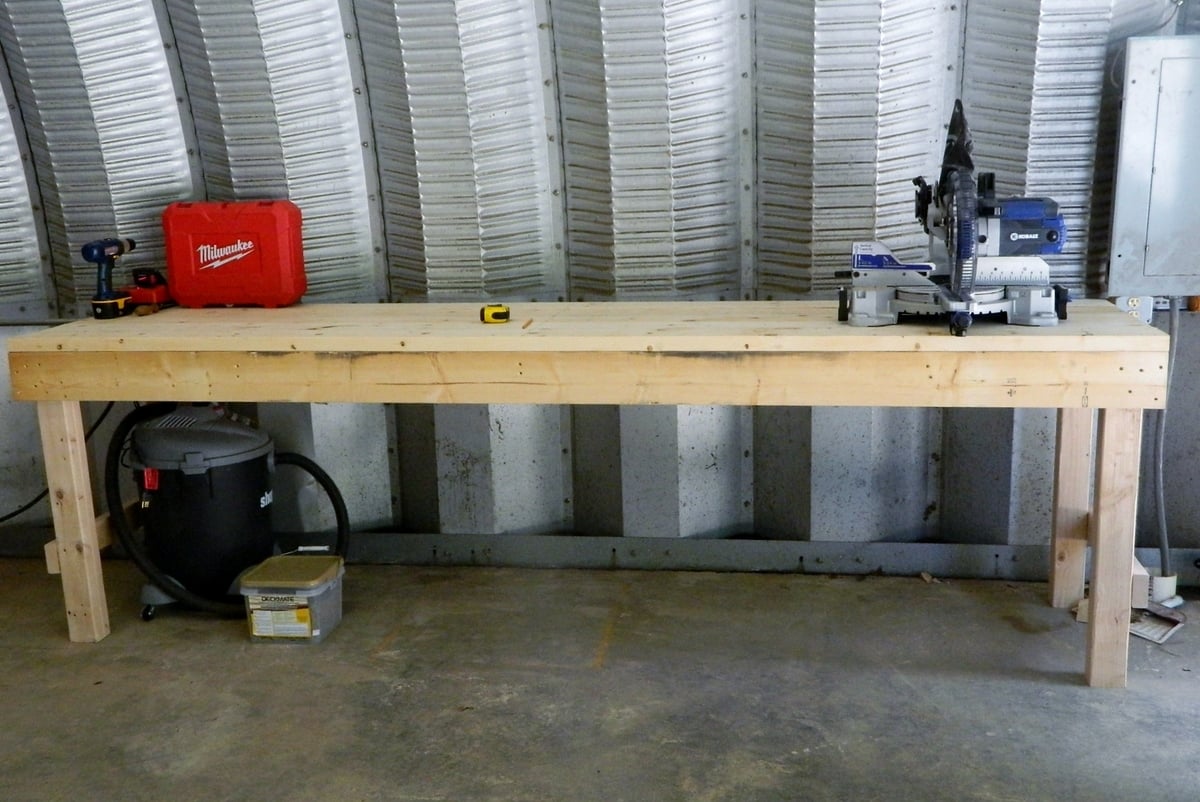
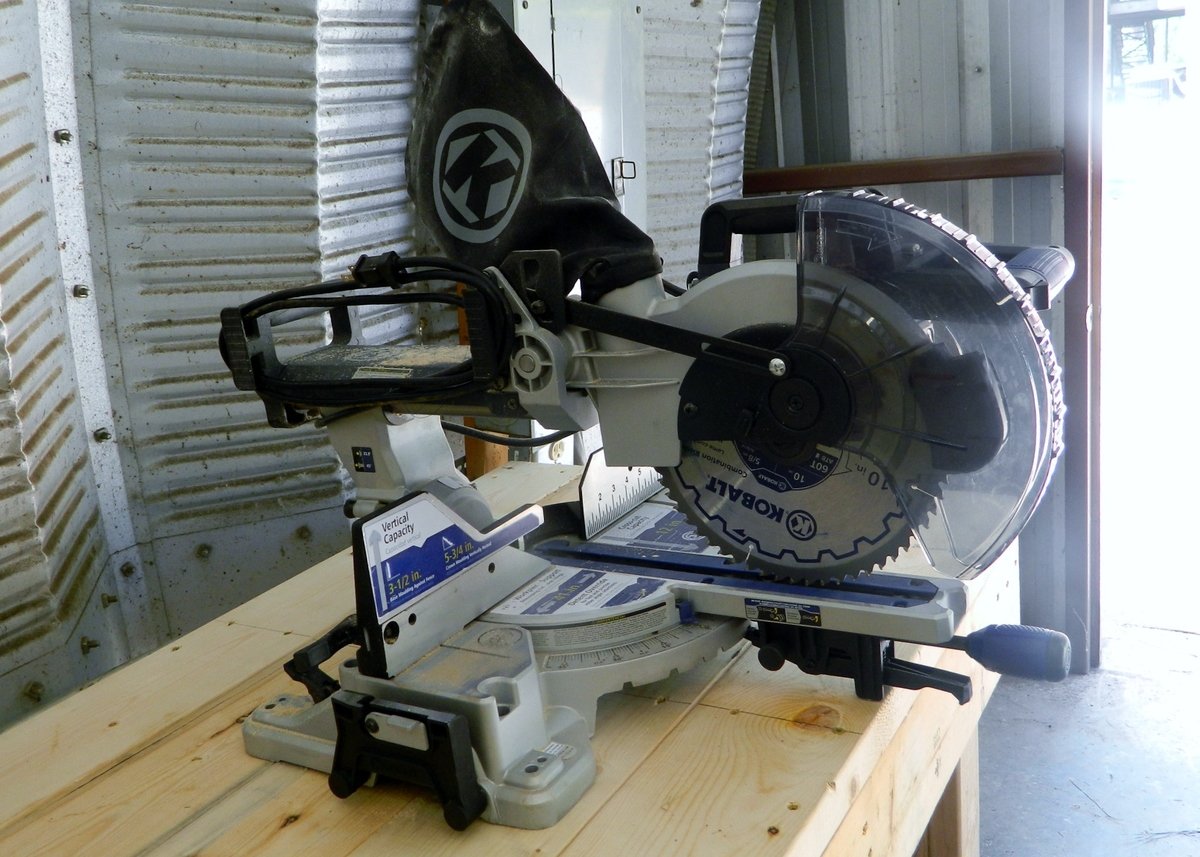
Workbench

This morning my dad decided to help my build the workbench I've been wanting since we moved to our new house. I would usually do it myself but being 37 weeks pregnant I wasn't wanting to get out there on my own and lift a bunch of 10 ft boards. So we got a bunch of 2x4s and some 2x6s and threw one together... it ended up being 10 ft long and around 28 inches wide and a good 36 inches tall. Now I have a nice place to put my new saw I got for Mother's Day
Estimated Time Investment
An Hour or Two (0-2 Hours)
Recommended Skill Level
Beginner
Hall Tree
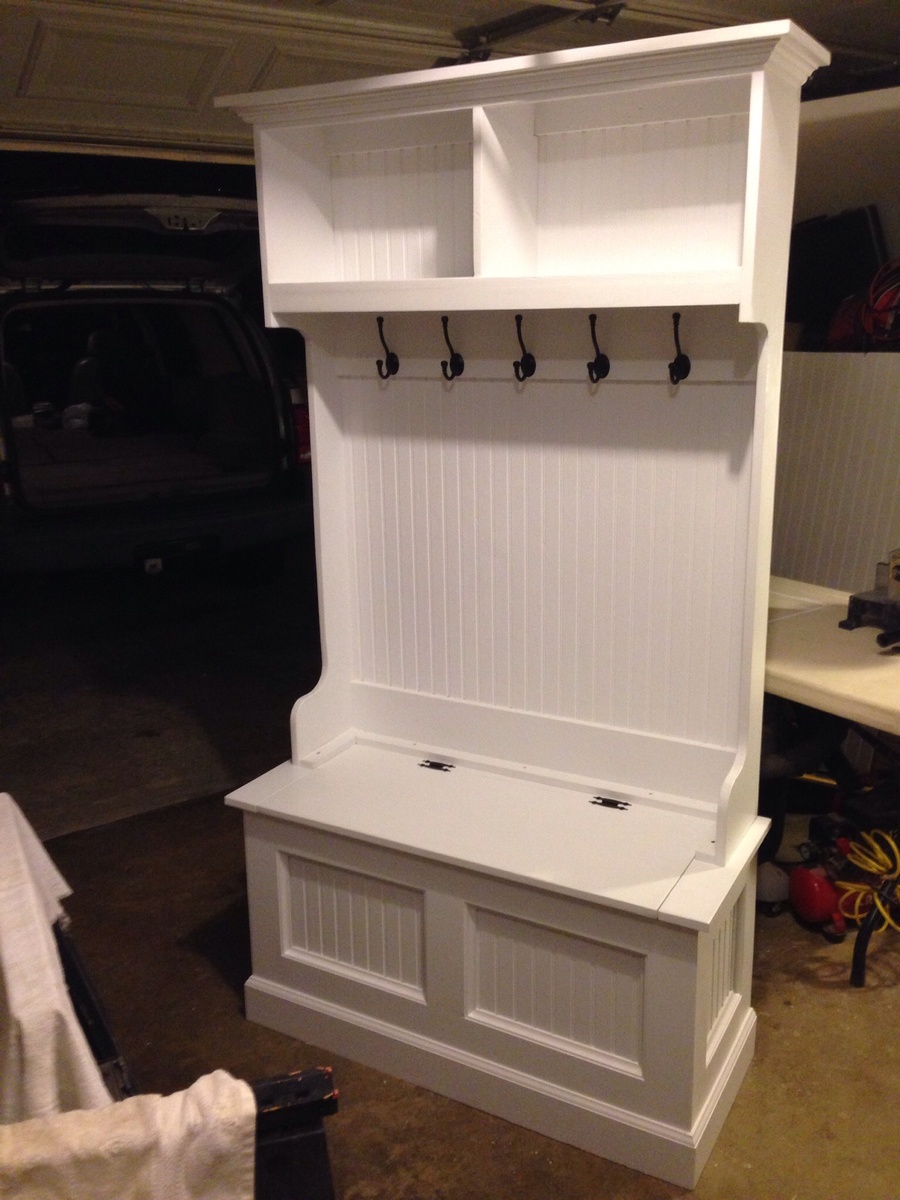
This was my first attempt at building actual furniture. It went pretty well I think. I followed the plan pretty much. I made the bench longer and taller. I also added a few inches to the height if the hutch.
A couple other changes I made that I thought it needed was 2x2 bracing on the bottom if the bench for stability. I also added a band of 1x2 to the bottom of the hutch so I could screw the hutch to the bench without having to go inside of the bench and try to line it up .
I then added another board to the top band of the hutch, because with the one small board there it want wide enough to mount a decent size hook to.
That's pretty much it. If you have any questions, let me know.
Built from Plan(s)
Estimated Cost
$200
Estimated Time Investment
Week Long Project (20 Hours or More)
Finish Used
Painted White
Recommended Skill Level
Intermediate
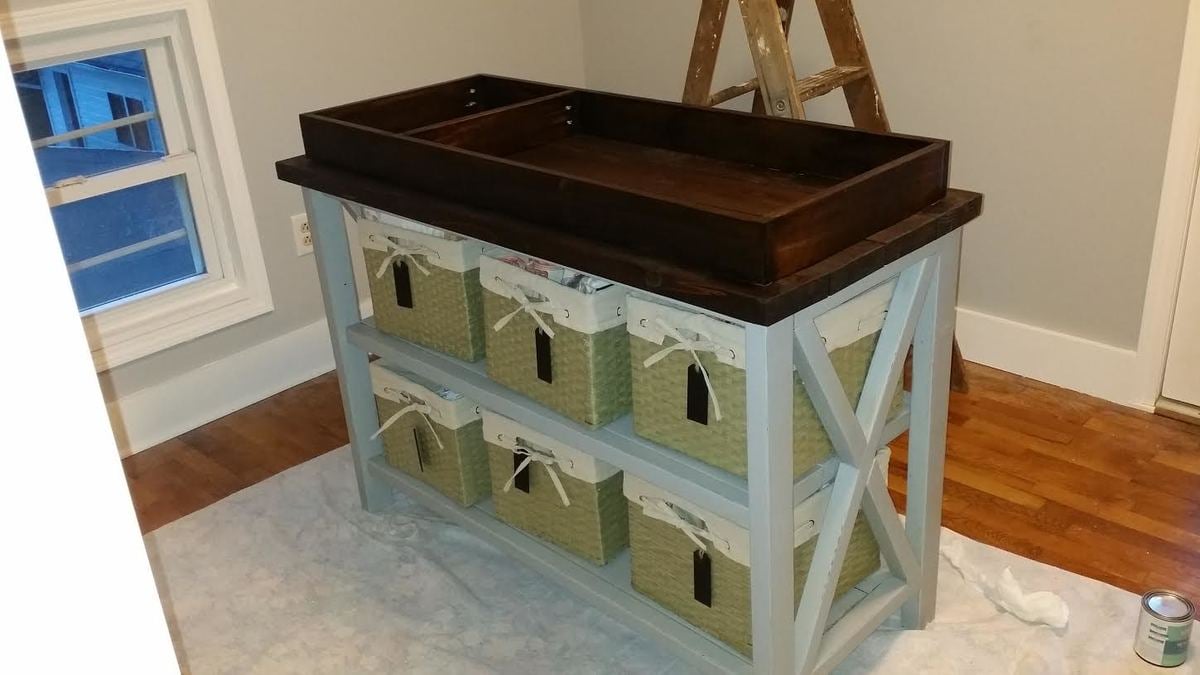
Nursery Dresser
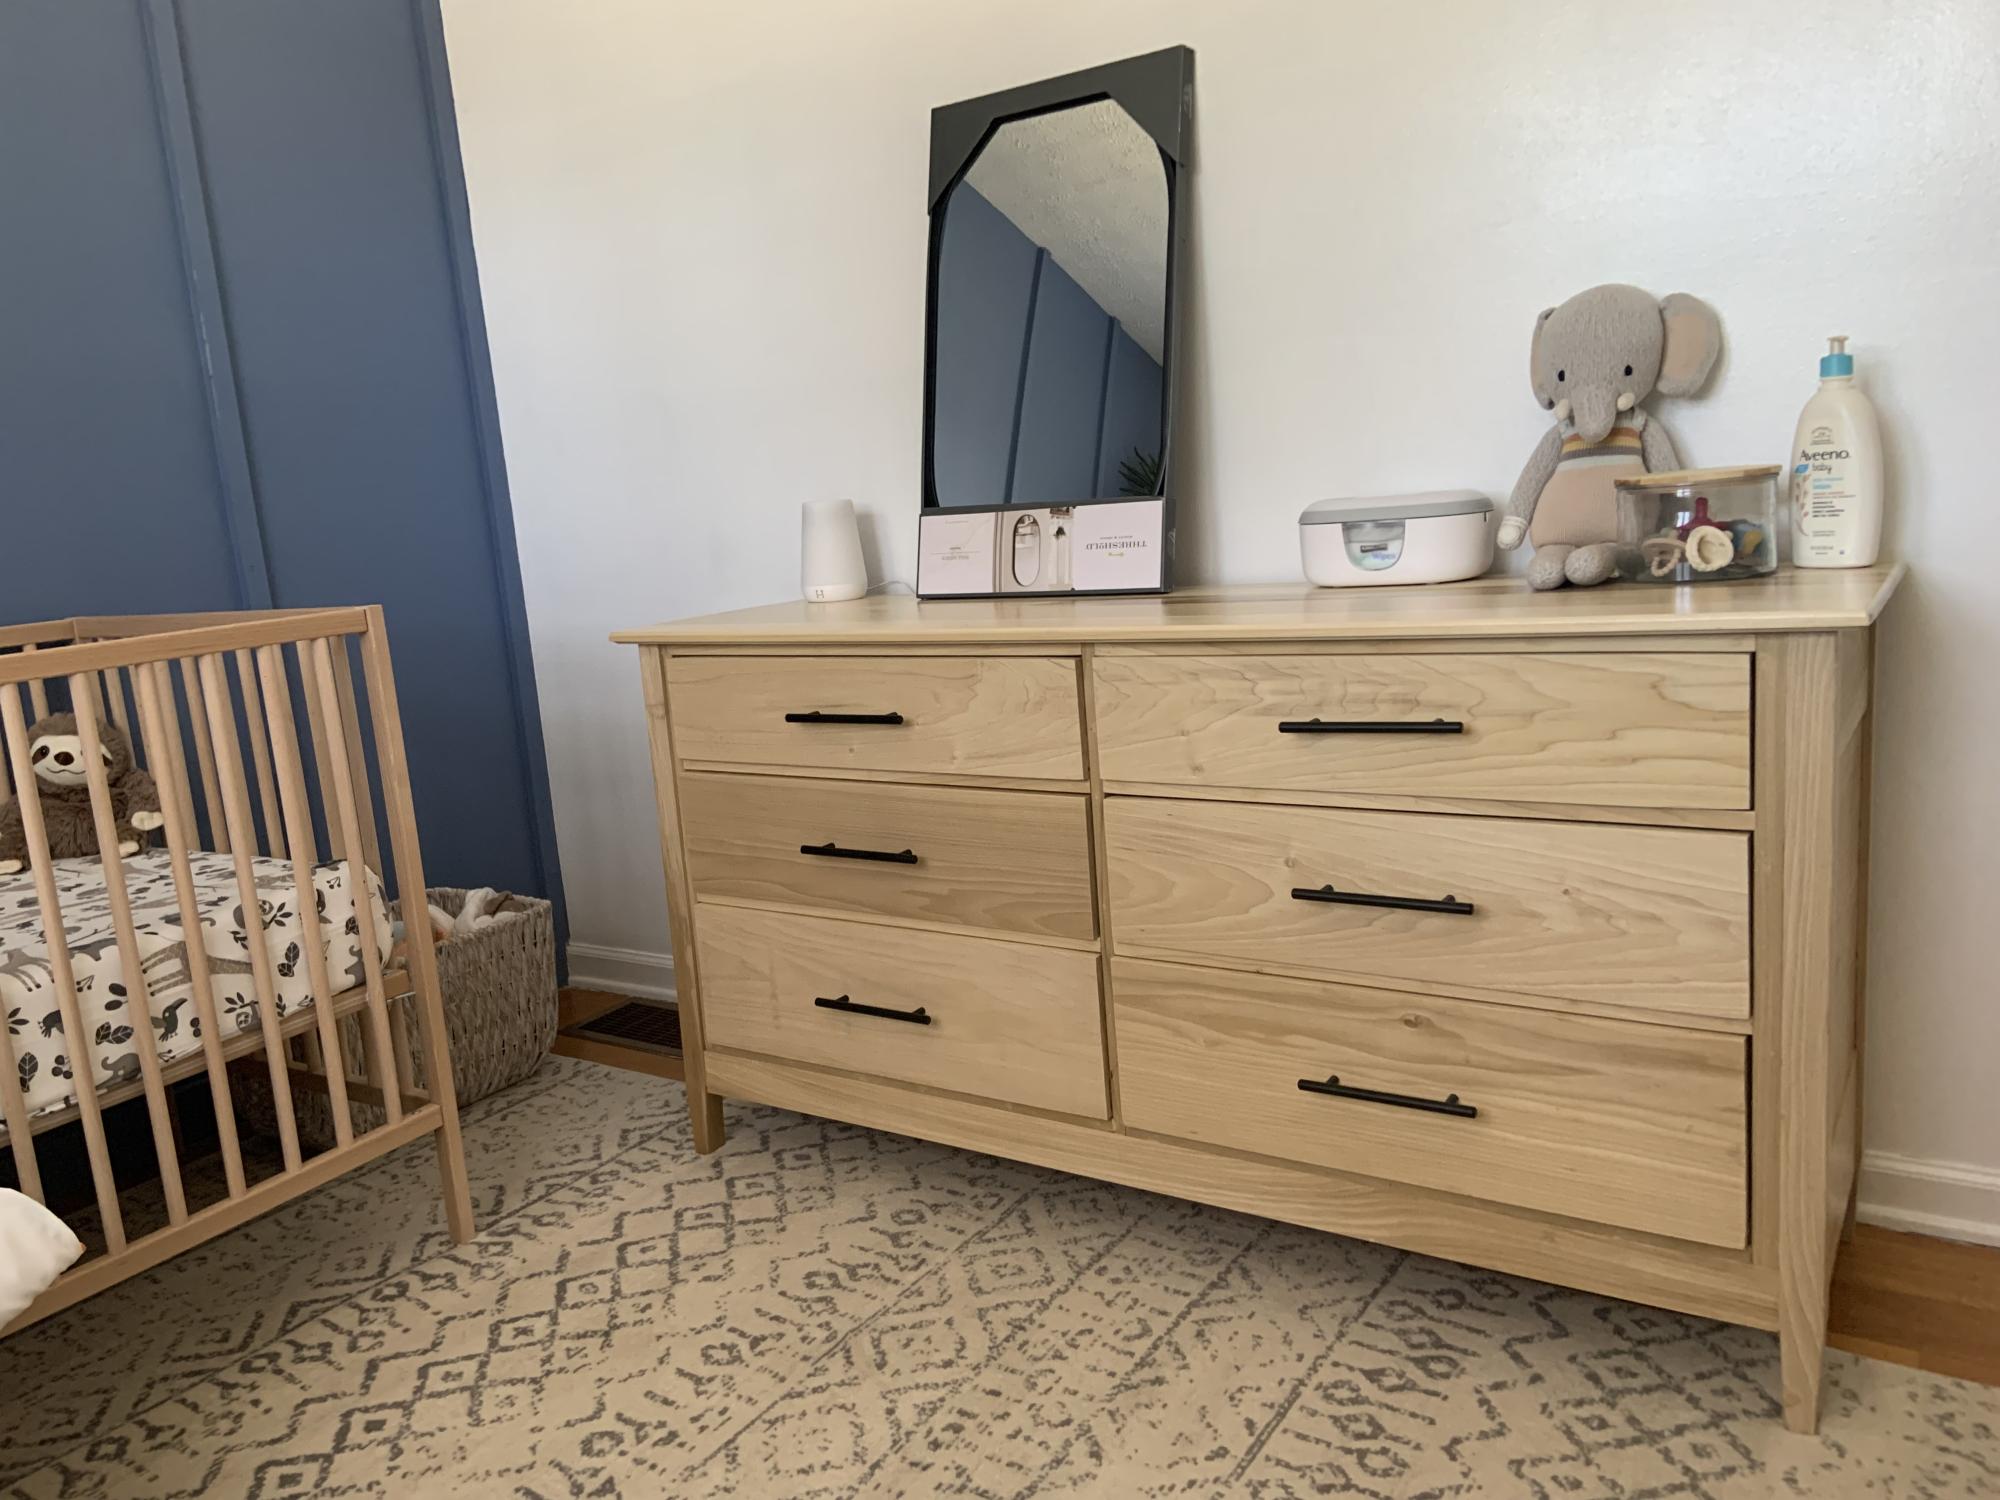
My first attempt at a dresser before my first grandson arrives.
Rick White
Comments
Tue, 11/28/2023 - 09:51
Great nursery set up!
The room looks great and the dresser is fabulous! Thanks for sharing.
Console Table w/Drawer & Raised Dog Bowls
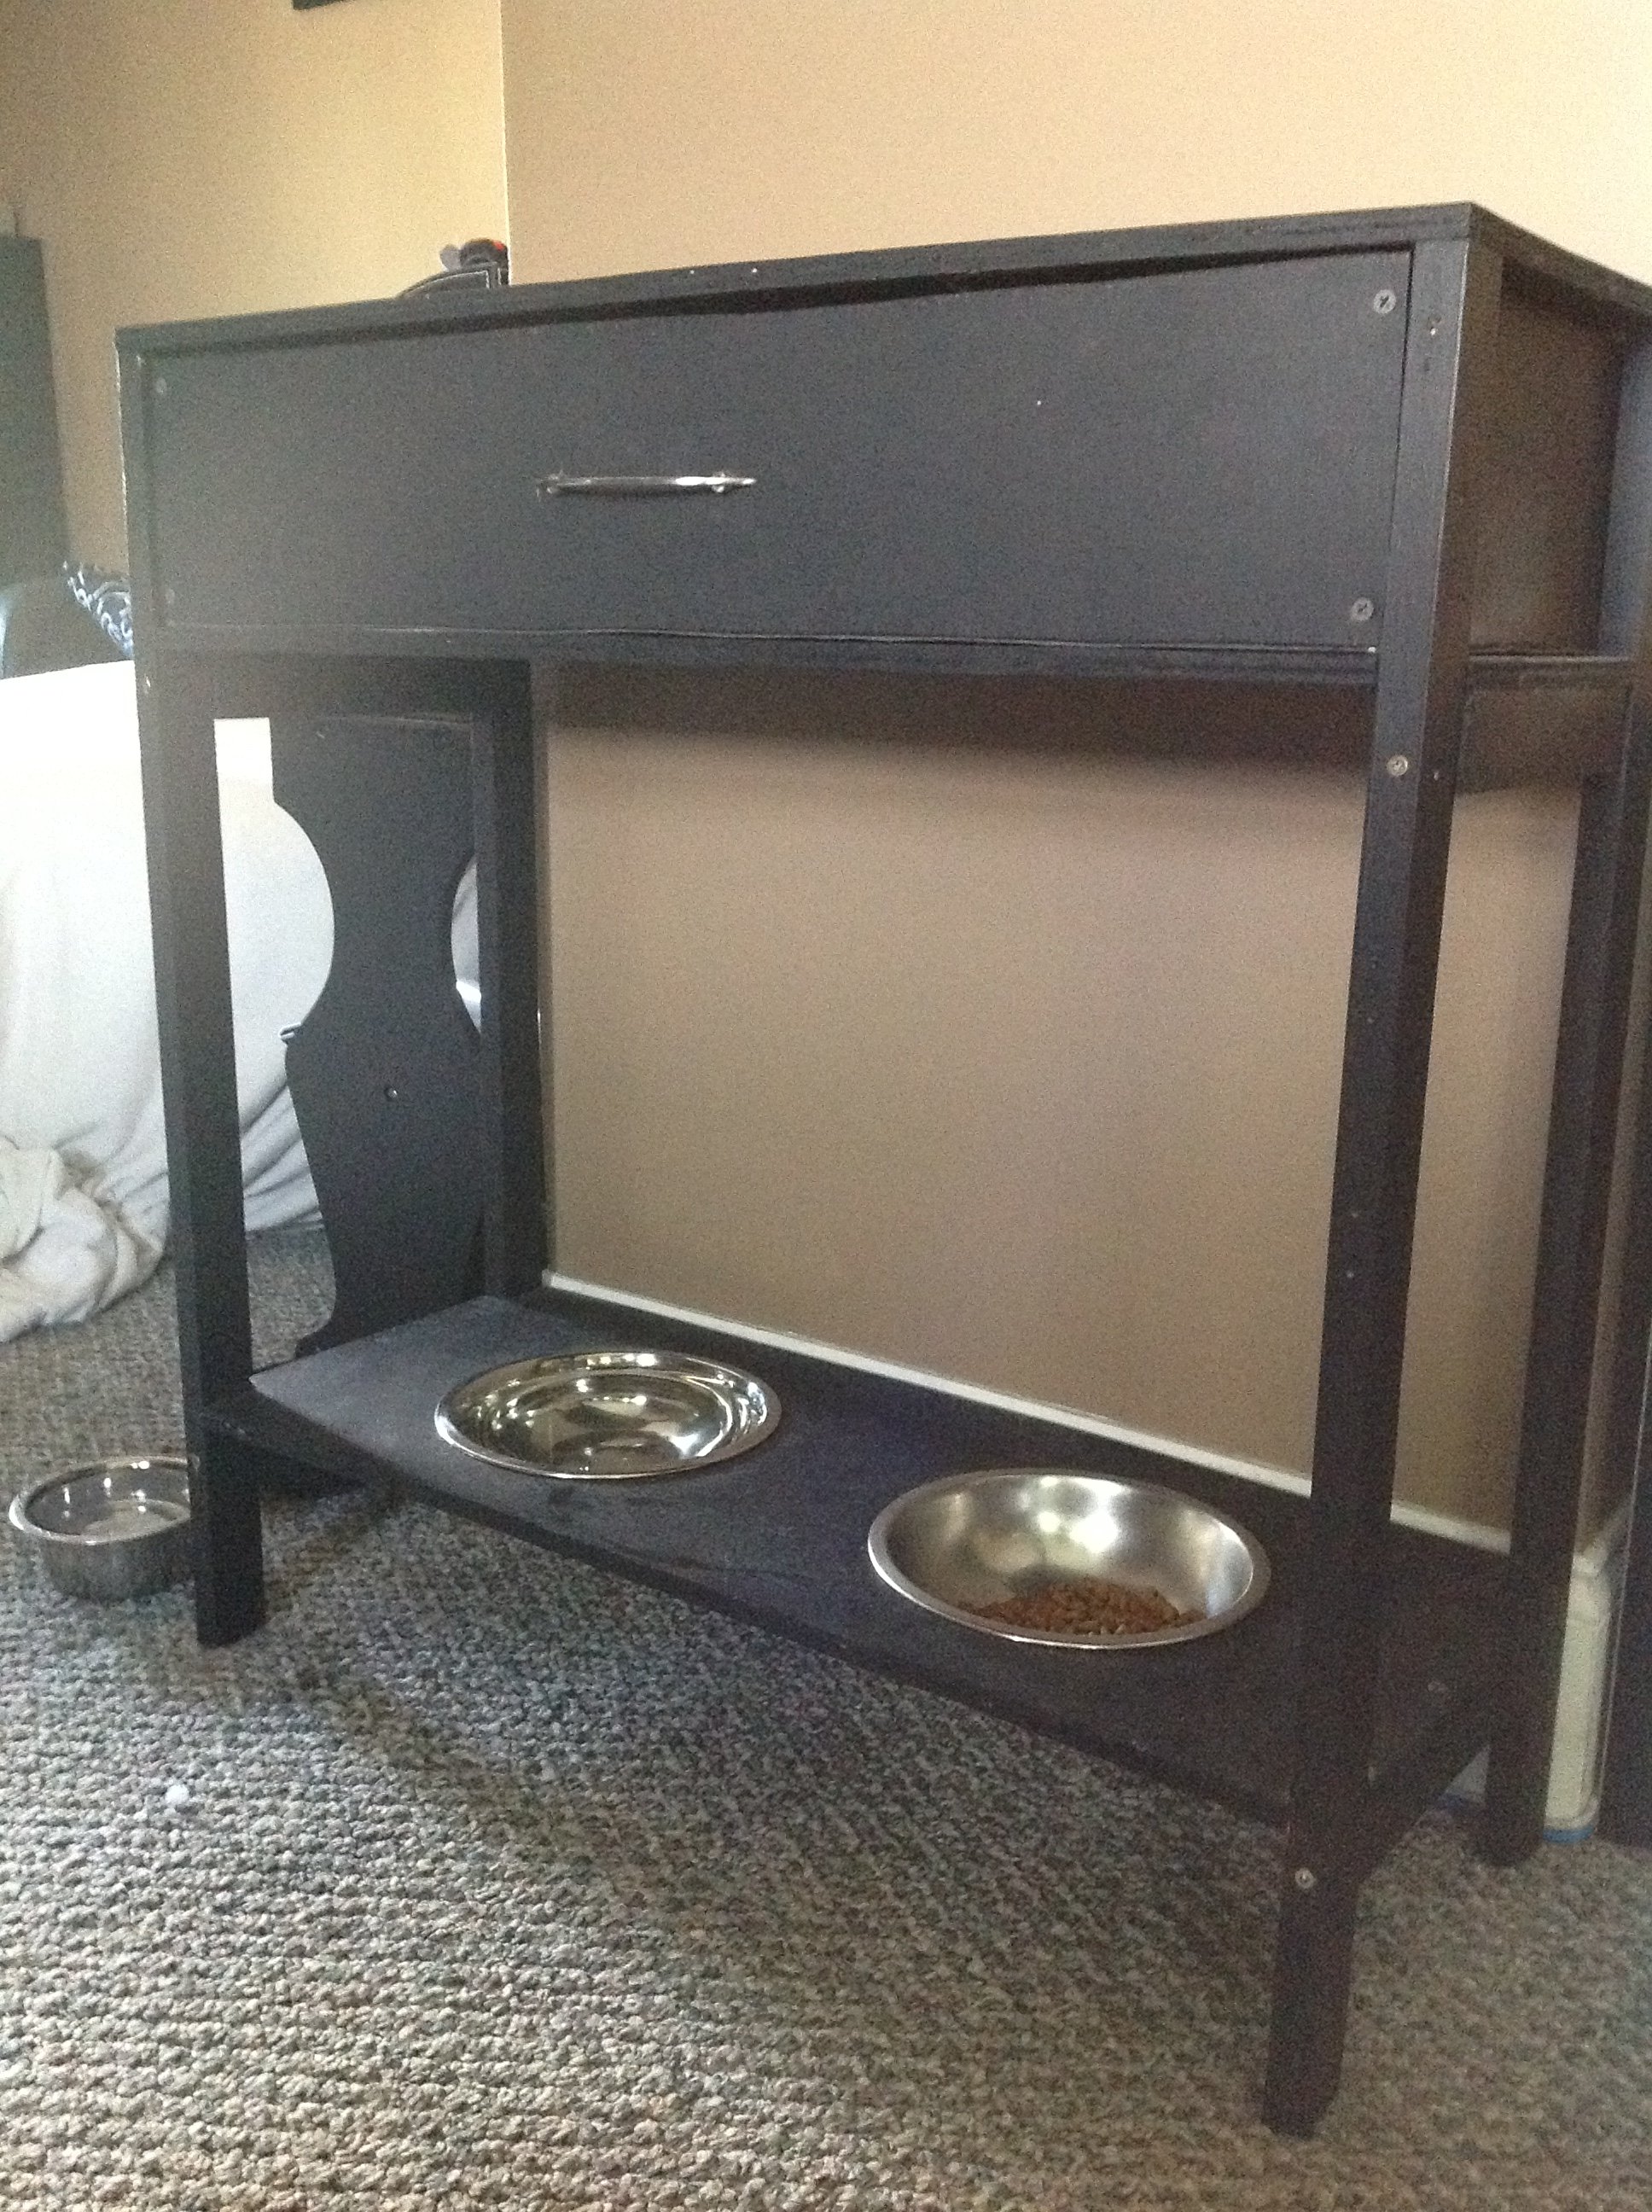
I actually designed & built this table on my own but it is very similar to Ana’s Simple, Cheap, & Easy Console Table. When we moved from an apartment to a house our lil neurotic jack Russell terrier decided he wasn’t going to eat unless we were both in the same room as him. So his food was put in a spot where he could see both of us even if we were in separate rooms, it just turned out that where that spot was, is the exact spot I wanted a console table. Well I couldn’t find a console table with a raised dog bowl shelf in it so I built my own. Now the dog bowls are up off the floor at a comfortable level for our fur babies & I keep all their vet paperwork, sweaters & toy stash in the drawer, all puppies things in one place.
Built from Plan(s)
Estimated Cost
$35
Estimated Time Investment
Afternoon Project (3-6 Hours)
Finish Used
Valspar Flat Black Indoor/Outdoor Enamel
Recommended Skill Level
Intermediate
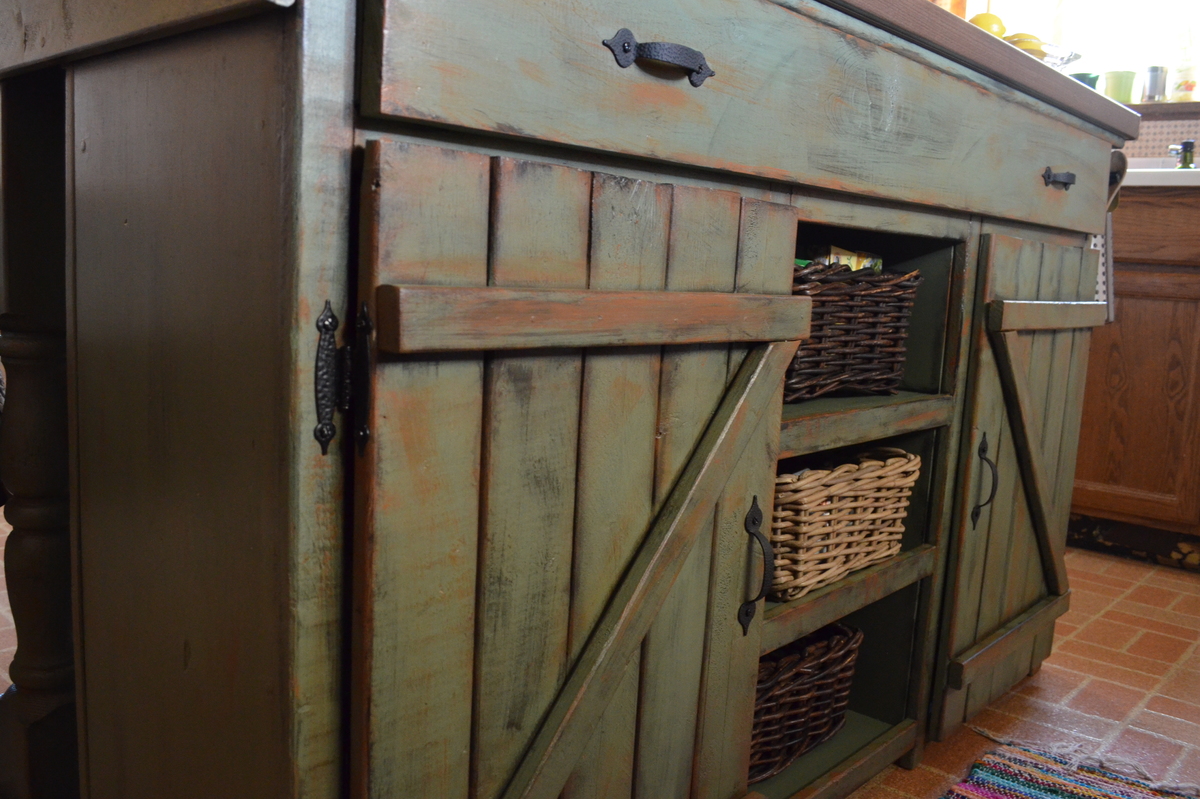
Farmhouse Kitchen Island

Grabbed some cheap whiteboard for my first project. My wife was looking at buying an island and I decided to surprise her by trying my hand at building one. Turned out to be an enjoyable new hobby that I hope to continue (plus, Laura now says I am her "favorite husband!").
Materials breakdown:
The lumber is white board from Lowe's for $115
The countertop is laminate Pragel from Ikea for $59 (cut to size)
Paint, polyurethane and drawer hinges were $50
I had another $75 in tools, glue, wood filler, nails, etc, because this was my first project.

Built from Plan(s)
Estimated Cost
$225
Estimated Time Investment
Weekend Project (10-20 Hours)
Finish Used
Green paint with black and chestnut dry-brushed distressing. Two coats of polyurethane.
Recommended Skill Level
Intermediate
Comments
In reply to Love the color by NimbleShopper
Wed, 04/02/2014 - 17:38
Thank you!
My wife, Laura, helped with the paint and came up with the dry-brush distressing technique.
In reply to Impressive by Ana White Admin
Wed, 04/02/2014 - 17:42
Thanks
We just moved into an old house with a garage and the previous owners left a work table and an ancient Craftsman jig-saw, circular saw, and scroll saw (all from 1956). They were a bit sketch, but they got the job done!

Fri, 04/04/2014 - 21:42
wow. very impressed. love the
wow. very impressed. love the finish! it turned fantastic for your first project; looks like you have a new hobby!
In reply to wow. very impressed. love the by birdsandsoap
Tue, 11/15/2016 - 00:15
Nice design
I love that. It have a nice design. ین درها دارای تکنولوژی مدرن و پیشرفته بوده و استفاده از آن سهل و آسان می باشد. وجود موتور توبولار و مرکز کنترل پیشرفته الکتروند فرانسه در آن باعث ایجاد امنیت، آرامش خیال و سهولت کارکرد آن بصورت دستی و اتوماتیک شده است. این مدل درب اتوماتیک به دلیل کم حجم بودن و جمع شدن در زیر سقف فروشگاه ها و یا مراکز تجاری و یا به صورت عمودی در سوله ها و کارخانه ها، هم باعث کارآیی بیشتر و هم دارای زیبایی مضاعف می باشد و کاربرد آن در مراکز تجاری، فروشگاه ها و صنعتی باعث ایجاد امنیت، راحتی و سهولت در استفاده از آن شده است .
2 simple writing desks

I made these for kids since ordering online will take 2 - 3 weeks. I was able to do this in 3 afternoons. The only difference is that I didn't flush the drawer with the table edge.
Thank you Ms. White for the plans.
Built from Plan(s)
DIY Christmas Projects
Getting ready for Christmas.
Fireman Joe
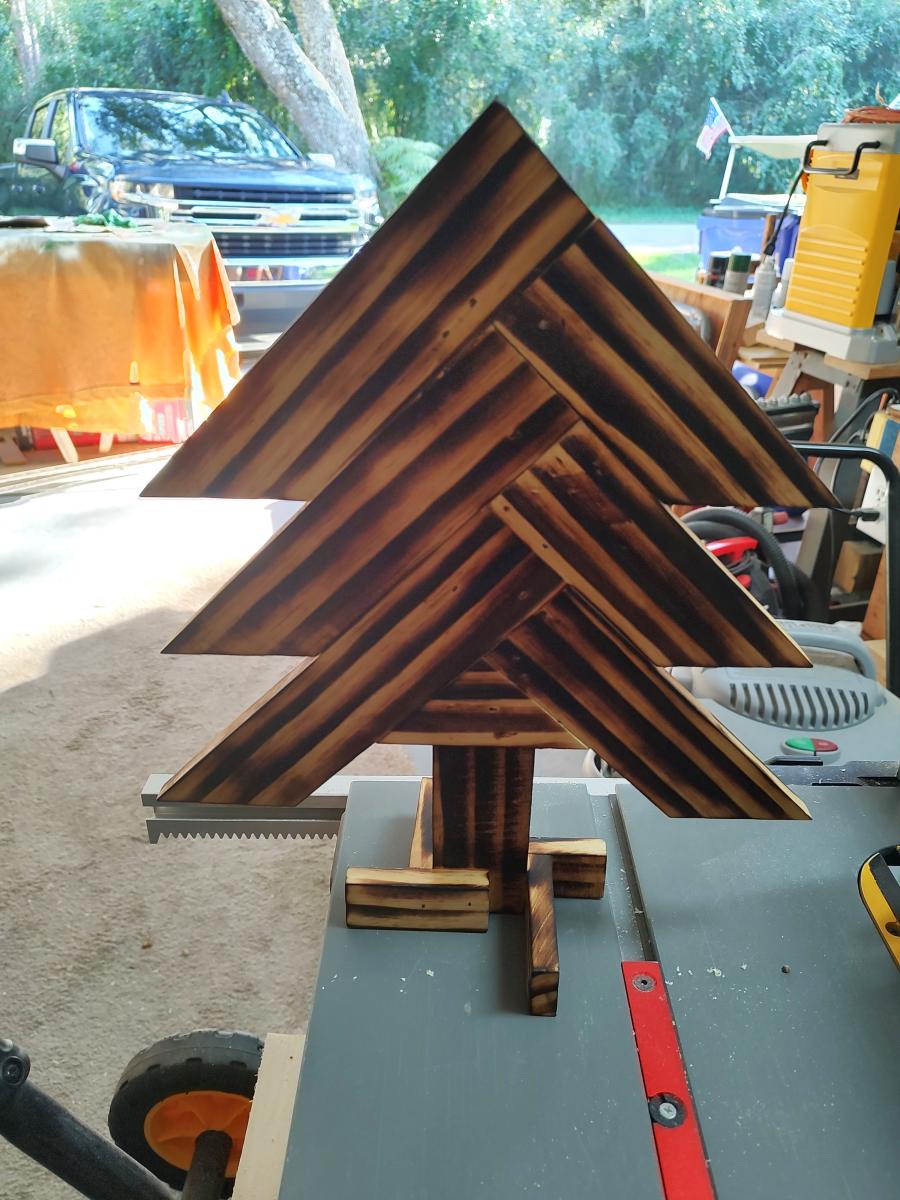
Seasonal And Holiday
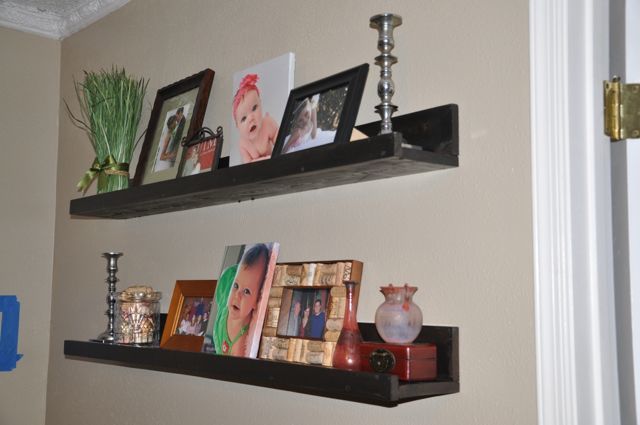
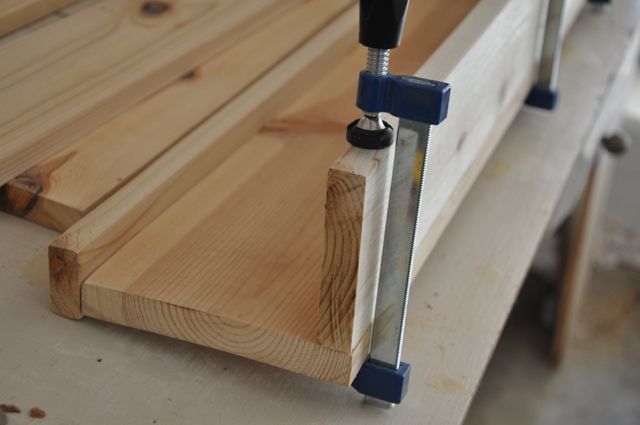
10 Dollar Ledges in Espresso
I made these ledges with pine and white wood, 4' long. I wish I had used pocket hole screws to connect them, but instead I just counter-sank the screw holes and butt jointed the boards with wood screws. I filled the screw holes with 5/16" wood plugs and sanded them down flat. Then I sanded, stained, varnished, and sanded again.
Please see my process below on my blog.
Thanks, Ana!
Estimated Cost
$30
Estimated Time Investment
Afternoon Project (3-6 Hours)
Finish Used
A mix of "ebony" and "walnut" oil-based stains, then 2 coats of varnish and a light sanding with 600 grit paper.
Recommended Skill Level
Starter Project
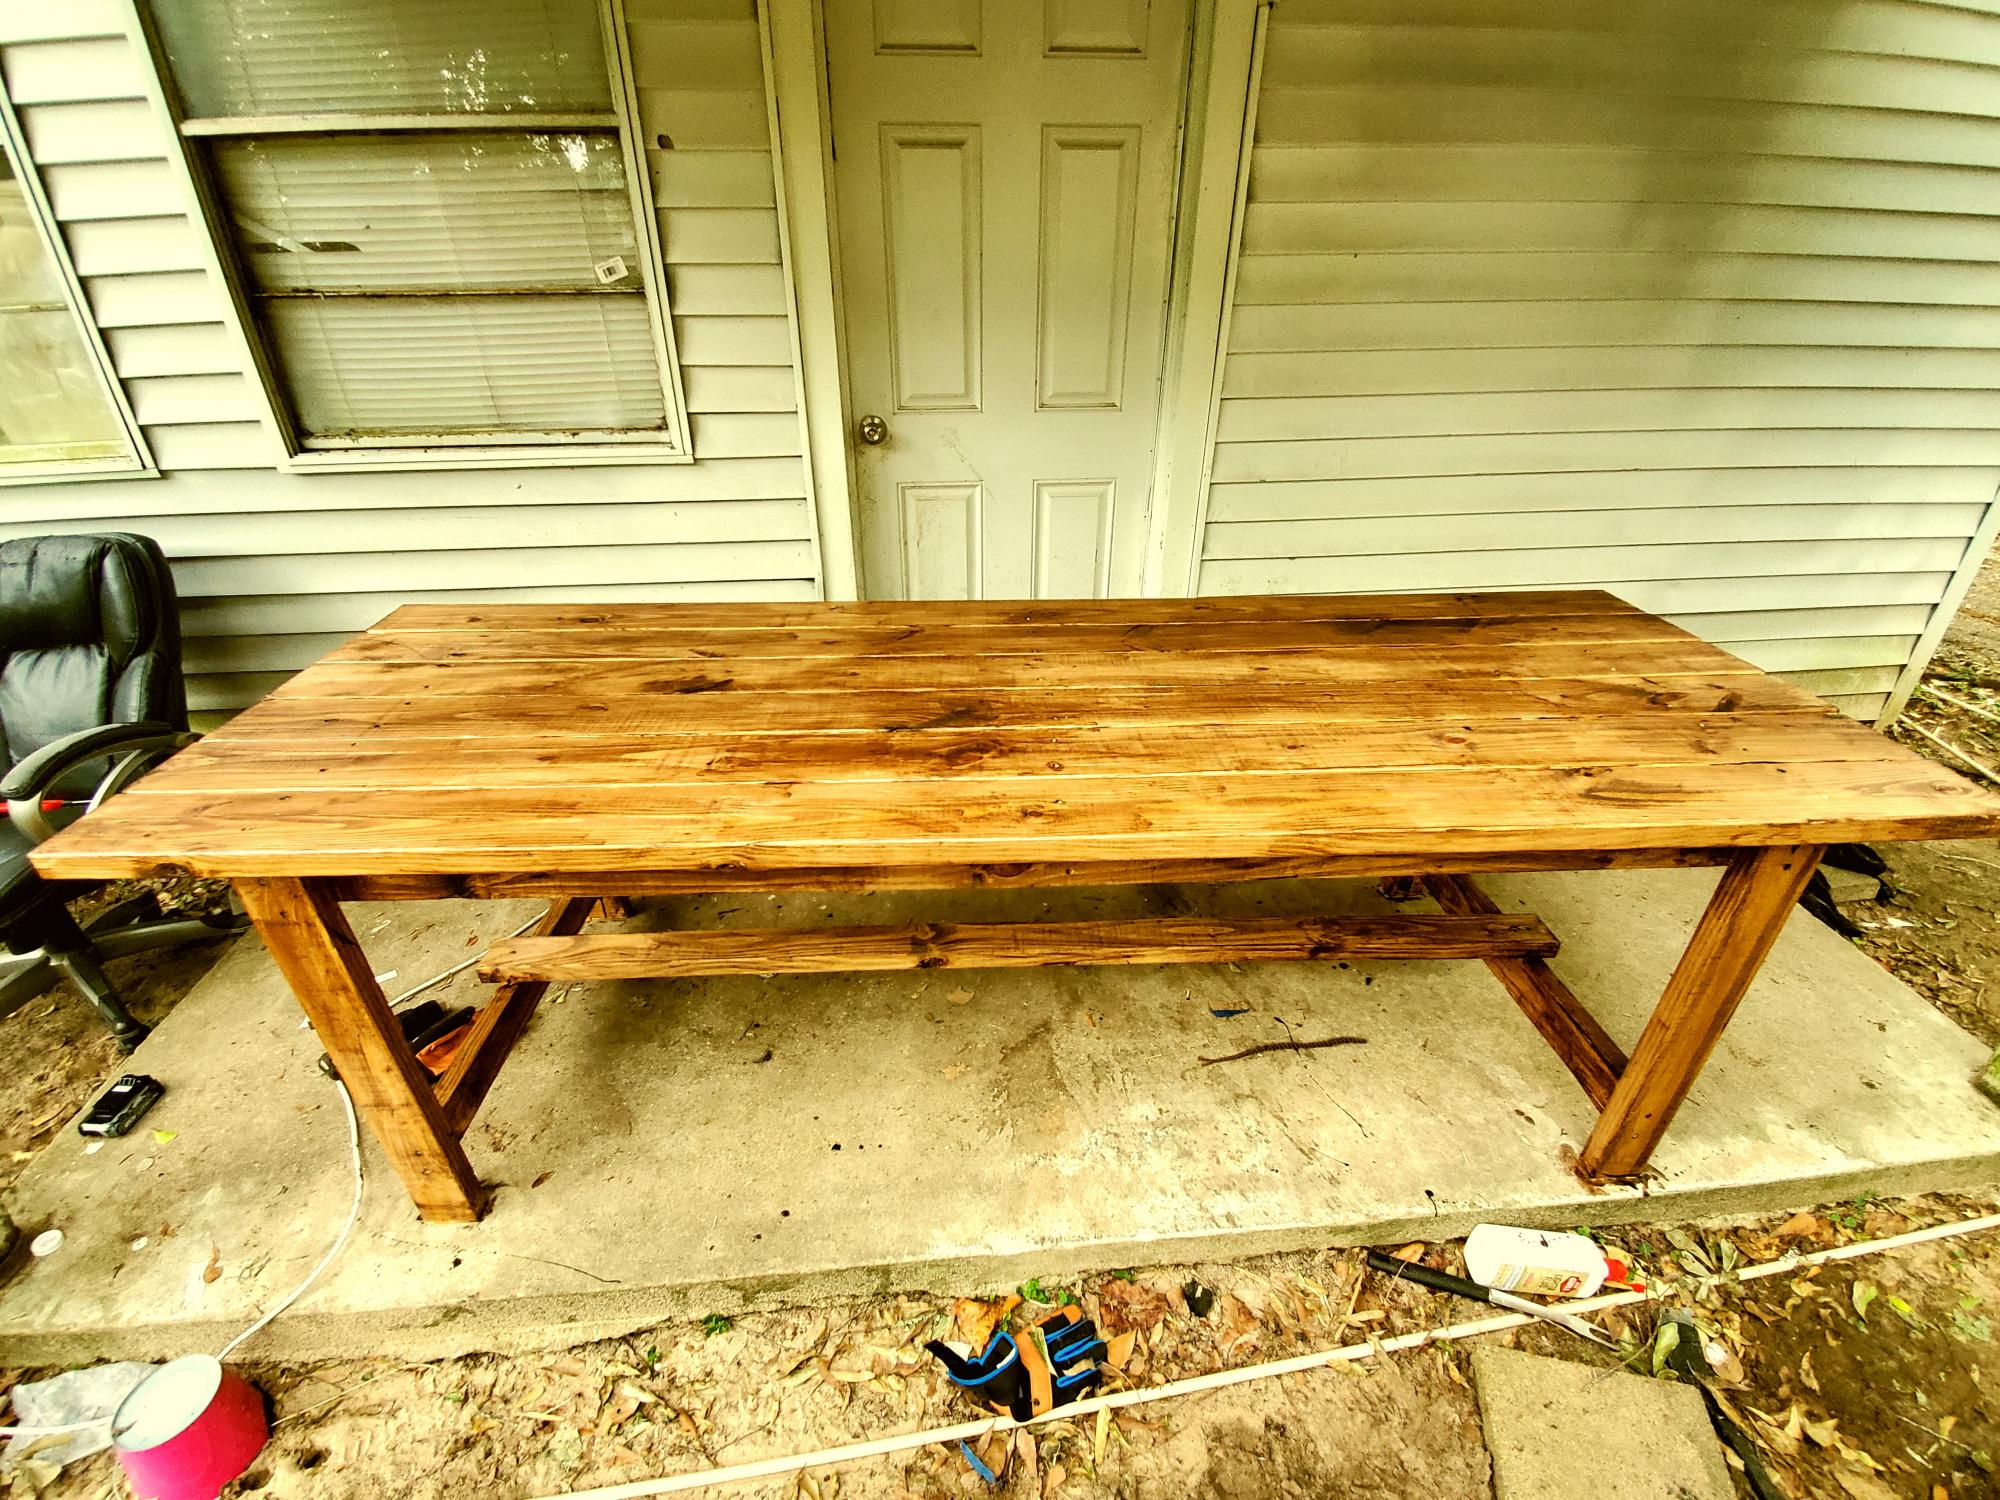
Rhyan Coffee Table
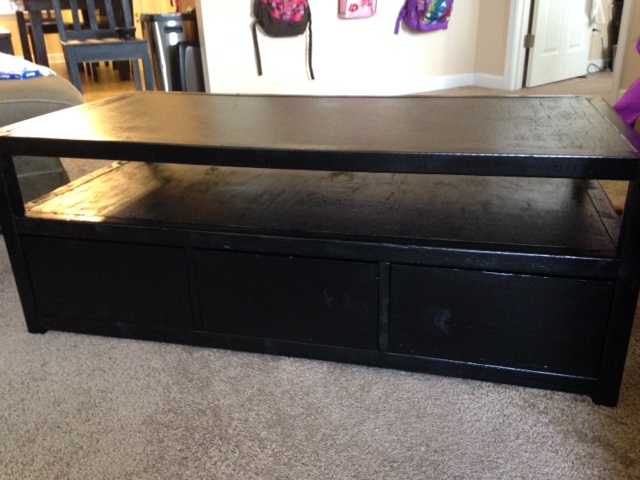
I loved this coffee table plan. I found it on www.morelikehome.net and also linked on Ana White's page. My wife and I loved the size and also the number of drawers for storage. I would say that the plans were great and I had to only make minor adjustments due to my own errors.
It took me about four days to complete. I used the Kreg jig to complete most of the joining. I put it all together by the end of the second day. It is solid as a rock. The last two days were mostly staining all pieces and then restaining to get the right finish. It also took a couple more weeks to find pulls and get them installed. But now it's all done and we love it already!
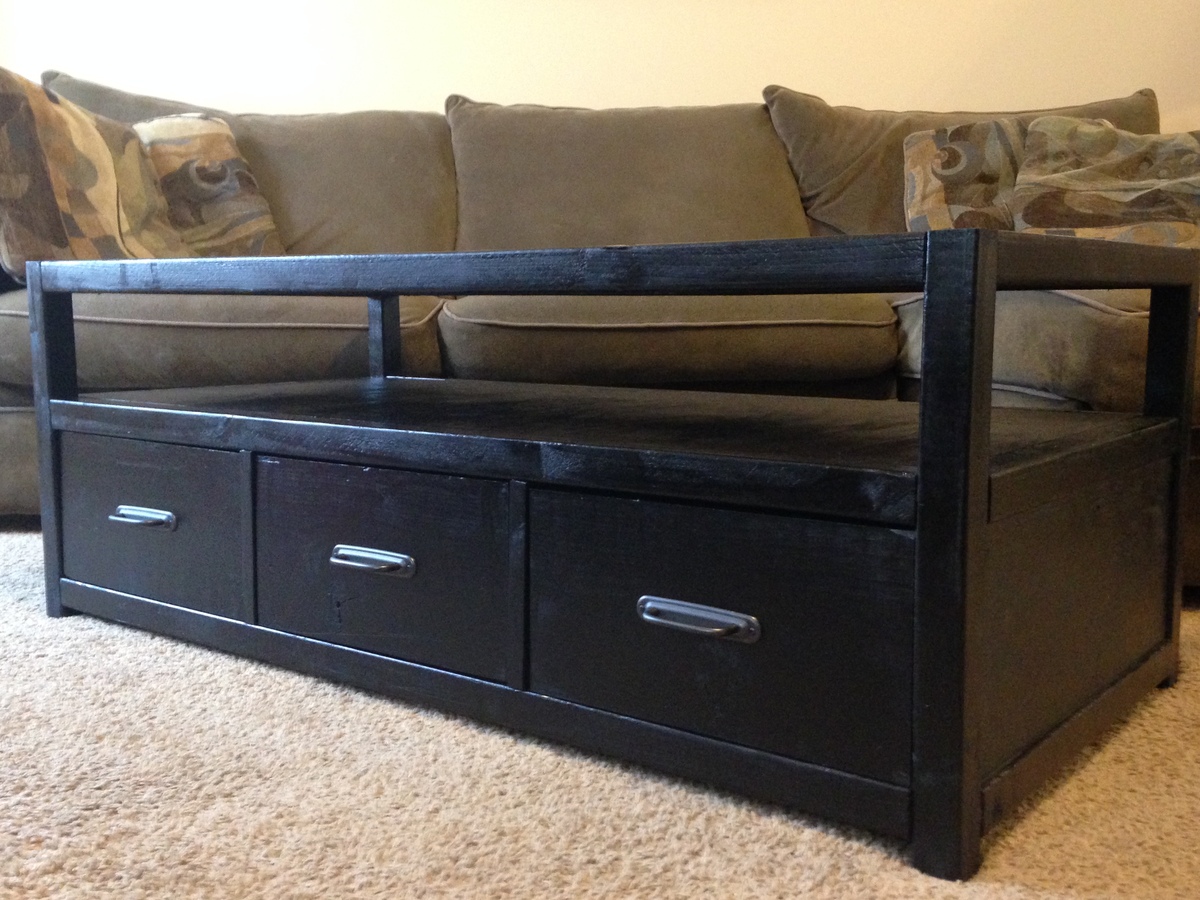

Built from Plan(s)
Estimated Cost
140
Estimated Time Investment
Week Long Project (20 Hours or More)
Finish Used
Black satin polyurethane
Recommended Skill Level
Beginner