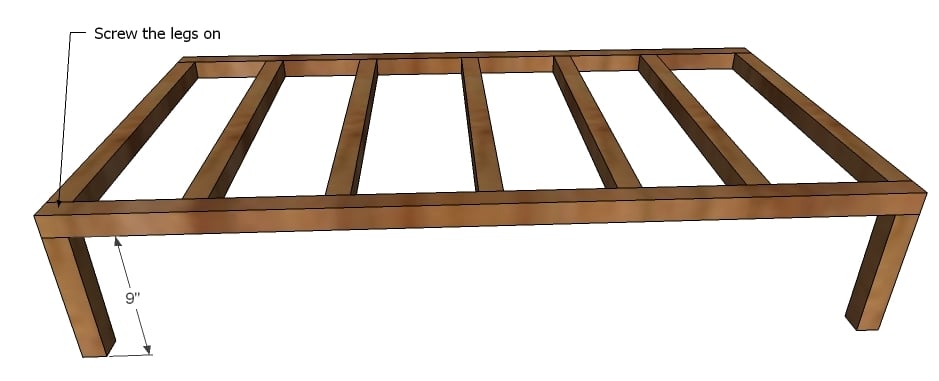
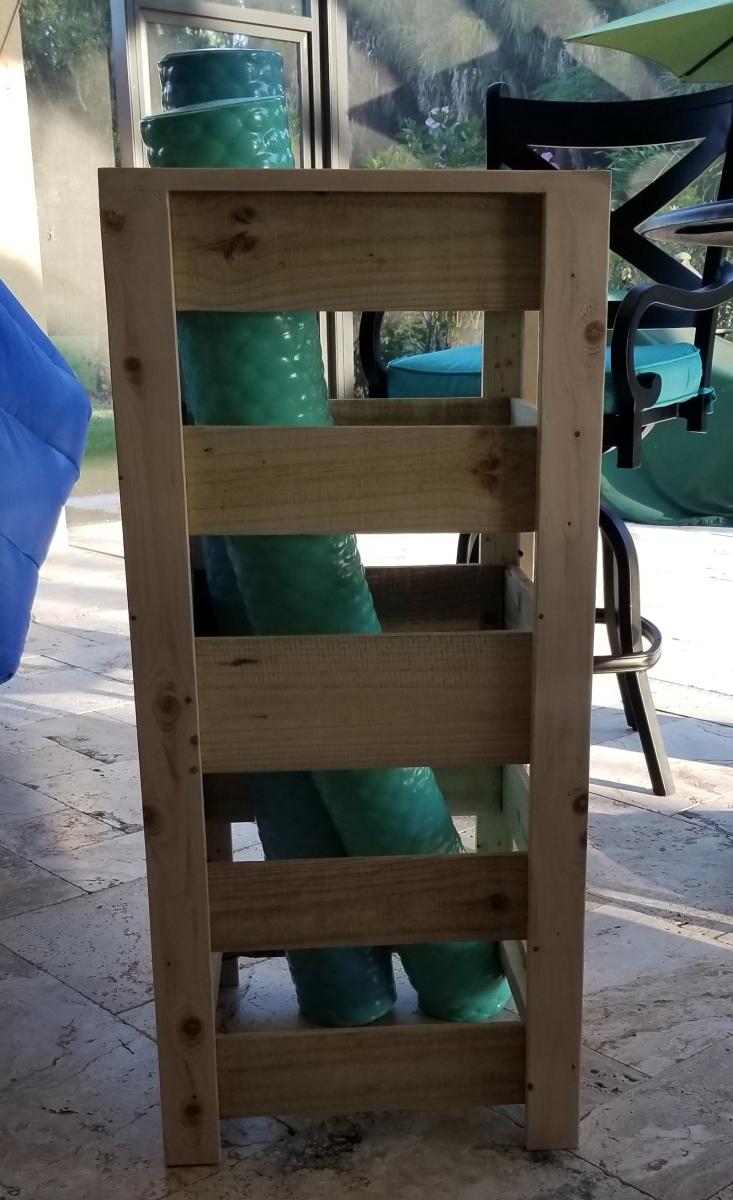
Community Brag Posts

Cedar Planter Boxes

Submitted by KaityJene on Wed, 07/17/2013 - 19:59

They were simple to make and the plan was easy to follow. The only modification I made was adding the 1x3 topper in place of the longer legs sticking out of the top.

Built from Plan(s)
Estimated Cost
$23
Estimated Time Investment
Day Project (6-9 Hours)
Finish Used
Thompson's Water Seal which I just brushed on using a cheap paint brush.
Recommended Skill Level
Beginner

Comments

Debi G

Fri, 07/19/2013 - 06:36

Adding these to my to-do list for spring (yes, I plan ahead). I'm thinking of elevating and elongating them to fit around a bay window.

Adirondack Chairs with Foot Rest

Submitted by Anonymous (not verified) on Sun, 07/30/2023 - 14:45

Great set of outdoor chairs with foot rest!


RG Design & Build

Comments

Loft Cabin Bunk Bed

Best Christmas present according to my 4-year-old twins :)  I combined ideas from Jen Woodhouse's "cabin bed" and "loft cabin bed" after seeing another brag post from someone who had turned it into a bunk bed.  I added a separate platform for the lower mattress for uniformity and to provide some air circulation for the mattress.  I also opted for a 2x6 as the bottom weight-bearing beam because I wanted to be able to add an extra couple pocket screws since this mama likes to play in the top bunk too!  My girls took turns sleeping in the top/bottom for the first 2 nights, and have been camping out together in the top bunk ever since... and my husband and I are finally getting to sleep in on the weekends because they never want to come out of their room!  


**Side note -- I'm not sure how my pictures got flipped but I have no idea how to fix it!

Built from Plan(s)
Finish Used
3 coats of white primer + paint in satin finish for the main house
Varathane weathered grey for roof & stairs
Rustoleum "Chalked" in charcoal for window trim

Comments

Twinkies' mom

Fri, 10/02/2020 - 09:33

I am SO sorry but I haven't been on here since I posted the bunkbeds (almost 9 months ago!) I had written out all of my modified measurements on the Jen Woodhouse plans but have since lost it somewhere in my garage :( Here is what I can tell you at the moment: short side of "front" & "back" panels = 77.25" ; I kept the angles on the sides/roof the same, so the highest point of roof = 89" (I have short 8' ceilings so this leaves ~7" space up top). I used what I believe were 5" tongue & groove flooring panels instead of plywood for all sides, framed by 2x4s and 2x6 underneath for a little extra support. The height from the bottom of the top bunk to the floor is 38", and I added a 2x6 piece between the bottom legs of the 2 side pieces, flush with the outside edge. I built a rectangular frame for the bottom mattress using 2x6" on the long sides and 2x4 on the short sides -- the 2x4s are raised off the floor in order to allow for air circulation under the mattress and act as the end slats (they're flush on top with the rest of the slats, which I used 2x4s instead of the 1x in the plans)... instead of the 2x2 supports for the mattresses I used some scrap 2x3s from my kids old toddler beds which I had also built but tried to recycle as much of the wood as I could for this project, plus the 2x6 gave me a little more wiggle room -- if you use 2x4 you won't have space for 2x3 supports. The front "door" opening is 22.75", which I based on my size and me being able to get in and out easily (as mentioned above, I like to camp out with my kids sometimes!). The window openings are 12" w x 13.5" h, but the height is measured after I made a 1x3" window ledge which is flush with the inside of the wall; the rest of the windows are framed with 1x2s and 1x3s.
The full width of the side panels is 38" and the front/back are 78.5" -- I based these on the mattresses which I had already bought (Novaform twin from Costco -- since they're memory foam they're a little easier to "squeeze" in the top bunk than I would imagine a regular mattress would be).

I think that covers everything, sorry again about replying so late!

Twinkies' mom

Fri, 10/02/2020 - 09:42

2 more things:
The bottom "frame" was meant to be removable for easy assembly/disassembly as my family moves a lot! That is why I used the inner 2x4s to hold the long side rails together, and the short-side 2x6s which are attached to the side frames are merely fore the illusion that it's all one piece. I did place a couple 2.5" screws through the inside of the 2x4s right into the legs of the upper bunk to make sure it stays in place.
When building the front panels with the windows, I decided on door opening first, then window opening (based on the size of the tongue & groove flooring), then calculated the width of all the pieces to create the window opening. I used pocked holes to connect the tongue & groove flooring to the "frame" created by the 2x4 pieces, and TONS of wood glue in between the boards. Adding the window frames with glue & nails helped provide a little more stability to the windows, although once the glue was dry there was zero movement around the window but I never know with my extremely-destructive twins! Now they're able to climb all over the bunk using the window ledge for support and it's no problem.

Florida Gator Themed Playhouse

My husband Jon recently built this playhouse with/for a friend of his from work. It took them two months to complete and it's awesome! Jon's friend is also a die hard Gators fan so they made sure to add blue and orange as much as they could. Thanks Ana for giving them the courage to take on such a feat!

Estimated Cost
$2000
Estimated Time Investment
Week Long Project (20 Hours or More)
Finish Used
None
Recommended Skill Level
Advanced

Comments

birdsandsoap

Wed, 03/21/2012 - 01:51

Great Job! All this says is "GO BRONCOS!" I'm an Idaho girl and I love the BOise State colors, lol! "Playhouse" is an understatement. This is a jungle. This is a huge play structure! and it is awesome.

Mudroom Closet Makeover

Submitted by Anonymous (not verified) on Thu, 01/21/2021 - 07:10

The concept of hidden boot storage at the back is genius!!! I knew as soon as I saw your plan that I needed that in this space! Thank you so much for what you do!

Finish Used
Bench seat was wood conditioner, minwax early American, minwax weathered oak. Then finished with shellac. The coat hooks are from Amazon. The ring pull is from Lee Valley.

Comments

Outdoor Sectional

Submitted by Anonymous (not verified) on Fri, 04/28/2023 - 05:24

This was my seventh outdoor couch but my first sectional. My very first couches were all inspired by Ana White's plans and I have gotten so much better with my skills that I building other things as well. Thanks Ana for all your inspiration!

Comments

Custom Modern Chicken Coop

Submitted by Anonymous (not verified) on Wed, 08/30/2023 - 08:49

I made this coop twice as wide like Ana suggested since I have 4 chickens and wanted to make sure there was some extra wiggle room in case “chicken math” got the best of us. I made a nesting box to mount on the outside. I also used plywood for the sides like Ana did in the video. I installed a Run Chicken automatic door that opens at sunrise and closes at sunset. I added some hasps and clasps to make sure all my doors would close tightly. I put hardware cloth across the top before installing the roof panels. I stapled and buried hardware cloth around the perimeter for predator protection. I also spray painted the hardware cloth flat black so that it would be easier for us to see inside the coop. I stained the rest of the wood with Varathane Semi-Transparent stain, color “Carbon Gray.” I also added some roosts and cedar shingle siding for some extra protection during our New England winters at to match our house. Working 2-4 hours a day, off and on, with a bum shoulder and weak hands, this took me about a week! Thanks for the great plan, Ana!

Built from Plan(s)

Comments

Seasonal And Holiday

Pull-out Shelves

Stationary shelves are such a hassle, especially in a deep pantry cabinet! Now I can actually SEE the contents of my pantry cabinet. Thanks for the inspiration and tutorial to get it done!

Estimated Cost
$50 for 5 shelves & framing, new hinges.
Estimated Time Investment
Day Project (6-9 Hours)

Comments

Built in dry bar

Submitted by releematt on Fri, 12/28/2018 - 14:16

My husband and I worked on this for a few months, no rush. This is the outcome and all we need to do now is get one glass shelf for each cabinet. This is a great place to store all liquors and glassware. The drawers are a nice addition. The paint it black chalk paint with wax finish. All materials were purchased at Lowes or Home Depot. 

Estimated Cost
$800.00 including butcher block top, glass, back splash and lights.
Estimated Time Investment
Week Long Project (20 Hours or More)
Recommended Skill Level
Beginner

Modified Garage Shelf (w/ Workbench)

Submitted by Anonymous (not verified) on Thu, 06/08/2017 - 11:15

Great plans allow for versatility and easy customization. Put the whole thing together in a day w/ one other person. My set up is 16' long - 5' on the side shelves and 6' for the workbench. Added a pegboard and fluorescent light under the top middle shelves. I'm also designing a slim drawer to go under the workbencheck area. Thanks a bunch!

Estimated Cost
~$150 including pegboard.
Estimated Time Investment
Afternoon Project (3-6 Hours)
Finish Used
Will stain dark in the future
Recommended Skill Level
Starter Project

Comments

Christmas 3-tier cookie stand

Submitted by calcowoods on Thu, 12/31/2020 - 12:51

Inspired by Shara of Woodshop Diaries, created this 3 tier tray for displaying cookies for Santa. Added a 3 dimensional star as the topper and simply followed the excellent photos and schematics on Shara's website.

Estimated Cost
$5
Estimated Time Investment
Afternoon Project (3-6 Hours)
Finish Used
Minwax paste wax
Recommended Skill Level
Beginner

Comments

Pool Noodle Holder from DIY Planter Box

Submitted by Anonymous (not verified) on Sat, 06/04/2022 - 06:58

I modified the plans for the planter box to make a holder for Pool Noodles. I made it 40" tall and used 4-4" fence pickets and 1-5.5" fence pickets. I used a 4" spacer and the openings worked out perfect. I stained inside and out since it would show with 2 coats of the solid stain. It is perfect! Thank you so much for the inspiration and plans!

Comments

Modern Patio Chairs/Love Sear

Submitted by Anonymous (not verified) on Sun, 09/25/2022 - 15:57

Super easy and fun project! We altered the original plans to build a loveseat and had zero issues. We did add some extra support below.
I did not find 25”x25” cushions within our price range so I settled for 25”x22.5” and they work but ultimately 25x25 works best.

Raised Wood Planters by Urban Wood Solutions

Planters build by Urban Wood Solutions

Comments

Simple Square Cedar Outdoor Dining Table

Submitted by Finns-Dad on Mon, 03/12/2012 - 17:58

I've been planning on building a patio table for this coming spring and summer, but didn't know where to begin. I found Ana's wonderful site and now I don't know where to stop! So many great ideas.
After seeing ewood's great table I decided to make one similar. I made my square table based on Ana's and ewood's basic designs. Thank you both. I also made a bench based on Ana's design.

Built from Plan(s)
Estimated Cost
300--475
Estimated Time Investment
Weekend Project (10-20 Hours)
Finish Used
Semigloss Spar Urethane
Recommended Skill Level
Beginner

Comments

7CsShepherds (not verified)

Thu, 03/29/2012 - 07:37

I have a family of 7 (soon to be 8, I hope), and was trying to figure out how to fit us all on the rectangular table. This is the solution! I can simply make 4 benches to go with it! Thanks for the idea and the picture!

Guest (not verified)

Mon, 04/09/2012 - 07:24

Love this table and your modifications to ewood's table. I was wondering what size are the legs on your table - I can't tell if they are 4x4s...which is sort of what I'd like to have on mine. And they are under mounted, which I love because I want to make ours with the ability to remove the legs for reduced storage space in the winter. If you could would you mind putting a few close up photos of how the outside corner came out and the underside of the corners. It would be much appreciated.

K_W (not verified)

Mon, 04/09/2012 - 07:27

Love this table and your modifications to ewood's table. I was wondering what size are the legs on your table - I can't tell if they are 4x4s...which is sort of what I'd like to have on mine. And they are under mounted, which I love because I want to make ours with the ability to remove the legs for reduced storage space in the winter. If you could would you mind putting a few close up photos of how the outside corner came out and the underside of the corners. It would be much appreciated.

In reply to by K_W (not verified)

Finns-Dad

Sat, 04/14/2012 - 13:35

Hi - sorry it took a little while to get back to you. Yes the legs are 4x4's. I used knotted cedar 4x4's for the legs and made them 29" tall. I wanted to be able to disassemble the table and put it away for winter, so I attached the legs using carriage bolts, 2 per side (4 total per leg). I drilled holes using a pilot bit, then used a spatter bit to make the larger holes for the carriage bolt.

I didn't bother to counter sink them, but if I made another I think I would try that to make a more polished look. The legs are sturdy, the table doesn't wobble at all, but I am sure that someone with more furniture building experience might have a different/better idea.

I've added a couple more photos showing the corners, outside and underneath. I've also added my very basic plans that I used to make the table, one of these days I will study Ana's post of how to use sketch-up, until then this is what I worked with.

Joni

Wed, 06/06/2012 - 09:26

Can you tell me what size (width) boards you used on the frame pieces of the table, and what size on the inner boards? From your diagrams, it looks like the frame is made of 1x4s, but the inner pieces look smaller. Thank you !!!

Your table is absolutely beautiful. It looks like a very high-end piece of furniture. One of my favorite things is how the carriage bolts are installed -- I wouldn't change a thing on them!

In reply to by Joni

Finns-Dad

Tue, 07/30/2013 - 16:36

Sorry it took so long to reply - I didn't see your post. So far the table is holding up well.

You're right, the top is made from 1x4's, including the inlaid slats. To support the top, I cut 1x4's down to 1x3's so they remain hidden by the side 1x4's of the frame.

Aussie Paul (not verified)

Tue, 10/16/2012 - 18:02

Love the table - looks absolutely fantastic! I have been looking for a decent square outdoor table for ages and this one certainly fits the bill.

Can you please add a photo of the underside of the table and advise how you fastened inner boards on table top. Thanks.

In reply to by Aussie Paul (not verified)

Finns-Dad

Tue, 07/30/2013 - 16:40

I added a new photo of the bottom. Hopefully this will help show how I attached the top. I have a number of additional photo's I can send to you if you like - this site limits the number of photos I can add.

Everything is attached from the bottom to hide the screws. I used a kreg jig and it helped so much - i really recommend it.

Belmo

Wed, 08/14/2013 - 12:35

I love the look of this table, man - I think I'm gonna steal some ideas from this.

I have a question about your top, though. The slats look to be 1x4s, which I can understand, but the edges seem to be a bigger size.

Did you use 1x6 boards for the edges? 1x8s? Something else?

Thanks for your help.

Finns-Dad

Mon, 09/02/2013 - 11:03

Thank you - please take any ideas from it that you can. That is what I love that about Ana's site. You can take these great ideas and make them fit your own style...

You're right - the table top is made of 1x4's and 1x6's. When i put the top together I made the frame first. Then I added the exterior 1x6's. Next I added the center 1x6. Lastly I cut each 1x4 to size and added them.

livingston.140

Sat, 05/17/2014 - 07:15

This is an amazing table, it is beautiful! I am somewhat new to wood working and was wondering if there was a material list? I plan on creating this in AutoCAD first, so I have a visual to work off of. Also what did you use for spacing in between the boards or what was the allowance of space.

Thanks again, your work is beautiful!

leitaf

Wed, 04/22/2020 - 20:37

In looking at the plans and the underside of the table, there are some measurements missing that make it a little hard to decipher. It would be good to know the lumber sizes e.g. 1x4x8 etc. the underneath side seems to have some additional boards that don’t seem to be in the drawing. I was just wondering if it might be possible to get some additional details?

@njhorseplayer

Sun, 05/24/2020 - 08:05

This is a beautiful table and I'm going to try and replicate in a rectangular version. Primary question I have is what length screws you used to affix the framing pieces underneath to the top side so that the wood doesn't split and that the screws don't pop thru the top. Any help you can provide would be appreciated, if even you still look at this page. Thanks in advance!

IKEA Hack 6" Tray Cabinet

Submitted by Matty3481 on Thu, 01/07/2016 - 16:30

I'm happy to share with everyone my IKEA hack 6" tray cabinet.

I found a 24" cabinet box in IKEA's As-Is section and took it home for half price ($23)!  I would have preferred plywood, but my table saw is a little small and cutting large sheets of plywood is a little scary.  When I deconstructed the cabinet, it sustained some damage (as its particleboard), so if you try this at home, be careful!  I ended up changing the depth to 22" in order to cut off the damaged piece, but that shouldnt be noticeable with average trays and cutting boards.  

I used Ana's 6" tray cabinet plan and modified the dimensions a little for my planned space.  It still needs the back, face frame and door (which will be a replacement drawer front from the cabinet manufacturer).  I plan on building the face frame at the time the cabinets are installed, since this will go in between the 36" corner easy-reach and the 36" sink base.  Once its done, I'll post updated pics!

Estimated Cost
$30 (cabinet and an aluminum straight edge tool to help me cut straight lines with my Dremel).
Estimated Time Investment
Afternoon Project (3-6 Hours)
Finish Used
Face frame will be painted to match factory cabinets
Recommended Skill Level
Intermediate

Sandbox with Benches

Submitted by cscottrun on Mon, 04/13/2015 - 10:33

We altered the original plan by enlarging the sandbox (approx 5' x 6') which made for wider benches that can comfortably seat an adult.  The benches and back rests are three boards deep instead of two.  We added 2x12 supports under the benches for additional support, as well as another 2x4 support in the middle of the backrest.

Built from Plan(s)
Estimated Time Investment
Day Project (6-9 Hours)
Finish Used
None
Recommended Skill Level
Beginner

Comments

Seasonal And Holiday
Back