Planter Porch Steps

Plan modified to be built on stringers due to hight.
Built from Plan(s)
Finish Used
Pending
Plan modified to be built on stringers due to hight.

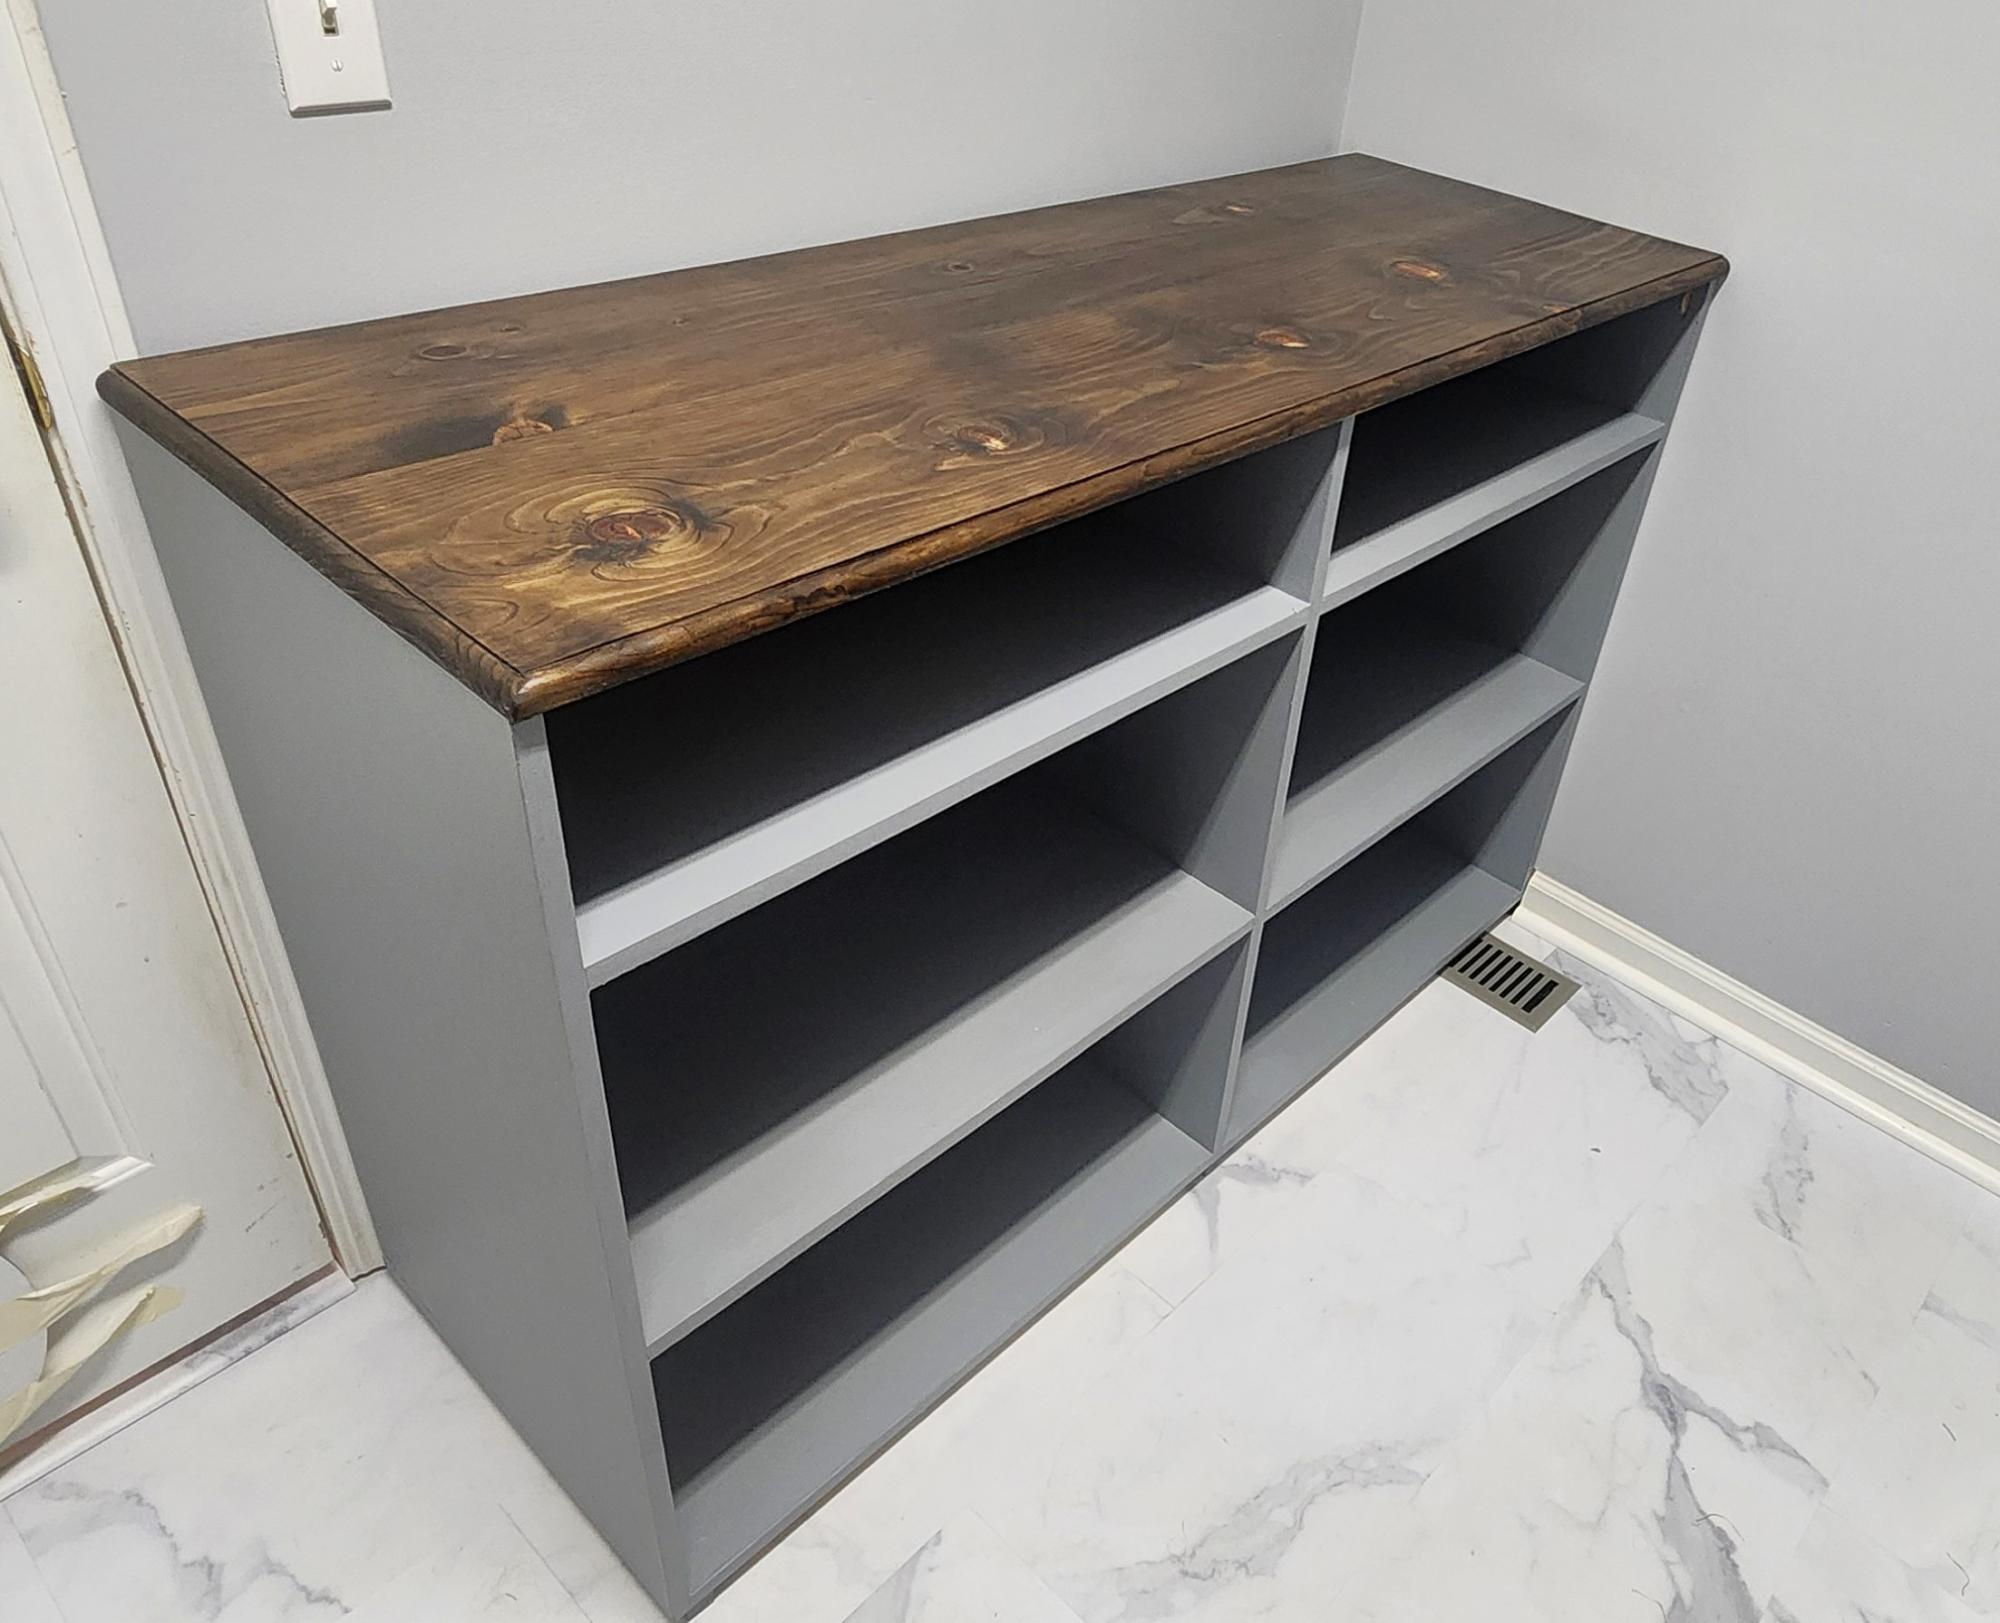
We had just moved into our new house and were using an end table for our TV stand I just didn't like it. I found this and modified it so it's shorter and fits in our room better. I also opted to not put doors on it and use it to display items instead. This was a relatively easy build and I'm learning new things with every build I make. It took about 2 days to complete not including filling holes/paint/stain. I love it, it looks so great in our room and I am planning on building end tables to match as well as replacing our buffet with movies in it to match also. Thanks for the easy-to-follow plans!


I’m a first year teacher of construction class at Waterloo High School in Illinois. We recently used your Small Cedar shed instructions with some modifications for a class project. It’s a bear getting cedar right now, so we used T1-11 for the outside and 2x4 for the frame.


Sat, 03/25/2023 - 09:14
Very fun and job well done! Thank you for sharing.
This was a modification to an Ana White design and another brag.
Designed on sketchup. It holds 4 laundry baskets sideways. Because I wanted it to be counter height I have a 6 inch shelf.
3/4 reconditioned plywood for the base assembled using Kreg pocket screws.
The top is a low cost pine 11.5 wide.
I jointed them using a 14 inch hand plane. First time for that. Cut the top to 22 inches wide.
Prestain conditioner. Minwax dark walnut stain and 6 coats of minwax poly wipe on.
Attached using Kreg screws.
Randy Eby


I had some left over wood from pallets and I really liked the look of the simple outdoor bench. One pallet was made out of some type of red colored wood and I decided the slats for the seat would look good in the red colored wood. The rest of the bench was from a lighter colored pallet. I used nails and glue to attach the seat slats so that my daughter could help. She loves to help, but does not like my drill even if she has hearing protection. See more at http://www.makeitlovely.com


I used 1 x 10s to make the bookcase a little shallower, and left the back open. Thanks for the great plan.


I had very little clearance on the long side of the shed, so I opted to put the door on the short side. Thanks for the plan, it was a great starting point for my project.
Tue, 09/10/2013 - 10:15
Thanks for posting! I plan to make this shed. Yours turned out beautiful!

Was my first project from Ana White's designs. I enjoyed making it, and plan on following up with the outdoor loveseat this spring.


I absolutely love this build. I did end up using pocket holes for the carts to make them slightly stronger. I also had to do custom work on the top of my table saw cart due to rack and pinion fence. I routed the the plywood tops with a slight round over and waxed them smooth. I plan to add a dust collection hood around the miter saw and then install an inset stop block for the miter fence.


Fri, 07/24/2020 - 16:08
Very nicely done! It never even crossed my mind that the cart would need modifications to fit that table saw. That's the exact same table saw I've had my eye on, and I plan on purchasing any day now; so that is definitely good to know! My project is still a work in progress. I currently only have one cart built.
Do you have enough room to adjust your miter saw to make 45 degree cuts from the position pictured? Or do you have to move it forward in order to clear the work bench frame? I only ask because that's what I have to do with mine at the moment. I have to have it all the way forward on the shelf. I am considering making the miter saw shelf a little bit wider to remedy that minor issue.

Sofa table


We are getting a puppy in a couple weeks and we want to crate train her. We have a small house so the only place we have to put the crate is in the living room. Needless to say, we needed a way to make the crate look good in our living room. That's when I found the plans for the rustic x-end table. The dimensions were almost the same as the dog crate. I only had to change the dimensions by a couple inches and wallah! Now the crate doesn't look out of place and I have a place to put my laptop and phone! I ended up ripping the 2x6's just a saw blade width down to get rid of the rounded edges and that made the top come together smoother. I also planed down the top a bit as well. In some spots, you can hardly tell they were 2x6's laminated together! I used two different stains on it. The first coat was a tudor stain but I wanted to warm it up a bit so I put a coat of antique walnut on it as well. I am very very happy with how this turned out. Now my husband would like me to build a coffee table to match!
Thu, 02/25/2016 - 08:59
This entire site is click bait. yet to see one actual plan. its like all stolen data from pinterist. which is equally as bad

My second build from Ana's toy box plan. I had my son use his CNC machine to carve boy's name into the front. Depth of the letters is about 0.25". Looks really good.


This was my first project building something from this site. I absolutely love it! We didnt add the X's because the miter saw was at my dad's house, which I was kind of sad about, but I think it still looks good. Not too bad for mine and my husbands first build!

When my wife and I moved we sold our old table and was in need of a new one. We've shopped around and didn't like anything we were seeing. She insisted that I build one but I never had any time due to my job. In the past it would've been easy because that's what I did was woodworking. So she researched and came across ana's plan and she loved it. Keeping the wife happy I made time. I made my material list & cutlist but was concerned with using construction grade lumber for the tabletop due to over time it likes to cup and warp in the right conditions. Instead I went with 8/4 Poplar which will make a solid tabletop and last forever. I was only able to work weekends on the project so it was finished in a month which I added the total hours & it equaled 1 week. She loves her new table and is now shopping for 5 canvas chairs to go with it. With her posting on social media I now have requests to build more. Where will I find the time?


The base of our playhouse felt like the perfect spot to use the sandbox plan with built-in seats. The bench seats actually fold flat to create a lid for the sandbox when it’s not in use. I followed Ana’s plans exactly and used the list of materials she provided. The only modification I made was eliminating the back supports. It was not necessary for me to add the back supports since we have the playhouse posts to support the back of the bench.


I built the above corner bench based off of the frameless drawer bench plans (they are on the shelf help site) which are very similar to the essential entryway bench plans, but the drawers are included. The long bench is 60", the shorter side 42".
For the carcass i did use the shelf help pre cut plywood.
When I started the project beginning of 2021, there was no tutorial for the corner part yet, so I was very glad to see I did the right way when the corner 'add on' came out, also found on the shelf help site).
The shaker fronts were shown in the barn door console plans, so I adopted that.
I get loads of compliments and obviously even more when people hear I built it myself.
The hardest part about this project were the drawer slides and getting them to line up and work as expected. The I broke the soft close on one of the big drawers during final assembly and still didn't bring myself to exchange the slide to a working one... 😊
But overall I'm really proud of it!
Tue, 10/05/2021 - 12:03
Thank you so much for trying out Shelf Help, what a grand project!
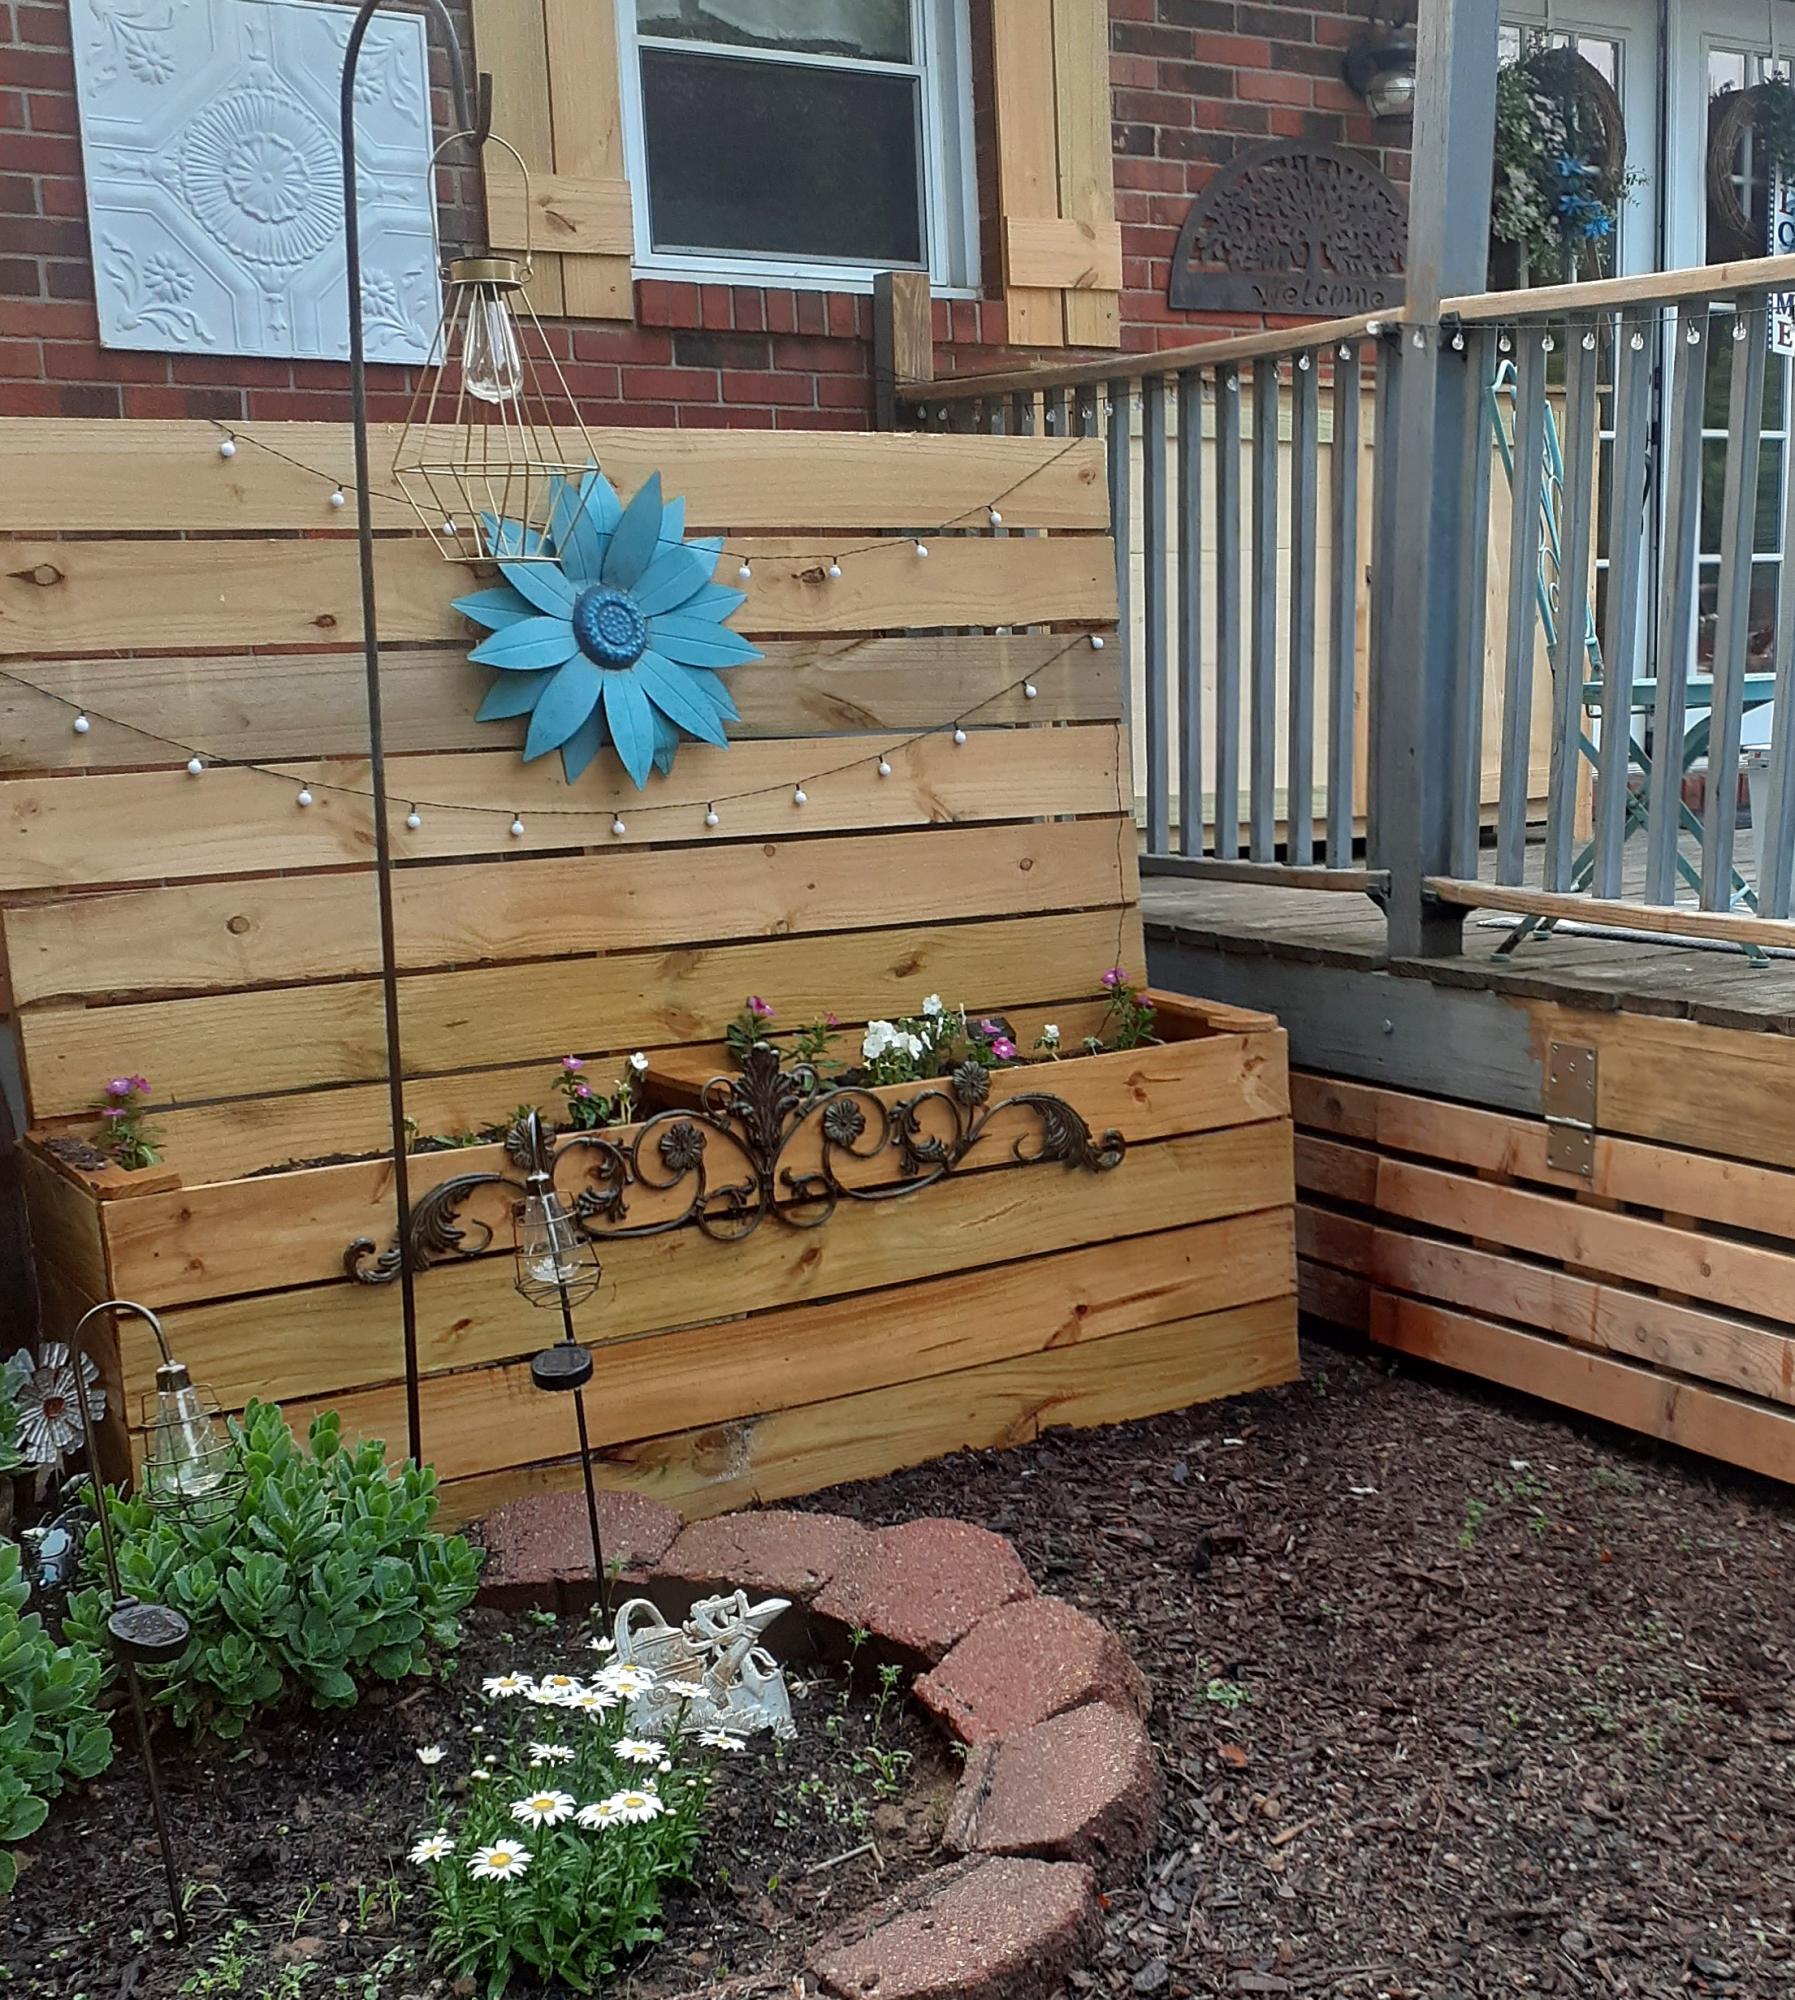
In the middle of a much needed makeover on our back deck! We did not have skirting around the deck and decided that we would like to close it in for extra storage(ladders,compost bin...) and we came up with this little something as a bonus. We are always hosting backyard get togethers and seating is a challenge. Setting up and putting away chairs,ugh. This has been the perfect solution. This was completely an "as we went" plan but the biggest need to know is, heavy duty hinges! (As I said,the deck is getting a makeover so go easy on the appearance:)
Jodi and Matt B.


With six people in our household, we were in desperate need of easily accessed storage for our off season clothes/gear. This ended up being a perfect solution. We customized shelf heights to fit the bins that we use for storage as well as made an area for our cat box (at the bottom right). It's such a relief to finally have everything tucked away but easy to get at when we need it.


THE MOTIVATION
After a recent washer outage (that I was ultimately able to repair myself), my wife and I talked about eventually replacing our front-loading washer/dryer set. One of the bullets I hate biting is paying the exhorbitant prices for the matching pedestals for new washer/dryer sets.
Having just bought a good set of cordless powertools, and having watched my father when I was a kid build countless household fixtures, window dressings, furniture pieces, etc., I decided to try my hand and construct a permanent platform for our current washer/dryer set, thereby eliminating the need to ever buy manufacturer pedestals again.
The existing pedestals were a standard 15" high, with a storage drawer, which we felt was still not high enough for comfort. And, the washer pedestal drawer was entirely inaccessibl due to the 2" walls on the washer drain pan, so its drawer was totally useless, wasted space.
And, lastly, we really wanted more space for clothes baskets full of laundry, which we generally stacked (full and haphazardly) on top of the machines.
THE CHALLENGES
The largest challenges were mainly logistics, and gravity. The washer/dryer would have to be unavailable for at least 2-3 days while they sat disconnected in the next room waiting for their new home. So I coordinated with the family so they'd know when they needed to have their laundry done, or tough it out until I was done.
There was no way to know for sure what the drain connection for the washer pan looked like until I got the washer out. So it was a small gamble that I'd be able to get the parts needed to extend the drain pipe up to the new platform right when I was ready for them. Fortunately, this was no issue at all.
The biggest challenge turned out to be toward the end when it came time to lift our 230-lb. washer onto the new platform. I seriously considered disassembling the washer to the point that I could remove its molded concrete counter-weights, but instead (and arguably stupidly) elected to use a large hydraulic car jack to raise the washer. This ultimately worked, but I have to STRONGLY ADVISE AGAINST trying this.
THE SPACE
Our laundry room is also the "mud room" between our kitchen and the garage. It is only large enough for the two machines, and the walk way between the two doors--in total, about 70.5" square. Building the platform from wall-to-wall made the most sense, and minimized framing by fastening edge framing directly to the wall studs.
THE PLAN
Pretty basic: 2x4's all around for the edge framing--back and sides fastened directly to the wall studs, and front 2x4 supported by two, notched 4x4 legs. 3/4" plywood for the subsurface, and 1/4" laminate faux-wood flooring on top (left over from reflooring, so it matches the floor below). Bore holes for the washer pan drain and the dryer vent. 1" quarter-round molding on the sides, and 5.5" face piece flush with the top of the molding across the front (spare lauan I had looks perfect). I also made a point of putting the machines on the platform before the face piece since it might have been in the way or damaged.
Anyone will tell you that it's best to at least sketch out what you want to do so you can minimize surprises, forgotten parts, etc. I, of course, did virtually none of that, and made several course changes and corrections along the way. For this project, I was lucky that I didn't need to backtrack at any point, and probably won't learn this lesson any time soon anyway. However, you SHOULD.
TAKE-AWAYS
The main mistake I made was while gathering the platform dimensions for cutting the plywood. It was only blind luck that kept me from having to do it more than once (and having to buy more than one 4x8 sheet). I know that it's actually very unlikely that two adjacent walls are perfectly square, so I made a point to measure the width between the walls at the back and at the front--and, sure enough, found a 1/8" difference--wider at the front. But when I measured and marked the plywood for cutting, I measured both distances from the precut edge, and then cut. By doing this, I inadvertently assumed that one of the back corners was perfectly square.
What I should have done was used a carpenter's square in each back corner to extend a square line from the back edge to the front, and then measured from the square lines to their respective side wall. This would have accounted for neither back corner being square.
Fortunately, my mistake wasn't big enough to keep the plywood from fitting, but it was very, VERY close.
GIDDY
I honestly couldn't be happier with the finished project (or more smug). We've raised the washer/dryer 9" higher than they were (24" off the floor), and we now have basket storage underneath all the way across. I placed two 24" plastic cabinets on top, which still leaves room for the detergent right over the soap inlet on the washer.
And, most importantly, I got to use every powertool I own. Kinda beats "the quick brown fox jumped over the lazy dog" thing, huh?


Fri, 04/17/2015 - 19:54
Thanks for sharing the ins and outs of your project! Looks great!

I modified the plans slightly to go taller so it could fit a standard propane tank. I also added a hinged lid based on an image I found on Pinterest that did something very similar. I still need to sand and stain it next weekend.
Like others, I had a little trouble keeping the fence planks from splitting when screwing them to the 2x2 legs, since there was about an 1/8” gap between. I tried to find some scrap to fill in the gap and didn’t overtighten the screws. The lid was made entirely of 1x3”.


Needed a new console that would match other living room furniture. We had inherited the electric fireplace and previously didn’t know what to do with it. I adjusted the plans slightly to fit it in and am happy with the results

Comments
Ana White Admin
Wed, 09/09/2020 - 11:42
Great application of this plan!
This worked out great! Thanks for sharing:)
VGuz
Fri, 07/07/2023 - 15:22
Do you have an illustration…
Do you have an illustration or instructions on the exact modifications you used for this project?