Community Brag Posts

Modern Adirondacks UK

Submitted by Anonymous (not verified) on Thu, 06/04/2020 - 11:16

Hi Ana

Just wanted to say thanks for the plans. Here's how ours came out!

Ben.

Estimated Cost
£50
Estimated Time Investment
An Hour or Two (0-2 Hours)
Finish Used
Tanalised pressure treated timber.
Recommended Skill Level
Intermediate

Small Upholstered Stool

We just purchased a rolling island to replace our old kitchen table. We wanted to make stools to fit under it properly at the right height. We used all recycled wood and it’s painted with and exterior black semi-gloss paint that I had on hand that I use for my outdoor barn quilts. I covered it with 1” foam, a layer of Dacron and some off white(to match our kitchen cupboards) heavy vinyl. We really like our new look❤️Thank you Ana for sharing all of your plans. We are going to be using more in the future. I just know it.

Mississippi Lakeside Creations.


Built from Plan(s)

Washer and Dryer Pedestal

Submitted by katie0910 on Mon, 07/30/2012 - 13:10

Our very first project! We absolutely love how it looks and that there's an easy way for our kids to sort their laundry. Can't wait to start more projects! You can see how we built it here http://addicted2diy.com/2014/01/14/diy-laundry-pedestal/

Estimated Cost
$125
Estimated Time Investment
Weekend Project (10-20 Hours)
Recommended Skill Level
Beginner

School Library Cart

Submitted by dmfinet on Sun, 05/25/2014 - 19:11

My 11 year old son made this library cart for our homeschool books. He followed Ana's plans with a few changes on dimensions. I love how it turned out, and it is a perfect addition to our school room. We kept the cost low by using some wood and paint that we already had.

Built from Plan(s)
Estimated Cost
$23.00
Estimated Time Investment
Day Project (6-9 Hours)
Recommended Skill Level
Beginner

Shared room

Submitted by kile529 on Fri, 08/26/2016 - 05:38

We have 3 (almost) teenage boys and needed the storage of the Brookstone bed for their sport gear, etc. I built 2 of them and my 15 year old built his. I can't get over how easy they were to build! This was the first building project I ever made and they turned out beautifully! The headboard took about 2 hours to build and the bed about 5 hours. I was pretty slow though, checking and double checking measurements, glueing and clamping like crazy, being careful not to rush. Still, 7 hours to make the bed and a couple hours to paint, not a bad days work! The lumber cost $144/each so we were happy with the cost of the beds. I would highly recommend furniture movers underneath them. I used 4 huge ones under the ends of the 2x2 supports and small squares under the legs/headboard. They move so easily with them! Thanks, Ana, for a great plan!! We are so thankful and love our new beds!!

Estimated Cost
$144 for lumber
Estimated Time Investment
Day Project (6-9 Hours)
Finish Used
Grey paint. Wanted a grayish stain but couldn't get the pine to take it the way I wanted it to.
Recommended Skill Level
Beginner

Comments

anita1977

Tue, 12/06/2016 - 07:56

I have 4 boys, but 3 are married and gone now and I bought my youngest a new bed last year, but I would have loved to have been able to make these for the older ones when they were growing up!  Great job to you and your son!

Toy Box

Submitted by Sgeisinger on Sun, 06/07/2020 - 08:16

This design turned out to be perfect! It was super simple and easy to build! Easy to follow plans! Great beginner project!

Estimated Cost
Around $40 in lumber
Estimated Time Investment
Day Project (6-9 Hours)
Finish Used
Varathane Premium Wood Stain in Red Mahogany
Recommended Skill Level
Beginner

Comments

Sewing Tables

Submitted by sgilly on Thu, 08/02/2012 - 12:58

I have a friend who makes beautiful quilts. She's been doing this by sitting on the floor to cut her fabric and plopping her sewing machine on a wobbly folding table. When she decided to turn her guest room into a dual purpose sewing/guest room she asked me to build her something that would fit into a niche under her dormer window.
The built in table has two large drawers for sewing notions and is supported at the back by a shelving unit with adjustable shelves. She plans to store items that she seldom uses here. They will be accessible, but out of the way and barely visible when she has guests using her room.
I suggested that I also build Anna's sewing table for small spaces so that she use that as a night stand when not in use as a cutting table.
I usually don't finish projects I build for others - I'm just not good at it! But, my friend asked me to put a finish on it. She picked out the Minwax polyshades product, and I have to tell you that it was a nightmare! (You can read about that here: http://thewidowsworkshop.blogspot.com/2012/06/lessons-learned-again.html)
I ended up using a stripping product to remove that finish. The final finish, just a stain and rub on poly, turned out beautifully!
Installation was also a challenge, but using brute force - and a hammer! - I was able to fit it between those very out-of-square walls!
She's happy, I'm happy to be done!

Estimated Cost
$150 for both
Estimated Time Investment
Weekend Project (10-20 Hours)
Finish Used
Originally, Minwax polyshades, had to strip that off. Then I used Minwax wood finish in Colonial Maple. I applied 3 coats. Then I used Minwax rub on poly in semi-gloss and applied 3 coats of that (following directions for dry time and sanding). I finished it off with a minwax polishing wax to give it a really nice smooth finish.
Recommended Skill Level
Beginner

Neighbors

Submitted by Pebcat on Tue, 05/27/2014 - 20:22

I found Ana's website in my search for the desk plans, and in the process found many other wonderful plans I want to try. My goal is to make a sawhorse desk for my new home office. I need to learn all proper woodworking skills, however.

Therefore, I decided to start with this birdhouse project, which was a joy for me since I have a fascination with photographing birdhouses wherever I go. I also have fond memories of making birdhouses with my mother when I was a little girl. She did all the cutting and nailing, and I sanded and painted.

This project brought back happy memories, and my mom got a kick out of seeing photos of the finished results.

In addition, today I had the wonderful opportunity to photograph my own birdhouses!

Estimated Cost
$3 per house for the wood
Estimated Time Investment
Afternoon Project (3-6 Hours)
Finish Used
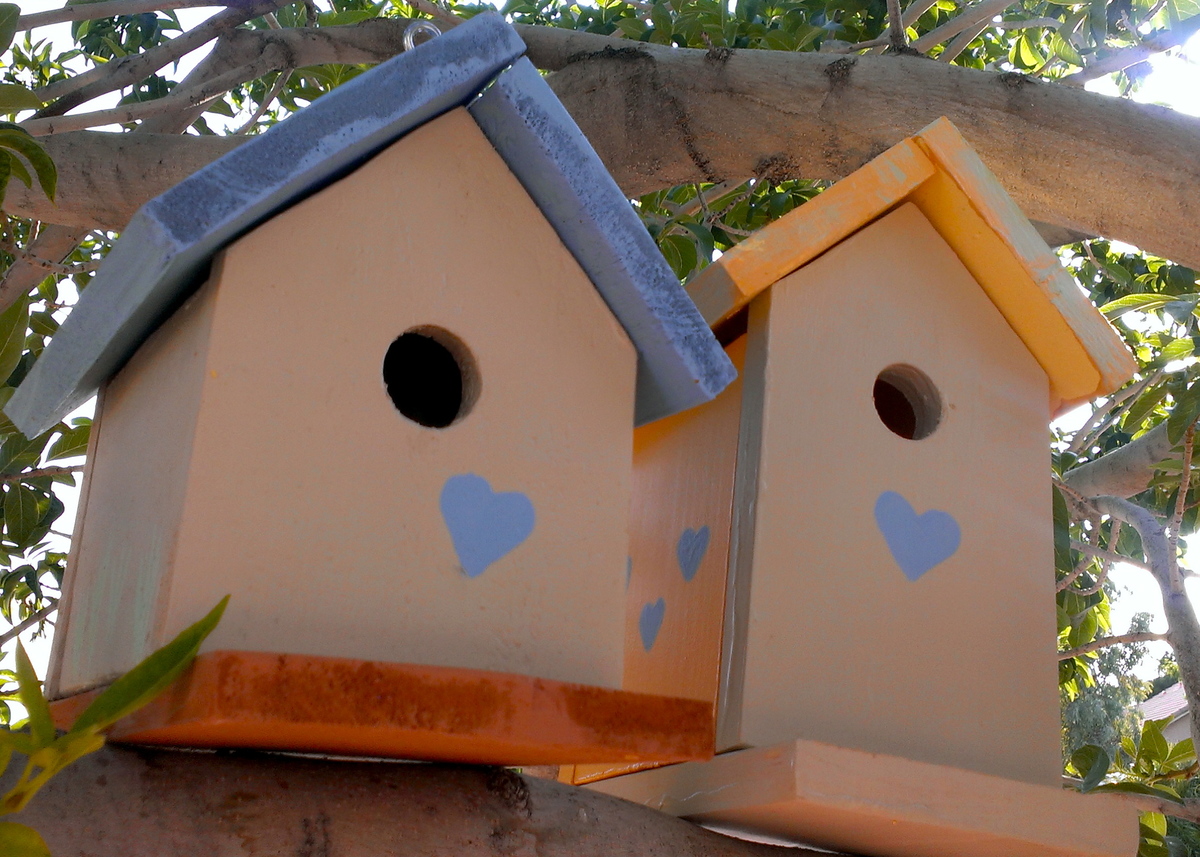
I used a combination of paint I had on-hand, all Valspar. Most of the paints were Valspar Ultra Paint & Primer.

Paint colors for the birdhouse on the left are called: Country Heather (blue), Bittersweet Stem (beige), brandywine (terracotta), and Pistachio Ice (green) for accents.

The colors of the house on the right also included Country Heather, Bittersweet Stem, and Pistachio Ice (again for accents). In addition, Buttered Hazelnut was used for the walls and roof.

I completed most of the painting prior to assembly, adding only accents such as hearts and windows post-assembly.
Recommended Skill Level
Starter Project

Surf Shack Bunk Bed (Using Club House Bed Plans)

Submitted by Anonymous (not verified) on Sun, 08/28/2016 - 21:39

We decided to follow the Club House bed plans, but we added another bunk below. We did this by adding a foot to the height and duplicating the slats and ends etc. My boys absolutely love this bed! We actually enjoyed building it. I can't wait to try more Ana White plans - they were so easy to follow and it's so satisfying having made something cool from scratch.

Built from Plan(s)
Estimated Cost
$200
Estimated Time Investment
Weekend Project (10-20 Hours)
Finish Used
One part water to two parts white paint
Recommended Skill Level
Intermediate

Coffee table with toy box trundle

This was my second project ever, so I know it is far from perfect, but I am so happy with it. It is super useful since I have 3 little kids that are so far the only grandchildren from both sides of the family and I have the impression that toys come to our house to reproduce.
I made a mistake on choosing the stain for the top, and had to adapt to what I wanted, but I kinda like the end result, although it is more formal than what I had wanted at first.
It is a gloss mission oak, from miniwax.
I built this without the Kreg, but I have bought one since, so my next project should be better!
The paint is Antique White from Glidden (DUO), distressed until my shoulders could not handle it anymore.
Building is so empowering, I am so happy I found this site! Thanks Ana for all the great work!

Estimated Cost
100
Estimated Time Investment
Weekend Project (10-20 Hours)
Finish Used
Miniwax Mission Oak Gloss Polyshade for top and inside the trundle.
Glidden Antique white and distressing with sandpaper and stain.
Recommended Skill Level
Beginner

Comments

Farmhouse Table

Submitted by normansm on Fri, 05/30/2014 - 07:17

This build was done with all pocket holes. I used some pre-made project boards for the top and joined them with pocket holes and glue. Also I used all pine for this project. The chairs are just old chairs from my previous table. Stained with special walnut and finished with semi-gloss poly and finishing wax. I rubbed and buffed the finish to get the nice shine. This project took a while because I decided to let the poly cure for about a week before finishing and placing in my dining area.

Estimated Time Investment
Weekend Project (10-20 Hours)
Finish Used
Minwax Special Walnut and Minwax Polyurethan (Both of them were Oil based)
Recommended Skill Level
Beginner

Adirondack Chairs

Here are some of the outdoor projects that I do to make extra money, Adirondack chairs...adult and kids sizes....patio tables....garden benches, used old pipes for the slats!!!

Estimated Cost
$15-$40
Estimated Time Investment
Afternoon Project (3-6 Hours)
Finish Used
Olympic Red Toner..with water repellent, good for seeing the wood grain!!!
Recommended Skill Level
Intermediate

Comments

6 cubby book case - nursery

This was my first project. It is for our nursery. Painted white to match the crib and dresser. So much fun. Plan was great and very easy to follow. Thanks to the other brag post which mentioned there was a missing cut for the box (bottom shelf). 28 3/4. I used countersink screws with a 1/2" countersink drill bit. I also used shelf pins to secure the shelf. With the paint I noticed the shelfs were very snug. I would probably take off 1/4" off the shelf size if I built it again. Can't wait for the next project! Thanks.

Built from Plan(s)
Estimated Cost
130
Estimated Time Investment
Day Project (6-9 Hours)
Finish Used
White paint. Eggshell finish.
Recommended Skill Level
Beginner

Spanish entry table

Submitted by Anonymous (not verified) on Sun, 09/04/2016 - 16:25

Built this entry table as a gift for my aunt. She has a beautiful Spanish style home, and I wanted to create a piece that looked as though it would have come from one of our California Spanish missions. I used the Honey Bear Lane staining technique. I used HD pine lumber and accented with metal straps from HD and clavos. This was a challenging but very fun project!

Estimated Time Investment
Week Long Project (20 Hours or More)
Finish Used
Honeybearlane.com technique- dark stain over white wash. Three coats of matte polyurethane varnish to seal.
Recommended Skill Level
Beginner

Potting Bench/Stand

Submitted by MikeO on Tue, 06/16/2020 - 09:58

Built this for my girlfriend's birthday present. Added a 1x4 backsplash and a 2x6 for the top shelf to give a little more shelf room instead of the 2x4 called for in the plan. Stained with Varathane "Vintage Aqua" color and then 3 coats of Helmsman Spar Urethane for outdoor durability. Set the whole thing on caster wheels (not pictured) so she can move around the deck as needed.

Built from Plan(s)
Estimated Time Investment
Afternoon Project (3-6 Hours)
Finish Used
Varathane Vintage Aqua
Helmsman Spar Urethane
Recommended Skill Level
Intermediate
Seasonal And Holiday
Back