Rocket Ship Bookcase
My son loves rocketships so this was a nobrainer. I made it a bit taller than the plans called for, it's about 6 1/2 feet tall. It should hold all of my son's books and then some!
I came across this plan and decided to make a chair for our patio from some wood that I happened to have in the garage. Well, people saw the chair and just had to have one. I've made 10 so far.
People passing on the street would see me working on them and stop to ask of they could order one!
Took a while biting think it came together well. Removed the top drawer so I could use it for the iPad. Then added the bottom shelf to hold the lap top.
This was my first project using designs from Ana White, and I am really pleased with how it's turned out. My son loves it! There were a few small errors but it was always going to be a learning curve and the good thing with wood is you can hide most errors. Using the pocket hole system was new to me, as it's not that big over here in the U.K but its a great system if joining wood. Also over here we tend to use different measurements and we pay a lot more for wood. I am looking forward to building more projects if the wife lets me ;)
Thu, 01/22/2015 - 19:41
Hello,
I am also a first timer and am just about to finish up the final coat of finish. I was wondering what you did to make the cushion on top? my girlfriend really wants to make a cushion for it but does no know where to start. Any tips or advice would be greatly appreciated! Your box looks amazing by the way. i like the lettters on the front.
Thanks
Alexander
Great project we did for a local customer. Super happy with the way it came out, and the contrast between the brown top and white base. Making the inset shelf a different color provided an additional later of difficulty, but the result is worth it.
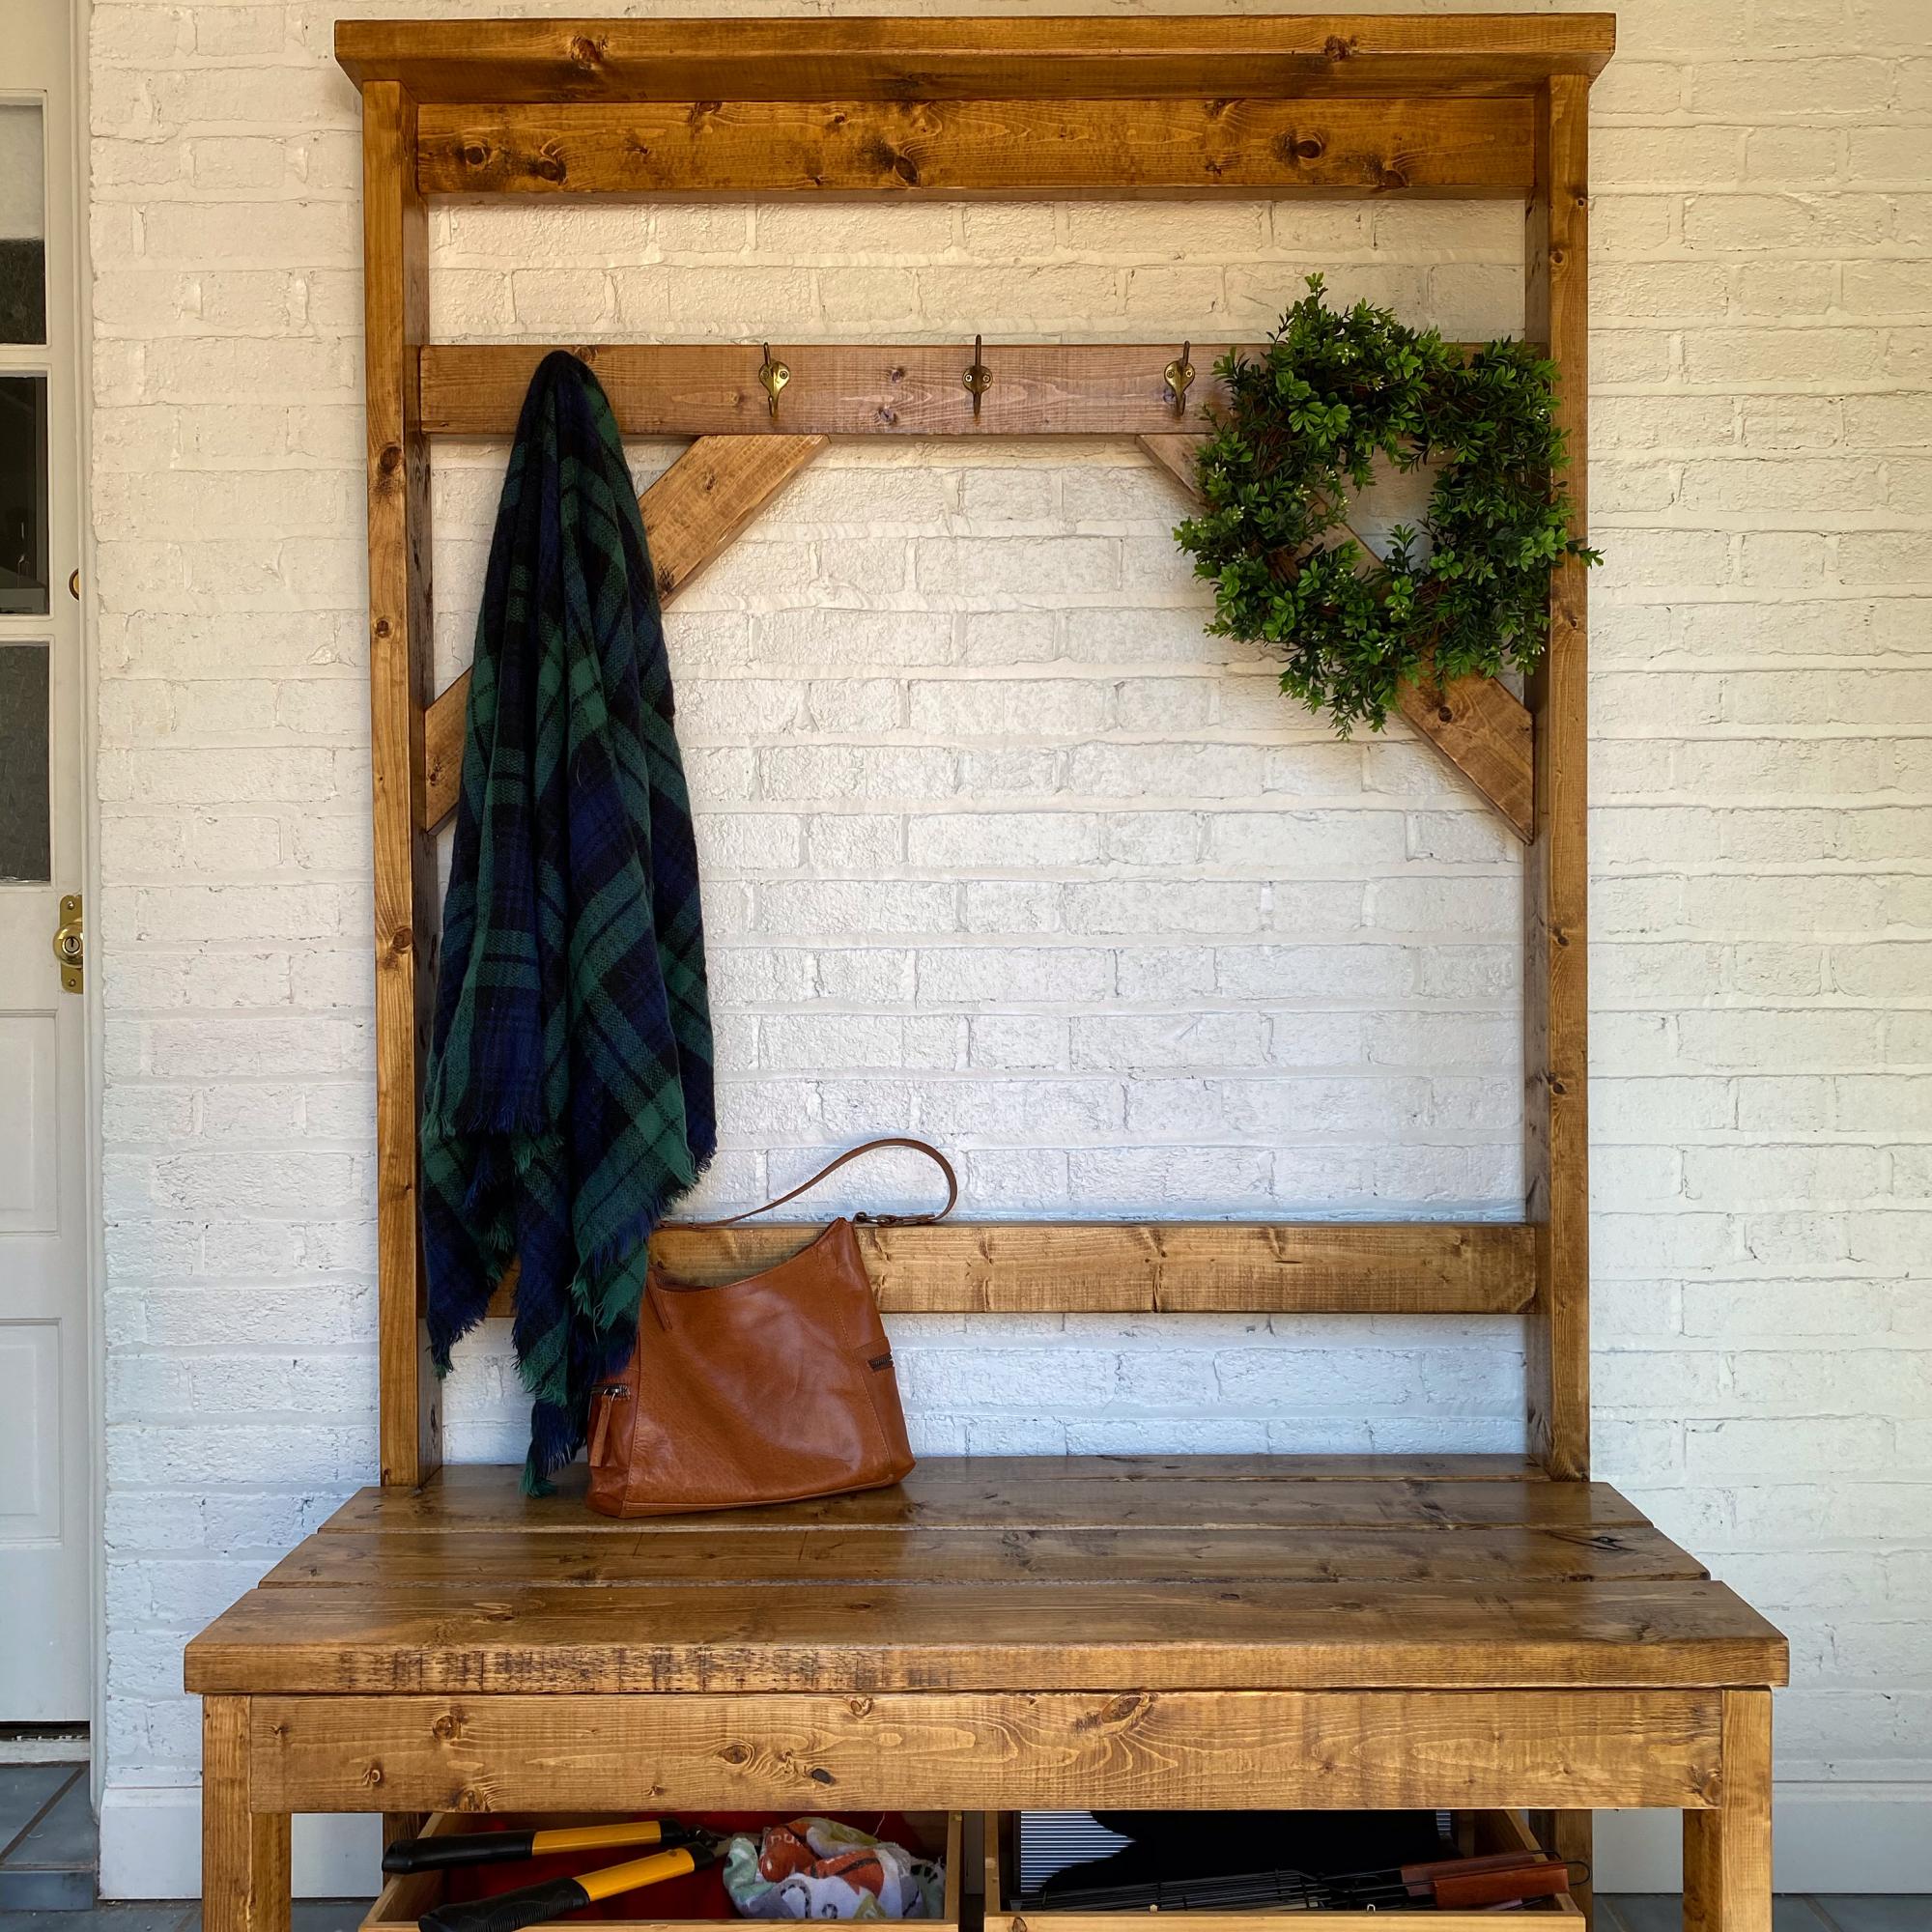
Our house has a big, beautiful front porch. The front door opens to our living room, which I’d like to think is warm and inviting. However, we rarely use our front door. Even when guests come to stay with us, we typically enter and exit out the back of the house. So, the first and last thing we see (and anyone else sees when they’re joining us) is the mudroom. The room isn’t unattractive when it’s bare, but in the past two years we have lived here it has become a holding room for shoes, dirty gardening tools, empty flowerpots, and grilling tools. While I do still want the space to store some things, I would like it to be less of a messy catchall.
To replace the storage furniture, I priced hall trees online. My favorites cost hundreds of dollars or more. Most of them are MDF, so set down one growler with some condensation — homebrewers’ wives, raise your hand if you feel me — and now the MDF has cracks and bubbles. Then I thought, can I make one?
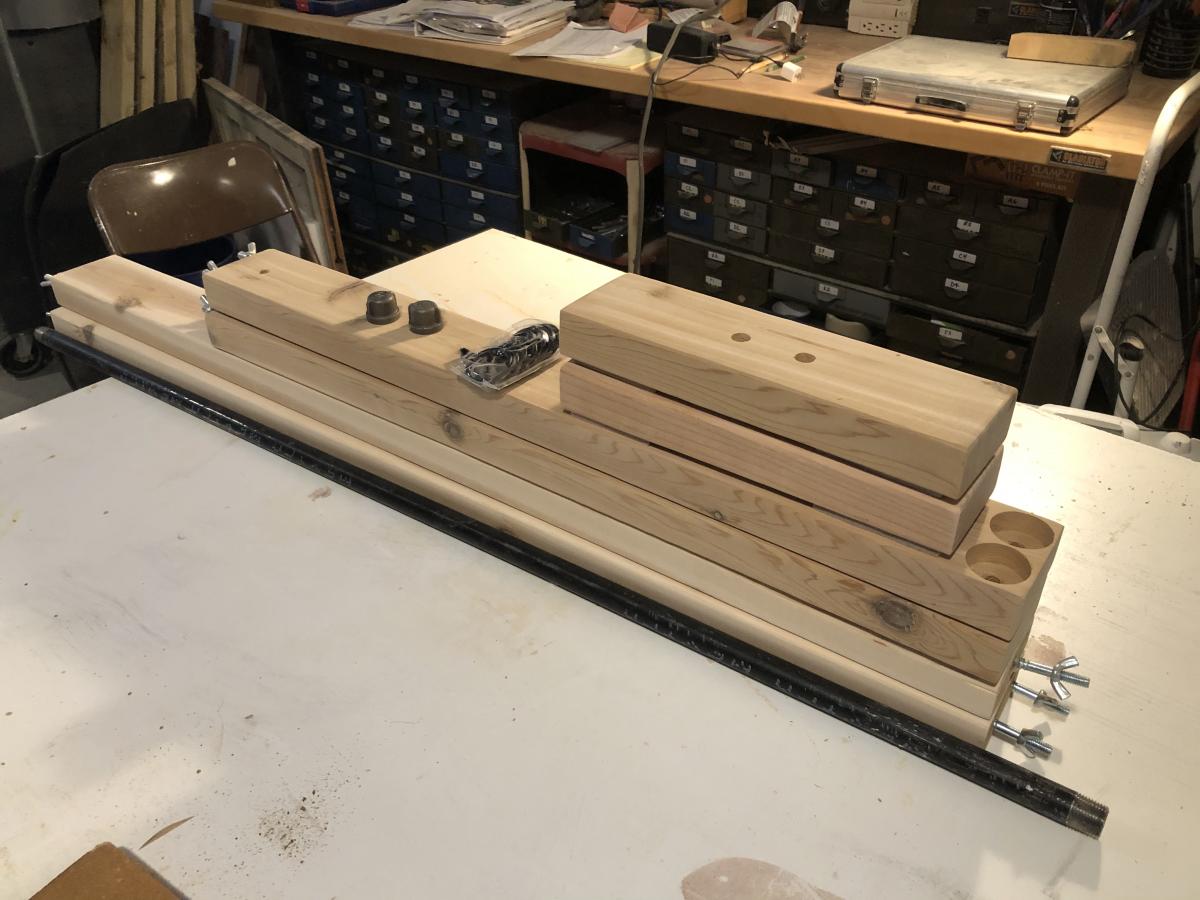
Spoiler alert: I made one with my husband using a plan by Ana White that uses six 2x4s and two 2x6s. It cost $90 in materials and equipment.
This was a bathroom remodel. We installed new windows new tub new sicks. Made a tub suround and tiled the whole bathroom with marble tile. Lots to watch for on projects like this. Yu need to watch for tile spacing and gettin everything square. Also watch your cuts. Get fast setting mud for yur walls the slower it sets harder it is to go up the wall. Crown molding watch your angles we used cheater blocks in tge corner one thts what the guy wanted and liked. The pillar is fasted into a rough joice and the bottom is also fastend same with to each ends of rhe wall. Then wrap with trim. Its a long process thtll test your patients but yull get it start small and then go big
As my husband and I were slowly piecing this shelf together, I began to worry if it was going to end up rather unattractive. Turns out I had no need to worry and the completed project was better than I had imagined! It's extremely sturdy and a good size (I actually brought down the width a notch). I painted the shelves and supports separately which turned out to be an excellent idea.
I followed the plans exactly except I made the legs 5 inches taller to allow more room on the bottom shelf. this was my first project with doors and drawers and my third big project after building a chicken coop and the Ana White triple pedestal table. I couldn't find 2x2s so I stripped 2x4s (the dimensions aren't exactly the same but close enough). Took me longer to build than it would most people because I'm not that experienced.
Thanks for the stocking stand plan! We have LOTS of people coming in for a Cozy COVID Christmas, and needed room for more stockings.
Made out of cedar. Substituted 4’ black pipe and drapery rings. And built it with hangar bolts and wing nuts so it can be easily broken down and stored between Christmases.
Based off of the Ana White design w/ pocket holes. This was really our first big project, so we made plenty of mistakes. Some lessons learned:
1. Pick non-warped wood to start with!
2. Clamps are pretty important to use when screwing into your kreg jig holes. It is REALLY hard to keep things flush without some strong clamps. Biggest lesson learned!
3. Always do your polyurethane coats in 60+ F temperatures. I did one coat when it was pretty cold, around 40 degrees. The liquid ended up beading and it was extremely hard to get out, eventually I just put many more coats on and called it a day.
4. Sand, sand, and sand some more!
This build is very rustic, but next time I think I could build a pretty perfect one. We're going to use this one, I like how rustic it is.
first project ever, made a few alterations to both plans and came up with this.
For our small 1960's Master bedroom, I needed more storage for under-the-bed totes. When we were all done, I made a bedskirt with the needed drop-length to hide all of the totes.
I made some for me but didn’t use cedar for the 1x2 and 1x2.5. This time I ripped the pickets for those and love how these came out. I may be making me some more in the future.
My husband built this bed for our son by combining 2 of the plans from here. The Loft bed and the Camp Loft Bed w/ stairs. We knew we wanted to build a loft bed for our son but liked the idea of the platform w/ stairs so it wouldn't block his window. We also wanted to incorporate a bookshelf for his growing collection of Legos to display as well as books, etc. The next project to add to this will be the desk for underneath. I'll add pictures when we build that. Instead of using 2 x 4's for the top rails of the bed, he improvised and created his own version of a panel for the top. I love how it turned out!
Mon, 06/10/2013 - 22:25
absolutely love this, just what I would like to have for my son! Thanks for the inspiration :-)
Mon, 07/01/2013 - 05:14
Just love this, I'm hoping to do something similar in a full size for my 9yr old daughter. She feels a bit sketchy with a ladder so the stairs will be better and I love using my Kreg jig so not having to piece together the supports sounds good to me!
This was the first table we built.
Wed, 11/26/2014 - 12:20
All for only $35!! Thats a good deal and nice work too! I love the two tone color!
I build these basically with leftovers from our new fence. The coffee table is 4x4 post legs with a 2x4 frame attached underneath. For stability, I used a 12" wide scrap of 3/4" plywood on the top before attaching fence pickets. Old tags were used on both sides and ends. The (two) end tables were 2x4 legs with 1x4 side trim pieces, but without the plywood stabilizer, and a single cut down picket for the top.
I ran out of time to stain or paint so it is all natural for now. I will get some stain in it come spring time and warmer weather. When it isn't holding Christmas stockings, it is a great place to hang dog towels. Thanks for another great plan Ana!
This bunk bed project was absolutely perfect for a small cottage bedroom for our son. We selected this plan when noticing that this could essentially be built as 4 flat sections and easily transported.
We were able to construct the bunk beds prior to owning the cottage and were then able to move in and bolt together.
Fri, 03/19/2021 - 01:12
The best way to shop on the internet and get one dealership to beat another’ price.main thing is only pay the cash no extra. I just only share the website which you find the best and also lowest price on a new car review toyota tundra
Made this over a few afternoons during the interesting year that is/was 2020! First DIY project and really enjoyed it! I used an opaque white stain and it's filled with succulents from our local nursery (Lincoln Nursery in Pasadena, CA). Painting took the longest as one coat of the stain still let some of the knots in the wood show through. Thanks so much for the plan and inspiration!
Comments
Ana White
Fri, 11/14/2014 - 13:42
The rocket tower! Love the
The rocket tower! Love the fun colors that you chose!