Community Brag Posts

seesaw

Submitted by gtg352j on Mon, 06/23/2014 - 19:35

This was our first foray into a built-it-yourself Anna White project, and WE DID IT!!!

(and you can see from the picture that it's structurally sound!)

It took a little longer than the 45 minutes in the plans, but was finished before the birthday party :-) Our kids ( 5 and 7) even had ownership in this project and enjoyed helping sand.

Only modification we made to the plans was to turn the seats 90 degrees to make a bit more of a seat so that our 2 year old could seesaw too.

Built from Plan(s)
Estimated Cost
$60
Estimated Time Investment
Day Project (6-9 Hours)
Finish Used
polyurethane
Recommended Skill Level
Beginner

Kimara's first build

Submitted by kimara on Thu, 08/30/2012 - 12:00

I had been looking for a small table for our small entry space. When I was searching, I was hoping to buy a table but couldn't find something I liked. I found this plan but it scared me because I had NEVER built anything. After researching on this site, I decided to jump in and try it. I made it much smaller to match our space. I added the shelf higher than recommended because I wanted to be able to use it as a homework spot when the kitchen table is covered by a project. I don't like the finish, but it will stay for a while because others like it.

Estimated Cost
30
Estimated Time Investment
Afternoon Project (3-6 Hours)
Finish Used
Cherry by Cabot
Recommended Skill Level
Starter Project

Comments

MzBarasha (not verified)

Sat, 10/06/2012 - 21:08

By chance did you have the cut measurements?

Mini Flat BookShelf

Submitted by kenmc on Thu, 06/26/2014 - 01:18

A mini flat shelf for my daughter. Initially sized to fit on the landing until I realized I had just built her a ladder to climb the banisters, so relocated it to the hall.

Width increased to 630mm between uprights to allow 3x A4 books side by side. Height is 830mm to fit initial planned location.

Painted with Annie Sloan Duck-Egg Blue distressed at the edges and waxed with Annie Sloan soft wax.

Built from Plan(s)
Estimated Cost
€20-€25
Estimated Time Investment
Day Project (6-9 Hours)
Finish Used
Annie Sloan Chalk Paint and wax
Recommended Skill Level
Starter Project

Little Boy's Version

Submitted by Anonymous (not verified) on Mon, 09/26/2016 - 11:23

Thank you for the great plans!  I modified it a bit to fit our needs.  I made the footboard identical with the headboard; added feet from Osbourne Wood and finials I found on Etsy.  To accomodate the feet, I made the vertical corner posts flush with the siderails and head/foot boards.

Estimated Time Investment
Weekend Project (10-20 Hours)
Recommended Skill Level
Intermediate

Comments

YellowKlondike

Mon, 09/26/2016 - 11:28

I forgot to mention that I went to Ikea and bought slats for their toddler bed to use as the mattress support for mine.  They were $9.99 discounted to $5.99 and it was a lot cheaper and easier to just use that as the support.

outdoor couch

So I love Restoration Hardware but think their prices are exploitative. I found a picture of a couch I really like from there. Turns out it was discontinued so I looked on Ebay and found cushions for it and I just tried to copy the picture as best I could. I considered trying to learn about bending wood for the arms but that would have significantly delayed the process so I just took a 2x6 and cut the curves with a band saw. It worked.

Estimated Cost
$60 not including cushions
Estimated Time Investment
Weekend Project (10-20 Hours)
Finish Used
white semi gloss
Recommended Skill Level
Intermediate

Comments

Sarah Jane

Thu, 05/16/2013 - 11:30

I love your variation!! It looks like a cross between the outdoor sofa and the Bristol? Could you tell us what size wood you used for the different components? I know 2x6 cut to shape for the front leg......but what about the seating area slats (1x3?) and the back rest slats (1x3?) and the back leg/backrest upright (2x4?) and the top of the back rest(2x4? with radius end) and the box for the seating area (2x4?) You did a truly amazing job!!!!!!! I would love to see more pictures if you have any showing your progress through the build! [email protected]

Michael J

Tue, 05/13/2014 - 12:51

I like the way you curved the front legs.
I am wondering how you curved the back legs/backrest?

Double Farmhouse Bed

Submitted by Anonymous (not verified) on Sun, 10/02/2016 - 06:34

This was my first Farmhouse bed!  I am totally in love with how it turned out!  These plans were very detailed and easy to follow.  I added some fancy trim like in the Mom's Fancy Farmhouse bed. I also changed the way I attached the side rails.  I used siderail supports from Lee Valley as I wanted to be able to dismantle the bed for easier moving if needed.

I am also thinking of adding a trundle to it.


Thank you so much Ana, for these wonderful plans.

I have made numerous items from your site and will continue to do so. 

Built from Plan(s)
Estimated Cost
150-200
Estimated Time Investment
Weekend Project (10-20 Hours)
Finish Used
Varathane Triple thick one coat stain-Expresso
Varathane Triple thick one coat clear finish.
Recommended Skill Level
Intermediate

Bench

Submitted by carlablock on Tue, 07/07/2020 - 10:10

Fun to make and so pretty!

Built from Plan(s)
Estimated Cost
30.00
Estimated Time Investment
Afternoon Project (3-6 Hours)
Recommended Skill Level
Beginner

Queen Farmhouse Guest Bed

Submitted by Anonymous (not verified) on Wed, 05/08/2024 - 09:33

Ana - built this Queen Farmhouse Bed from your plans and videos. Really a warm, guest room that I built inspired from your work and detailed plans — thanks again!

Chris K

Built from Plan(s)

Princess Castle Bed

Submitted by ajjasser on Mon, 09/03/2012 - 22:00

Thanks to Ana White and fsmumford, I was inspired to create a castle bed for my princess. It was a lot of hard work but it paid off seeing her going up the stairs and down the slide a million times the 1st day!

Estimated Cost
Around $500 painted
Estimated Time Investment
Week Long Project (20 Hours or More)
Recommended Skill Level
Intermediate

Comments

NicoleStruck

Mon, 01/11/2016 - 07:13

Have you found the plans yet for this bed? I would love to make this for my daughter's new room, but I can't seem to find them either :[

Joey Oc

Thu, 11/26/2015 - 15:49

Thanks  so  much  for  being  so  generous  with your plans. I just  had  my  first  granddaughter  and you've  given  me so many options  for  what  I can do for  her. The castle bed will be great  in a few years. Thank you.

Joshnewton

Fri, 06/17/2016 - 17:52

Is there any plans i can get you to send me? I am building my daughter a princess bed and would love to see your plans.


THanks for your help.


JOsh #struggling dad

DIY Playstand

My husband and I made this completely fabulous DIY playstand for my niece's birthday. It turned out fantastic. Ana's plans were straightforward and easy to follow. The most difficult part was making the buntings, but even those turned out fine. The only recommendations that I have beyond what is in Ana's post are use a good piece of plywood since it isn't easy to sand, and to put the extra velcro for holding back the theater curtains on the back. My cost is a little higher than the one on the original plans, but I also factored in the cost of the different fabrics, velcro, etc.

You can read more about it on my blog.

Built from Plan(s)
Estimated Cost
$100
Estimated Time Investment
Afternoon Project (3-6 Hours)
Finish Used
Cedar colored stain, chalkboard spray paint.
Recommended Skill Level
Starter Project

Comments

Play farmhouse table

Submitted by Anonymous (not verified) on Wed, 10/05/2016 - 10:47

My husband took care of cutting, drilling and putting together the table. I took care of sanding, staining and sealing. It was an easy project. Thank you for the plans, our kids love this table! 


Built from Plan(s)
Estimated Cost
100+ we had to buy tools we didn't have.
Estimated Time Investment
An Hour or Two (0-2 Hours)
Recommended Skill Level
Beginner

Girly Girl Doll Bed

This was a quick and easy project we made with all the scrap wood in the garage. It went together in a few hours, and made a great gift for one of my daughter's friends. It was so much cuter than any of the American Girl doll beds at the store, and WAY cheaper, too.

Estimated Time Investment
An Hour or Two (0-2 Hours)
Recommended Skill Level
Starter Project

Comments

First project: Kid's Ladder Bookshelf

Submitted by Ashcooper on Fri, 07/04/2014 - 13:10

This was our first family project. My husband has built a lot of things, but I've been so inspired I wanted to start building things too! Our two older kids were involved as much as possible (hence the very orange color) and we had a lot of fun. I definitely need some practice cutting straight lines haha, but practice makes perfect! My kids love to read and it is eye-catching as it is functional!

Built from Plan(s)
Estimated Cost
$50
Estimated Time Investment
Afternoon Project (3-6 Hours)
Finish Used
Primer and Flat paint
Recommended Skill Level
Starter Project

Hidden Desk

Submitted by Anonymous (not verified) on Sat, 10/08/2016 - 12:24

I shrunk the size and dumbed down the plans to fit my skill level.

Built from Plan(s)
Estimated Cost
175
Estimated Time Investment
Weekend Project (10-20 Hours)
Finish Used
Walnut
Recommended Skill Level
Intermediate

Comments

Texastia

Mon, 10/10/2016 - 09:08

I love what you did! It looks so great! I prefer this style, which is more simplistic than the other. Great work!!


Jessi_ites

Tue, 10/11/2016 - 14:56

Thanks! I wish I would of set up an account before I posted so I could get notifications.  I honestly didn't think anyone would notice it :)

Jessi_ites

Tue, 10/11/2016 - 14:58

I am so excited that people noticed this :)  Is there any way of putting this under my account?  I didnt make an account until today and I would like to get notifications.   I have my project on my facebook page and can prove that I made it with other pictures. Thanks!

crstorm

Mon, 01/20/2020 - 07:44

I would love to see this in a farm-house (rather than rustic) aesthetic along with drawers under the seats for extra storage. Maybe on casters with a fold up extension on the other side? So many ideas running through my head with this!

Toddler Picnic Table

Submitted by boneill on Thu, 07/09/2020 - 05:02

My son loves this table . Great size and super lightweight

Built from Plan(s)
Estimated Cost
$35.00
Estimated Time Investment
Day Project (6-9 Hours)
Finish Used
Satin white paint , top/benches custom color - special walnut stained then dry brush over with white paint for barnwood style type look
Recommended Skill Level
Beginner

Refinished Chifferobe

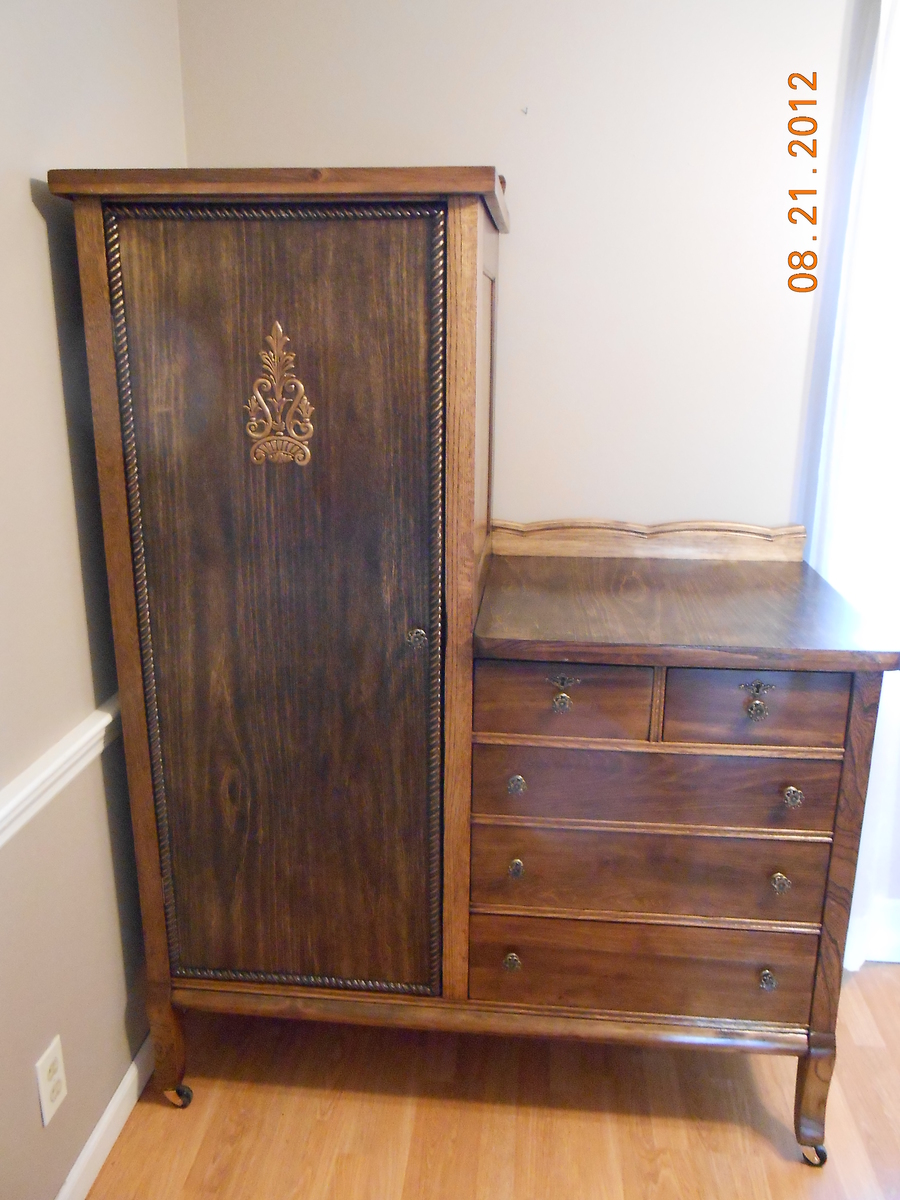
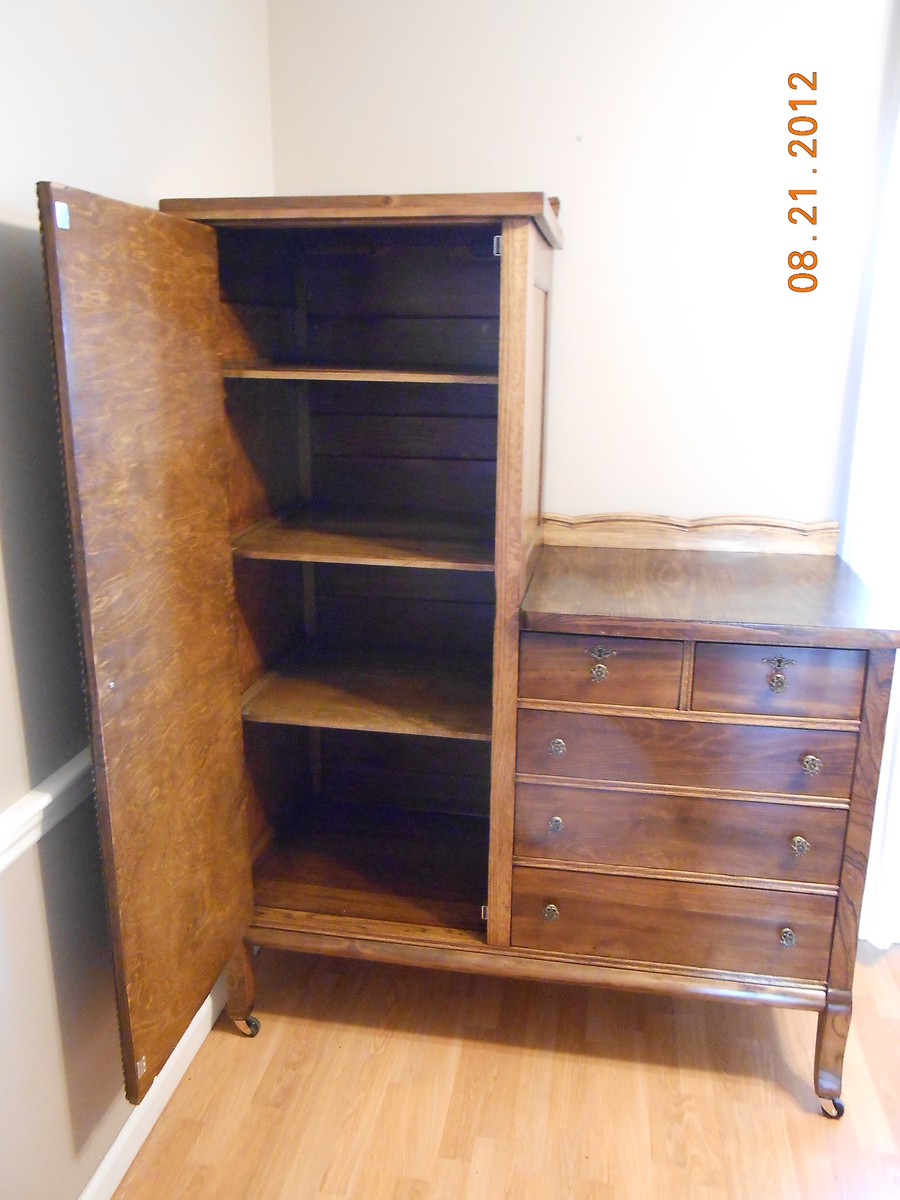
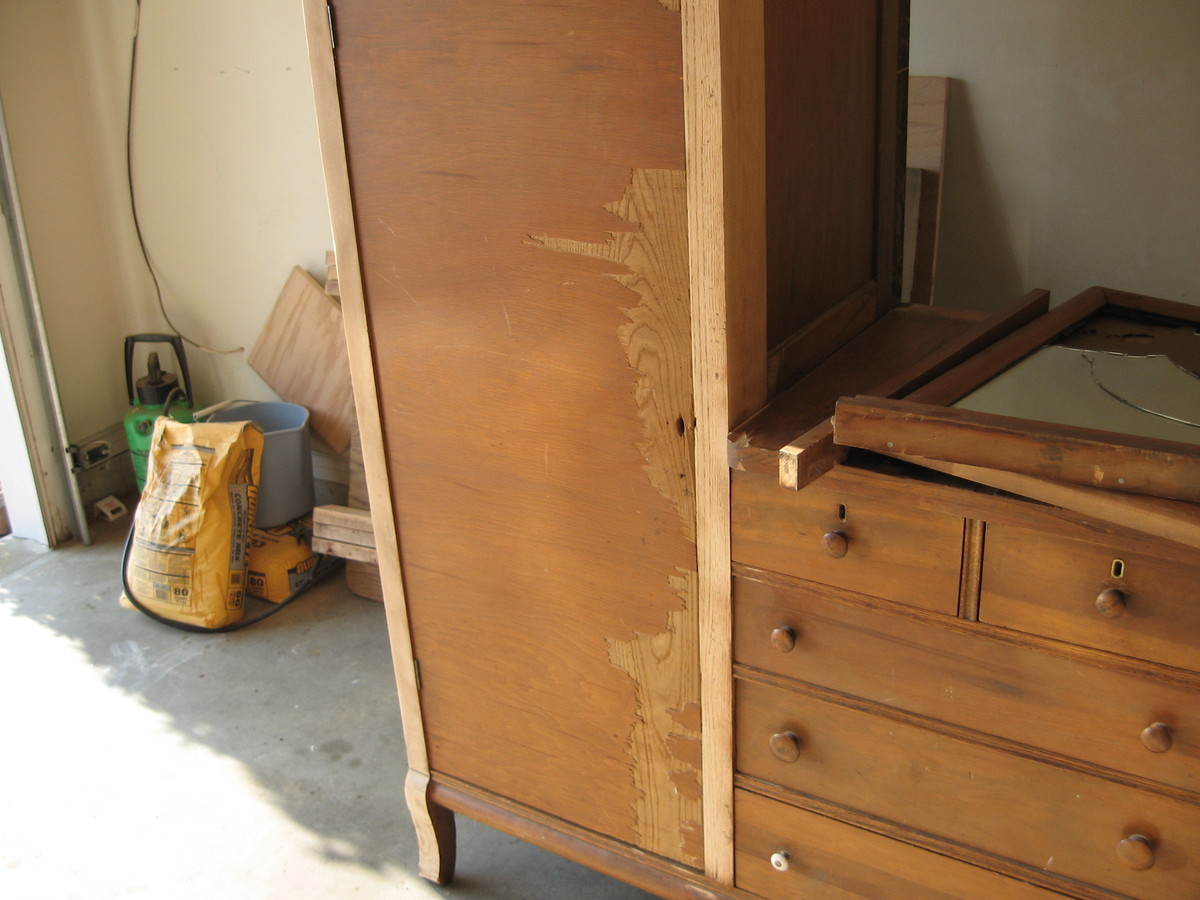
This is a poplar (yellow tulip) chifferobe I purchased off of Craigslist for $40. I included some before and after photos. It was in sad shape. Much of the veneer was broken or coming off. My wife wanted me to add shelves inside. I began stripping off the old finish using liquid stripped and by sanding. I removed the old veneer by using a very hot steam iron and a putty knife. I ordered up the new veneer from veneersupplies.com and new hardware from Kennedy Hardware.

I built the new shelves using 1/2" poplar. I then began putting on the new veneer. I used 22 mil. paperback veneer and contact cement. If you have never replaced veneer spend $10 and get a veneer cutter and another $10 and purchase a scraper. They make the job much easier.

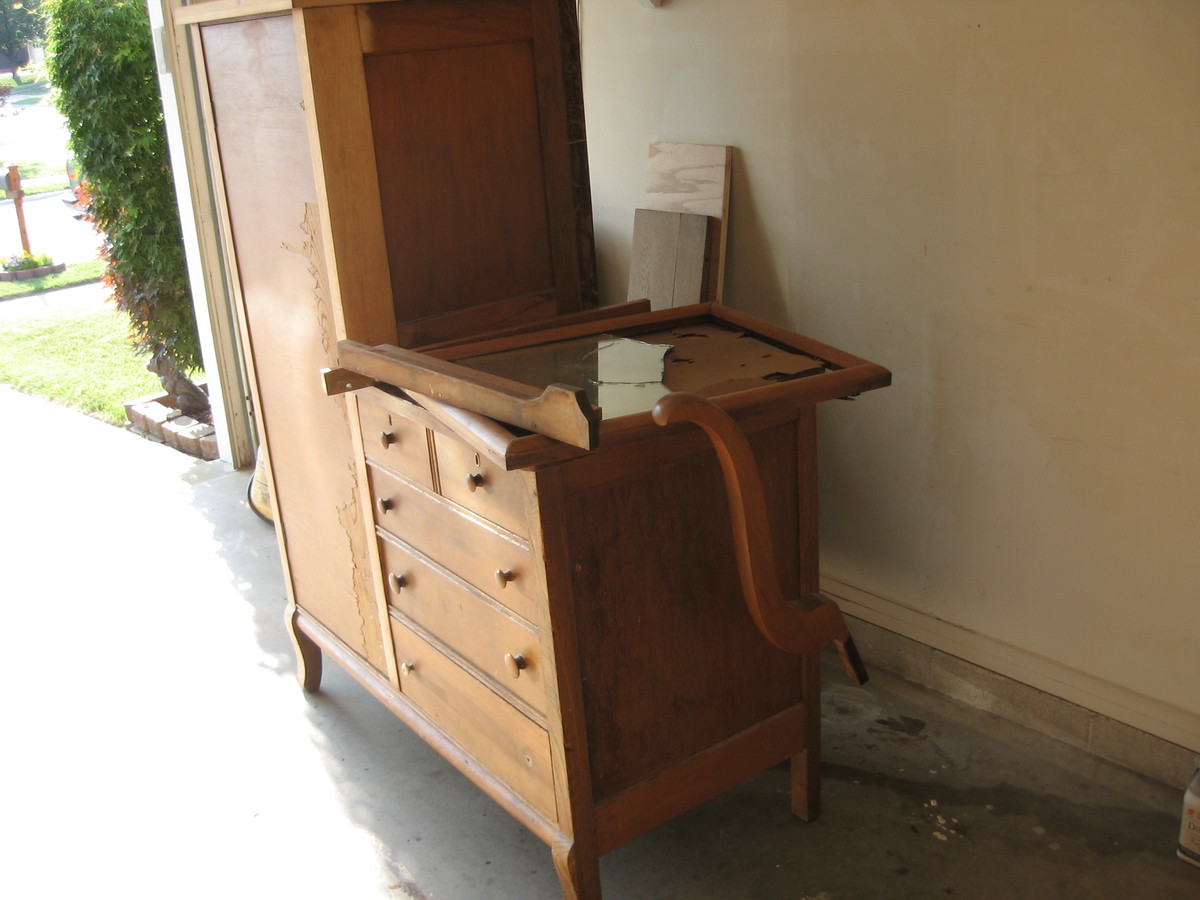
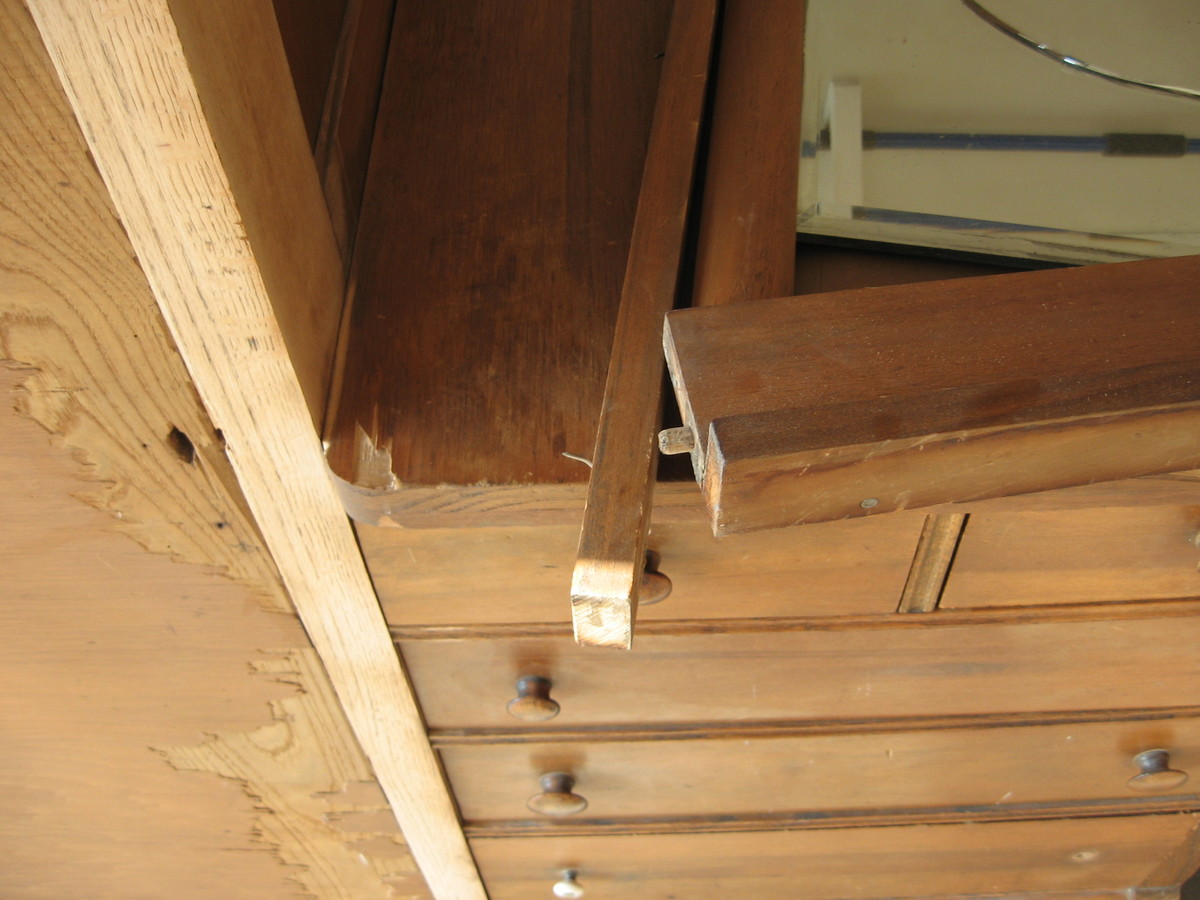
I then began applying the stain which is Minwax Aged Oak gel stain. I had a challenge with trying to match the stain. The old veneer was tough to match the stain with the new veneer. Father time adds his patina so I had to darken the stain. I used Minwax Jacobean stain. I think I got it too dark but since it is completed I like the contrast. I went ahead and purchased some 1/2" rope trim (poplar) and a poplar applique to add to the door. Since the mirror was broken I decided to go ahead and fabricate new back splashes for the chifferobe. I found these on Ebay. A gentleman had bought out these from an out of business pool table company. They are poplar and once I cut them down they really seemed to match. I will use the mirror frame for a later project to make a photo frame.

My wife and I had wanted to put this into our bedroom for extra storage. We didn't realize that we couldn't get it into the bedroom due to a narrow hallway. It ended up in the kitchen/dining room as a buffet. The funny thing was that it looks like it belongs there now.

The whole project cost me around $150 and took approximately 40 hours to complete.

Estimated Cost
$150
Estimated Time Investment
Week Long Project (20 Hours or More)
Finish Used
2-3 coats of Minwax aged oak gel stain. I used 2 coats of a mix of the aged oak and Minwax Jacobean liquid stain for the new veneer. I think I mixed it too dark.

I applied the stain with a brush. I wiped it down after 10-15 minutes using a cotton rag. I applied 3-5 coats of Minwax fast drying polyurethane and sanded with 320 grit sandpaper between coats.

When replacing veneer on parts of a project, remember that new veneer will stain differently than antique veneer. I have used a product called wood-ager in the past and it helps somewhat in matching color but it seems to cause air bubbles in the veneer. Those can be taken out with a hot, dry iron.
Recommended Skill Level
Intermediate

Three birdhouses

Submitted by Maribel on Mon, 07/07/2014 - 08:15

Our first plan from Ana White. It was really easy to follow and this was a fun project to do with the children. We used pine wood because it was cheaper than cedar, so we will try to not put them directly under the rain.

We were able to make two birdhouses in removing .25 inch in one birdhouse. We used wood we already had for the third one.

We let the children added some details to the birdhouses. Because of the birds we want to attract here, one hole is 1.25 inch and the other two are 1.5 inch.

Estimated Cost
$1.50 per birdhouse for wood
Estimated Time Investment
Afternoon Project (3-6 Hours)
Finish Used
The children applied acrylic paint and we will add varnish before to put them outside.
Recommended Skill Level
Beginner

Farmhouse Bar Table

Submitted by Anonymous (not verified) on Tue, 10/11/2016 - 18:18

I made several changes to the original Ana White plan. I wanted to build a bar height table for my husband's man cave. I left the length at 5ft long, but instead of dinner table height, I raised it to be a bar top. It perfectly accomodates typical bar height stools, as seen in the picture. 


www.withlovefromgablog.blogspot.com

Estimated Cost
$100
Estimated Time Investment
Day Project (6-9 Hours)
Recommended Skill Level
Beginner

Rustic X Desk

Submitted by Anonymous (not verified) on Fri, 07/10/2020 - 18:14

The only modification was I used 1x8's instead of the 1x10's on the plan and I also routered the edge of the top, first time attempting this.

Built from Plan(s)
Estimated Cost
$70
Estimated Time Investment
Day Project (6-9 Hours)
Finish Used
Minwax black stain and white paint
Recommended Skill Level
Intermediate
Back