
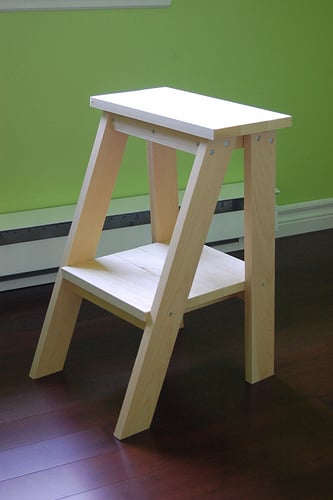

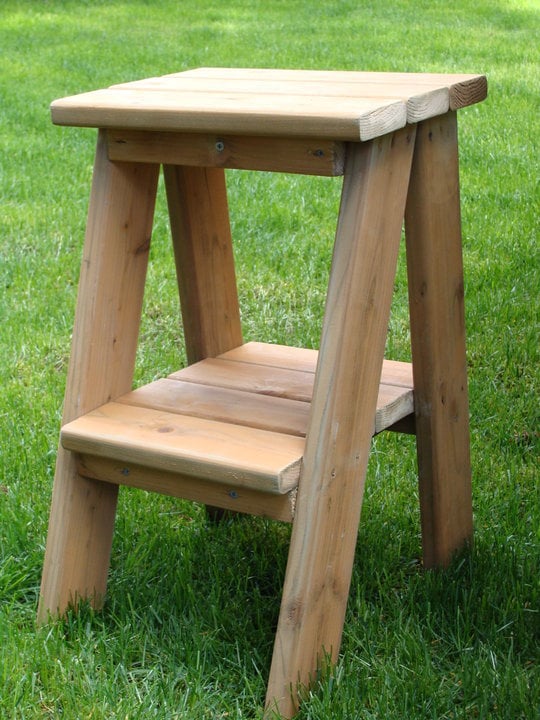
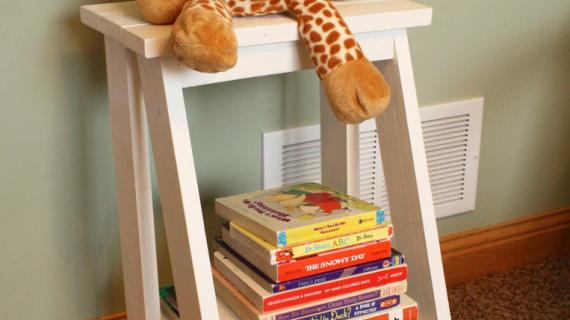
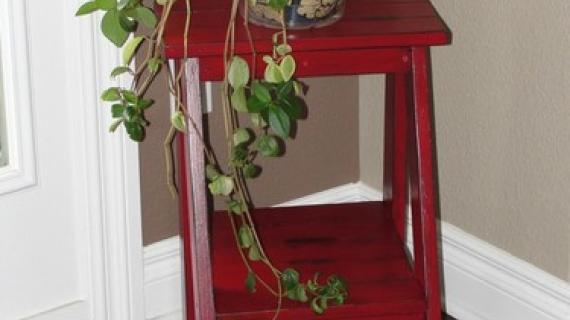
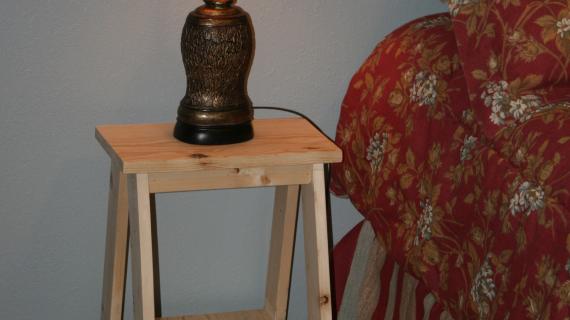
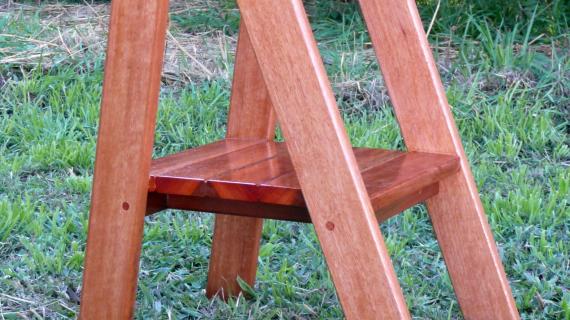
A simple table reminicent of a small painter's ladder can work as a bedside table or a side table. This is a great project to use up your scraps.
Preparation
2 – 1×3 Boards
1 – 1×2 Boards
2″ Screws
1 1/4″ Screws
Wood Glue
Wood Filler
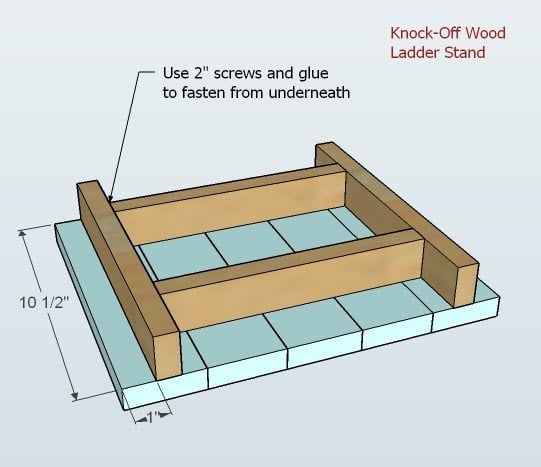
4 – 1×2 @ 10 1/2″ (Top and Bottom Shelf Supports)
3 – 1×2 @ 5″ (Top Shelf Supports)
2 – 1×2 @ 9″ (Bottom Shelf Supports)
3 – 1×3 @ 14″ (Top Shelf Boards)
5 – 1×3 @ 10 1/2″ (Bottom Shelf Boards)
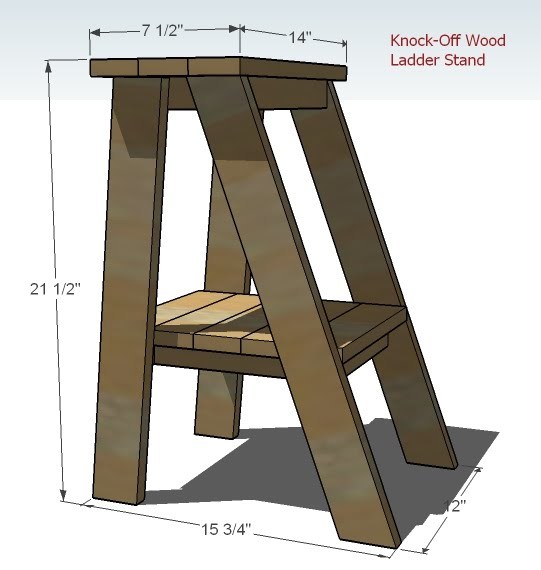
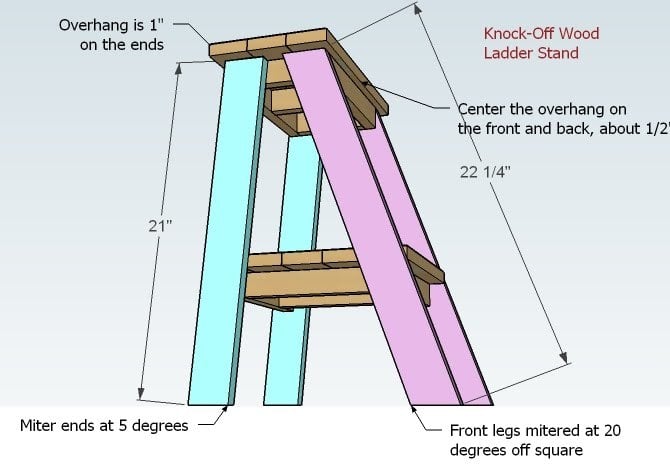
2 – 1×3 @ 21″ (Back Legs, ends cut at 5 degrees off square, end parallel)
2 – 1×3 @ 22 1/4″ (Front Legs, ends cut at 20 degrees off square, ends parrallel)


Work on a clean level surface
Take a square after each step
Use wood glue
Countersink all screws with a countersink bit (or use Pocket Hole Technology)
Be safe, use necessary safety equipment
Remember that you can click images for a larger view
Instructions
Step 1
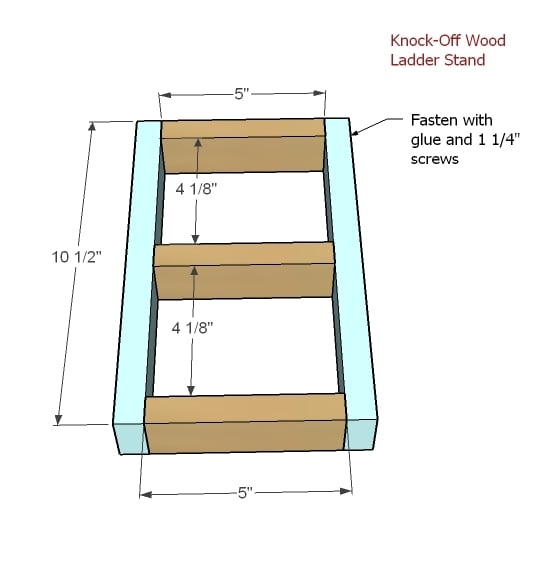
Build the top shelf supports as shown above using the 1×2 @ 10 1/2″ and the 1×2 @ 5″. Screw together using 2″ screws and glue.
Step 2
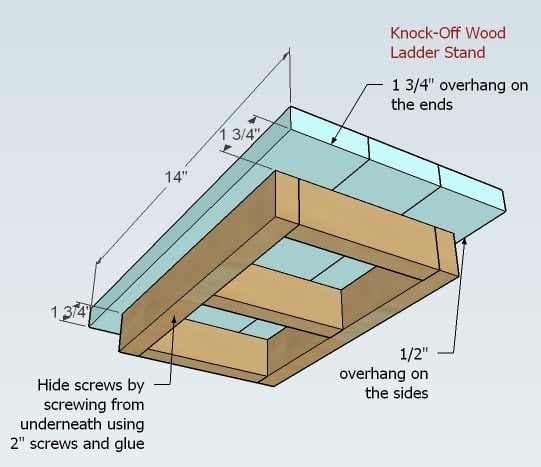
Using the 1×3 boards 14″ long, fasten through the supports into the underside of the shelf boards as shown above. Use 2″ screws and glue.
Step 3

Just like the top shelf, put the bottom shelf support together as shown above. Use glue and 2″ screws.
Step 4
As you did the top shelf, screw thought the supports into the underside of the shelf boards using 2″ screws and glue. Use the diagram above to guide you.
Step 5


Comments
Okay (not verified)
Wed, 04/28/2010 - 22:49
Another great project Thanks
Another great project Thanks Ana.
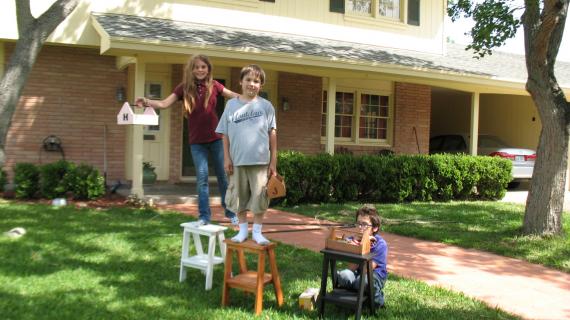
if it is possible, i would also love to see kid two Step Stool plan.
~Sha~ (not verified)
Wed, 04/28/2010 - 23:59
Nice, I was thinking of
Nice, I was thinking of making a couple stools for the workshop, and may try to modify this one for the height requirements! Perfect! I am seeing bright red!
Diana (not verified)
Thu, 04/29/2010 - 02:29
Definatly my next project, I
Definatly my next project, I might even have to work on this one today! I really need a side table/plant stand for my front porch and I cringe every time I see the $30-40 price tag on a tiny little folding end table at the big box store!
rach (not verified)
Thu, 04/29/2010 - 03:26
I love this idea--simple, but
I love this idea--simple, but cute! I would also love to see the larger-version ladder shelf that PB sells.
Chris (not verified)
Thu, 04/29/2010 - 04:00
Love it! I have added this to
Love it! I have added this to our "to make" list. We will make 2 for our boys room and I am thinking of painting them blue. :) Thanks so much!
Betsy (not verified)
Thu, 04/29/2010 - 04:02
Great plan! I could so see
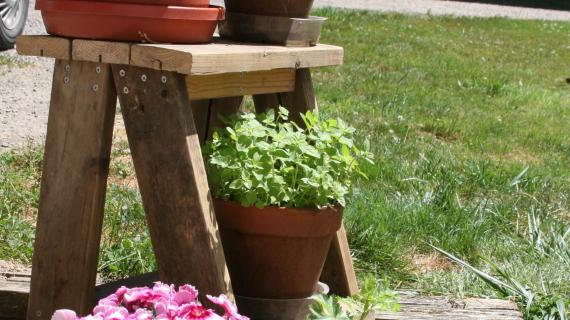
Great plan! I could so see this on the front porch, with some plants on it.
How long do the initial boards need to be?
Faith (not verified)
Thu, 04/29/2010 - 04:15
Thanks Ana! I'm going to try
Thanks Ana! I'm going to try to makle a couple of these for my mom for Mother's Day. They will look great on her patio. Got any plans to make plans for a glider or adirondak chairs? Those ould be great for my mom too!
Melissa (not verified)
Thu, 04/29/2010 - 05:23
A *PERFECT* plan for a
A *PERFECT* plan for a help-mommy-cook stool. Question - Besides the fact that it would be really over-built, is there any reason I can't make the whole thing out of 1x3s? I've got tons left over from the Reclaimed Wood Headboard.
Ana White (not verified)
Thu, 04/29/2010 - 06:54
Thanks everyone, there is no
Thanks everyone, there is no reason, Melissa, you couldn't use up your 1x3s. But just remember a 1x2 is like $1.
amanda (not verified)
Thu, 04/29/2010 - 12:08
Love it! My husband is good
Love it! My husband is good at puzzles, and I'm less than 5'3", so this may need to be bumped up in our "must build" list ;)
Jannah (not verified)
Thu, 04/29/2010 - 13:16
I did mine a little different
I did mine a little different than the plans since I used treated wood I used a 2x2 and a 1x4, even with the different wood I followed the plans and it worked great. My kids are loving stepping up to the trampoline without my help.
Steph (not verified)
Tue, 05/04/2010 - 07:39
Hi there!I was thinking of
Hi there!
I was thinking of making one of these as a nightstand. What is the average cost of making this (just the materials needed to build, not the tools)?
Thanks!
Kellye (not verified)
Wed, 05/05/2010 - 02:49
I love this and it's going to
I love this and it's going to be the perfect Mother's Day gift for my Mom. I've already built it and it has one coat of paint! RED! Can't wait to show you!
Heidi (not verified)
Thu, 05/06/2010 - 01:59
I just finished mine last
I just finished mine last night, its a gift for a dear friend today! I'll let her paint it herself.
Anyway, it only took me about 15 minutes to cut all the pieces, and an evening to put it together!
Thank you!!!
M Roselius (not verified)
Sun, 05/16/2010 - 13:36
Just built this over an
Just built this over an afternoon. Great project - smaller than it looks in the pictures. Maybe it was the screws I used - but initially I had a lot of trouble with the wood splitting as I screwed it together. pre-drilling the holes helped.
Vester (not verified)
Wed, 08/25/2010 - 16:50
Mm-m-m-m I might like to
Mm-m-m-m I might like to build one of these.
You can see the Adirondak chairs and birdhouses I build at http://www.myadirondakchair/com
jcostigl (not verified)
Wed, 09/22/2010 - 10:10
Thanks again Ana for great
Thanks again Ana for great plans. I have to say that I did not miter the back legs and my font legs ended up being 19" in length but the ladder still works! I really love your plans, you've given me a whole new hobby. Here's the link to my pics:
http://thatsmyletter.blogspot.com/2010/09/s-is-for-step-stool.html
Beautifully FR… (not verified)
Thu, 12/09/2010 - 10:33
[...] and mostly square,
[...] and mostly square, thanks to a little help from my husband, we made these boxes and this nightstand/bookshelf, for Avalon’s [...]
Tasha (not verified)
Tue, 02/08/2011 - 12:13
Thanks so much for these
Thanks so much for these plans!! I built in the afternoon using scrap wood I already had!!
http://eightmuddyfeet.blogspot.com/2011/02/kitchen-stool.html
Tasha (not verified)
Tue, 02/08/2011 - 12:13
Thanks so much for these
Thanks so much for these plans!! I built in an afternoon using scrap wood I already had!!
http://eightmuddyfeet.blogspot.com/2011/02/kitchen-stool.html
Evandro
Wed, 08/03/2011 - 16:49
I have a question: what is
I have a question: what is the standard length of these boards? Here in Brazil there is no standard length :/
Ali (not verified)
Tue, 10/18/2011 - 10:26
I just got done making 2
I just got done making 2 nightstands. Thank you so much for the great plans. Here is my blog to see the finished project.
http://alidawnscrafts.blogspot.com/2011/10/nightstands.html
stcurry
Wed, 06/13/2012 - 07:46
Make it folding
I made one of these and I love it. My mother in law would like to have one that folds up.
I would love any ideas on an easy way to do that
wimsy (not verified)
Thu, 06/21/2012 - 05:31
Don't use as a step stool
I love this as a TABLE, but some of the comments say they plan to use it as a step stool. It's not safe to stand on, except perhaps by small children. Look at a "real" wooden step ladder to see how it's made if you plan to use it that way. Have fun making this, but be safe if you plan to stand on it!
Jenna D (not verified)
Sat, 12/29/2012 - 14:59
Unsafe to stand on?
Hey Ana—this is the perfect stool for my kitchen but I wanted to get your thoughts about how much weight it can hold. It wouldn't be used for more than a few seconds to grab something, and no more than 110lbs. Do you think it's safe?
In reply to Unsafe to stand on? by Jenna D (not verified)
Jake
Sat, 12/29/2012 - 17:22
Unsafe? It depends..
I have made five of these tables/stools and they can be very safe. The one in my kitchen has been there for two years and I at 180 lbs have not caused it to break. However I did build one using firing strips and it did break. Not at the joints but the leg itself. If you build it use the best pine the store has to offer (adds $5 to your total cost) and where possible throw in an extra screw especially places where the joint is in a shear orientation. After your build is complete take it out on the lawn and find someone that weighs about 200 lbs to get up and down from it several times. If it doesn't break you are safe. If it does break your test subject just lands in the yard. You can see three of the stools by clicking on my name. Actually three kids built them.
Jenna D (not verified)
Sun, 12/30/2012 - 09:13
Thanks Jake
Thank you for your tips, can't wait to build mine!
In reply to Thanks Jake by Jenna D (not verified)
Jake
Sun, 12/30/2012 - 09:37
Good Luck and another tip
When you install the bottom step just measure and locate the step on either the back or front legs (use a small level to make sure that it is level between the legs and then rotate it up with a level on it (aimed front to back) until it is level then mark your locations. This is better than trying to measure. Hope you get my suggestion. Also use a good glue like Titebond II or III. III just gives you more time to work. II sets up rather quickly.
Quartney
Mon, 04/29/2013 - 13:10
broken!
I made a beautifully stained & monogrammed stool for the kids and my husband, even though I told him it was not made for a grown man, used it as a step stool and broke the lower step! Whole thing was ruined :( When I make it again, I'm going to change the arrangement of the lower step and attach it to the legs via the support wood.
Jake
Mon, 04/29/2013 - 15:14
Stools Breaking
I have not had a problem with my stools except one I made from furring strips. However, to be safe you can add a block under the lower step as added support or even attach the lower step with dowels