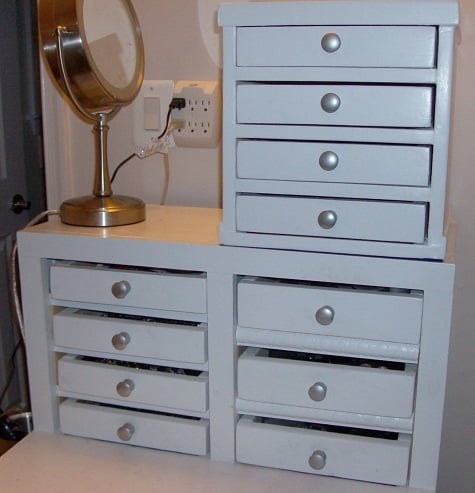
These little dressers are inspired by Ana's Master Closet System drawers, and the Willy Bookshelf. These were made entirely from scrap wood, so it only cost me for the knobs and the felt for the drawers/bottom. These drawers were sized to fit inside the cubes in my vanity/desk, and to fit the left over wood available from my scrap bin. This took a while to cut everything, but it was fun and didn’t cost me anything but my time. On the top dresser I used some ‘slices’ of lauan for trim, to hide the cut edges and the bit of ‘cup’ on my side pieces (these were re-purposed old shelf boards from the garage). I used my finish nailer and glue for these.
Here’s a shopping and cut list (and a few tips) to make the 4-drawer equivalent (similar to the top one) with standard sized 1x12 lumber, and using 1x2 for drawer front/back/sides and applying 3/16” lauan ply for the bottoms. Haven't figured out how to use sketch up yet, so I can only provide a shopping list, cut list, and finished dimensions, so here goes:
Shopping list: (my 1x12’s are 11.25” wide and .75” thick, and 1x2’s were 1.5” wide, and .75” thick, and lauan is 3/16” thick)
1 pc 1x12x8
2 pc 1x2x8
2 pc 24” x 24” lauan (3/16’ plywood) (you’ll have some left over from the 2nd piece)
Felt - 4 pc 8.5” x 9.75” for insides of drawers, 4 pc 10” x 11.25” for drawer bottoms, and 1 pc 11.75" x 11.25" for dresser bottom. You can use 9 sheets craft felt (9” x 12”) for this – the 11.25” front – back measurement on the drawer bottoms is what’s most important –craft felt is 9” wide, and it’s OK if the felt doesn’t go all the way to the edges on the side-to-side measurement
(Sticky-back felt works and looks great, but costs a lot more than regular. I use sticky back on something I’m making as a gift, but these were for me so I just used regular felt and glued it in place with wood glue)
4 mini-knobs (Mine are unfinished ones from Ace, got for 2/$1.29 and spray-painted them)
Finish nails (I had 1 ¼” on hand) and plenty of glue
Finishing materials - filler, sand paper, plus paint/stain to suit your tastes
Cut list:
2 pc 1x12, cut at 2” (spacers - use these 'slices' for spacers while assembling, so the shelves are all spaced the same distance apart – this idea is from the Kreg jig demo video where they built the bookshelf). I like to cut these first, making sure they are nice and square. To me it’s easier and safer to cut these thin pieces from a larger piece with my miter saw.
2 pc 1x12 @ 11.75” (dresser top/bottom)
5 pc 1x12 @ 10.25” (2 for sides, 3 for shelves)
8 pc 1x2 @ 10” (drawer front/back)
8 pc 1x2 @ 9.75” (drawer sides)
4 pc 10” x 11.25” lauan plywood (drawer bottoms)
1 pc 11.75" x 11.75” lauan plywood (back)
Finished dimensions:
Dresser: 11.75” H x 11.75” W x 11 7/16” deep (includes back)
Drawer opening size: 10.25” wide x 2” tall x 11.25” deep
Drawer dimensions: 10”wide x 11.25” long x 1 11/16” tall (felt on the bottom of the drawer will make this height just a little taller)
Finished inside depth of drawer 1.5”, drawer inside dimensions 8.5” wide x 9.75” long
Finish: sanded, filled, sanded some more, and painted with some left over white paint, and used silver spray paint for the knobs
Assembly tips: Dresser part is constructed very much like the Willy bookshelf. The top and bottom are the same size on this one and the dresser bottom is applied the same way as the top of the Willy bookshelf. Once the bottom is on, use the ‘spacers’ to make sure the shelves are the same distance apart all the way up, then the top goes on last. 3/16” plywood goes on the back. Drawers are constructed like the master closet system drawers. Drawers slide directly on the shelves (and bottoms of drawers covered with felt) so no drawer glides are used. Applied the felt and knobs after sanding and finishing. Make sure the felt goes all the way from the front to the back of the drawer bottom, and is glued on thoroughly.
Comments
Guest (not verified)
Wed, 12/21/2011 - 14:41
Great idea for Bare
Great idea for Bare Escentuals Make up!
Guest (not verified)
Thu, 12/22/2011 - 20:43
Great Job!
These are so neat! I wish I had enough jewelry to fill one!!
Guest (not verified)
Thu, 12/22/2011 - 23:15
So clever. You did a great job.
How did you do the insides? Did you line it with some type of foam? Great work. Thank you for posting.
JoanneS
Fri, 12/23/2011 - 11:56
Insides of drawers
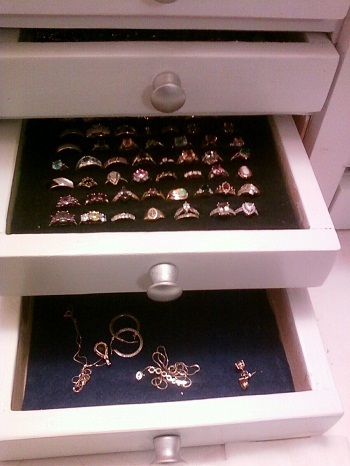
Thanks very much! For the ring drawer, I used a piece of 1" thick high density foam (I cut up a kitchen chair pad) and on top of this is a piece of sticky-back felt. I drew lines on the paper side and cut slits into the felt first, then stuck it on top of the foam, and cut into the foam following the slits, using a utility knife. I didn't cut all the way through the foam, but almost to the bottom. The slits go all the way across the foam (to about 3/4" from edge) to fit more rings in there, but you can also do individual slits for each ring (if you have more patience than me - haha). The other drawers have regular felt cut to size and attached with wood glue. (Sticky back felt inside the drawers would have worked fine too, it just costs more).
claydowling
Fri, 12/23/2011 - 16:55
That's pretty slick
I just built a gentleman's valet for my sister in law's boyfriend, partly to test out some joinery ideas, and partly because I found a beautiful piece of white oak in the discount bin while I was looking for something else at the lumber dealer. I was pretty impressed with myself, but it's got nothing on the ambition of this project.
Excellent work. I absolutely wouldn't have guessed it as a beginner project.
I'm almost certainly going to have to build a jewelry chest like this for my wife pretty soon. My dad just built my mom a nice one, and my wife will be wanting her own.
JoanneS
Sat, 12/24/2011 - 13:54
Thank you
Clay, thanks very much for the nice compliment. I've seen your projects here and on your blog and they are beautiful, so I'm very flattered! I've edited my original post to include measurements and cut list for a 'regular lumber' equivalent to the top chest. Lots easier than cutting all those drawer sides out of plywood and 1x12 like I did with my 'prototypes'. :) The next one I do will be with regular size lumber. Thinking of building one for my Mom. Happy holidays!
Lucy Huynh (not verified)
Thu, 02/02/2012 - 00:26
do you sell these? Its
do you sell these? Its awesome. I've been looking for a tabletop drawer to store my makeup but everything is made of plastic! I was actually googling to see if there was someplace I can do woodshop to make my own jewelry drawer but alas I dont have the skills nor do I have any tools. I really admire this drawer!
claydowling
Thu, 02/02/2012 - 04:56
Rentable Shop Space
Lucy, try looking for something like a Makerworks. These are communal workshops with space and tools that you can use for a fee or a subscription. I don't know how prevalent they are in most of the country. I live in a suburb of Detroit, and because of the large manufacturing base there are a lot of them around.
The more expensive ones offer classes where you can pick up basic skills on unfamiliar equipment, but even those "expensive" ones don't cost a lot of money. The inexpensive ones still offer training on their equipment, but less formally than a scheduled class.
One of the more interesting features of these places, at least around here, is that they have CNC machines available. A CNC machine would let you transfer sketchup drawings directly to cut parts. For a one-off item it's not worth the trouble, but if you wanted to duplicate an item it would be great.